
19 Essential Hand Sewing Stitches You Need to Know (A Beginner’s Guide)
This post may contain affiliate links. Please read my disclosure policy for details. As an Amazon Associate, I earn from qualifying purchases.
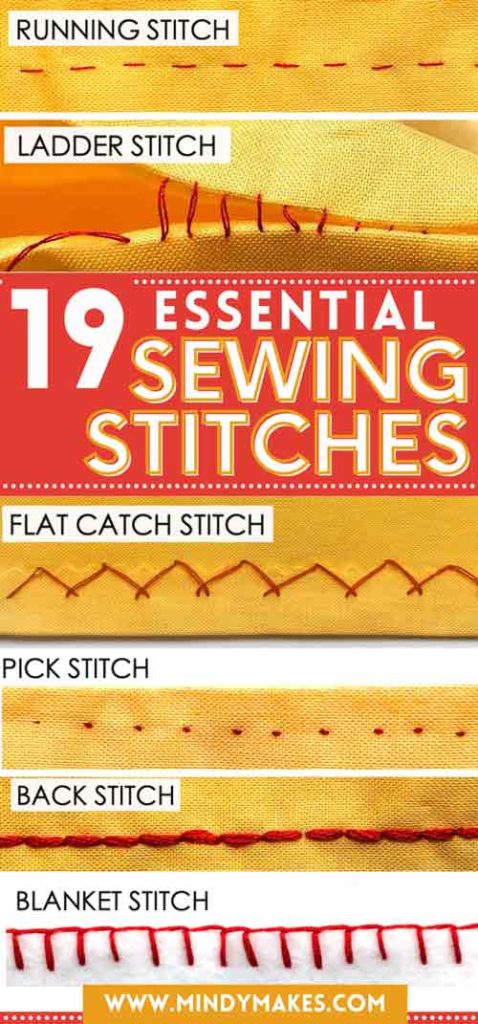
Basic hand sewing techniques are a MUST KNOW for beginner and advanced sewists. Follow this step-by-step tutorial to learn the 19 Essential Sewing Stitches that will allow you to sew pretty much everything!
Even if you own and know how to use a sewing machine, chances are you will still need to hand sew at times. While I absolutely LOVE sewing on my machine, I am not really a big fan of hand sewing. To me, it’s just too slow! Whenever I design a sewing project, I try my hardest to sew everything on my machine. However, there are times I CANNOT avoid sewing by hand. The results just don’t come out the same. This has been true in the 20+ years I’ve been sewing…so there’s little reason to believe that anything will change in the near future!
So…What are the Reasons I need to Hand Sew?
- Hand Sewing Gives you Access to small/tight areas. Sometimes, there are just those tight corners and small spaces that your sewing machine can’t get to. Hand stitching is great for these pain points as more than likely your fingers can access the small space whereas the machine cannot.
- Hand sewing Allows You to Sew Very Delicate Things. Have you ever experienced the machine “eating” your fabric? This is pretty common if you are sewing delicate and thin fabrics. The fabric bunches up as the feeddog tries to move it along, and before you know it, it’s stuck and you have to cut the project to release it from the machine (yikes!) Hand sewing prevents this terrible act of murder (by sewing machine) upon your now deceased sewing project. It will likely give you better end results anyway.
- Hand sewing Gives You Greater control of Your Sewing, which can yield more flawless results. There are times when using a machine where you can’t see where you are sewing, leading to undesirable bunching and overlapping. This is very common when setting a sleeve into an armhole or sewing a curved piece of fabric into a straight piece of fabric. Hand sewing allows you to see exactly where you are sewing as you move along so you can ease out the bunching and overlapping before your next stitch.
- Hand Sewing Creates Designs That Cannot be Replicated by Machines. This is especially true for embroidery stitches. Even if you own an embroidery machine, hand embroidered projects just have a very unique and luxurious look that no machine can do.
- Hand sewing Creates Certain finishing touches that a sewing machine cannot. This is especially true for blind hems and invisible stitches. Sewing by hand allows you to easily hide the thread in between seam allowances and hems so that you can’t see it once you are done. These days, my most frequently used sewing stitch is the Invisible Ladder Stitch. I use it to close the opening on almost all my sewing projects, repair holes, and sew just about everything.
What are the Benefits of Hand Sewing?
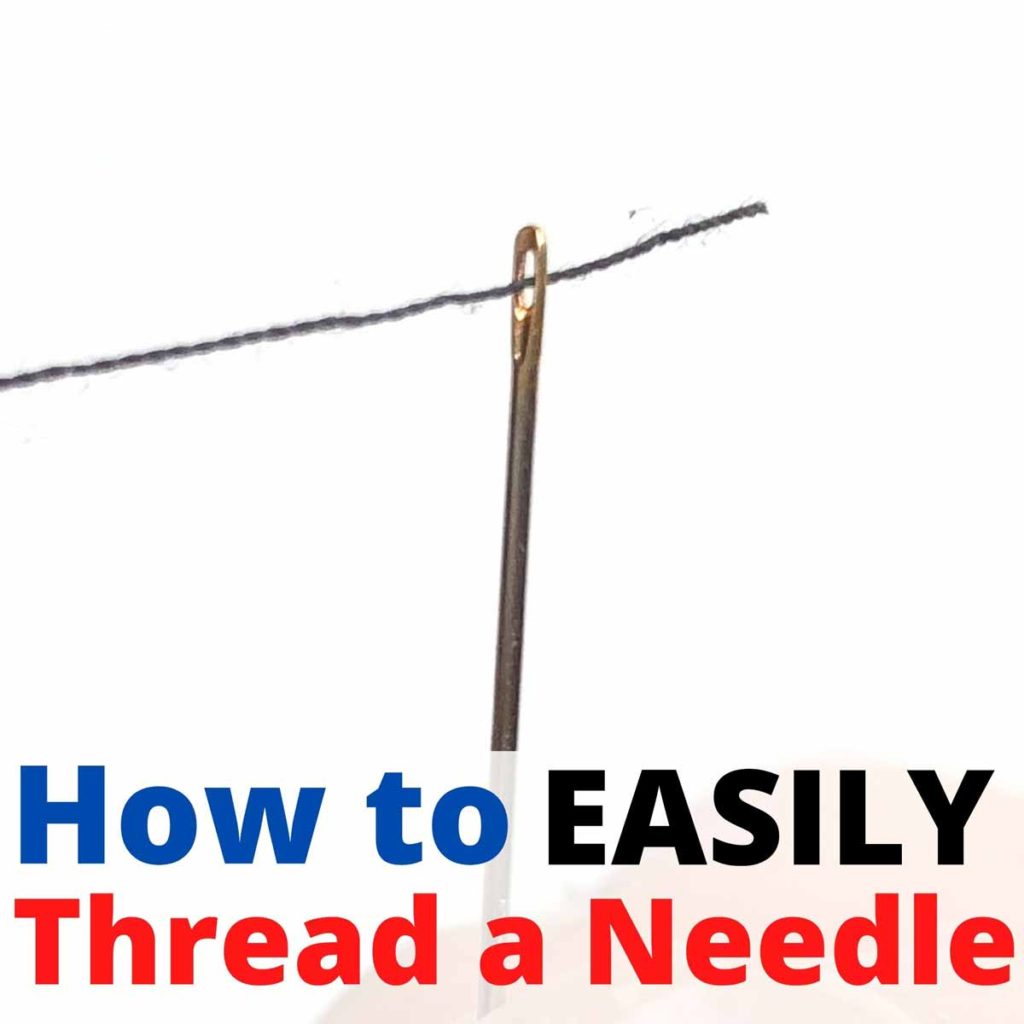
- Hand Sewing is Very Easy to Learn. Once you thread the needle, you just have to learn to pass the needle and thread through the fabric and guess what? You’re sewing! Learn a few basic hand stitches and with practice, you will get faster and better.
- Hand Sewing is Inexpensive. Thread and needle is a lot less expensive compared to even the most basic sewing machines. You don’t even need electricity! While you may need extra accessories such as a needle threader, thimble, beeswax, or embroidery hoop for hand sewing, they still won’t add up to the cost of a machine. Also, you won’t need to worry about purchasing extra machine accessories such as different types of sewing feet or specialized machine needles.
- Hand Sewing is Extremely Portable. As long as you can carry some needle, thread, and scissors, you can sew! Better yet, you don’t need to carry a heavy sewing machine around that needs to be set up before you can start sewing
With all that said, I surely hoped you’re convinced why you NEED to know some hand sewing stitches. Today, I’m going to show you 19 Basic Hand Sewing Stitches that are super useful to add to your sewing skill set. Once you know these stitches, you can pretty much sew anything and everything by hand!
- Running Stitch
- Back Stitch
- Overhand Stitch
- Ladder Stitch (Slipstitch) – Opens a New Tab
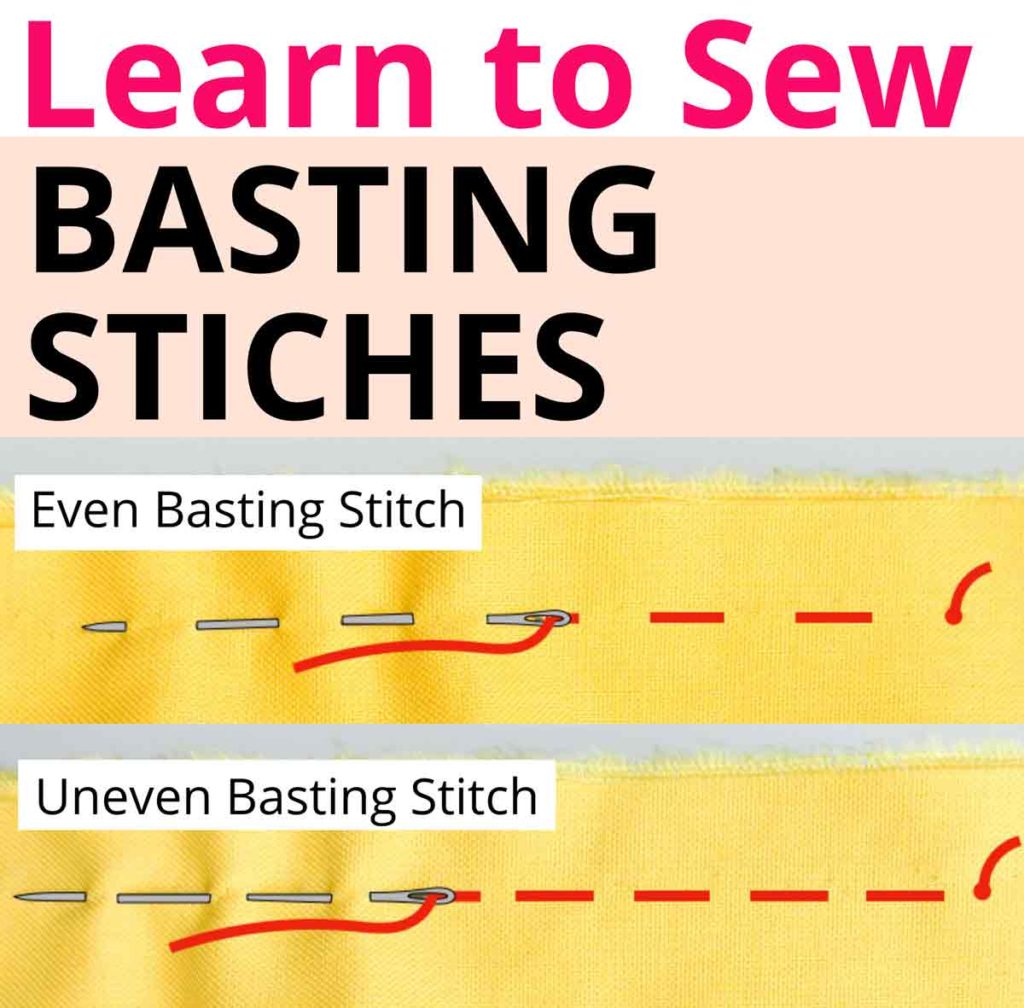
- Basting Stitch – Opens a New Tab
- Cross-Stitch
- Chain Stitch
- Tacks
- Finishing Stitches
- Hemming Stitches
What Hand Sewing Stitches Do I Need to Mend Clothes?
For those of you who only sew because you ABSOLUTELY have to (usually for mending), the following stitches are very useful to learn:
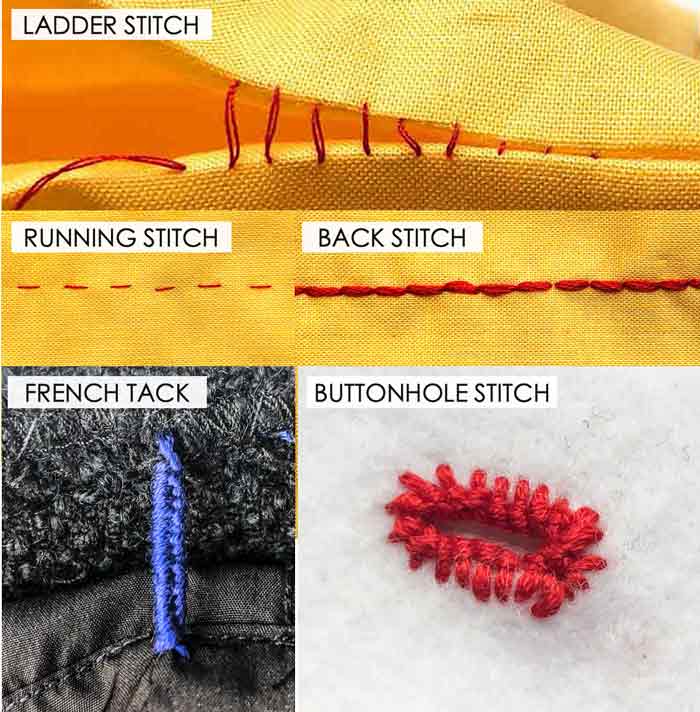
- Running Stitch – your basic straight stitch. Good for mending ripped seams. Must be sewn from the wrong side of fabric.
- Even Backstitch – the strongest hand sewing stitch, good for reinforcing or mending seams.
- Ladder Stitch (Slipstitch) – good for closing holes, stitching hems, and pretty much everything! Sewn from the right side of fabric
- Buttonhole Stitch – for fixing button holes
- French Tack – connects lining to outer shell of clothes. Tends to come undone with use.
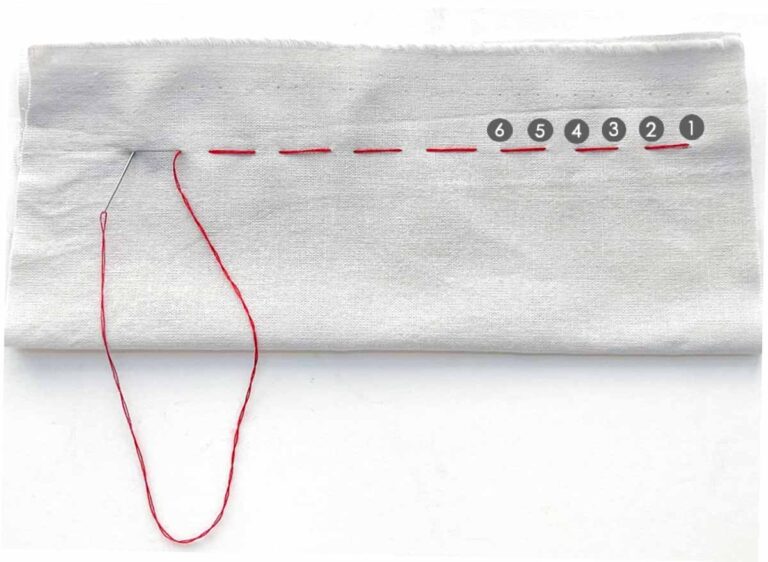
RUNNING STITCH

- The most basic stitch in hand sewing.
- It joins two pieces of fabric together with small, even, straight stitches.
- If you do any type of sewing project by hand, this will be the stitch you use the most!
- Made by taking the needle in and out of fabric layers several times before pulling the knotted thread through.
- You make the stitch from right to left (for right-handed operator).
- Keep the stitch size and distance small and as uniform as possible to make even, organized stitches.
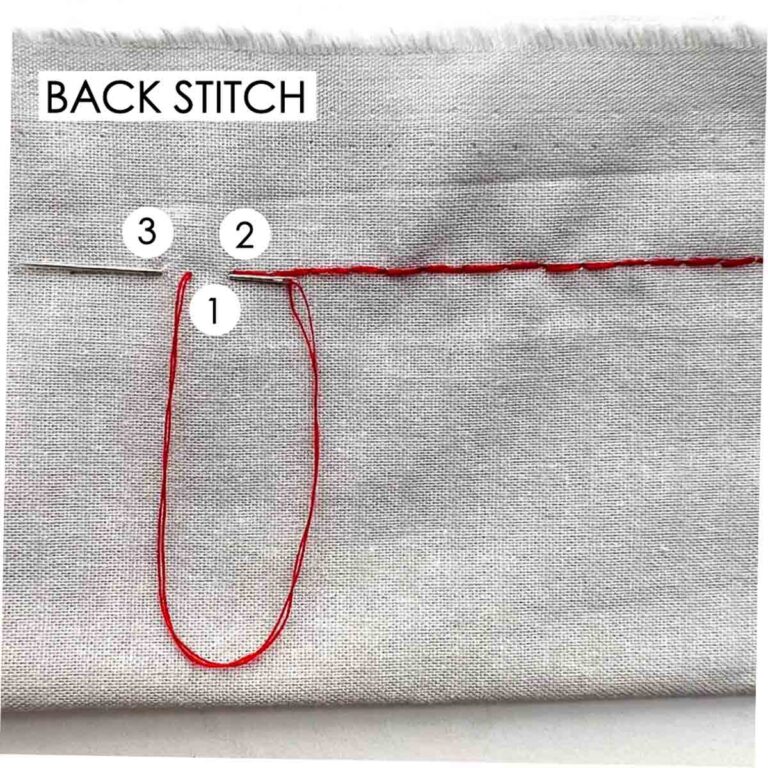
EVEN BACKSTITCH
- A very versatile hand stitch that is also one of the most durable stitches (doesn’t come undone easily).
- Made by passing hand needle behind the previous stitch where the thread comes out of fabric, almost like you are going backwards. Hence the name “backstitch”
- Used to secure hand stitches, repair seams, topstitching, and sewing zippers down (via prick stitch)
- The stitch is made by bringing thread behind the previous stitch and then coming out of the fabric in front of the previous stitch.
- From the front side of the fabric, the even back stitch resembles a straight machine running stitch as the space between stitches are very small.
- However, the going backwards stitching and looping underneath the fabric helps make this stitch very strong.
HALF-BACKSTITCH
- The half backstitch is done exactly the same way as the even backstitch.
- The only difference is that the stitch size is the same as the stitch space.
- Not as strong as the even backstitch, but also useful for closing seams.
- From the front of the fabric, the half-backstitch will look like a hand-sewn running stitch with even stitch length and spacing.
PRICKSTITCH
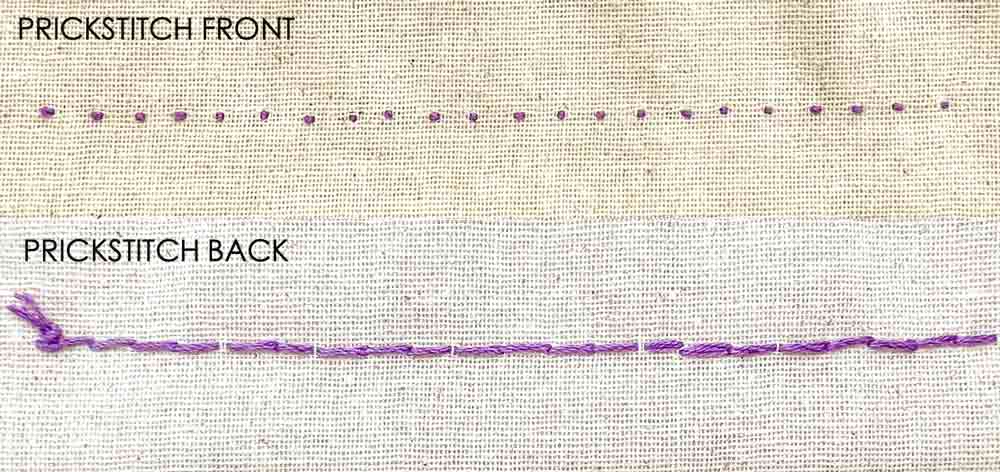
- A Type of backstitch that looks nicer than the even or half-backstitch
- This stitch is done on the right side of the fabric, from right to left (right-handed operator)
- Stitch size is very short, with long spaces in between
- Mainly used to attach a zipper (hand-picking a zipper)
NOTE: Many online tutorials use the term Prickstitch and Pickstitch interchangeably. However, I am going according to The Reader’s Digest “New Complete Guide to Sewing” which states that “While [the prick stitch and pickstitch] are very similar, they are different stitches.”
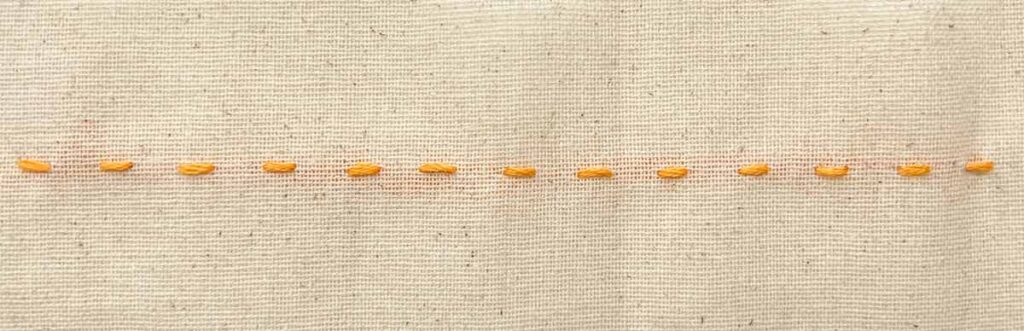
PICKSTITCH
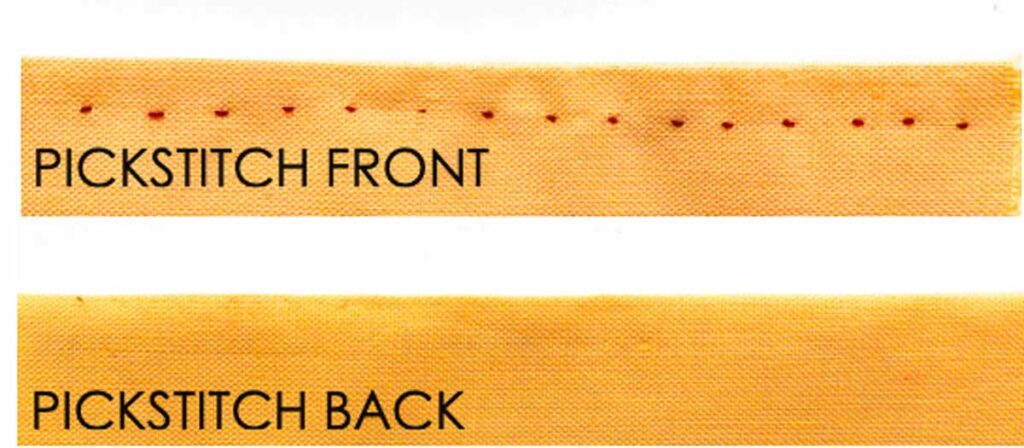
- Another type of backstitch that is made of short, almost invisible stitches and long spaces on the right side of the fabric
- The only difference is that the stitch does not go through all layers of the fabric – thus Stitches are not visible from the back of fabric
- Uniform stitch size and spacing
- Used for making hems
- Can be done with contrasting thread for decorative purposes
- Ideal for topstitching and hand under stitching (to prevent facings from rolling up)
- Commonly found along lapel edges, pockets, and vest edges of high end men’s suits
OVERHAND STITCH
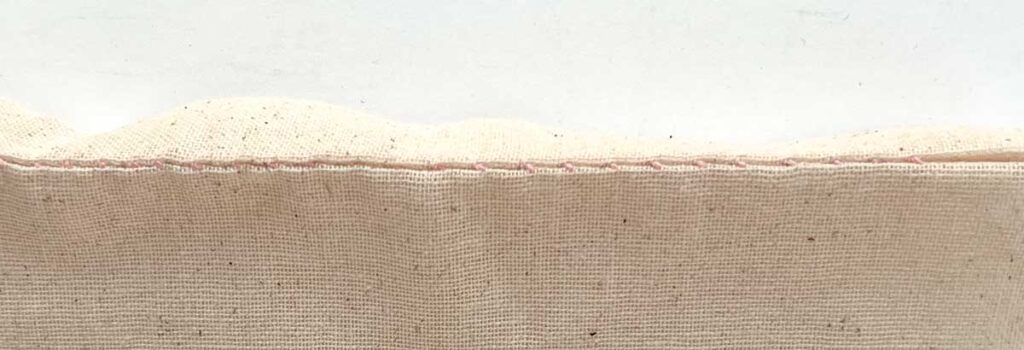
- Tiny, uniform stitches used sew two finished edges together
- Can be used to attach lace or ribbon to a garment.
- Can be use to close two raw fabric edges together so it resembles a french seam.
WHIP STITCH
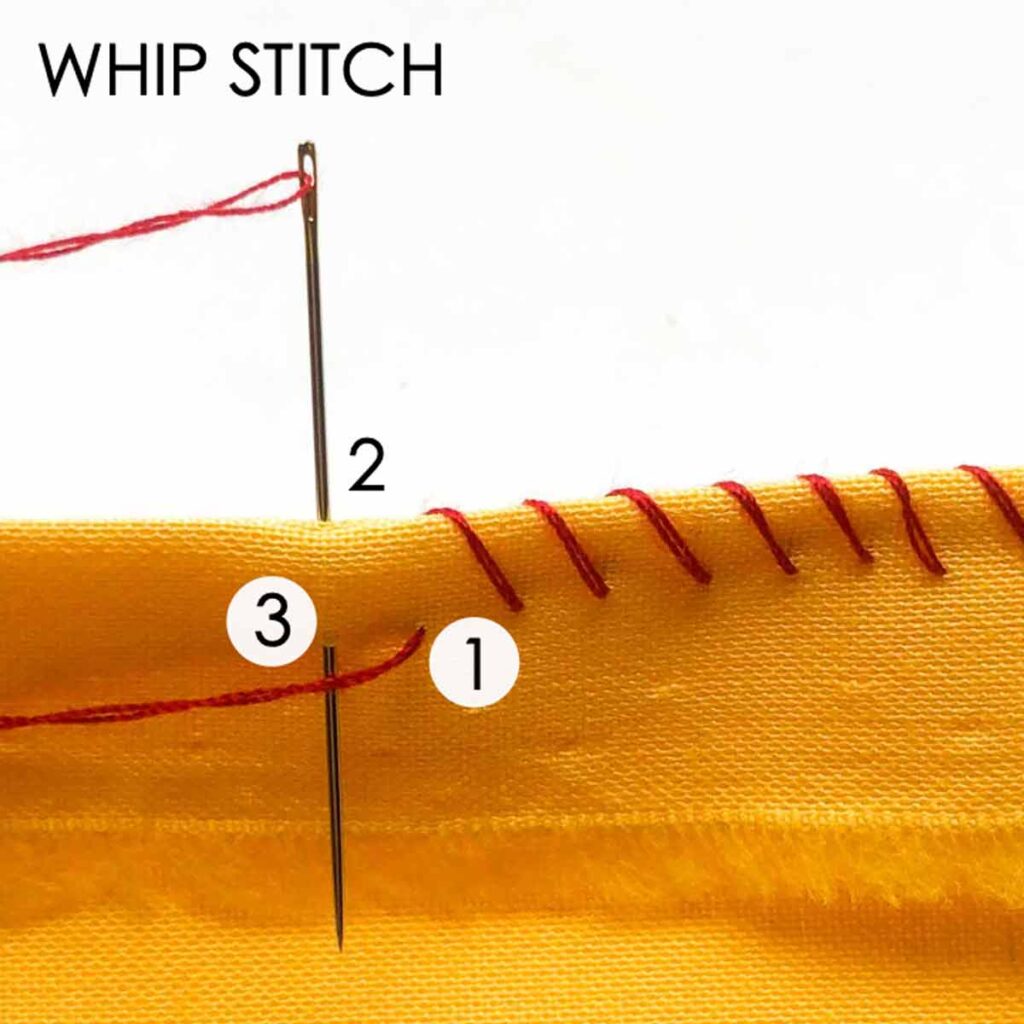
- Similar to the overhand stitch. The only difference is that you hold the needle straight when inserting it through the two fabric edges (versus diagonal)
- Used to join two finished fabric edges together
- Used to sew an unfinished edge to a straight edge or flat surface.
ESSENTIAL HAND STITCHES – CROSS-STITCH
- A series of horizontal stitches that are taken parallel to each other. The threads cross each other to form ‘Xs’, hence the name “cross-stitch”.
- Mainly used for decorative purpose.
- The oldest form of embroidery, the cross-stitch is used to create pictures and designs over fabric.
How to Make a Cross-Stitch:
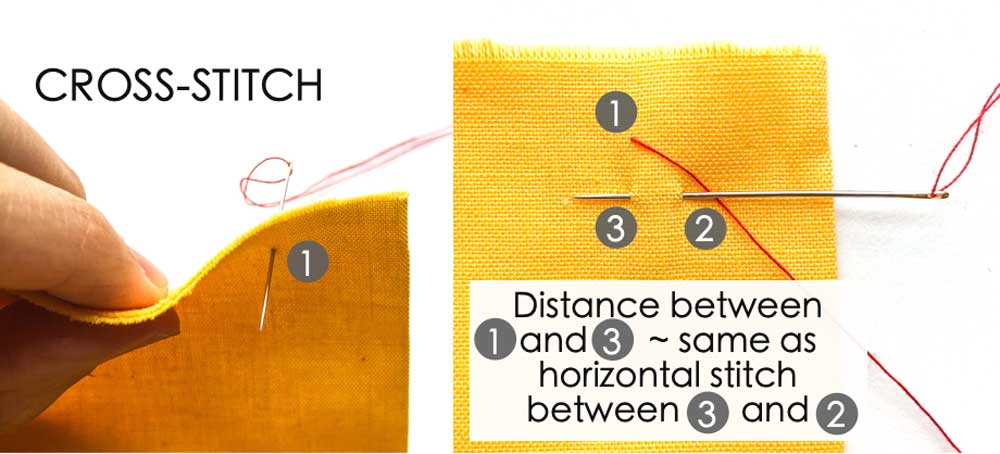
LEFT: Bring knotted needle to front of fabric (1). Pull thread through.
RIGHT: With the needle pointing to the left, make a horizontal stitch to the right and below (2) thread of previous stitch (1). Bring needle out to front of fabric (3). Make the the distance between (1) & (3) and (3) &(2) to be about the same. Pull thread through, keeping the stitch tight but not so tight that the fabric bunches up. You want the fabric to lay flat.
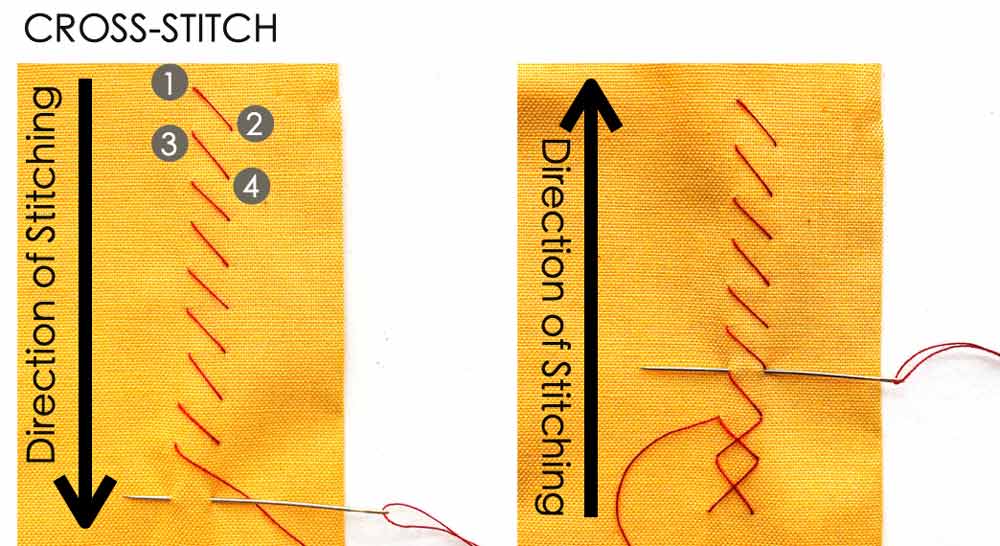
LEFT: Sewing downwards, continue taking horizontal stitches that are parallel and equal length to each other.
RIGHT: When you are done with the column of stitches, change the direction and sew upwards. Again, take horizontal stitches with the needle pointing to the left. Cross each of the diagonal threads in the column at the midpoint.
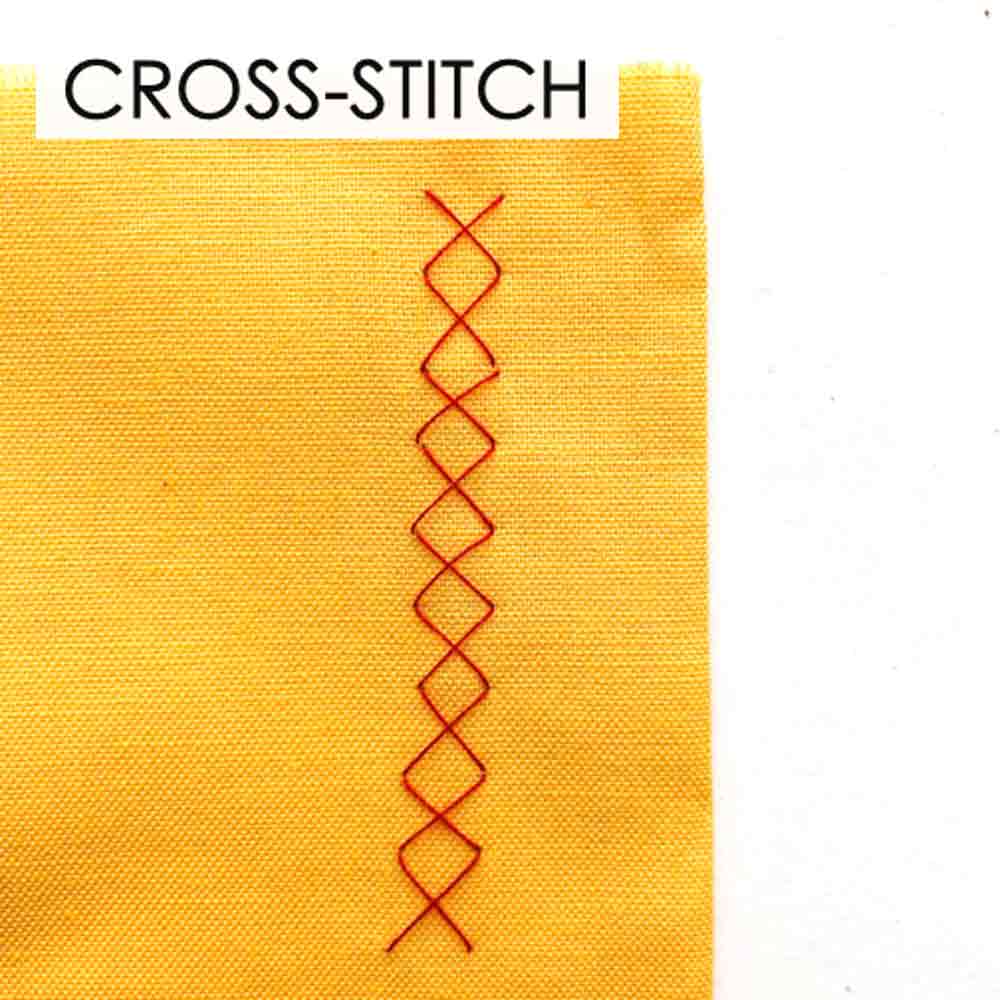
You will end up with a series of “X”s on top of each other.
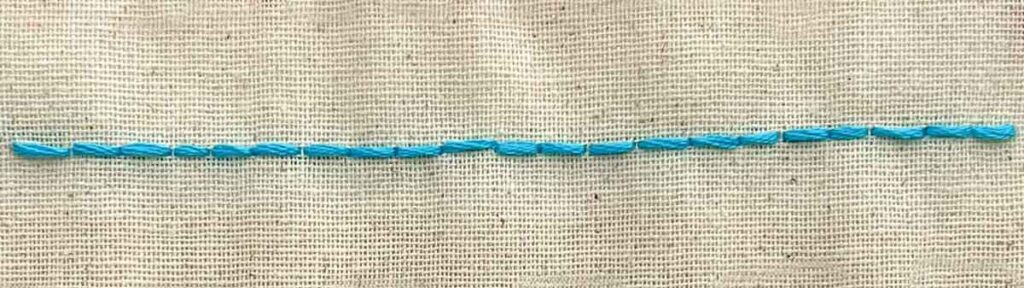
ESSENTIAL HAND STITCHES – CHAIN STITCH
- A series of continuous looped stitches that look like a chain
- The chain stitch easily forms flowing and curved lines, making it very suitable to create “drawing” thread designs on fabric
- Frequently used in hand-embroidery as surface embellishments in clothing, linens, and lingerie
- Because of its continuous looped nature, the stitch easily comes apart. Thus the chain stitch is more suitable for decorative purposes versus for functional purpose (i.e holding two or more fabric layers together).
How to Make a Chainstitch:
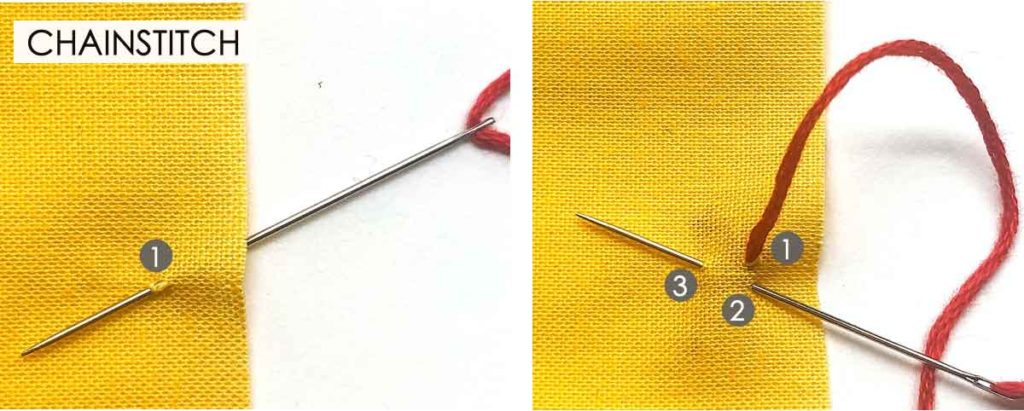
LEFT: Bring knotted needle to front of fabric (1). Pull thread through.
RIGHT: Insert needle (2) into fabric a tiny distance below where thread came out previously (1). Bring needle out (3) from fabric.
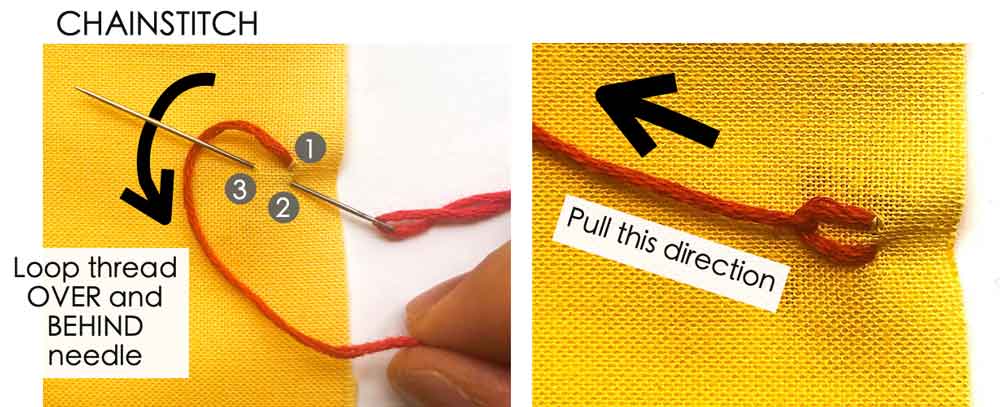
LEFT: Loop thread under needle
RIGHT: Pull thread through and away from previous stitch to form first loop of the chain.
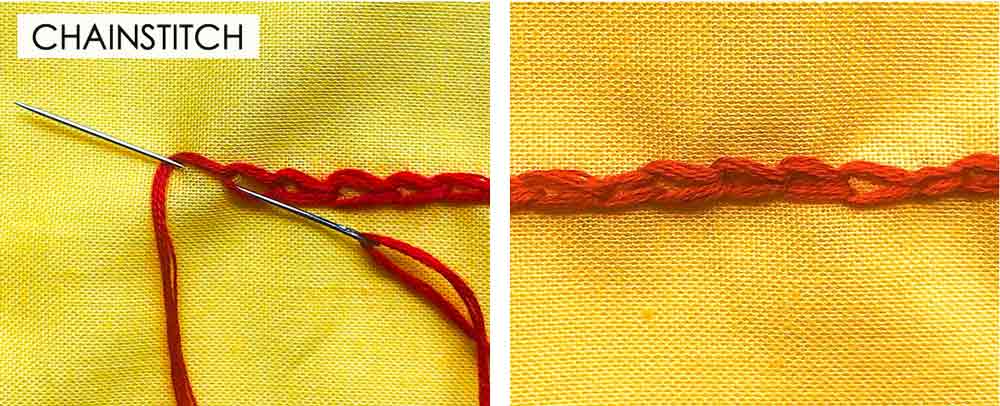
Continue forming loops in the same way.
ESSENTIAL HAND STITCHES – OVERCAST STITCH
- The most frequently used hand stitch for finishing raw fabric edges.
- Helps prevent fraying of fabric
- Good rule of thumb is that the more the fabric frays, the deeper and closer the stitches are.
How to Make The Overcast Stitch:
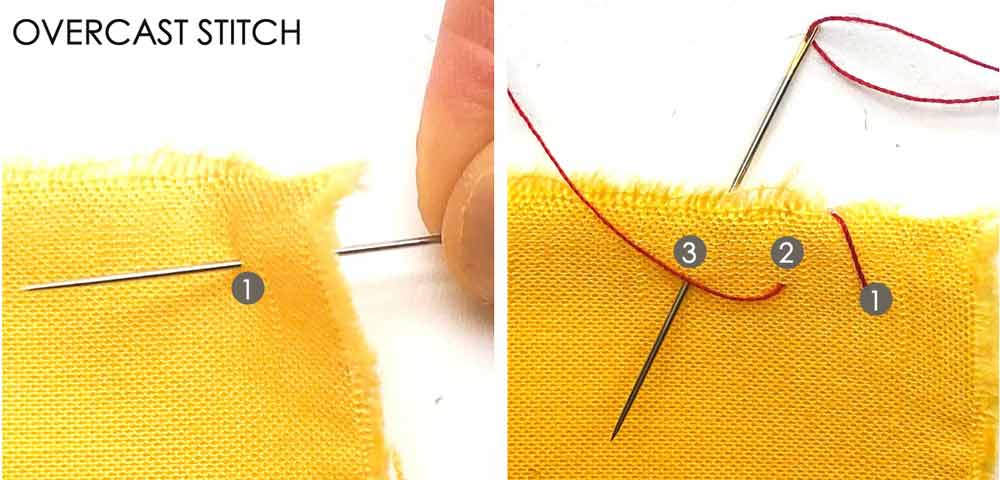
LEFT: Bring needle through fabric front (1) and pull thread through.
RIGHT: Wrap thread diagonally over edge of fabric and bring needle to front of fabric (2).
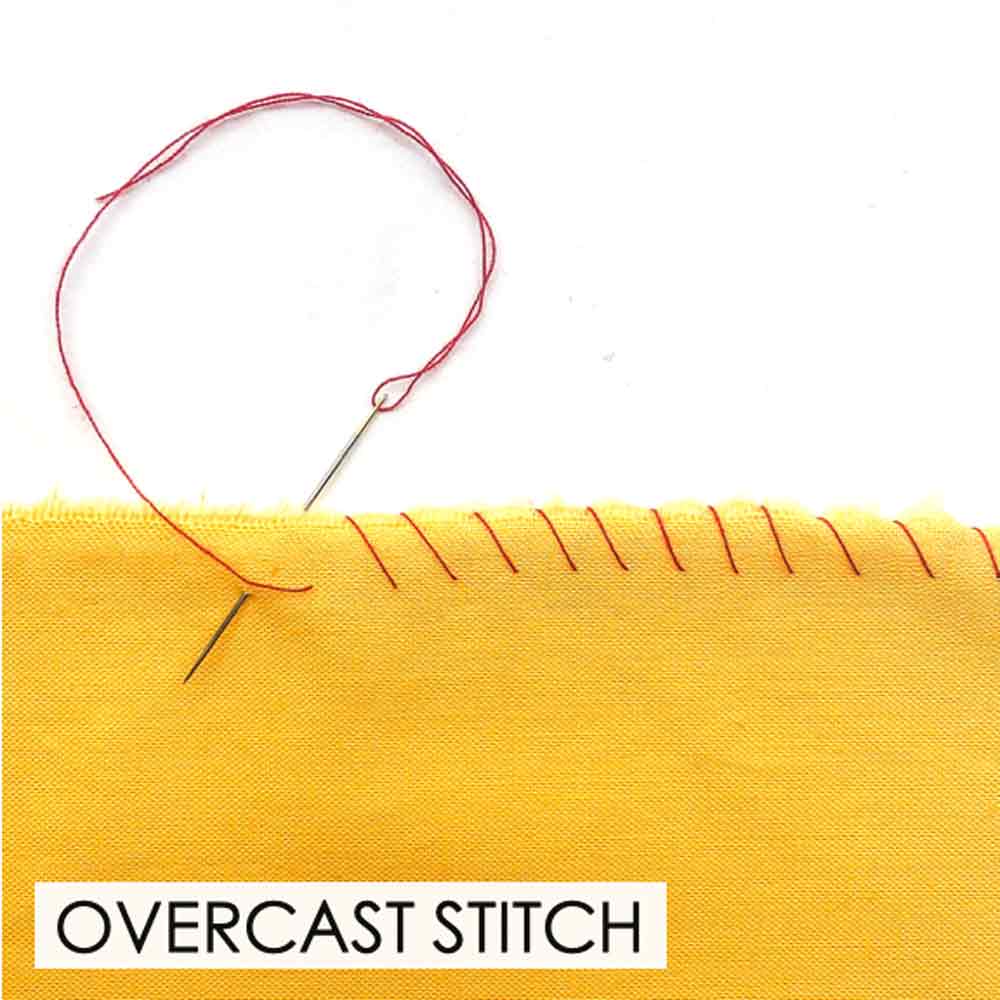
Repeat the stitches, keeping the stitch length and distance as even as possible.
ESSENTIAL HAND STITCHES – BLANKET STITCH
- Traditionally a hand-embroidery stitch, but can also be used for clothing construction.
- Frequently used as a decorative stitch to cover fabric edges
How to Make a Blanket Stitch:
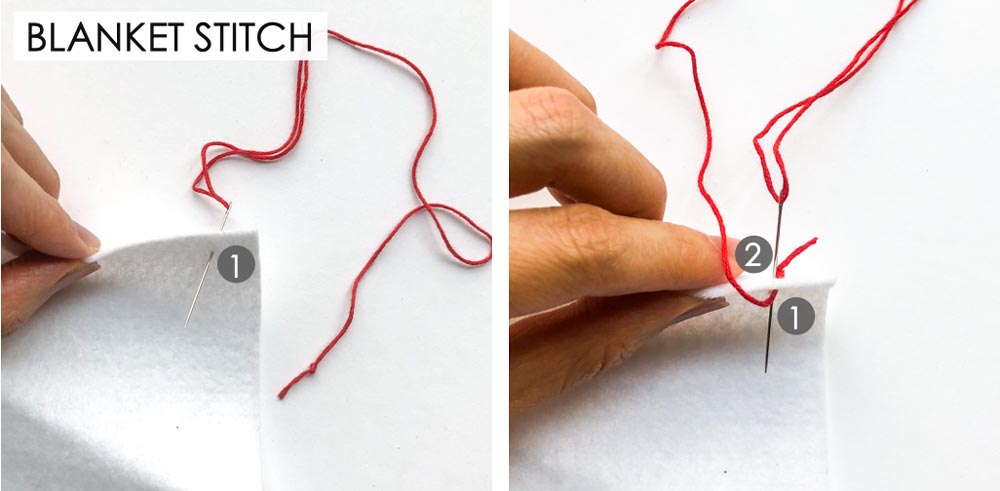
LEFT: To start the blanket stitch, bring knotted and threaded needle to front side of fabric (1). Pull through
RIGHT: Loop thread over edge of fabric and bring needle to front side of fabric (2) through the same point where the thread comes out (1)
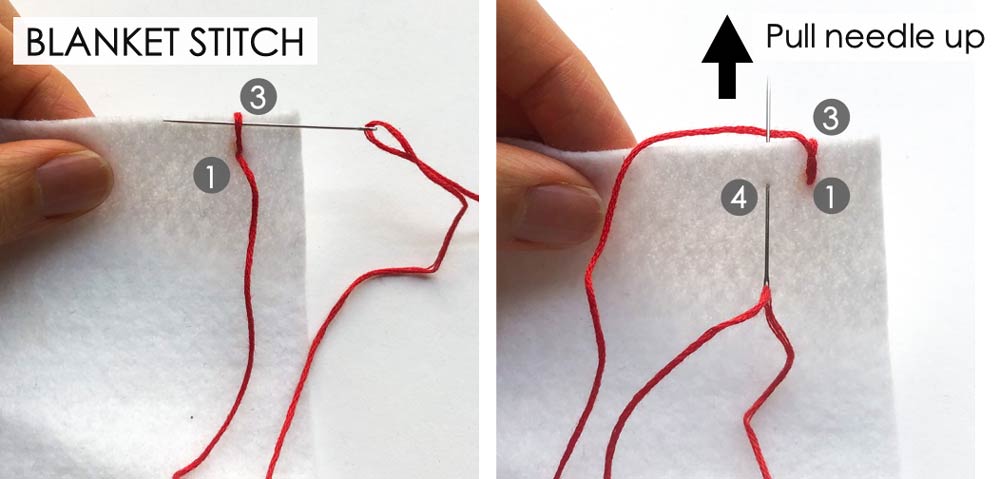
LEFT: With the needle pointing to the left, pass needle under the loop over fabric edge (3)
RIGHT: Bring needle through front of the fabric (4), keeping the needle pointing up (towards fabric edge). Loop thread behind the needle and pull needle through (up).
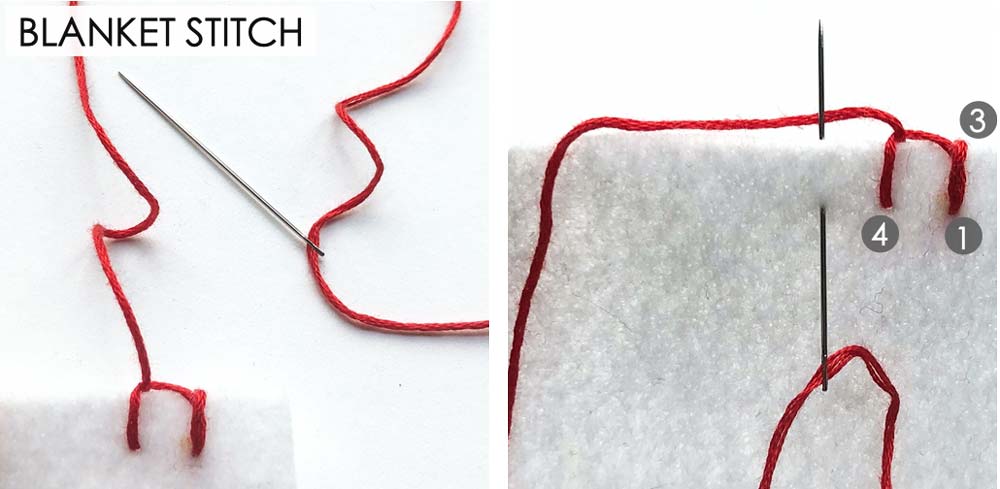
LEFT: View of thread pulled though to form blanket stitch over edge of fabric.
RIGHT: Continue making stitches in the same way, working from right to left. Note that the needle points towards the fabric edge and the thread is looped behind the needle.
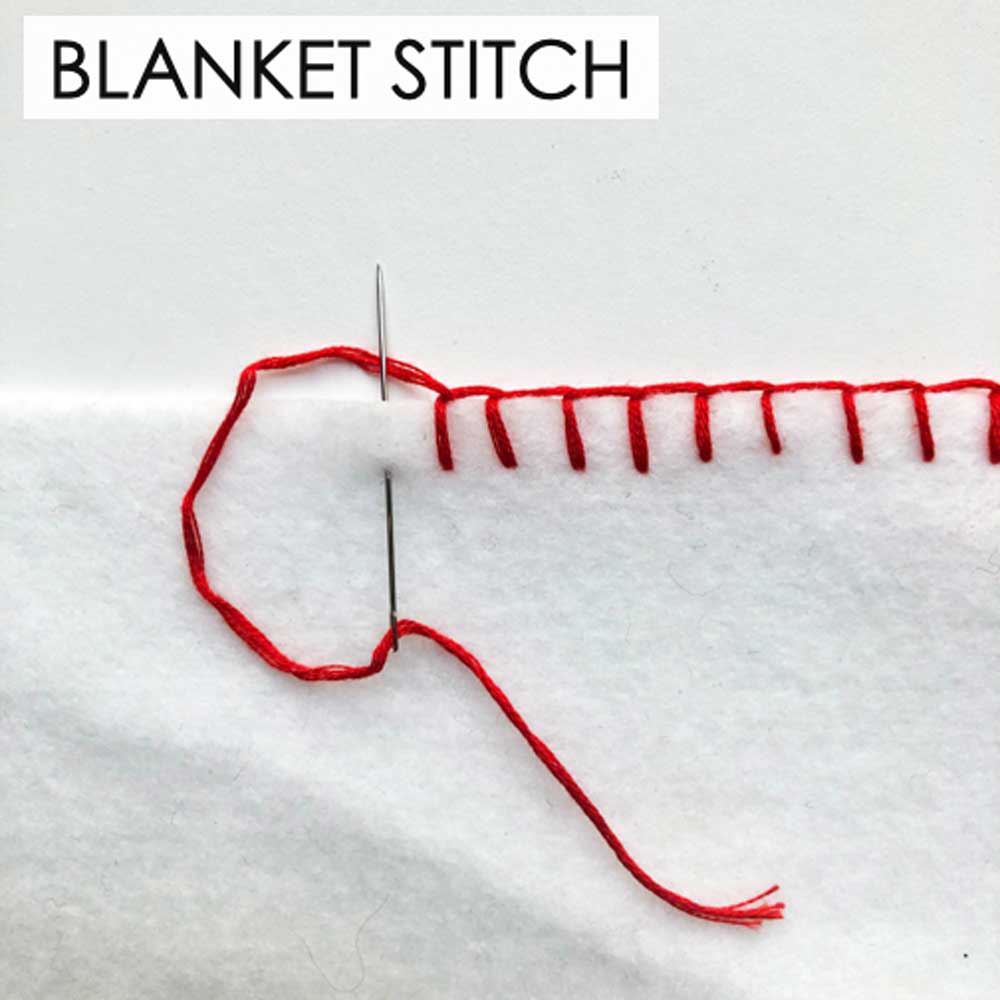
The stitch size and spacing do not have to be the same as each other, but keep the stitch size the same and the stitch space the same for a uniform look.
ESSENTIAL HAND STITCHES – BUTTONHOLE STITCH
- The buttonhole stitch is created the same way as a blanket stitch: looped stitches that cover the fabric edge.
- The only difference (compared to blanket stitch) is the needle points away from fabric edge (the buttonhole) as you make the stitch. When making the blanket stitch you point the needle towards the fabric edge
- Functionally, the buttonhole stitch is used to cover the edge of hand-sewn buttonholes to prevent fraying of fabric
- Can also be used as a decorative stitch around buttonholes.
How to Make a Buttonhole Stitch
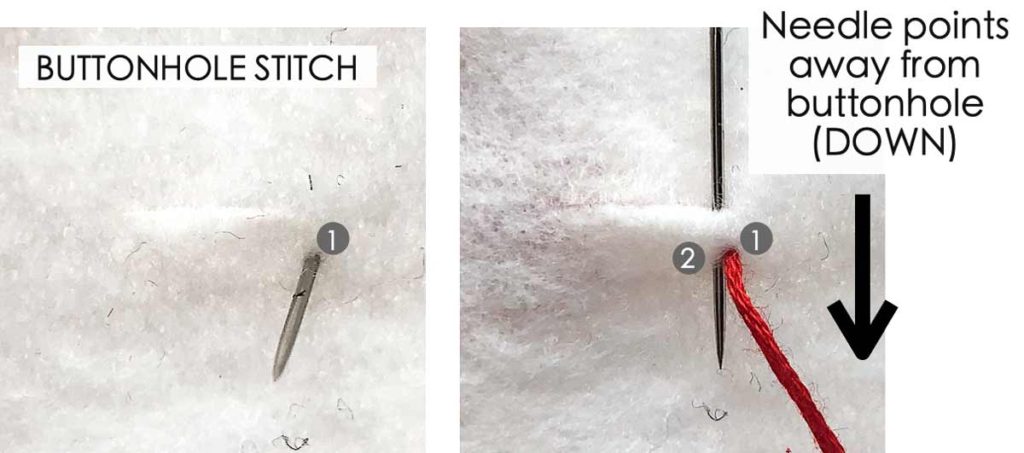
LEFT: Bring needle to front of fabric (1). Pull knotted thread through
RIGHT: Bring needle through buttonhole to front of fabric (2), right next to where thread was pulled out (1)Going from right to left, take the needle in and out of fabric layers several times before pulling the thread through. Keep the stitch size and distance small and as uniform as possible. . Note that for the buttonhole stitch the needle always points away from the buttonhole
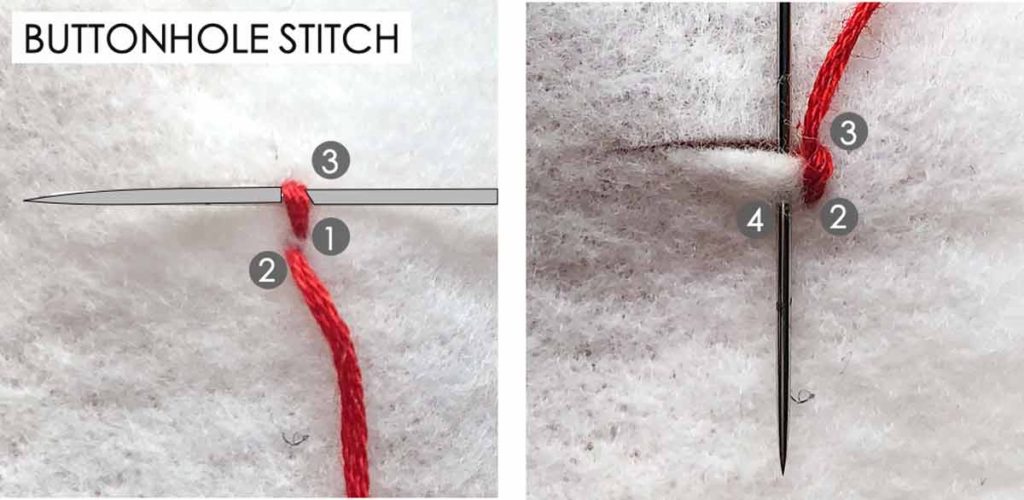
LEFT: Pull thread through (2) and bring needle (pointing to the left) under the loop (3) you just made.
RIGHT: Bring needle (pointing down, away from fabric edge) through the buttonhole to front of fabric (4), right next to previous stitch (2). Keep the distance between the stitch and edge of buttonhole to be about 1/8”(3mm).
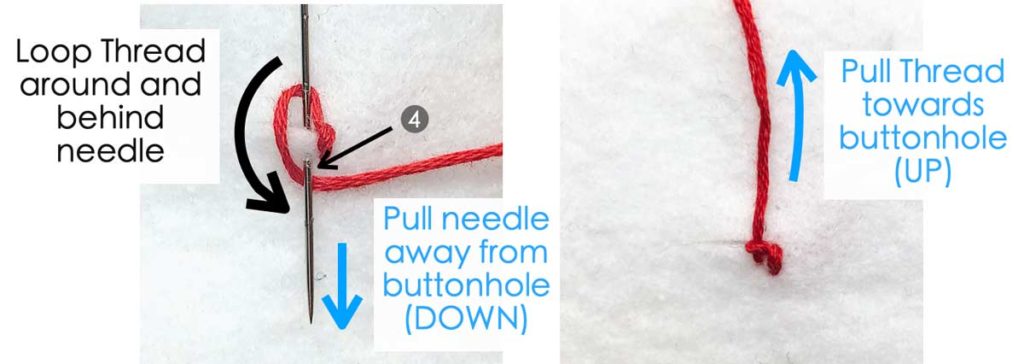
LEFT: Loop thread around and behind the needle and pull needle through, away from edge of buttonhole.
RIGHT: Pull thread towards buttonhole (up) to create the buttonhole stitch. This way, the looped thread portion of the stitch (the purl of the stitch) will lay on the buttonhole edge
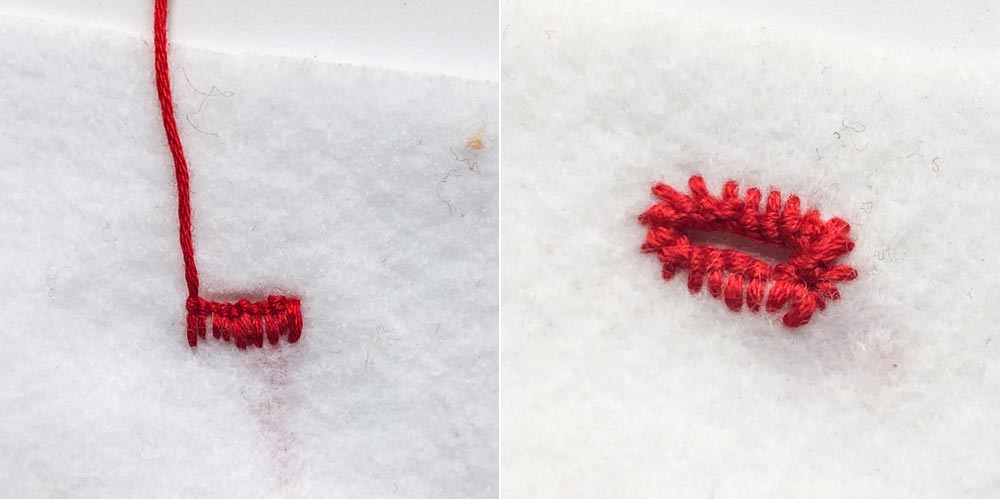
Continue repeating the stitches all around the buttonhole, keeping the stitches as close to each other as possible.
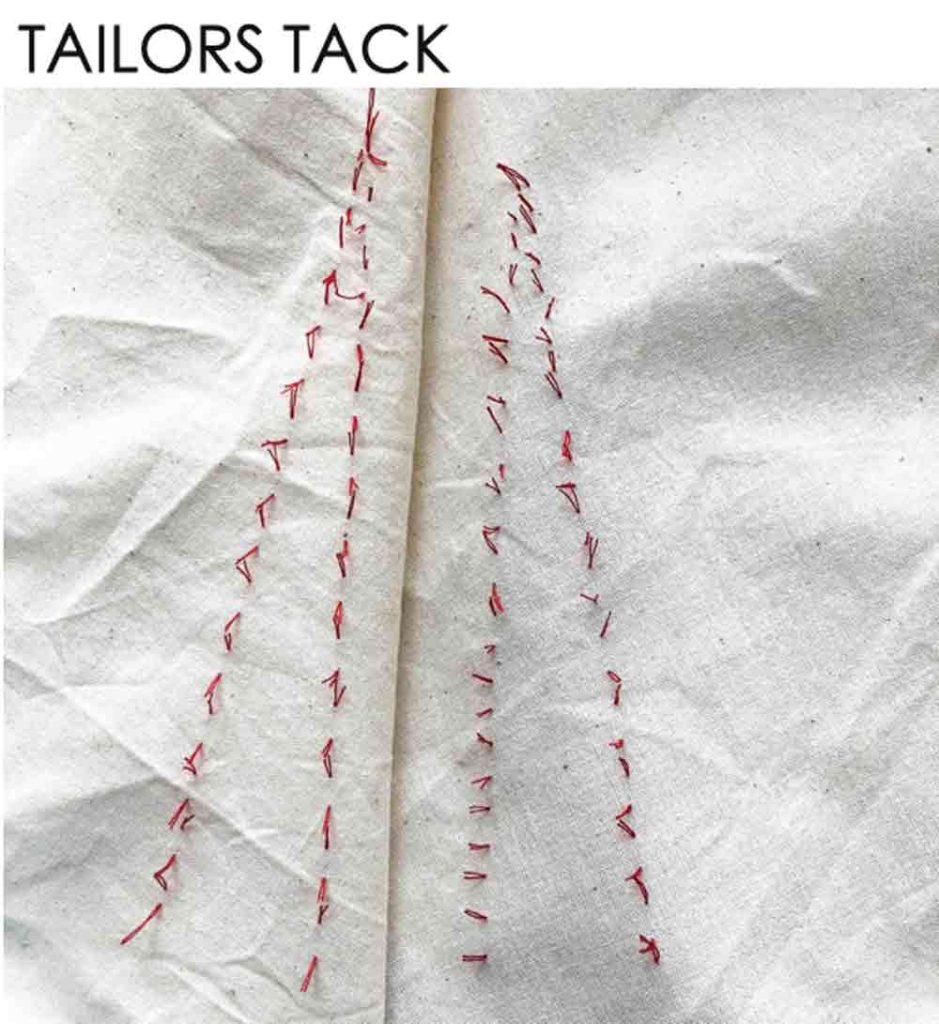
ESSENTIAL HAND STITCHES – TAILOR’S TACK
- Tailor’s tacks are used to transfer markings from the paper pattern to single or double layers of fabric
- Use double threads to leave “thread marks” on your fabric that can later be easily pulled out later.
- Commonly used to transfer dart lines, matching points, or placement markings (for example, where to put a sewn pocket on a shirt) from pattern to fabric.
- You use tailor’s tacks when you don’t want chalk or other marking tools leaving unsightly marks on your fabric. This is extremely good for expensive fabrics (silk) or sheer fabrics (chiffon) where chalk or dressmaker’s tracing paper may leave a mark.
- At other times, pins may fall out and chalk marks may rub off, causing you to lose your pattern markings on the fabric. The Tailor’s Tack is a super handy stitch in these situations!
How to Make a Tailor’s Tack:
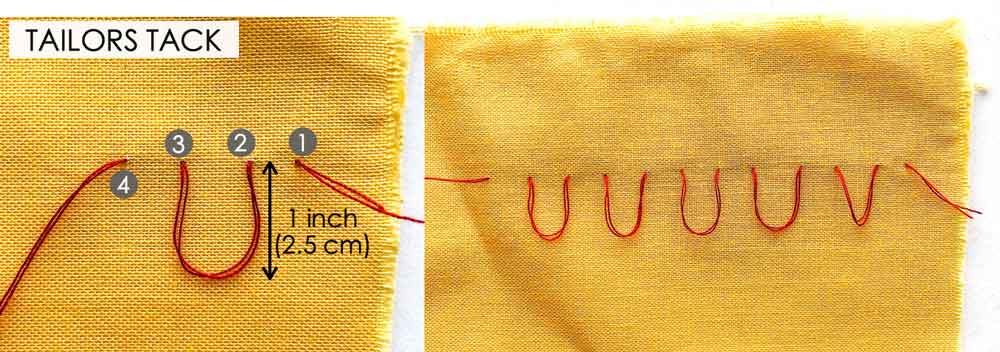
Using a long piece of double thread without a knot, take even, running stitches through two layers of fabric. Leave loops that are about 1 in (2.5 cm) high in between the stitches. Keep the distance between stitches to be about 0.5 in – 0.75 in (12-20mm).
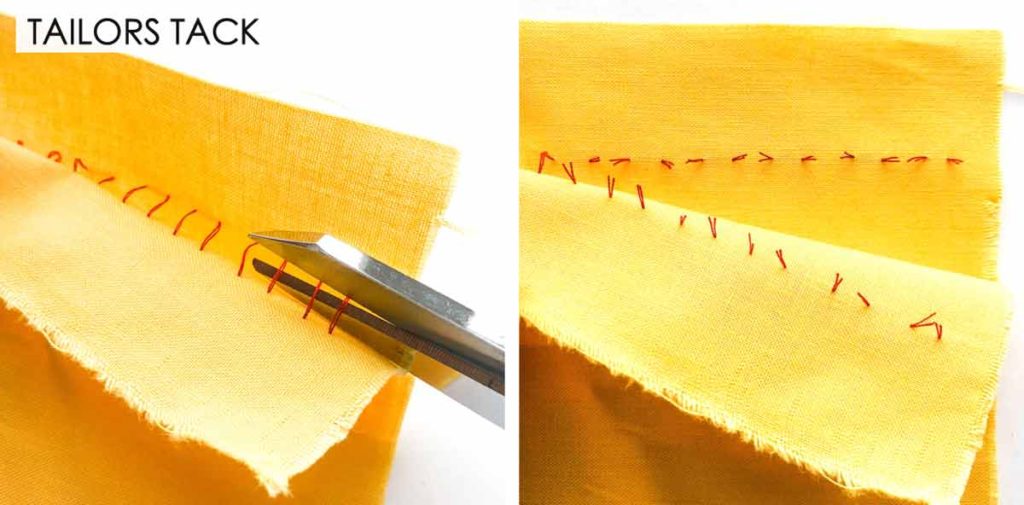
LEFT: On the bottom side of the fabric, gently pull apart the two fabric layers to 3/4 of the way of the thread loops and cut the threads using sharp scissors.
RIGHT: Thread tacks on bottom side of the fabric.
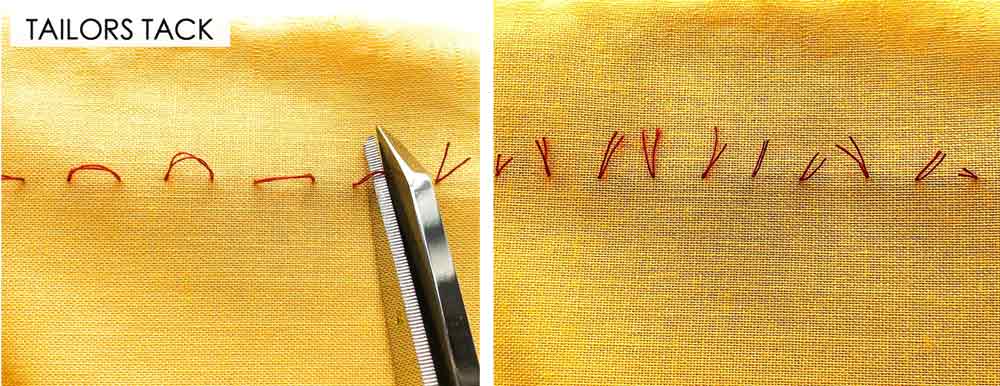
From the top side of the fabric, cut each loop to make individual thread tacks.
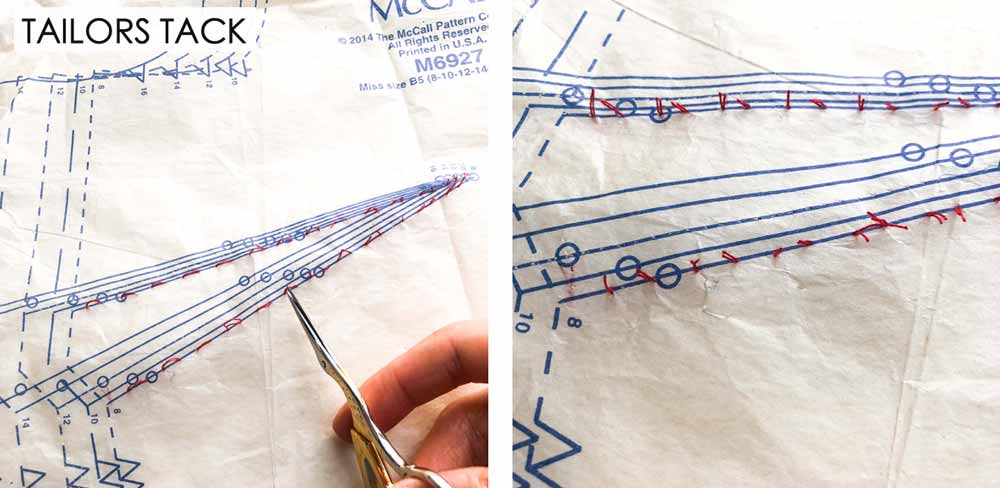
How to Transfer Darts from Pattern to Fabric Using Tailor’s Tacks:

LEFT: Pin pattern to all layers of fabric that need the dart markings. I recommend just doing 2 layers at a time. If you need to mark 4 pieces of fabric (for example, 2 lining and 2 outer fabric), I would recommend marking two pieces at a time and the repeating the process for the other two fabric pieces.
RIGHT:Make a running stitch along the top dart, catching the pattern and the two pieces of fabric underneath. Leave tall loops in between the stitches. Loops are approximately 1in (2.5cm) tall.

LEFT: Make a running stitch along the bottom dart, leaving tall loops in between the stitches
RIGHT: Remove pins
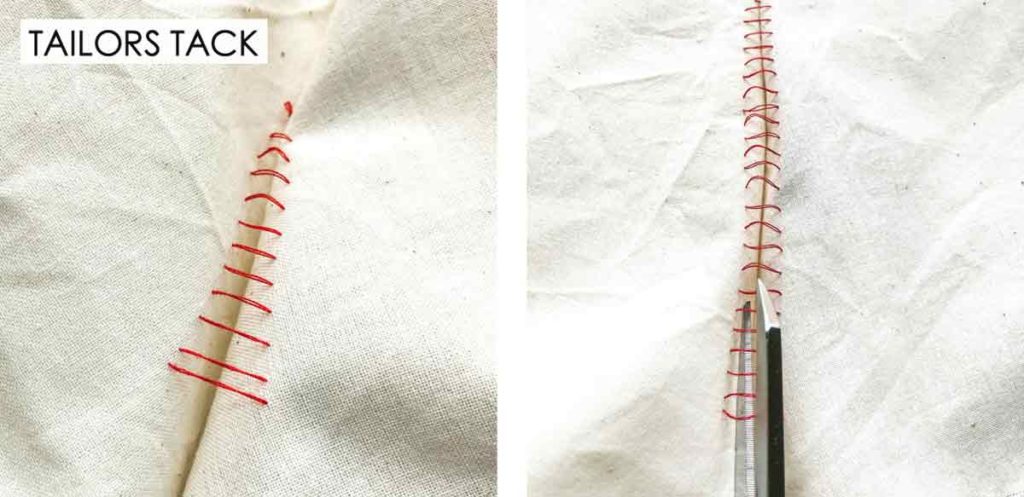
Gently separate the two fabric layers (the side of fabric that is not in contact with the pattern) apart and cut the threads of the top dart using sharp scissors

Continue separating the fabric to reveal the thread on the lower dart and cut them in the same way.
Darts marked with tailor’s tack (bottom side of fabric)
On the top side of the fabric, cut the loops over the pattern.
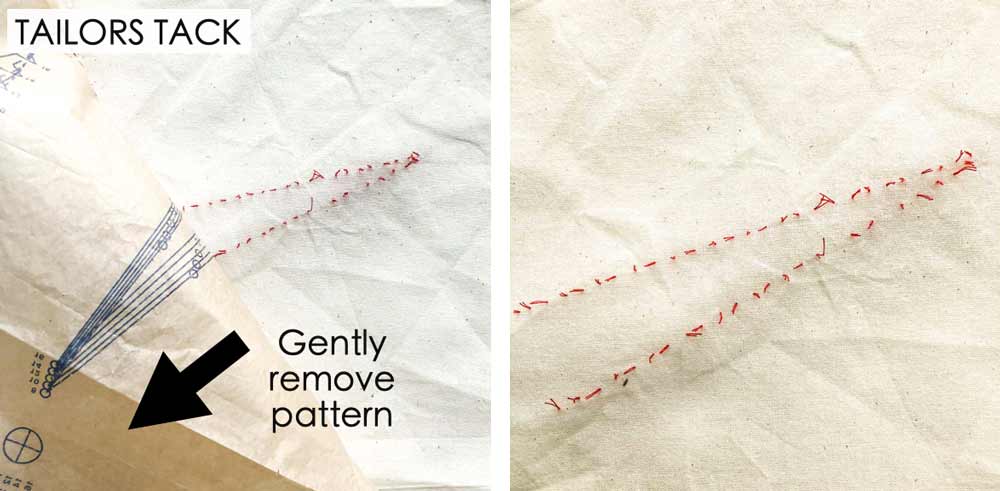
LEFT: Slowly and gently lift the pattern, being careful not to pull out thread markings.
RIGHT: Dart marking on top side of fabric.
ESSENTIAL HAND STITCHES – SIMPLIFIED TAILOR’S TACK
- Simplified Tailor’s Tack are a series of uneven thread tacks
- Best used to mark one layer of fabric
- Useful for marking fold lines, center lines, and pleat lines.
How to Make a Simplified Tailor’s Tack:
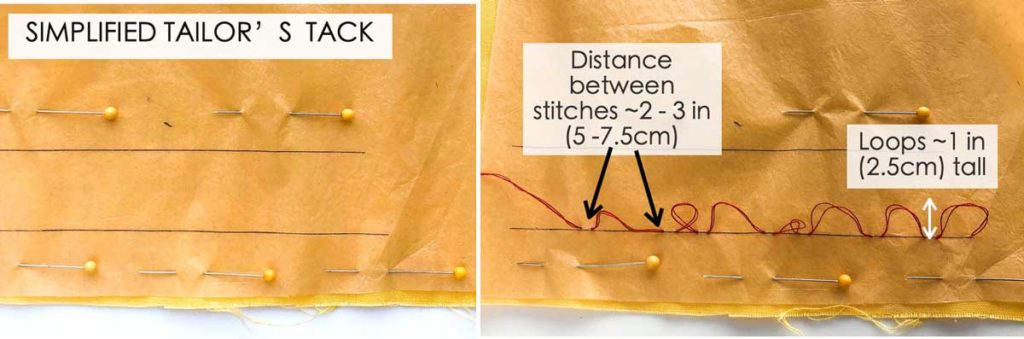
LEFT: Pin pattern to fabric
RIGHT: Use a long, unknotted double thread and make a small stitch through fabric and pattern. Pull thread though, leaving about 1 in (2.5cm) extra thread at the end. Take small stitches every 2 in -3 in (5 cm – 7.5 cm), leaving thread loops of 1 in height in between.
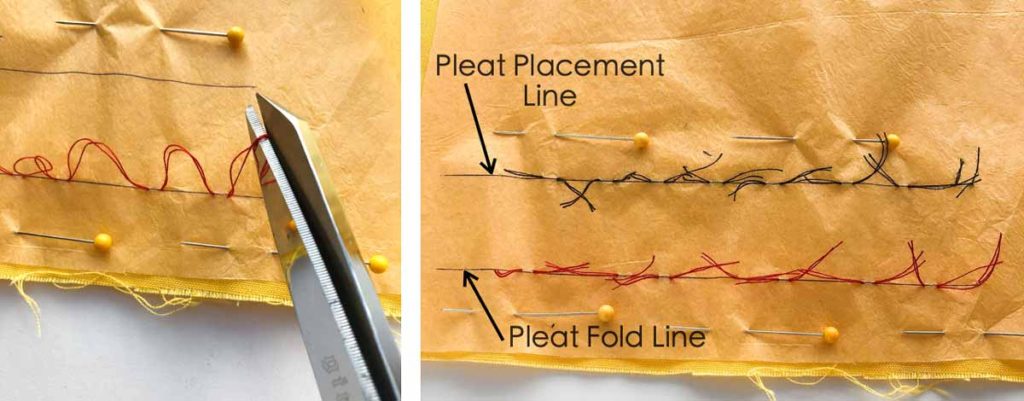
LEFT: Snip thread loops at the midpoint to create tacks.
RIGHT: Repeat same method of making tacks but use a different colored thread (top row) so you can tell difference between pleat fold lines vs pleat placement line.
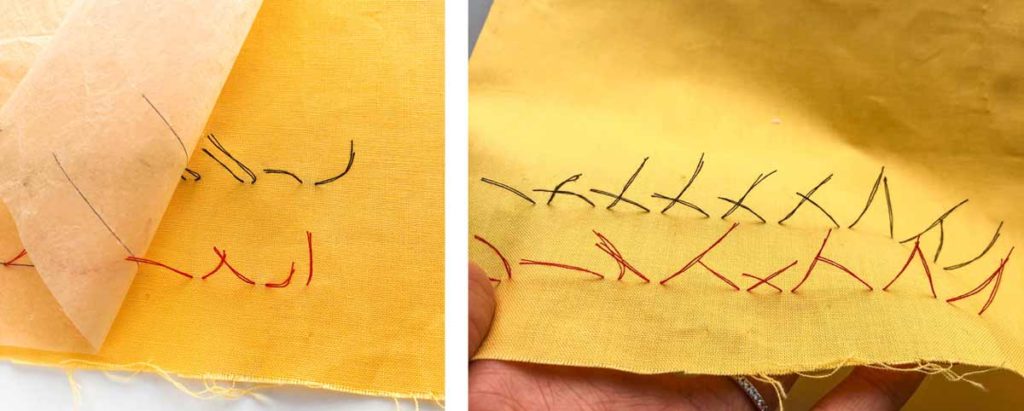
LEFT: Gently lift pattern without pulling thread tacks out
RIGHT: Simplified tailor’s tack completed
ESSENTIAL HAND STITCHES – FRENCH TACK
- The French Tack is used to loosely connect two garment sections to each other, usually the outer shell to the lining.
- The French Tack allows for independent movement of each garment section while the person wearing the garment moves around.
- Formed by making repetitive blanket stitches (that are spaced closely together) over a short distance of thread, usually 1-2in (2.5 – 5 cm)
- Common places in a garment where you’ll find a French Tack:
- Between skirt hem and skirt lining
- Between Bottom edge of a coat and bottom edge of lining
How to Make a French Tack:
The tutorial below shows how to make a French tack to connect the bottom edge of a skirt hem to the bottom edge of lining hem. Note that you would normally use a matching thread color to your garment. However, for the purpose of the tutorial I used a contrasting thread color.

LEFT: Bring needle (with knotted thread) through hem of garment and pull through (1)
RIGHT: Take a small stitch (2) and (3) in the lining directly opposite the hem. Pull thread through, leaving 1-2 inches (2.5 cm – 5cm) length of thread in between the hem and the lining.
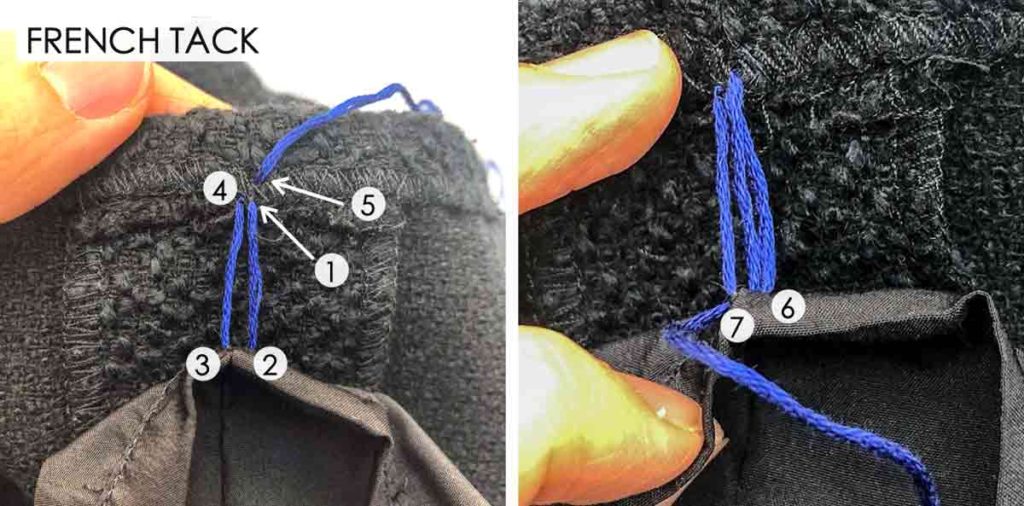
LEFT: Take another small stitch (in the same place) in the hem (4) and (5) and pull thread through, leaving the same length of thread in between
RIGHT: Repeat by taking another stitch on the lining in the same place (6) and (7).
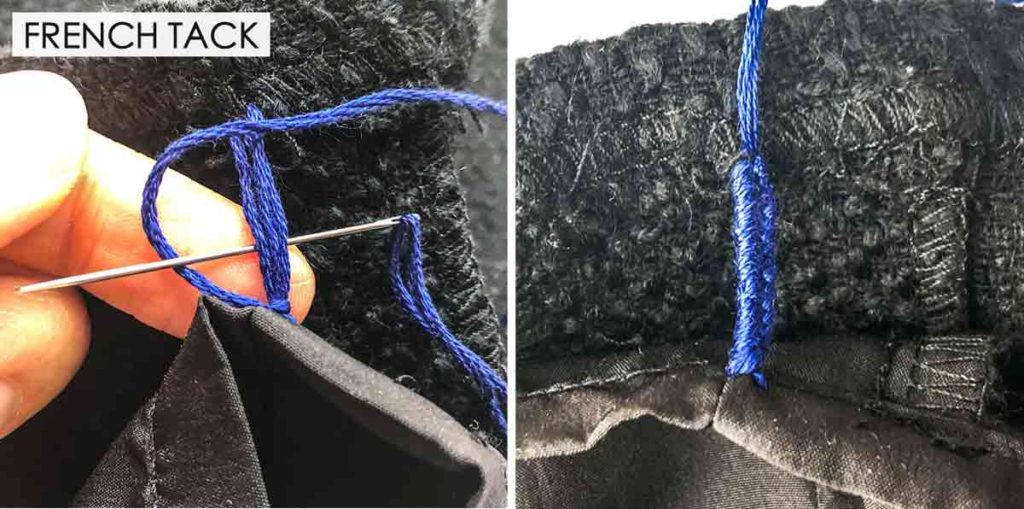
LEFT: One you have 3 strands of thread in between the hem and the lining, start making closely spaced blanket stitches across the the entire length of threads. Pull the thread in the opposite direction as the direction the needle was pointing. So in this photo, the needle points to the left, so you pull your thread to the right to create the French tack.
RIGHT: French tack, finished across hem and lining.

Tie thread off and hide the thread ends in the hem. You are done!
ESSENTIAL HAND STITCHES – FLAT CATCHSTITCH
- A type of hemming stitch that is very strong
- Useful for finishing hems that are pinked (zig-zag edge)
- By using a matching thread and taking small stitches on the garment, the Flat Catchstitch is mostly invisible from the right side of the garment.
How to Make the Flat Catchstitch:
Prior to sewing the Flat Catchstitch, make sure the raw fabric edges are finished (pinked, in this tutorial). Fold and press the hem at the seam allowance.
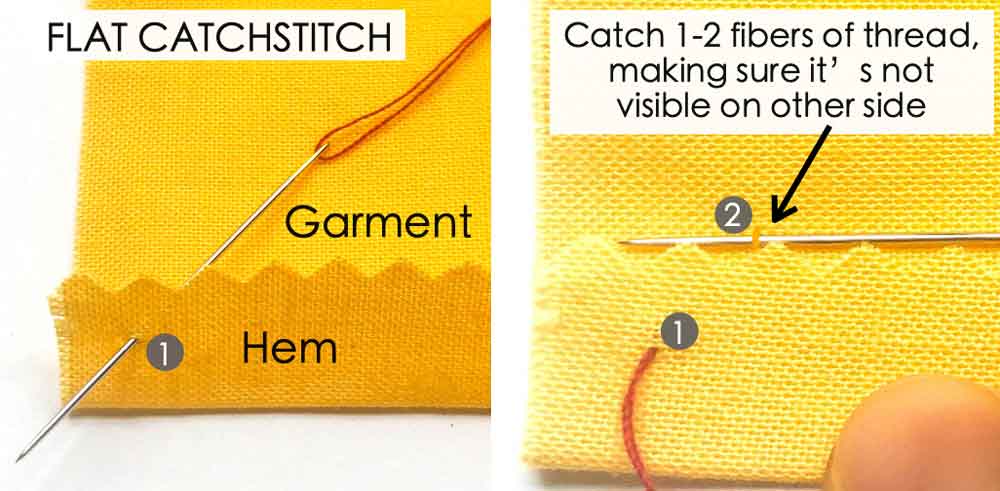
LEFT: Bring knotted thread and needle from wrong side of hem to right (1) and pull thread through.
RIGHT: With the needle pointing to the left, take a small stitch (2) about 1/4 in – 3/8 in (6 – 10mm) to the right of (1), catching only a few thread fibers in the garment fabric. The stitch (2) is made right above the edge of the hem. Make sure the thread is barely visible (if not invisible) on the right side of the garment

LEFT: With the needle pointing to the left, take another stitch in the hem (3) and (4), about 1/4 in – 3/8in (6 -10 mm) to the right of previous stitch (2) on garment. The stitch in the hem can go through the hem and does not have to as small as the one taken on the garment.
RIGHT: Continue making stitches in the same way, going from left to right. You will end up with a series of triangle stitches that cross each other on the fabric hem. Keep stitch size and distance uniform.
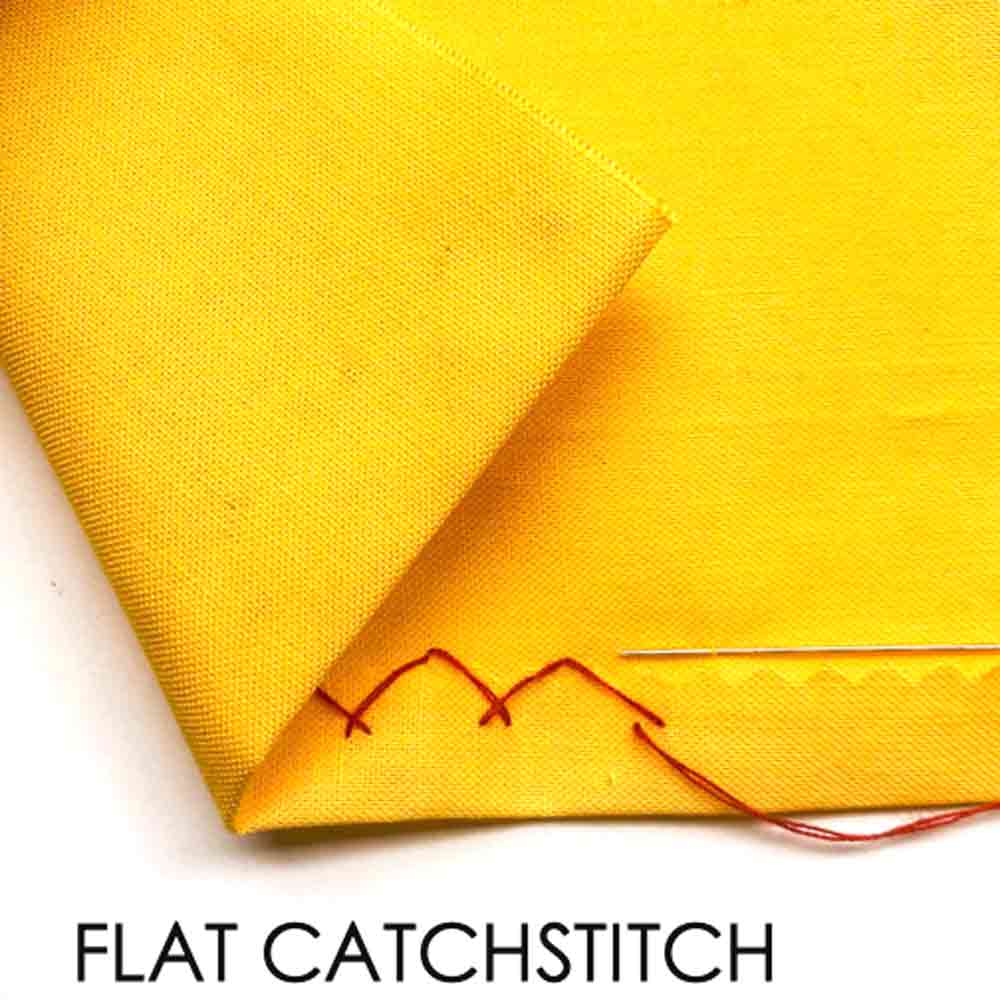
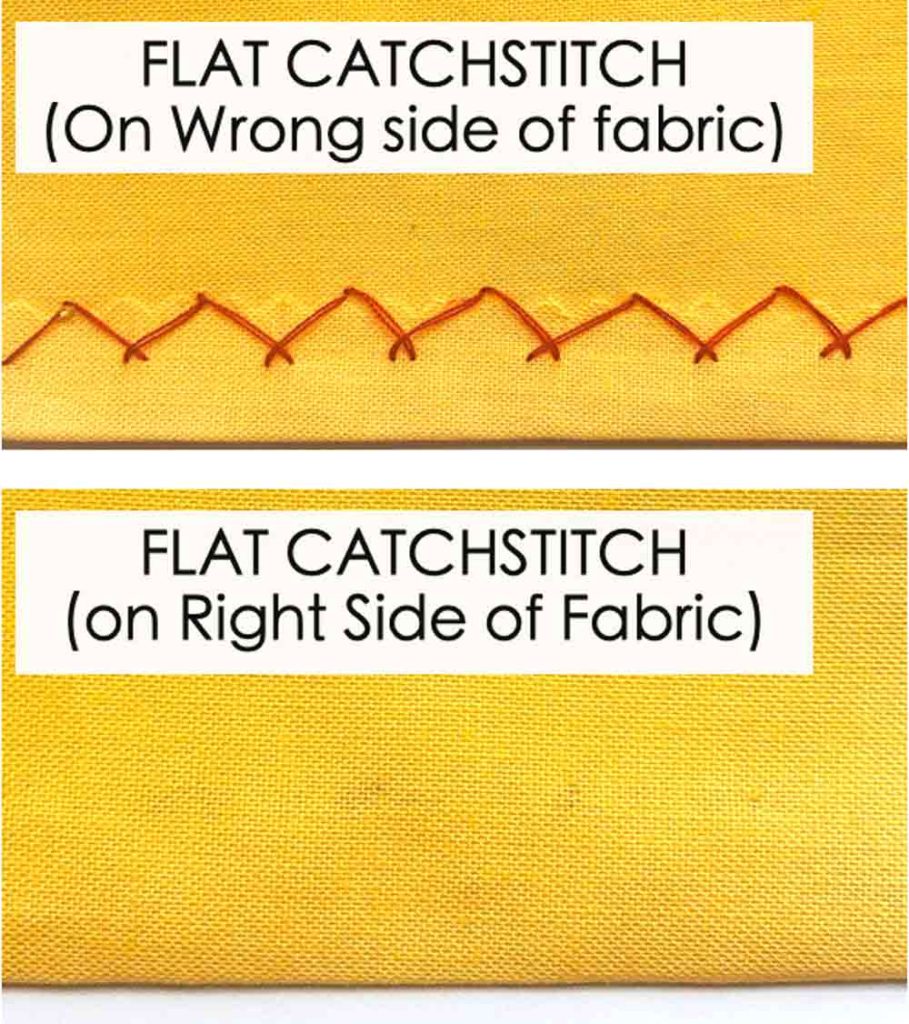
Finished flat catchstitch. Note that this stitch is mostly invisible on right side of fabric.
ESSENTIAL HAND STITCHES – BLIND HEMMING STITCH
- A quick and simple stitch used to create a hem that is not visible once finished (blind hem)
- The blind hemming stitch is made in between the garment and the inside of hem.
- Use a single thread for lightweight fabrics and and or double thread for medium weight fabrics
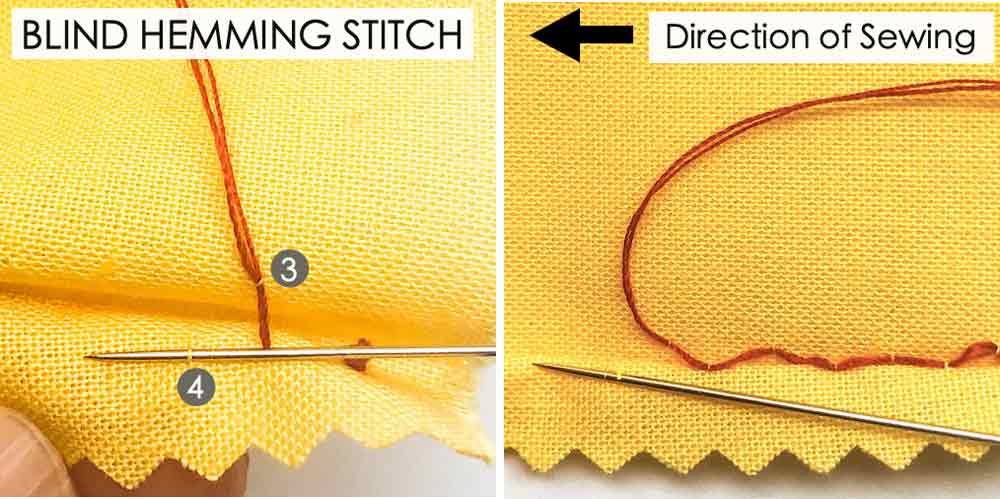
How to Make Blind Hemming Stitch:
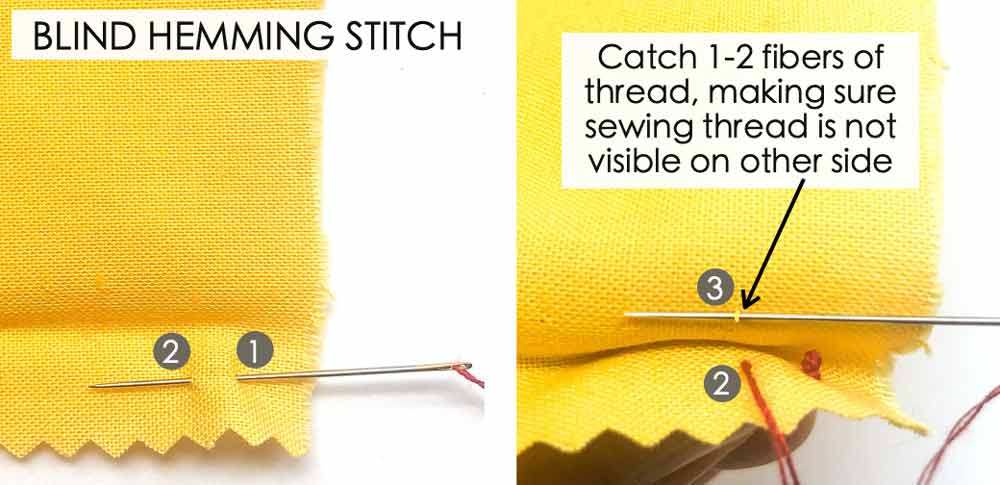
LEFT: With the needle pointing to the left, take a small stitch (1) and (2) through wrong side of hem.
RIGHT: Take a very small stitch on the garment (3), about 1/4 in (6mm) to the left and slightly above previous stitch (2).
LEFT: Working right to left, take another small stitch on the hem, another 1/4 in (6mm) to the left of the previous stitch (3)
RIGHT: Continue alternating stitches between the hem and garment, keeping the space between them about 1/4 in (6mm) apart. Make sure to keep your stitches small, only a few threads, especially on the garment
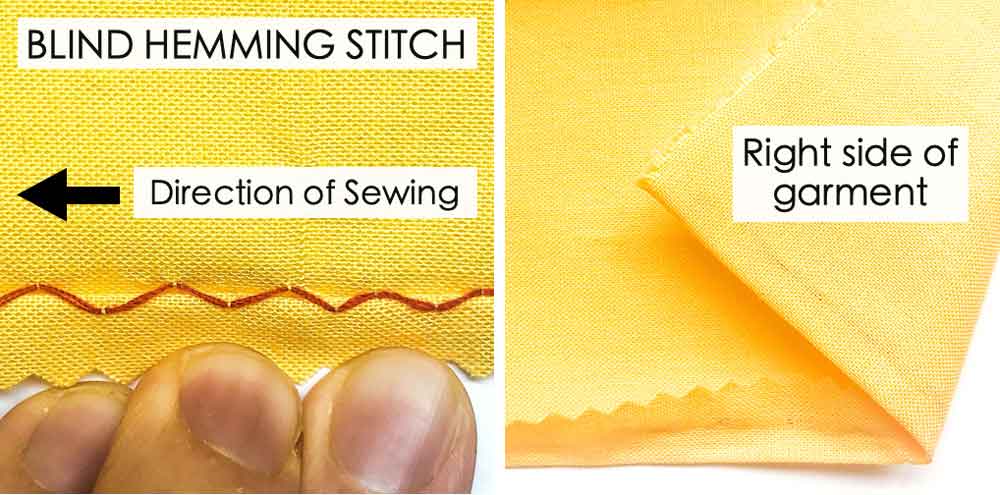
LEFT: Blind-hemming stitch with the edge of hem pulled down to show what it looks like
RIGHT: Note that the stitch is not visible on the right side of garment and barely visible on the hem.
ESSENTIAL HAND STITCHES – BLIND CATCHSTITCH
- The Blind Catchstitch is exactly the same as the Flat Catchstitch except that the stitches are made in between the hem and the garment.
- More stable and secure than the blind hemming stitch
- Good for heavy weight fabrics.
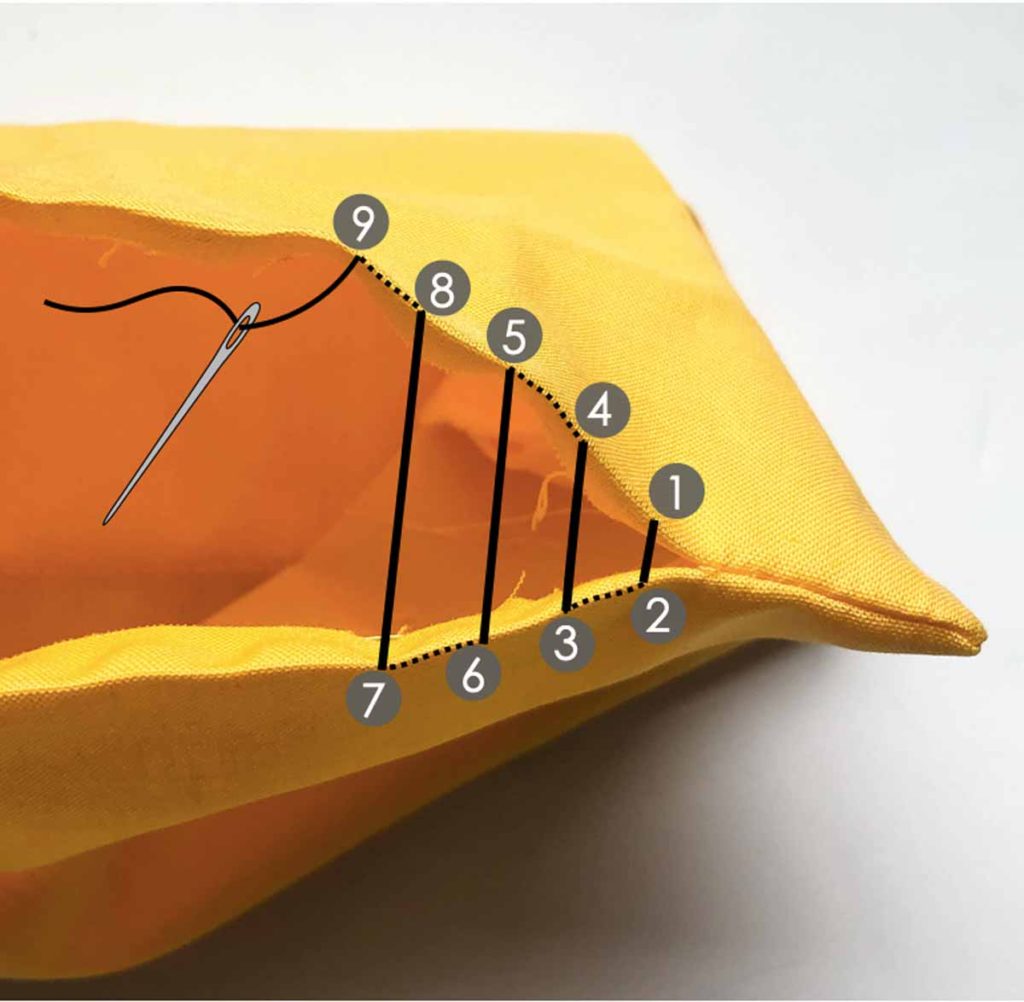
How to Make a Blind Catchstitch:
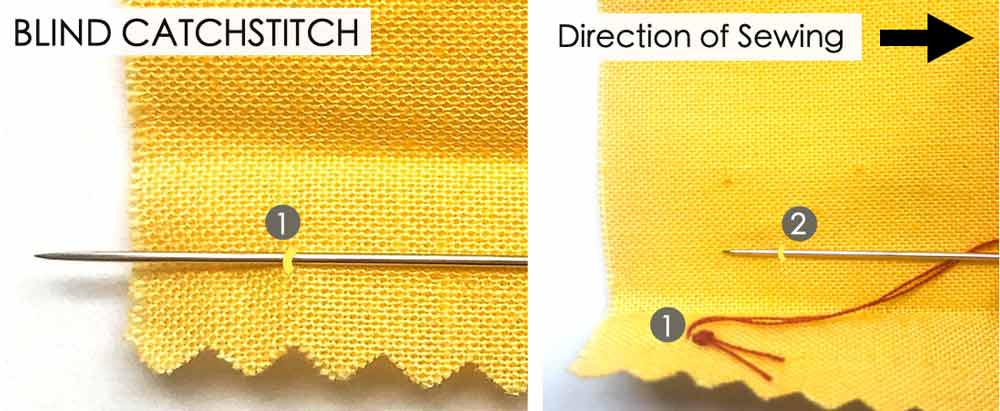
LEFT: With the needle pointing to the left, take a tiny stitch (1) on wrong side of hem. Pull thread through
RIGHT: Again, with the needle pointing to the left, take a second tiny stitch (2) on the garment (within the hem edge). This second tiny stitch (2) is taken about 1/4 in (6mm) to the right of the first stitch (1). Make sure the stitch on the garment is not visible on the right side of the fabric.
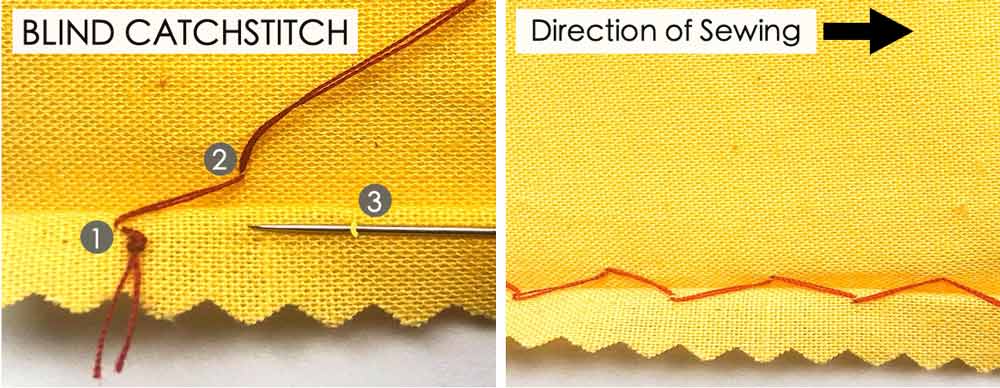
LEFT: Working from left to right, continue taking tiny stitches between the garment and the hem. Keep stitches about 1/4 in (6 mm) apart.
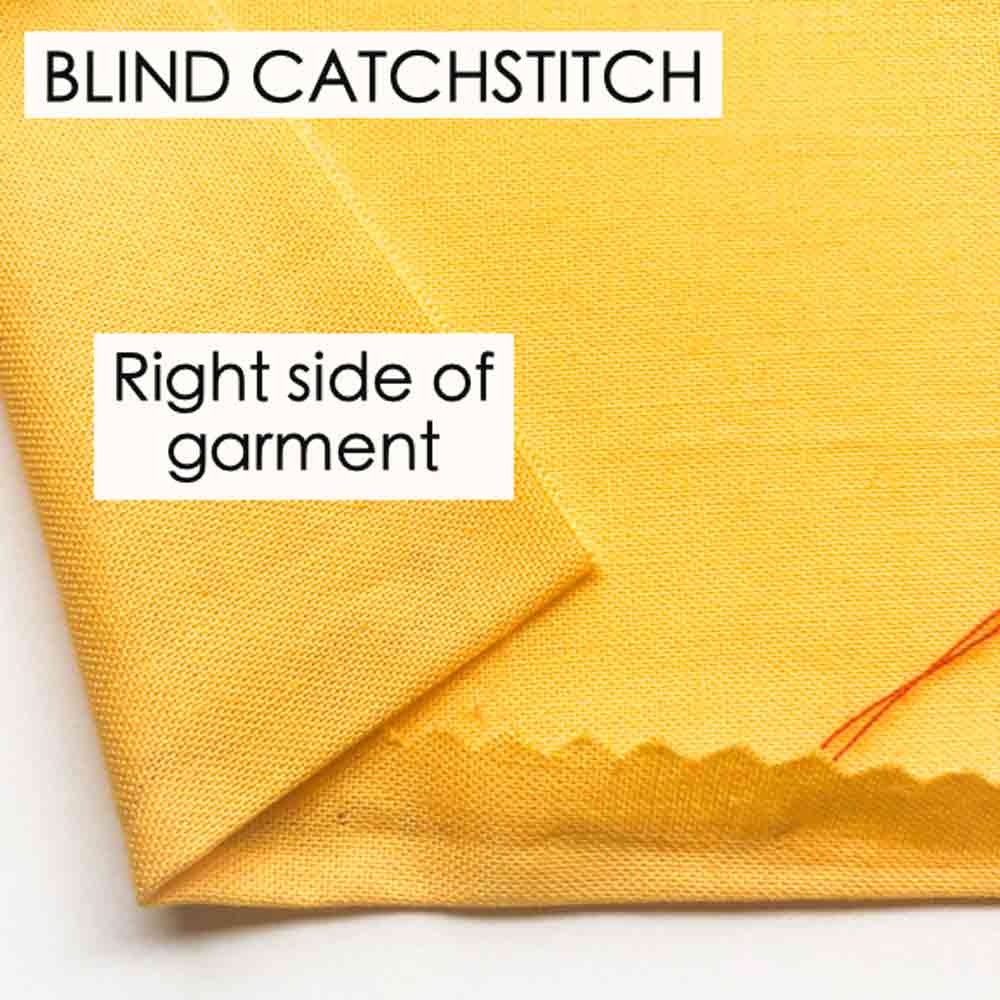
The blind catchstitch, when finished, is not visible on the right side of garment and barely visible on the hem.
Whew! And Those are the 19 Essential Hand Sewing Stitches that will let you sew pretty much anything. Let me know in the comments below if there are other stitches you consider essential, or tutorials of other stitches you would like to see. I hope this was a useful article to add to your sewing skill set. Happy Sewing!
Related posts you may be interested in:

best and most comprehensive guide ive come across so far. thanks for this
Hi Link, you are very welcome and thank you so much for your kind words!