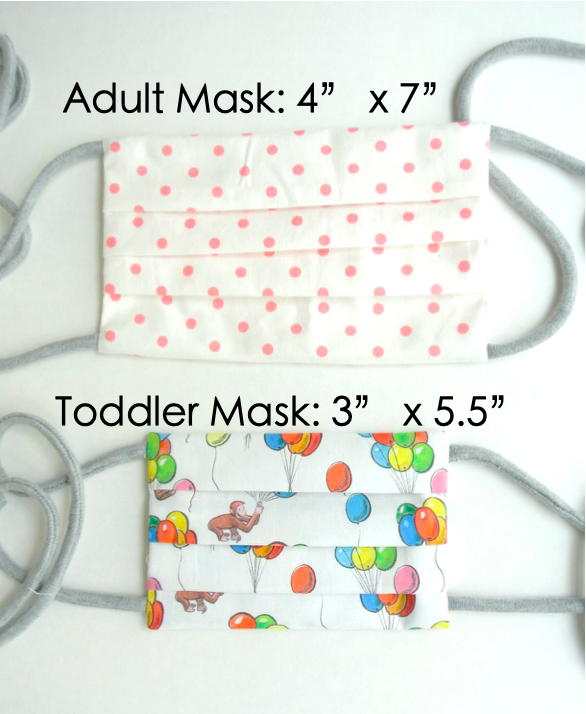
FACE MASK PATTERN FOR ADULT AND CHILDREN

Difficulty Level: Easy
Time: 20 Minutes
Post Updated 6/28/2020
It’s been so sad and horrifying to see recent news of the shortage of PPE (personal protective equipment) due to the COVID-19 outbreak. As a healthcare provider myself, I can’t imagine practicing without protective barriers, let alone caring for extremely high risk patients (both for patient’s safety and mine).
I’ve often seen cloth masks worn by scooter drivers in Taiwan, but wasn’t sure how effective cloth masks could be for patient care.
With the surge of PPE needs , and hospitals starting to accept homemade masks, friends started texting me about sewing homemade masks. I also found out that Chloe Dao, a local boutique shop owner in Houston, had already been making hundreds of cloth masks to donate. Having interned for her a few years back, I texted her and she sent me some useful info about mask materials.
According to this article by SmartAir filter, vacuum cleaner bags (86%) and dish towels (73%) were the most effective after surgical masks (89%) in capturing 0.02-micron bacteria, 5 times smaller than the Coronavirus at 0.1 micron. The percentage represents the amount of bacteria captured by the mask, so the higher the better. Unfortunately, both vacuum cleaner bags and dish towels had extremely low breathability, which would hinder the wearer from being able to keep it on for long.
The article also tested other materials, including cotton blend, antimicrobial pillowcases, regular pillowcases, 100% cotton T-shirt, linen, silk, and scarf. In the end they concluded that pillowcases, and other cotton materials were the material of choice.
“These materials filter out approximately 50% of 0.2 micron particles, similar in size to the coronavirus. They are also as easy to breathe through as surgical masks, which makes them more comfortable enough to wear for several hours.”
Another material we considered was using AC filter paper. My husband found a good resource about MERV ratings for AC filters from
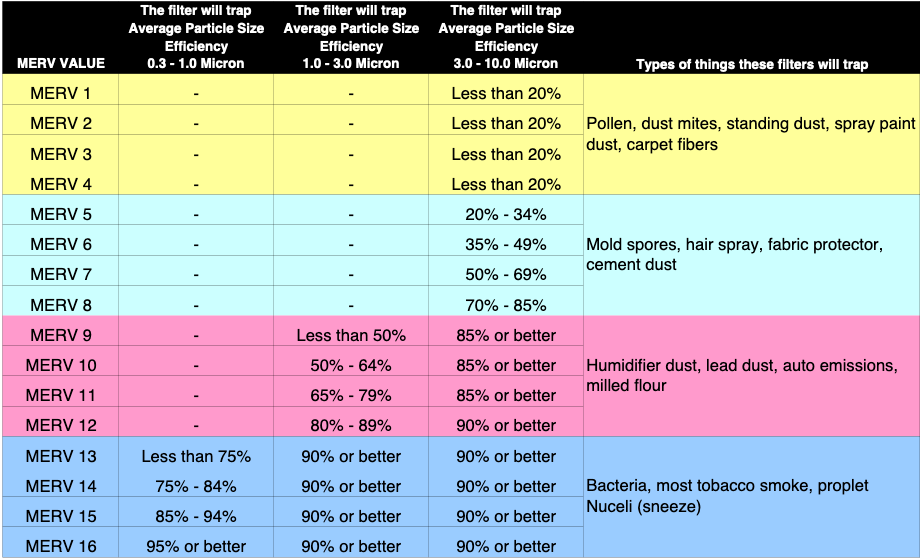
According to this chart, a MERV 16 AC filter could filter out about 95% of particles 0.3-1.0 Microns. Not bad! Unfortunately, we only had some MERV 13 filters on hand, so we tore one apart (taking the wires out) and used it as a removable filter to tuck into the mask.
With these information, I felt better about creating homemade facemasks. However, these masks are not meant to replace actual PPE as according to the CDC:
In settings where facemasks are not available, HCP might use homemade masks (e.g., bandana, scarf) for care of patients with COVID-19 as a last resort. However, homemade masks are not considered PPE, since their capability to protect HCP is unknown. Caution should be exercised when considering this option. Homemade masks should ideally be used in combination with a face shield that covers the entire front (that extends to the chin or below) and sides of the face.
From CDC’s website “Strategies for Optimizing the Supply of Facemasks” March 17, 2020
The mask is made from one piece of fabric and two sewing stitches, super simple. I’ve also included a tutorial to make makeshift elastic for the earloops because elastics are hard to come by these days.
The makeshift elastic do loosen with use (but are probably be more comfortable on the ears for long usage). However, if you stick the masks into the dryer cycle after washing, the heat helps tighten up the makeshift elastic again.
UPDATE 6/28/20: If you are concerned about the makeshift elastic getting loose overtime, you can also use them as fabric ties. Tutorial below shows how to sew them as fabric ties. I’ve also included patterns for Child and Toddler sized masks.

MATERIALS:
(for one mask)
Cotton Fabric (8″ x 17.5″)
Felt Scraps
Sixteen inch piece of 1/4″-1/2″ thick elastic (or knit fabric for makeshift elastic, see below)
4″ length wire (pipe cleaner/twisty tie/floral wire)
Matching Thread
MERV 13 AC Filter (optional)
PATTERNS:
Adult Face Mask Pattern (download here)
Child (Ages 2-4) Face Mask Pattern (download here)
Toddler (Ages 2-4) Face Mask Pattern (download here)
TOOLS:
Sewing Machine
Fabric Scissors
Chalk for marking fabric
Fabric Glue
Iron (optional, can also finger press)
Loop Turner
INSTRUCTIONS:
ELASTIC EARLOOP:
To determine if knit fabric is stretchy enough to be used as elastic for ear loop, make sure fabric can stretch to at least 50% of itself. This means that a 2” length of fabric can stretch to 3” (see photos below)
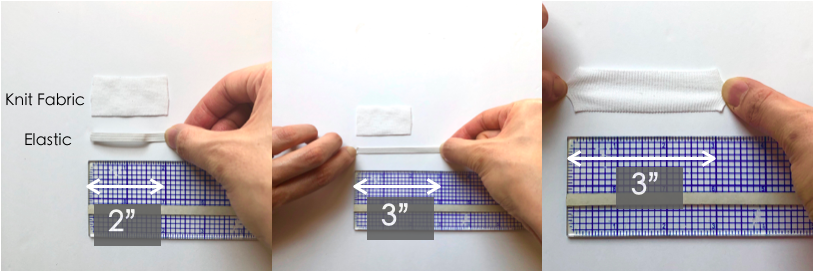
MIDDLE: 2” piece of elastic can stretch to 3″
RIGHT: Make sure a 2”piece of knit fabric can also stretch to 3” as well.
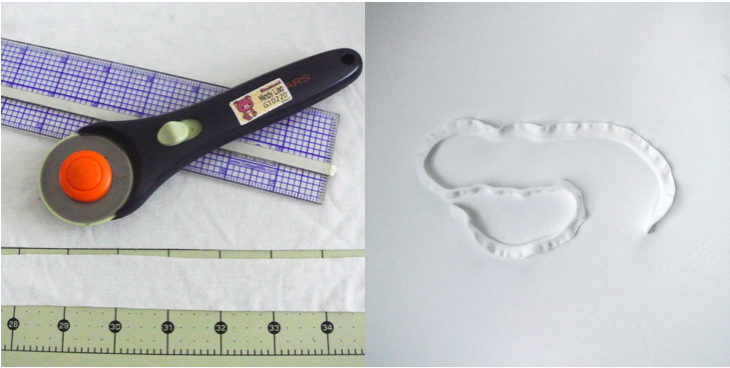
LEFT: Cut a strip of knit fabric 1”x 15”long
RIGHT: Fold fabric in half lengthwise and stitch at 1/4” seam allowance
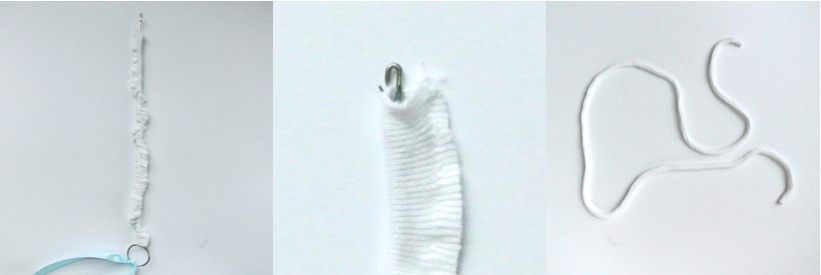
LEFT: Push Loop turner through cord (i tied a blue ribbon at the end otherwise I can never seem to find it when I need)
MIDDLE: Make sure to hook tip of fabric and close the hook
RIGHT: Pull loop turner through and turn elastic cord to right side.
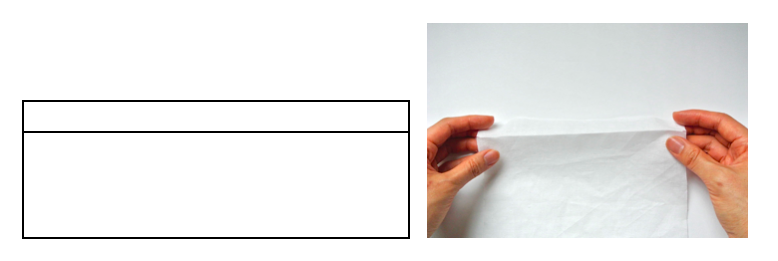
FACEMASK: LAYING PATTERN

LEFT: Print and cut out pattern and tape together at arrows. Pin and cut out pattern on cotton fabric. Make sure the paper pattern lays on top of the RIGHT SIDE of the fabric
RIGHT: Snip edges of the fold lines on both sides of the pattern + fabric. The snip makes a mark to indicate where to fold in next step.
FACEMASK: HOW TO FOLD
Solid line = “Mountain Fold”. Fold fabric above solid line DOWN.
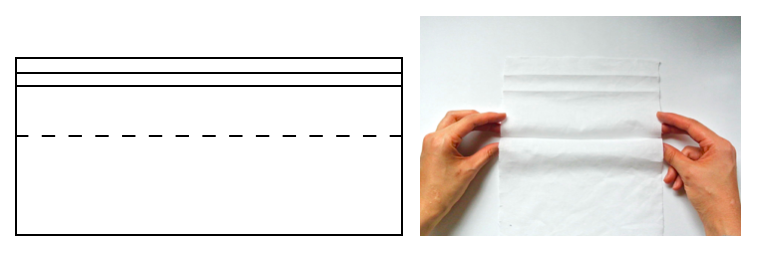
Solid line = “Valley Fold”. Fold fabric BELOW dotted line UP
View of folded dotted and solid lines.
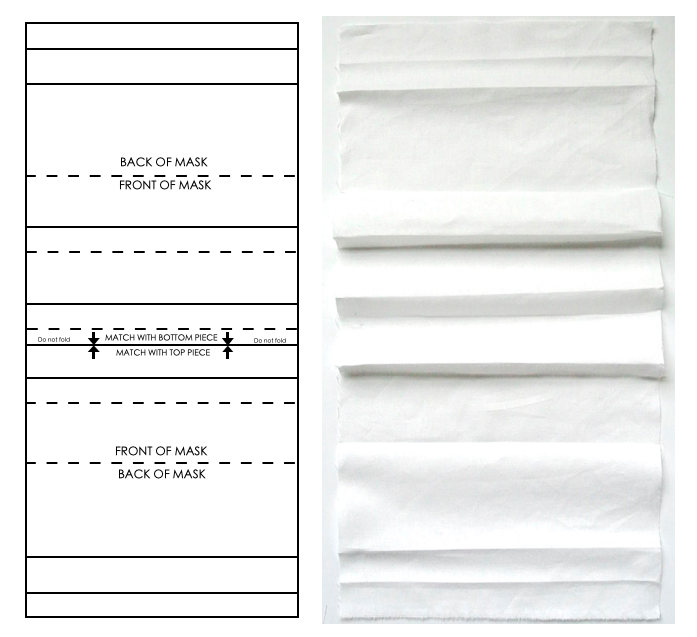
Fold accordion pleats on fabric following pattern.
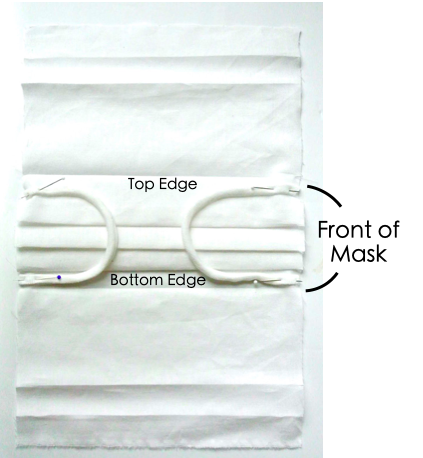
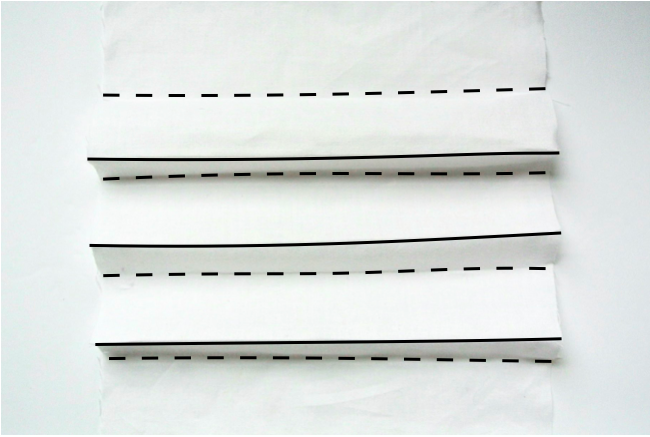
Collapse pleats together on front of mask. Pin elastic to sides of mask 1/4″ from top and bottom edge.
FACEMASK: ATTACHING WIRE
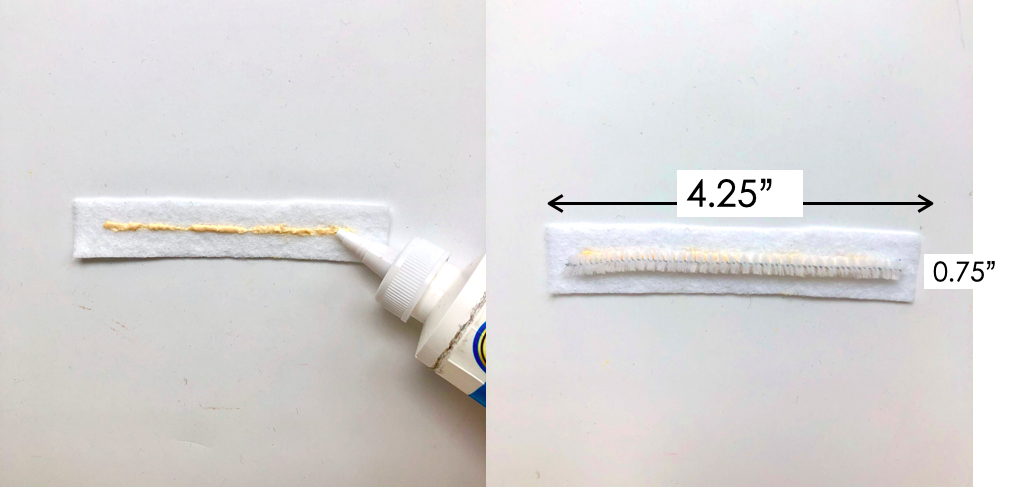
Cut a piece of wire about 4” in length (I used a pipe cleaner) and a piece of felt approximately 4.25” x 0.75”. Glue wire to felt using fabric glue (glue also works).

FACEMASK: SEWING
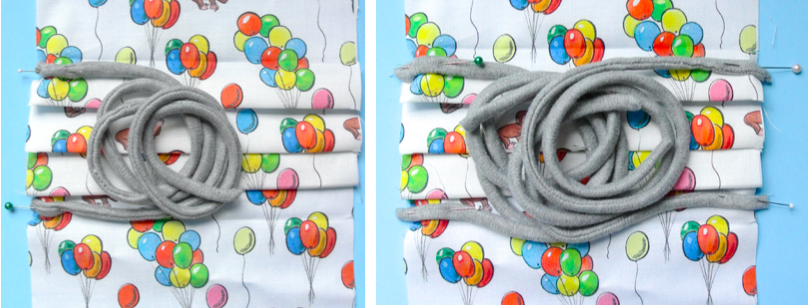
To make tie masks, cut 4 pieces of ties: 12″ for Toddler, 15″ for Child, and 18″ for Adults.
LEFT: Pin two pieces of ties to the top and bottom of Mask FRONT. Make sure to loop the ties so they lay within the FRONT of mask.
RIGHT: Pin other two pieces of ties to the other side of mask FRONT.
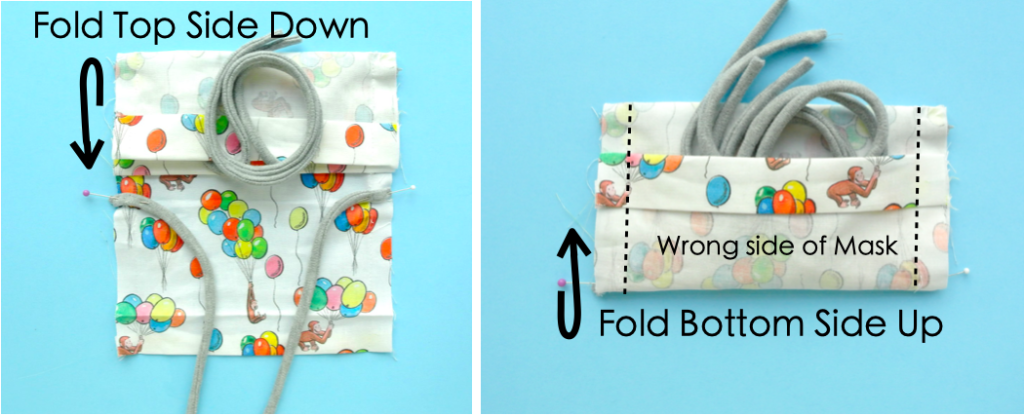
LEFT: Fold top side of mask DOWN
RIGHT: Fold bottom side of mask UP. Make sure none of the ties/elastic are caught in the seam allowance. Sew 1/2″ seam allowance (black dotted lines).
LEFT: Turn mask to right side, pushing out corners.
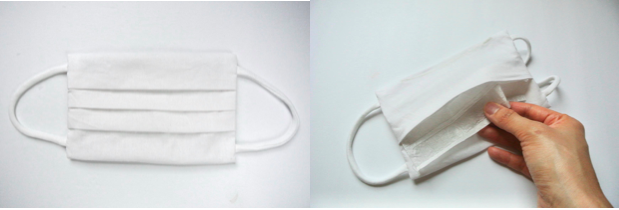
RIGHT: Insert extra filter in if desired. In this mask I placed a piece of 3M Merv 13 AC Filter. You can also fit a surgical mask inside as well in cases where surgical masks need to be reused. This will help extend longevity of surgical mask*
*DISCLAIMER: I have been told by healthcare worker friends that surgical masks with a mask cover can be reused up to 5 times. They also recommend laying surgical mask under direct sunlight to kill pathogens. They also recommend rewashing cloth masks after every use. However, these are not claims that have been scientifically tested or proven.
UPDATE 4/6/2020: This article from the New York Times recommends using “high-quality, heavyweight ‘quilter’s cotton,’ “ which according to their study are “as good as surgical masks or slightly better, testing in the range of 70 to 79 percent filtration.” I have since switched to using quilters cotton for these masks.