How to Sew Letters on Fabric (The Easiest Way)
Time: 30 min – 1 hour (depending on the number of letters)
Difficulty: Easy
Ever wanted to personalize a sewing project to gift someone so you make it extra special? Follow along this easy tutorial to learn how to add fabric letters to personalize bags, blankets, towels, and more. No embroidery machine needed!
True story: One time my mom went on a trip to Thailand and I asked her to bring me back a souvenir with my name. She came back with this cute pelican key chain, except the name on it was “Jessica” instead of “Mindy”. When I asked her why it said “Jessica”, she shrugged and said “they didn’t have any Mindy key chains.” LOL. However, even with it being the wrong name, I still kept the key chain over the years. I guess knowing that my mom had the intention to get me a name key chain (despite it being the wrong name) prevented me from throwing it away!
Anyway….back to our topic…If you are like me and don’t own an embroidery machine, fabric letter appliques will be your next best option.
What is Fabric Letter Applique?
Applique is the technique of sewing piece(es) of fabric over a large piece of fabric to form patterns or designs. Applique also refers to the fabric design/letter/pattern that is being cut out and stitched on to the larger piece of fabric.
In this case, fabric letter applique will be the technique of sewing pieces of fabric cut into letters over a larger piece of fabric to form names, words, or a simple monogram.
What Is Fabric Letter Applique Used For?
Fabric letter appliques are good for adding names, initials, words, etc to pretty much any sewing project. They generally work well for medium to large letters. If you want small letters (for example adding initials to a scrub top), you will need an embroidery machine, or hand embroider. However, there is usually a limit to the size of embroidery you can create with home embroidery machines. If you need large letters, applique is the way to go!
How Do You Applique Fabric Letters?
The general way to applique fabric letters consists of 3 steps:
- Cut out the fabric letters you want to applique.
- Place the letters on the larger fabric you will be appliqueing to, and keep them in place (more on that later)
- Stitch the letter applique onto the larger fabric. You can hand sew or machine sew the applique on.
What Machine Setting Should I Use For Fabric Letter Applique?
For machine sewing, the stitch type can vary from straight stitch, zig-zag stitch, or other decorative stitches available on your home sewing machine. Straight stitch is the fastest way but it leaves a raw edge. As a result if you are using fabric that frays, the applique edges will fray over time. If you are using a non-fray fabric such as felt, straight stitch will be acceptable. In this tutorial I will be focused on using the zig-zag stitch since that is the easiest and nicest way in my opinion, and it binds the raw edges to prevent fraying.
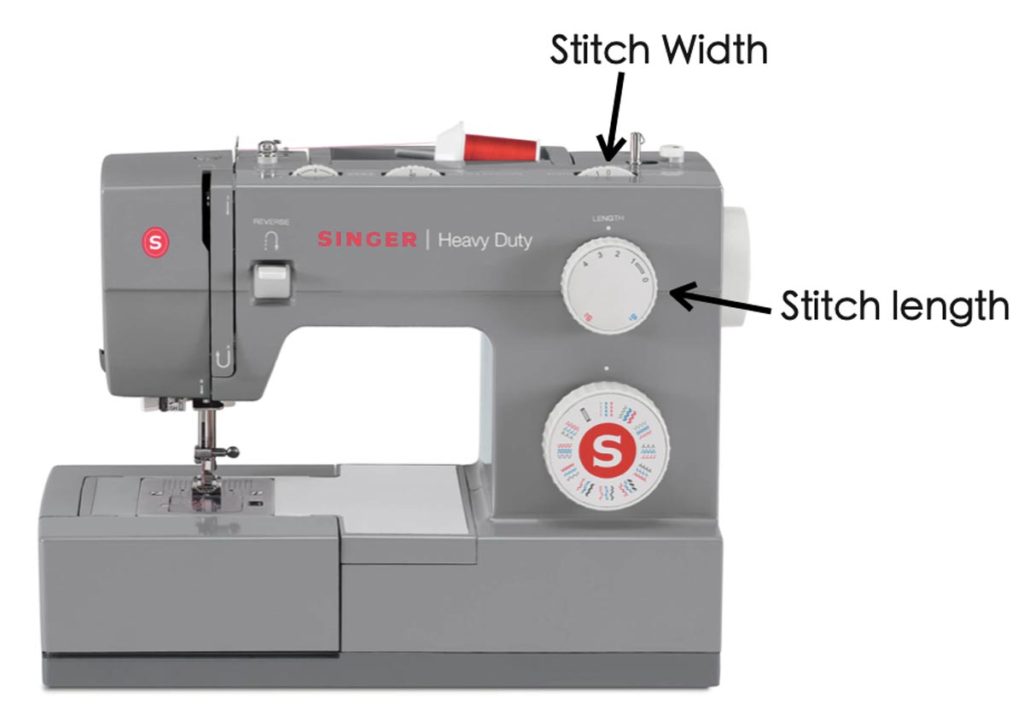
On every machine that has a zig-zag stitch option, there will be two other dials that control “Stitch length” and “Stitch Width”. Below is a photo of the sewing machine I use, the Singer Heavy Duty 4452 (which I love!). As you can see in the photo, there is a “stitch width” dial, a “stitch length” dial and a “pattern selector” which has all the decorative stitches including the zig-zag stitch.
Stitch width controls how wide the zig-zag stitch will be. In the photo below, notice how the zig-zag stitches get “taller” as you increase the width from 1 to 5, while keeping stitch length constant.
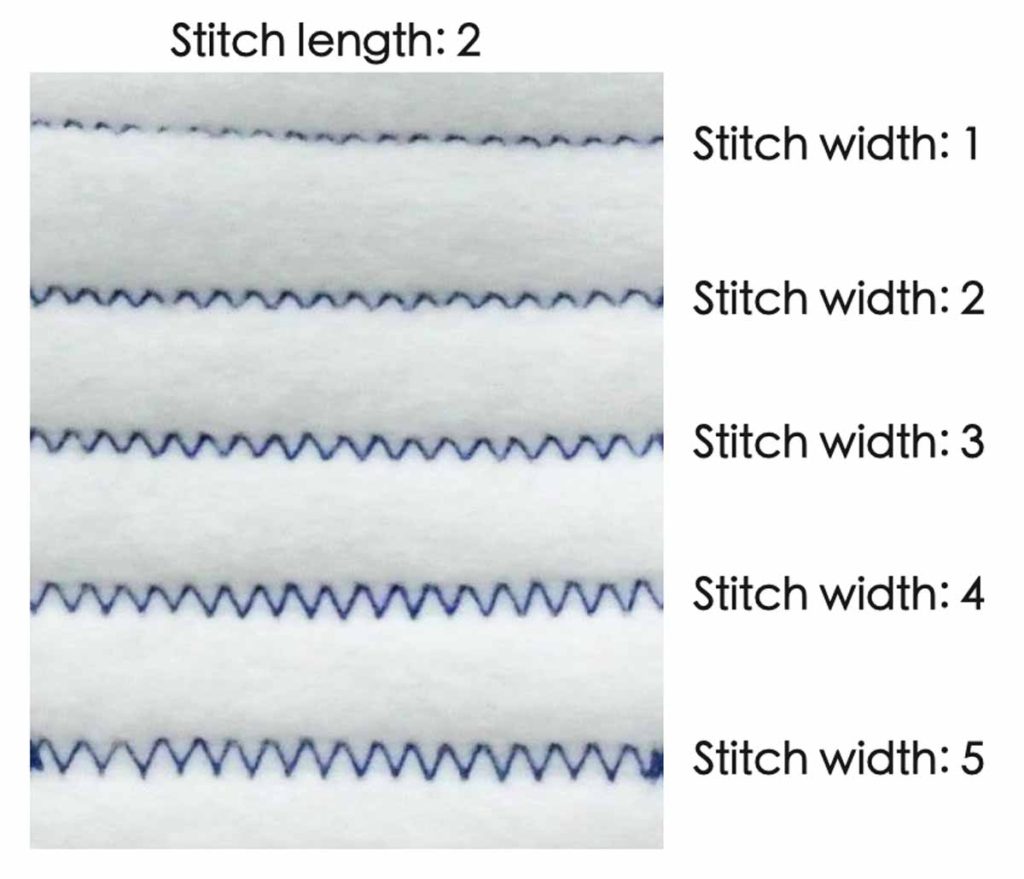
Stitch length controls how close together the zig-zag stitches are. In the photo below, see how the stitches grow farther apart as you increase stitch length from 0 to 2 while keeping stitch width constant.
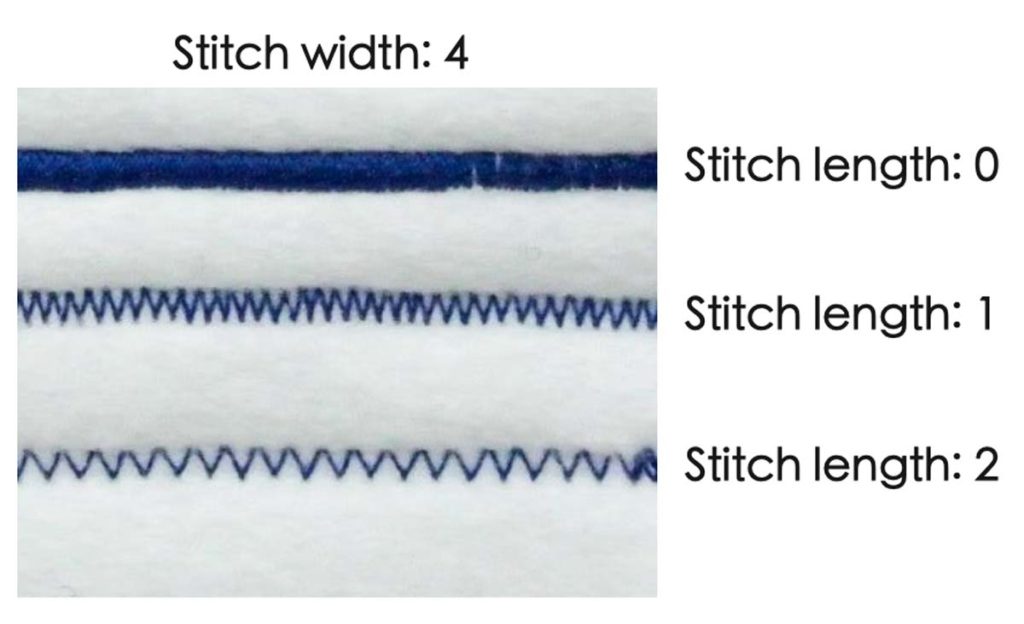
You will need to play around with your sewing machine settings to see which stitch width and length is good for your project. In general, I usually start with stitch width 4 and stitch length 1 for my projects and adjust accordingly.
How Do I keep The Letter Applique In Place Before Sewing?
There are several ways to keep the letter applique in place on the fabric you will sew it to. In this article I will discuss the three common ways: Iron-on-adhesive, iron-on-fusible web, and fabric glue + stabilizer.
Iron-On-Adhesive:
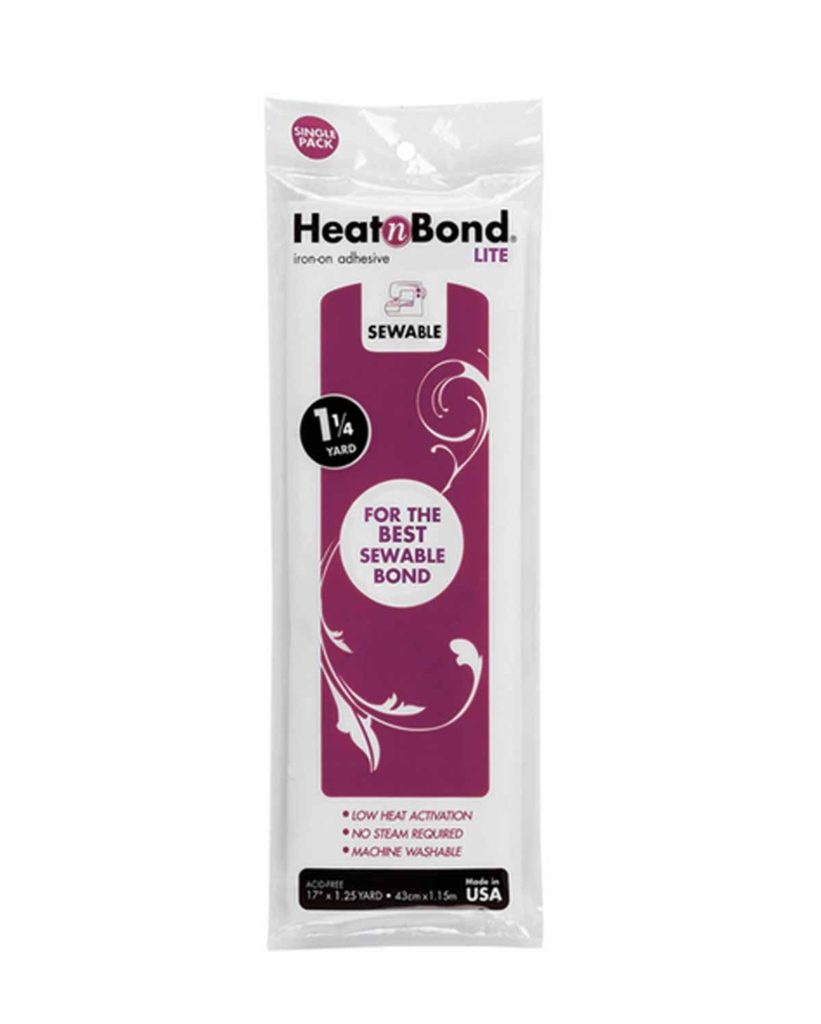
The original way I had learned to fabric applique is with the use of iron on adhesive like Heat N Bond LITE. This material is great because it has two adhesive surfaces. You first iron on one side of the adhesive to the bottom of your applique. Next, peel off the plastic paper to reveal the other side of the adhesive. Then you can iron on the applique to the fabric you want to applique it to. Once that’s done, you can easily stitch down the applique without worrying it will shift all over the place.
Iron-on Fusible Web:
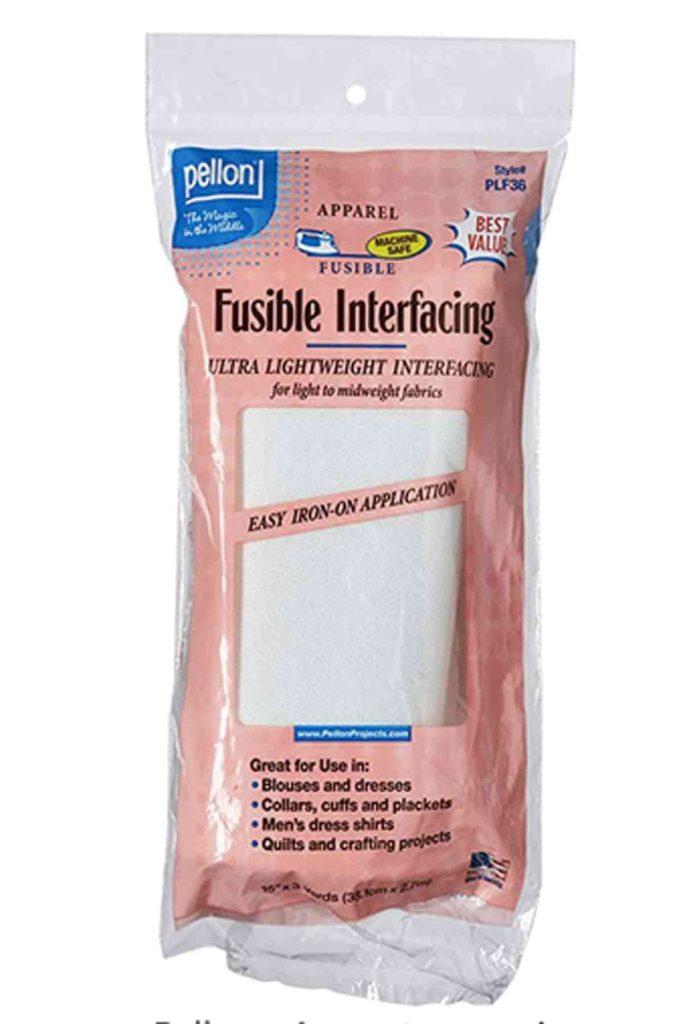
Another way to fabric letter applique is through the use of fusible interfacing. This is another good technique as it lets you draw/trace the letters you want on the fusible web (just make sure it’s a mirror image), then iron on the fusible web to the fabric. You can then easily cut out the letters on the fabric, and the fusible web adds extra stiffness to your applique, which is important when sewing it down.
Fabric glue + Stabilizer:


This is my favorite way to keep the applique in place because it does not require the use of an iron. Here are 4 reasons I prefer NOT using iron-on-adhesive/fusible. Reason 3 and 4 only relate to using iron-on-adhesive.
- Certain fabrics don’t have the same look once ironed. Iron-on-adhesive/fusible, as the name implies, needs to be ironed on. The adhesive gets melted by the hot iron and that how it sticks to the fabric. While this isn’t a problem if you use woven fabrics (such as cotton) for letter applique, it will create a problem if you want to use a thicker fabric with more texture, for example fleece. Fleece fabric is soft and fuzzy. However, ironed fleece becomes a dense flat piece of fabric that is neither soft nor fuzzy. Not pretty. So depending on the look you are after, you just might not want to iron that applique.
- You don’t have to get out of sewing chair and run to the iron just to iron the adhesive on. This might make me sound so lazy, but one of my biggest pet peeve is needing to get out of my sewing chair, run to the iron, turn it on, wait for it to heat, and iron. I just want to sit in the chair and work on project until it’s done! Anyone else with me here?
- You don’t need to cut out the applique one more time after you’ve ironed on the adhesive. Iron-on-adhesive comes in a large sheet, so either you can cut out the shape of your applique before you iron it on, or after you iron it on. Either way, you will need to trim the extra adhesive off, which creates an extra step. Who doesn’t love saving a step when you can achieve the same results!
- Related to reason 3…if you don’t cut out the iron-on-adhesive before you iron it to your applique, you will need to make sure the surrounding excess adhesive doesn’t touch your iron otherwise the adhesive will get stuck to your iron. Not fun! While you can easily fix this just by ironing over parchment paper, sometimes you may be in a hurry, or forget. This generally doesn’t create a problem for the project you are working on, but if you forget to clean the adhesive off your iron, the next time you heat the iron to use it, all the adhesive will get on your next project (and possibly ruin it). *gasp*
With that said, iron-on-adhesive isn’t all bad. There are many good uses for it. Generally if I am going to applique a fabric that looks the same before and after it goes through the iron, I don’t mind using iron-on-adhesive/fusible. Also, if I’m going to be sewing small letters, I find that the iron-on-adhesive helps hold it in place better than glue or pins.
Whew! That was a lot of information wasn’t it? Now that we understand fabric letter appliques and the different techniques, I will show you my favorite one (fabric glue + stabilizer).
MATERIALS:
Fabric of choice for Applique (I used anti-pill fleece from Joann’s)
Fabric Glue
Embroidery Stabilizer (or two pieces of white tissue paper)
Free Letter Applique Pattern (available in my free resource library)*
TOOLS:
Sewing machine
Fine Pins
Thread
Fabric Scissors
Optional – Cheap fabric scissors to cut paper and fabric simultaneously
NOTES:
*I’ve included the entire English Alphabet of letters for the font used in this tutorial, both in upper and lower case. Feel free to adjust the sizing when necessary. However, you can also make your own set of applique letters (if you want to use another font) with your word processor by simply printing the font and size you like.
INSTRUCTIONS:


Print out name that you want to applique and prepare fabric that you will be using. Cut out letters from paper.
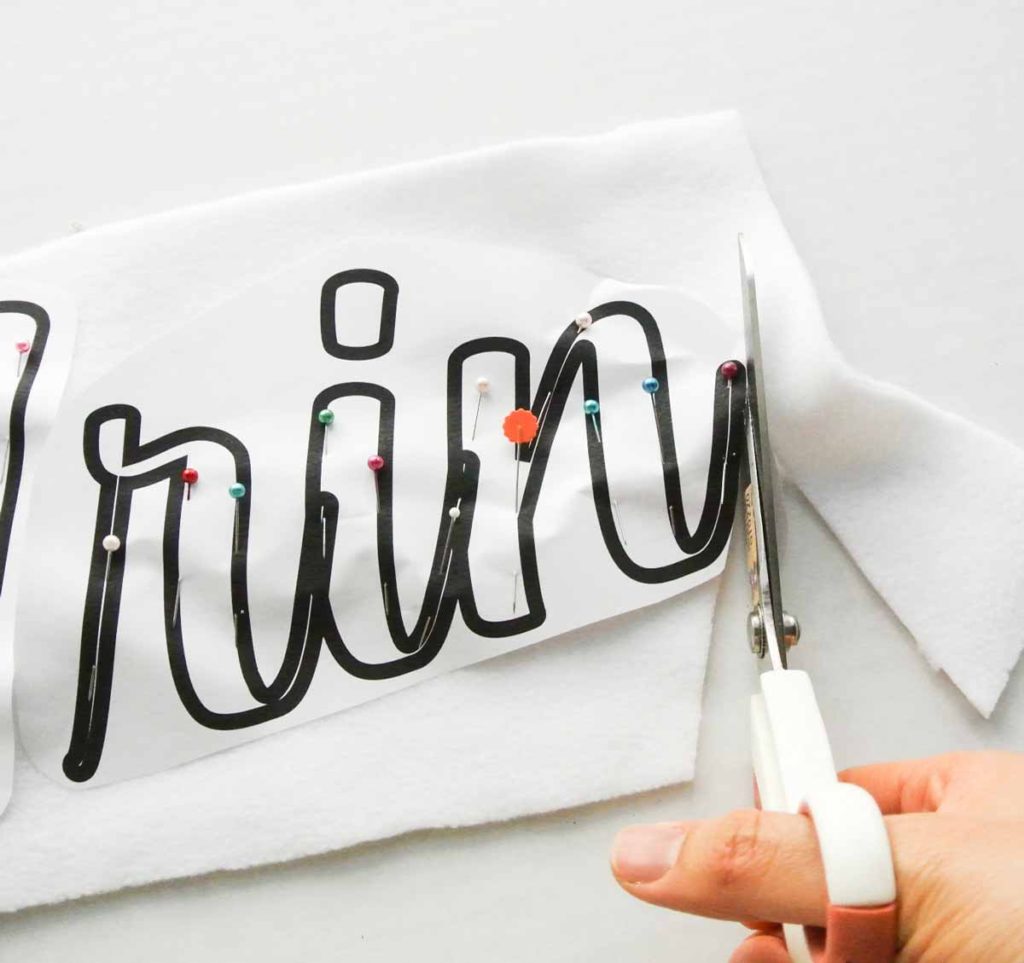
Pin printed letters onto fabric and cut them out.
Note: I used a pair of fabric scissors purchased from the dollar store to cut out the paper and fabric at the same time. However, if you have a nice pair of fabric scissors PLEASE do not do this, as they will RUIN your fabric scissors. Instead, cut out the letter outline first, pin on your fabric, and cut out the letters from the fabric.

View of fabric letters cut out and paper letters on bottom.

Determine where you want to place your applique on the sewing project
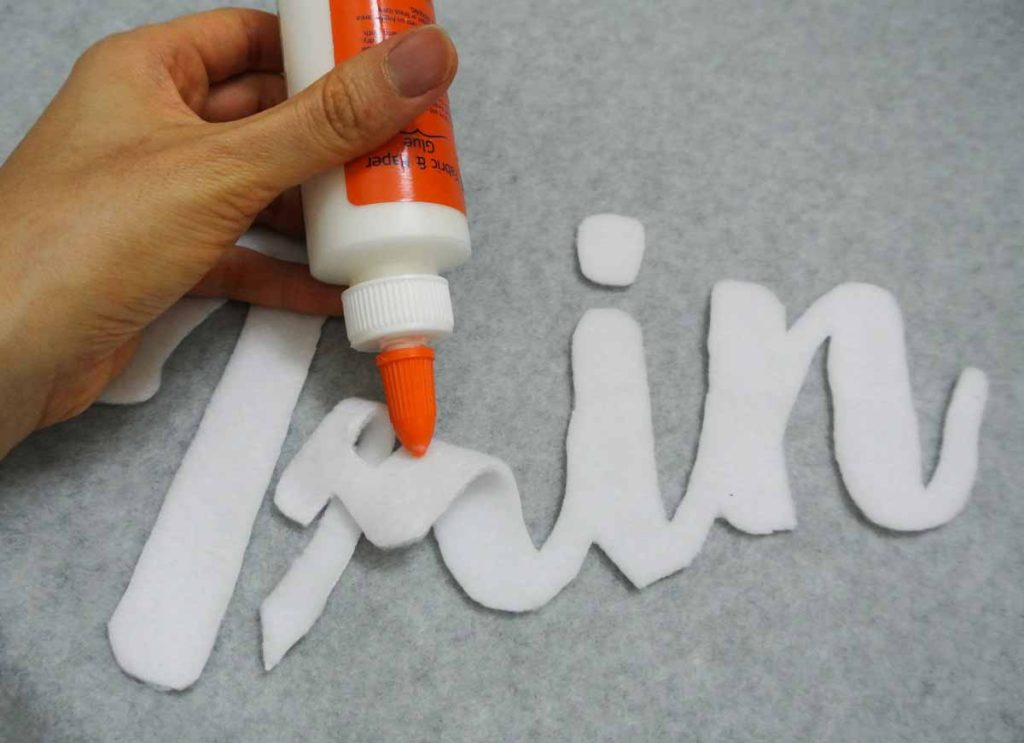
Glue down the letters with fabric glue.


LEFT: Cut a piece of stabilizer that is slightly larger than the entire letter applique (I used embroidery stabilizer)
RIGHT: Place stabilizer under the fabric (wrong side of fabric) where the letter applique will be sewn to.

Pin the letter applique down to fabric and stabilizer (make sure to catch the stabilizer on the other side). The pins help hold the stabilizer in place for when you sew.

Zig-zag stitch applique in place. For these letters, I used stitch width: 4 and stitch length: 1.
Notes: Since I was sewing this letter applique on a large piece of fabric, there were times I had to stop midway through a letter, flip the fabric to a more favorable position, and then start sewing from another part of the same letter, eventually making them connect. This won’t be a problem if you are sewing on a small piece of fabric because you can easily turn the fabric.

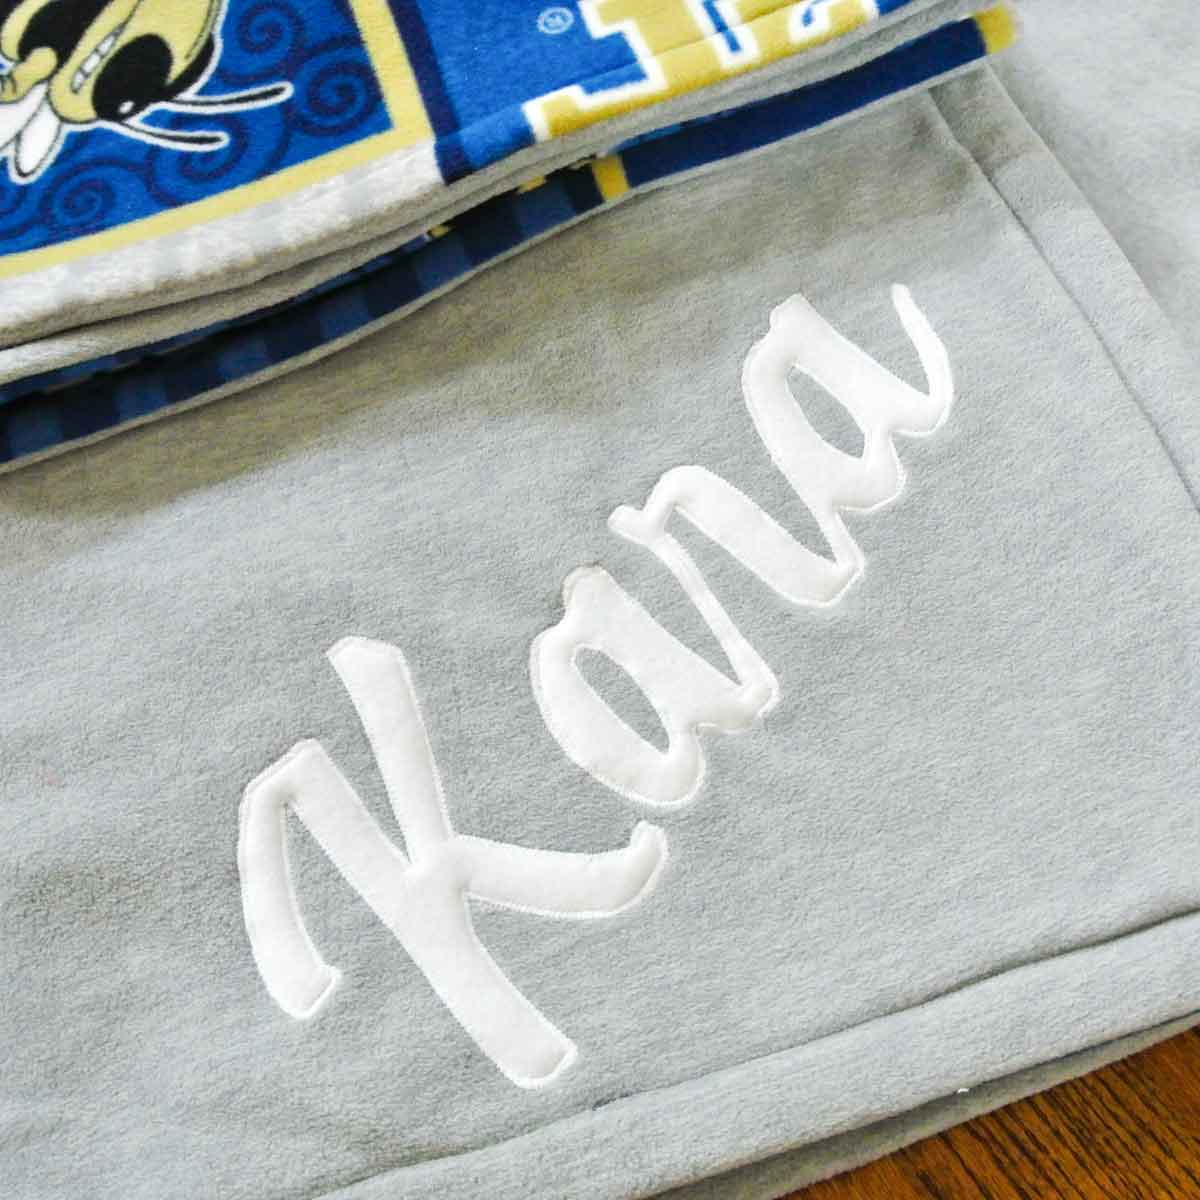
View of finished applique.

View of back of fabric. See how the entire applique is stitched onto the stabilizer.

If the back side of the applique will be exposed, you can remove the stabilizer by tearing it out. (I didn’t do it in the photo, but I would also remove the stabilizer in between the letter stencils).
Wasn’t that easy? Now you can personalize any sewing project and make someone feeling extra special! Happy sewing 🙂


This is the best tutorial ever! I’ve been looking for days on how to sew fleece letters onto fleece. Thank you!!
Hi Eileen,
I’m so glad to hear that, and you are very welcome! Happy Sewing!
This information is so so helpful!
Hi Kate,
I’m so glad you found it helpful!
Thank you for making this tutorial.
Christmas ideas for my grandchildren. Blankets with names on them. I can’t wait. I lost my late husband in 2021. I am actually excited about celebrating this year. I’m making a snowman Christmas tree, too.
Hi Rachel,
I am so sorry about the loss of your husband, but am glad that you are actually excited to celebrate this year. Blankets with your grandchildren’s names on them sounds like such a fantastic idea!
What fabric did you use for the letters.
Hi Cynthia,
I used no-pill Fleece for the letters on the fabric. Hope that helps!
Have you tried this method on smooth Minky?
Hi Julie,
I’ve never tried this method on smooth Minky, but I think it will work in the same way!
So I am assuming you are sewing the letters onto one layer of fleece before you tie the two layers of fleece together?
Hi Barbara,
That’s absolutely correct!
I just wanted to say that I know how it feels to never find my name on a key chain.
Haha! I’m glad you understand, fellow Mindy!!!
I saw a project I would like to attempt that makes a pillow out of a baby’s receiving blanket and you make letter appliqué’s out of the outfits to spell out her name, sew it on the pillow and voila! Beautiful keepsake. Except it’s $60 per pillow and I have 4 kids.
Would your tutorial work with cotton fabric for the letters? And why will it ruin your scissors to cut the fabric letters and paper simulataneously?
Hi Elizabeth,
Absolutely! The tutorial works will cotton fabric for letters as well. Although, I would probably recommend using double sided fusible interfacing to bond to the cotton fabric first as it would add stiffness to the cotton (I’m assuming it’s thin cotton) and that makes it easier to sew. I believe using fabric shears to cut on paper (or any other material not fabric) will dull your shears substantially faster because the shears are made specifically for fabric. Hope that helps!
I am unable to locate the alphabet you spoke of in the tutorial.
Hi Kelly,
The alphabet templates are in our free resource library. Once you subscribe you will get the password. Hope that helps!
Thanks for the great tutorial! If I want to stuff some backing behind my larger letters on my fleece blanket, do you think pinning the letters down would be substantial enough? Or do you think the glue is really necessary? Thanks for your help!
Hi Lindsay,
Yes I think pinning would work if you want to stuff some backing in behind the larger letters.