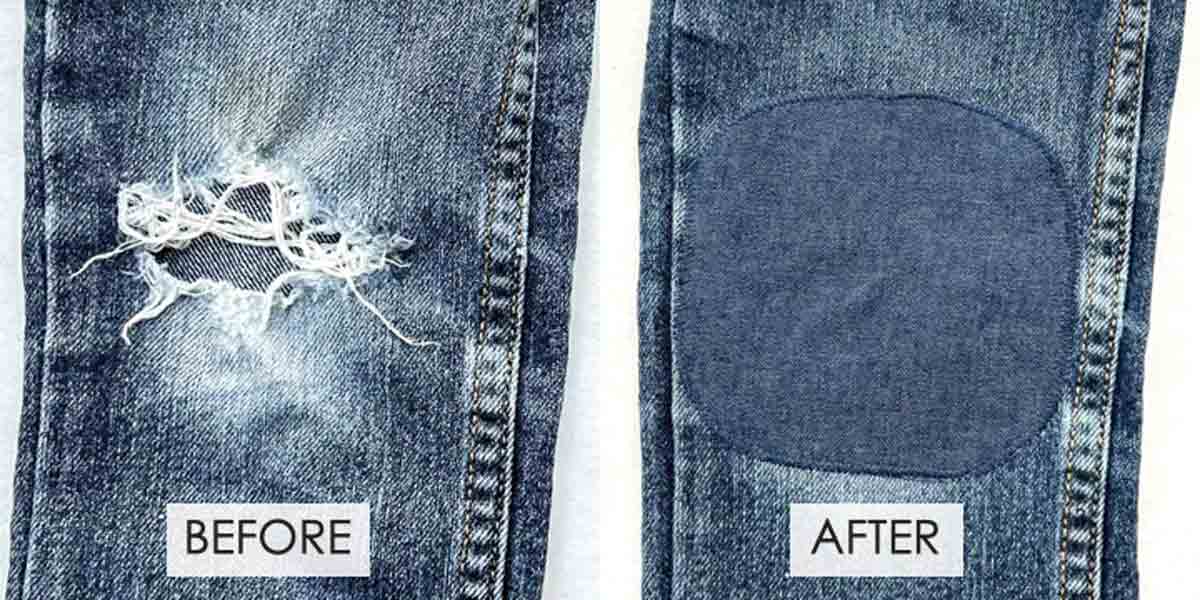
How to Repair a Hole in Jeans (3 Ways)
Have a pair (or many pairs) of ripped jeans and not sure how to fix them? These 3 easy DIY methods will save you a trip (and money!) to the tailor and give your jeans new life.
This post may contain affiliate links. Please read my disclosure policy for details. As an Amazon Associate, I earn from qualifying purchases.

How to Fixed Ripped Jeans
Do you have a little person in your home who um…loves to slide around in their jeans? Or if they see a tiny hole in their jeans/pants will incessantly pick at it until “Oops! I can fit my hand in it now!”
Honestly, who really knows what these little people do all day such that jeans and pants of all sorts withstand no chance of surviving intact.
If you ever figure it out please tell me.
But thankfully, mending a hole in jeans is a very simple task. Furthermore, you can easily purchase jean patches online that makes things even easier! Definitely my type of mending project.
How to Mend a Hole in Jeans
Today, I will be showing 3 easy methods of how to mend a hole in jeans. Which method you choose depends on your needs (and your jean destroyer!).
METHOD 1 is suitable for moderate jean destroyers. This means that your jean destroyer wears holes in their jeans, but usually takes a few months. See method 3 if your jeans destroyer wears a hole in their jeans in a few weeks.
This method creates a subtle look so that the repair doesn’t look so obvious. You can either complete the repair by hand or with a sewing machine.
METHOD 2 is suitable for light or unintentional jean destroyers. Your jean destroyer may have accidentally ran into something that caused a tear. Usually, holes are created over years of use.
This method is done via hand sewing and creates a distressed look in the jeans for style.
METHOD 3 is best suited for severe-heavy jean destroyers. This means that without exception, holes appear after only a few weeks of wear!
This method creates an obvious patch-over look and can be done with a machine or by hand. Use a matching colored patch for a less noticeable look or create style by using a contrasting colored patch!
How to Patch a Hole in Jeans with Iron On Patch
To make this an extra easy sewing project, I’m going to be using iron-on jean patches. I found these Iron on Patch Roll on Amazon and they come pre-cut with double sided fusible interfacing.
Additionally, I LOVE that they come in a variety of denim shades! That way, you can easily choose the color that matches your jeans.

I highly recommend using these if you don’t have denim fabric (or old denim that can be cut up) just lying around. You can get an assortment of colors without going to the fabric store to purchase denim.
How to Patch a Hole in Jeans with Fabric
However, if you already have denim fabric (or old denim apparel that you don’t mind cutting up) at home, feel free to use that! I love reusing old clothes for new projects.
Just make sure you also have double sided iron-on adhesive as that is how you will be fusing the fabric to the jeans.
All the steps of the 3 methods below still applies even if using fabric. However, just a few modifications:
- Cut out desired size and shape of fabric you will use as the patch.
- Trace fabric patch onto double sided iron-on adhesive and cut out adhesive.
- Fuse one side of double sided adhesive to patch (see Note).
- Use in the same way as store bought fabric patch.
NOTES:
If applying patch from the inside of the jeans (Method 1, 2, and 3), fuse the double sided adhesive to the right side of the fabric. This way, the right side of the fabric will show through the tear once you fuse it on.
Alternatively, you can also apply fusible adhesive only around the outer border of the jeans hole. That way, the fabric showing through the tear will not have any adhesive on it.
If applying the patch from the outside of the jean holes (method 3), fuse double sided adhesive to wrong side of fabric.
Repair hole in Jeans: What Do I Need?
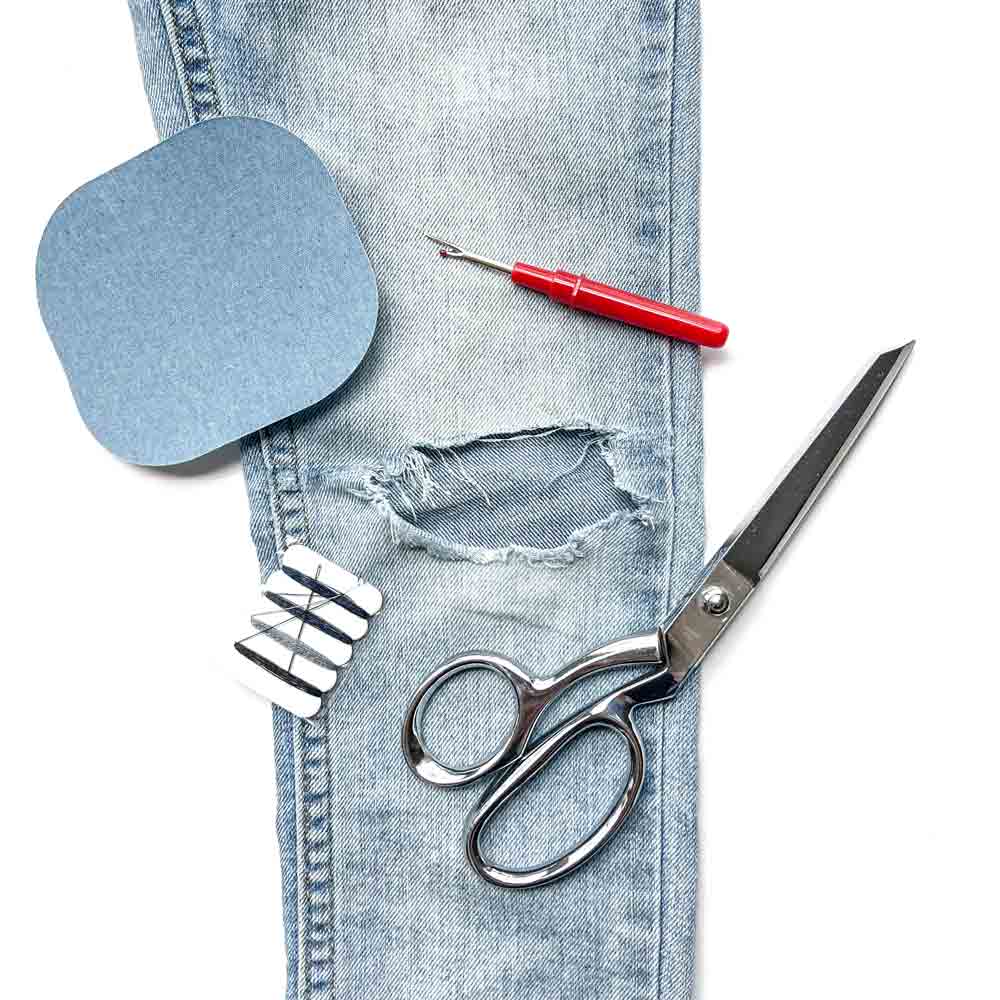
Materials
- PREMADE DENIM PATCH
- DENIM FABRIC (or OLD DENIM APPAREL you are willing to cut up) – if not using denim patch
- DOUBLE SIDED IRON-ON ADHESIVE – if not using denim patch
Tools
- SEWING MACHINE
- FABRIC SCISSORS or EMBROIDERY SCISSORS
- SEAM RIPPER
- HAND SEWING NEEDLES
- SEWING PINS
- IRON – I love my Rowenta Iron with a retractable cord for easy storage
- IRONING CLOTH or TEFLON PAPER
How to Patch Jeans
Method 1
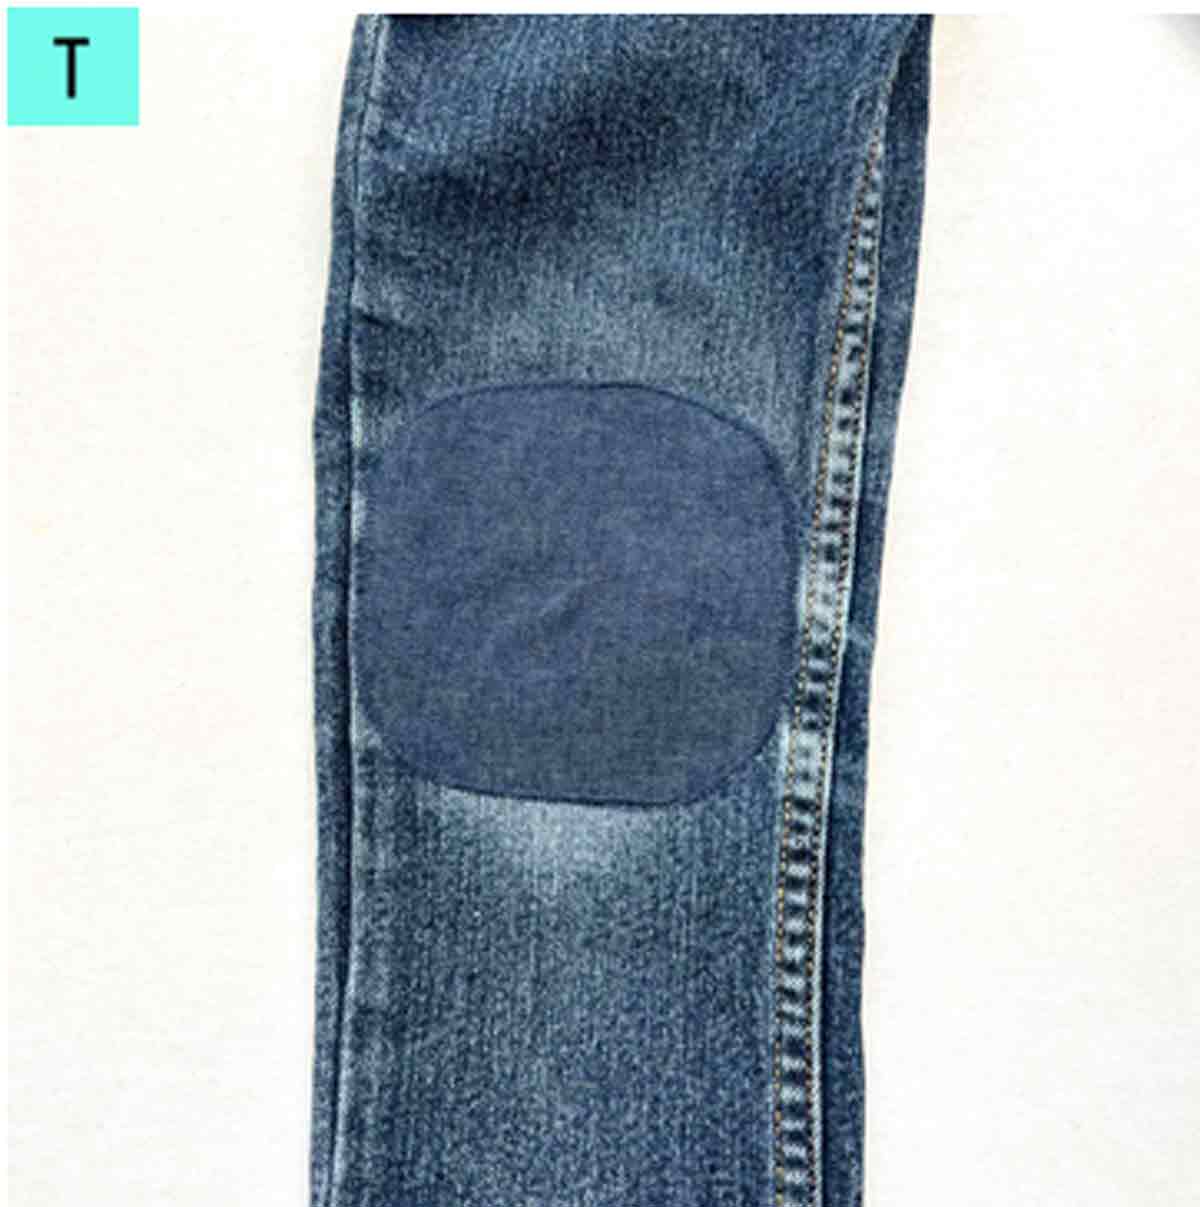
In this method of fixing a jeans hole, a denim patch is fused to the wrong side of the jeans. Then, you stitch over the hole and patch in horizontal, vertical, and diagonal directions for reinforcement.

As you can see from the photo, the result is quite subtle. The repaired hole looks like it’s part of the normal fade of the jeans! This method is my favorite way to fix a hole in jeans because the result is so inconspicuous.

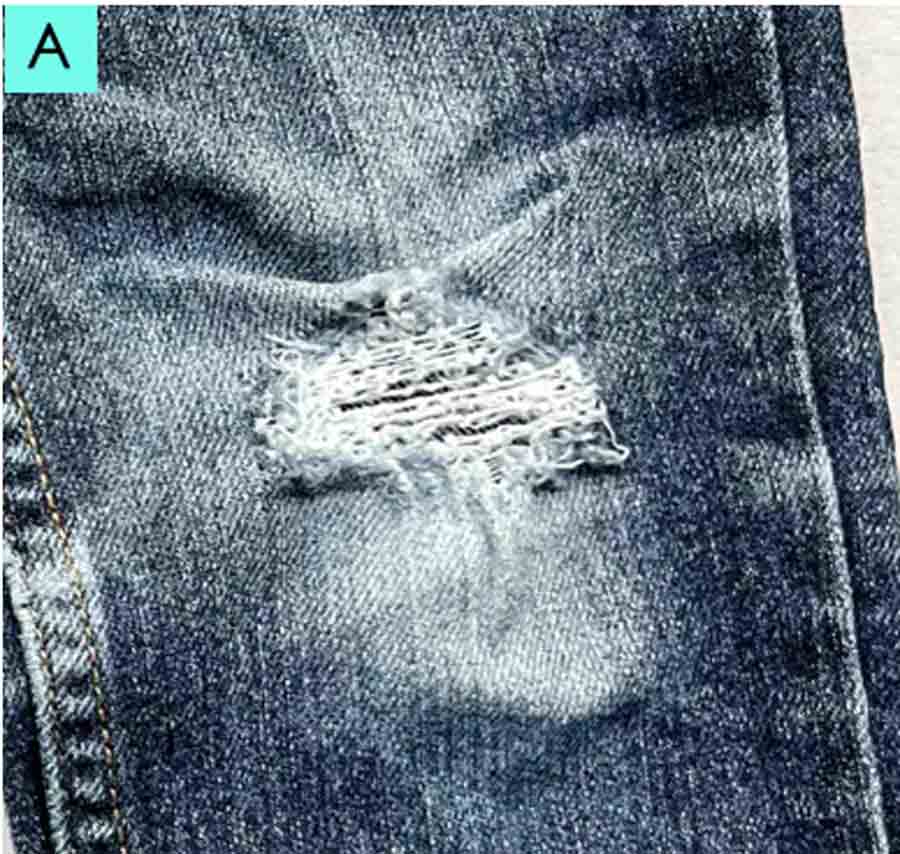
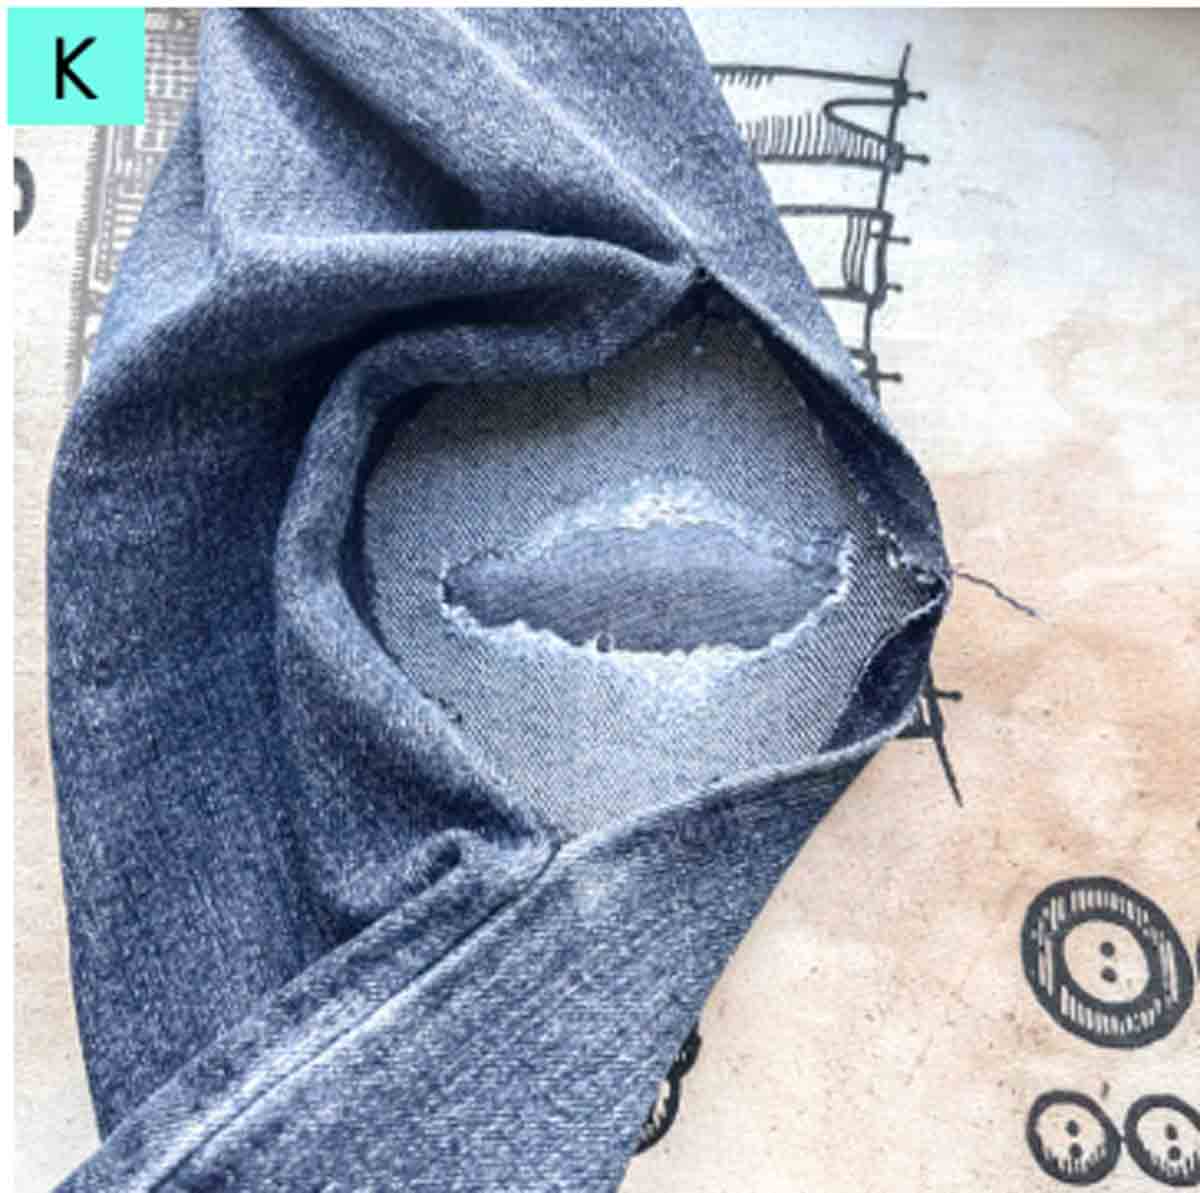
(A): Here is the jeans hole that needs to be fixed.

(B): First, choose a patch color that most closely match the hole you want to fix. For this hole I chose a light colored patch as the area around the hole has been worn down so it’s much lighter in color.

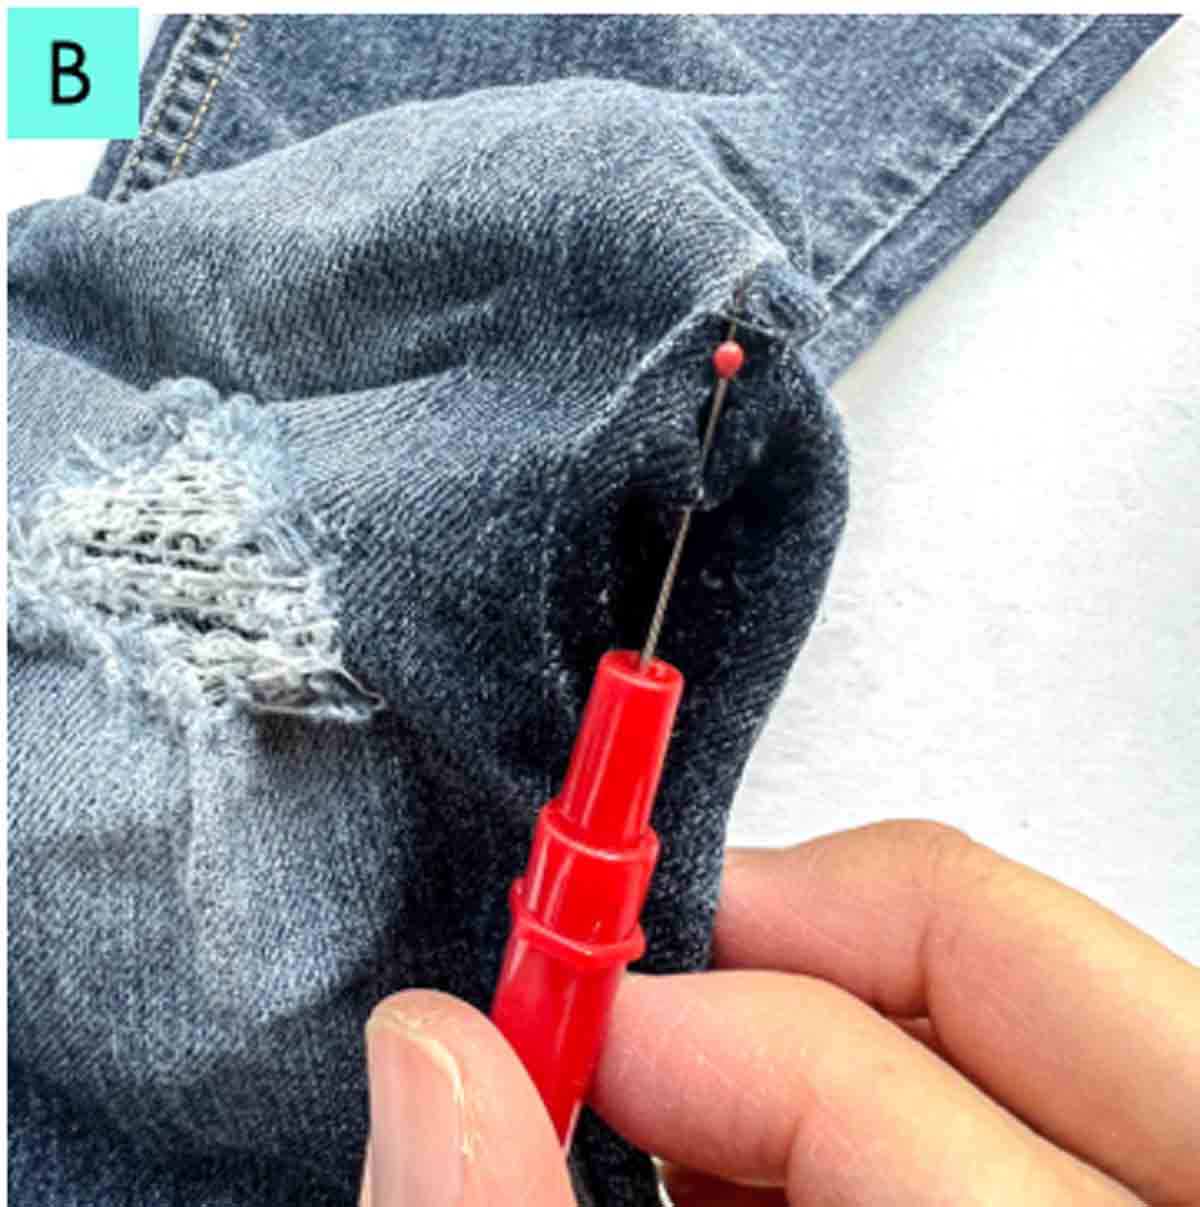
(C): Next, open the jean leg at the side seam (see Note 1).
Note 1: I find it easier to open the jeans on the side without the top stitching. You don’t need to open the entire leg, just enough for you to to be able to access the hole for sewing. Since this is a pair of children’s jeans, I needed to open more of the side seam to get good access. You may not need to open as much depending on how wide the jeans are.

(D): Here is the view of hole from the wrong side of jeans.

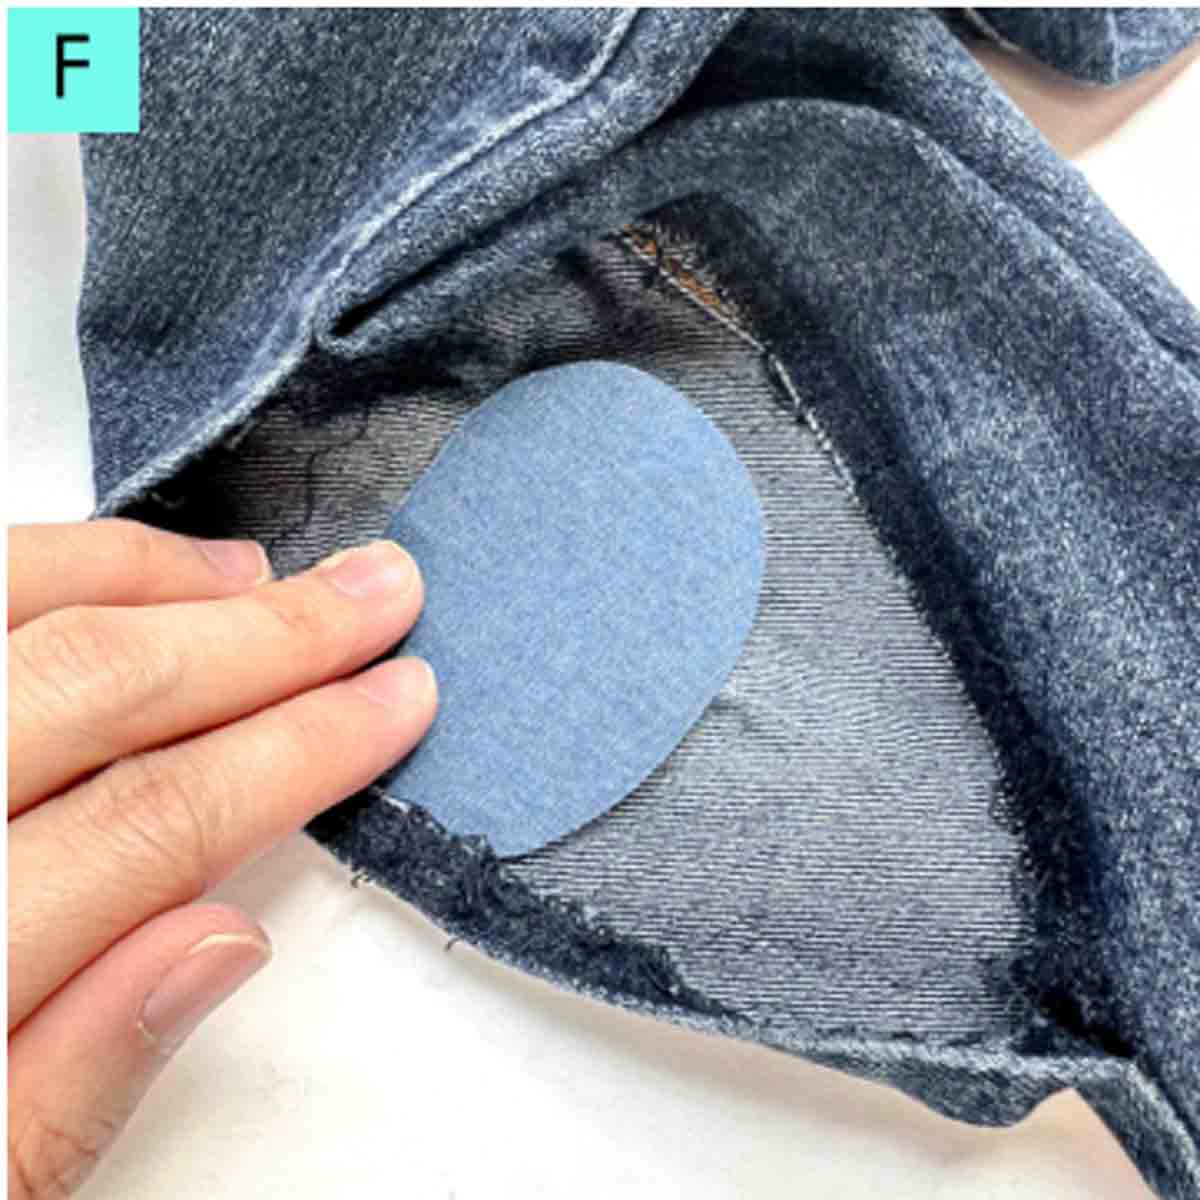
(E): Now remove the white plastic backing over the jeans patch and place it shiny side down against wrong side of jeans.

(F): Then take a look from the right side of the jean to make sure you like the selected shade of the jeans patch.

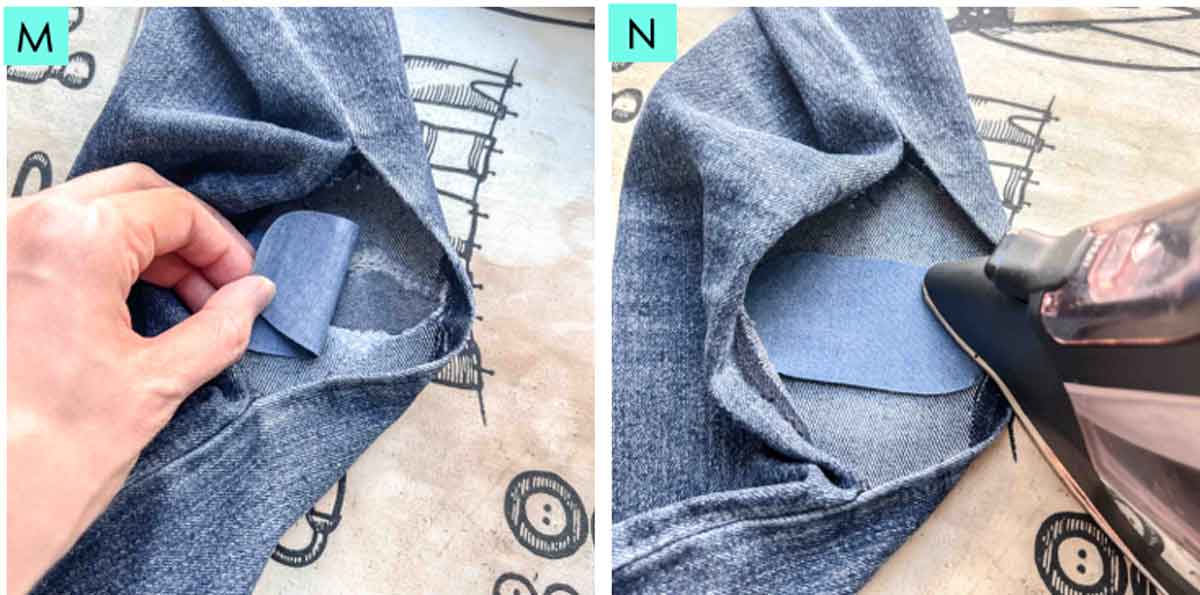
(G): Now on the inside of the jeans, place the patch (shiny side down) over the hole so that it extends at least 1/2” (1.27cm) beyond the entire hole, red dotted line in (H).
NOTE: In my case, I used the entire patch because I didn’t think there would be enough leftover patch for another mending project. However, depending on the size of your hole, you can also cut the patch to the desired size.

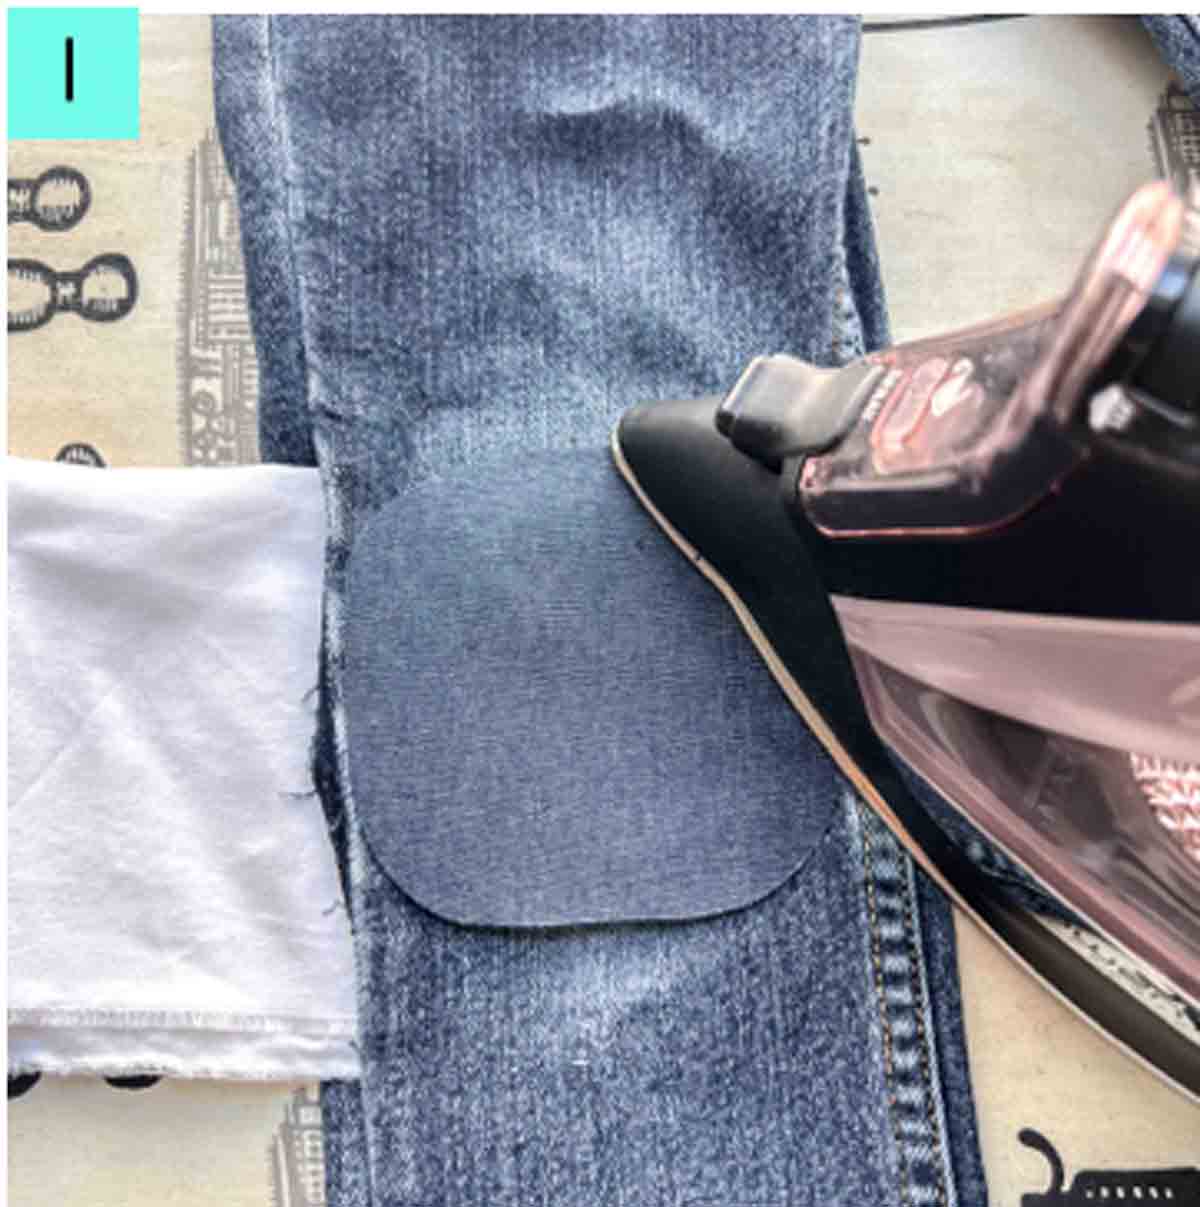
(I), (J): Next, iron the patch in place. Make sure you put a piece of teflon paper or ironing cloth on the bottom to prevent the fusible glue to get on your ironing board.

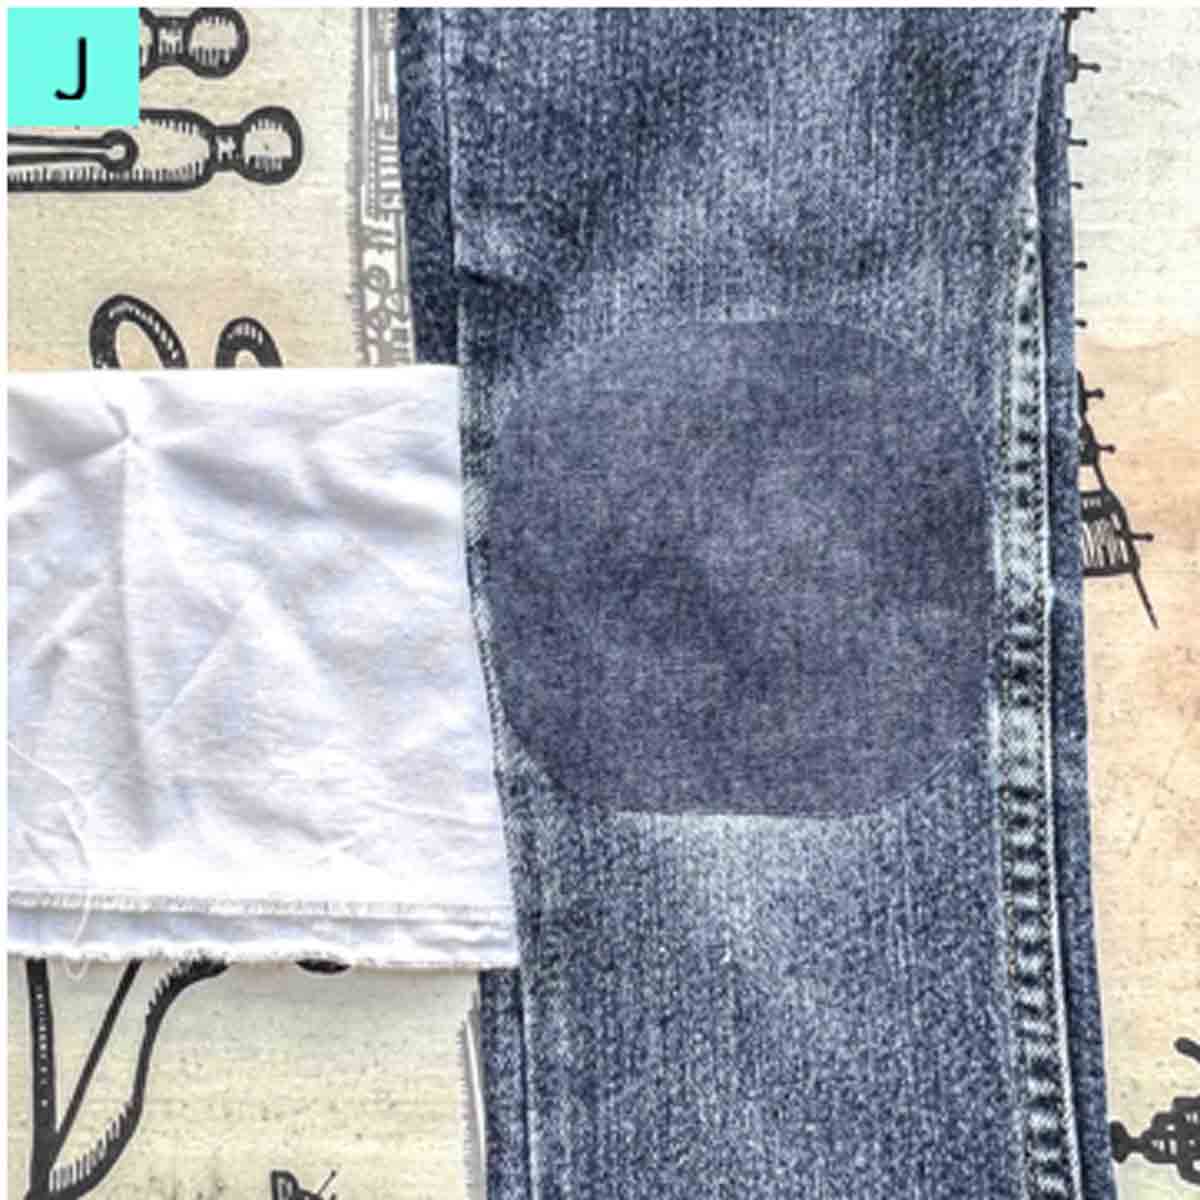
(K): View of hole after patch has been ironed on from the back.

(L), (M): Now iron the patch from the right side of the jeans. Again, make sure you use teflon paper so the fusible glue doesn’t get on your iron.

(N): Next, choose a thread color that matches your hole.
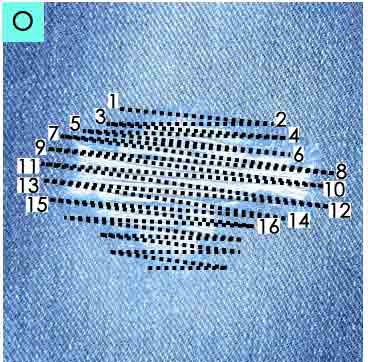
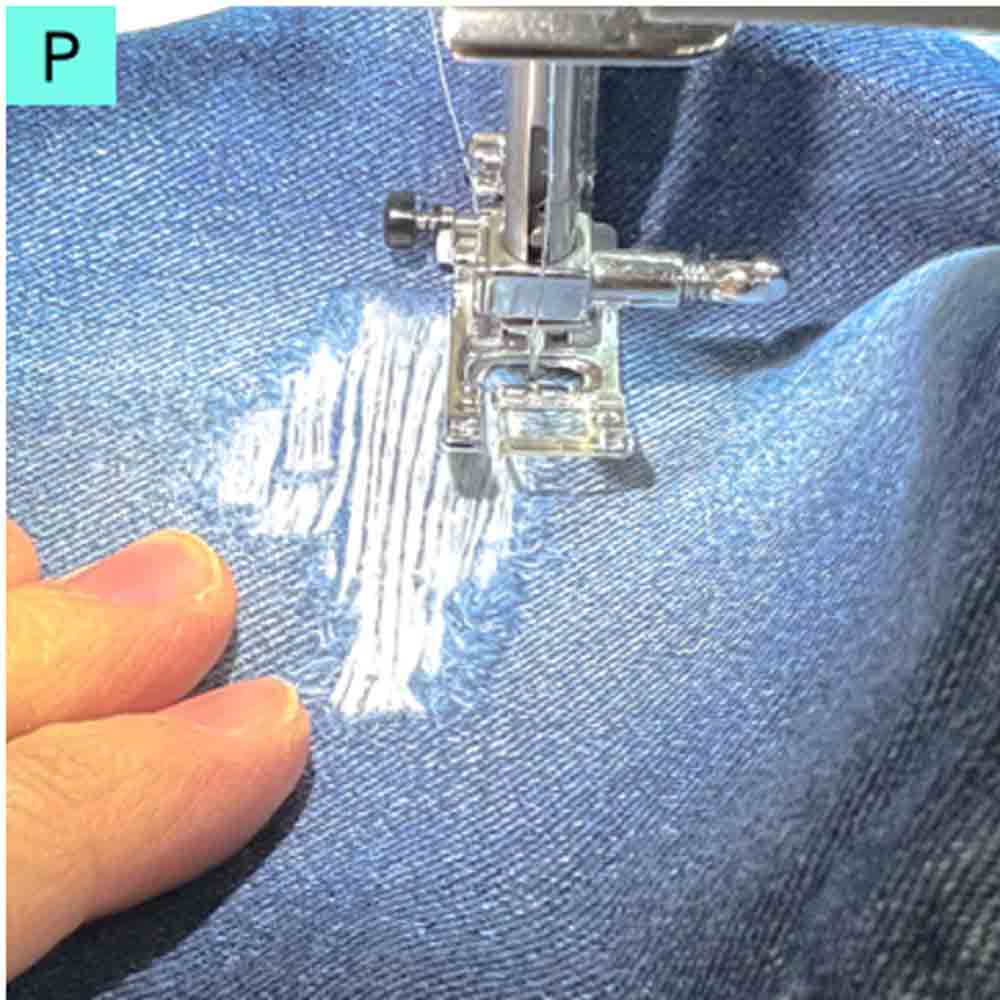
(O), (P ): Then, we are going to make straight stitches forward and back across the entire hole, as shown in the photo (O). Make sure your stitches extend 1/4 – 1/2 inch beyond the hole on both sides.
NOTE: You don’t want the forward and back stitch lines to be too far apart as the stitches help reinforce the hole. However, the exact placement of the stitch lines is up to you.

(Q), (R): Front and back view of the hole with horizontal stitch lines.

(S), (T): Next, make diagonal back and forth stitches across the hole. Again, make sure your stitch line extends about 1/4 – 1/2 inch beyond the hole.

(U), (V): Photo shows right and wrong side of the hole with diagonal stitch lines.

(W), (X): Finally, make up and down vertical stitches across the hole. Again, make sure your stitch line extends about 1/4 – 1/2 inch beyond the hole.

(Y), (Z): Front and back view of the hole.

Sew up the seam allowance of the jeans and you are finished! See how nice that looks? The repair blends nicely into the fade of the jeans and is not very noticeable at all!
NOTE: Alternatively, you can also use a darning foot to make the stitches in different directions if you have one. However, I wanted to show you how to sew a hole in jeans using your regular sewing foot.
Method 2
In this method, you fuse a piece of patch on the wrong side of the jean. Then, you make hand stitches over the right side of the jeans to create a “distressed” look. The patch on the wrong side of the jeans helps reinforce the hole. However, the stitching on the right side of the jeans is more for looks rather than function.

I recommend this method if you want to create distressed jeans for fashion purposes. However, I don’t recommend this method when trying to patch a hole for an active child who’s jeans receive lots of wear and tear. Instead, use method 1 or 3 for durability and longevity.
(A): Photo shows the ripped hole that needs to be fixed.
(B): First, take out the side seam of the jeans on the side that doesn’t have the top stitching.

(C): View of hole from wrong side of jeans

(D), (E): Next, use a piece of see through paper to determine (and draw) how big of a patch you need (if your hole is small). Otherwise, use the entire patch.
(F): Cut out the patch according to what you drew.

(G), (H): Now place the patch shiny side down against wrong side of hole and iron it in place.

(I): View of hole from the right side after patch has been ironed on.

(J), (K), (L): Next, from the right side of jeans, trim off any loose fabric threads.

(M), (N): Then, we are going to sew across the entire hole by hand in a ladder pattern (red dotted lines). Take your stitches 1/4 – 1/2 inch beyond the border of the hole.
NOTE: I’m using regular thread that is double threaded (2 strands). You can also use more thread strands or embroidery floss to create the look you want. Designer’s choice!

(O), (P): Photo shows view of hole after stitches are completed (right and wrong side).
NOTE: Again, you can decide how far or close apart you want to make your stitches.
Method 3
This method of repair places a patch on the front and back side of the hole for added durability. This method is good for large holes, as well as if your (little) jean wearer needs that extra extra reinforcement!
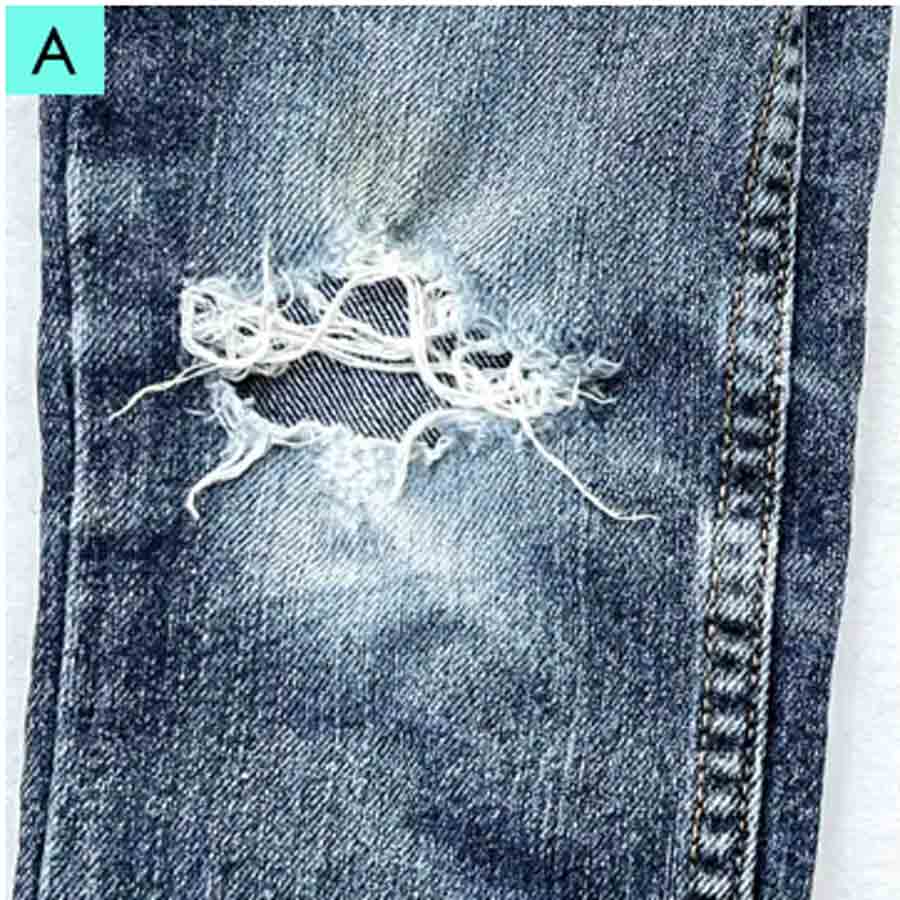
(A): Look at that hole! As mentioned before, this method of repair is good for larger holes.
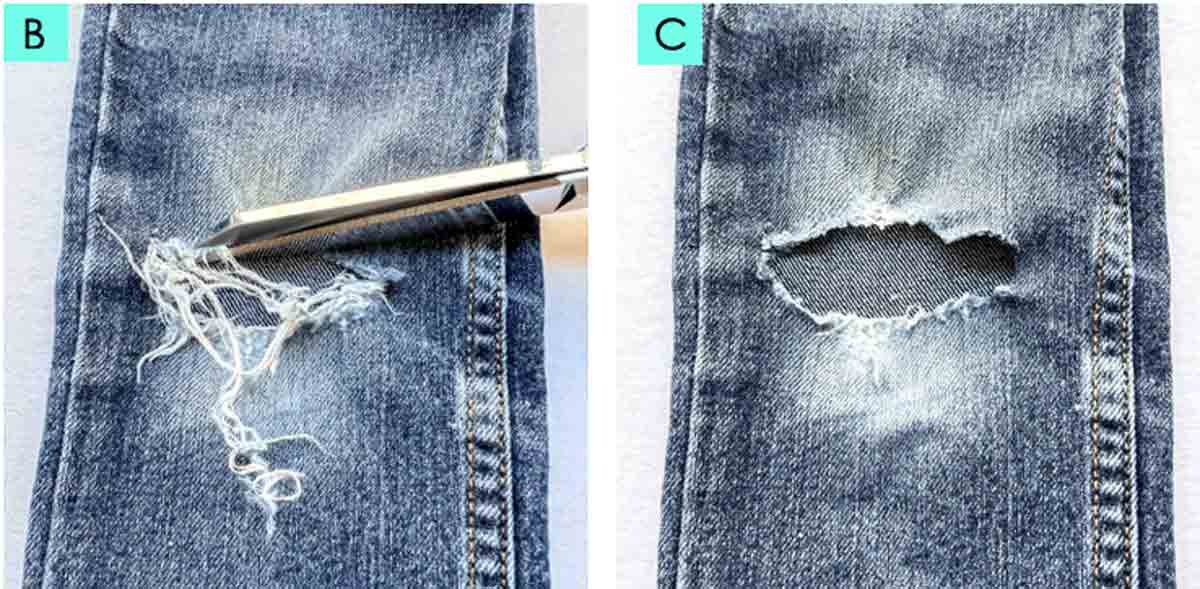
(B), (C ): First, trim off excess threads from around the hole so that it’s nice and clean.

(D): Next, take out the side seams (along the side without the top stitch), as much as necessary to gain good access.
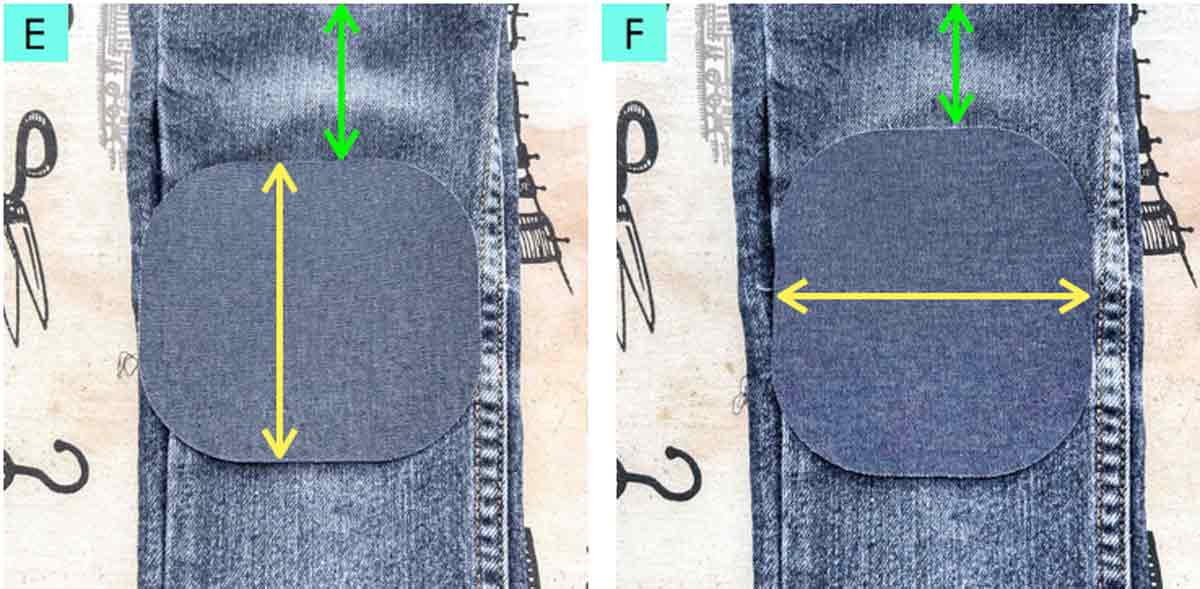
(E): Now choose a patch that matches the outside of the jeans. You can also feel free to choose a non-matching patch for style!
Note the direction the grain of the patch run when you put the patch in landscape (photo E, yellow arrow), versus in portrait (photo F, yellow arrow). You want the lengthwise grain of the patch to match the lengthwise grain of the jeans (green arrow) so they are going in the same direction.

(G):Next, trim the patch to size if necessary.

(H): Now remove white backing on patch and place it shiny side down over the hole. Don’t forget to put an ironing cloth right under the hole so the fusible doesn’t get on the other side of the jeans.
(I): Iron the patch in place.
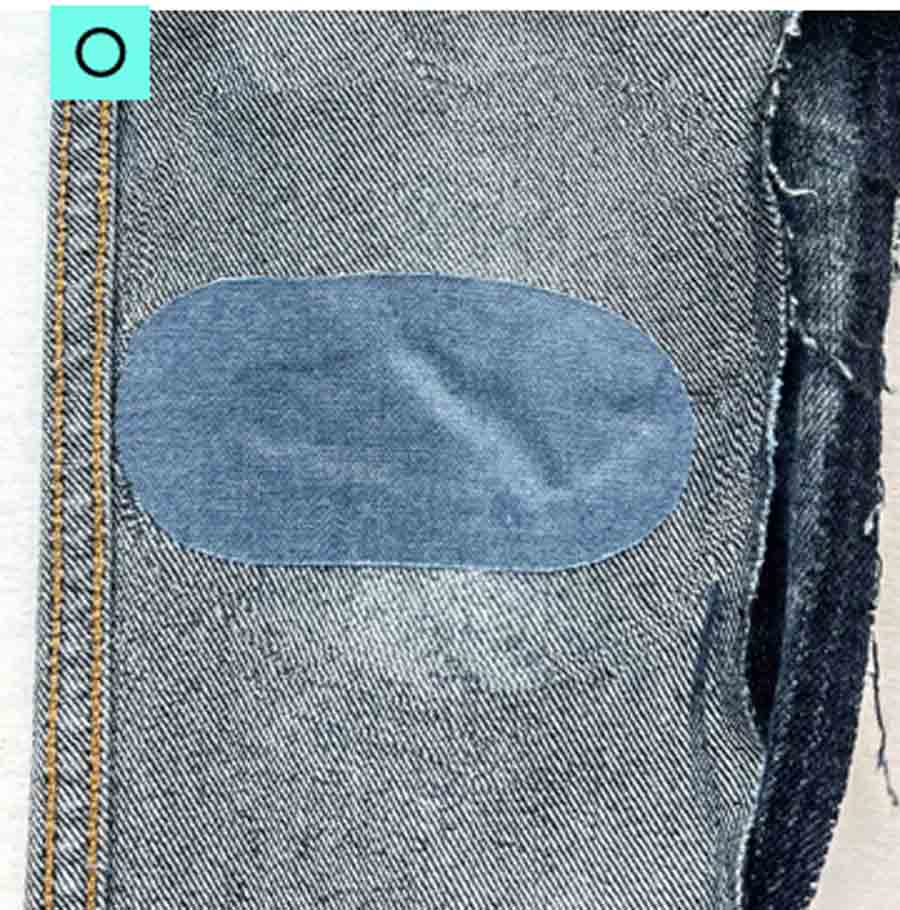
(J): View of patch ironed on from the front.
(K): View of hole from the wrong side of jeans.

(L): Next, cut a second patch that is large enough to cover the hole (at least 1/4 – 1/2 inch beyond the border) from the inside of the jeans. Since this patch will be on the inside, the patch doesn’t necessarily have to match the jeans.
(M), (N): Again, place the patch shiny side down over the hole and iron in place.
(O): View of patch ironed onto wrong side of jeans.
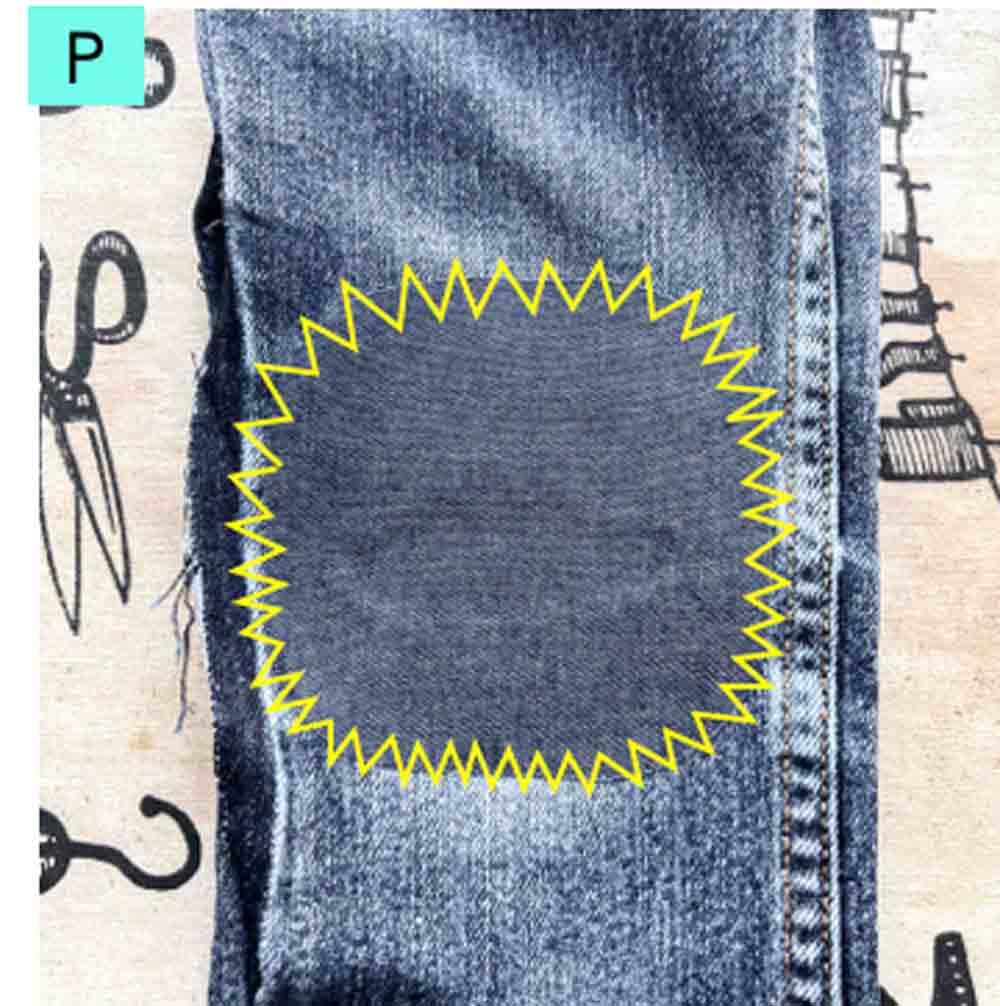
(P): Now we are going to stitch down the patch from the front side of the jeans using zig-zag stitches. It’s really up to you how wide and how tight together you want to make your stitches.
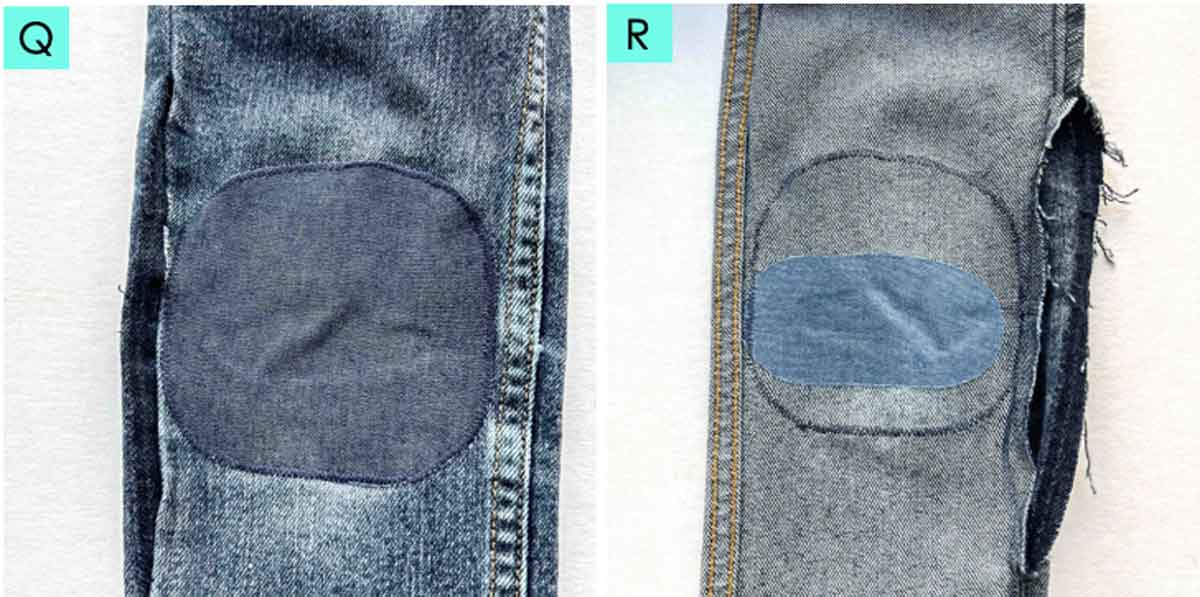
View of patch after tight zig-zag stitches are done around the border (photo Q, front of jeans), and back of jeans (photo R)
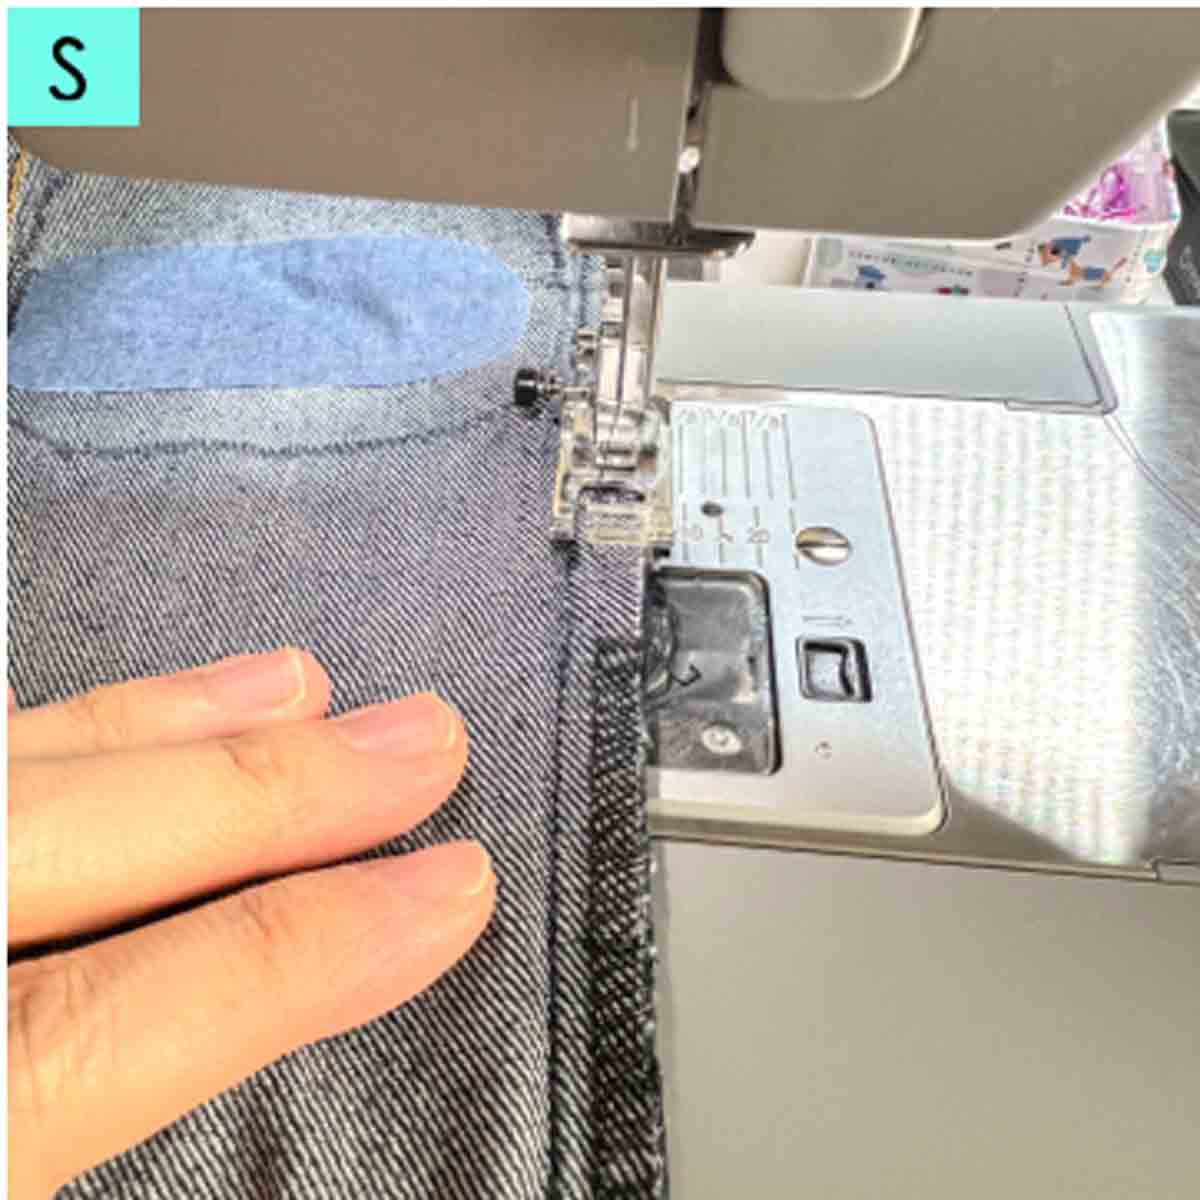
(S): Finally, stitch the side seam back together and serge the raw edges. If you don’t have a serger, make zig-zag stitches along the raw edges and make the stitches the same width as the original serged stitches.
(T): Finished!!
How to Sew a Hole in Jeans By Hand
Don’t have a sewing machine? Or don’t want to pull it out? All the methods shown above can be completed via hand sewing.
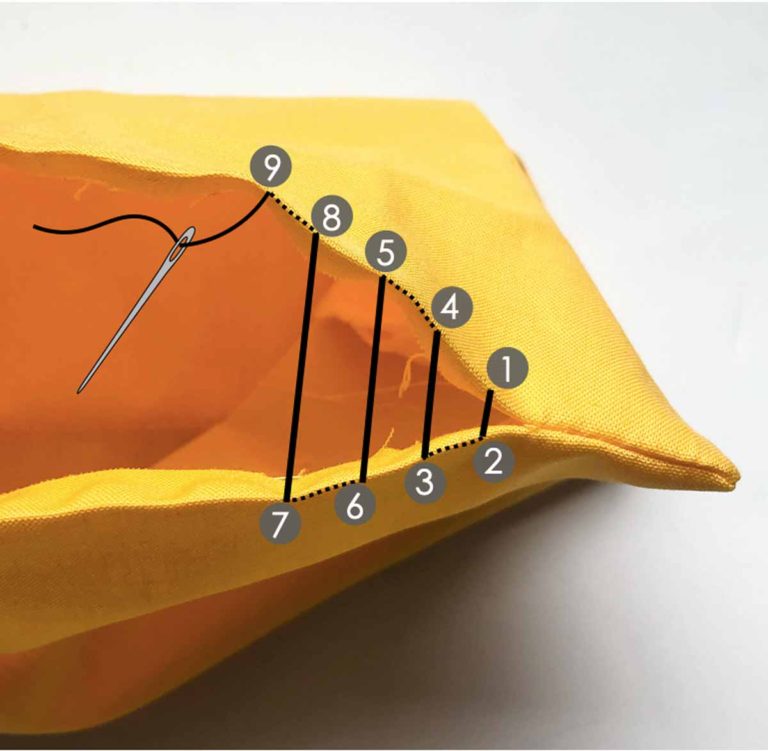
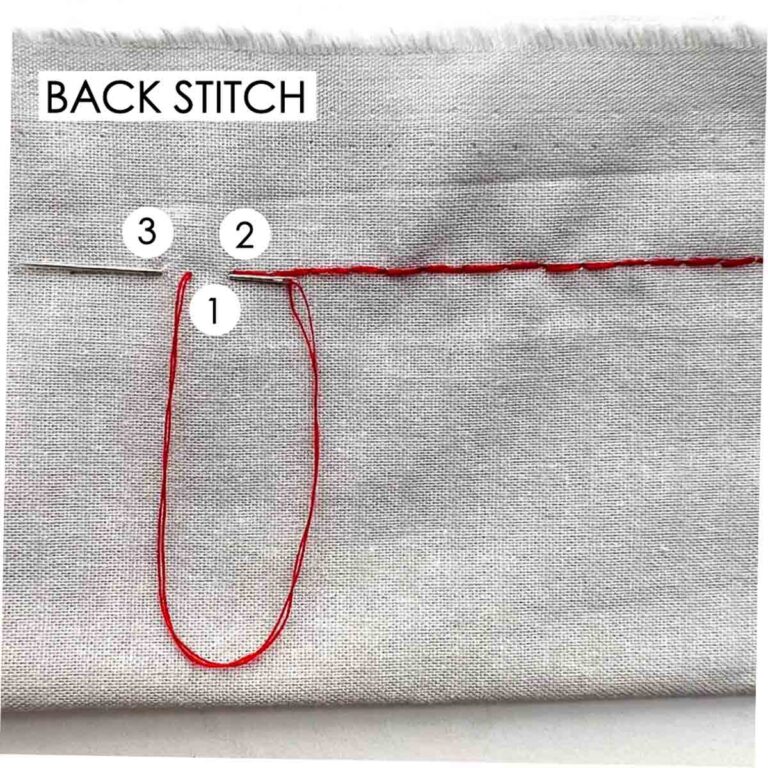
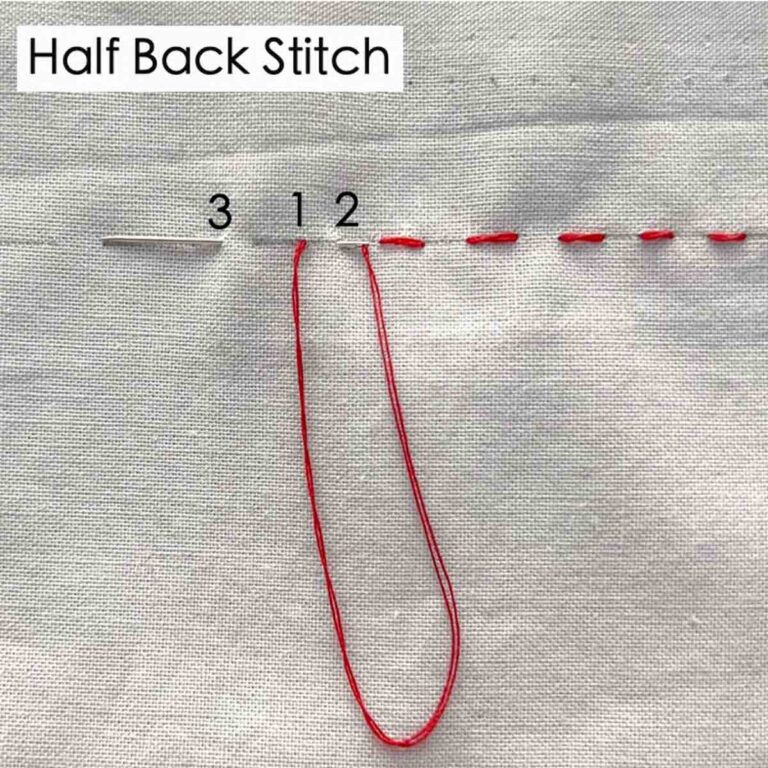
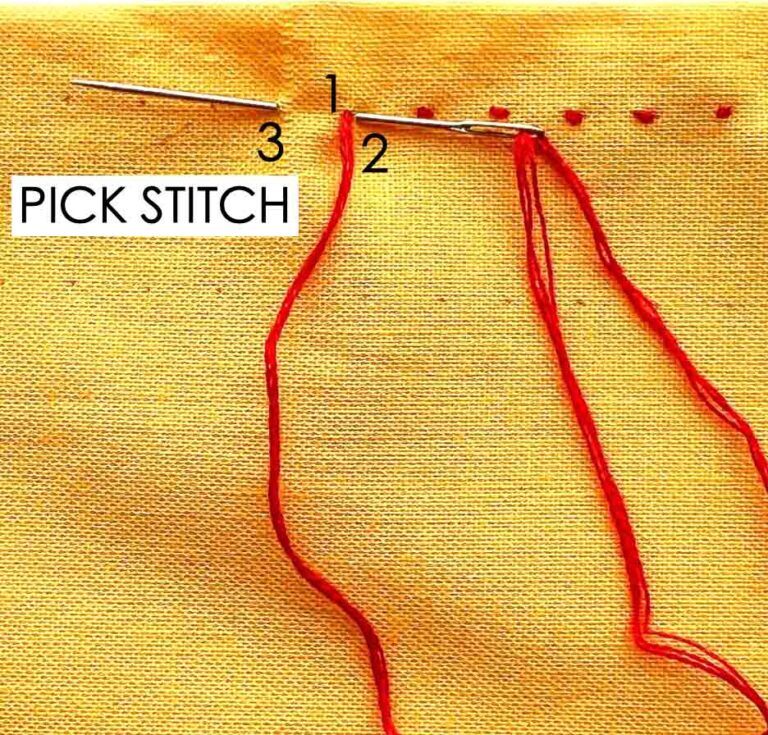
- For method 1, take straight running stitches across, diagonal, and vertically through the entire patch. You can also do pick stitch or back stitch to create a decorative look over the patch if desired.
- Method 2 stays the same.
- For method 3, make whip stitch or blanket stitches around the border of the patch.
How to Mend a Hole In Jeans

Give those torn jeans more life by learning how to repair holes in jeans! This simple tutorial will show you 3 easy ways how to fix ripped jeans!
Materials
- PREMADE DENIM PATCH
- MATCHING THREAD
- DENIM FABRIC (or OLD DENIM APPAREL you are wiling to cut up)
- DOUBLE SIDED IRON-ON ADHESIVE (if using denim fabric)
Tools
- SEWING MACHINE
- FABRIC SCISSORS
- SEAM RIPPER
- HAND SEWING NEEDLES
- SEWING PINS
- IRON
- IRONING CLOTH or TEFLON PAPER
Instructions
METHOD 1
- Choose a patch color that most closely match the hole you want to fix.
- Open the jean leg at the side seam (see Note 1).
- Now remove the white plastic backing over the jeans patch and place it shiny side down against wrong side of jeans.
- Take a look from the right side of the jean to make sure you like the selected shade of the jeans patch.
- On the inside of the jeans, place the patch (shiny side down) over the hole so that it extends at least 1/2”(1.27cm) beyond the entire hole.
- Iron the patch in place. Make sure you put a piece of teflon paper or ironing cloth on the bottom to prevent the fusible glue to get on your ironing board.
- Now iron the patch from the right side of the jeans. Again, make sure you use teflon paper so the fusible glue doesn’t get on your iron.
- Next, choose a thread color that matches your hole.
- Then, we are going to make straight stitches forward and back horizontally across the entire hole. Make sure your stitches extend 1/4 - 1/2 inch beyond the hole on both sides.
- Make diagonal back and forth stitches across the hole. Again, make sure your stitch line extends about 1/4 - 1/2 inch beyond the hole.
- Finally, make up and down stitches going vertically across the hole. Again, make sure your stitch line extends about 1/4 - 1/2 inch beyond the hole.
- You are done!
METHOD 2
- First, take out the side seam of the jeans on the side that doesn’t have the top stitching.
- Next, use a piece of see through paper to determine (and draw) how big of a patch you need (if your hole is small). Otherwise, use the entire patch.
- Cut out the patch according to what you drew.
- Place the patch shiny side down against wrong side of hole and iron it in place.
- Next, from the right side of jeans, trim off any loose fabric threads.
- Then, we are going to sew across the entire hole by hand in a ladder pattern. Take your stitches 1/4 - 1/2 inch past the border of the hole (see Note 2).
- Once you are happy with the look of your repair, you are done!
METHOD 3
- First, trim off excess threads from around the hole so that it’s nice and clean.
- Next, take out the side seams (along the side without the top stitch), as much as necessary to gain good access.
- Now choose a patch that matches the outside of the jeans. You can also feel free to choose a non-matching patch for style!
- Trim the patch to size if necessary.
- Remove white backing on patch and place it shiny side down over the hole. Don’t forget to put an ironing cloth right under the hole so the fusible doesn’t get on the other side of the jeans.
- Iron the patch in place.
- Next, cut a second patch that is large enough to cover the hole (at least 1/4 - 1/2 inch beyond the border) from the inside of the jeans. Since this patch will be on the inside, the patch doesn’t necessarily have to match the jeans.
- Again, place the patch shiny side down over the hole and iron in place.
- Stitch down the patch from the front side along the border using zig zag stitches. It’s really up to you how wide and how tight together you want to make your stitches.
- Finally, stitch the side seam back together and serge the raw edges. If you don’t have a serger, make zig zag stitches along the raw edges and make the stitches the same width as the original serged stitches.
- Finished!
Notes
Note 1: I find it easier to open it on the side without the top stitching. You don’t need to open the entire leg, just enough for you to to be able to access the hole for sewing. Since this is a pair of children’s jeans, I needed to open the side seam more to get good access. You may not need to open as much depending on how wide the jeans are.
NOTE 2: I'm used regular thread that is double threaded (2 strands), You can also use more thread strands or embroidery floss to create the look you want. Designer's choice!