“Thanksgiving Turkey” Craft for Kids (Free Printable)
This post may contain affiliate links. Please read my disclosure policy for details. As an Amazon Associate, I earn from qualifying purchases.
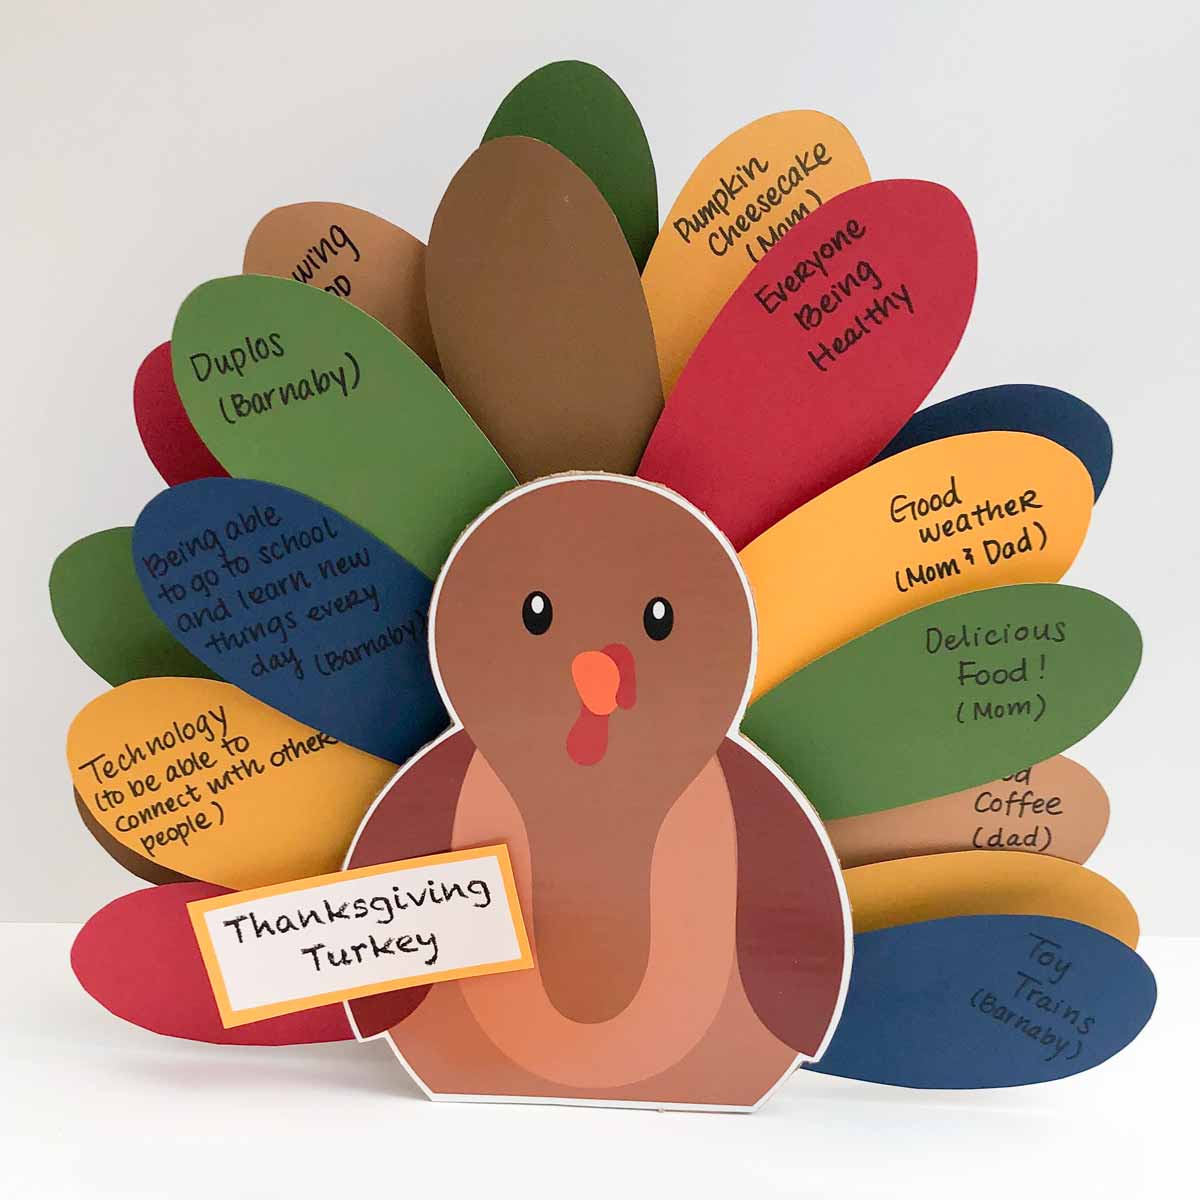
Celebrate the true meaning of Thanksgiving with this fun and cute “Thanksgiving Turkey” craft activity. Great activity for kids and adults to practice gratitude!
I LOVE Thanksgiving Holiday. Not only is it a time to gather with friends and family, but it’s also the time of the year to feast on greasy, delicious, fatty foods. And then eat the same leftovers the next few days. Total awesomeness.
However, there’s also been Thanksgivings where I didn’t get to gather with loved ones. Where I didn’t get to gorge on scrumptious fatty foods. And this has left me feeling discontent and unhappy.
As we quickly approach Thanksgiving again this year, I thought about what I wanted to teach my 3 year old about this holiday.
Thanksgiving is a time to give thanks, as was the original intent of the holiday. The truth is, even in those less than ideal Thanksgiving holidays, there’s ALWAYS plenty to be thankful of.
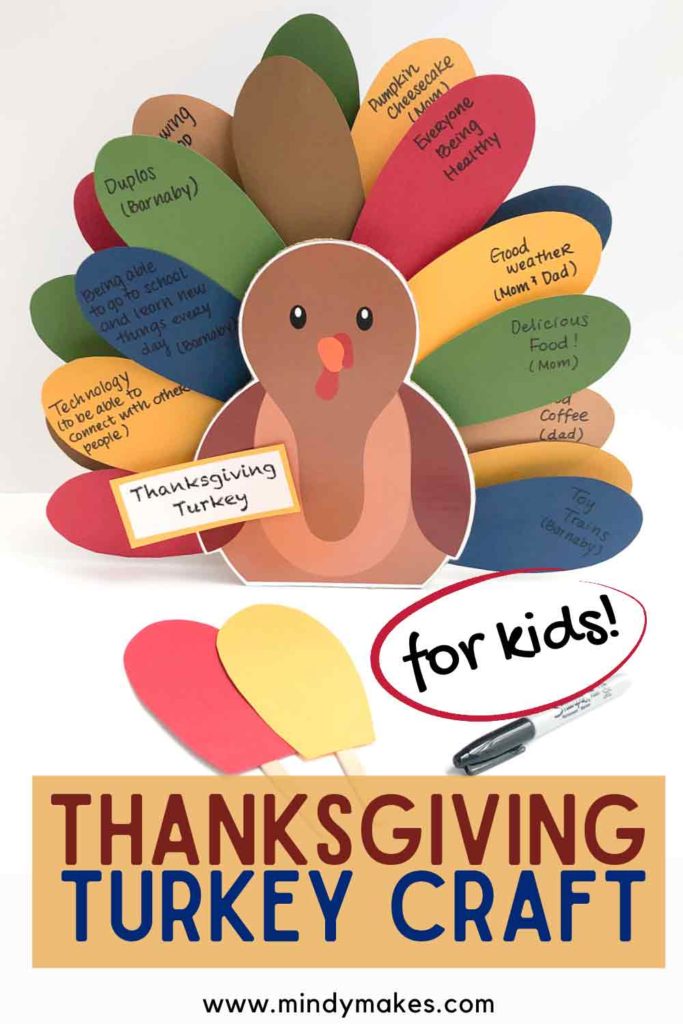
As I thought about these things, I decided to create a Thanksgiving craft for kids where our whole family could reflect on the things we are thankful for. What better craft to make than a “Thanksgiving Turkey”? Haha. Pun intended.
WHAT DO I NEED TO MAKE “THANKSGIVING TURKEY” CRAFT?
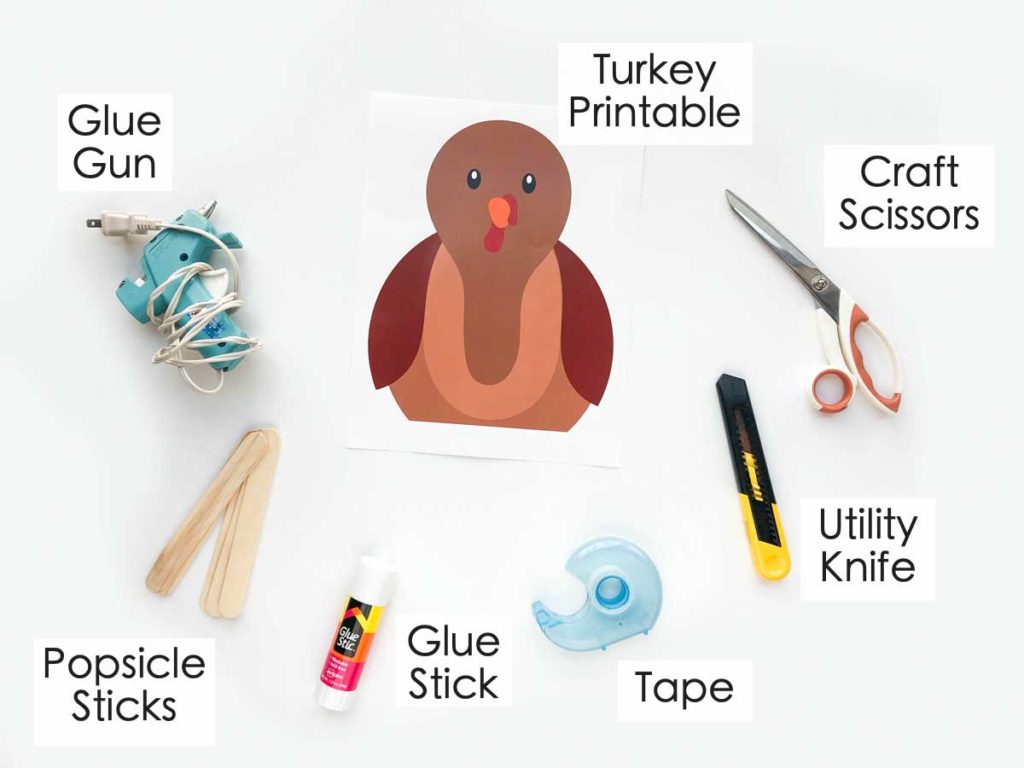
For this craft you will need:
- “Thanksgiving Turkey” Craft Free Printable (Available in my FREE RESOURCE LIBRARY)
- Craft Scissors
- Utility/Craft Knife
- Glue Stick
- Glue Gun
- Tape
- Popsicle Sticks
- Construction Paper or Card stock (not pictured), Note 1
- Cardboard from cardboard box, Note 2
MATERIAL NOTES:
- Construction Paper – I chose fall colors for this craft. However, feel free to use whatever color paper you wish! Make a Neon or Pastel color themed turkey for something different!
- Cardboard Box – I used a heavy duty diaper box. This makes the turkey more stable. However, in this case I had to use a utility knife to make all the cuts (scissors didn’t work). You can also use a cereal box. It will be less sturdy but you can cut it (or have your kids cut it) with scissors.
HOW TO MAKE “THANKSGIVING TURKEY” KID’S CRAFT
This craft is very simple to make and kids can definitely participate! The only part that requires adult supervision is cutting cardboard with a craft knife (if you use a thick cardboard).
- Print turkey printable, cut it out, and glue it onto cardboard
- Cut out cardboard – adult supervision required if using utility knife
- Make the back of the turkey “box” – (see step-by-step tutorial for how to do this)
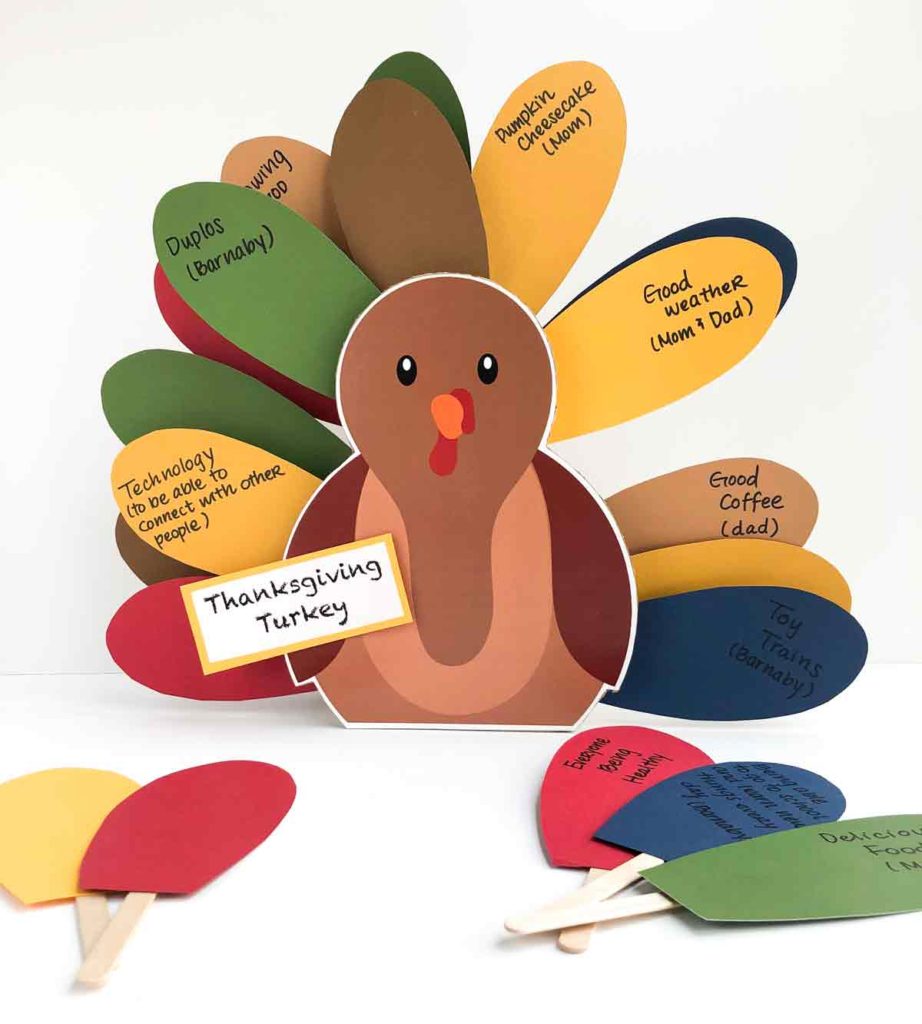
- Cut out turkey feathers with construction paper and stick feathers onto Popsicle sticks.
- Make slits on the back of the turkey “box” – adult supervision required.
- Start writing down all the things that you are thankful for on the feathers.
- Stick the colorful feathers into the back of the turkey to make it a FULL turkey.
STEP-BY-STEP: HOW TO MAKE “THANKSGIVING TURKEY” KID’S CRAFT
Gluing Printable to Cardboard
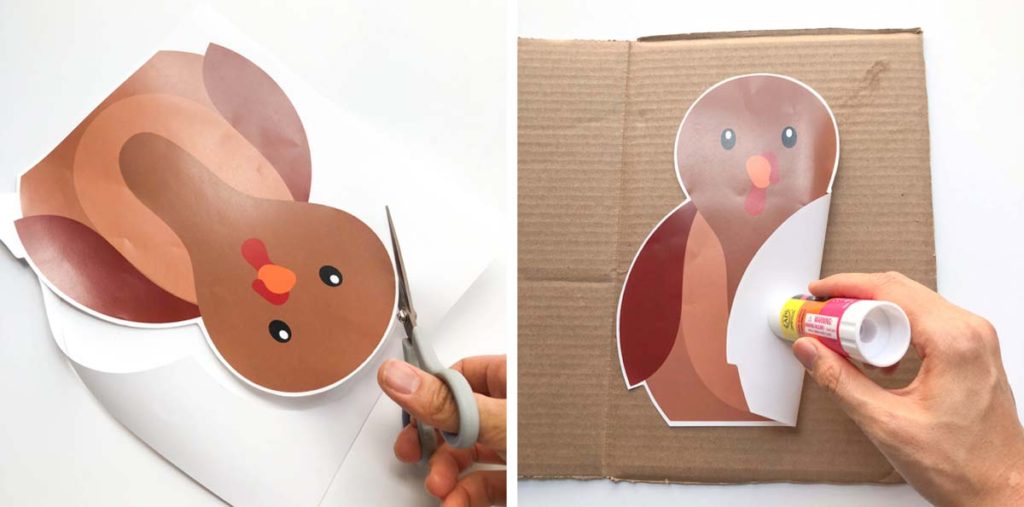
LEFT: Print and cut out Turkey Printable. I liked to leave a small white border around the image.
RIGHT: Apply glue stick generously over entire printable
LEFT: Press down firmly over entire printable to make sure it’s completely glued down to cardboard.
RIGHT: You can also use your glue stick like a rolling pin and roll over the printable with firm pressure. This helps the printable stick more evenly to the cardboard.
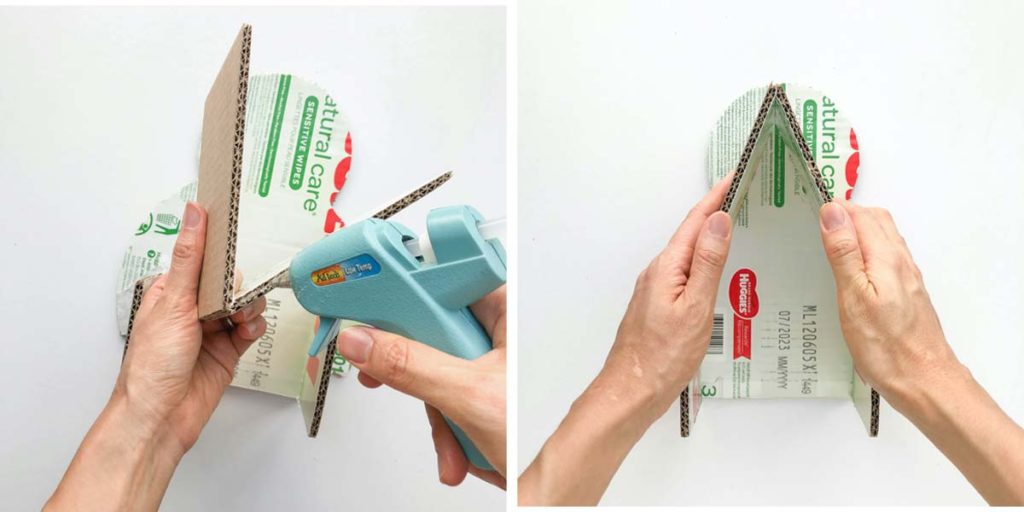
How to Make the Back Portion of Turkey Craft

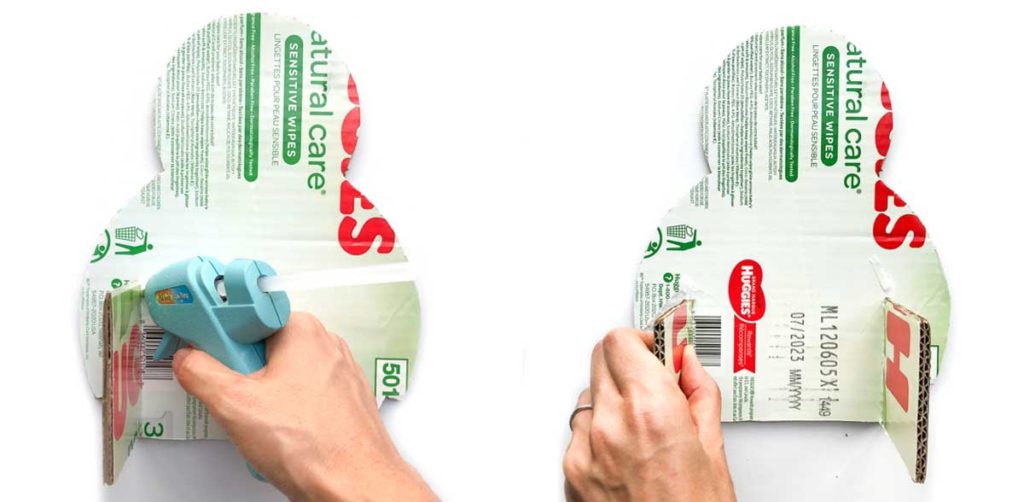
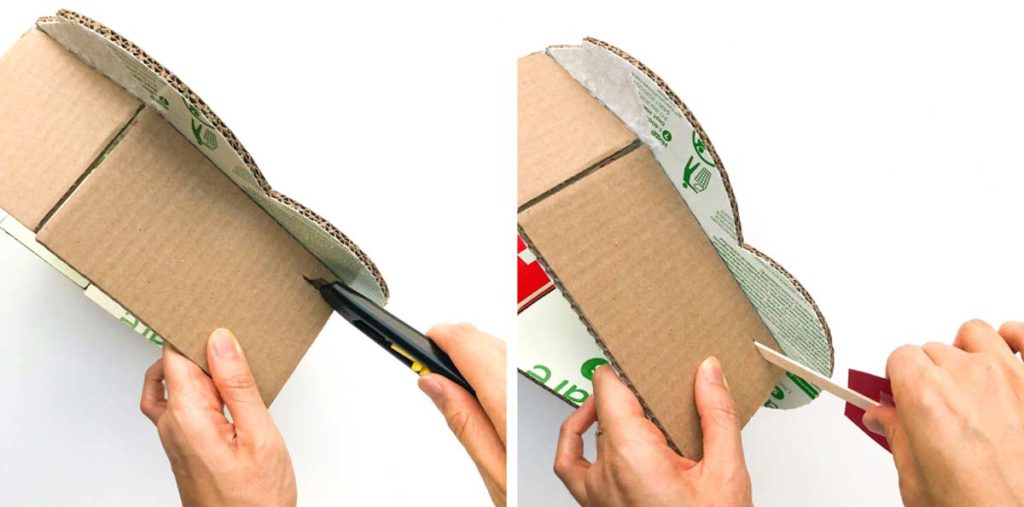
LEFT: Cut around cardboard of turkey. I find that a utility knife is much easier than using scissors. Adult supervision required!
RIGHT: Cut out 3 pieces of cardboard with the following dimensions:
- 2 Pieces: 3” x 6”(7.6 cm x 15.24 cm)
- 1 Piece: 3” x 12”(7.6 cm x 30.48 cm)
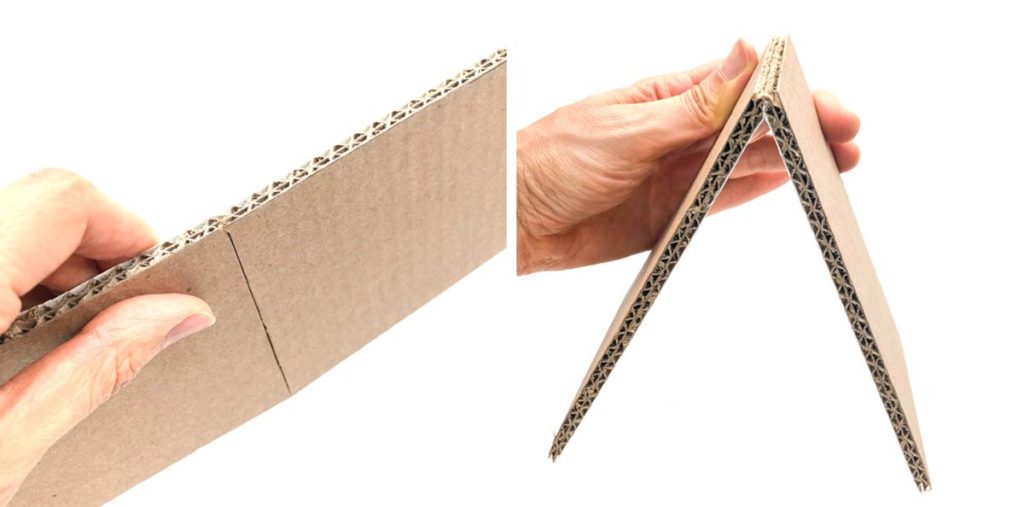
LEFT: Make a half-slit in the mid line of the long piece. Don’t cut all the way through the cardboard
RIGHT: This slit is to create a fold line is so you can easily fold the cardboard at the mid line.
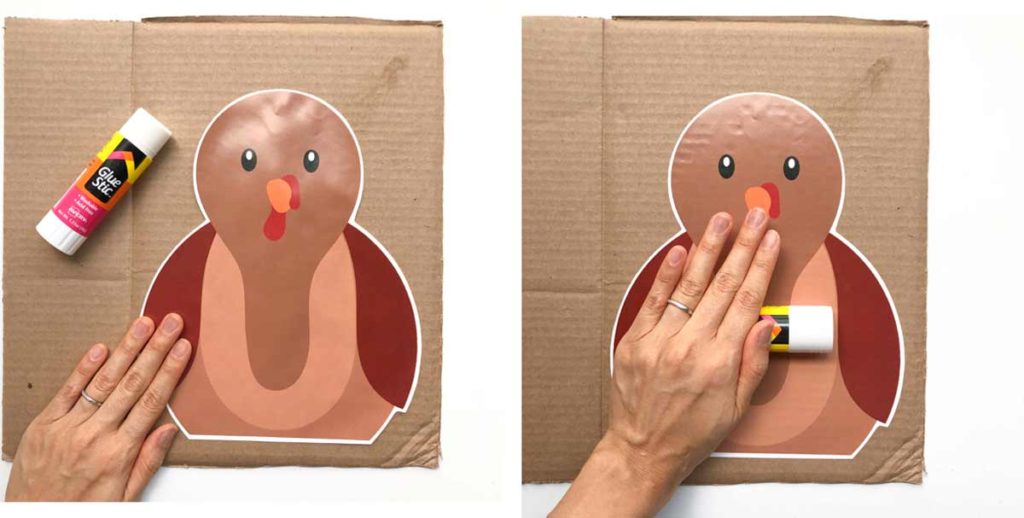
Glue the 3” x 6” pieces of cardboard to the bottom of the turkey. Make sure you glue the 6” (longer) side of the cardboard to back of the cardboard turkey.
Apply glue to the long piece of cardboard and glue it down to the back of the turkey
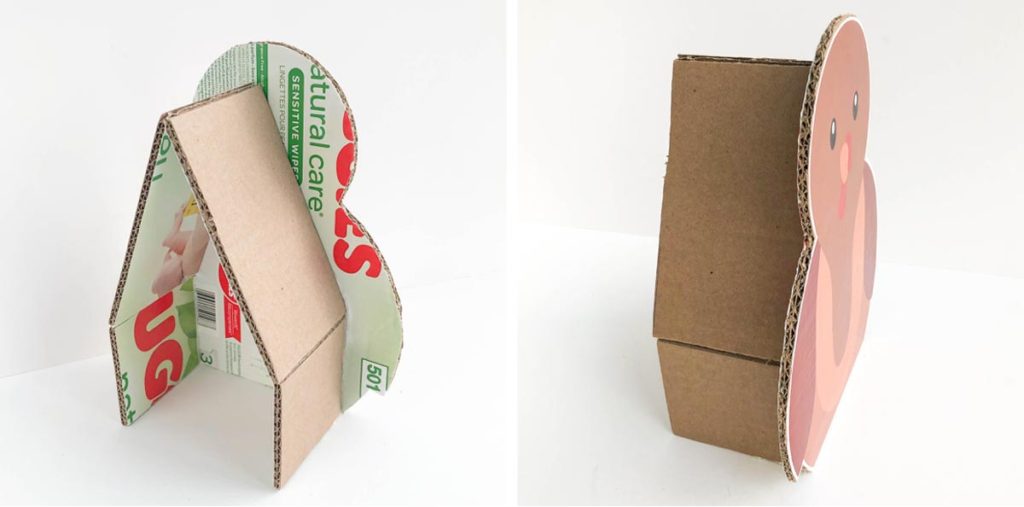
Make sure the bottom of the long cardboard piece meets the two 3” x 6” cardboard.
Finished view of cardboard glued to the back of Turkey. It looks like a little house shape in the back.
Making Turkey Feathers for Thanksgiving Craft
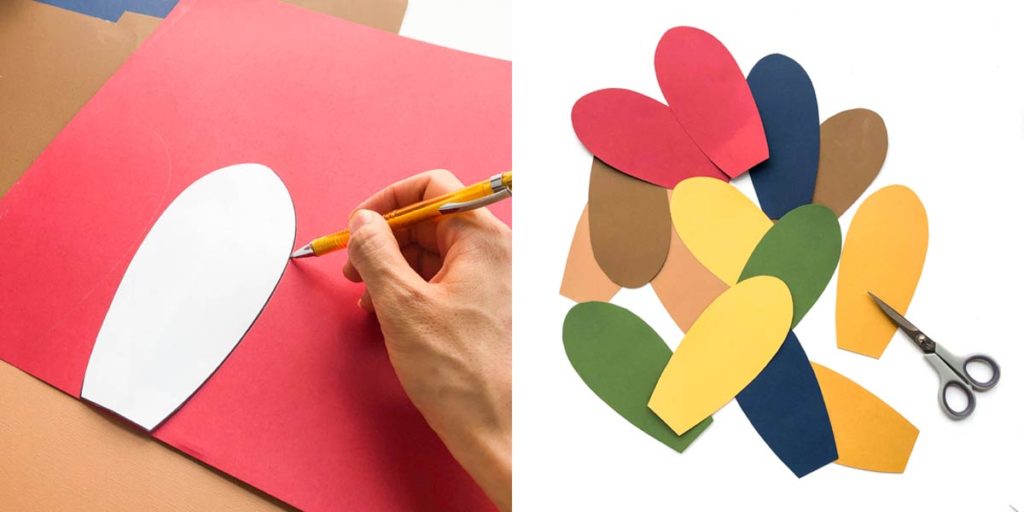
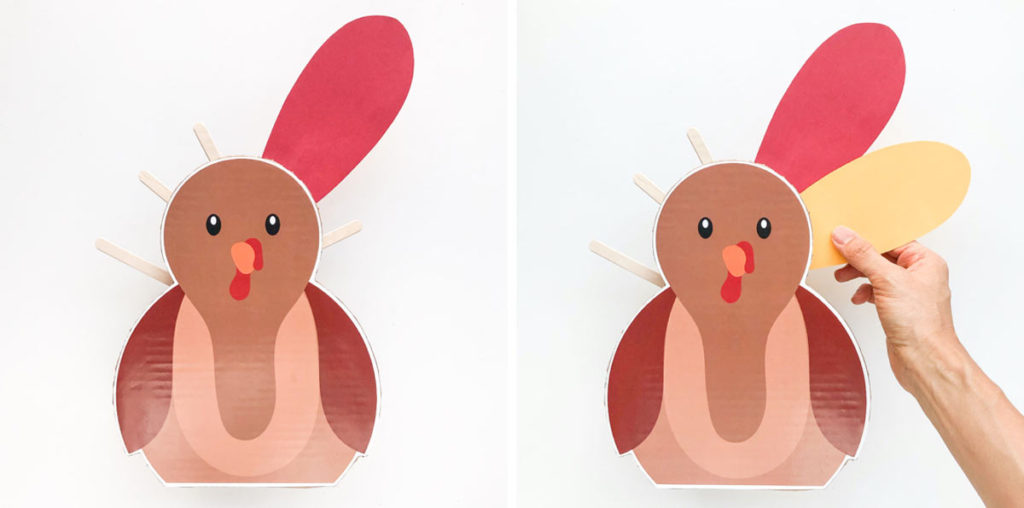
Print and cut out the turkey feather pattern. Trace the pattern onto colored construction paper. Cut out as many different colored feathers as you like.
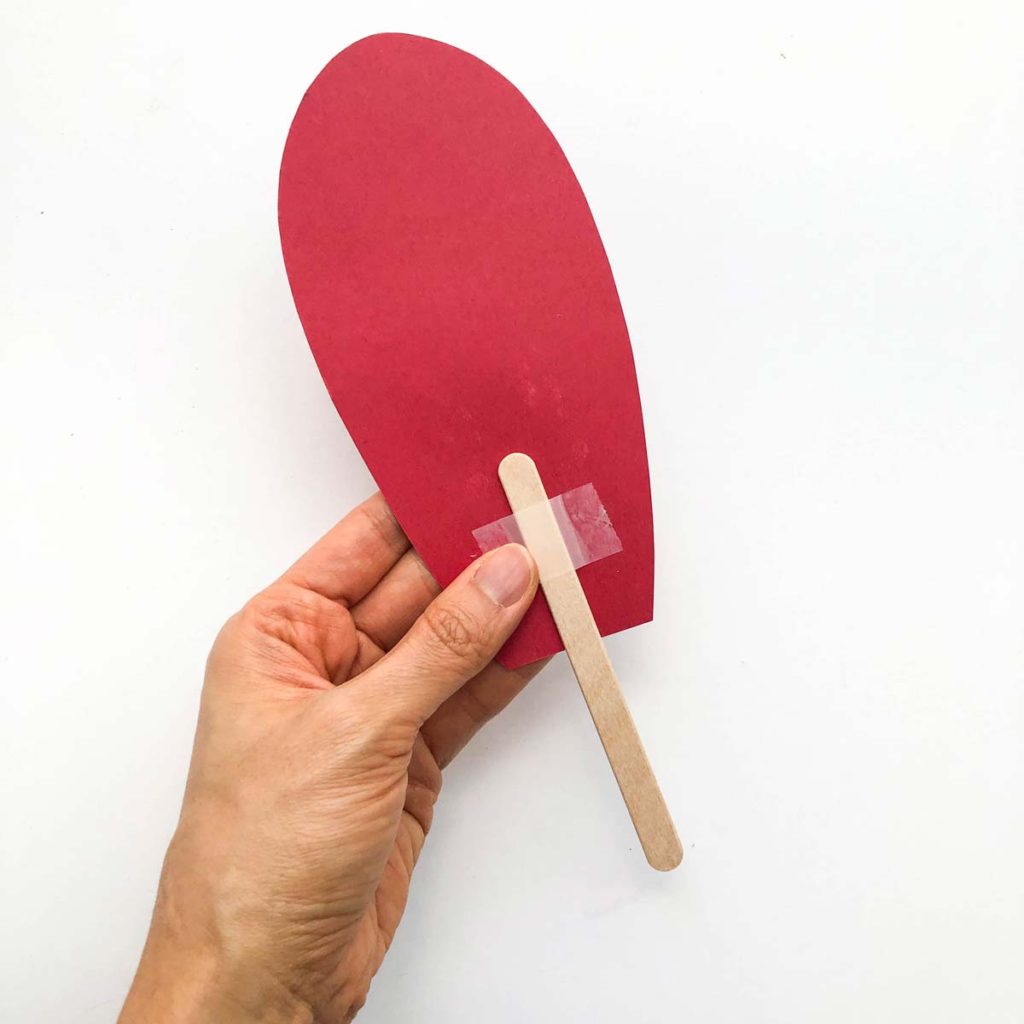
Stick the feather to the Popsicle stick using clear tape. You may have to adjust where you stick the feather on, or may even have to trim the feather shorter so it looks nice on the turkey.
Thanksgiving Turkey Craft for Kids: Putting it All Together
Make a slit all the way through the cardboard backing. Use a Popsicle stick to poke the hole completely through the cardboard.
Repeat making slits in different parts of the cardboard back and stick Popsicle sticks through.
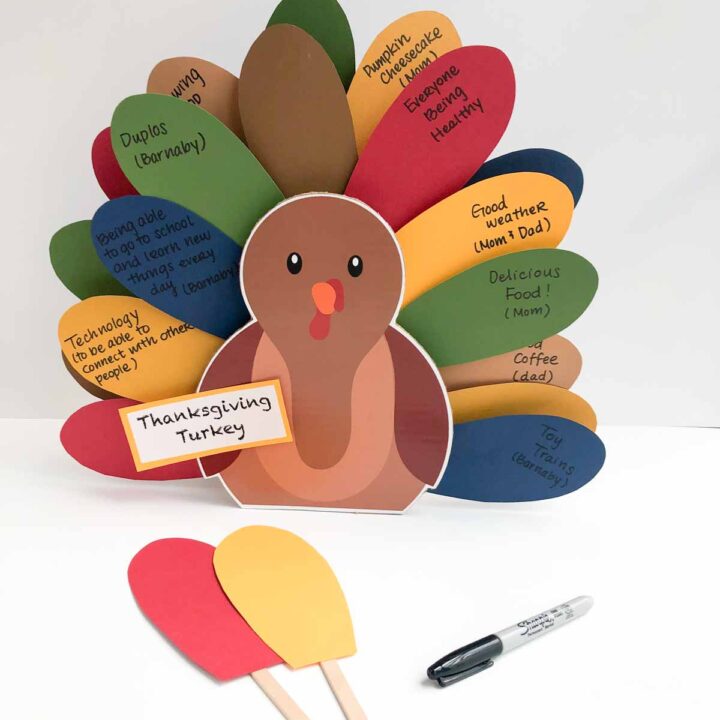
I’ve found that to it’s easiest to stick a Popsicle stick into the slits first, and then tape the feathers on. This allows me to see the placement of the feathers to make it look nice.
Continue repeating, putting as many feathers as you like!

I also like “layering” the feathers so that some feathers are closer and some are farther away. This gives the turkey a more 3-Dimensional look.
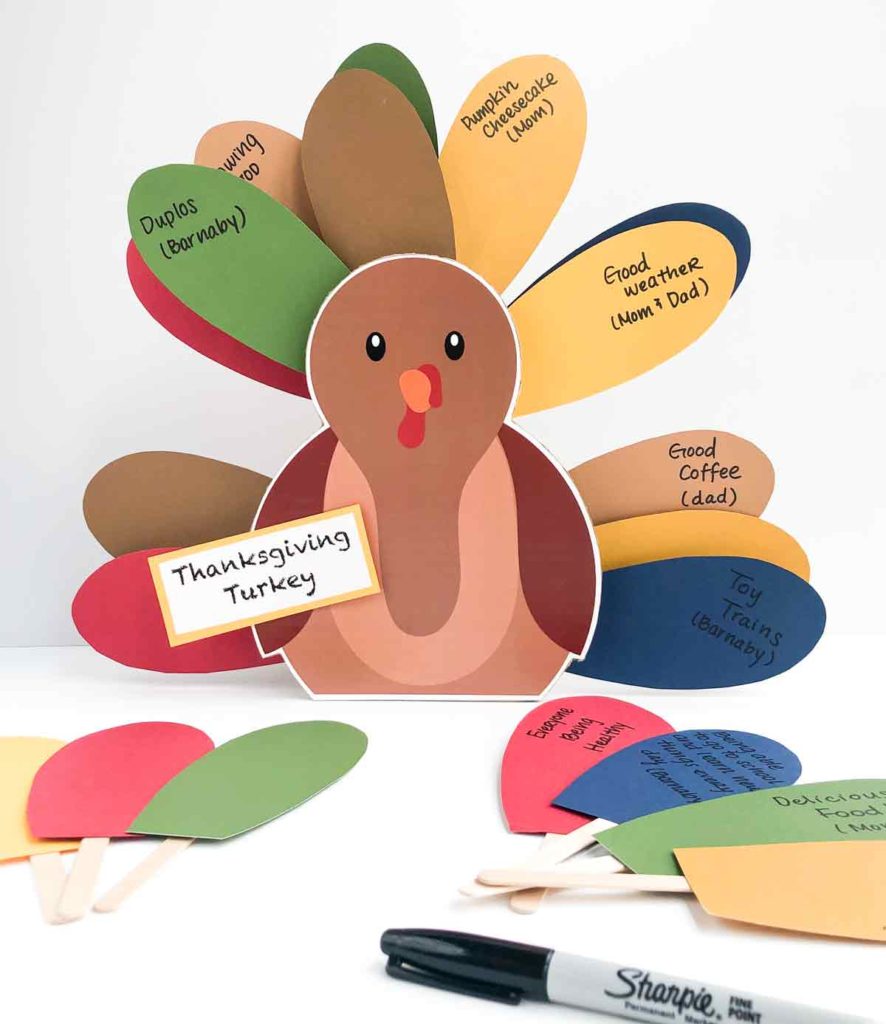
Once you start writing, you’ll start to realize how many things there are to be thankful for. You may need to cut out more feathers!

Feel free to back the “Thanksgiving Turkey” sign on colored paper and stick it to the turkey as well. We also like to write the person’s name after each item they are thankful for.
How to Make a Thanksgiving Turkey Craft
Celebrate the true meaning of Thanksgiving with this fun and cute "Thanksgiving Turkey" craft activity. Great activity for kids and adults to practice gratitude!
Materials
- THANKSGIVING TURKEY CRAFT PRINTABLE
- CRAFT SCISSORS
- UTILITY/CRAFT KNIFE
- GLUE STICK
- GLUE GUN
- TAPE
- POPSICLE STICKS
- CONSTRUCTION PAPER or CARD STOCK (see note 1)
- CARDBOARD (see note 2)
Instructions
- Print and cut out Turkey Printable. I liked to leave a small white border around the image.
- Apply glue stick generously over entire back side printable and stick to cardboard.
- Cut out turkey. I find that a utility knife is much easier than using scissors. Adult supervision required!
- Cut out 3 pieces of cardboard with the following dimensions (see note 3)
- Make a half-slit in the mid line of the long piece. Don’t cut all the way through the cardboard
- Glue the 3” x 6” pieces of cardboard to the bottom of the turkey. Make sure you glue the 6” (longer) side of the cardboard to back of the cardboard turkey.
- Apply glue to the long piece of cardboard and glue it down to the back of the turkey.
- Make sure the bottom of the long cardboard piece meets the two 3” x 6” cardboard.
- Print and cut out the turkey feather pattern. Trace the pattern onto colored construction paper. Cut out as many different colored feathers as you like.
- Stick the feather to the Popsicle stick using clear tape. You may have to adjust where you stick the feather on, or may even have to trim the feather shorter so it looks nice on the turkey.
- Make slits that are slighter wider than the width of of popsicle stick on the cardboard backing. Make sure the slit goes all the way through.
- Use a Popsicle stick to poke the hole completely through the cardboard.
- Repeat making slits in different parts of the cardboard back and stick Popsicle sticks through. (See Note 4).
- Repeat, putting as many feathers as you like.
- Layer the feathers so that some feathers are closer and some are farther away. This gives the turkey a more 3-Dimensional look.
Notes
- I used fall colors for this craft. However, feel free to use whatever color paper you wish! Make a Neon or Pastel color themed turkey for something different!
- I used a heavy duty diaper box. This makes the turkey more stable. However, in this case you will need to use a utility knife to make all the cuts (scissors didn't work). You can also use a cereal box. It will be less sturdy but you can cut it (or have your kids cut it) with scissors.
- Cut out following dimensions of cardboard:
• 2 Pieces: 3” x 6”(7.6 cm x 15.24 cm)
• 1 Piece: 3” x 12”(7.6 cm x 30.48 cm - I’ve found that to it’s easiest to stick a Popsicle stick into the slits first, and then tape the feathers on. This allows me to see the placement of the feathers to make it look nice.
MORE WAYS TO ENJOY “THANKSGIVING TURKEY” ACTIVITY
Incorporate this Activity into Your Thanksgiving Day
You can most definitely make this craft ahead of time. On thanksgiving day, after dinner, you can pull it out as an activity for everyone around the table to write down what they are thankful for. I say after dinner because before dinner you just want to dig in already! Haha.
After everyone has written down what they are grateful for, go around the table and take turns sharing. As each person shares, they can stick the feather into the turkey.
Continue doing this until all the feathers have been inserted into the turkey.
Include this Activity as Part of Your Thanksgiving Week
This is similar to the concept of the advent calendar. First, have the Turkey Activity ready at the beginning of Thanksgiving week. Then each day, everyone writes down one thing they are thankful for and stick it into the turkey.
On Thanksgiving day, you finish writing your thanksgivings. Then, at dinner time, you have a finished turkey to display as the centerpiece. You can then reflect about the things everyone wrote during or after dinner.
Let me know in the comments below how your family plans to use this thanksgiving turkey this holiday season!


to get the printable for the turkery- its password protected? How do I get the password?
Hi Kristin,
Follow the step-by-step instructions here which shows you how to subscribe, enter the library, and download the printable.