How to Make an Easy 3D Felt Christmas Tree (Free Pattern)
This DIY felt Christmas tree for toddlers is fun and easy to make! Step by step tutorial includes printable tree pattern as well as patterns for making no sew felt Christmas ornament. Great way to keep the little ones busy this holiday season!

- How Do You Make a Felt Christmas Tree For Kids?
- What are the Dimensions of the Pattern?
- Is This Easy Sewing Project Good For Kids?
- What Do I Need to Make this Easy Sewing Project?
- Tools
- 3D Felt Christmas Tree Tutorial: Step-by-Step
- Assembling the Christmas Tree
- How to Make Tree Base
- DIY No Sew Felt Christmas Tree Ornaments
We don’t own a Christmas tree.
Every year I tell myself I will buy one right after Christmas when all the trees are discounted, but for some reason it never happens.
I’m pretty sure it’s because I secretly dread the thought of having to pull out a tree, decorate it, and then put it away after Christmas.
If I owned a Christmas tree, I would probably be one of those people who has it up all year because I don’t want to put it away!
This year, since my toddler is actually old enough to understand and appreciate Christmas, I thought it would be nice for him to have a little tree. I liked the idea of a toddler-sized tree because he loves everything that is his size.
There are a lot of DIY felt trees for toddlers that you can stick on the wall for them to decorate. However, I wanted him to have 3D felt tree because it looks more like a real tree. So I decided to create a simple one, just for my special little guy!
How Do You Make a Felt Christmas Tree for kids?
This 3D Christmas tree is very simple to make! All you have to do is sew two pieces of tree-shaped felt together (with a stabilizer in between) and make two of those. Then you cut slits in both trees pieces, slide the slits over each other and wah-lah! You have a standing Christmas Tree!
I also included a tutorial to make a no sew tree base. The tree base helps the tree stand better, and it also makes the tree look nicer.
what are the dimensions of THE PATTERN?
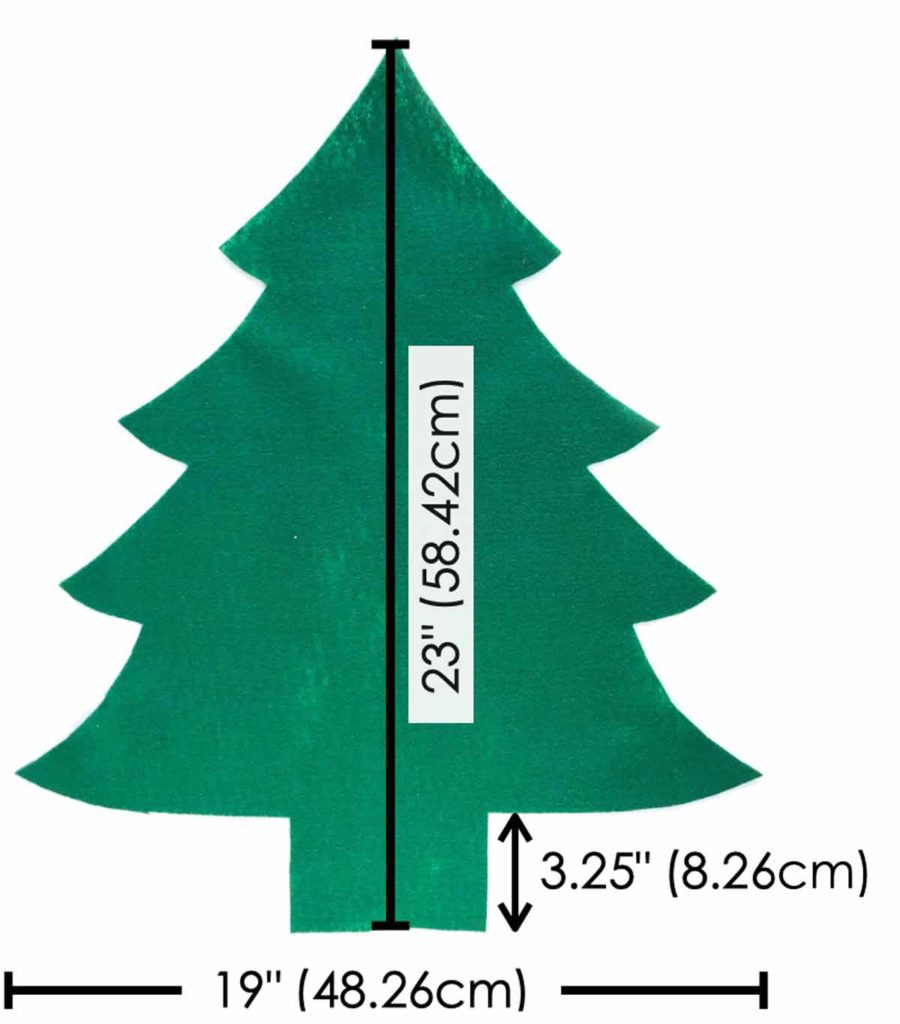
The felt tree pattern measures 23″ (58.42cm) in height x 19″ (48.26cm) at the widest part of the tree. The Tree base is about 3.25″ (8.255cm) tall.
is this EASY SEWING PROJECT GOOD FOR KIDS?
Yes! This DIY felt Christmas tree is absolutely great for toddlers!
First, it’s their sized, so you know they will love it.
Second, since the tree is made of felt, you’re not worried that it will topple over and hurt your little one. If you have a rowdy toddler like mine, your tree will be a falling tree many times over.
Third, since all the ornaments are made of soft felt, you won’t have to worry about any of them breaking when your toddler runs into the tree!
Fourth, I love that felt sticks to itself. This makes it easy for kids to decorate the tree themselves. It’s also a bit of problem solving challenge when your toddler does it for the first time. Eventually they will figure out that a little “pat, pat, pat” on the felt ornaments will do the trick.
Finally, this tree is super cute and easily stored away in a tall kitchen trash bag for years to come. I also love that the ornaments are so easy to remove and can be reused over and over again!
Have I convinced you that you need a 3D felt Christmas tree in your house this year as well? Let’s get started!
what do i need to make this easy SEWING PROJECT?
First, grab the Free 3D Felt Christmas Tree Pattern – Available in my Free Resource Library (subscribe to get the password) Listed under the letter “F”
- 1 yard of 72″ Wide Felt – I used Kelly Green Craft Felt from Joann’s. Note that you can’t use craft felt sheets to make this sized tree, it has to be felt by-the-yard. You can also find it on Amazon.
- 1.5 Yards of Peltex Ultra Firm Stabilizer – There is the Pellon Peltex 71F, which is a one sided fusible versus the Pellon Peltex 72F, which is a two-sided fusible. I recommend using the Peltex 71F One Sided Fusible for both the tree and the base instead of buying the two-sided for the tree and the one sided for the base (like I did).
- 1/8 Yard (4.5 inches or 11.5cm) Brown Craft Felt
TOOLS
- Sewing machine
- Fabric Scissors – these Ginghers are my favorite.
- See-Through Sewing Ruler
- Sewing Pins
- Matching Thread
- Glue Gun
- Fabric glue or Craft Bond – for gluing details on felt ornaments
3D Felt Christmas Tree Tutorial: step by step
Cutting out Tree Pattern
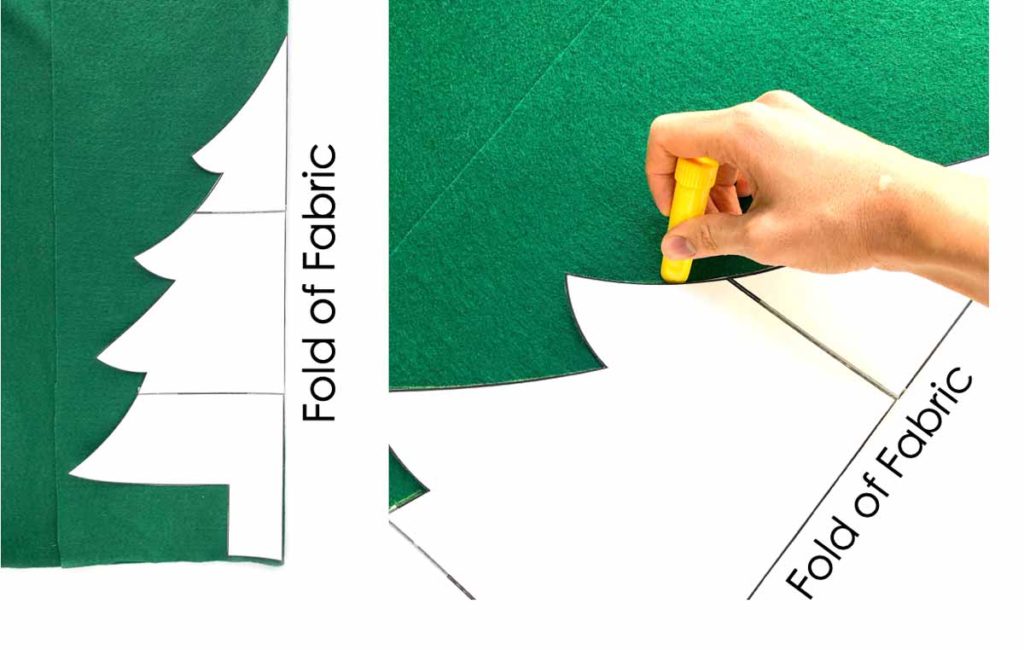
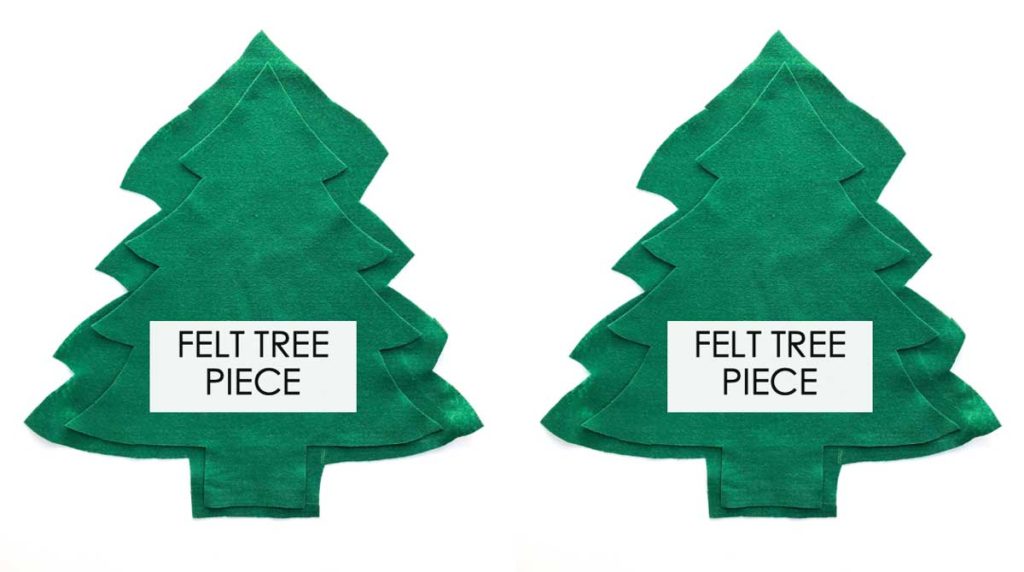
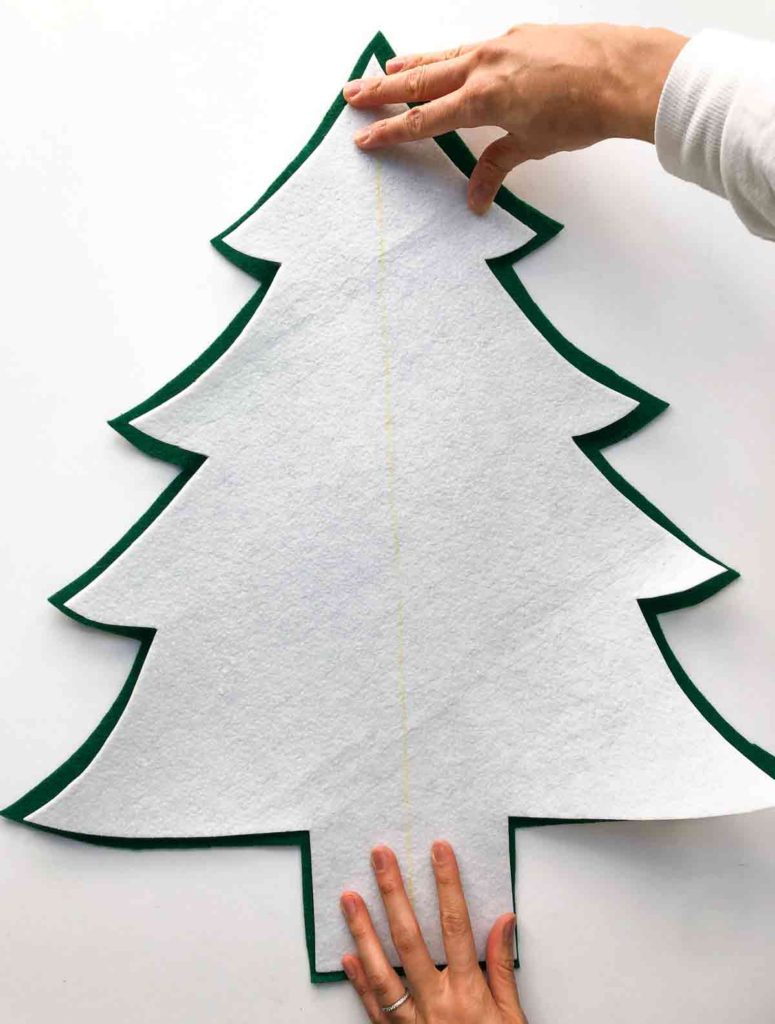
Print, cut, and assemble the Large Christmas Tree Paper Pattern. Place the pattern on fold of fabric. Trace pattern with chalk.

Cut Christmas tree out on fold. Repeat this process again so you end up with two pieces of felt tree.
For each of the FELT TREE PIECE, cut out two more pieces of felt that are slightly larger than the tree (doesn’t have to be that exact!).
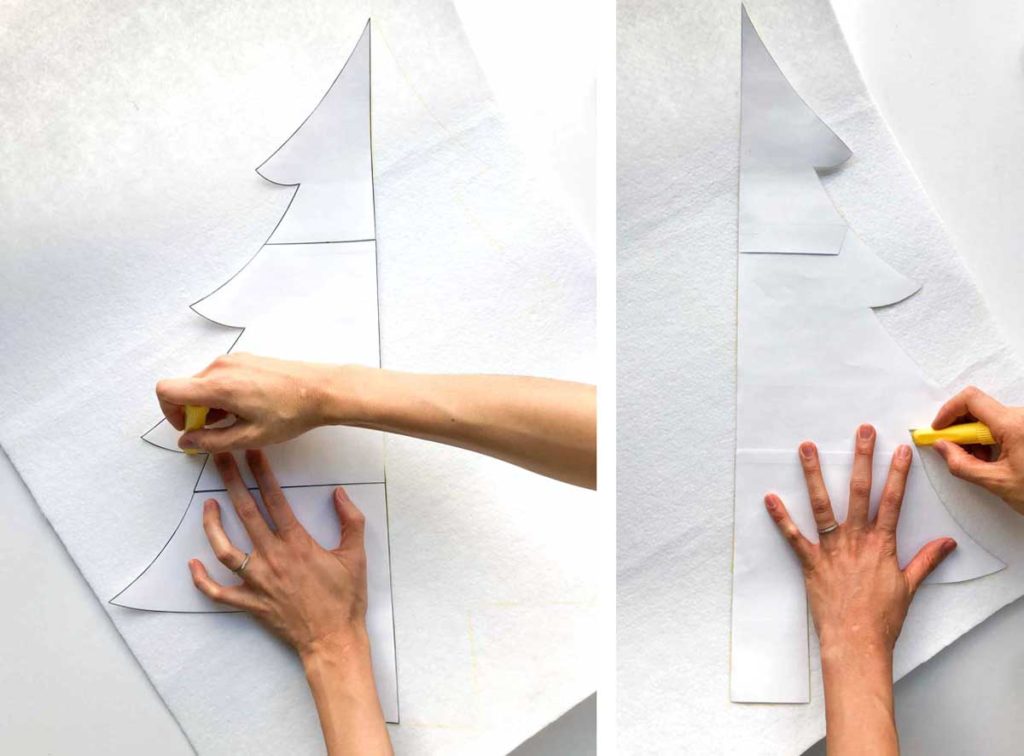
Print, cut, and assemble the Stabilizer Paper Pattern. Trace one side of the pattern on the Stabilizer, then flip the pattern to the other side and trace again to make a full tree
TIP: Placing the pattern slightly on the diagonal of the stabilizer is the most space saving.
Cut out TREE STABILIZER PIECE. Use the first piece as the “pattern” to trace for the second stabilizer piece.
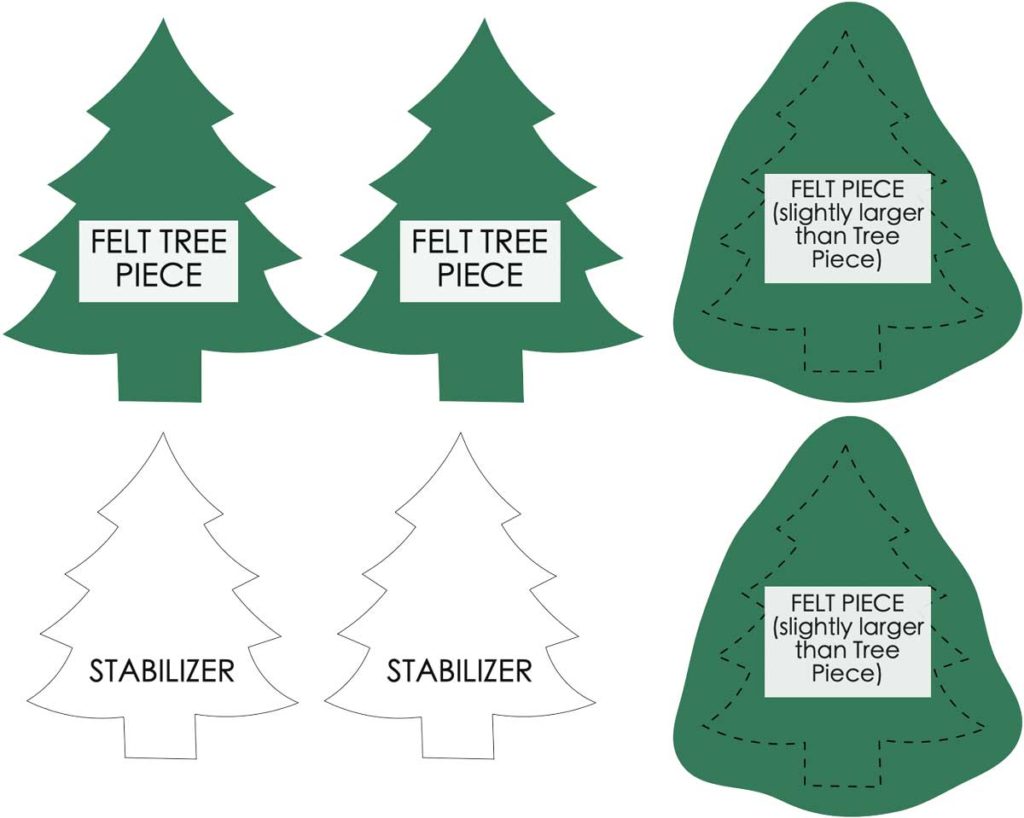
You will end up with the following Pieces (to make one Tree):
- FELT TREE PIECE (x2)
- STABILIZER (x2)
- ROUGHLY CUT FELT PIECE – slightly larger than TREE PIECE (x2)
Sewing The Christmas Tree
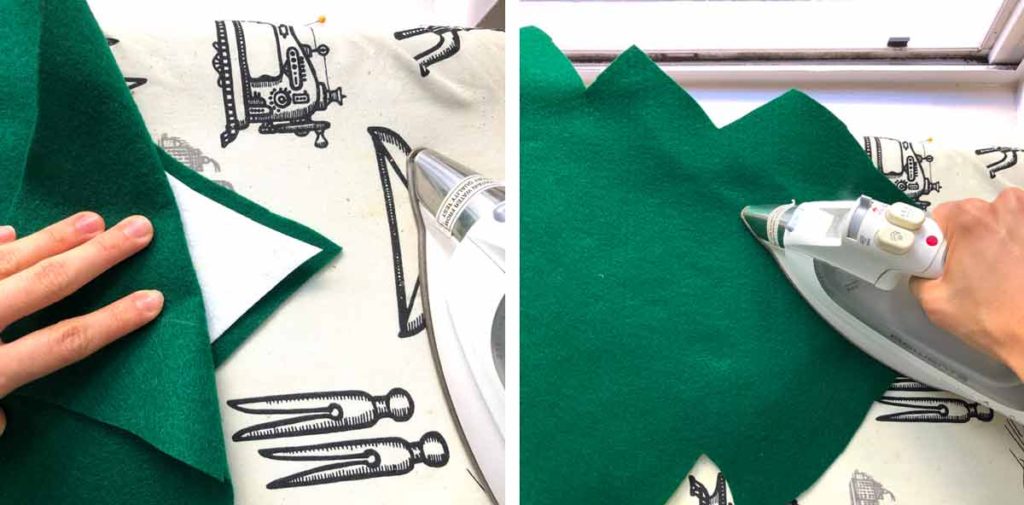
Place STABILIZER PIECE over FELT TREE PIECE so that the extra felt around STABILIZER PIECE is roughly equal all around.
If you are using two-sided fusible stabilizer:
Place the ROUGHLY CUT FELT PIECE over the STABILIZER + TREE PIECE and press all 3 pieces together.
If you are using single sided fusible stabilizer:
Fuse the the STABILIZER to the FELT TREE PIECE.
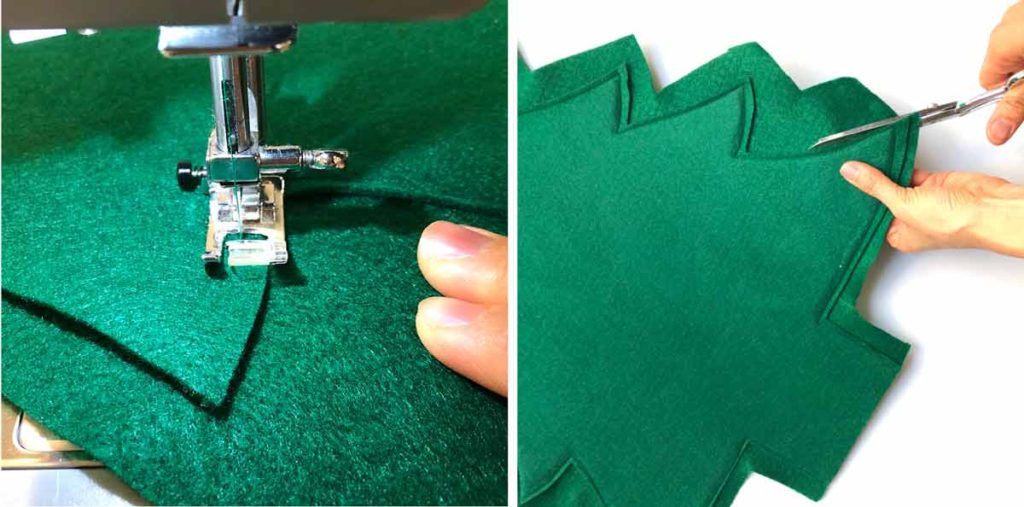
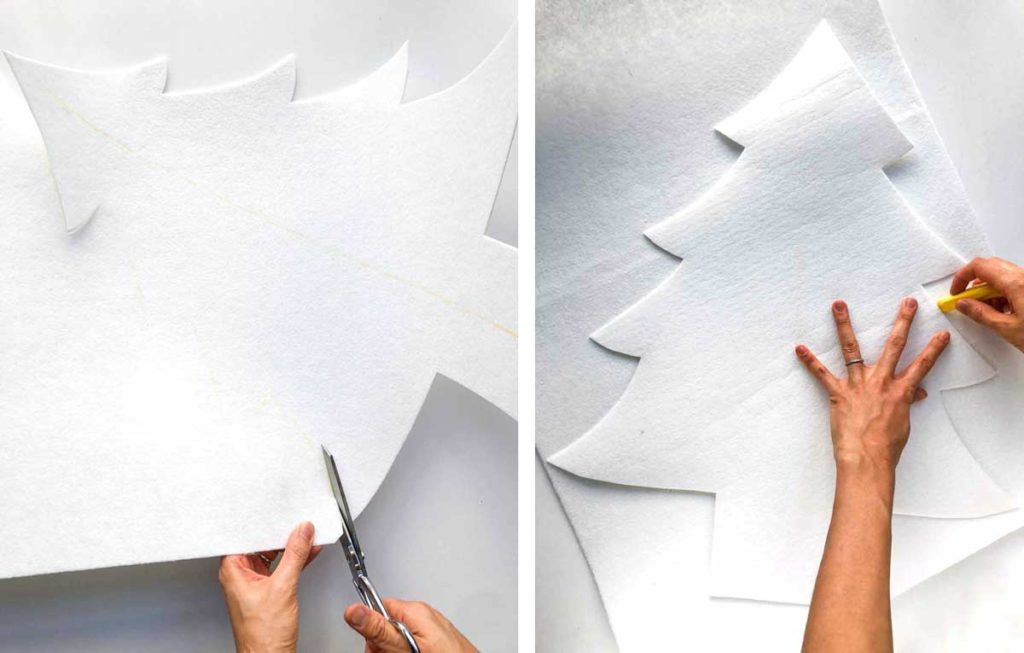
Sew the felt pieces together at about 1/4” (6.35mm) from edge of FELT TREE PIECE. Then trim off excess felt from the ROUGHLY CUT FELT PIECE.
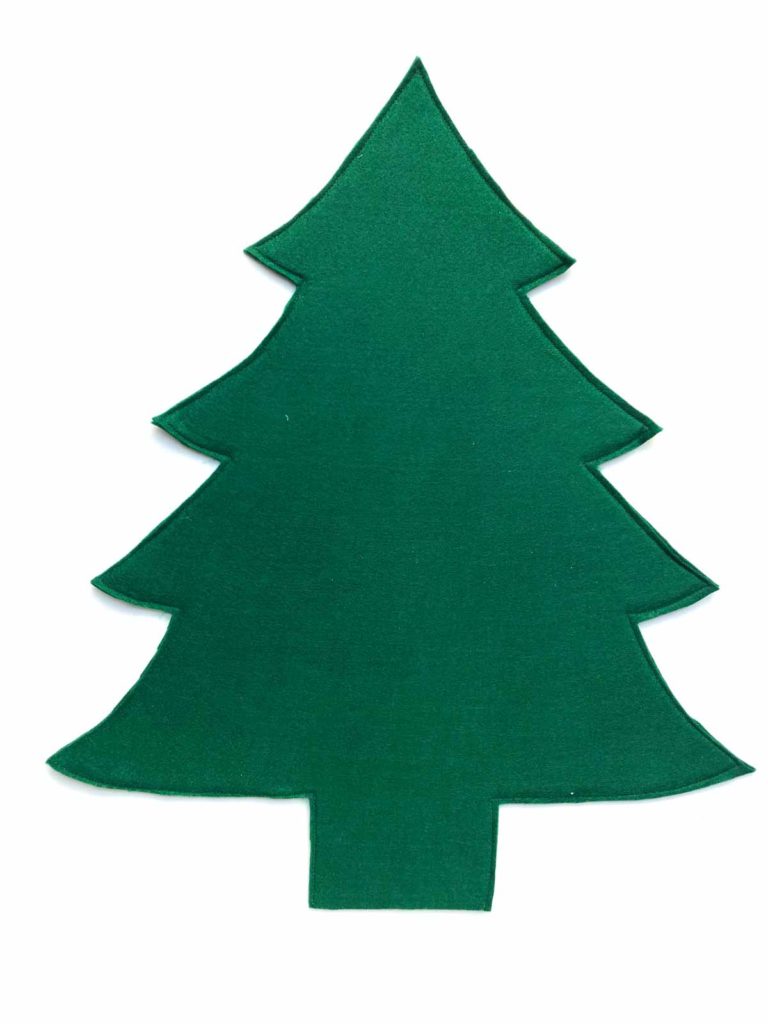
One piece of felt Christmas tree sewn and cut! Repeat for other piece.
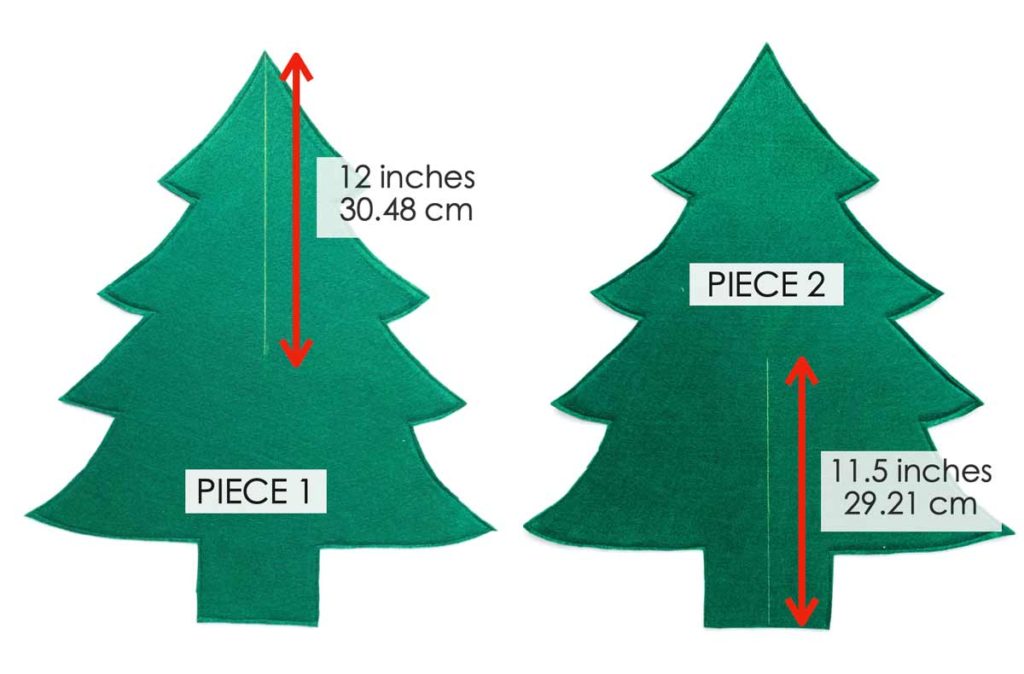
On PIECE 1 of Felt Christmas tree, mark 12 inches (30.48cm) down from the tip of the tree at the mid line. On PIECE 2, mark 11.5 inches (28.21 cm) Up from the bottom of the tree at the mid line.
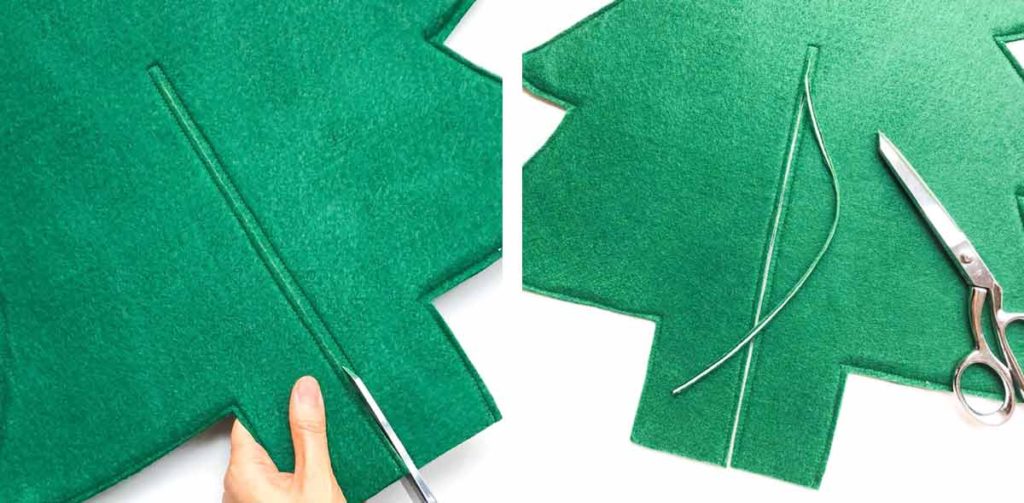
Stitch a distance of 1/4 inch (6mm) away from the line on both sides and the top of the line. Cut out a 1/8 inch (3mm) wide slit in between stitch line. Repeat for PIECE 1 of felt tree.
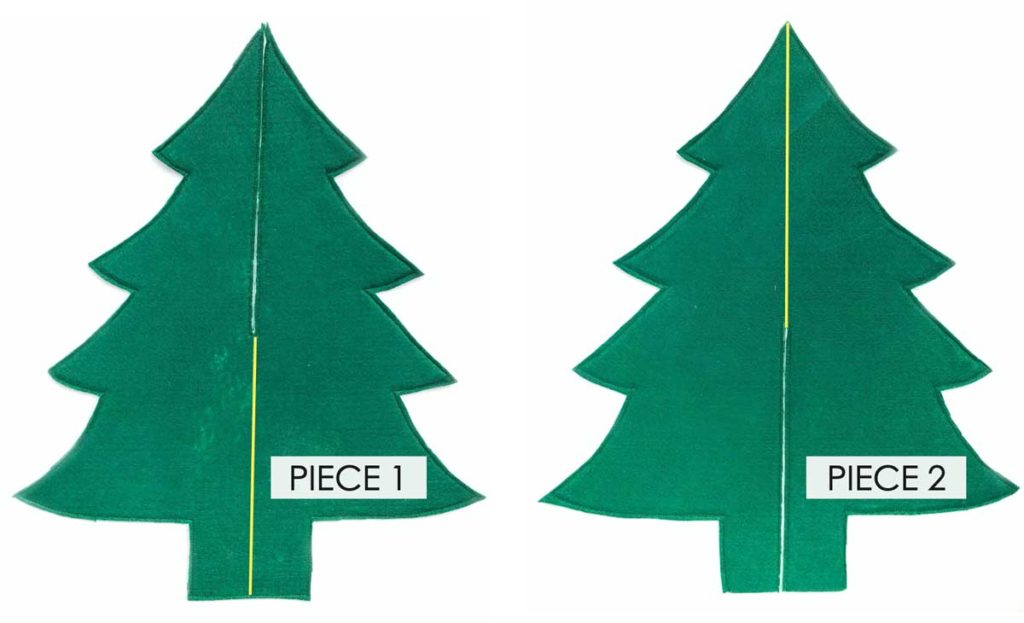
You’ll end up with PIECE 1 FELT TREE that has a cut slit at the top, and PIECE 2 FELT TREE with a cut slit from the bottom. Mark the mid line of the tree (yellow line) starting from end of slit. The line is there to guide you to know where to glue the tree pieces together in the next step.
ASSEMBLING TREE PIECES TOGETHER

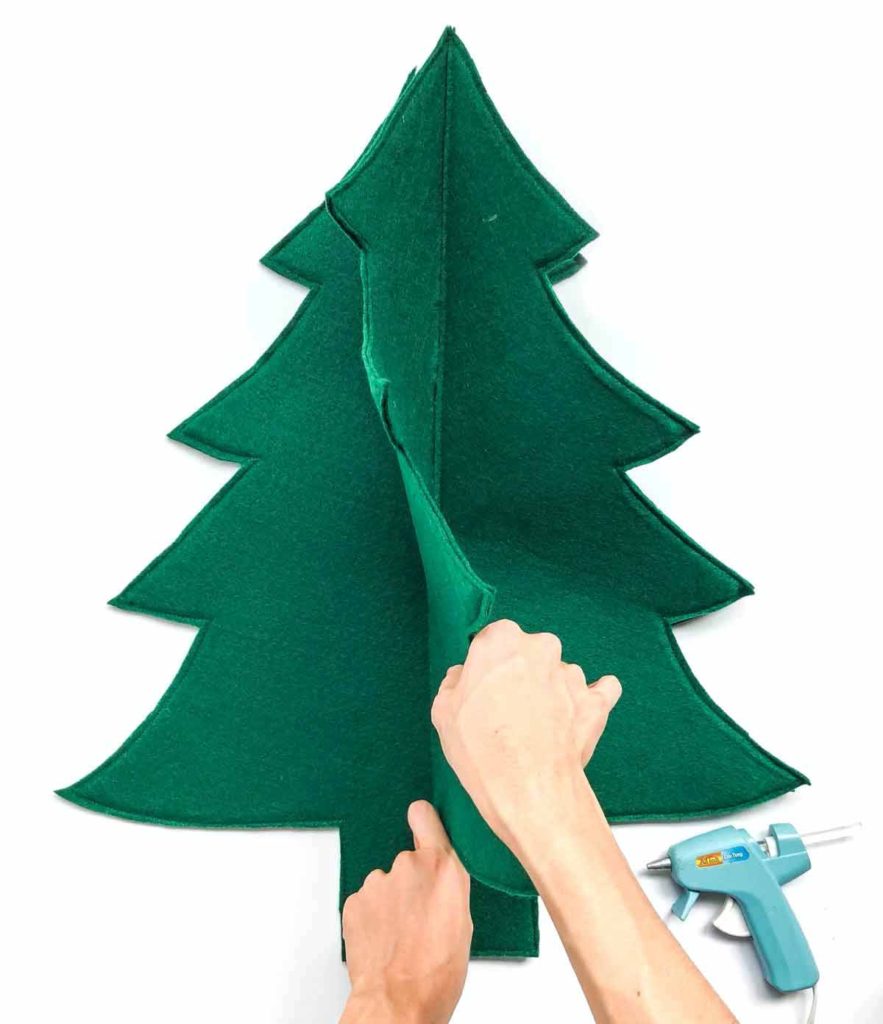
Slide PIECE 2 (the one with the slit on the bottom) over PIECE 1 (slit on top). The two tree pieces should match exactly at the top and bottom.
Note: If you need to make the two tree pieces match, you can always cut the slits on the tree a little bit longer. It’s ok if you end up cutting past the stitch line at the end of the slit.
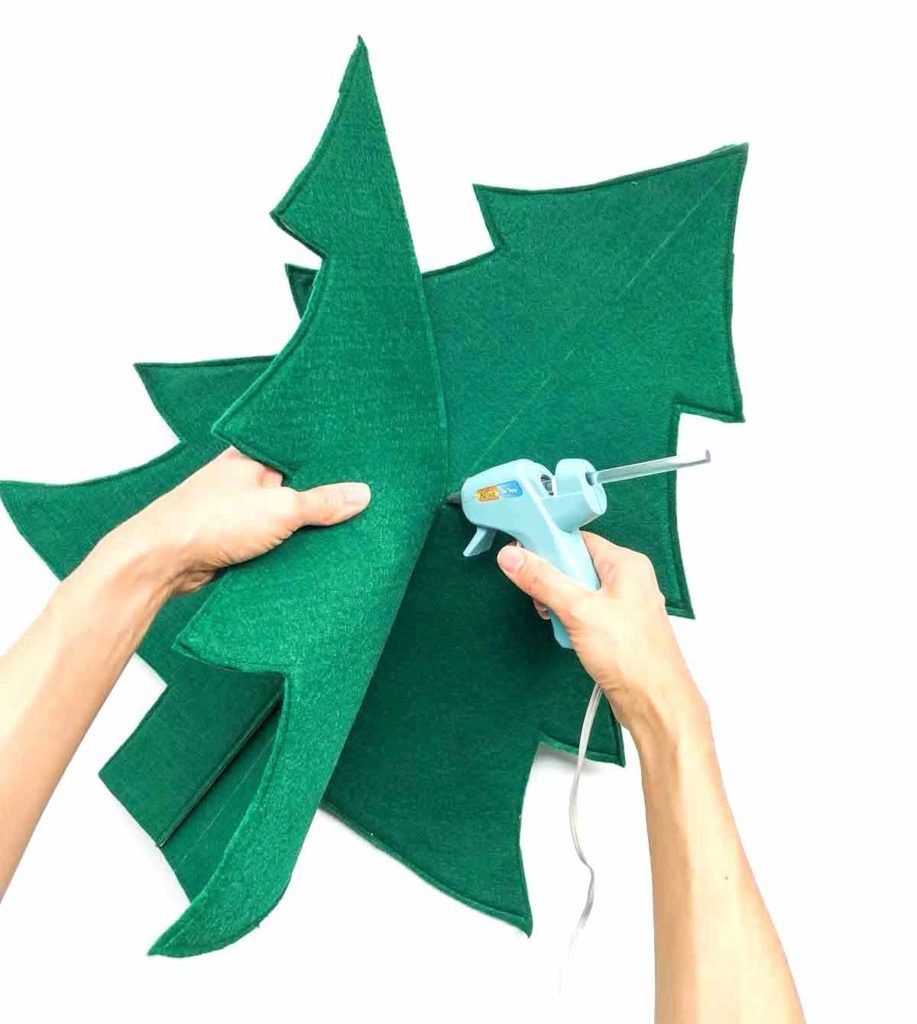
Apply glue on the mid line (following the chalk line you just marked), and glue the tree pieces together at the top.
TIP:
1. Apply just enough glue and not to over do it or else you’ll see the excess glue.
2. Hold the Tree Piece perpendicular to each other while the glue dries so it’ll look the best
Repeat gluing the bottom part of the tree together.
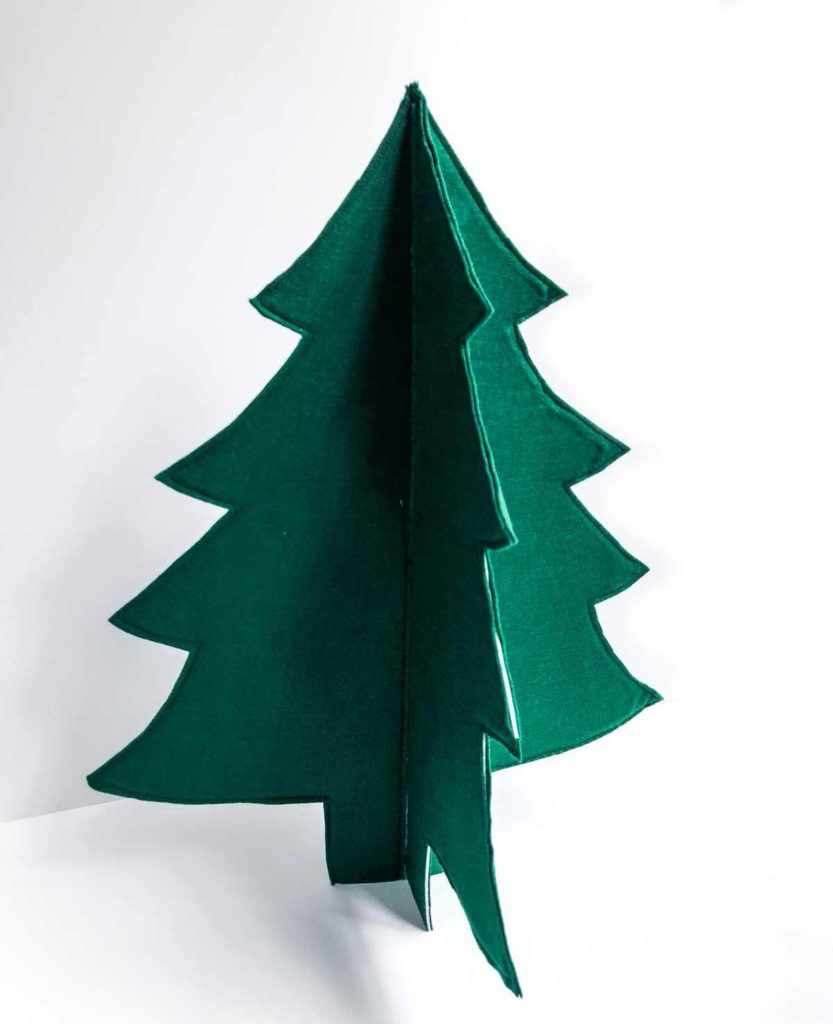
Finished Felt Tree! Tree will stand on its own.
how to make TREE BASE
Cutting and Preparing Tree Base Pieces
Cut out the following pattern pieces on brown felt and stabilizer:
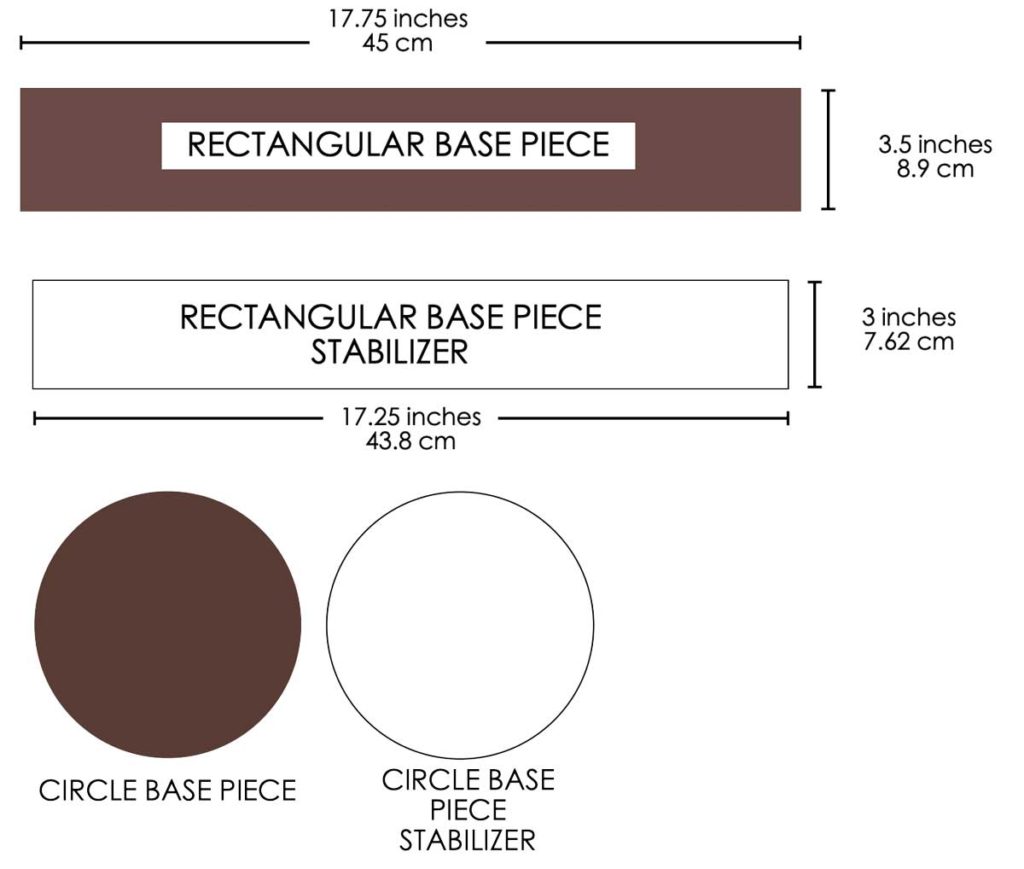

Fuse the stabilizer to the CIRCLE BASE PIECE. Mark the dotted “+” from the paper pattern to the brown felt. The dotted “+”lines are 5.25” (13.3 cm) long, slightly smaller than the diameter of the circle, and cross at the center of the circle.
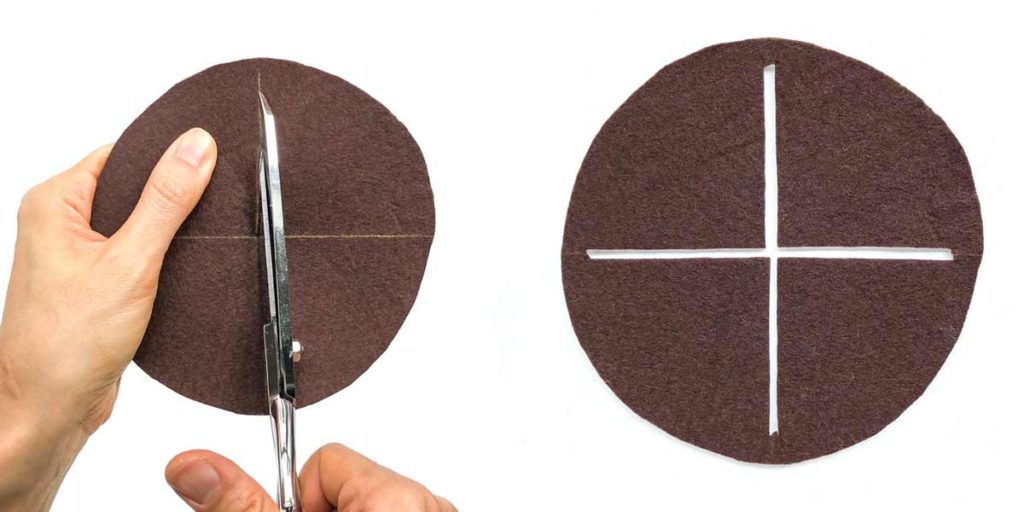
Cut out the “+” mark, about 1/8 inch (3mm) in width.
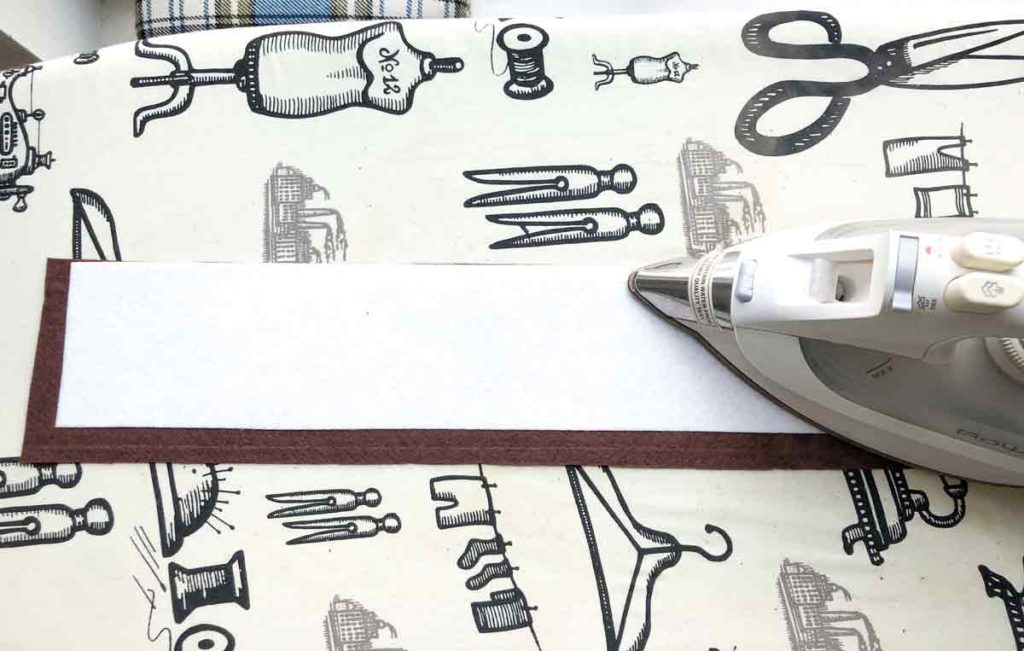
Press the fusible stabilizer to the brown felt, matching at one corner.
Fold and glue the excess brown felt down over the stabilizer on the two sides where the felt is cut slightly larger.
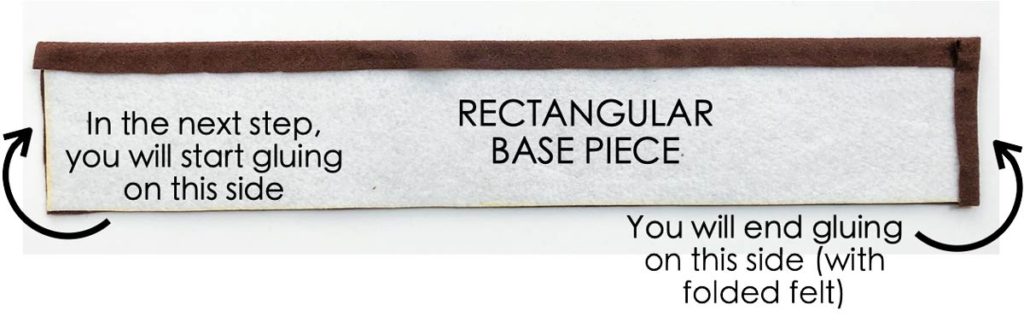
Note: When you glue the tree base later on, you will start on the side that doesn’t have excess felt folded over (Left side in Photo). The side of that has the excess felt folded over is where you will end (Right side in the photo)
Gluing Felt Tree Base Together
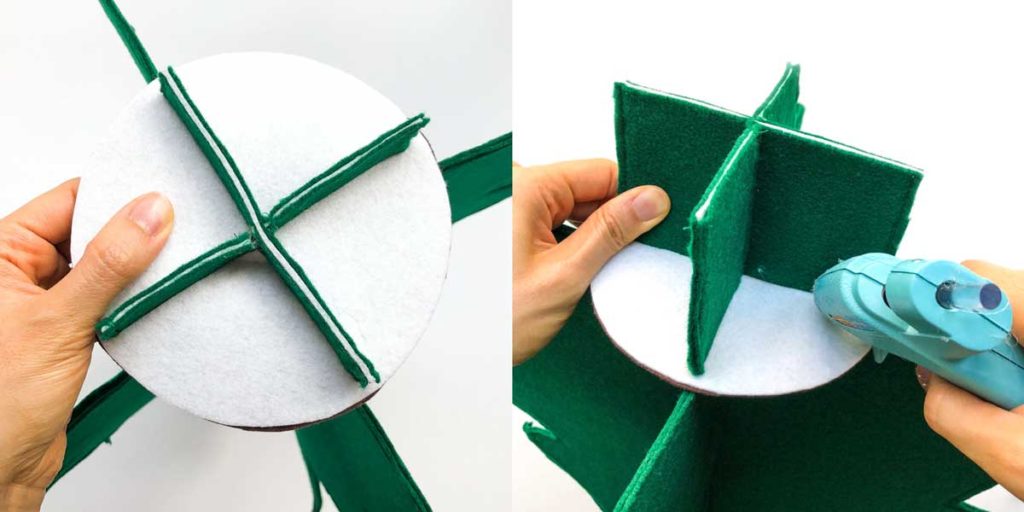
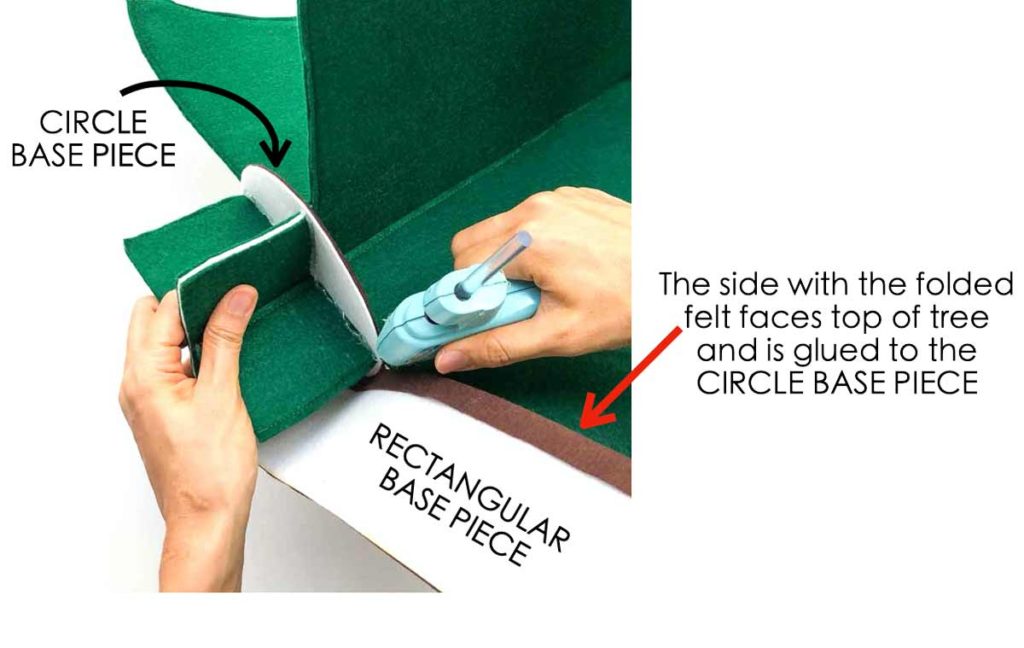
LEFT: Slide the CIRCLE BASE PIECE over the bottom of the felt tree, with the brown felt side facing towards the top of the tree.
RIGHT: Push CIRCLE BASE PIECE all the way up so it touches the bottom of the tree. Glue the CIRCLE BASE PIECE to the tree.
View of felt tree with circle base in place.
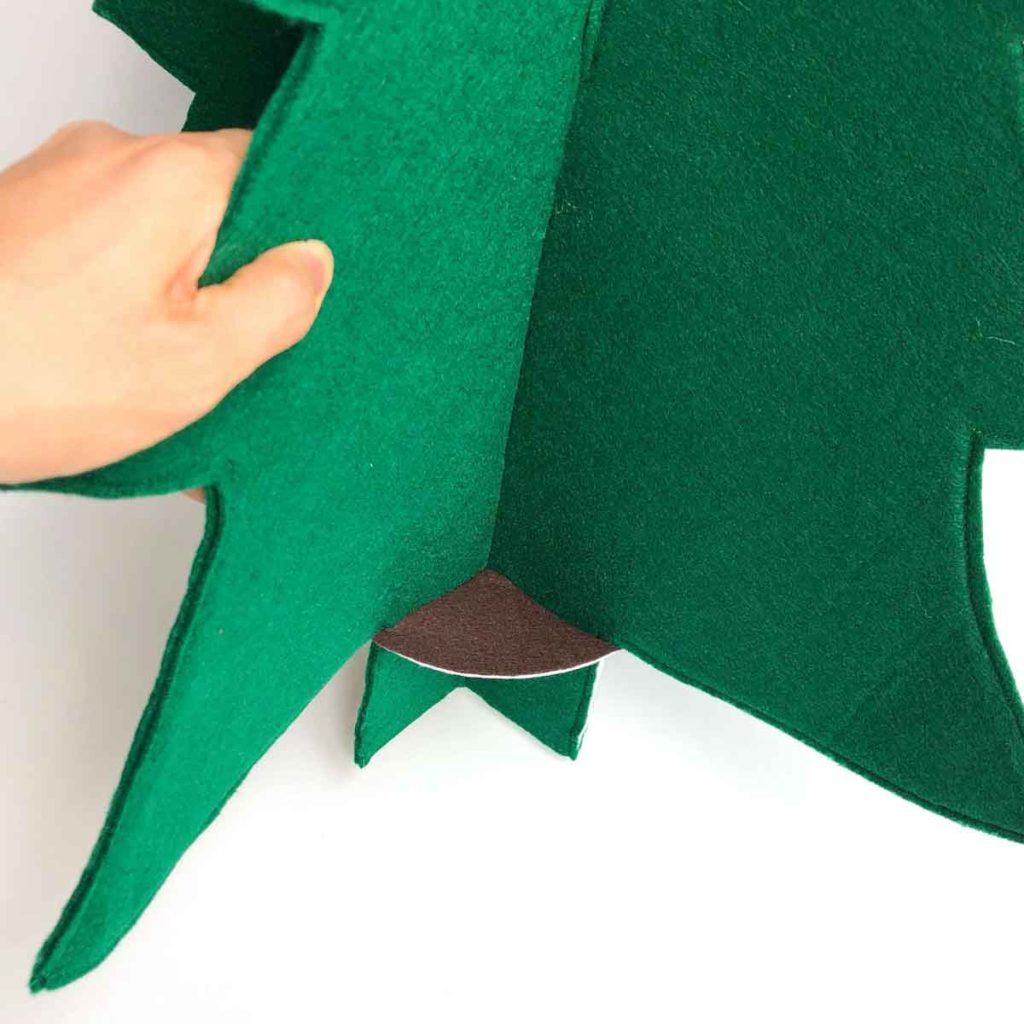
Glue RECTANGULAR BASE PIECE to CIRCLE BASE PIECE, starting at one of the tree corners (doesn’t matter which one). Apply glue to the CIRCLE BASE PIECE a little at a time and gently roll the RECTANGULAR BASE PIECE over.
TIP:
1. Make sure to start gluing on the left side of RECTANGULAR BASE PIECE that doesn’t have the excess felt.
2. Make sure the top side of RECTANGULAR BASE PIECE with the folded felt is facing up towards the top of the tree. This side is glued to the CIRCLE BASE PIECE.
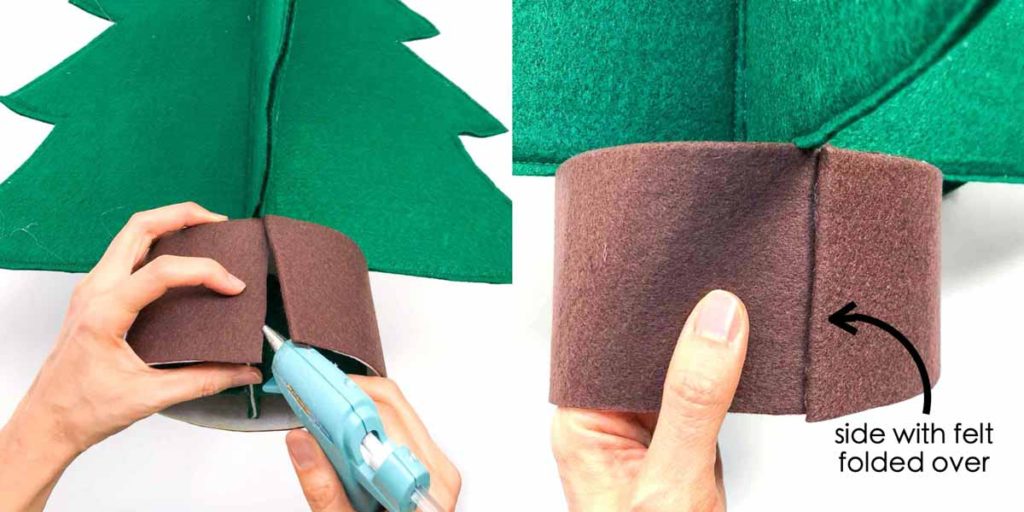
Once you get to the end of the base, apply glue to the side of RECTANGULAR BASE PIECE where you started and glue the other side down.
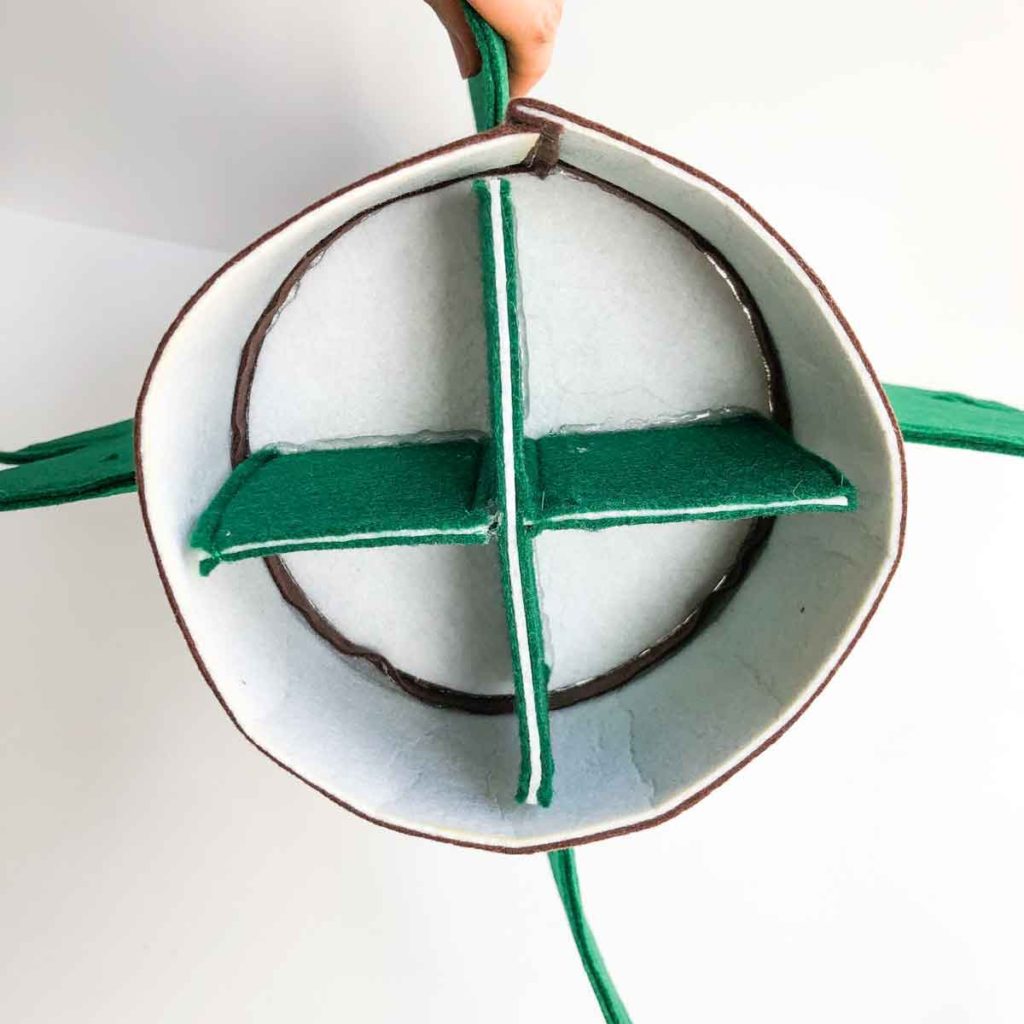
View of bottom of felt tree after base is completed. You can also cut out another CIRCLE BASE PIECE with stabilizer and felt if you want to cover the bottom of the tree. I didn’t do this but it will look nicer if you do!
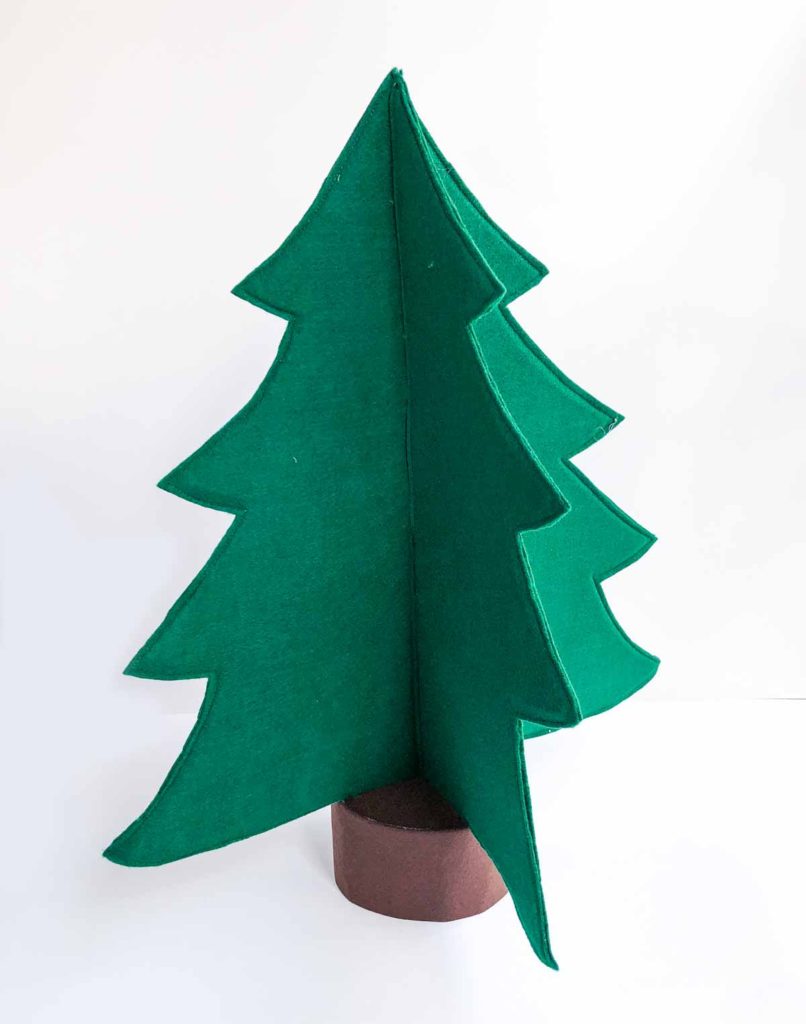
Finished felt tree with base.
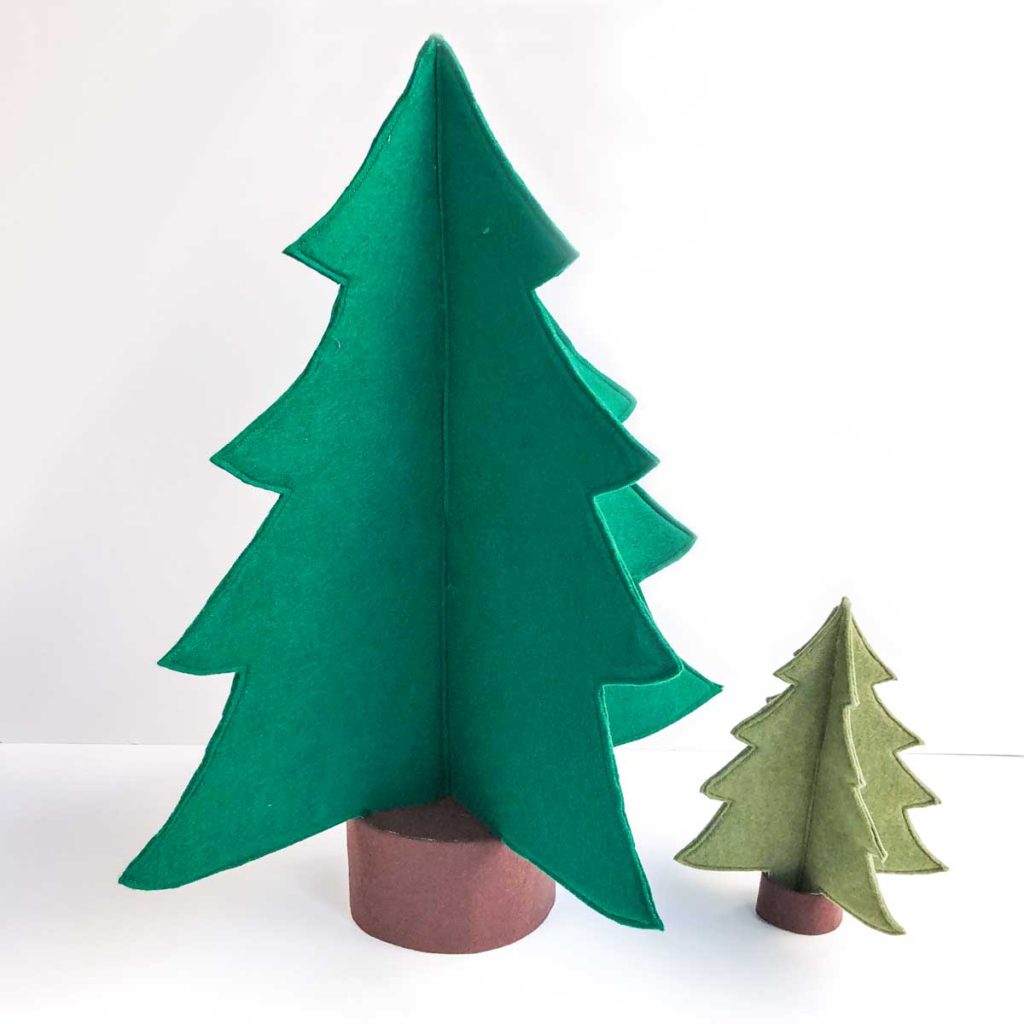
Large Felt Tree with Mini Felt tree.
How to Make a 3D Felt Christmas Tree
This DIY felt Christmas tree is fun for toddlers and easy to make! Includes patterns for no sew felt Christmas ornament. Great way to keep the little ones busy this holiday season!
Materials
- 3D FELT CHRISTMAS TREE PATTERN
- 72" WIDE DARK GREEN FELT - 1 yard
- PELTEX ULTRA FIRM ONE-SIDED STABILIZER - 1.5 Yards
- BROWN FELT - 1/8 Yard (4.5 inches or 11.5cm).
Tools
- SEWING MACHINE
- FABRIC SCISSORS
- SEE-THROUGH SEWING RULER
- FABRIC CHALK
- SEWING PINS
- MATCHING THREAD
- GLUE GUN
- CRAFT BOND
Instructions
- Print, cut, and assemble the Large Christmas Tree Paper Pattern.
- Place the pattern on fold of green felt. Trace pattern with chalk.
- Cut Christmas tree out on fold. Repeat this process again so you end up with two pieces of felt tree.
- For each of the FELT TREE PIECE, cut out two more pieces of felt that are slightly larger than the tree (doesn't have to be that exact!).
- Print, cut, and assemble the Stabilizer Paper Pattern.
- Trace one side of the pattern on the Stabilizer, then flip the pattern to the other side and trace again to make a full tree. (See Note 1)
- Cut out TREE STABILIZER PIECE.
- Use the first piece as the "pattern" to trace for the second stabilizer piece.
- Place STABILIZER PIECE over FELT TREE PIECE so that the extra felt around STABILIZER PIECE is roughly equal all around.
- Fuse the the STABILIZER to the FELT TREE PIECE with a hot iron.
- Sew the felt pieces together at about 1/4” (6.35mm) from edge of FELT TREE PIECE.
- Then trim off excess felt from the ROUGHLY CUT FELT PIECE.
- Repeat for other piece.
- On the first piece of Felt Christmas tree (PIECE 1), mark 12 inches (30.48cm) down from the tip of the tree at the mid line.
- On the second piece of Felt Tree (PIECE 2), mark 11.5 inches (28.21 cm) Up from the bottom of the tree at the mid line.
- Stitch a distance of 1/4 inch (6mm) away from the line on both sides and the top of the line.
- Cut out a 1/8 inch (3mm) wide slit in between stitch line. Repeat for PIECE 1 of felt tree.
- You’ll end up with PIECE 1 FELT TREE that has a cut slit at the top, and PIECE 2 FELT TREE with a cut slit from the bottom.
- Mark the mid line of the tree with fabric chalk starting from end of slit. The line is there to guide you to know where to glue the tree pieces together in the next step.
ASSEMBLING THE TREE TOGETHER
- Slide PIECE 2 (the one with the slit on the bottom) over PIECE 1 (slit on top). The two tree pieces should match exactly at the top and bottom tips (See Note 2)
- Apply glue on the mid line (following the chalk line you just marked), and glue the tree pieces together at the top (See Note 3)
- Repeat gluing the bottom part of the tree together.
HOW TO MAKE TREE BASE
- Cut out pattern pieces on brown felt and stabilizer.
- Fuse the stabilizer to the CIRCLE BASE PIECE.
- Mark the dotted “+” from the paper pattern to the brown felt. The dotted “+”lines are 5.25” (13.3 cm) long, slightly smaller than the diameter of the circle, and cross at the center of the circle.
- Cut out the “+” mark, about 1/8 inch (3mm) in width.
- Press the fusible stabilizer to the brown felt, matching at one corner.
- Fold and glue the excess brown felt down over the stabilizer on the two sides where the felt is cut slightly larger.
GLUING FELT BASE TREE TOGETHER
- Slide the CIRCLE BASE PIECE over the bottom of the felt tree, with the brown felt side facing towards the top of the tree.
- Push CIRCLE BASE PIECE all the way up so it touches the bottom of the tree.
- Glue the CIRCLE BASE PIECE to the tree.
- Glue RECTANGULAR BASE PIECE to CIRCLE BASE PIECE, starting at one of the tree corners (doesn’t matter which one).
- Apply glue to the CIRCLE BASE PIECE a little at a time and gently roll the RECTANGULAR BASE PIECE over (See Note 4).
- Once you get to the end of the base, apply glue to the side of RECTANGULAR BASE PIECE where you started and glue the other side down.
- Optional. - You can also cut out another CIRCLE BASE PIECE with stabilizer and felt if you want to cover the bottom of the tree. I didn't do this but it will look nicer if you do!
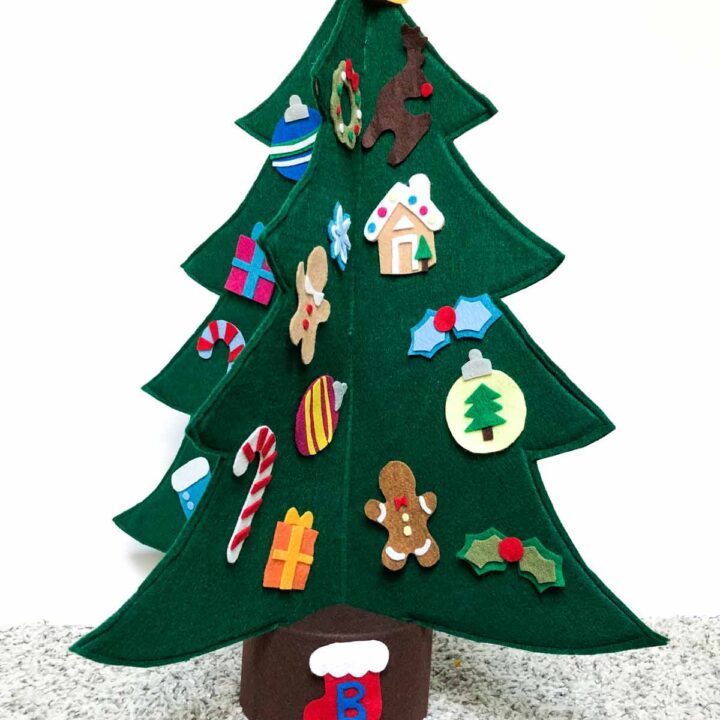
- 3D Felt Tree is Finished!
- Now cut out some felt ornaments to decorate the tree and you are done! No Sew Felt ornament patterns are available for Free in the MindyMakes Library
Notes
- Placing the pattern slightly on the diagonal of the stabilizer is the most space saving.
- If you need to make the two tree pieces match, you can always cut the slits on the tree a little bit longer. It's ok if you end up cutting past the stitch line at the end of the slit.
- Tip for Gluing Felt Christmas Tree Pieces together
• Apply just enough glue and not to over do it or else you’ll see the excess glue.
• Hold the Tree Piece perpendicular to each other while the glue dries so it’ll look the best - Tip for Gluing Rectangular Base
• Make sure to start gluing on the left side of RECTANGULAR BASE PIECE that doesn’t have the excess felt.
• Make sure the top side of RECTANGULAR BASE PIECE with the folded felt is facing up towards the top of the tree. This side is glued to the CIRCLE BASE PIECE.
DIY no-sew FELT Christmas tree ornaments

Now cut out some DIY felt ornaments to decorate your tree! You can find Printable Felt Christmas Ornament Patterns in the free resource library. These templates are the basic shapes of the ornaments. Cut them out and add any details you like!

I actually had the most fun cutting out these little ornaments, it was hard to stop! Use Craft Bond or Fabric glue to glue the details to the ornaments.
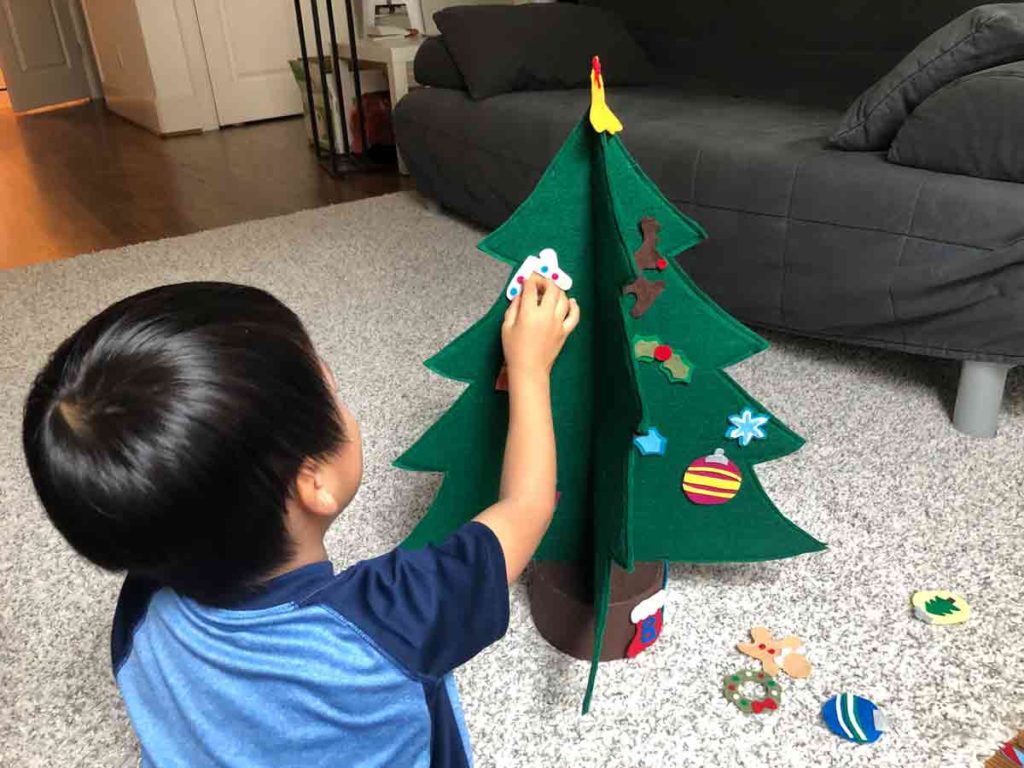
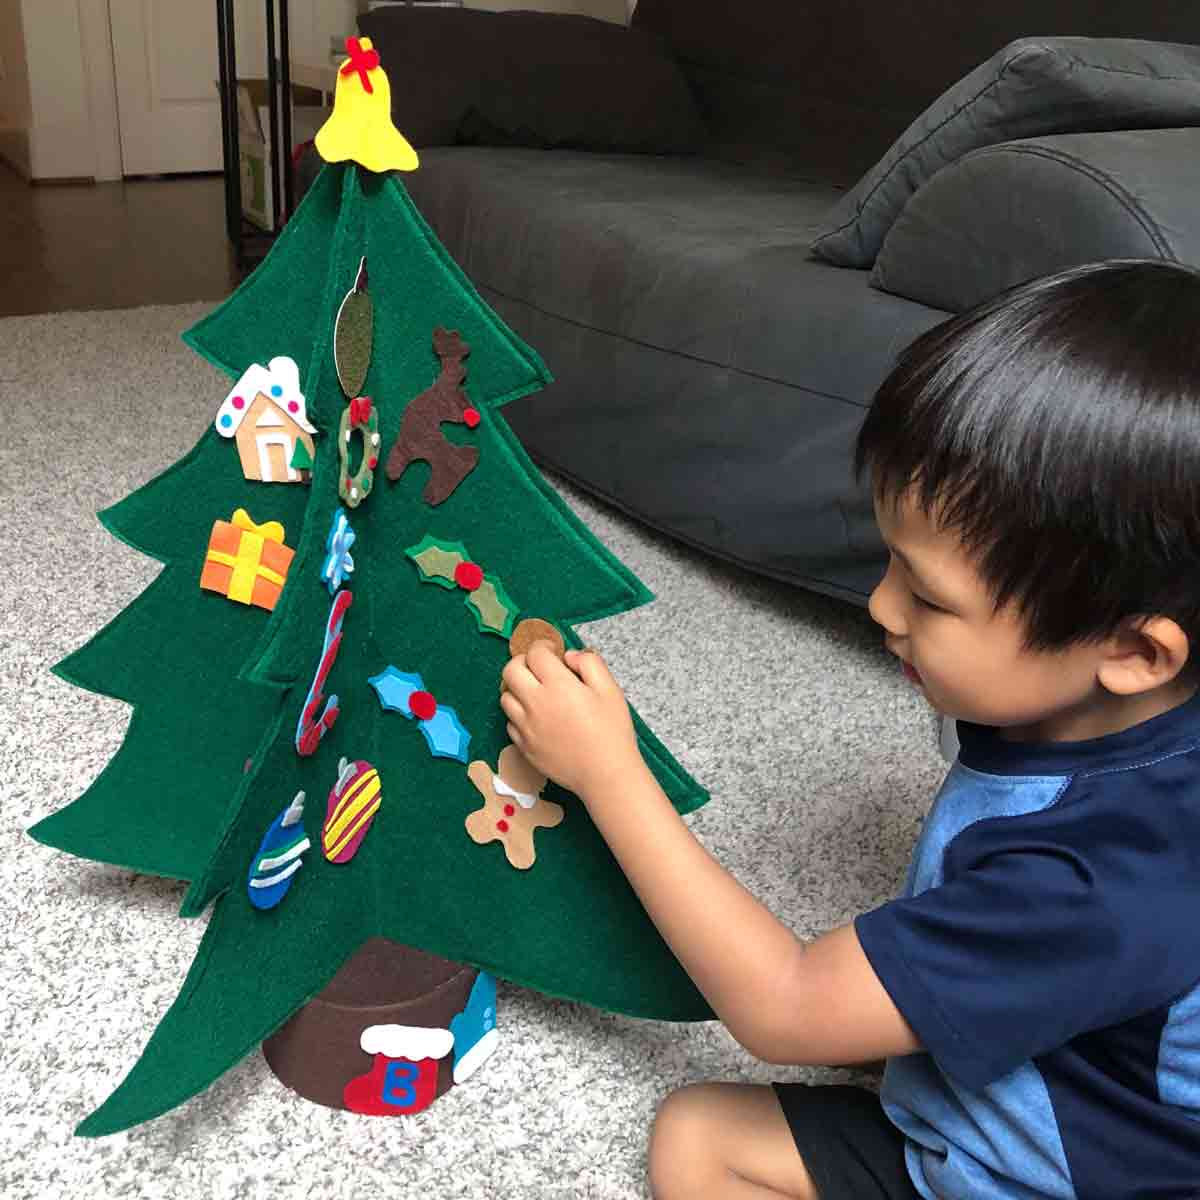
Then, pat, pat, pat. Let your toddler decorate the the tree and place the ornaments wherever they want. My little boy decided the golden bell should be the tree topper and put that one on first.
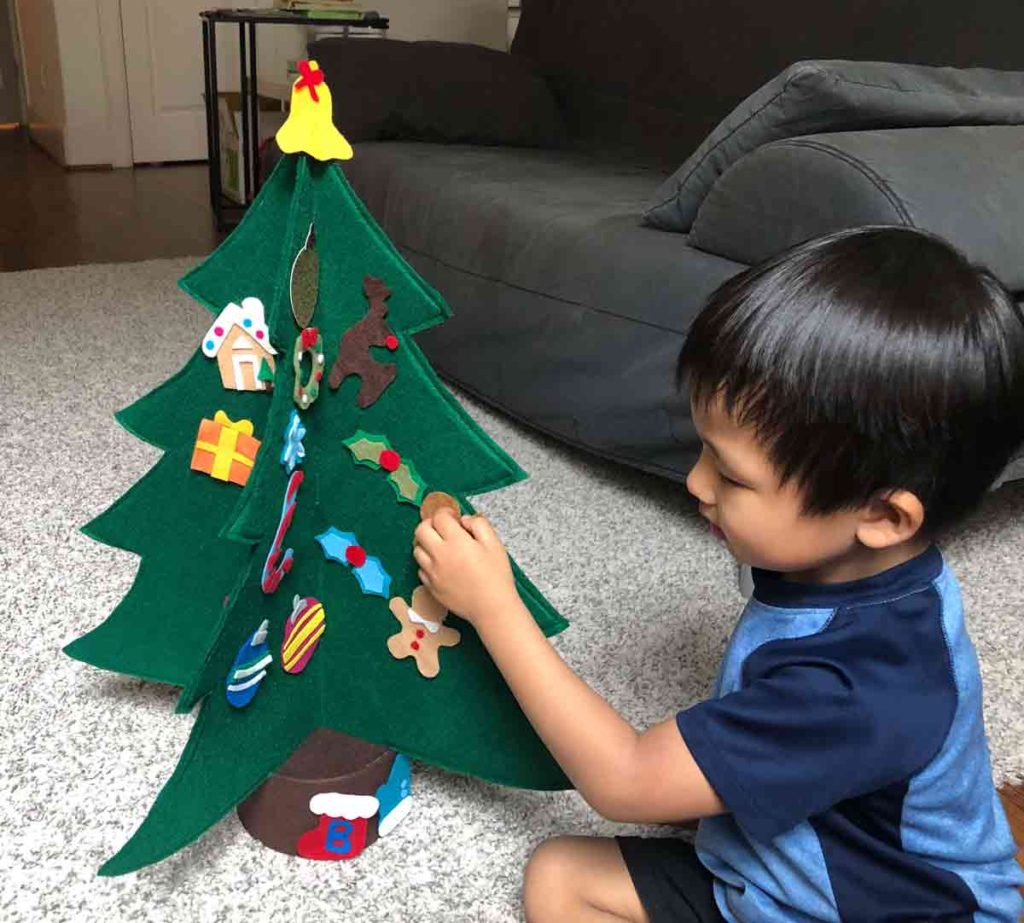
Gingerbread man goes here. Stockings go here. Presents. What a super fun project! Let me know in the comments below if your little one enjoyed their tree. And we finally have a Christmas tree for this year. Yay!