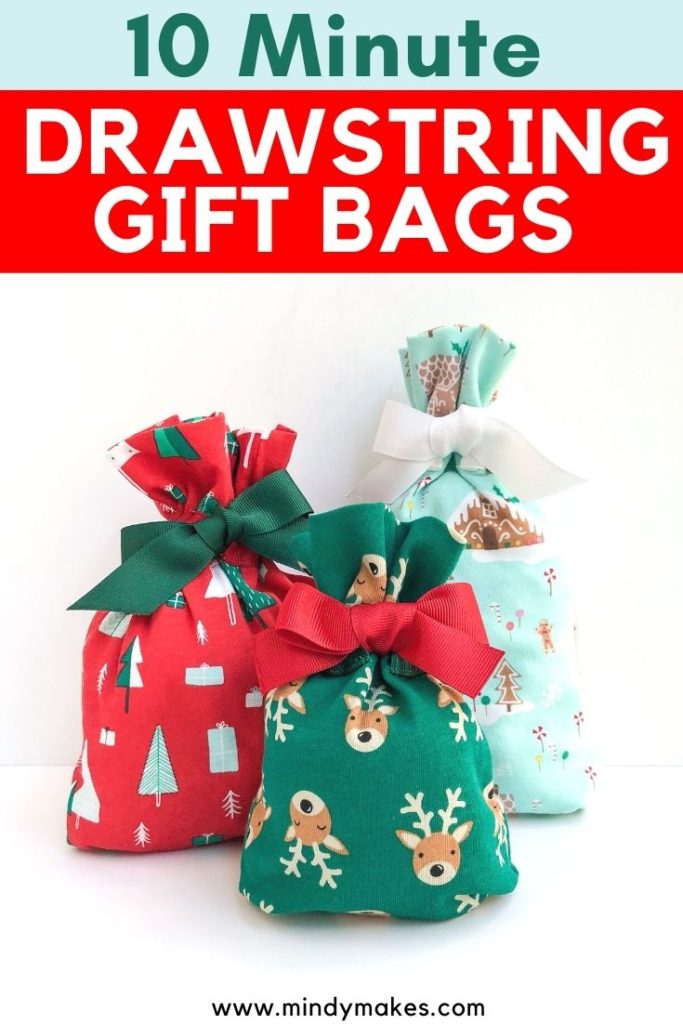
Easy Fabric Drawstring Gift Bag with a Gusset (Free Pattern)
These adorable drawstring gift bags are perfect for holding treats, party favors, stocking stuffers, and more! The best part? Gift bags are 100% reusable and only take 10 minutes to sew. Get ready to follow this easy step by step tutorial and sew a bunch for the holiday season!
- Details of the Sew Very Easy Gift Bag
- What are the Dimensions of The Drawstring Gift Bag?
- What Do I Need to Make this Easy Fabric Drawstring Gift Bag?
- Tools
- Fabric Drawstring Gift Bag Pattern
- Where do I Sew the Drawstring Channel?
- How to Make Fabric Drawstring Gift Bag Step-by-Step
- How to Sew a Drawstring Channel?
- How to Tie the Perfect Ribbon?
In the recent years I’ve been trying to be more diligent about giving out Christmas treats to my neighbors. I figure it’s a good way to extend a little hospitality and also get to know them better. On top of that, I really want to teach my toddler that Christmas is a time for giving (because we’ve already received the best gift from God through Jesus!)
So far, my toddler really enjoys bringing out all the treats and ringing each of the neighbors doorbell. Unfortunately, most of the time we don’t find the neighbor (since Amazon delivery also rings the doorbell and leaves the package at the door, so most people don’t come out when they hear the doorbell). However, a few days later we end up receiving little gifts and sweet notes in return from our neighbors as well! So fun!
This year, as I contemplated what to make for our neighbors, I also thought about how to package them. I’ve also always wanted to sew fabric gift bags because I’m obsessed with fabric. Additionally, I love that fabric gift bags are reusable.
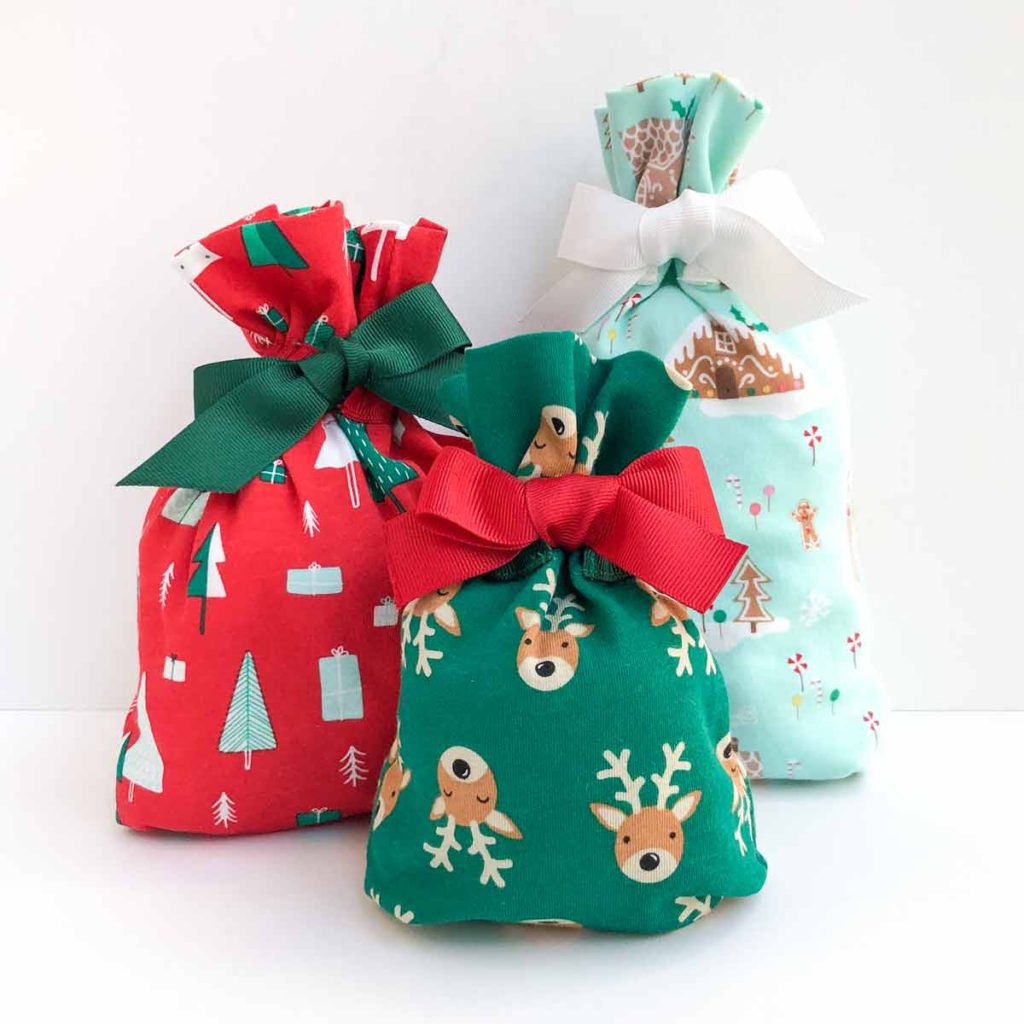
These drawstring fabric gift bags are super adorable because the drawstring is made using a ribbon. Secondly, I love that the drawstrings end in the middle of the bag. This way, you can tie a bow with the ribbon drawstring after packing your gift. Perfect.
Of course, If you’re planning to use these bags for edible treats, you will still need to first package them in a plastic baggie. However, these handmade gift bags replaces the need for a paper gift bag and they can be washed and reused again and again.
Details of The Sew Very Easy Gift Bag:
First, the drawstring channel of the fabric gift bag is created by simply sewing a piece of ribbon over the bag itself. I love this as it makes for a quick and easy sewing project. You don’t have to make an extra fabric strip or bias as the drawstring channel. Also, the sides of the ribbon doesn’t fray so you don’t have to worry about tucking in seam allowances to create this channel.
Next, you thread a piece of the same ribbon (or a different matching color ribbon) into the channel to create the “drawstring”. The drawstring part of the bag closes off your gift and is then tied into a ribbon. You can also attach a gift tag or personal note to the ribbon.
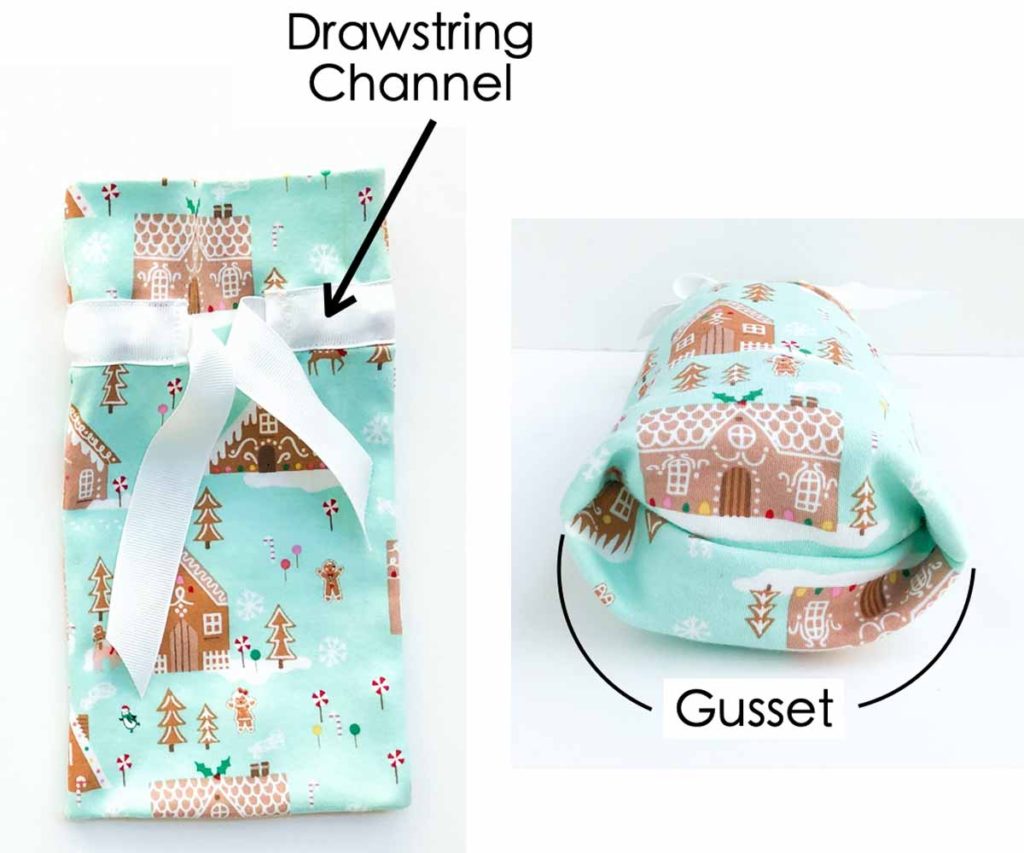
Third, there is a gusset at the bottom of the bag. In case you don’t know what a gusset is (don’t worry, I didn’t know either), it’s an extra piece of fabric, usually at the bottom, to make the bags roomier.
I’m sure your gift recipients will be delighted by such a nicely packaged present!
What Are the Dimensions of The Drawstring Gift Bag?
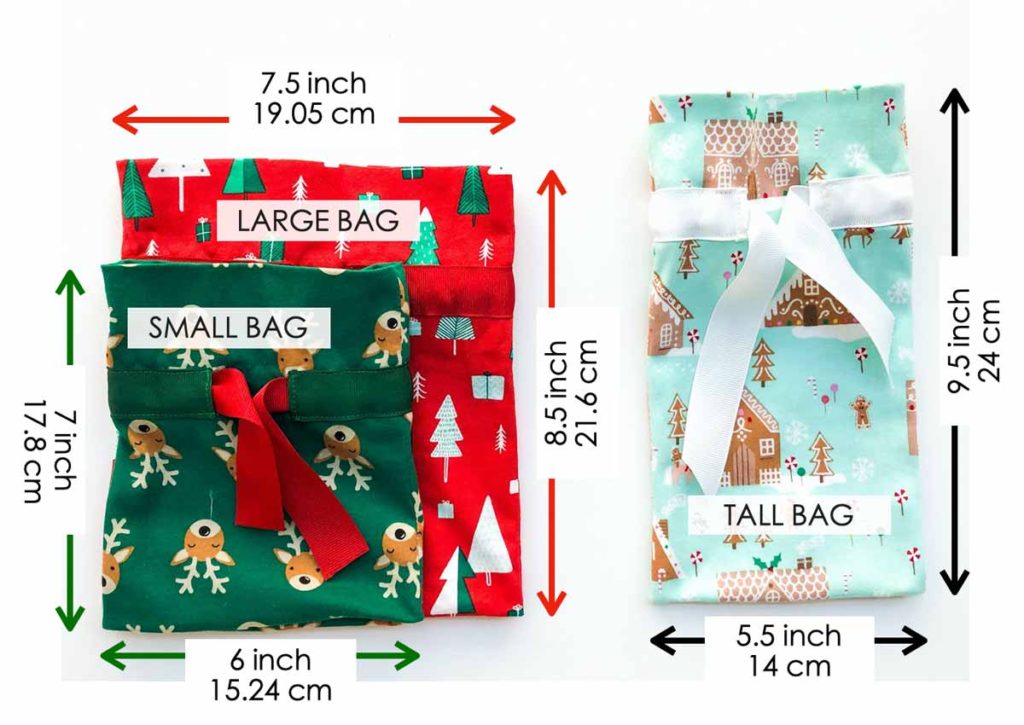
The size of the drawstring gift bags are as follows:
Small Bag: 7 in/17.8 cm (height) x 6 in/15.24 cm (width)
Large Bag: 8.5 in/21.6cm (height) x 7.5 in/19.05 cm (width)
Tall Bag: 9.5 in/24 cm (height) x 5.5 in/14 cm (width)
Gusset (on bottom of bag) measures 3″ (7.62 cm) wide.
These bags are great for holding homemade treats, party favors, small gifts, and more!
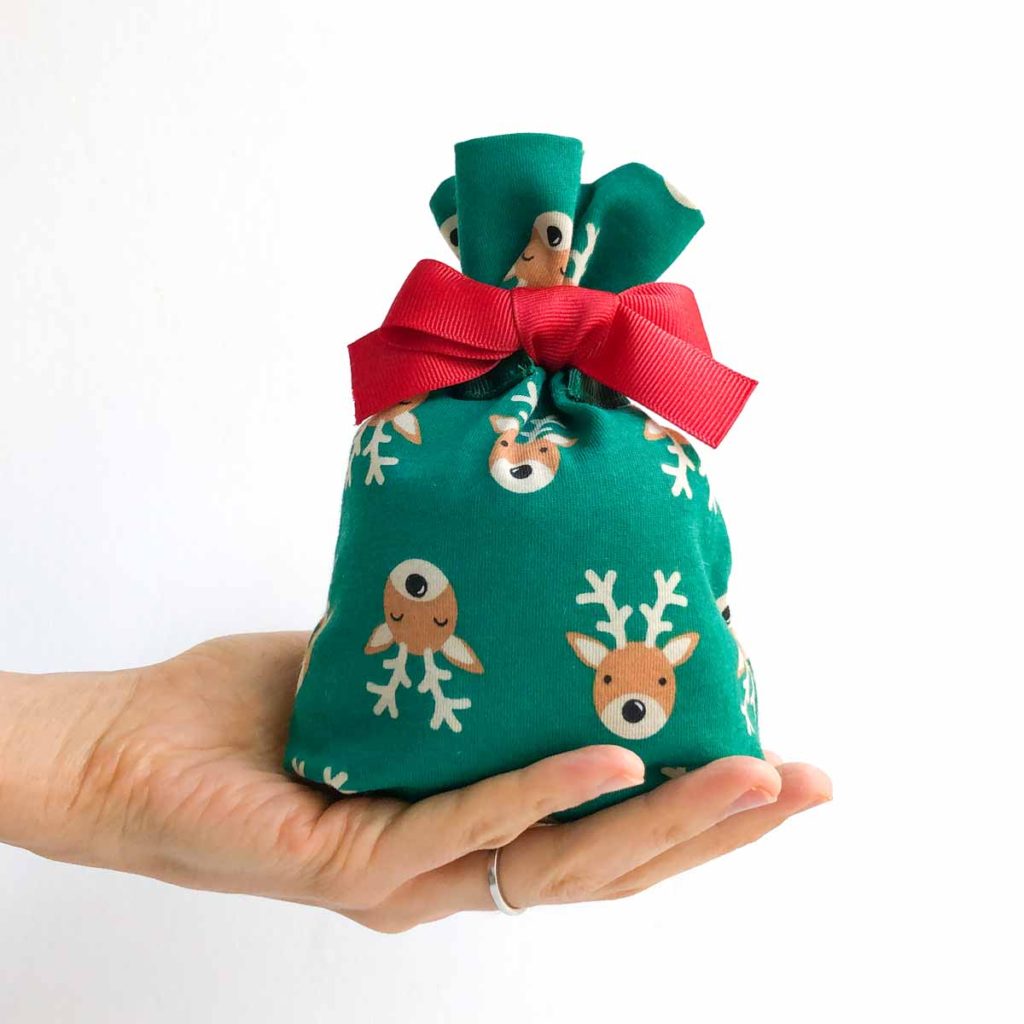
Although the bags may seem small at first glance,the gusset at the bottom adds a lot more room to hold more! In addition, the filled bag will stand on its own (and looks better when properly filled).
what do i need to make this easy Fabric Drawstring Gift Bag?
- 1/3 – 1/2 yard of Fabric – To make the small bag, you’ll need 1/3 yard. If you’re making the Large or Tall bag, you’ll need 1/2 yard. I used 100% Cotton Jersey Knit because the prints are just super adorable! The good thing about knits is that the edges won’t fray. For an in depth tutorial about sewing knits, check out How to Sew Knits and Stretchy Fabric. Note: If you use woven fabric, make sure to pink or serge the fabric edges first.
- 7/8″ Ribbon Spools, matching color– I used Offray brand Grograin Ribbon. However, feel free to use whatever ribbon you like. Just make sure to use a 7/8″ wide ribbon for the drawstring channel otherwise it will be difficult to thread.
TOOLS
- SEWING MACHINE
- FABRIC SCISSORS
- SEE-THROUGH SEWING RULER
- FABRIC CHALK – These Chaco Liners by Clover are my absolute favorite
- SEWING PINS or SEWING CLIPS – Sewing clips are great for holding knit fabrics together
- MATCHING THREAD
Fabric Drawstring gift bag pattern
First, to make one gift bag, you will need to cut out the following:
- Gift Bag Pattern (x2)
- Drawstring Channel (x1) – Cut a piece of ribbon to make this
- Ribbon (x1)
Gift Bag Pattern Sizes:
Note:
1/2 in (1.27cm ) seam allowance included in pattern
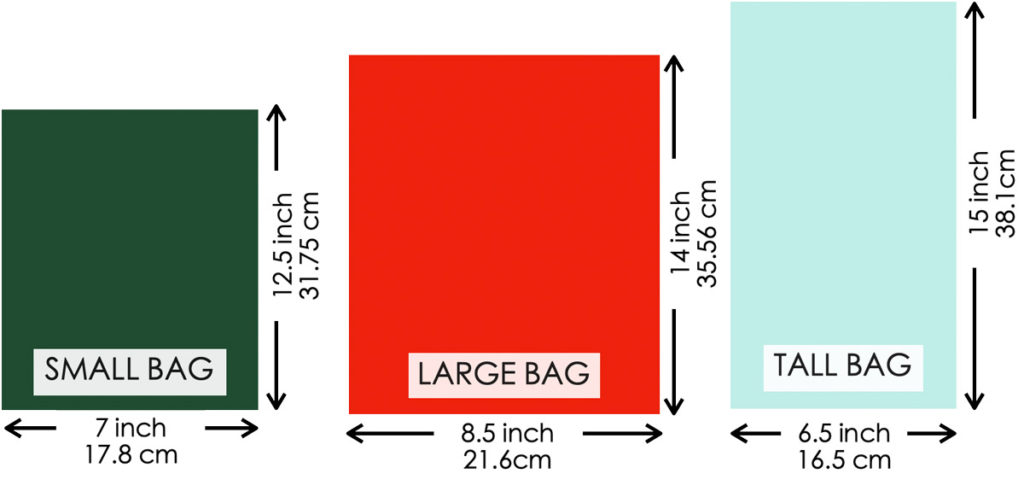
- Small Bag: 12.5 in/31.75cm (height) x 7 in/17.8 cm (width)
- Large Bag: 14 in/35.56 cm (height) x 8.5 in/21.6 cm (width)
- Tall Bag: 15 in/38.1 cm (height ) x 6.5 in/16.5 cm (width)
Drawstring Channel:
Notes:
- Cut a piece of 7/8″ grosgrain ribbon for the drawstring channel. Alternatively, you can also use fabric or bias tape instead. Just make sure your channel is at least 1/2 – 7/8 inches in height otherwise it will be difficult to thread the ribbon in later on.
- 1 inch or 2.5 cm seam allowance already included in measurements
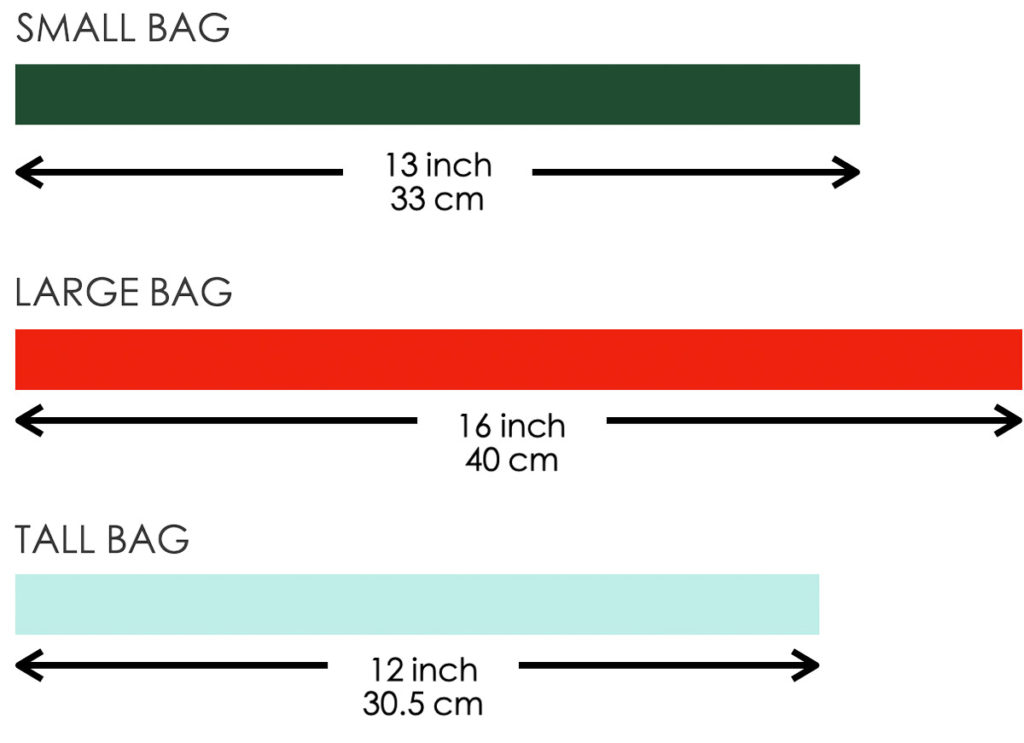
- Small Bag: 13 inch (33 cm)
- Large Bag: 16 inch (40 cm)
- Tall Bag: 12 in (30.5 cm)
Ribbon:
For the drawstring ribbon, I recommend cutting out the following lengths at the minimum for each bag size. However, you can always cut the ribbon lengths longer and trim them down afterwards.
- Small Bag: 18 inch (46 cm)
- Large Bag: 21.5 inch (55 cm)
- Tall Bag: 21 in (54 cm)
Where Do I sew the Drawstring Channel Onto the bag?
You want to leave about 1″ (2.5 cm) in between the drawstring channel, at the front middle of the gift bag. The following photo should give you an idea for where to place the drawstring channel relative to the side seam.
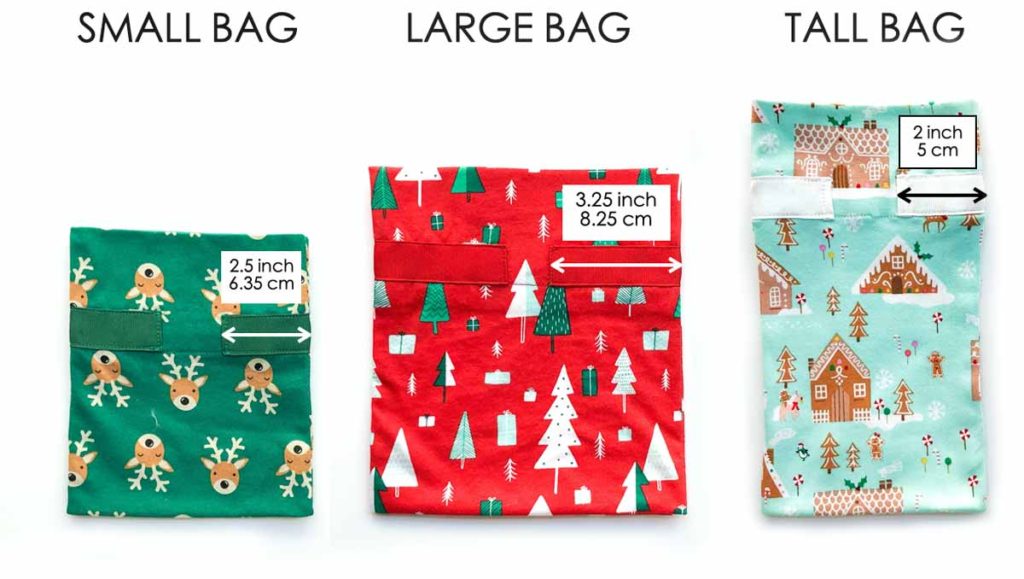
Small Bag: Place edge of drawstring channel about 2.5″ (6.35cm) from side seam.
Large Bag: Place edge of drawstring channel about 3.25″ (8.25cm) from side seam.
Tall Bag: Place edge of drawstring channel about 2″ (5cm) from side seam.
How to Make a Fabric Drawstring Gift Bag Step By Step
In this tutorial, I will be showing you how to make the Tall Bag.
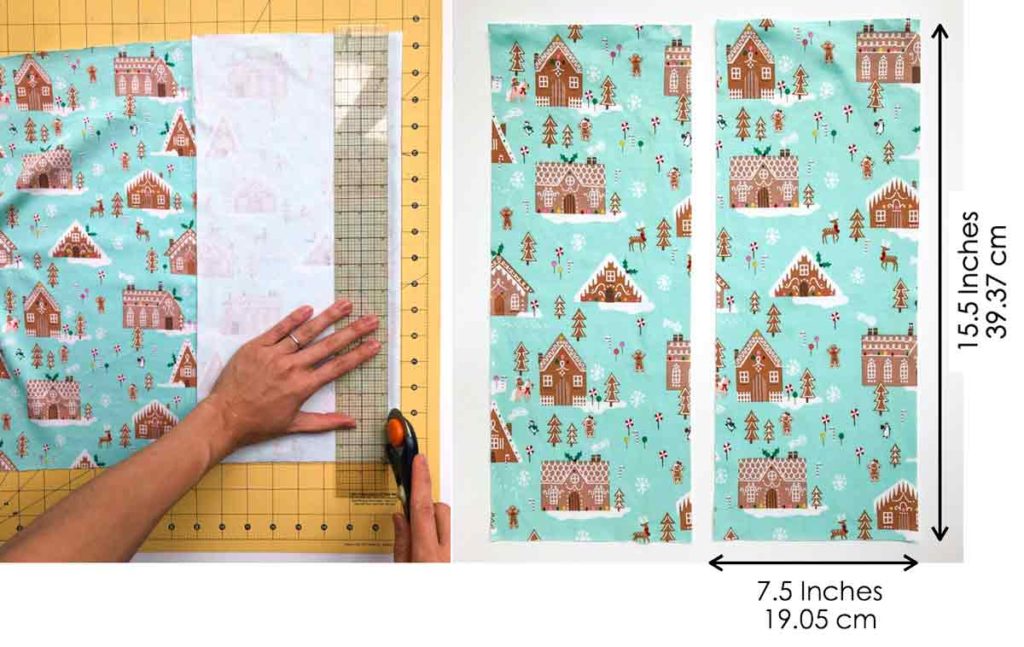
Cut out front and back of bag pattern. A rotary cutter is the perfect tool for this project as it cuts very straight edges. For more information on rotary cutters, check out the post Rotary Cutters Vs Scissors
Using chalk, mark 3 lines on the wrong side of fabric as pictured. Make sure to do it on both pieces of fabric.
- Line 1: 0.5”(1.27cm) from top edge
- Line 2: 3.5” (8.9cm) from top edge
- Line 3: 2”(5 cm) from bottom edge
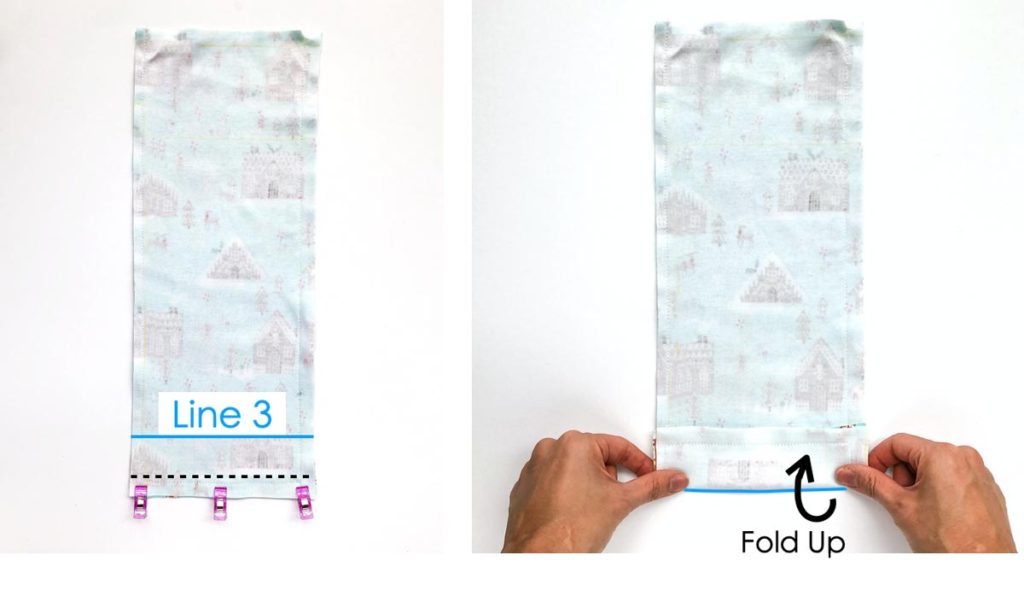
LEFT: Line fabric pieces right sides together and sew at 0.5” (1.27cm) seam allowance (black dotted lines)
RIGHT: Fold bottom of bag up at Line 3
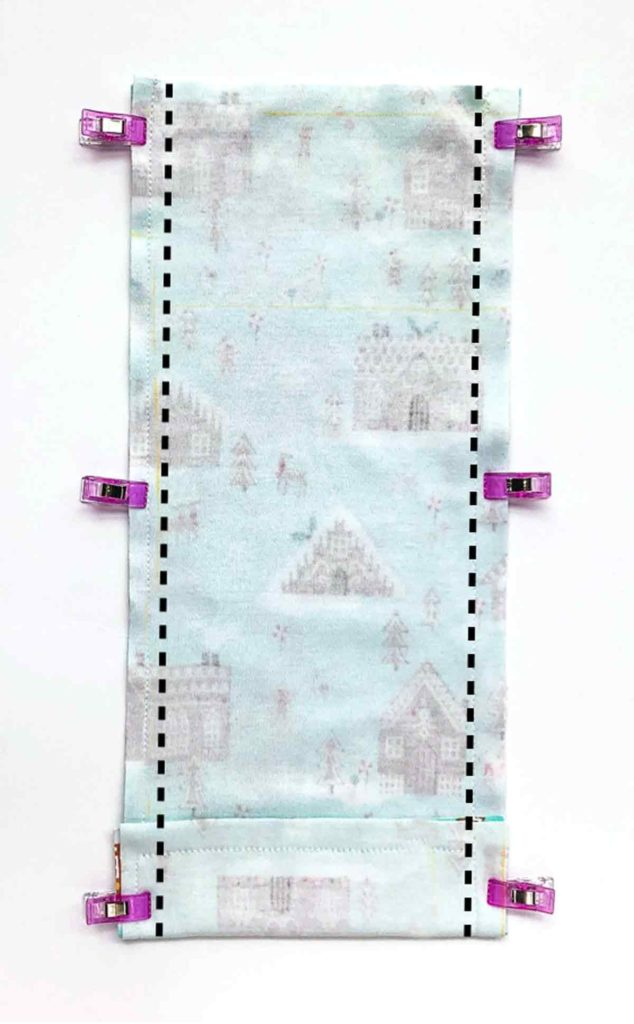
Pin/clip side of bag together and sew at 0.5”(1.27cm) seam allowance (black dotted lines). Make sure to sew the folded part at the bottom of the bag. This fold creates the gusset of the gift bag.
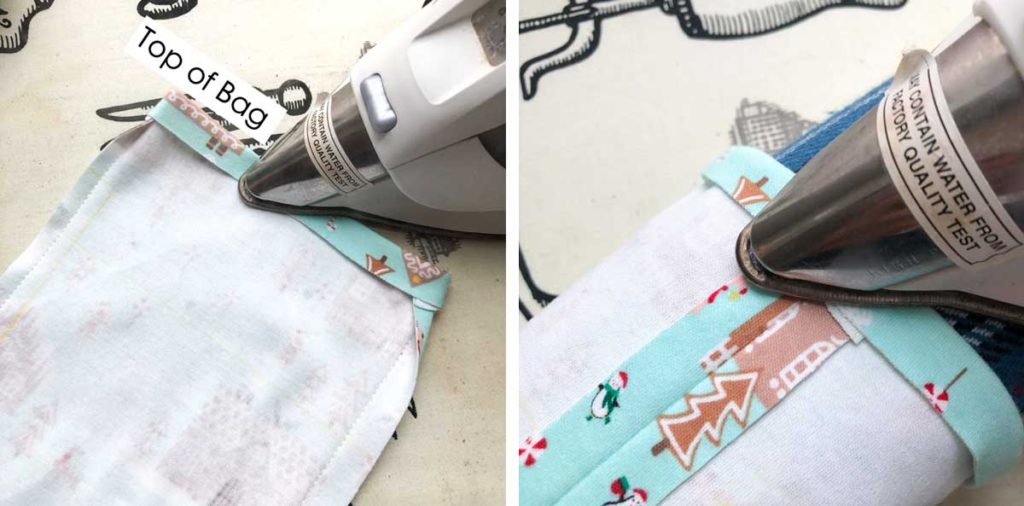
LEFT: First, with wrong side of fabric facing up, press down 0.5”(1.27cm) from top of bag (where you marked Line 1 previously) all around the bag
RIGHT: Next, when you reach the side seams, press them open
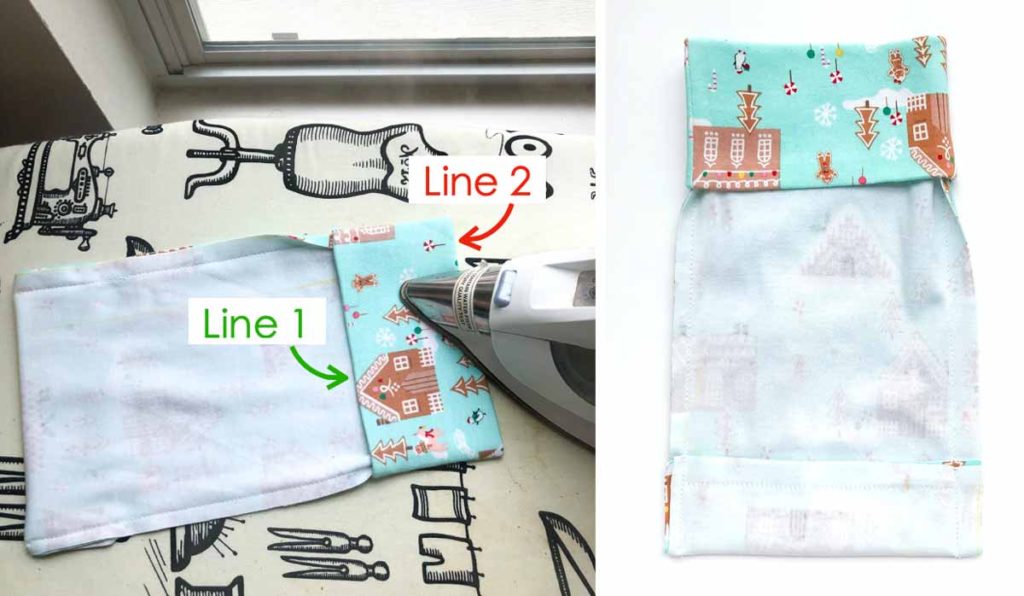
LEFT: Press down again at Line 2 (3.5” from top of bag)
RIGHT: View of Bag after pressed
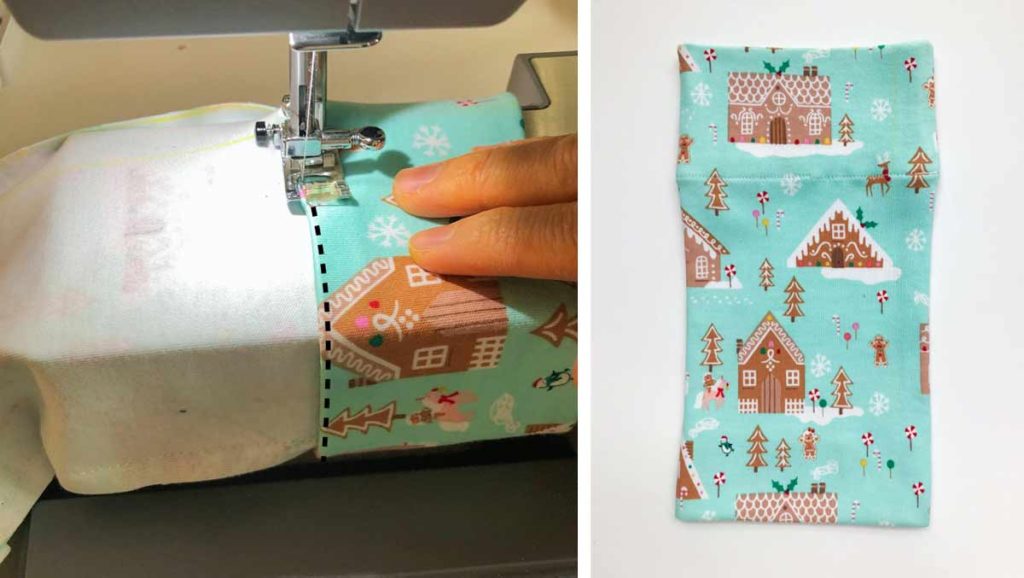
Using matching thread, stitch around bag at 1/8”(3mm) from edge of Line 1. Black dotted lines indicate where you will be sewing. Note: you will need to remove the sleeve of the sewing machine in order to fit the bag over to sew.
How to Sew Drawstring Channel:
The drawstring channel is made from a piece of 7/8″ Grosgrain ribbon. To determine how much you need to cut for each bag size, jump to here. You can use a ribbon that matches the bag, or a contrasting one. Totally up to you!
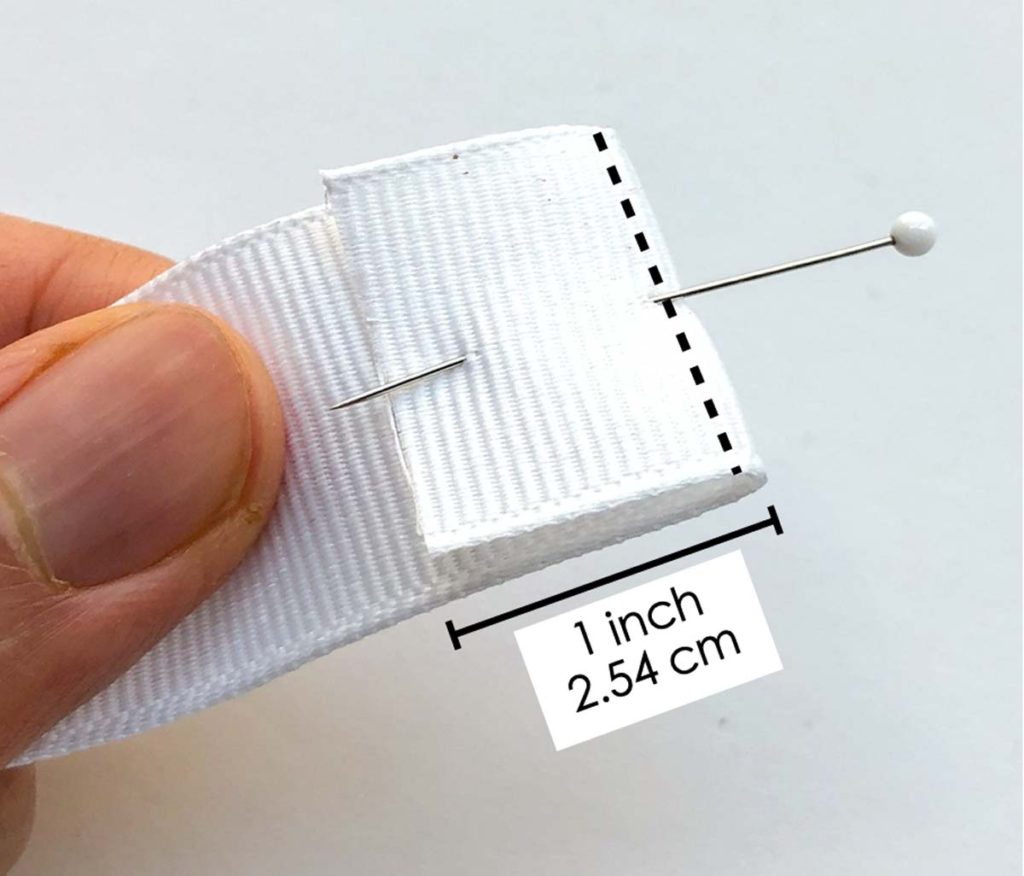
Fold end of ribbon down 1”(2.54 cm). Stitch at 1/8”(3mm) from folded edge (black dotted line). Repeat for other end of ribbon. This prevents ends of ribbon from fraying.
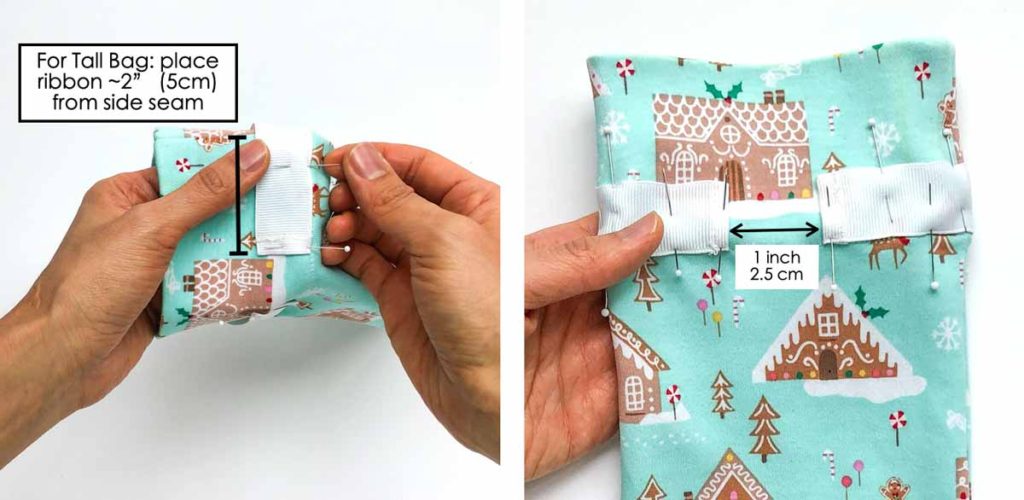
Take one end of Drawstring Channel and place the edge about 2”(5cm) from side seam of your bag. If making Small or Large Bag, jump to here for placement.
Pin Drawstring Channel right above the stitch you had previously sewn, all around the entire bag. There should be 1” (2.5 cm) gap in between the two ends of Drawstring Channel at the front of the bag.
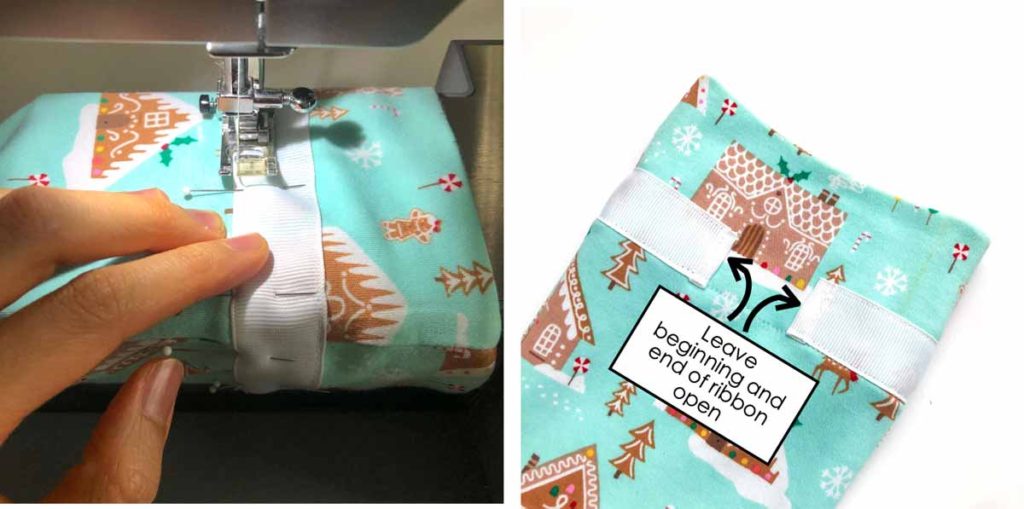
Stitch top and bottom of ribbon to bag at 1/8”(3mm) from edge of ribbon. Leave ends of ribbon open. You have now created your ribbon channel for your drawstring gift bag.
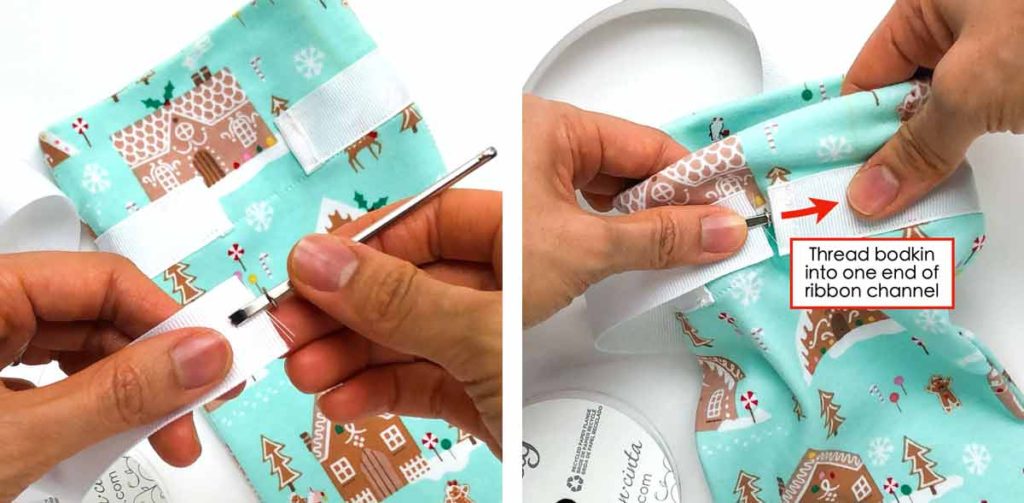
Using the bodkin, thread second piece of ribbon through one end of ribbon channel.
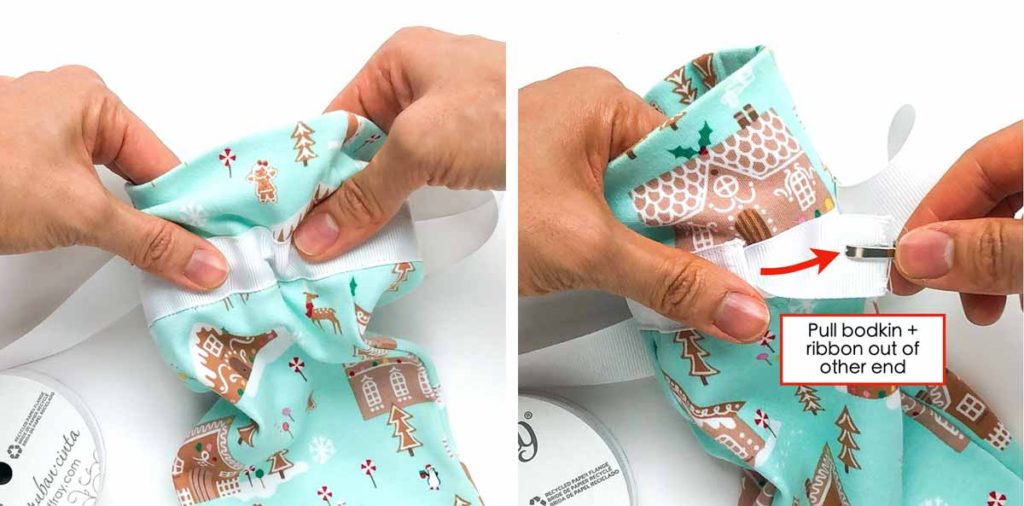
Pull ribbon with bodkin through ribbon channel until it comes out of the other end.
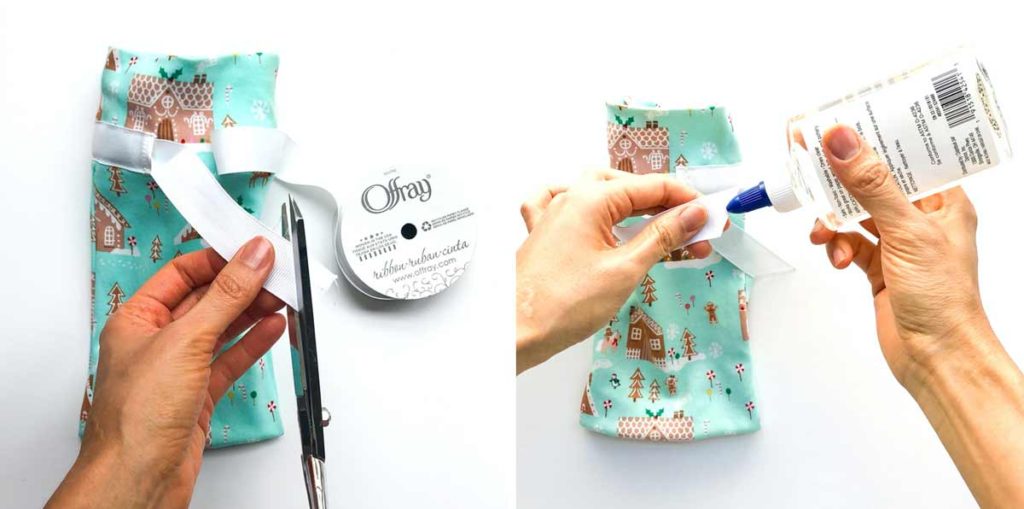
Cut ends of ribbon at a diagonal (or leave them straight). I also like to apply some clear glue at the ends to prevent fraying (fray check works great too!)
How to Tie A Perfect Ribbon
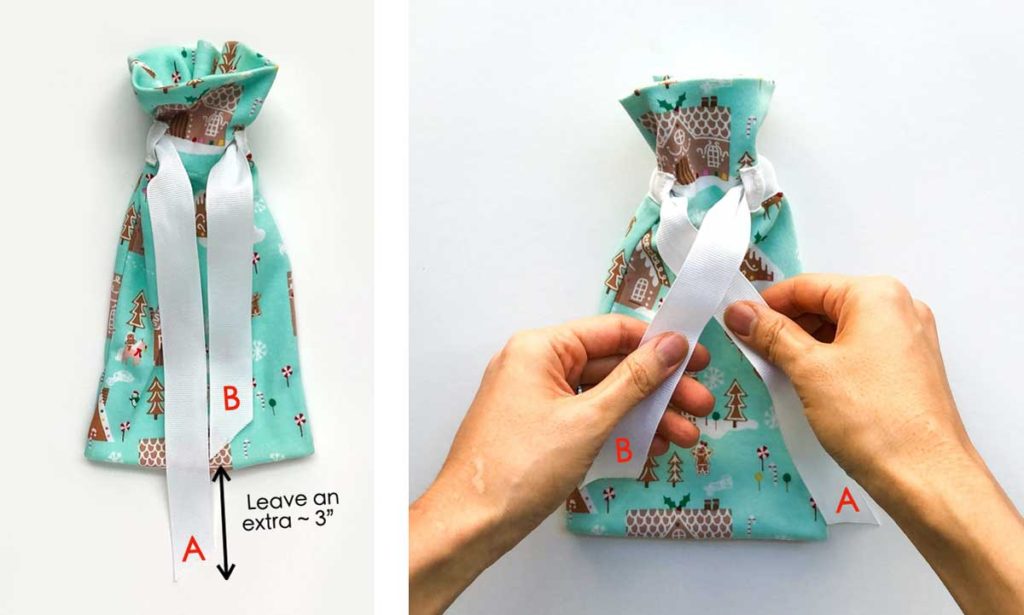
LEFT: Pull drawstring of the bag until it’s tight. Adjust the ends of the ribbon so that the left side is longer than the right (about 3 inches or 7.6cm). For this tutorial, the longer end is called (A) and the shorter end (B). We will also be looking at the bag from an aerial view (top down). The longer end (A) will be on the left, and the shorter end (B) will be at the right.
RIGHT: Place (A) behind (B).
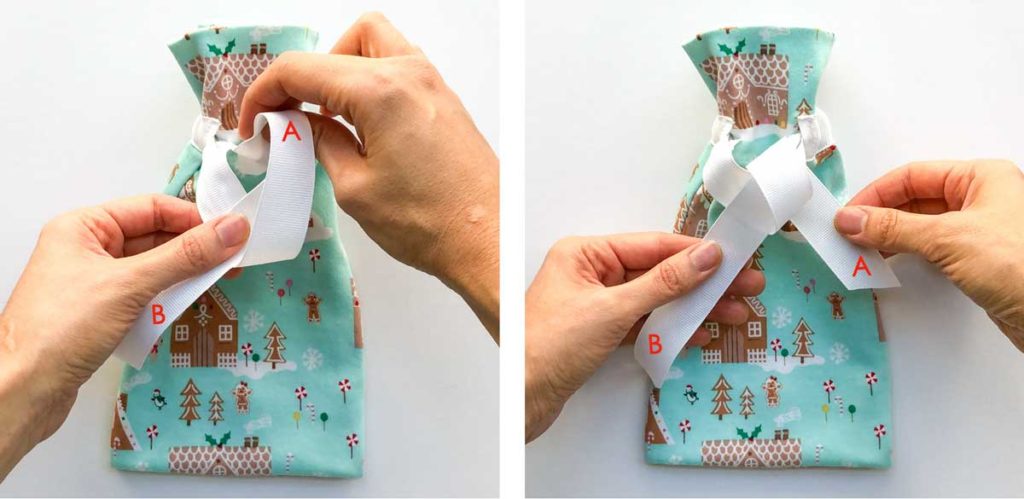
Loop (A) over (B) and make a regular knot.
LEFT: Pull knot tight so the drawstring bag closes. (A) will now be on the right side and (B) will be on the left side.
RIGHT: Make a loop with (B)
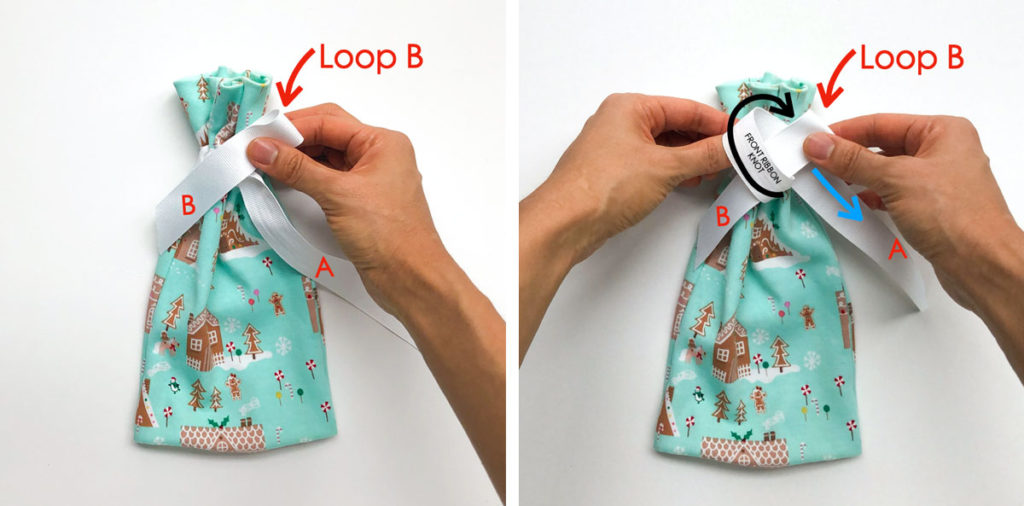
LEFT: Move the loop of (B) over to the right side
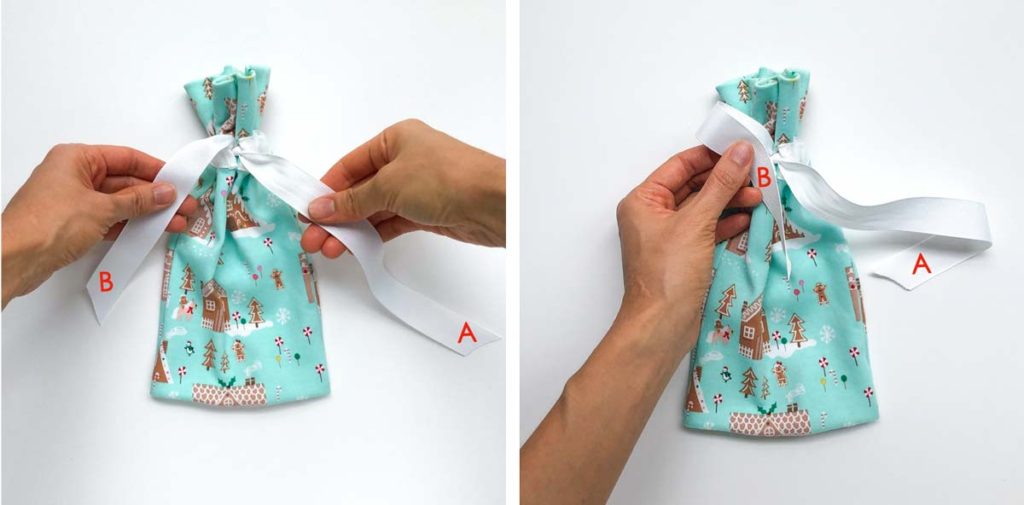
RIGHT: Wrap (A) in front of Loop B, indicated by black arrow. Next, pull (A) behind Loop B, indicated by blue arrow. This front part of (A) that we wrapped over Loop B will be referred to as the FRONT RIBBON KNOT
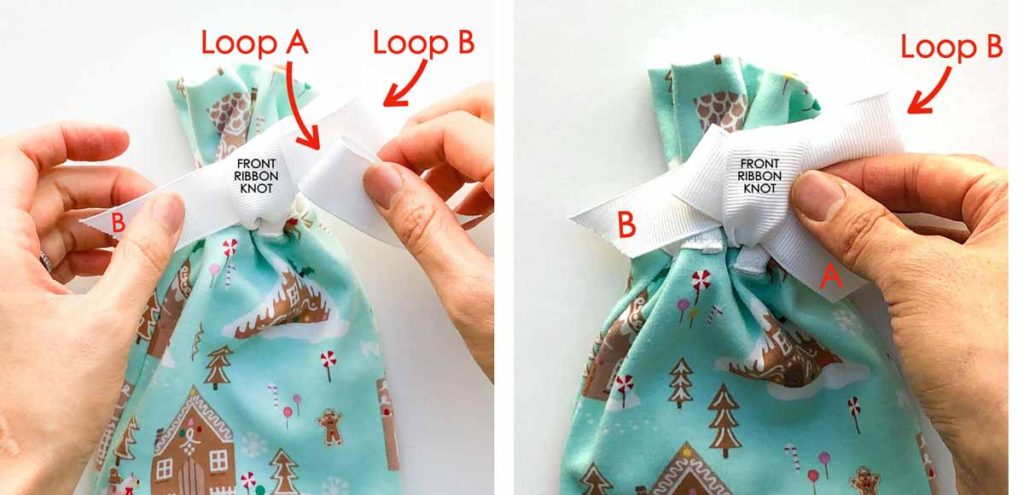
Make a Loop with (A) and slide it into FRONT RIBBON KNOT, just in front of Loop B.
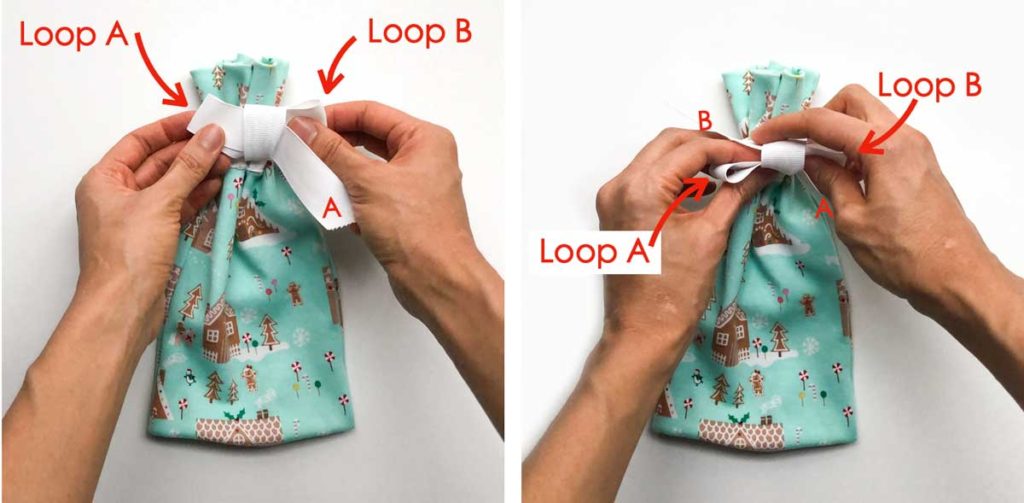
Front and Top view of bow.
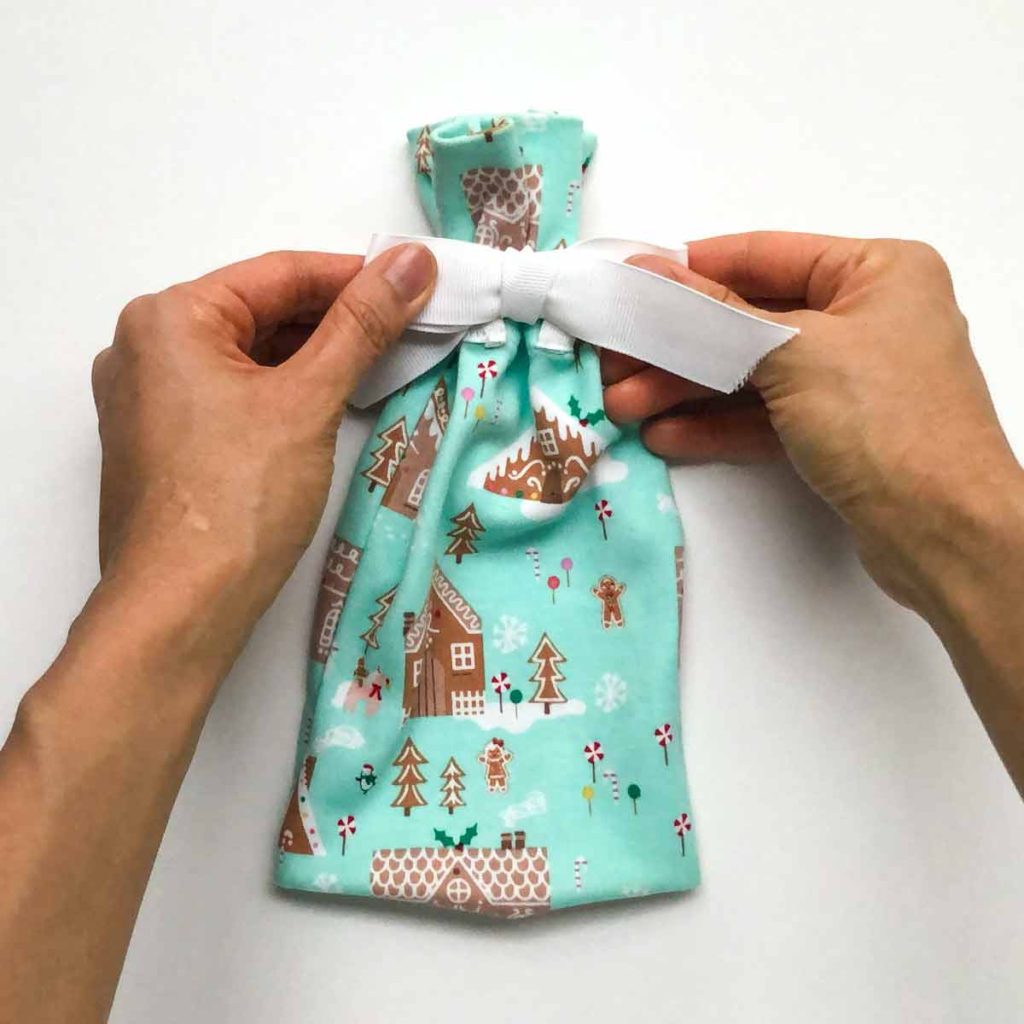
Tighten and adjust your bow as necessary. You now have a perfect ribbon bow!
Wasn’t that a simple little sewing project? I hope you enjoyed it as much as I did!
How to Sew A Fabric Drawstring Gift Bag (3 Sizes)

These adorable drawstring gift bags are perfect for holding treats, party favors, stocking stuffers, and more! The best part is that gift bags are 100% reusable and great even for beginners!
Materials
- DRAWSTRING GIFT BAG PATTERN (see Post for details)
- FABRIC: 1/3-1/2 Yard
- 7/8" RIBBON SPOOLS
Tools
- SEWING MACHINE
- FABRIC SCISSORS
- SEE-THROUGH SEWING RULER
- FABRIC CHALK
- SEWING PINS or
- SEWING CLIPS - great for knit fabric
- MATCHING THREAD
- ROTARY CUTTER (optional)
- PINKING SHEARS (optional, if using woven fabric)
- BODKIN - alternatively, use safety pins
Instructions
- Cut out front and back of bag pattern according to the size that you want to make (see Notes* for pattern dimensions).
- Using chalk, mark 3 lines on the wrong side of fabric**. Make sure to do it on both pieces of fabric.
- Line fabric pieces right sides together and sew the bottom together at 0.5” (1.27cm) seam allowance.
- Fold bottom of bag up at Line 3.
- Pin/clip side of bag together and sew at 0.5”(1.27cm) seam allowance***
- With wrong side of fabric facing up, press down 0.5”(1.27cm) from top of bag (where you marked Line 1 previously) all around the bag
- Next, when you reach the side seams, press them open.
- Press down again at Line 2 (3.5” from top of bag).
- Remove free arm of sewing machine.
- Use matching thread and stitch around bag at 1/8”(3mm) from edge of fold.
HOW TO SEW DRAWSTRING CHANNEL
- Cut Ribbon length according to the size of gift bag you are making ****.
- Fold end of ribbon down 1”(2.54 cm). Stitch at 1/8”(3mm) from folded edge.
- Repeat for other end of ribbon. This prevents ends of ribbon from fraying.
- Take one end of Drawstring Channel and place the edge about 2”(5cm) from side seam of your bag (For TALL Bag). See Note ***** If making Small or Large Bag.
- Pin Drawstring Channel right above the stitch you had previously sewn (step 10), all around the entire bag. There should be 1” (2.5 cm) gap in between the two ends of Drawstring Channel at the front of the bag.
- Stitch top and bottom of ribbon to bag at 1/8”(3mm) from edge of ribbon. Leave ends of ribbon open.
- Use a bodkin to thread second piece of ribbon through one end of drawstring channel.
- Pull ribbon through drawstring channel until it comes out of the other end.
- Cut ends of ribbon at a diagonal (or leave them straight). I also like to apply some clear glue at the ends to prevent fraying (fray check works great too!)
- Pack your gift bag, tie a ribbon, and you are done!
Notes
* Pattern Dimensions for Gift Bag:
- Small Bag: 12.5 in/31.75cm (height) x 7 in/17.8 cm (width)
- Large Bag: 14 in/35.56 cm (height) x 8.5 in/21.6 cm (width)
- Tall Bag: 15 in/38.1 cm (height ) x 6.5 in/16.5 cm (width)
** Where to Mark Lines on Fabric
- Line 1: 0.5”(1.27cm) from top edge
- Line 2: 3.5” (8.9cm) from top edge
- Line 3: 2”(5 cm) from bottom edge
*** Make sure to also sew over the folded part at the bottom of the bag. This fold creates the gusset of the gift bag.
**** How Much Ribbon To Cut to Make Drawstring Channel
For the drawstring ribbon, I recommend cutting out the following lengths at the minimum for each bag size. However, you can always cut the ribbon lengths longer and trim them down afterwards.
- Small Bag: 18 inch (46 cm)
- Large Bag: 21.5 inch (55 cm)
- Tall Bag: 21 in (54 cm)
***** Where to Place drawstring Channel
- Small Bag: Place ends of drawstring channel about 2.5" (6.35cm) from side seam.
- Large Bag: Place ends of drawstring channel about 3.25" (8.25cm) from side seam.
More Fun Sewing Projects You Will Love:
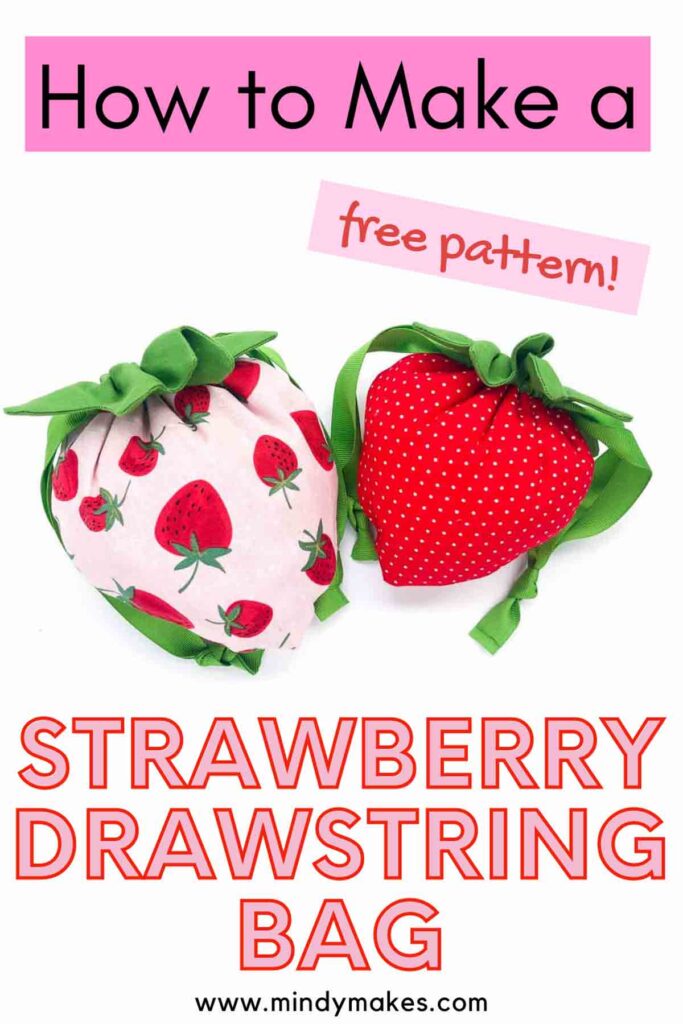
These Strawberry Drawstring bags are perfect for holding treats to gift your friends and family.
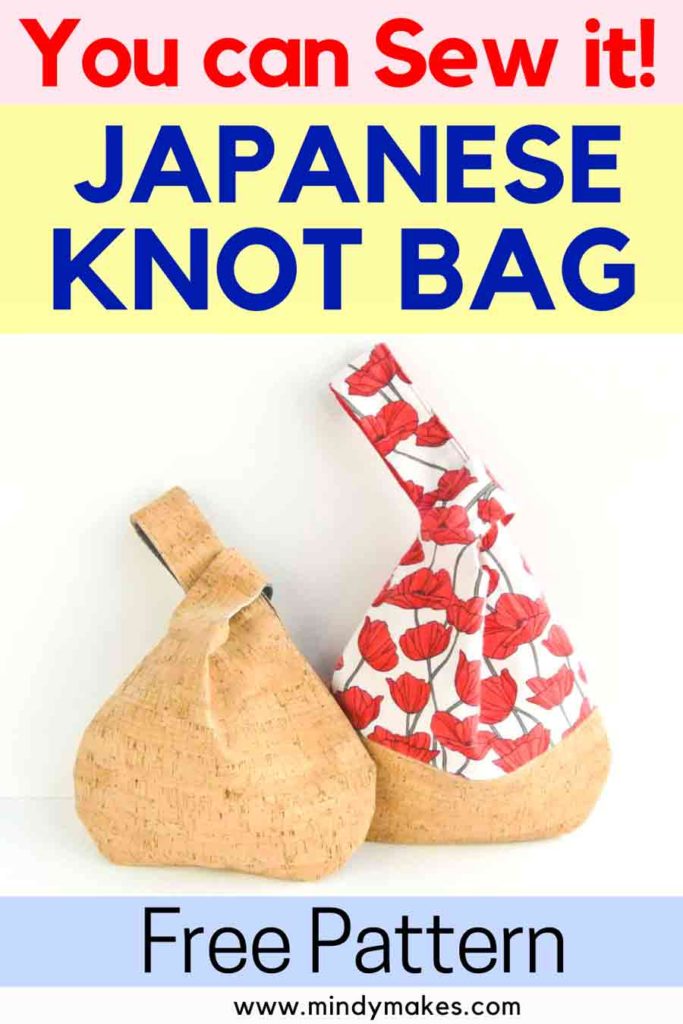
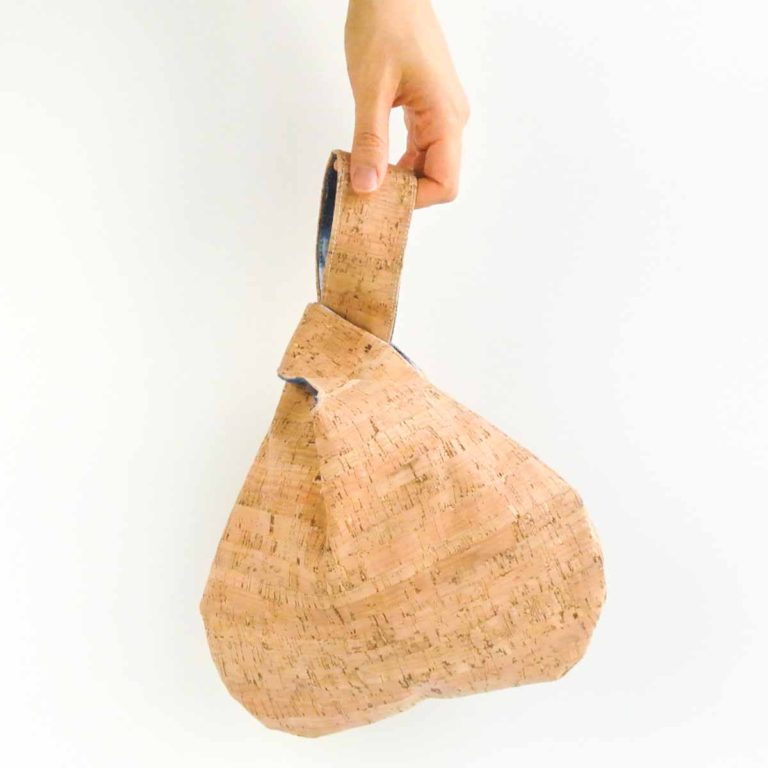
The Japanese knot bag is a super chic accessory.
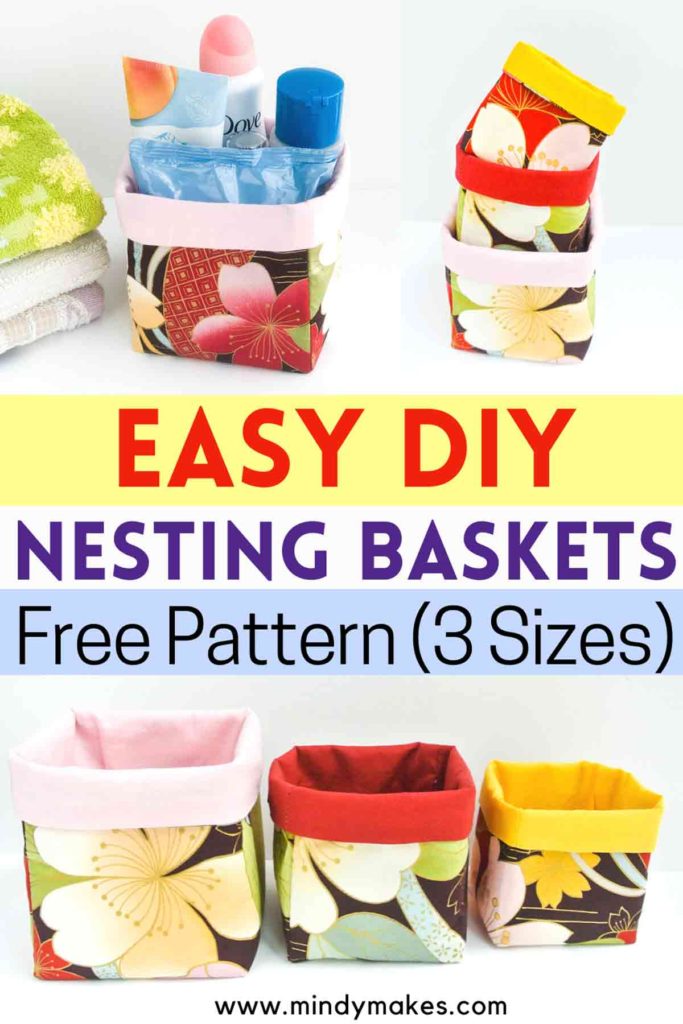
Organize your desk, drawers, and cabinets with these handy fabric bins.

This flat bottom, lined drawstring bag stands up on its own. Great for holding dice, trinkets, and more
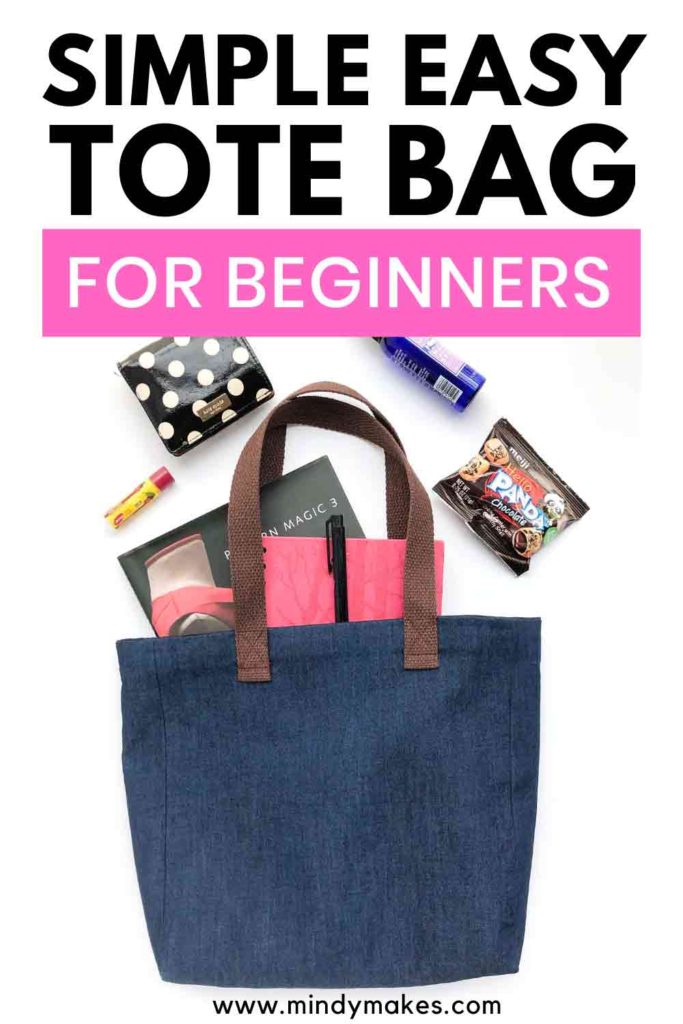
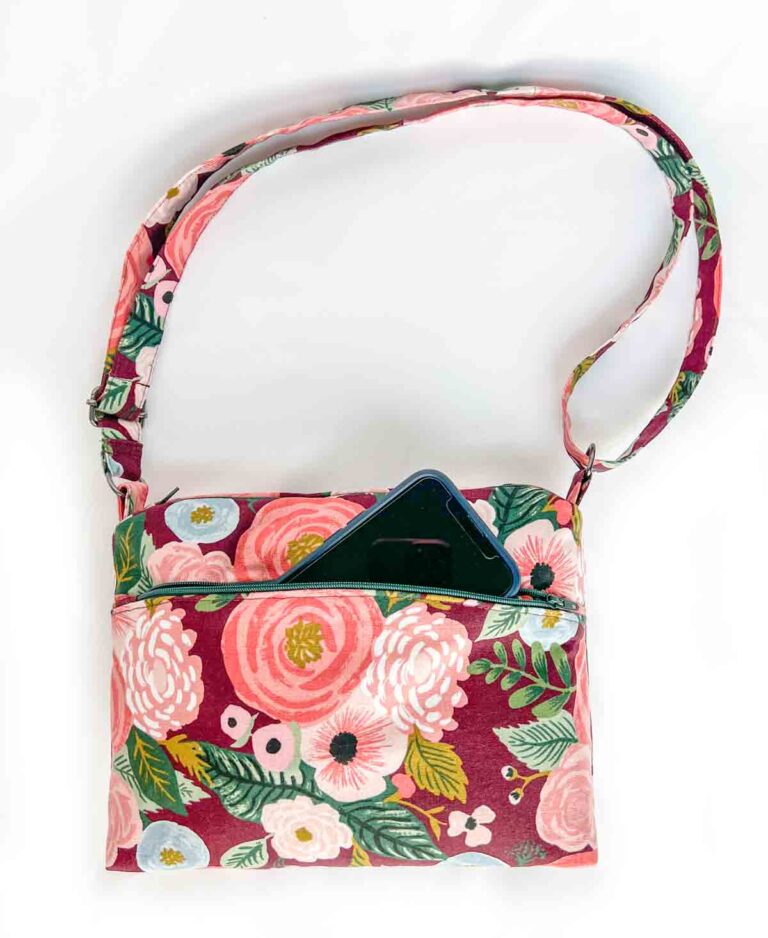
This fully lined tote bag is all you need on the go.
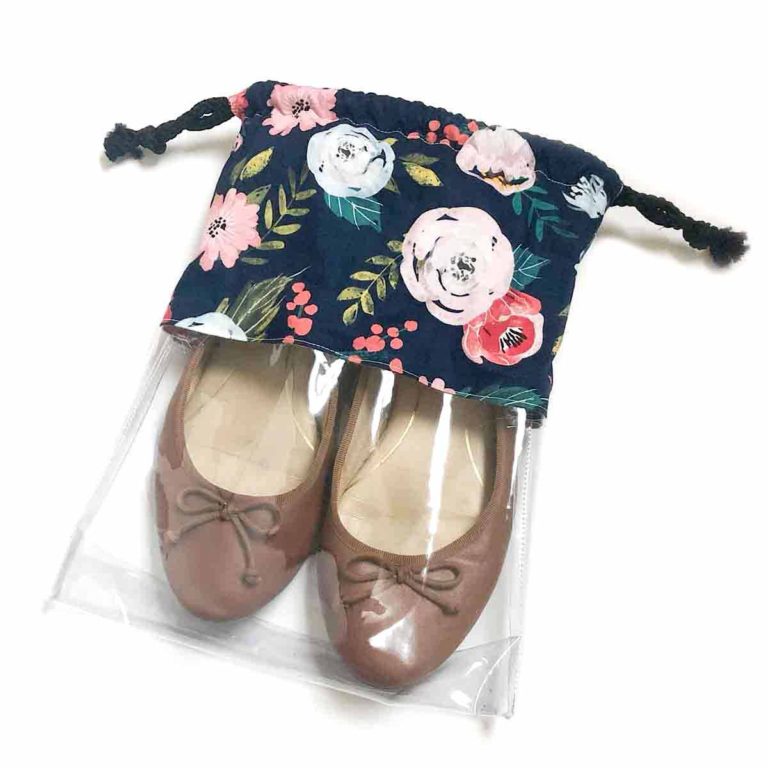
A no fuss drawstring shoe bag with clear vinyl to keep those shoes protected and organized.