How to Sew a Basting Stitch: Everything You Need to Know
What is a basting stitch and what is it for? Did you know that professional seamstresses use basting stitches all the time? Learn the basics of the when, where, why and how of basting stitch and you will be well on your way to beautiful sewing!
What is Basting in Sewing?
In sewing, basting is the method of temporarily holding two or more pieces of fabrics together before you permanently sew them down.
There are four ways to baste your fabrics:
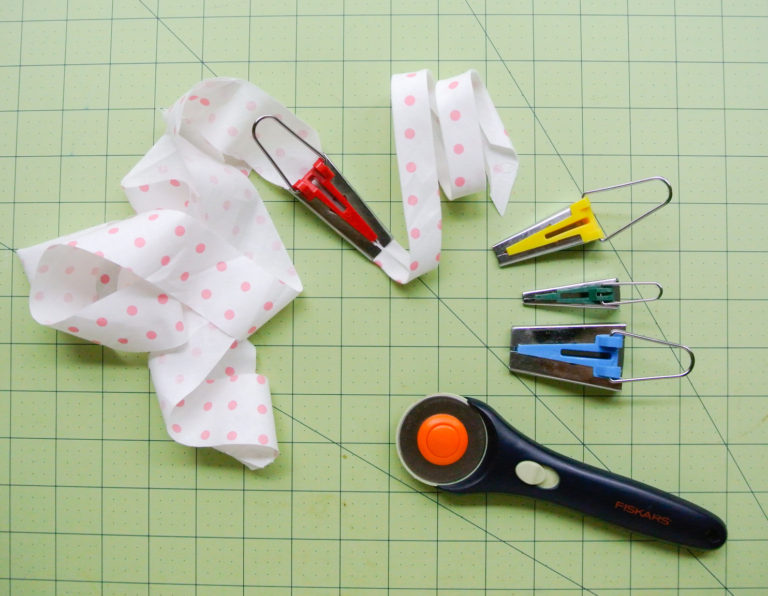
- Pin + Clip Basting
- Machine Basting
- Hand Basting
- Adhesive Basting
Basting is important because you don’t want your fabric to shift out of place before (or while) you are sewing. The most common way to baste is to pin baste (often referred as “pinning your fabric” or “pin together), followed by machine basting, then hand basting.
Clip basting is frequently used in quilting and also for fabrics where pins and needles may leave permanent holes (i.e. vinyl).
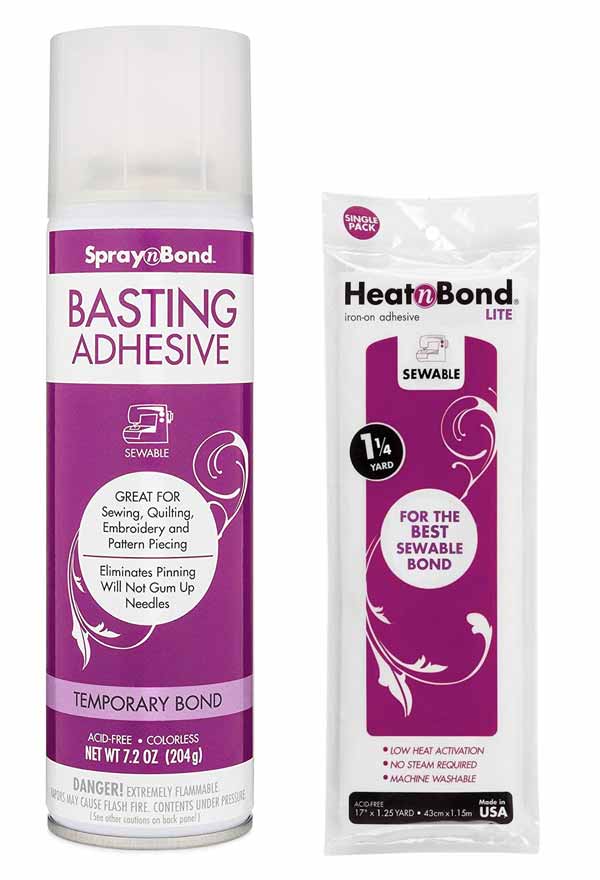
LEFT: Spray on Adhesive (temporary); RIGHT: Iron on Adhesive
Adhesive basting is where you apply adhesive (either spray-on or iron-on) to hold fabrics together. This is commonly used in appliques, embroidery (i.e. holding stabilizers behind fabric), or quilting (i.e. holding batting and fabric layers). Spray-on adhesive is usually temporary and washes away with water. Iron-on interfacing is double sided, activated by heat, and permanent. Both types of adhesive allows you to sew with a machine after basting.
What are Basting Stitches?
Basting stitches (also known as tacking) are stitches used to temporarily hold two or more pieces of fabrics together. They can be done via hand (hand basting) or machine (machine basting).
Since basting stitches are done loosely and with large intervals in between, they are easy to remove. This helps you make sure the fabric pieces are aligned correctly before you permanently sew them down.
When Do I need to use Basting Stitches?
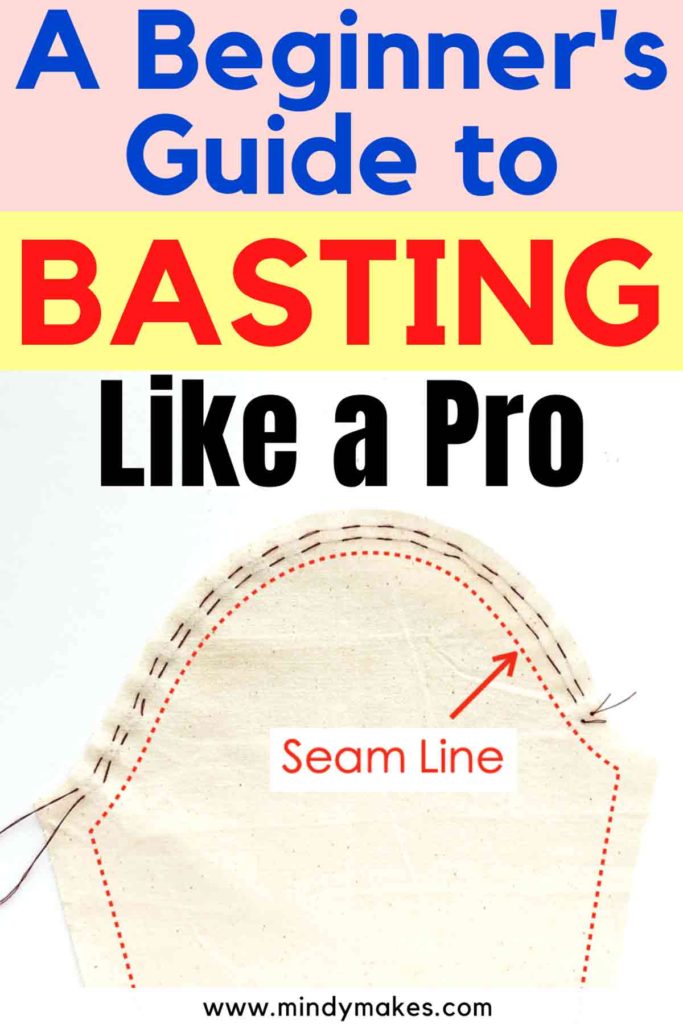
Sewing Along the Bias
The most comment place you will encounter the bias is when sewing along curves. Basting not only helps to hold the curved pieces in place, it also prevents the fabric from stretching as you sew. Remember, bias is the diagonal of the fabric and is the stretchiest part of the fabric. Thus, stretching readily occurs along the bias when you sew (especially on a machine). Baste stitching first can easily prevent that.
Sewing bias tape binding is another place where basting stitches are commonly used.
Serging

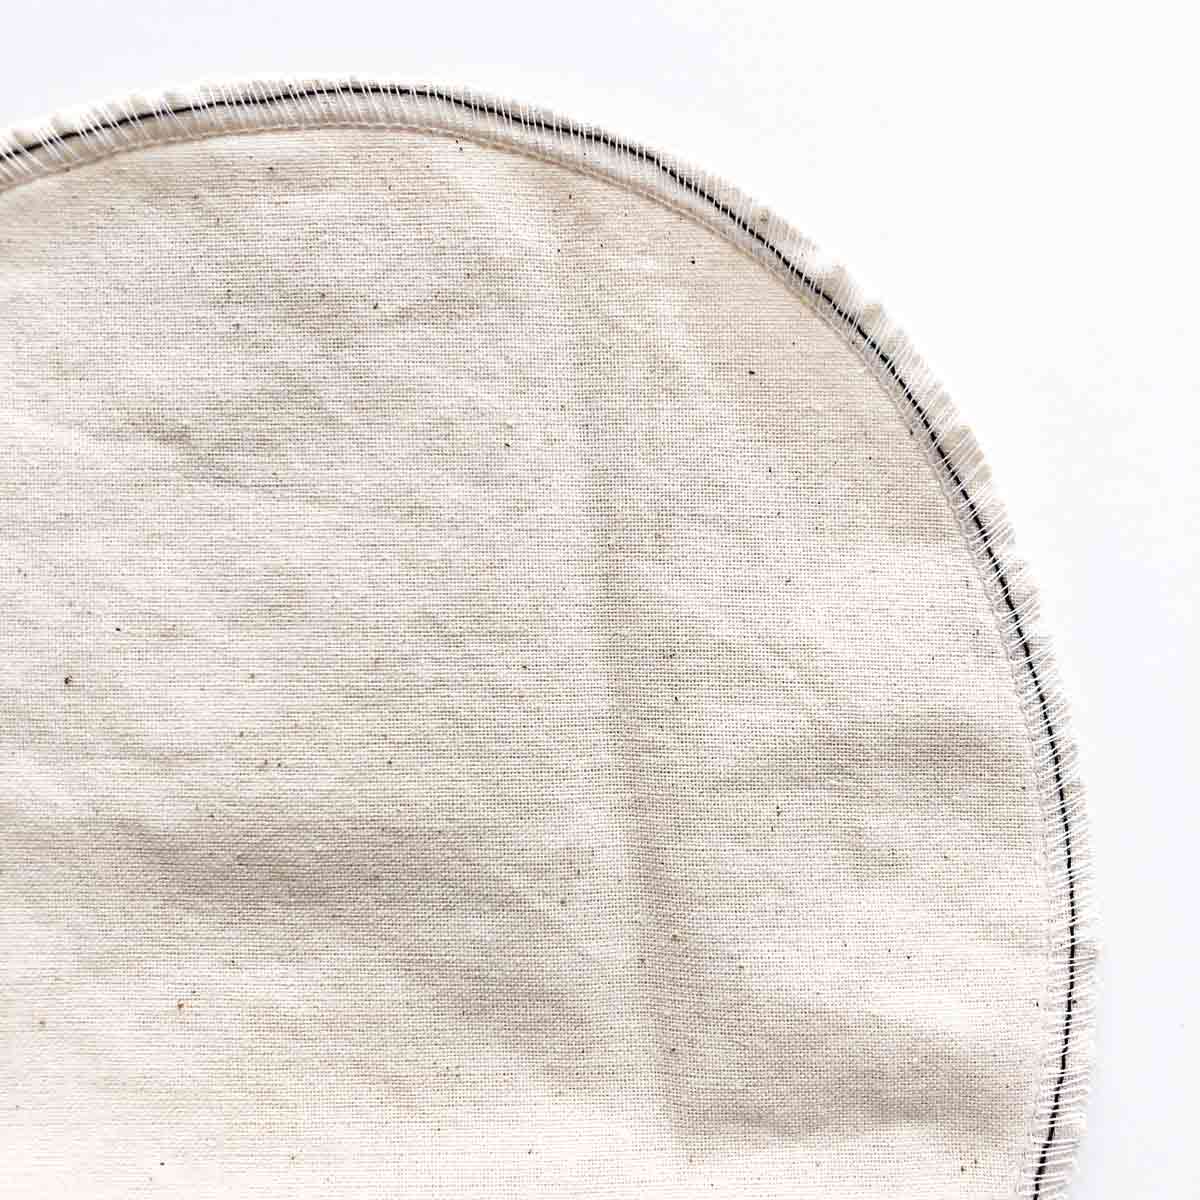
Sergers (or overlock machines) come with a blade that trims the raw fabric as the machine wraps an overlocking stitch around the edge. For this reason, you never want to pin at the fabric edges as the blade will cut into the pin, damaging both pin and blade.
This is where basting stitches come in handy. Baste within the seam allowance using a contrasting thread (LEFT photo). That way, you won’t have to remove the basting stitches afterwards.
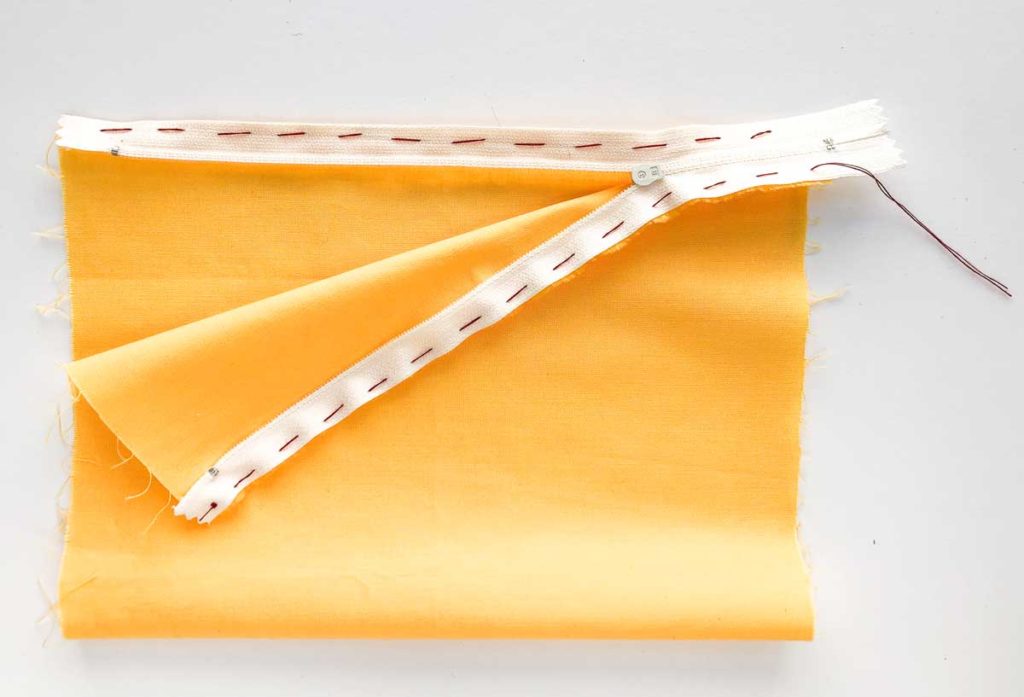
Zippers
Zippers are frequently basted down before permanently sewing. This allows you to:
1. Check that the zipper is installed correctly.
2. Close the zipper (since there are no pins getting in the way) to make sure the left and right zipper matches perfectly.
An example is installing a zipper at the back of a dress that extends past the waistline. You want the waistline and neckline to match exactly once the zipper is pulled up. Baste stitching first will ensure a perfectly fitted zipper!
Checking and Altering Garment Fit
In garment construction, it is very common to first make a sample of the garment using plain cotton muslin fabric (the sample itself is called a muslin). You then fit the muslin on a dress form (or the actual client) and use basting stitches to take in seams where the fit is loose.
This method works in garment alterations as well, except you will sew basting stitches on the actual garment instead of the muslin. In both cases, do your final sewing exactly where the basting stitches are made for the most accurate fit.
Creating Gathers
The basting stitch is commonly used for creating gathers for skirts, dresses, sleeves or other decorative purposes. To create gathers, sew two rows of basting stitches within the seam allowance. Gently pull on the two rows of thread to gather until you are satisfied. If you are using machine basted stitches, pull on the bottom threads (the one from the bobbin) to gather


To set a sleeve into an armhole, you will use a basting stitch. First, make two rows of basting stitch at the top of the sleeve, within the seam allowance. Next, gently pull on the basting stitch from both ends to create a slight curve around the top of the sleeve. Now you can easily and accurately sew the sleeve into the armhole!
Quilting
In quilting, you often create a quilt sandwich which consists of top fabric, batting, and backing fabric. Prior to sewing the layers together, you will need to baste them first. The basting stitches holds all the fabric layers in place so the top fabric won’t shift from the batting as you sew. This prevents the quilt sandwich from getting uneven bumps and puckers. As a result, you will end up with a beautiful, smooth quilt.
Matching Plaids, Chevron, or other Designs
Have you ever seen a check or plaid patterned garment that’s not matching at the seams? Yuck. Again, you can prevent this by first basting the fabric pieces so the designs match. For matching fabric patterns, you will use a slip basting stitch (discussed below).
Other Uses:
- Sewing small or tight areas and pins/clips are getting in the way
- When you need to sew narrow curves or corners
- Holding decorative trims (i.e. bias binding, piping, decorative ribbons, etc) down
- Holding slippery fabrics together
What type of Thread Should I use to Baste?
Specialized Basting Threads – These threads are 100% cotton, lightweight yet thicker than regular thread, and break easily. These qualities make basting threads easy to use and easy to remove.
Water Soluble Threads – As the name implies, the thread dissolves when soaked in water. You can use it like regular thread in hand basting, and can also use it as top thread and bobbin threads for machine basting.
Regular Sewing Threads – You don’t need to go out and buy specialty basting thread if you don’t already own any. Regular sewing threads work great. Just make sure to use a contrasting thread color. Double thread your needle for thicker fabrics, and use single thread for ultra-fine fabrics. This helps prevent the double thread leaving unsightly holes in the lightweight fabric.
How do you Machine Baste?
Some models of sewing machine have a pre-programmed “basting stitch”. With this setting, your sewing machine will adjust stitch length to the longest possible.
If your sewing machine does not come with a basting stitch function, fear not! Simply adjusting stitch length to the longest possible and use that instead. On my Singer Heavy Duty Sewing Machine, the longest stitch length goes to a 4 (which is 4.0mm), so I use that as my machine basting stitch. Some machines go to 5.0mm, and some even to 7.0mm or 9.0 mm.
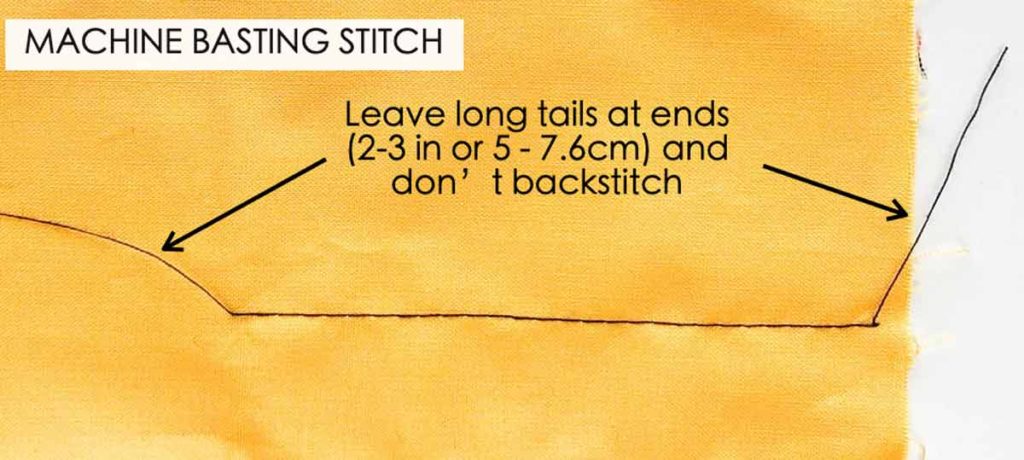
When machine basting, don’t back stitch at the beginning and end of the stitch as this makes them hard to remove. I generally like to leave 2-3” of extra thread at the beginning and end of the stitch so the basting doesn’t come undone before I permanently sew.
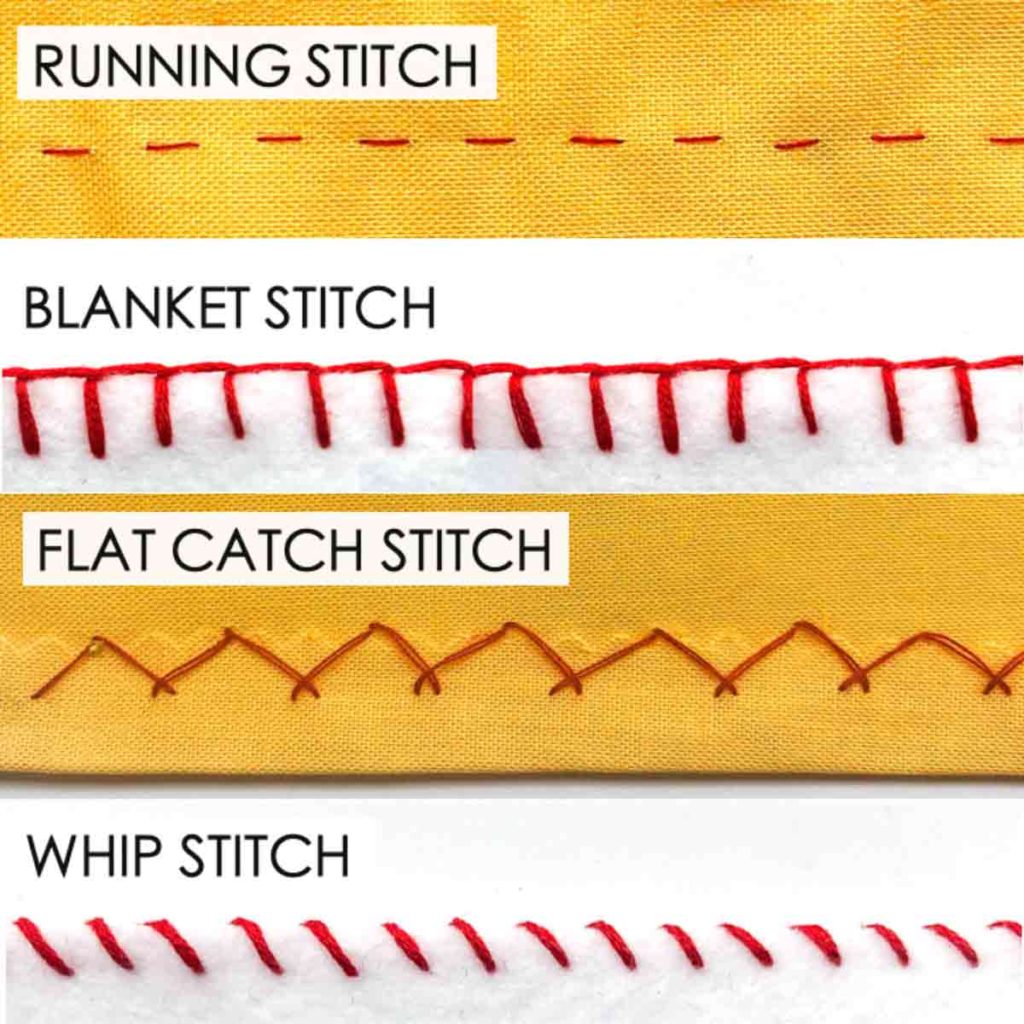
What are the 4 Different Hand Basting Stitches?
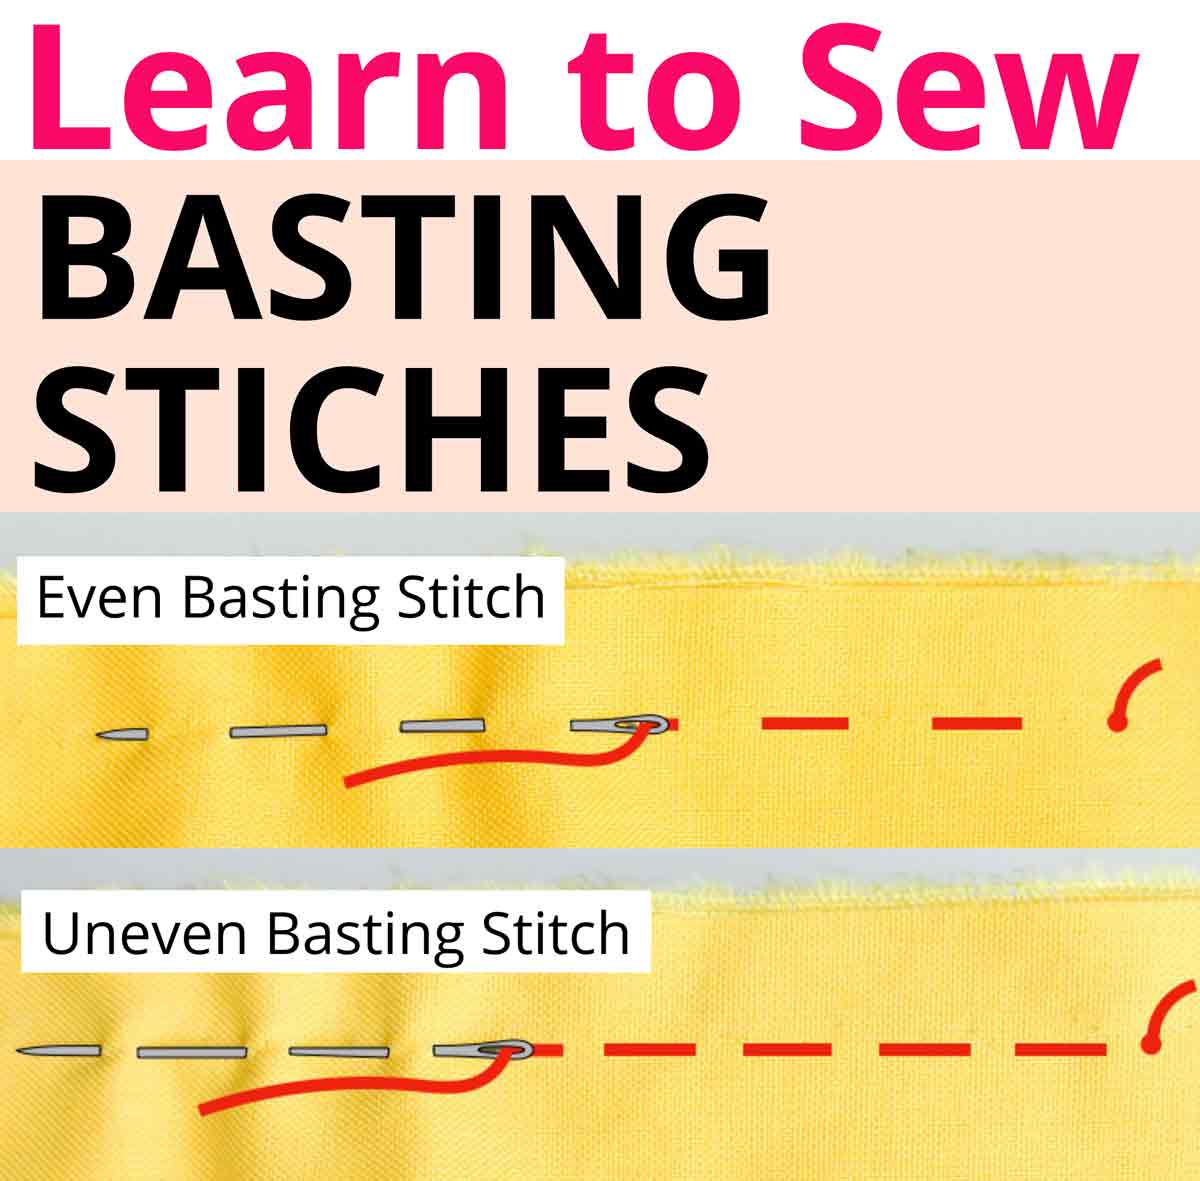
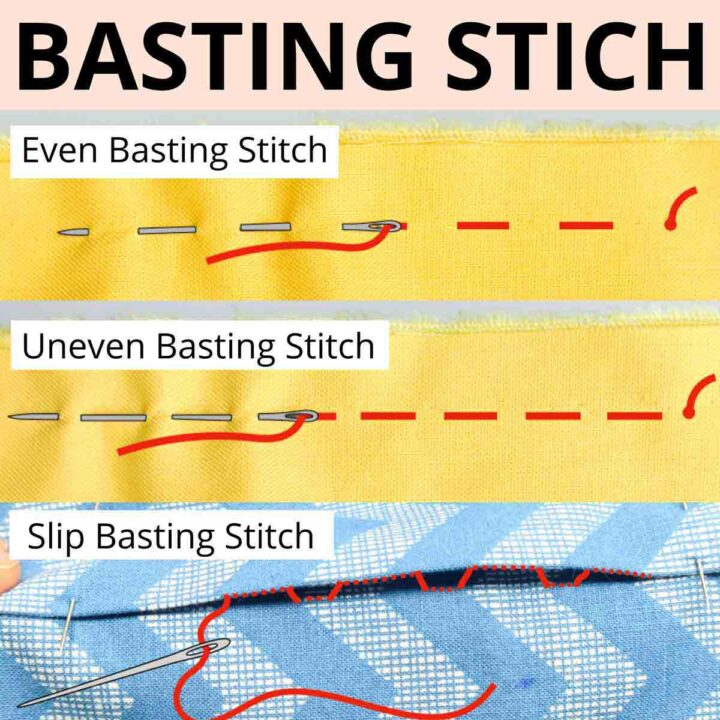
Uneven Basting
Uses:
- All purpose basting stitch for most applications
- For holding together seams that need less control during permanent stitching (i.e. straight lines)
- For marking the right side of fabric (when you’re worried the chalk will leave a mark on the fabric)
How to Make Uneven Basting Stitch:
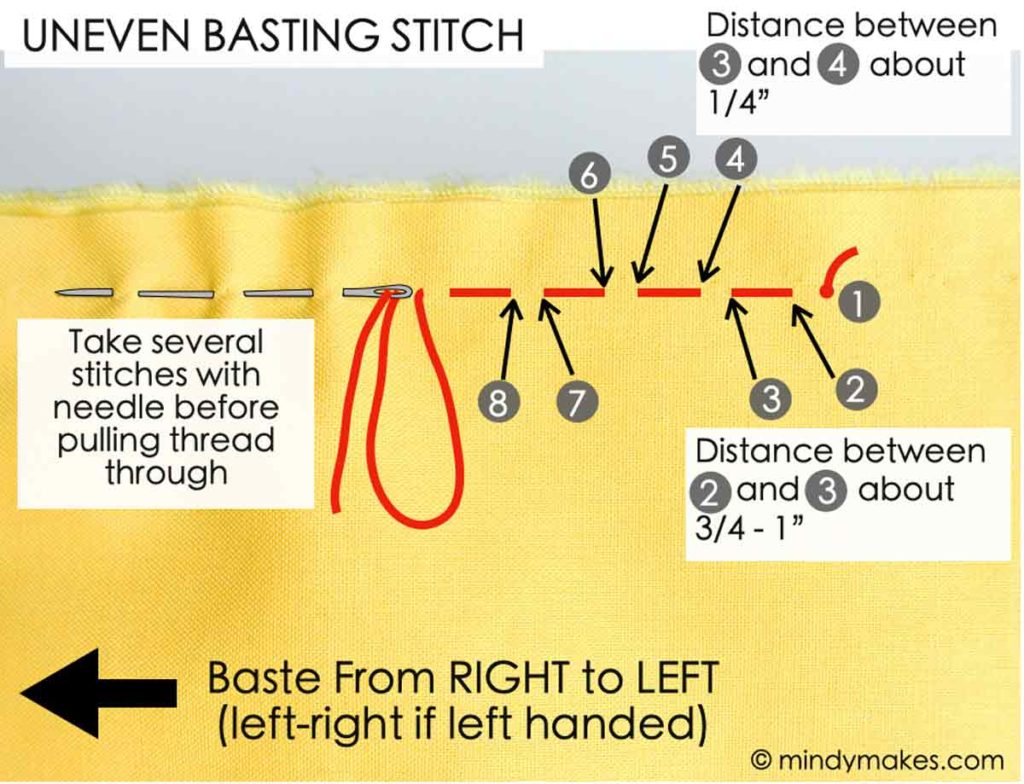
Make stitches that are longer ( 3/4”-1”) and shorter distance apart (1/4”)
Even Basting
Uses:
- For smooth fabrics
- In areas that needs more control (i.e. curves, corners, seams with ease, and set-in sleeves)
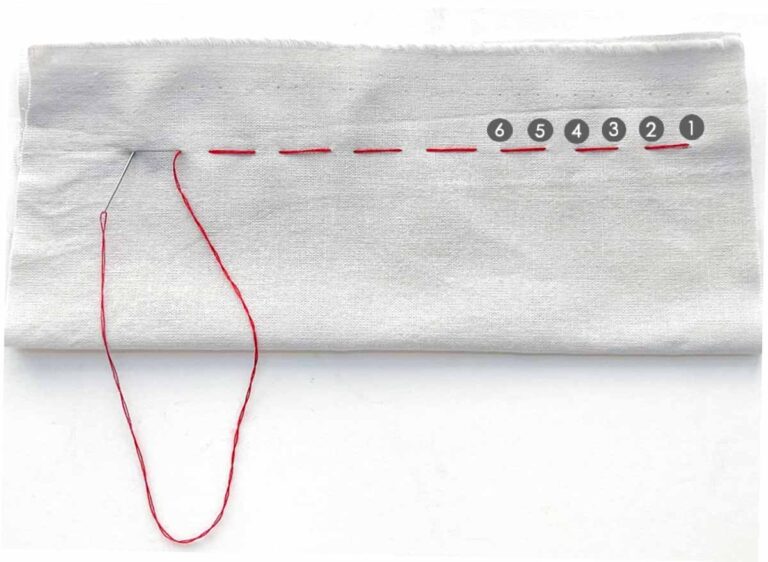
How to Make Even Basting Stitch:
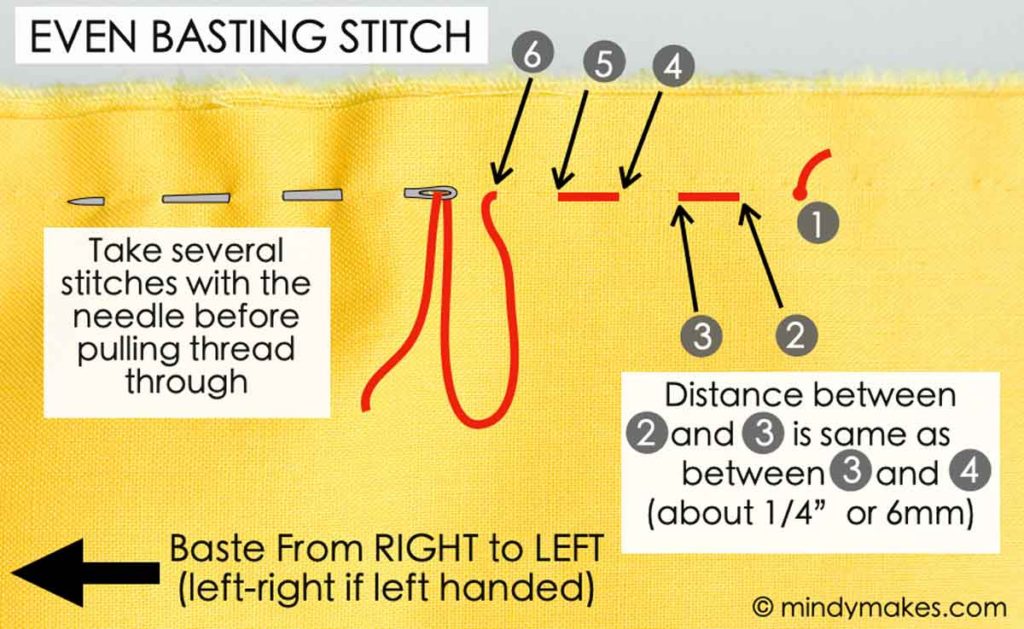
Make short stitches that are the same length and distance apart (about 1/4” or 6mm). Sewing from right to left (or left to right if you are left-handed), use your needle to take a few evenly spaced stitches before pulling the thread through.
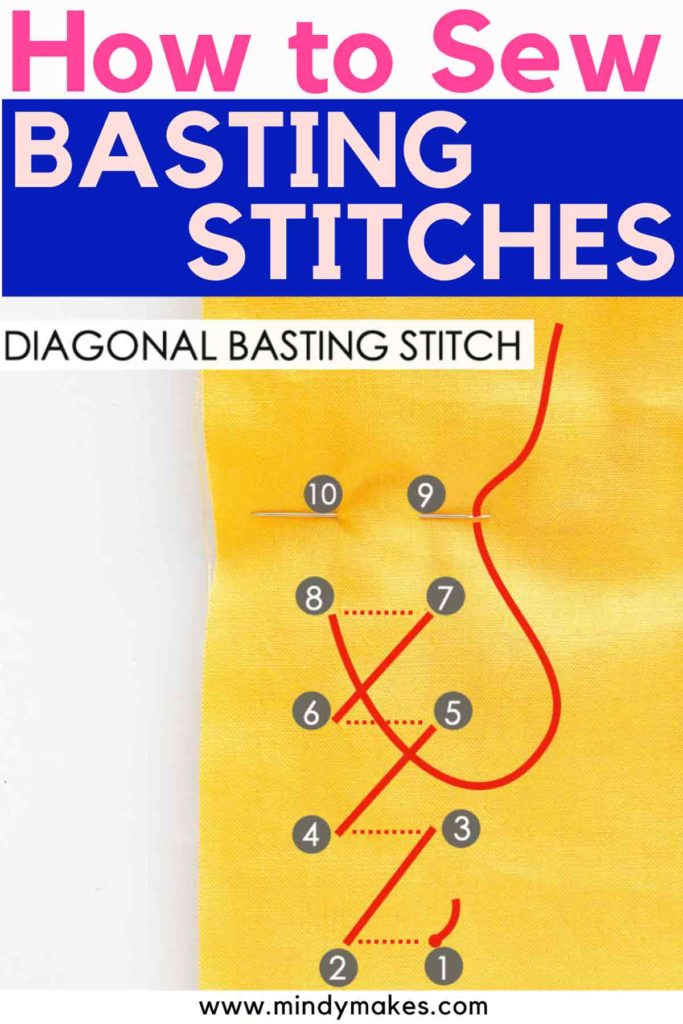
Diagonal Basting
Uses:
- used to hold or control layers of fabric
- The short diagonal basting stitch holds seam edges flat during stitching or pressing
- The long diagonal basting stitch is used to holding underlining to fashion fabric (the pretty fabric that you want showing) in garment construction
How to Make Diagonal Basting Stitch:

When making the stitches, the needle points from right to left (or left to right if you are left-handed).

Use your needle to take horizontal stitches that are parallel to each other to make diagonal stitches
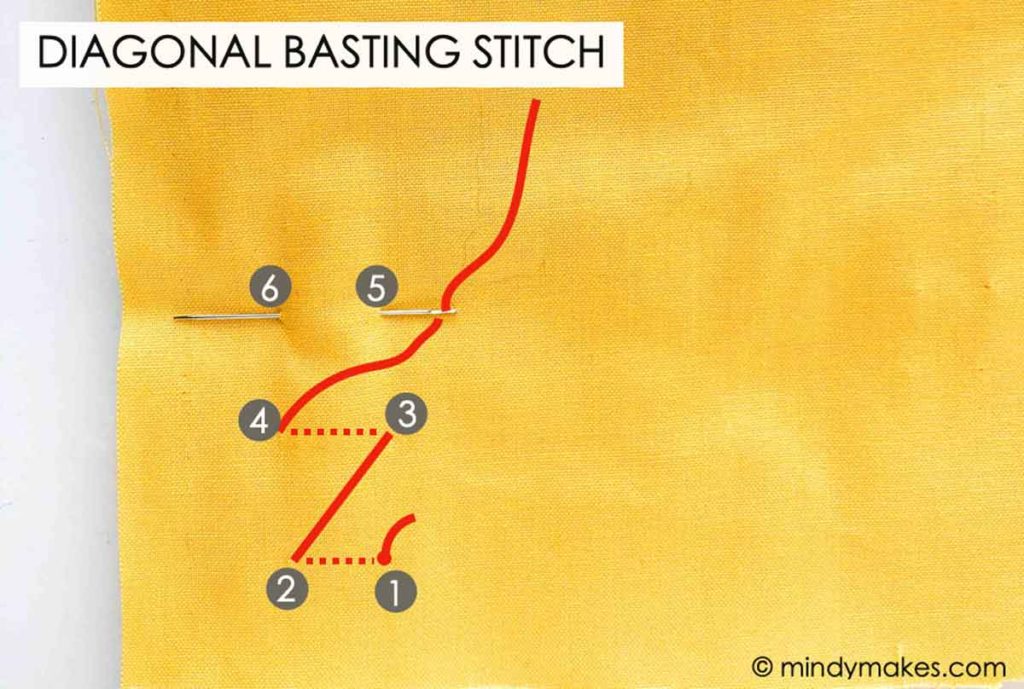
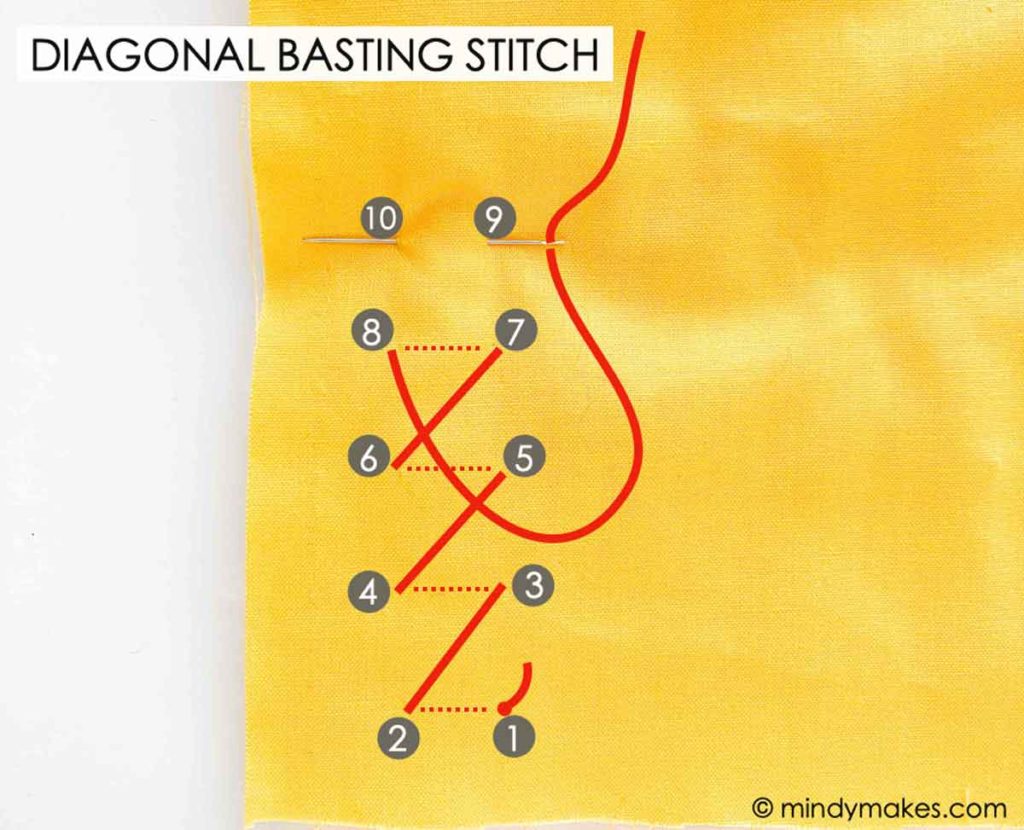
On the fabric, the thread will appear as rows of diagonals.
For more control, take short stitches that are spaced closely together (you will end up with shorter diagonal stitches that are closer to each other). In areas where you need less control, take longer stitches spaced farther apart (you will have longer diagonal stitches that are farther apart).
Slip Basting
Uses:
- To perfectly match plaids, stripes, or other large prints at the seam
- To hold intricately curved sections in place
- For making fit adjustments (when sewing garments) from the right side of the fabric (for example, while the client is wearing the garment that needs fitting adjustments)
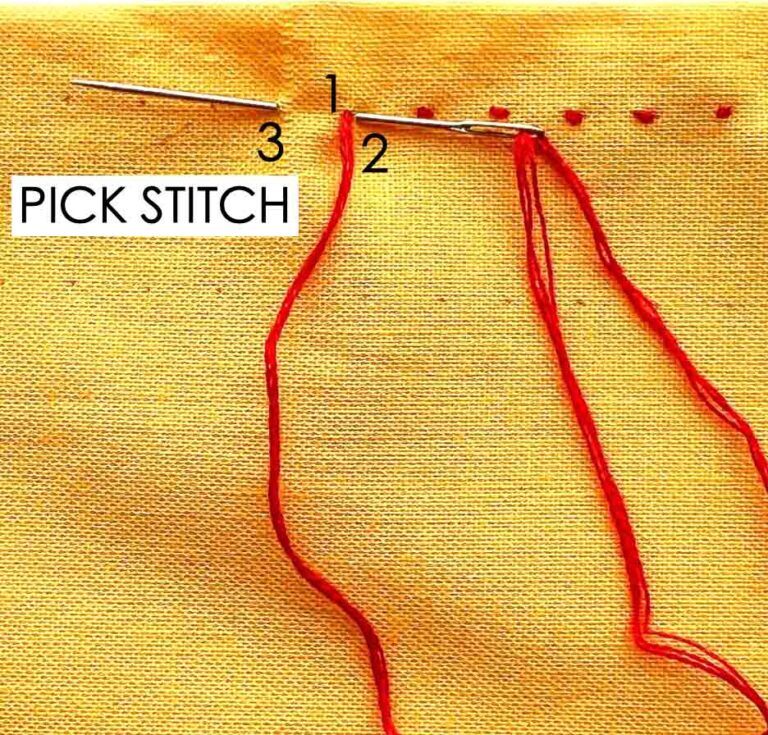
How to Make Slip Basting Stitch:
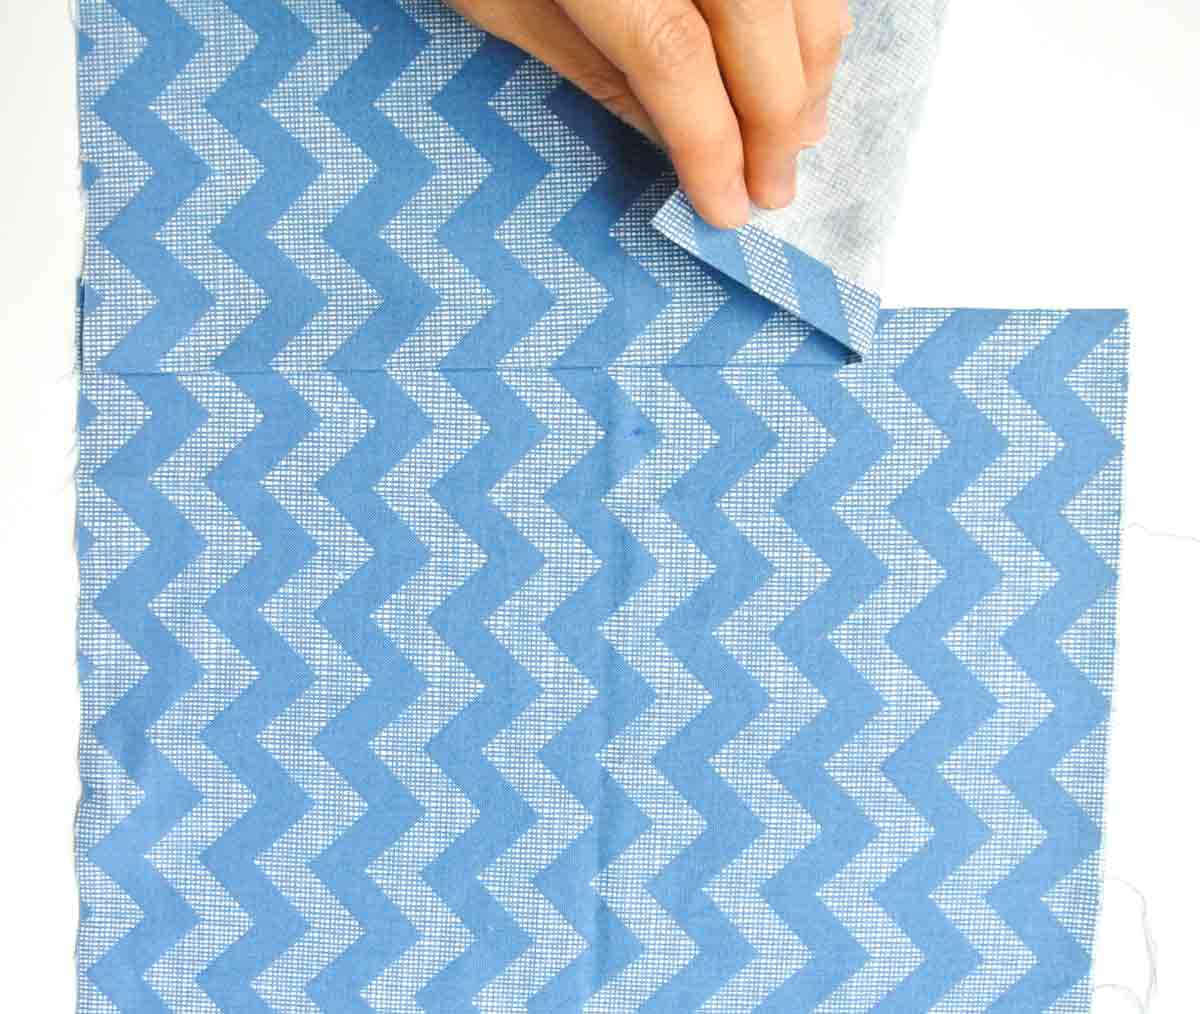

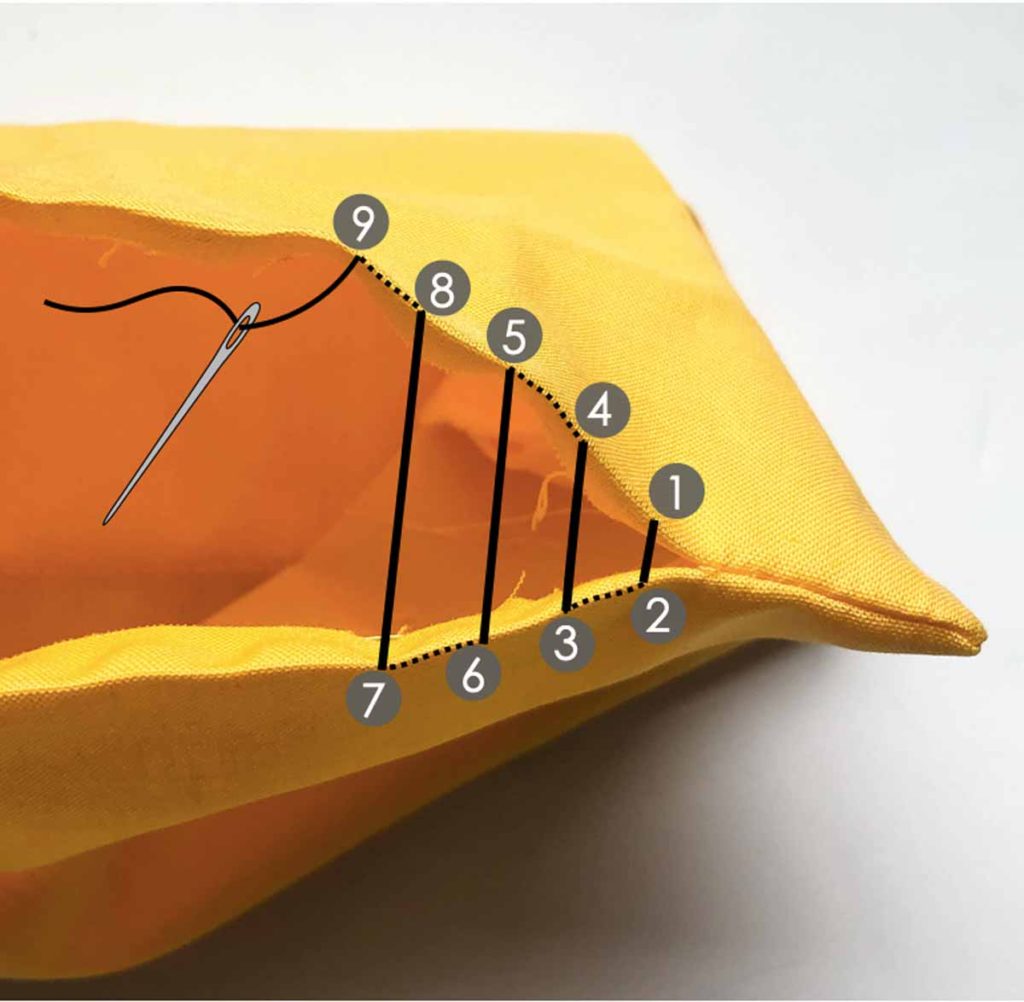
Take one piece of fabric and turn under the edge along the seam. With right sides of fabric (the pretty side) up, place folded edge over the other fabric piece at the seam. Position the folded edge so that the design (plaid, pinstripe, etc) matches the other piece of fabric. Pin in place.

Work from right side to left side (or left to right if you are left-handed). First, make a longer stitch through the bottom fabric at the seam. Shown as [1] and [2] in photo. Next, make a shorter stitch through the folded edge of top fabric along the seam. Shown as [3] and [4] in photo. The length of the stitches depend on the fabric pattern that needs to be matched.

Pull thread through [4] and repeat by taking another longer stitch [5] and [6]
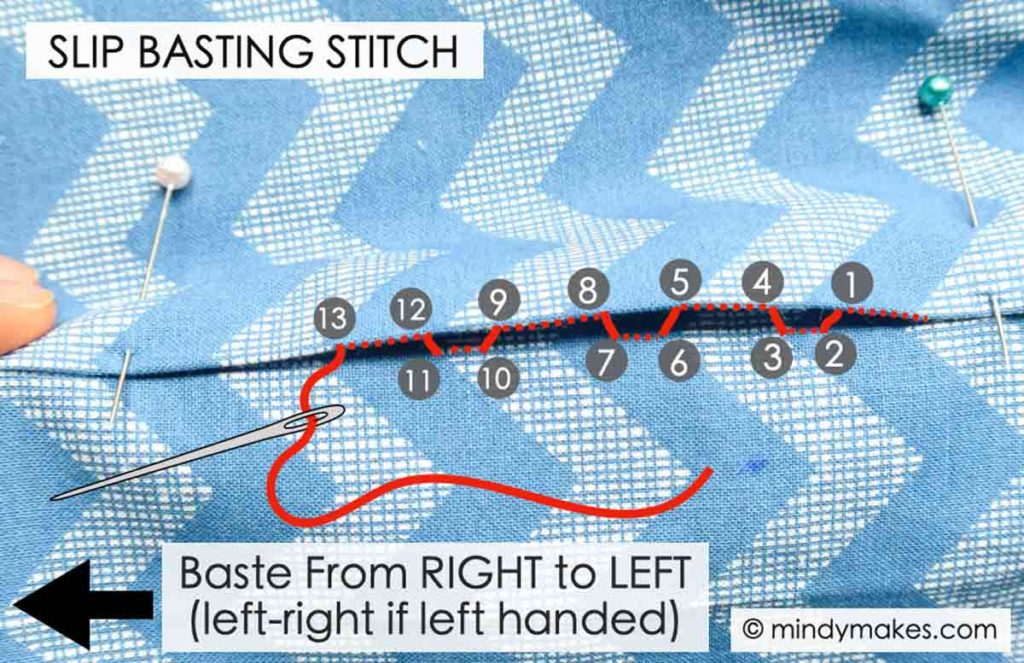
Continue doing alternating stitches, removing pins as you go.


LEFT: Slip basted stitch
RIGHT: See how the chevron design matches perfectly after basting. Now you are ready to sew permanently!
What’s the Difference Between a Basting Stitch and a Running Stitch?


A running stitch is a a set short even stitching made by the needle and thread passing over and under pieces of fabric. It is exactly the same as the even basting stitch except that the stitches are smaller and tighter together. The purpose of running stitches is to permanently bind layers of fabric together. On the other hand, the even basting stitch is to temporarily hold pieces of fabric together, hence they are spaced wider apart.
Tips for Basting Success
- Use contrasting thread color (from your fabric and permanent thread) so it’s easy to see and remove
- Use thicker thread (or basting thread) when available. Thicker thread holds fabric together better and are easier to spot for removal.
- Apply beeswax on the thread to prevent tangling
- Use a thimble on the hand NOT holding the needle so you don’t accidentally get poked (ow!)
- Lay your fabric pieces on a flat surface as you baste to prevent distortion
- Use a long, sharp needle. The long needle allows you to take several stitches through the fabric before pulling the thread through
- Tie a knot at the end of your basting thread so the stitches don’t come undone before you sew permanently
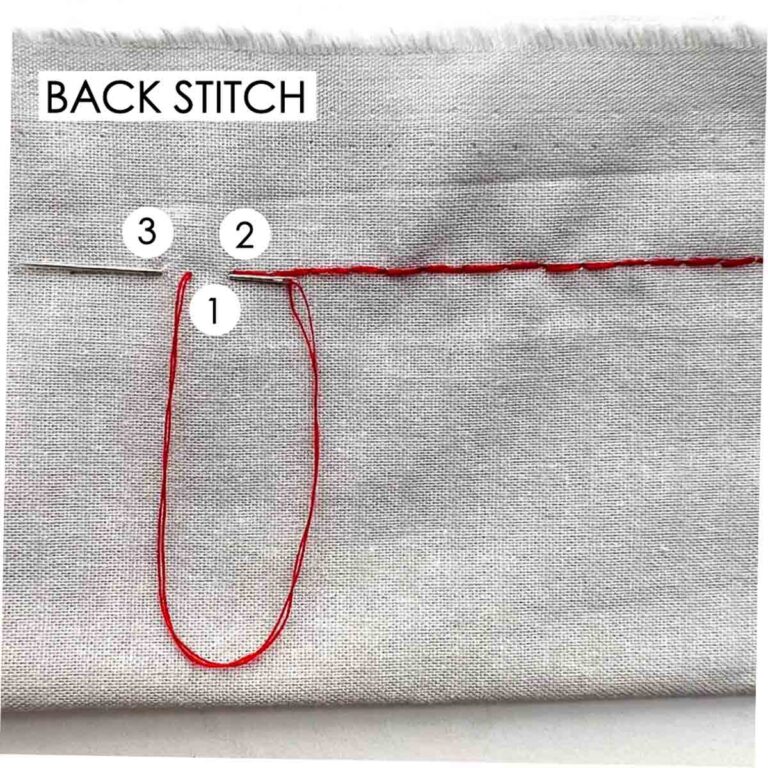
- If you don’t want to tie a knot, leave a long tail and make one back stitch to anchor the thread before you start basting.
- Pull the stitches just enough so the fabric pieces stay together while laying flat (otherwise you will end up gathering the fabric)
- Make short stitches when you need to firmly hold the fabric pieces together.
- Make long stitches for quicker basting
- Remove basting stitches first before pressing. Otherwise the thicker basting thread may leave a slight indentation on your fabric when pressed.
- In most cases, make the basting stitches above or below the seam line. This way the basting stitches won’t get caught when you are making permanent stitches. For slip basting, you will be basting along the seam line, so use a thin, matching thread instead.
With all this knowledge about basting, you are ready to sew beautifully and tackle more challenging projects! Just remember, with any new skill, basting may feel hard and unnatural at first. However, the more you do it, the better you will get. Learning a new skill is a journey, so be patient with yourself. I hope you found this article helpful to your sewing journey. Happy sewing 🙂
Don’t forget to pin this image and save for later!
How to Sew Basting Stitches
Basting stitches are so important for sewing garments, quilting, and more! Learn these essential basting stitches to be able to make beautiful sewing projects.
Tools
- SEWING MACHINE
- HAND SEWING NEEDLE
- BASTING THREAD
- WATER SOLUBLE THREAD
Instructions
HOW TO MACHINE BASTE
- Some models of sewing machine have a pre-programmed “basting stitch”. With this setting, your sewing machine will adjust stitch length to the longest possible.
- If your sewing machine does not come with a basting stitch function simply adjust stitch length to the longest possible and use that as basting stitch.
- When machine basting, don’t back stitch at the beginning and end of the stitch as this makes them hard to remove. (See Note 1).
HOW TO MAKE HAND BASTING STITCHES
UNEVEN BASTING
- Baste from right to left (right handed people)
- A series of hand stitches that alternate between long stitches and short stitches
- Long stitches are 0.75" - 1" apart and short stitches are approximately 0.25" apart.
- Take several stitches with hand needle before pulling thread through.
EVEN BASTING
- Make short stitches that are the same length and distance apart (about
1/4” or 6mm). - Sewing from right to left (or left to right if you are
left-handed) - Use your needle to take a few evenly spaced stitches before pulling the thread through.
DIAGONAL BASTING
- The needle points from right to left (or left to right if you are left-handed).
- Use your needle to take horizontal stitches that are parallel to each other to make diagonal stitches.
- On the front side of the fabric, the thread will appear as rows of diagonals.
SLIP BASTING
- Take one piece of fabric and turn under the edge along the seam.
- With right sides of fabric up, place folded edge over the other fabric piece at the seam.
- Position the folded edge so that the design (plaid, pinstripe, etc) matches the other piece of fabric.
- Pin in place.
- Work from right side to left side (or left to right if you are left-handed).
- First, make a longer stitch through the bottom fabric at the seam.
- Next, make a shorter stitch through the folded edge of top fabric along the seam. The length of the stitches depend on the fabric pattern
that needs to be matched. - Pull thread through and repeat by taking another longer stitch.
- Continue doing alternating stitches, removing pins as you go.
Notes
- I generally like to leave 2-3” of extra thread at the beginning and end of the stitch so the basting doesn’t come undone before permanently sewing.