How to sew the PERFECT Ladder Stitch | Invisible Stitch | Hidden Stitch by hand. A Beginner’s Guide
- What is a Ladder Stitch?
- Ladder Stitch (Invisible Stitch): What is it Used for?
- What do I need to Sew a Ladder Stitch?
- Perfect Ladder Stitch Success Tips
- How to Do a Ladder Stitch (Invisible Stitch)
- One Final Tip for Sewing the Ladder Stitch (Invisible Stitch)
- How to Finish off the Ladder Stitch (Invisible Stitch)
What is a Ladder Stitch?
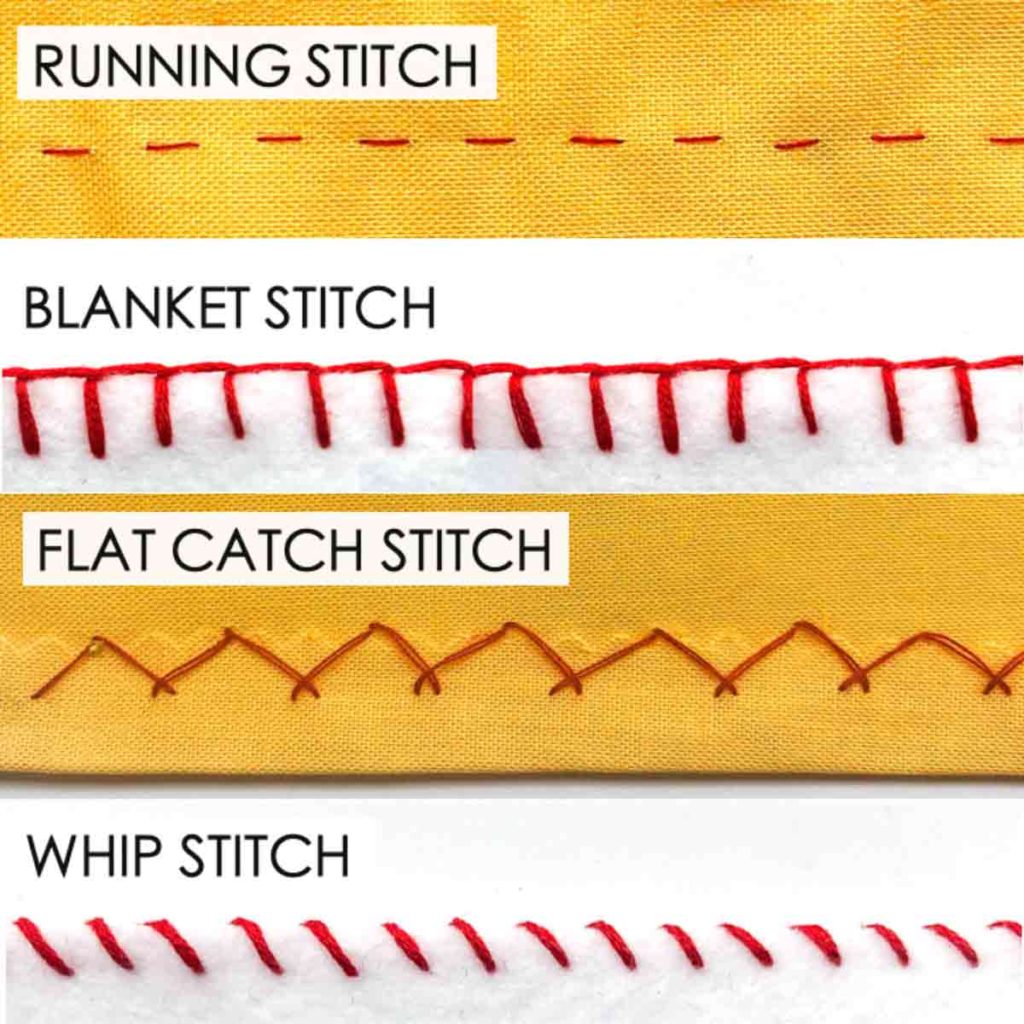
A Ladder Stitch (in sewing) is also known as an Invisible stitch, Hidden Stitch, Blind Stitch, and Slip Stitch. It is a type of hand stitch where you sew on the right side of the fabric so the stitch is basically invisible.Hence the names Invisible Stitch, Hidden Stitch, and Blind Stitch. (Remember that you normally sew on the wrong side of the fabric and turn the fabric to the right side so the stitch and seams are hidden on the inside.)
On the other hand, the name Ladder Stitch is also used because the stitch resembles a ladder shape when you run the stitches in and out of the fabric pieces that are joined together.
In a nutshell, the Ladder stitch mimics the stitches usually done on the wrong side of the fabric, except you are doing it from the right side of the fabric.
Ladder Stitch (Invisible Stitch): What is it Used for?
The Ladder Stitch (Invisible Stitch) is a versatile stitch used to close a seam by hand from the outside. Common uses include:
MENDING AND REPAIRS
Have a hole in your favorite jeans or shirt? A ripped seam on the lining of a tailored suit? A child’s beloved stuffed toy has a hole? Use the Ladder stitch to easily mend these common problems. Even if you only sew out of necessity, there are SO MANY uses for this stitch that it is definitely a MUST-KNOW for your sewing repertoire.
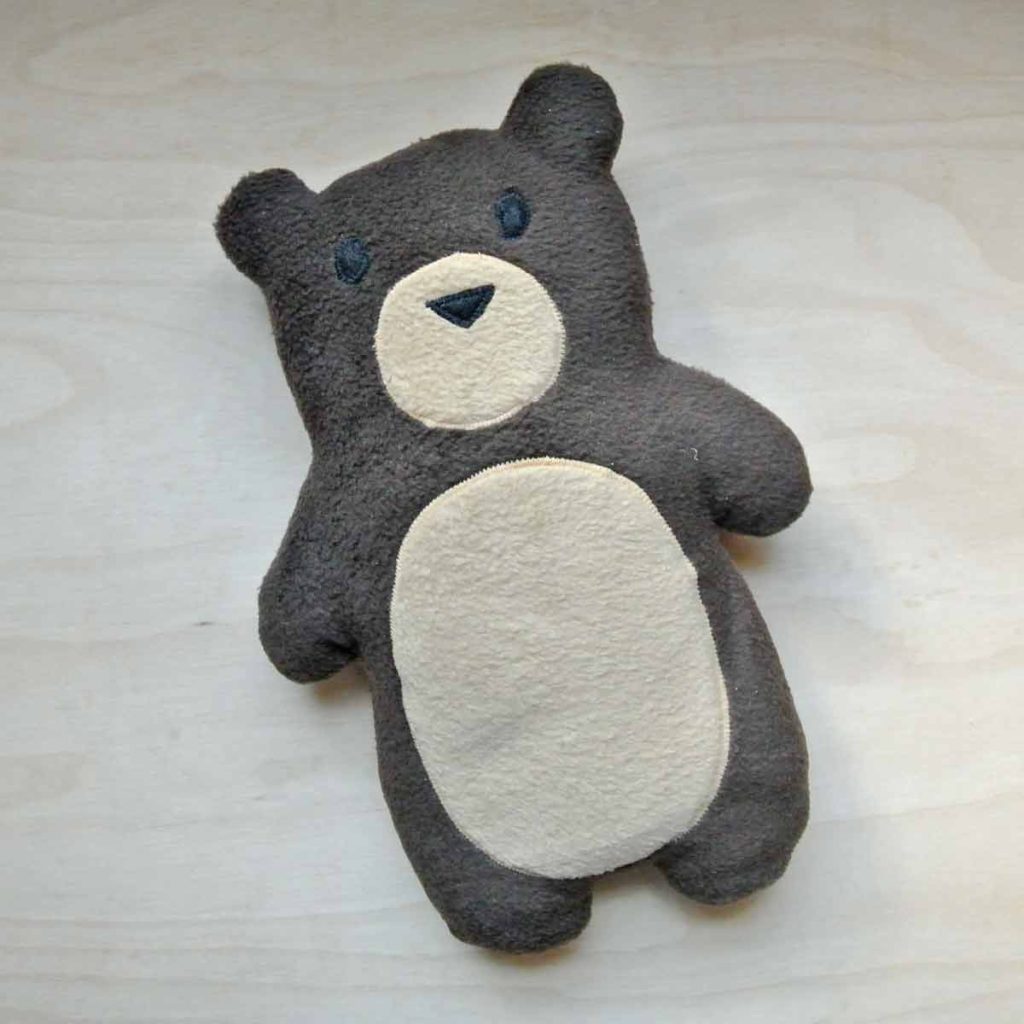
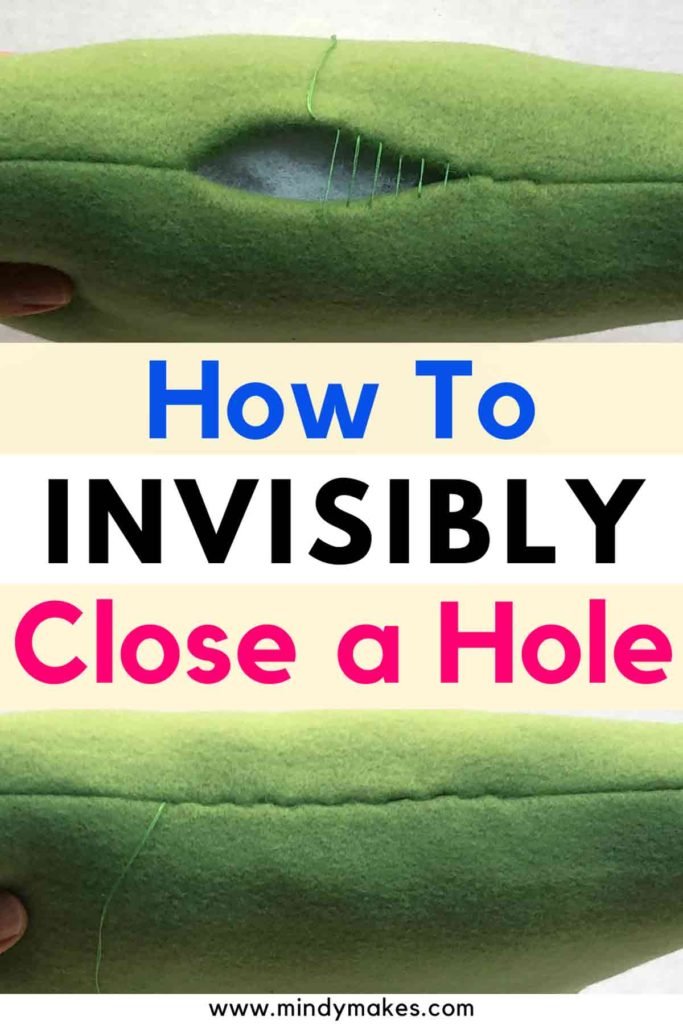
PLUSH TOY
Use the Ladder stitch to close the hole of stuffed plush toys so it is invisible from the outside.
For more information about how to sew Plush Toys, check out A (Easy!) Guide to Making Your Own Custom Plush | Free Pattern
PILLOWS/CUSHIONS
The Ladder Stitch is also perfect for finishing off a pillow or cushion.
LININGS
The Ladder Stitch is often used to close linings in bags or clothing.
BIAS BINDING
Whenever you use a bias binding to finish the edge of a project (i.e, edge of baby blanket, neckline or armhole), you can use the Ladder Stitch to finish attaching the binding. This will give your project a beautiful, couture finish.
APPLIQUES
You can use the Ladder Stitch to hand sew an applique to any project.
What do I need to Sew a Ladder Stitch?
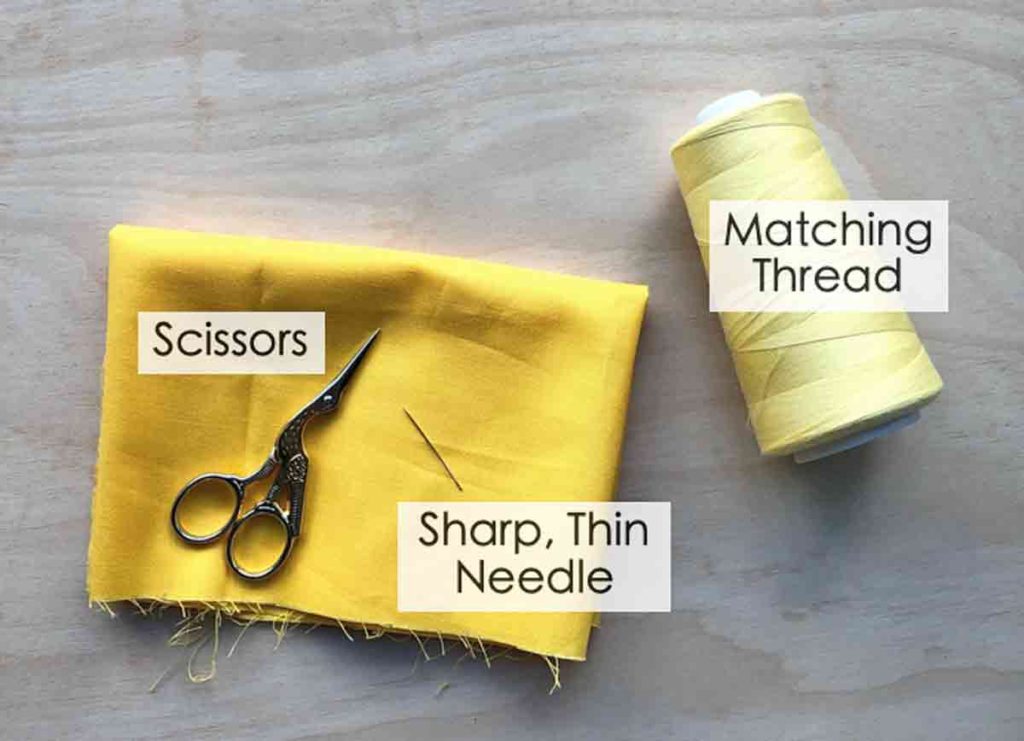
- Scissors (I like these embroidery scissors)
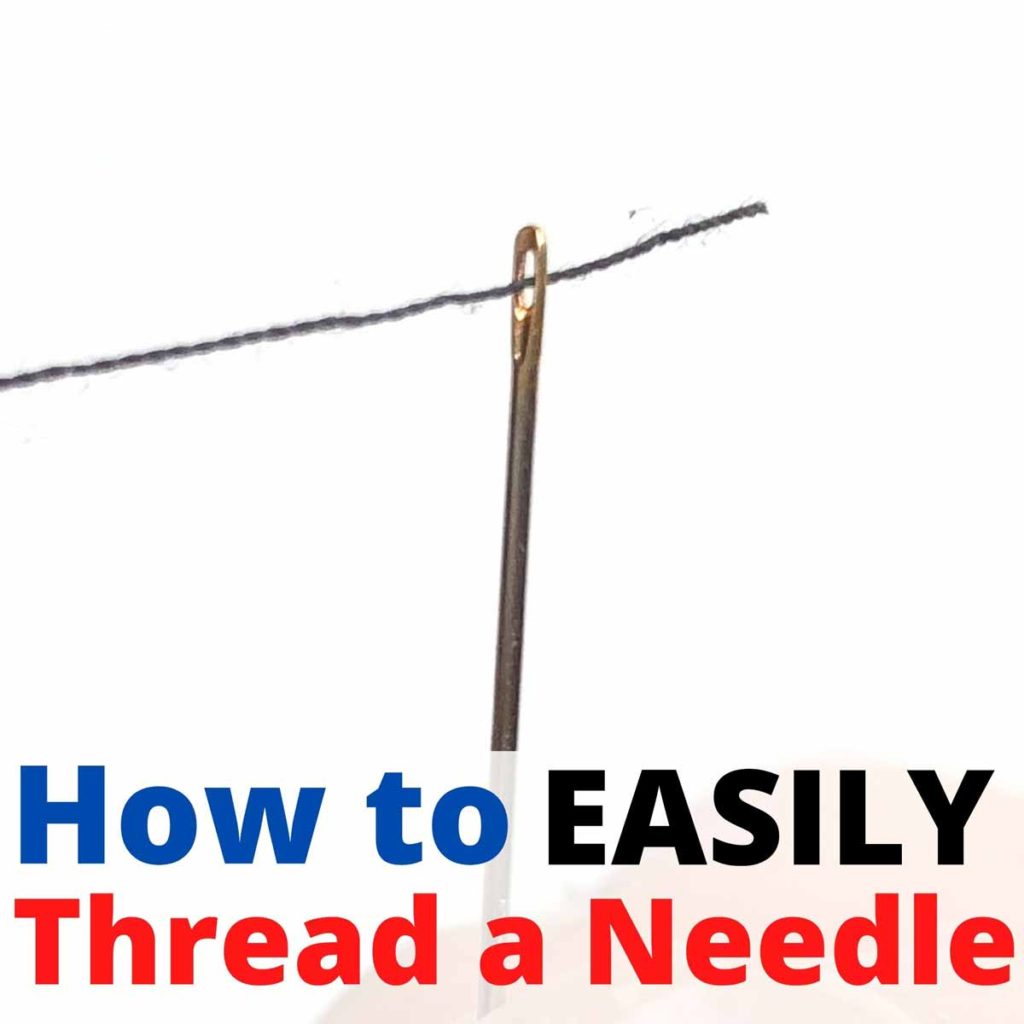
- Sharp, Thin Needle
- Matching Thread
Perfect Ladder Stitch Success Tips:
- Before you start, press the edge of the seam so that it’s sharp and crisp. You can do this with an iron or by pinching the edge of the seam tightly with your nails. Having a crisp edge makes it easier to do a perfect ladder stitch as you will be running your needle and thread through this edge over and over.
- Use a sharp, thin needle – Sharp needles will poke through the fabric easily. A thin needle is so the needle doesn’t leave large, unsightly holes in the fabric. Remember, the goal of the ladder stitch is invisibility. Shhh…you don’t want anyone to know that you’ve actually hand-sewed that part of the fabric.
- Use good quality thread that is durable. It’s no fun when the thread breaks while you are sewing. Or, the mending comes apart because the thread snapped and came out! Also, make sure the thread is not thicker than your fabric because otherwise the threads will show. Regular all purpose thread is sufficient for most projects.
- Choose thread color that matches. When it isn’t possible to find an exact match, use the closest color that is slightly darker than the fabric. If your fabric is multicolored, choose the most prevalent color on the fabric.
- Make small, evenly spaced stitches. The closer your stitches are, the more invisible they will be. Aim for 1/4″ or less between the stitches if you are sewing thin fabric. For thicker fabric your stitches may be closer to 1/2″ apart.
- Focus on thread tension. The thread should be tight enough to close the gap between the two piece of fabric. However, if you pull the stitches too tight, the fabric will bunch together and you won’t get a nice seam.
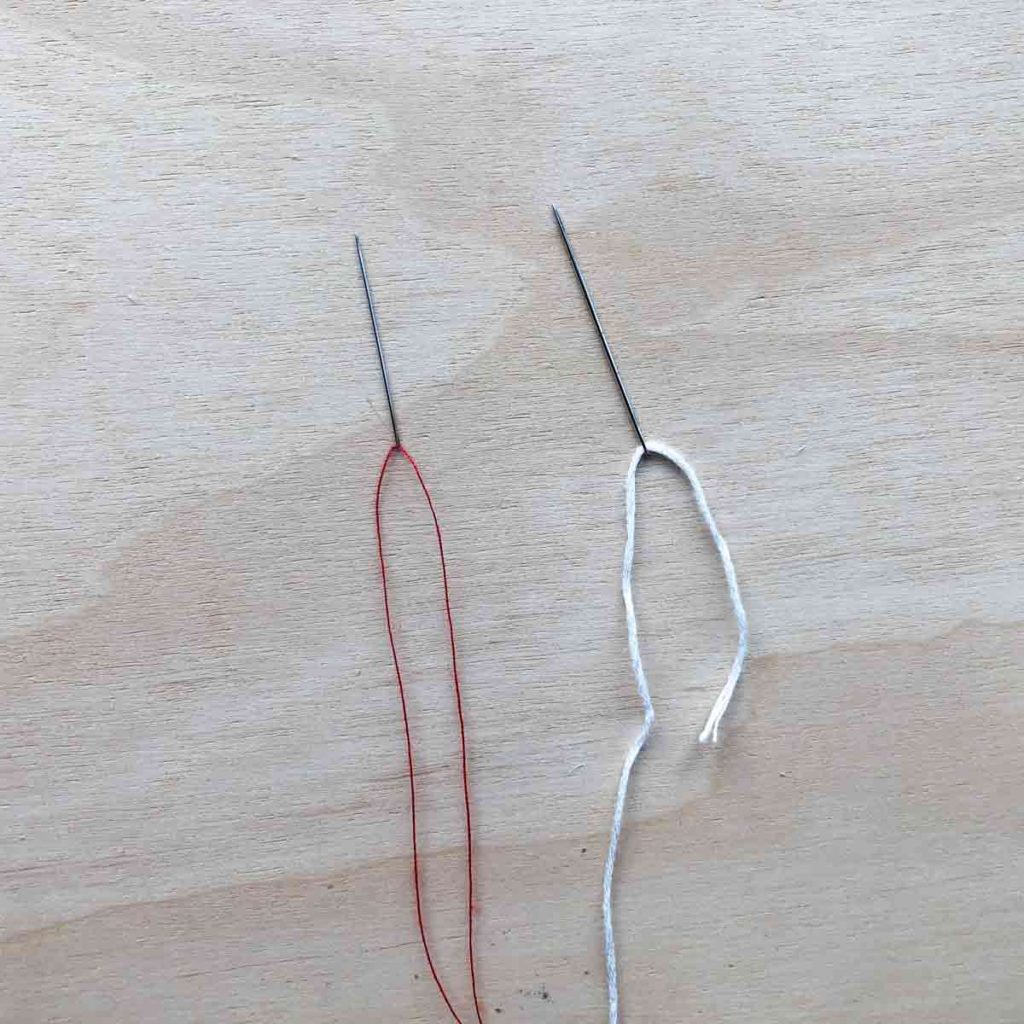
Make sure the thread you use isn’t thicker than the fabric. Right side shows white embroidery floss which is too thick. Left side shows double threaded all purpose thread which is perfect for Ladder Stitch.
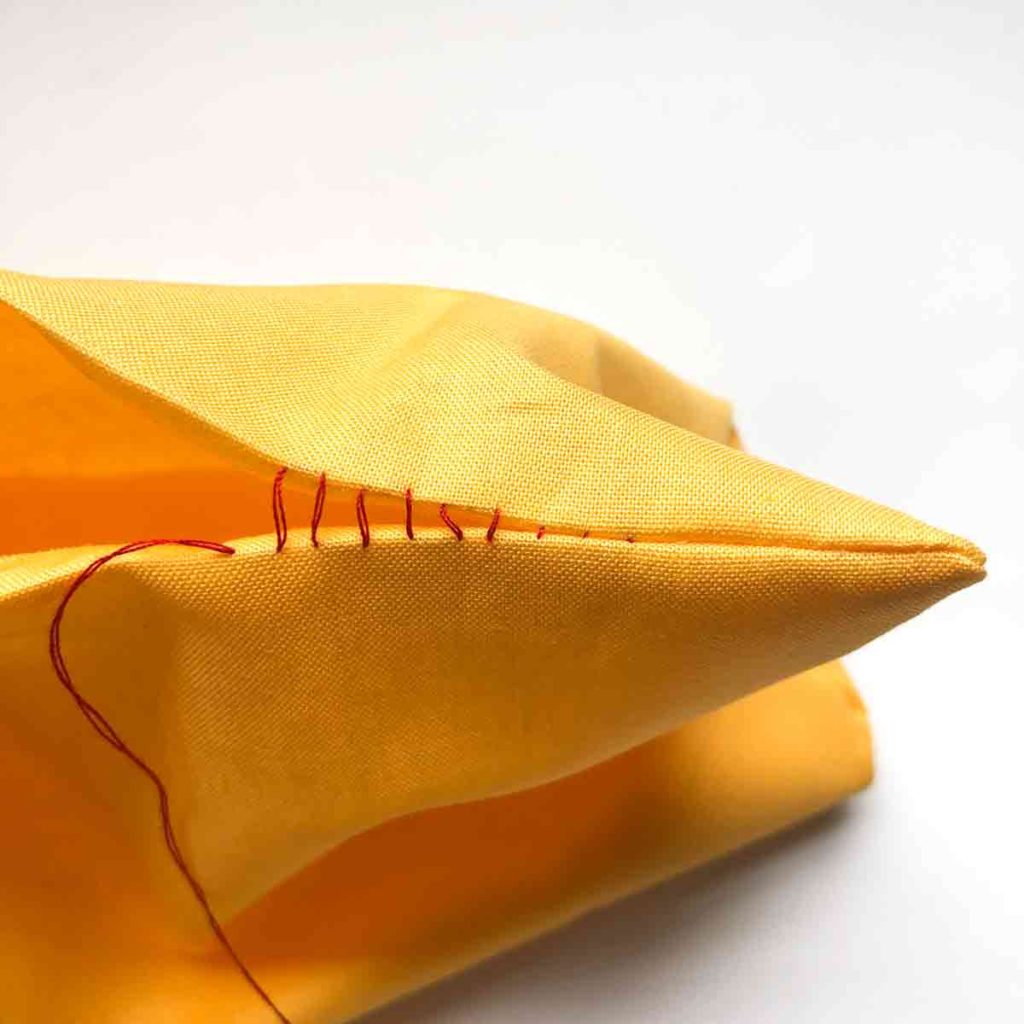
Make even, small stitches (no more than 1/4″ wide) when doing the ladder stitch so it will look invisible.

Don’t pull your thread too tight or else your seams will pucker .
How to Do a Ladder Stitch (Invisible Stitch):
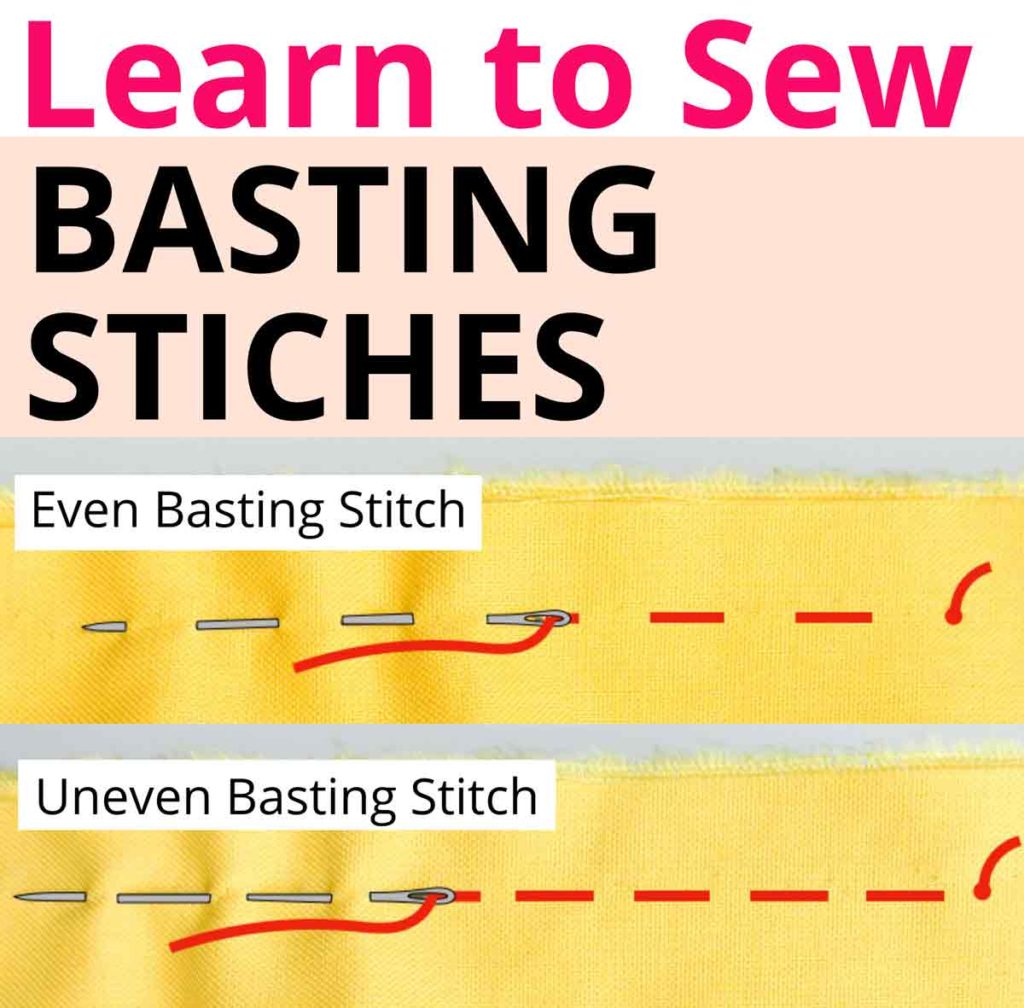
Start by threading a thin, sharp needle with matching thread. In the photo tutorial I am using red thread on yellow fabric so you can see better.
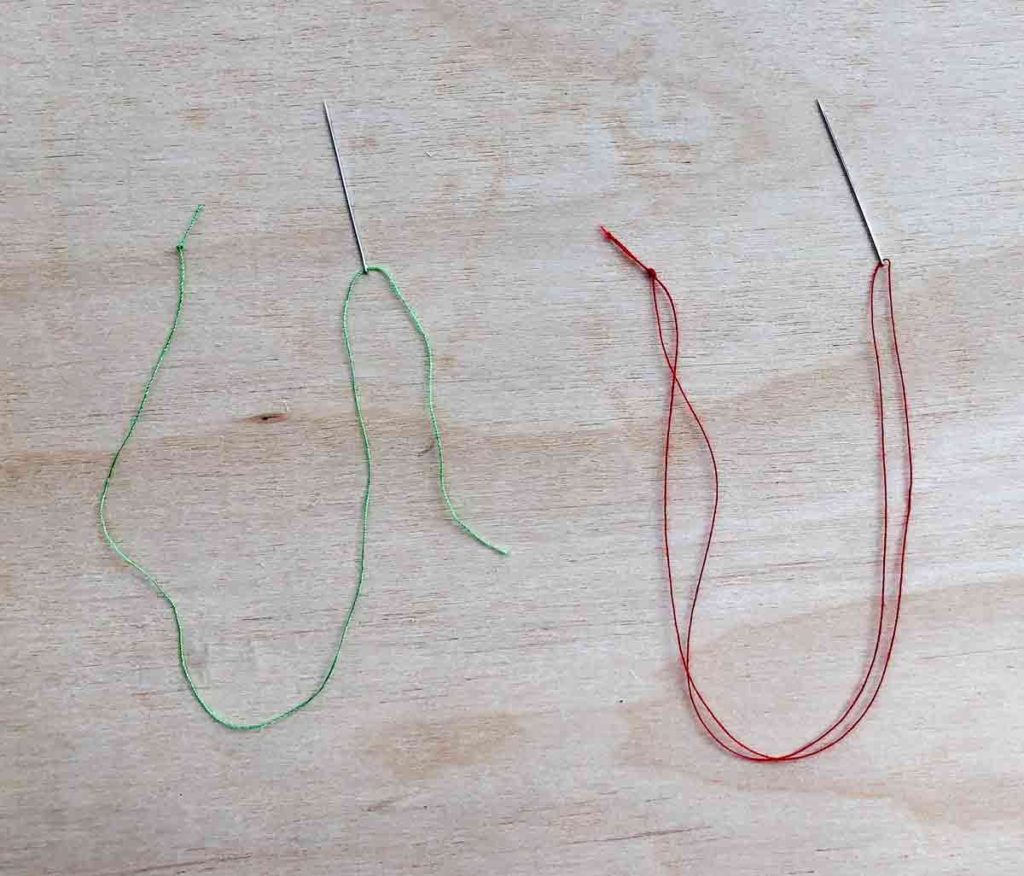
You can either use a single or double thread. I prefer double threading my needle so the thread doesn’t come out during sewing. Make a knot at the end of the thread
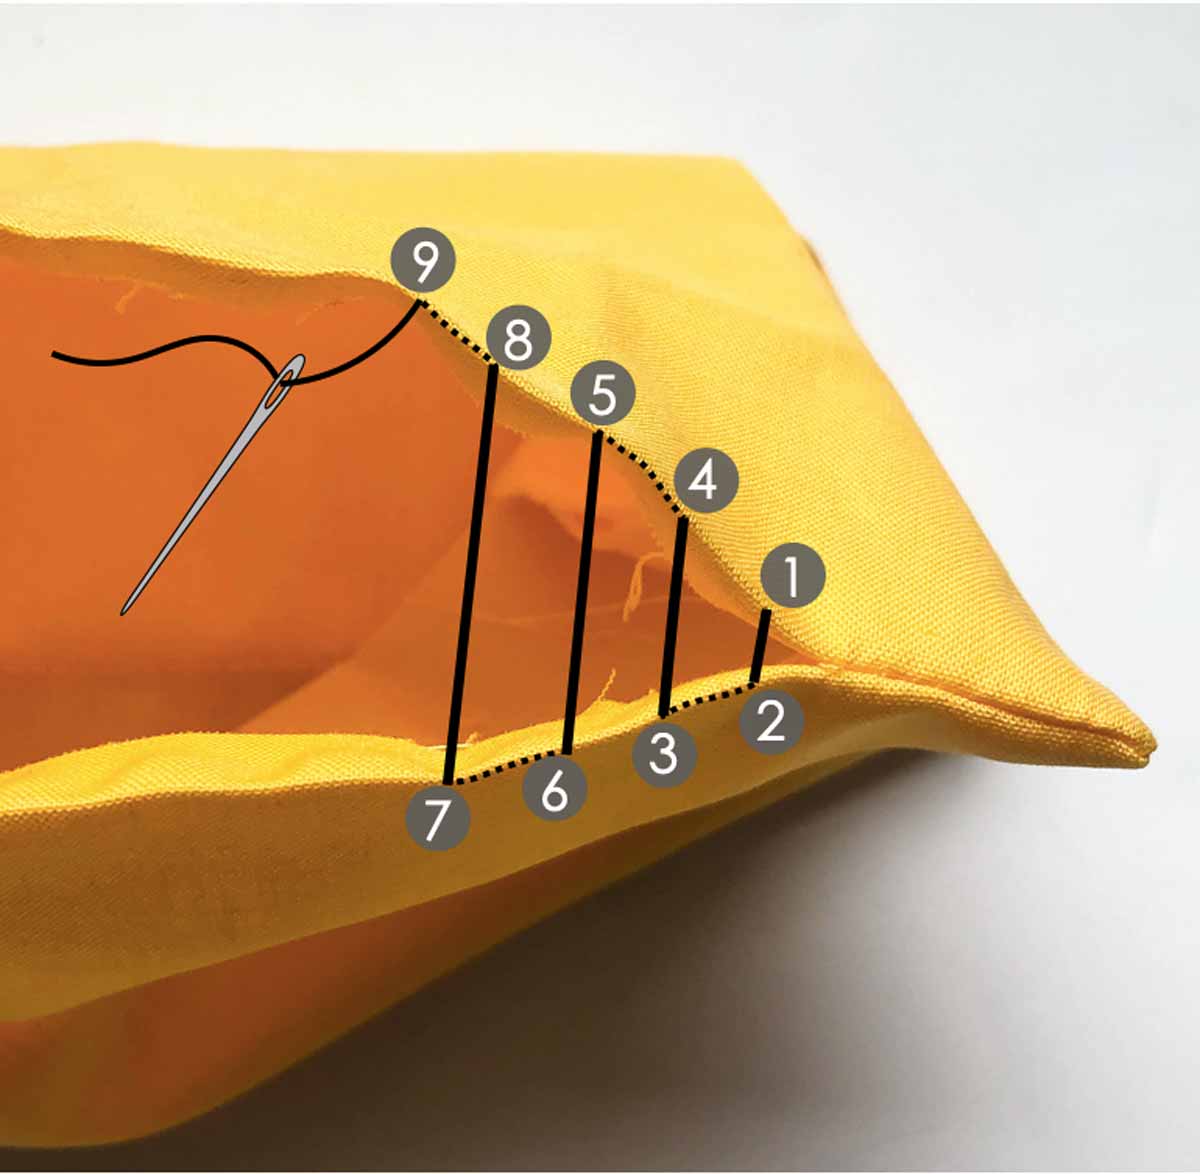
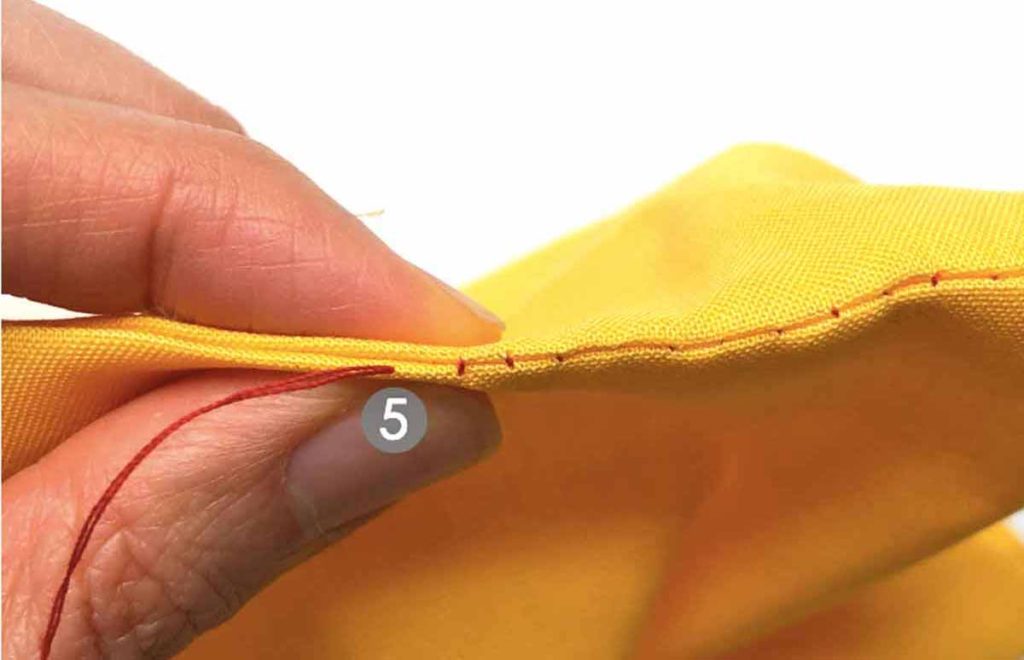
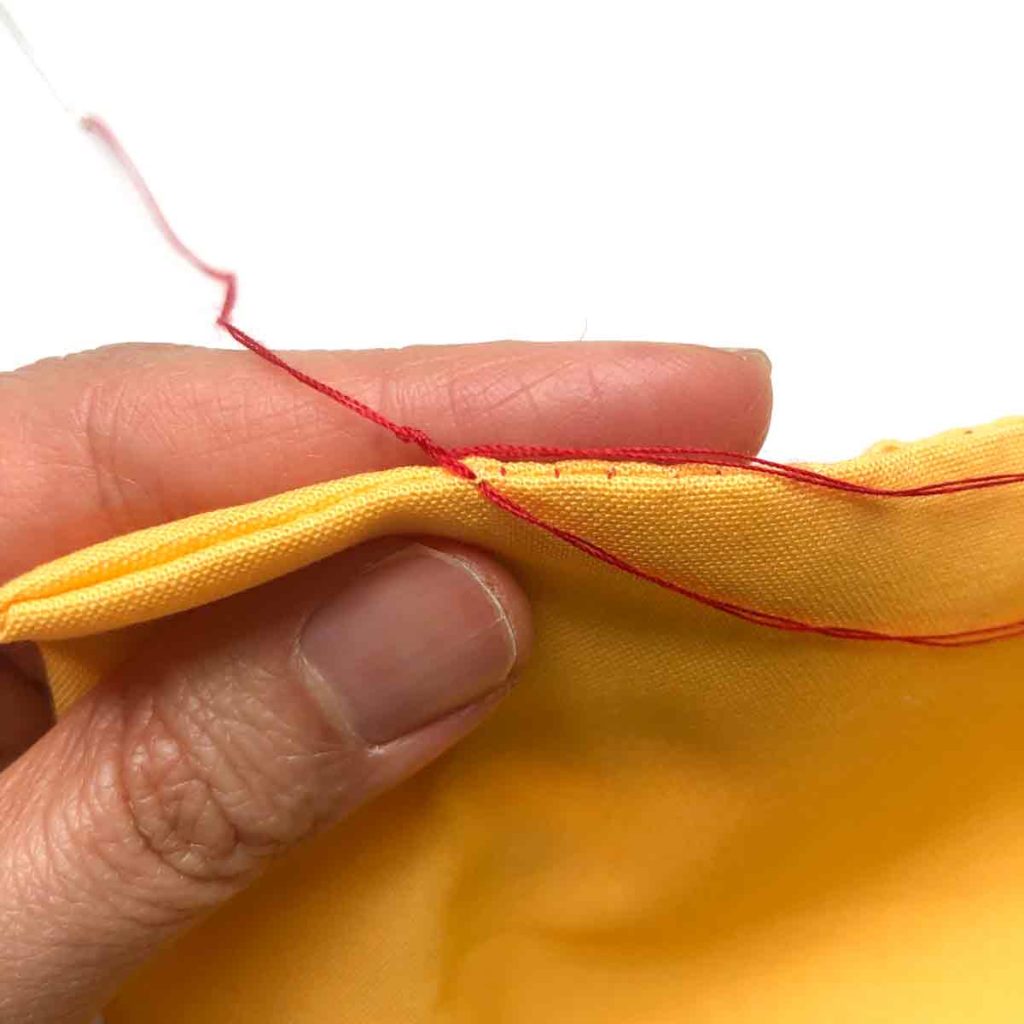
Starting the Ladder Stitch:
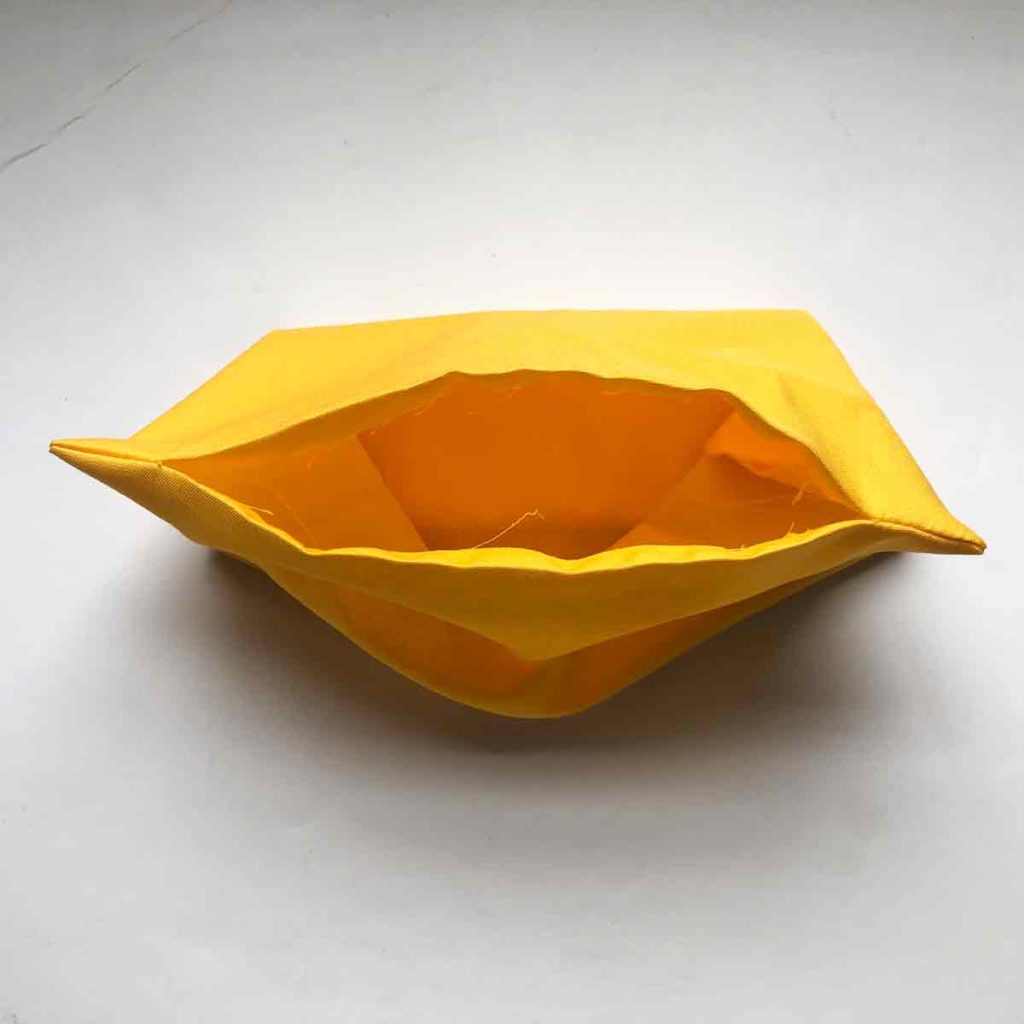
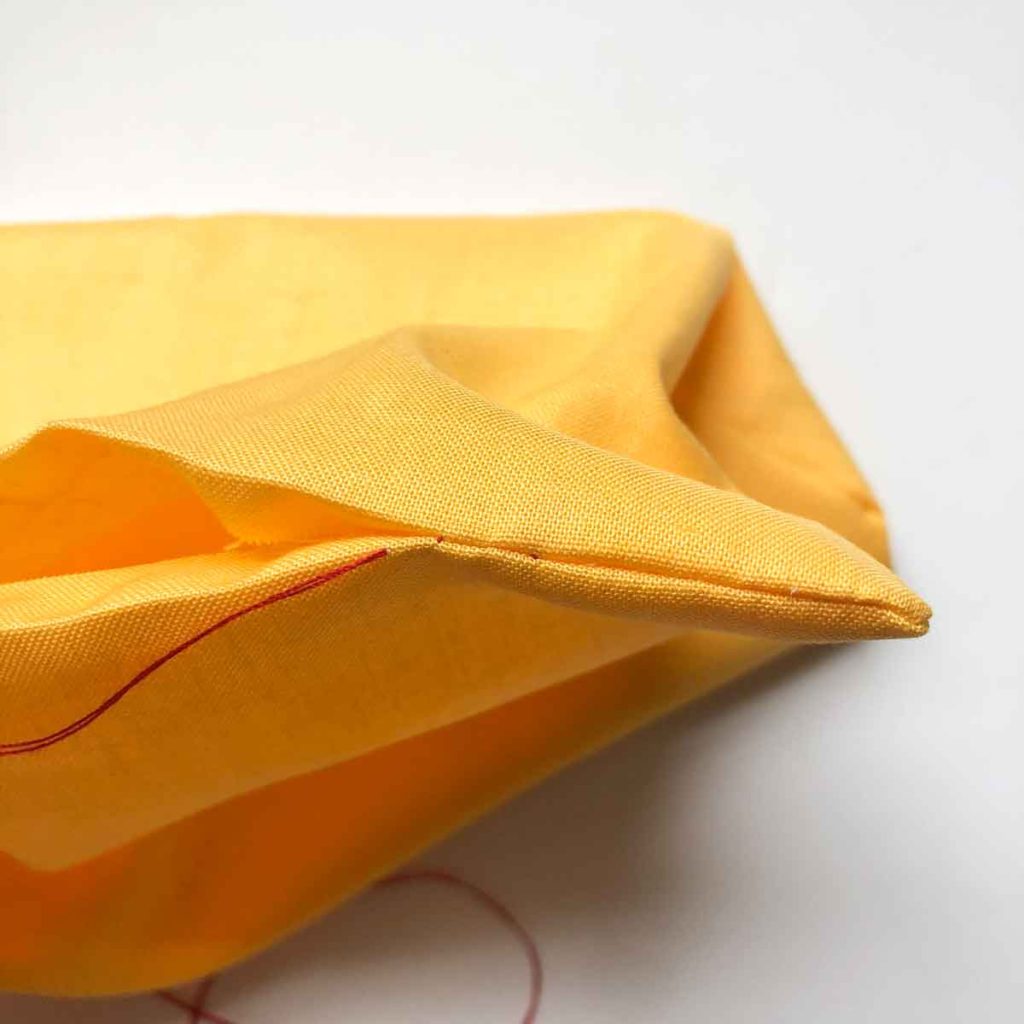
Start with the hole you need to close.

Poke needle through the edge of the seam allowance, about 1/8 – 1/4″ from the end of the opening (where the seams are turned in). Sew from RIGHT side of the opening to the LEFT side of the opening (for right handed people).
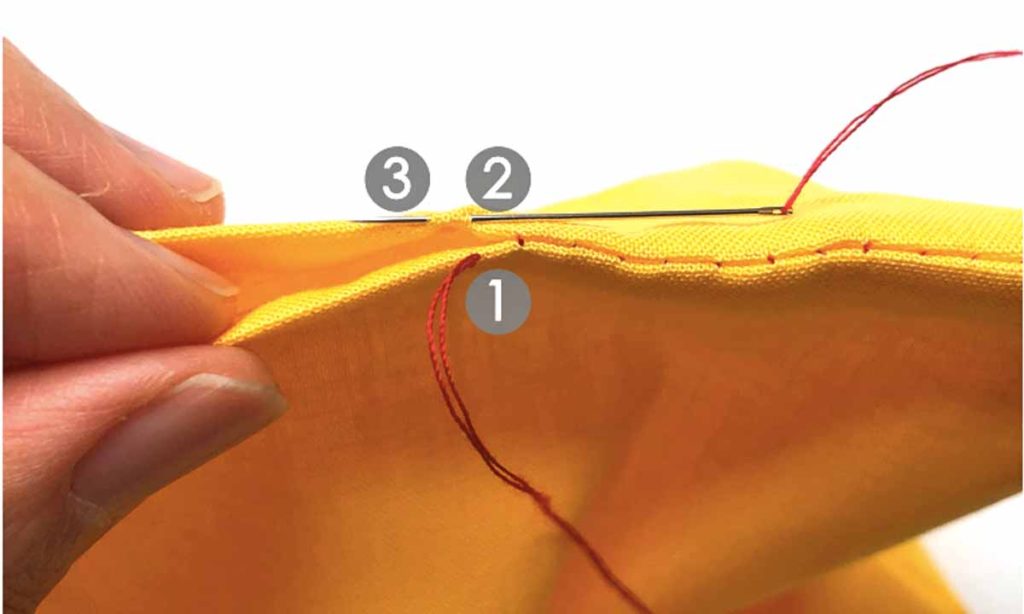
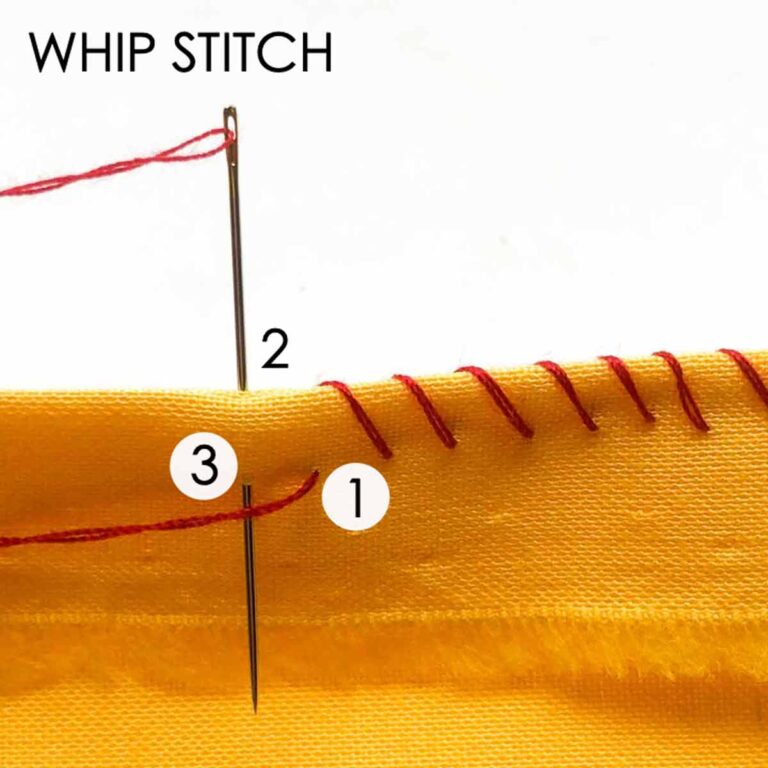
Sewing the Stitches:
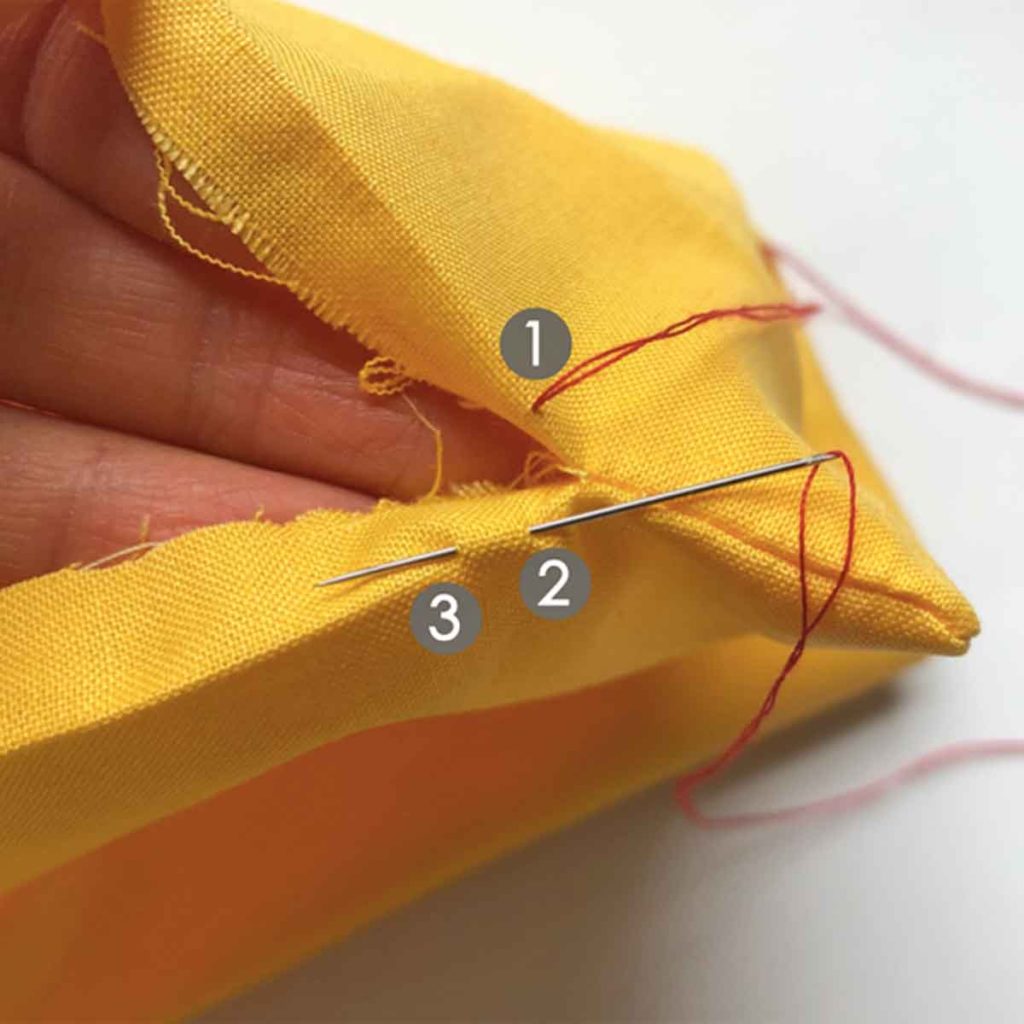
Pull the thread through so it stops at the knot (1). Then take the thread to the other side of the fabric and poke the needle about 1/4″ through the edge of seam allowance (2) and (3).
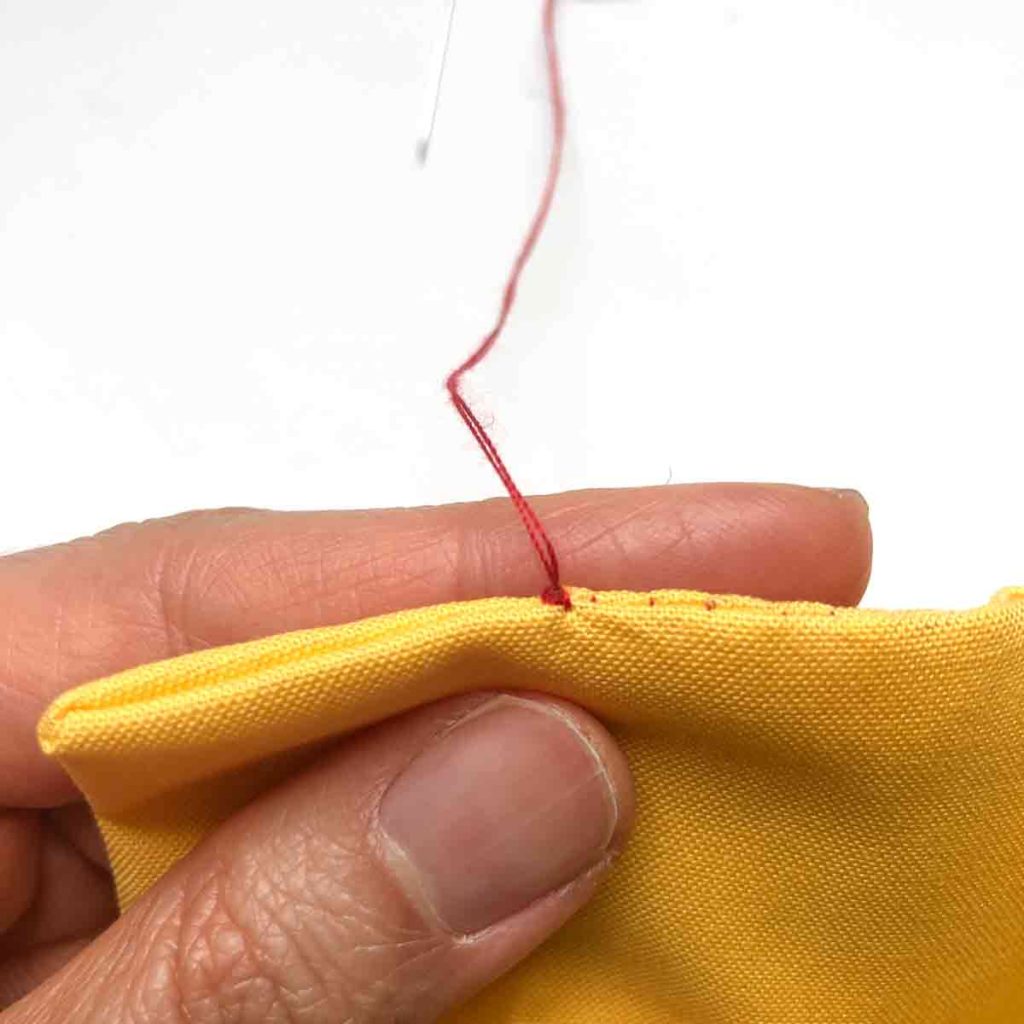
Pull thread through.
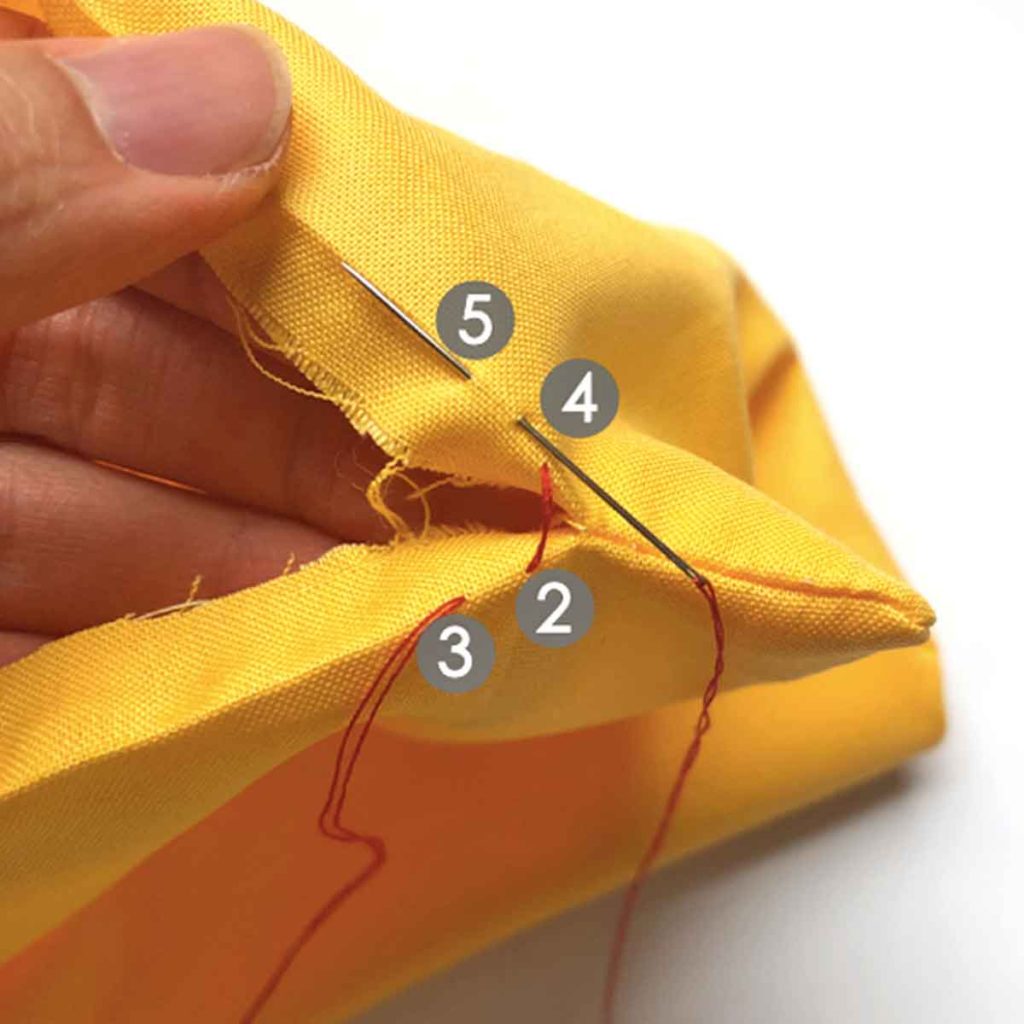
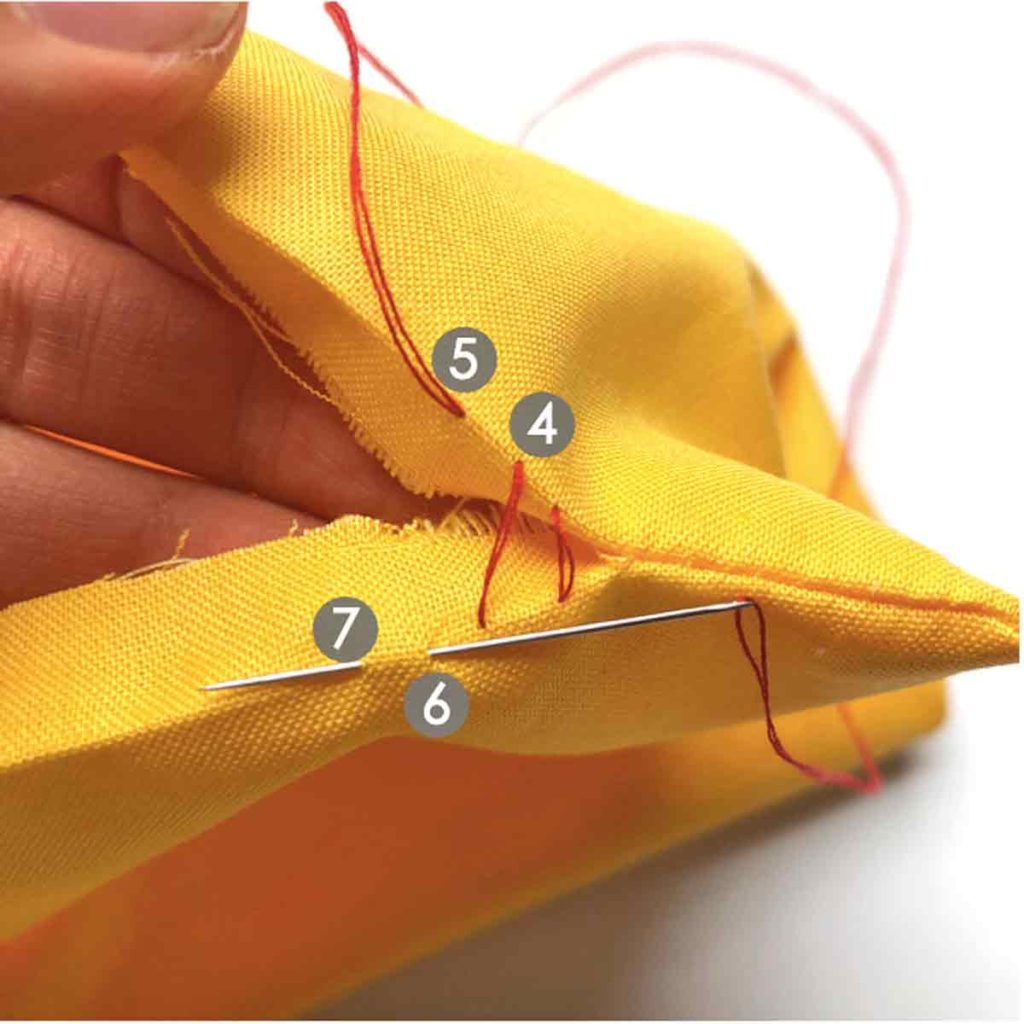
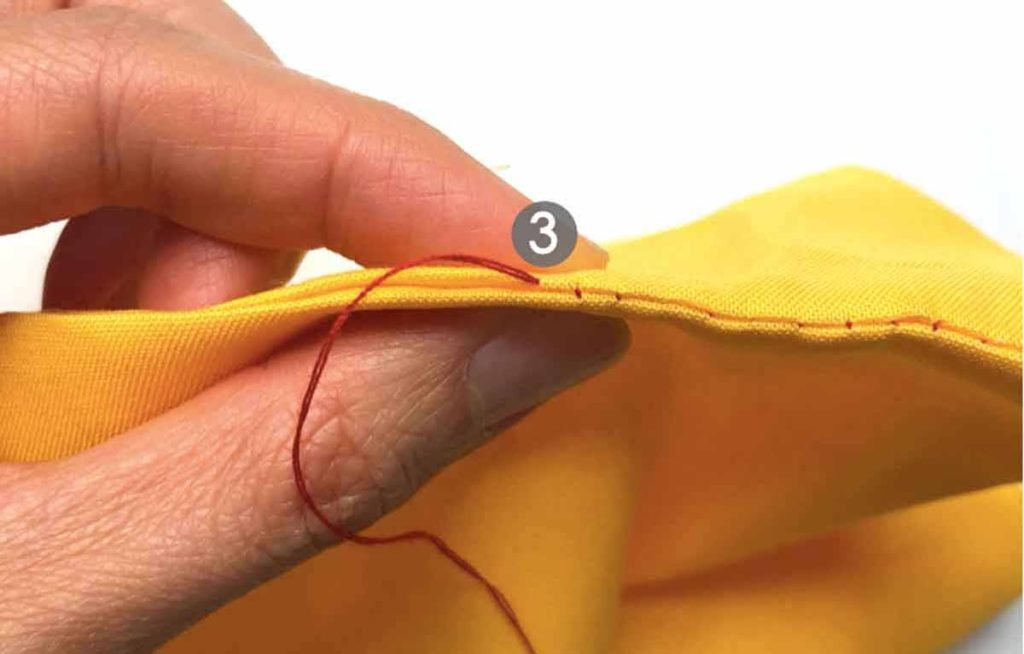
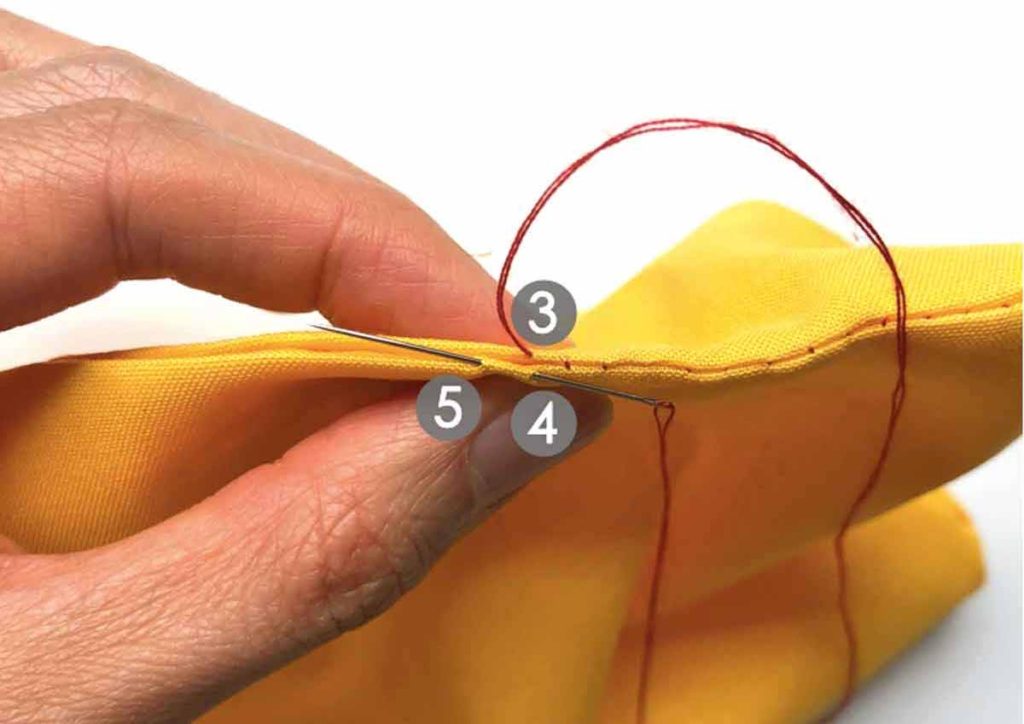
Now take the needle and poke it through the first side of the fabric (where you started the stitch). (4) and (5). Keep the stitches about 1/4″ apart.
Pull thread through.
Repeat the process.
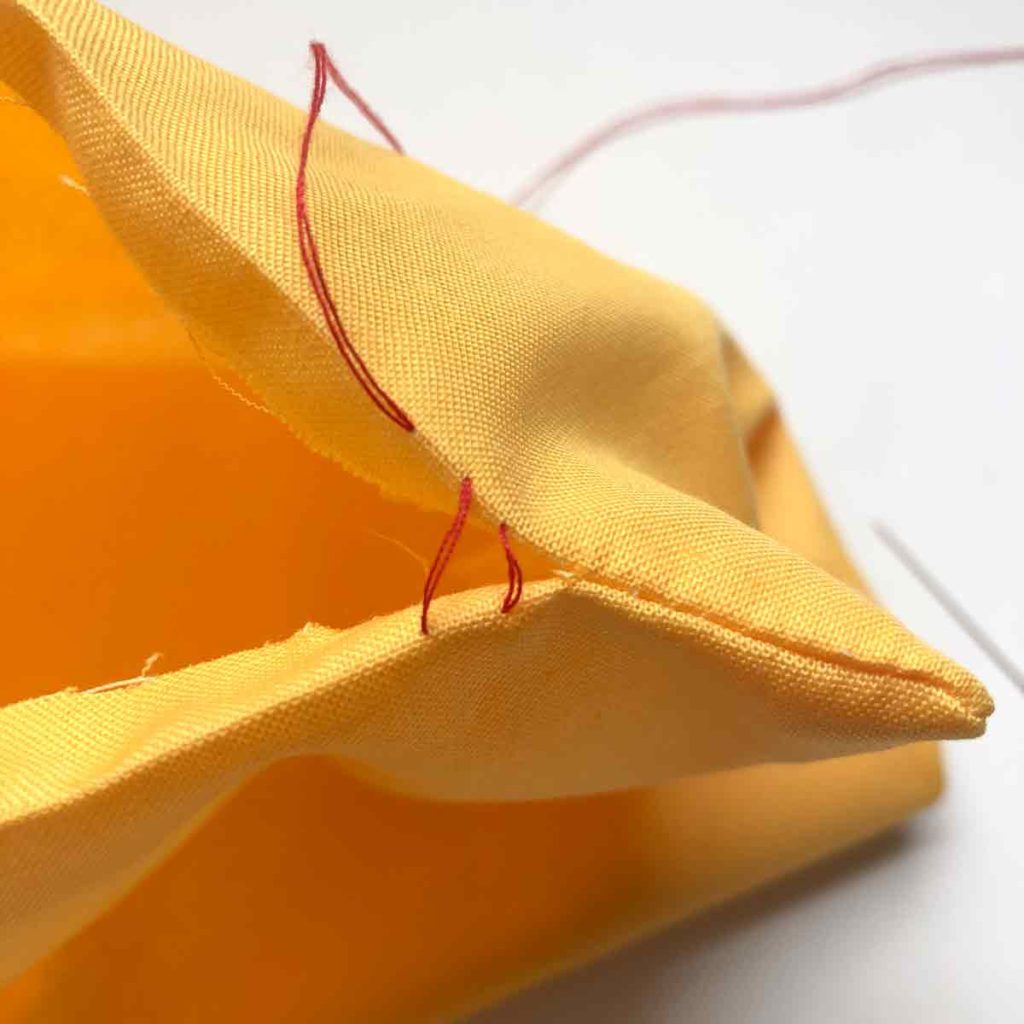
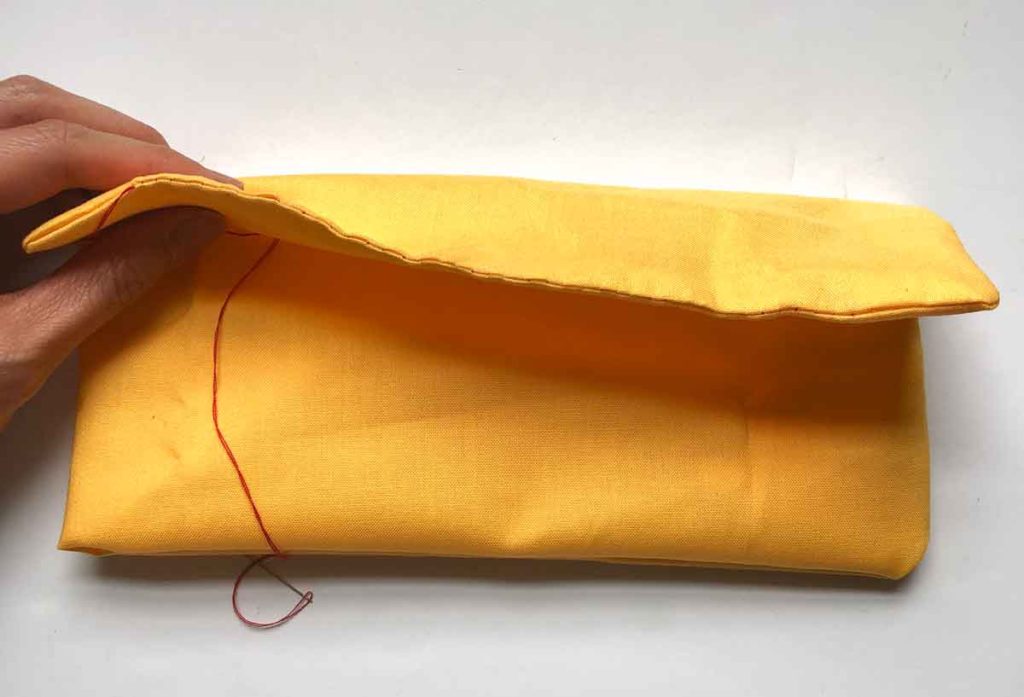
Pull and Close Stitches:
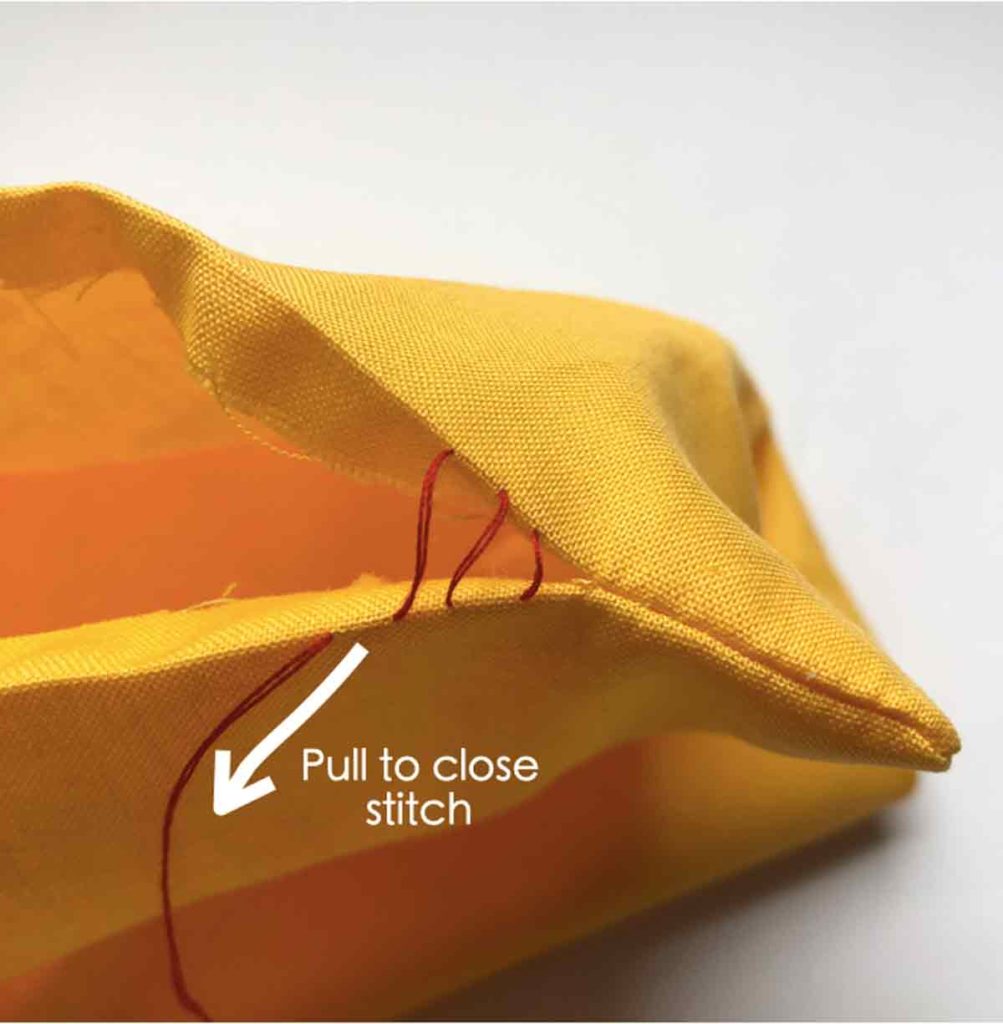
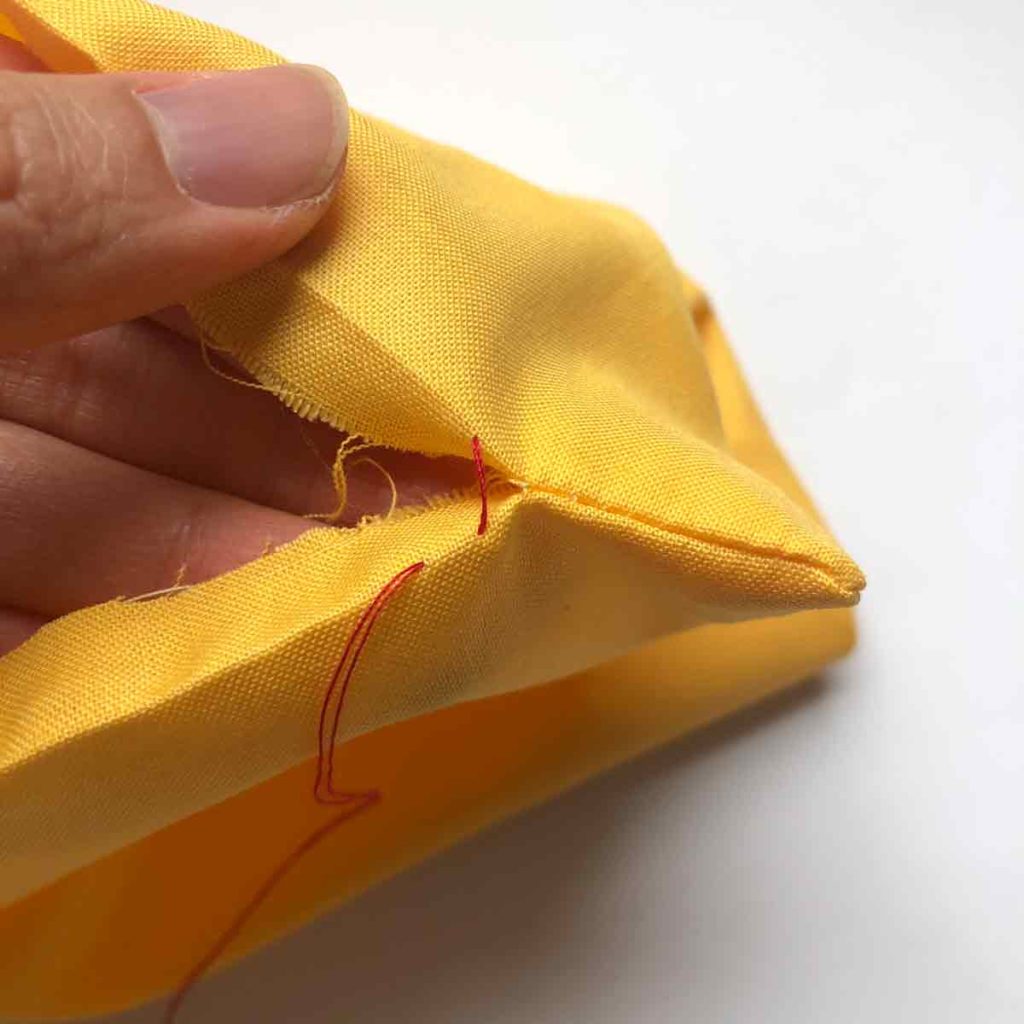
See how the stitch resembles a ladder, hence the name “Ladder Stitch“. Now pull the thread to close the opening.
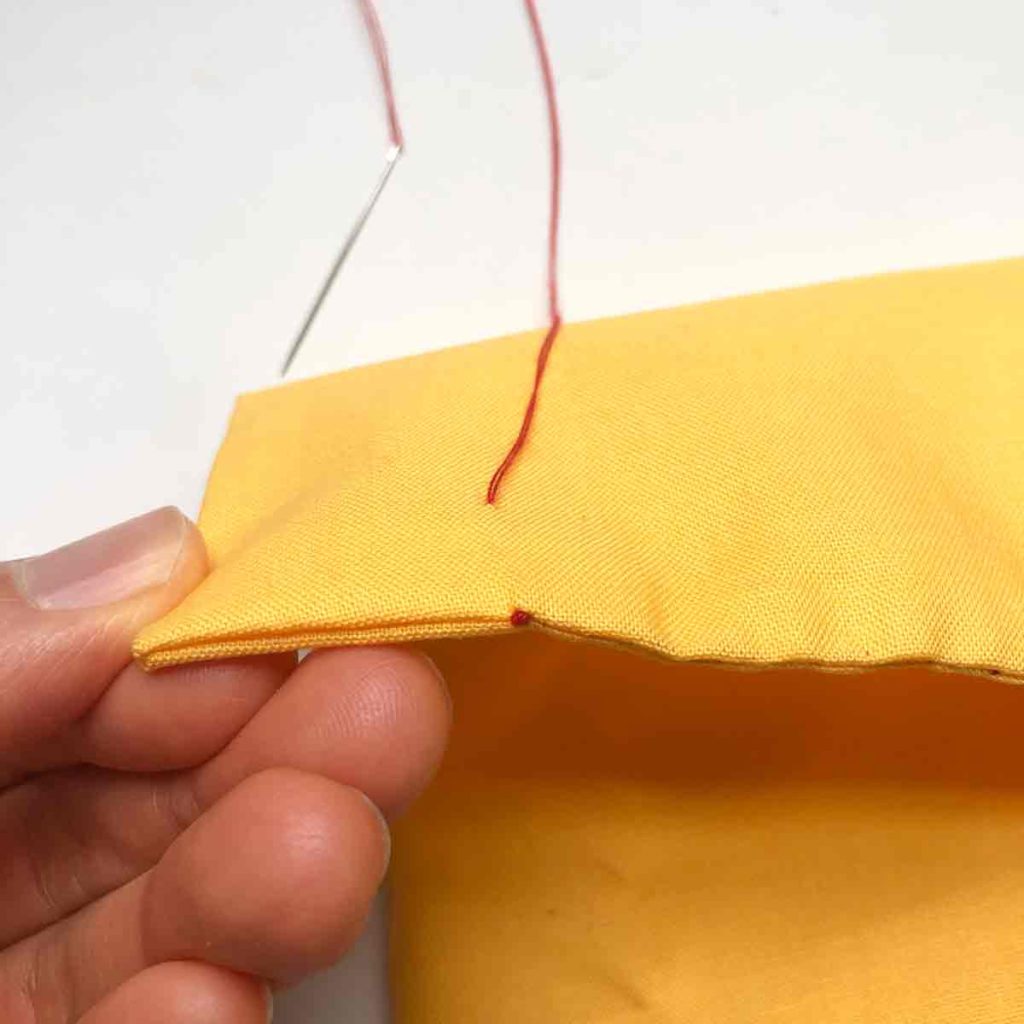
There! See how invisible that looks? If you used matching thread it would look even better.
One Final Tip for Sewing the Ladder Stitch (Invisible Stitch)
When sewing the ladder stitch, it’s easier if you hold the two sides of the opening very close together as you stitch the seams closed. First, this helps you visualize how the opening should look once it’s closed. Secondly, it helps you to know where to poke the needle as you stitch from one side of the fabric to the other.
The photos below show how to do the ladder stitch with the seams of the opening very close together:
How to Finish off the Ladder Stitch (Invisible Stitch):
Once you’ve closed the entire seam, it’s time to finish off the ladder stitch.
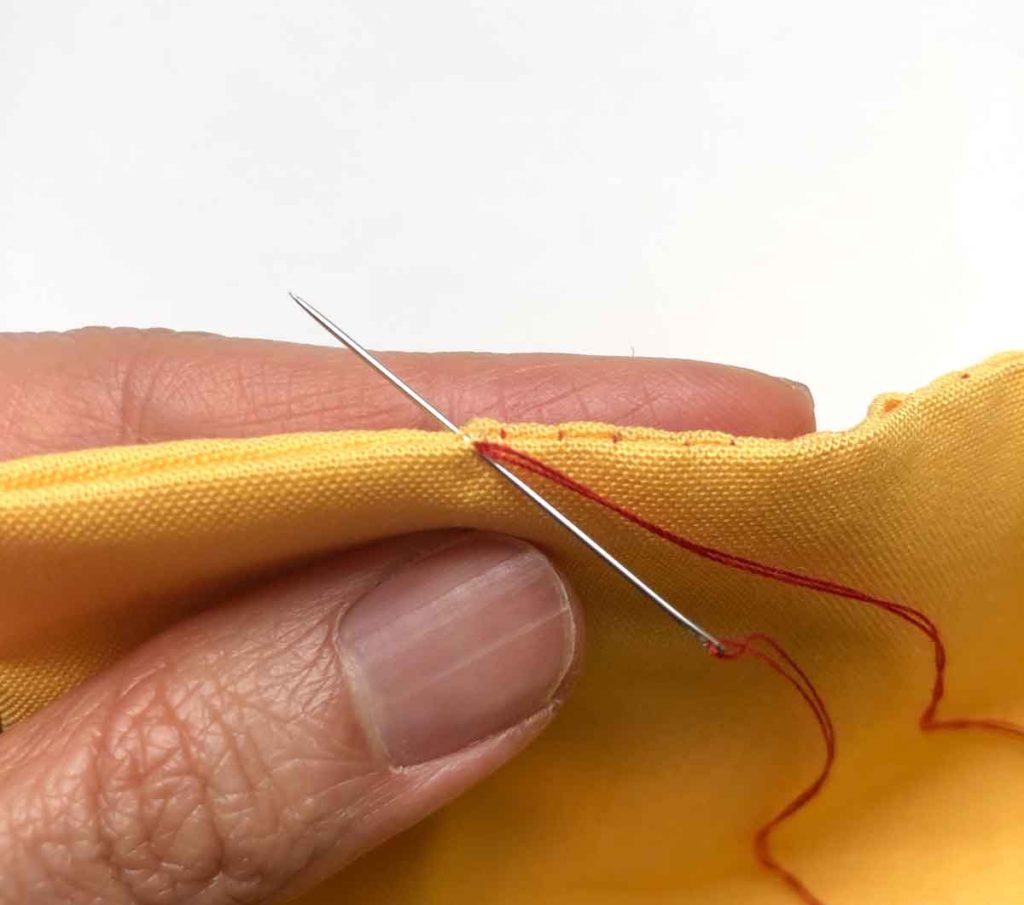
Poke the needle back through the fabric from (pretty much) where the last stitch came out.
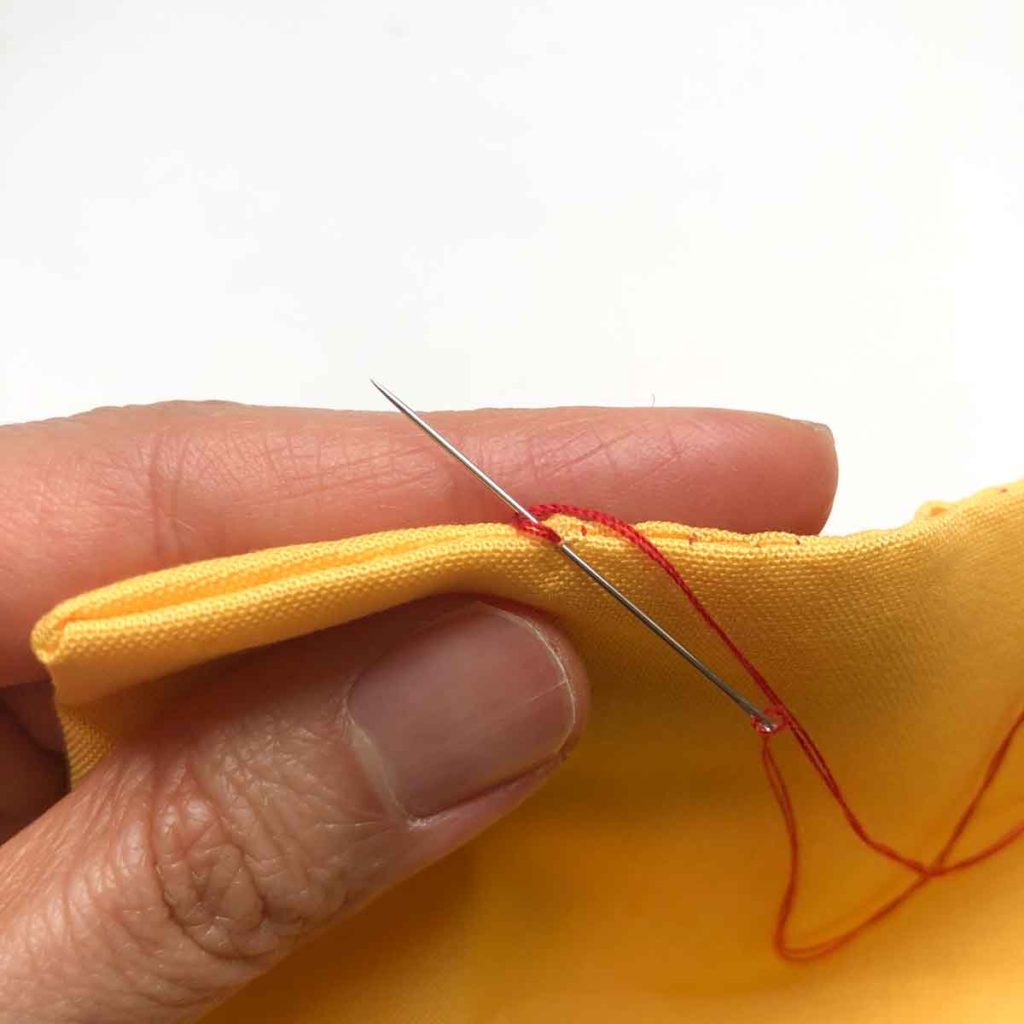
Take the thread and loop it around the needle once.

Then loop it around the needle again.
Pull needle through the two loops.
Tighten the thread and you have your knot.

Poke the needle back through the fabric right next to the knot
Poke out the needle from the fabric a little distance away (1-2″) from the knot.
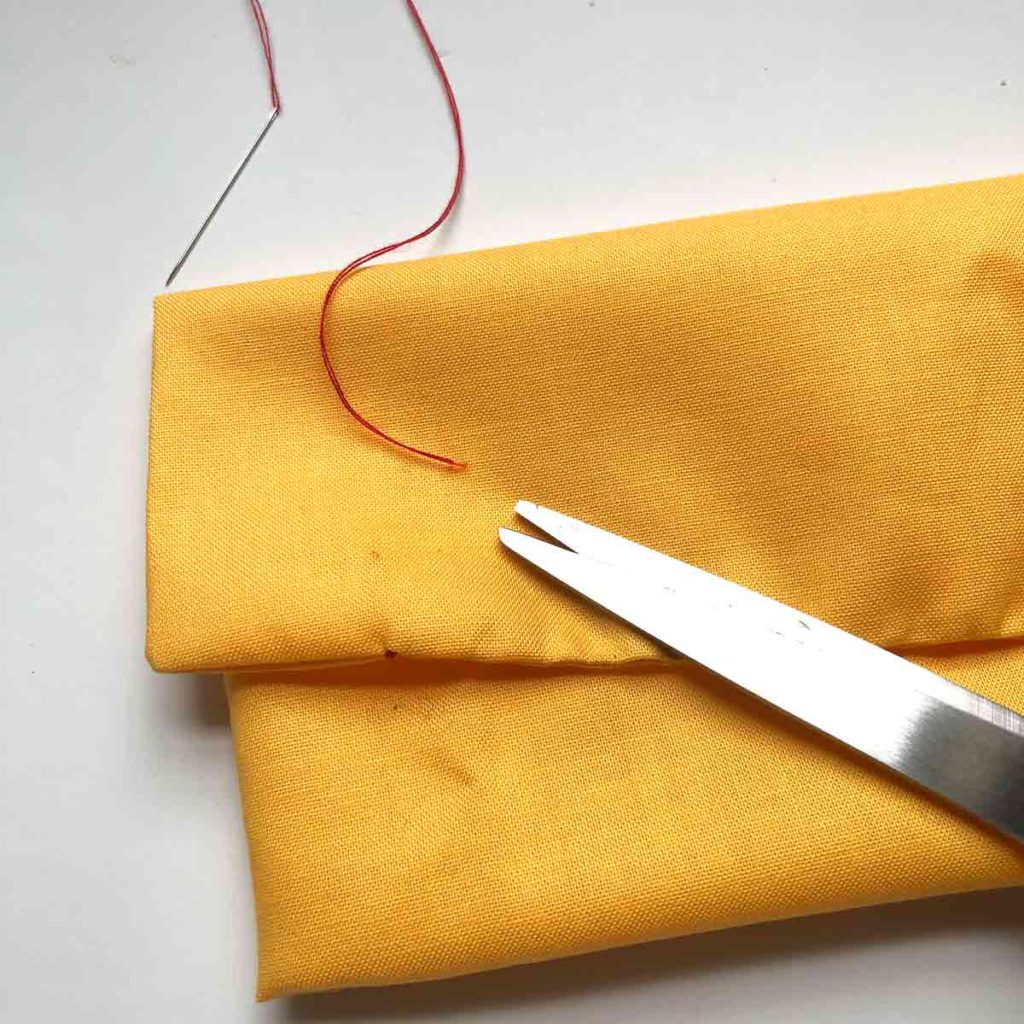
Now snip off the excess thread and you are finished!
How to Sew the Perfect Ladder Stitch

The Ladder Stitch/Invisible stitch is an extremely versatile stitch used to close a hole by hand from the outside so the seam is virtually invisible!
Tools
- Scissors
- Sharp, Thin Needle
- Matching Thread
Instructions
- Start with the hole you need to close.
- Poke needle through the edge of the seam allowance, about 1/8 - 1/4" from the end of the opening.*
- Pull the thread through so it stops at the knot.
- Take the thread to the other side of the fabric and poke the needle about 1/4" through the edge of seam allowance.
- Pull thread through.
- Now take the needle and poke it through the first side of the fabric (where you started the stitch). Keep the stitches about 1/4" apart.
- Pull thread through.
- Repeat the process until you have created 2-3 "rungs of the ladder". Then, gently pull the thread to close the opening**.
- Once you've closed off the entire hole, tie a knot at the end and you are done!
Notes
*Sew from RIGHT side of the opening to the LEFT side of the opening (for right handed people).
** The thread should be tight enough to close the gap between the two piece of fabric. However, if you pull the stitches too tight, the fabric will bunch together and you won't get a nice seam.
Ready to put to use what you just learned? Try these projects finished off with the ladder stitch.

Other Basic Sewing Skills You May be Interested in.
Don’t forget to Pin this image to save it for later!

Thank you for showing this step by step. I know I can mend my jacket the right way now.
You are very welcome!
Thank you for the great pictures and explanation. There are videos of some “miracle “ stitches but they go so fast it is difficult to figure them out. This was one that I was I was interested in. Thank you for taking out the mystery of how to do this.
Hi Mary!
You are so very welcome! I’m so glad you found this tutorial useful. This is one of my favorite hand sewing stitches and I use it all the time!!
I honestly believe this is the best picture tutorial I’ve ever viewed. I will be saving this & using for my sewing projects & can’t wait to see what other ideas you have for viewing. Thank you!
Hi Lynn!
Thank you so much for your kind words! I’m so glad you found this tutorial useful as the ladder stitch is one of my favorite hand sewing stitches and I use it all the time! Many of the sewing projects on this site is finished off with the ladder stitch. I also have a tutorial for 19 Essential Hand stitches that you may find useful as well. Happy Sewing 🙂
I was told you could use ladder stitch to take in jeans just on the hips, is this correct and if so how is it done ?
Yes! You can use the ladder stitch to pretty much sew anything and everything! To take in jeans, first pin the amount that needs to be taken in at the hips. To make this easier, have the person wear the jeans inside out and pin the correct amount that needs to be taken in at the hips (on both left and right side). Have the person take off the jeans, then turn the jeans to the right side. You can then proceed to stitch up amount that needs to be taken in (“marked” using pins) with the ladder stitch following the tutorial. I hope that makes sense. Let me know if you have any more questions!
Thank you so much, I’m teaching my daughter to sew & this is the perfect tutorial for this must know stitch! Great pictures and simple clear instructions. Keep them coming!
Hi Marcie,
Thank you so much for our kind words! And I’m so happy (and excited) to hear that you are teaching your daughter to sew!
Thank you so much for this tutorial! It was easier to follow than others I found.
Hi Audra,
I’m so glad you found this tutorial helpful and easy to follow!
This is a great tutorial…thank you for sharing!
Hi Karen,
You are so welcome! I’m so glad you enjoyed the tutorial and yes, it is one of my favorite stitches and I use it all the time for everything!
Thank you for such clear instructions. Loved learning how to make knot at the end too. I’m 78 and still learning! xx
Hi Gillian,
You are so welcome! And I’m so glad that you learned how to make the knot at the end. I actually learned how to do that from my father who learned it from my grandmother! Also thank you for the reminder that we need to never stop learning, doesn’t matter our age.
Excellent tutorial! Clear, detailed, comprehensive instreuctions. Thank you!
Thank you Dianne, so glad you found the tutorial helpful!
Thank you. I have just re stuffed my 15 year old teddy and you would never know thanks to your tutorial.
I’m very pleased with it
Hi Kerstin,
So glad to hear that! And you are very welcome 🙂 15 year old teddy bear is so precious!
I have looked at a lot of tutorials trying to understand this and yours is far and away the absolute best I have seen. I finally get it! Thank you for taking my sewing to the next level.
I’m so glad you found this tutorial helpful and thank you for your kind words! Yes keep learning!
Fantastic! Thanks so much!
You are so welcome Michelle!
Your tutorial was wonderful. Thank you. I’m finally able to sew, after 34 years of not knowing how.
Hi Andrew,
You are very welcome I’m so happy to hear that!