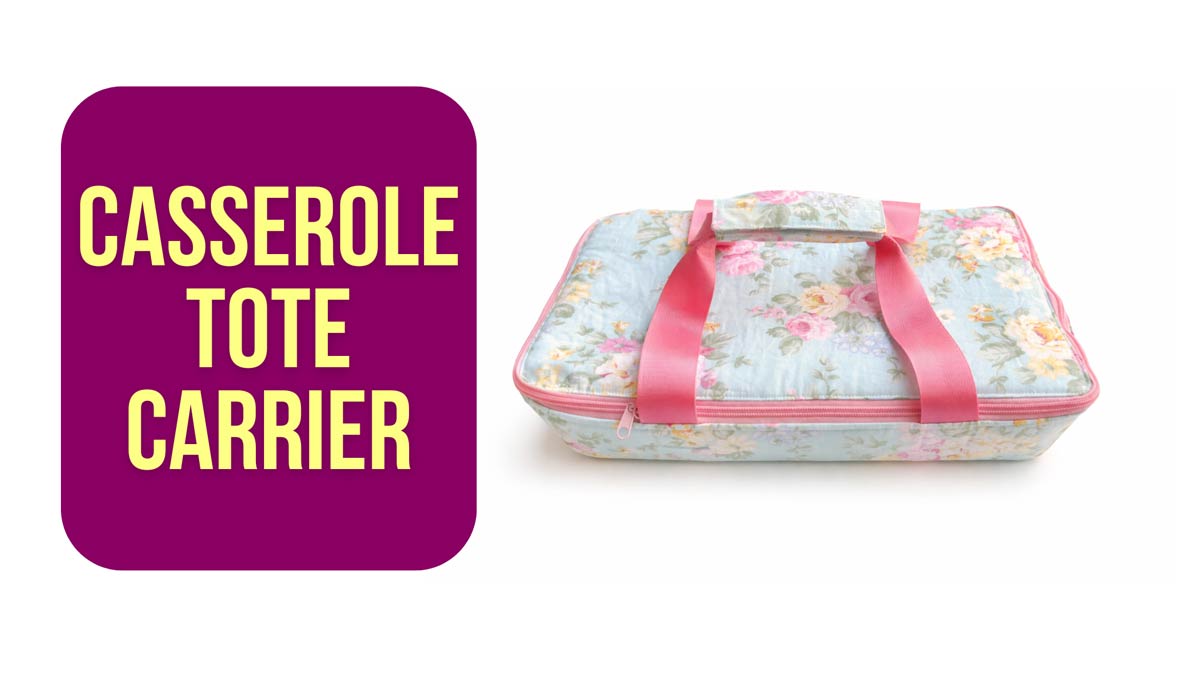
How to Make an Insulated Casserole Carrier
This handy insulated casserole carrier will keep your food warm (or cold) in transit to bring your A game to that potluck meal, game day, or family gathering!
This post may contain affiliate links. Please read my disclosure policy for details. As an Amazon Associate, I earn from qualifying purchases.

Sharing is caring! And what better way to love on a friends and family than bringing them a delicious dish straight from your oven? Better yet, keep it warm and ready-to-eat with this homemade casserole carrier that is padded and insulated!
This casserole tote pattern turns into a casserole carrier with a zipper opening, as well as straps for easy transport. Additionally, the casserole tote is lined with insulation material to keep your foods warm (or cold).
Finally, foam stabilizer in the casserole tote helps the carrier retrain its shape even when not in use. This sewing project is a lovely sewing gift for friends and family who love to share their home cooking with others!
Casserole Carrier Dimensions
Please note that dimensions are approximate and your final project may differ slightly from the dimensions listed below.
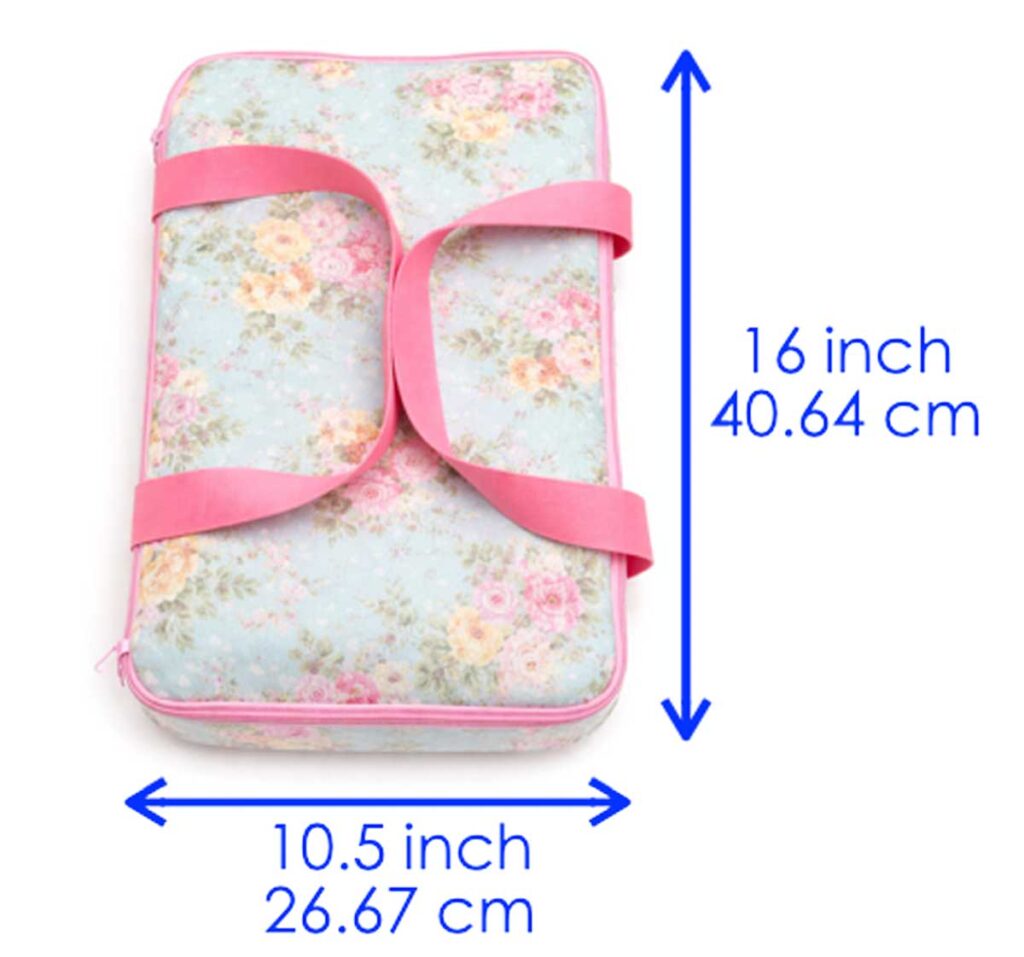
When closed, casserole carrier measures 10.5 inches (26.67cm) along the shorter side and 16 inches(40.64 cm) along the longest side.

When opened, the casserole carrier measures 22.6 inches (57.15cm) across. The strap is approximately 7 inches (17.78 cm) across.
What Do I Need for Making Casserole Carrier?
Materials
- CASSEROLE CARRIER PATTERN – available in OUR ETSY SHOP.
- EXTERIOR FABRIC – 2/3 Yard (0.6M), 100% Cotton or Cotton Blend Fabric.
- LINING FABRIC – 2/3 Yard (0.6M), 100% Cotton or Cotton Blend Fabric.
- INSUL-BRIGHT – 1/2 Yard (0.46M), see photo below
- FLEX-FOAM – 3/4 Yard (0.69M) if using 20″ wide flex foam. see photo below. I’m using Flex-Foam 1-Sided Fusible Stabilizer because that’s all I had. But you don’t need it to be fusible as I used basting adhesive to stick it to the fabric.
- MATCHING THREAD
- ZIPPER BY THE YARD – I really like THIS ONE as there are so many color variations to choose from. The amount of zipper length I used is about 39.5” (see Note 1)
- BASTING ADHESIVE
- WEBBING – In the tutorial below, I am using 1.5” wide webbing. However, 1” wide webbing is also suitable. You will need 44” or more of webbing.
NOTE 1: One of the benefits of using zipper by the yard is that you can attach two zipper pulls to it, turning it into a double zipper!

Tools
- SEWING MACHINE
- FABRIC SHEARS – I love my Ginghers Fabric Scissors! I’ve had it for over 10 years and it is still going strong!
- CLEAR RULER – I have the Dritz See Through Sewing Ruler 2 x 18 inch
- CHALK – I really like the Clover Chaco Chalk Liner for marking. It’s thin, marks well, and easy to use!
- POINT TURNER – optional, but very useful to push out the ears and bag.
- HAND SEWING NEEDLES
- SEWING PINS or SEWING CLIPS.
- POINT TURNER – optional, but very handy for all types of sewing projects!
- IRON – I love my Rowenta Iron with a retractable cord for easy storage
Pattern for Casserole Dish Carrier

Cut out the following pieces on fabric:
- BOTTOM PIECE
- EXTERIOR FABRIC (X1)
- LINING (X1)
- FLEX FOAM (X1)
- INSUL-BRIGHT (X1)
- LID PIECE
- EXTERIOR FABRIC (X1)
- LINING (X1)
- FLEX FOAM (X1)
- INSUL-BRIGHT (X1)
- HANDLE PIECE
- EXTERIOR (X1)
- LINING (X1)
- CONNECTOR PIECE
- EXTERIOR (X1)
- LINING (X1)
- FUSIBLE INTERFACING (X1)
DIY Insulated Casserole Carrier
Preparing Casserole Carrier Pattern Pieces
First, print and cut out all paper pattern pieces.

Next, piece together LID PIECE 1 and 2 (left), and also LID INTERFACING PIECE 1 & 2 (right), matching at the black arrows. Use tape to keep the pieces together.
Basting & Applying Interfacing

First apply basting adhesive to INSUL-BRIGHT BOTTOM PIECE and stick it to wrong side of BOTTOM PIECE-EXTERIOR FABRIC.

Next flip piece over so INSUL-BRIGHT is facing up. Next, align corner of Dart Tracing Piece Pattern (red arrows) with corner of INSUL-BRIGHT.

Finally trace pattern onto liner. Repeat on all 4 corners.

Now your insulating liner side will look something like the photo.

Next, repeat marking darts on wrong side of Lining.

Now, in the same way, place DART TRACING PIECE Paper Pattern on FOAM LINER PIECE.

Next, trace darts in all 4 corners.

Now in the same way, apply basting adhesive to INSUL-BRIGHT LID PIECE and stick it to wrong side of LID PIECE-EXTERIOR FABRIC.

Next, apply basting adhesive to FLEX FOAM – LID PIECE and stick it to wrong side of LID PIECE – EXTERIOR FABRIC (the side with the INSUL-BRIGHT).

Then, apply fusible interfacing with iron to wrong side of CONNECTOR PIECE – EXTERIOR FABRIC.

Next, repeat applying fusible interfacing for CONNECTOR PIECE -LINING.
Sewing Darts

First, sew corner darts together by matching the marked lines. Pin in place and sew. Back stitch on both ends.

Next, repeat sewing all 4 corner darts.

Now trim off excess dart fabric so seam allowance is about ¼”(6mm). Then repeat for all 4 darts.

Your Casserole Carrier Bottom will look something like this photo

Next, repeat same process for BOTTOM PIECE – LINING and trim off excess dart. Make sure you are sewing the darts together on the wrong side of fabric.
Now repeat sewing darts on FLEX FOAM.

Finally, trim darts to 1/4″ seam allowance. We will refer to this piece as BOTTOM PIECE – FOAM.
Marking Midpoint

First mark midpoint of BOTTOM PIECE-EXTERIOR by folding it in half length-wise, matching dart to dart

Second, make a tiny snip along the fold line on both sides. This will mark the midline (red arrows).

Now repeat marking midpoint on the following pieces: LID PIECE – EXTERIOR, LID PIECE – LINING, BOTTOM PIECE – LINING, CONNECTOR PIECE – EXTERIOR, and CONNECTOR PIECE – LINING (red arrows).

Next, fold in both sides 1/2”(12mm) on CONNECTOR PIECES to wrong side of fabric and press with steam.
Sewing Straps & Lining to Bag
NOTE: You will need to cut 2 pieces of webbing, each measuring 22”(55.88 cm) in length.

First, place webbing over right side of BOTTOM PIECE – EXTERIOR, 3.5”(8.89cm) away from dart and 1”(2.54cm) above edge, as pictured. Hold in place with clips.

Second, repeat same process on other side.

Next, baste webbing to BOTTOM PIECE – EXTERIOR (blue lines).

Now pin or clip CONNECTOR PIECE – EXTERIOR to BOTTOM PIECE – EXTERIOR, right sides together, matching at the midline. Baste in place (blue line).

Next, pin zipper to BOTTOM PIECE – EXTERIOR, right sides together, around top edge. Note that the zipper overlaps CONNECTOR PIECE by about 1/2” (1.27cm).
NOTE: Keep in mind that the side where the CONNECTOR PIECE is sewn becomes the back of your casserole carrier. The CONNECTOR PIECE is where the lid of casserole carrier attaches to the bottom of casserole carrier.

Continue to pin zipper around entire top edge.
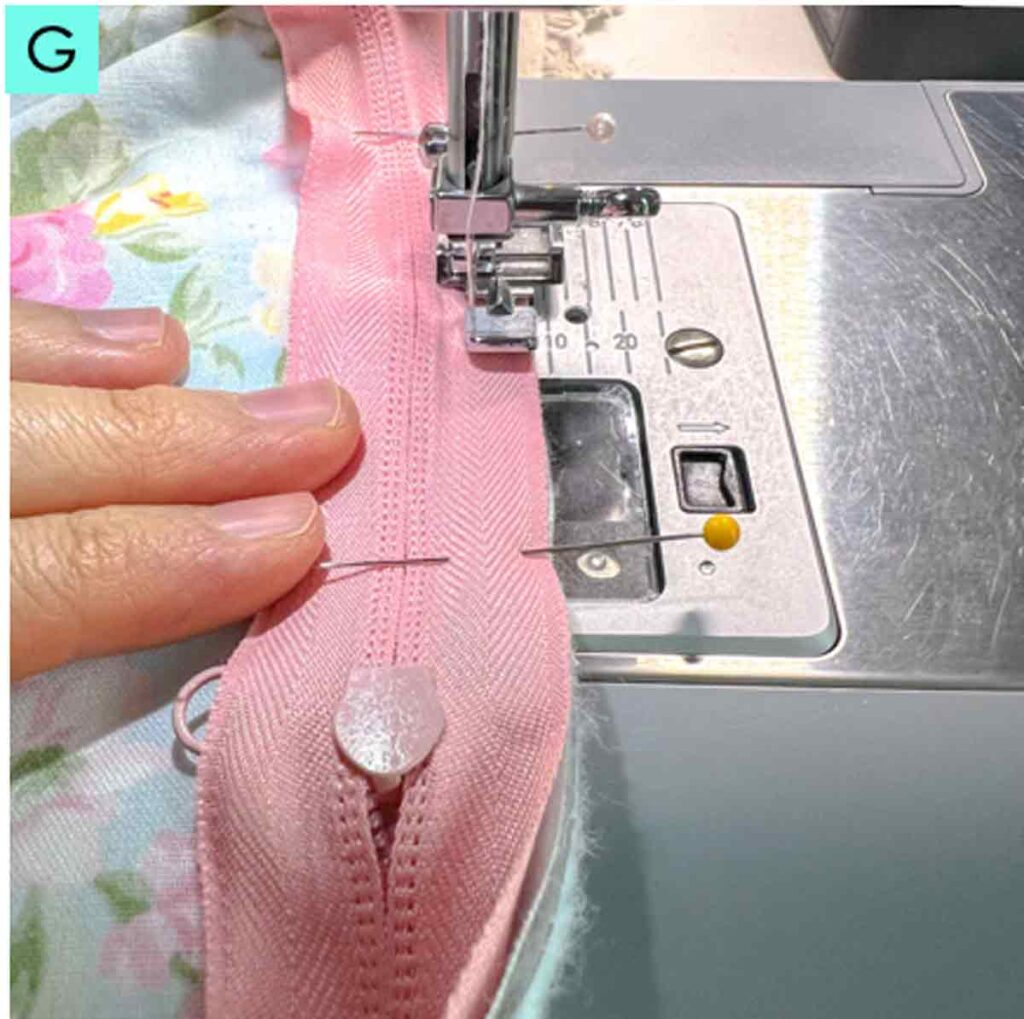
Now use zipper foot and stitch zipper down.

Then, place CONNECTOR PIECE – LINING over CONNECTOR PIECE – EXTERIOR and zipper, matching at midline. The right side of CONNECTOR PIECE – LINING will be facing towards you. Hold in place with clips or pins and baste in place (blue line).

Next, pin/clip BOTTOM PIECE – LINING over CONNECTOR PIECE – LINING from dart to dart, right sides together. Match at the midline (red arrow) and also at the darts (blue arrows). Then sew from dart to dart at 1/2”(1.27cm) seam allowance (blue dotted line)

This is the view of lining after its been sewn in from dart to dart.

Next, we are going to sew the extra 1 inch of webbing to BOTTOM PIECE – EXTERIOR. As you see in the photo, pull lining out of the way when you sew.

We will sew a box with an ‘X’ to secure webbing to BOTTOM PIECE – EXTERIOR.

This is the box with an ‘X’ viewed from right side of exterior fabric.

Now repeat sewing all the straps down to BOTTOM PIECE – EXTERIOR (black boxes).
Next, turn the lining (blue arrow) so it is behind BOTTOM PIECE – EXTERIOR. Lining and Exterior Fabric will be right sides together.

Now start pining BOTTOM PIECE – LINING to zipper, matching at darts and midline.

View of lining pinned to BOTTOM PIECE – EXTERIOR, right sides together.

Now, while you are pinning, you may find that the lining appears wider than your BOTTOM PIECE-EXTERIOR (there is excess lining). If that is the case, feel free to take in the dart lines so that the lining fits the BOTTOM PIECE-EXTERIOR better (see photo).
Note: if there is no excess lining, go to the next step.

Now sew lining to BOTTOM PIECE- EXTERIOR at 1/2” (1.27cm) seam allowance (blue dotted line). Leave an opening between the webbing. Back stitch on both ends.

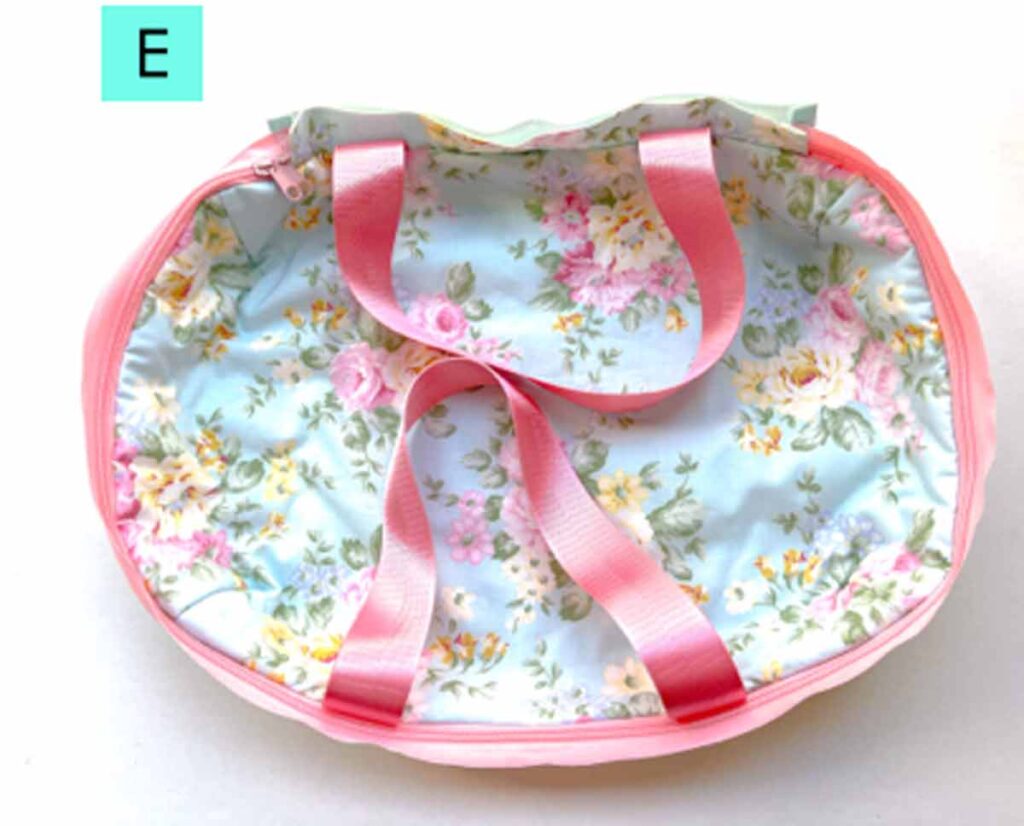
Finally, turn carrier to right side through opening. Your casserole carrier will look something like the photo.
Sewing Lid of Casserole Carrier
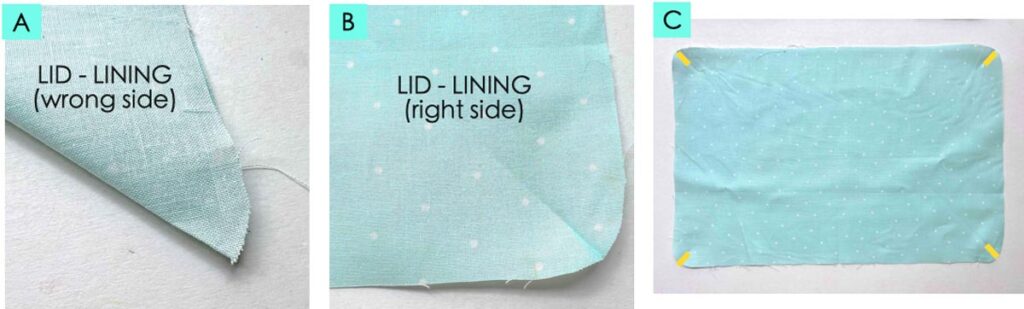
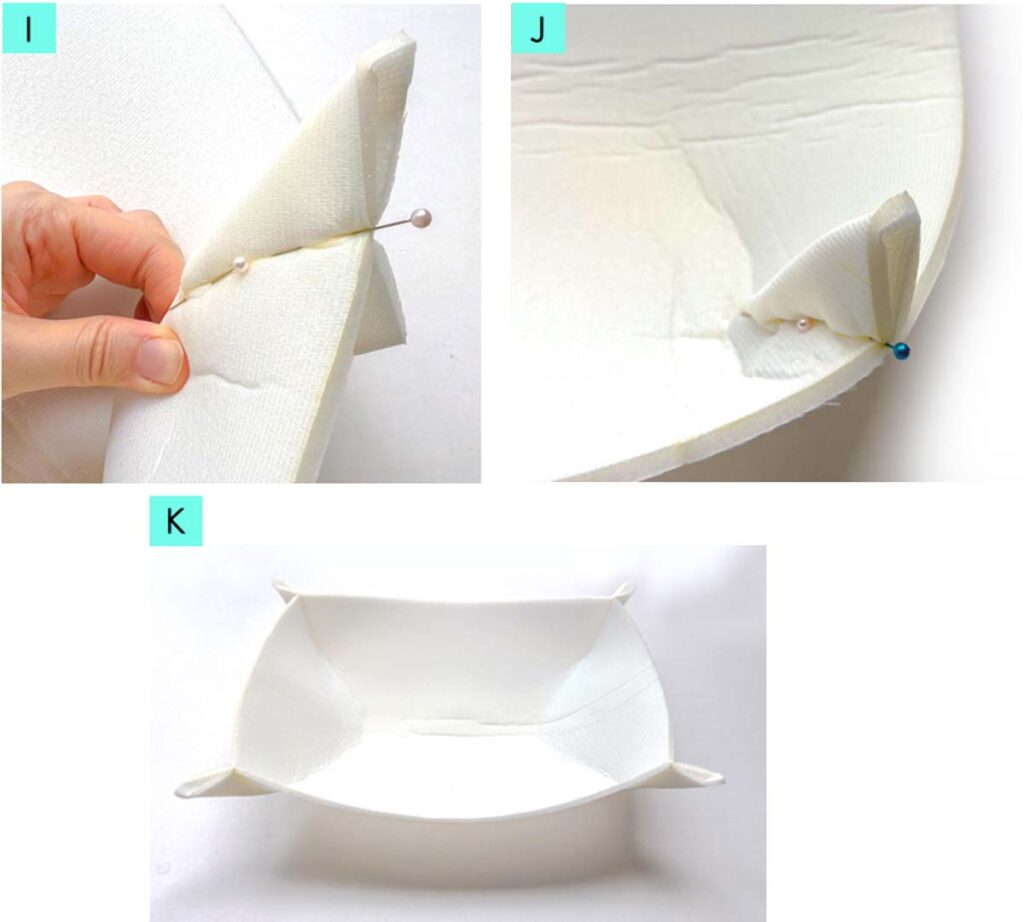
First, mark midpoint of all 4 curved corners of LID-LINING (C) by folding curved corners in half to make a mark (A) & (B). Depending on your fabric, the creased mark may be enough to see. Otherwise, use fabric chalk or make a small snip to mark the midline.

Next, repeat marking on LID-EXTERIOR.
Now flip the carrier bottom so the exterior fabric is facing you.
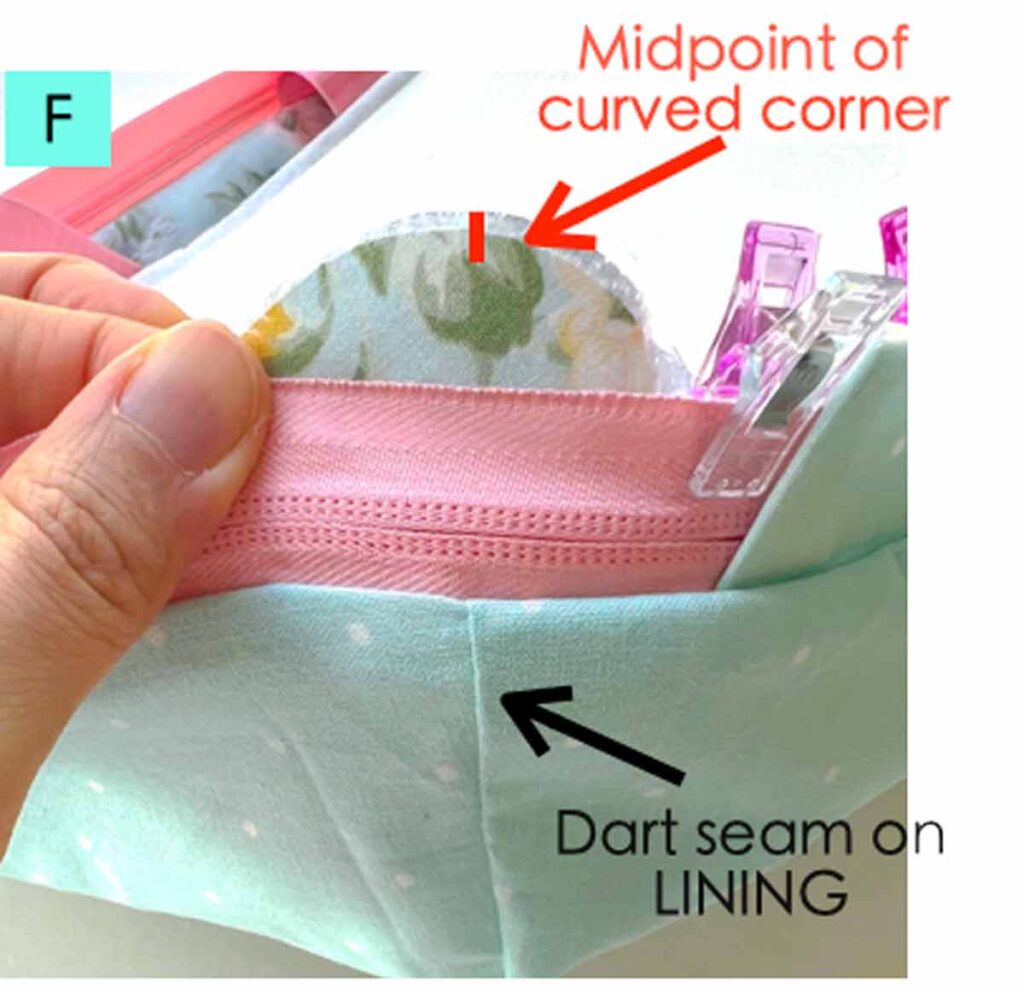
Next, pin (or clip) LID-EXTERIOR to carrier bottom, right sides together (exterior fabric faces exterior fabric). At the corners, you want the marked midpoint to match with the dart seam on lining.

(G): Please note that at the CONNECTOR PIECE, only pin LID-EXTERIOR to CONNECTOR PIECE – EXTERIOR. Make sure you don’t accidentally pin it to the CONNECTOR PIECE – LINING (see how LINING is pulled away).

Next, repeat pinning/clipping entire LID-EXTERIOR to carrier bottom.
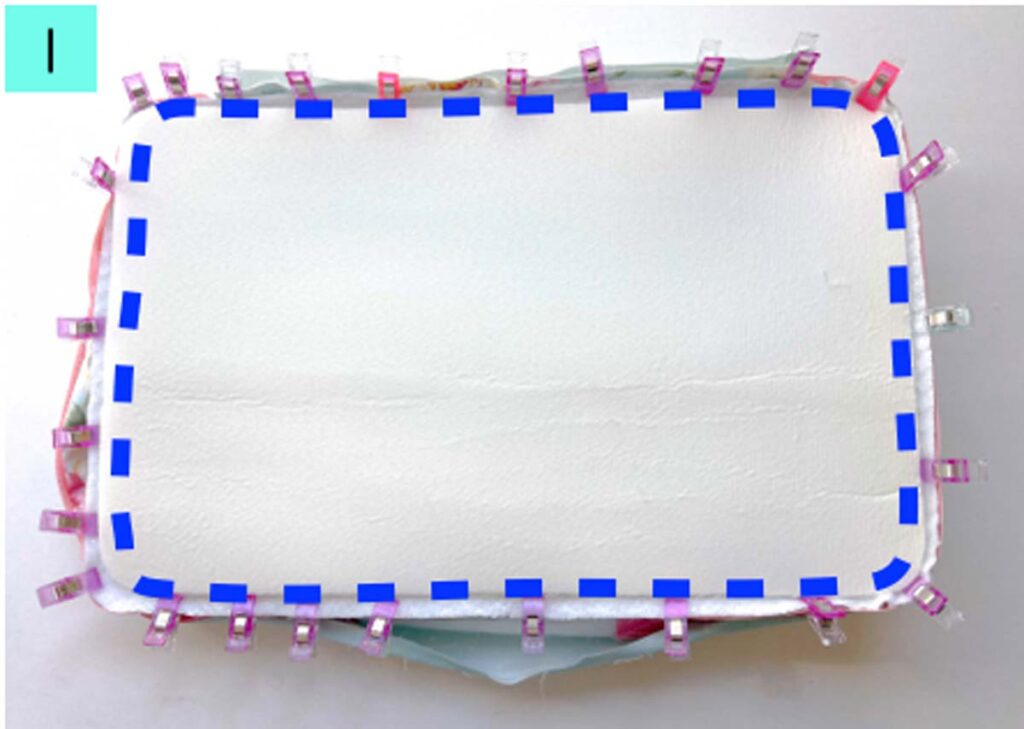
Now sew at 1/2” (1.27cm) seam allowance (blue dotted line).

(J): View of carrier after LID-EXTERIOR is sewn to the bottom with lid open.

(K): Another view of carrier with lid flipped over the bottom.

Next, turn the carrier so the LID-EXTERIOR wrong side faces up (L). Partially close the zipper so the carrier holds its rectangular shape.
Then, pin/clip LID PIECE – LINING to the zipper (blue arrow), right sides of lining together.

First, match the curved midpoints of linings together and pin in place

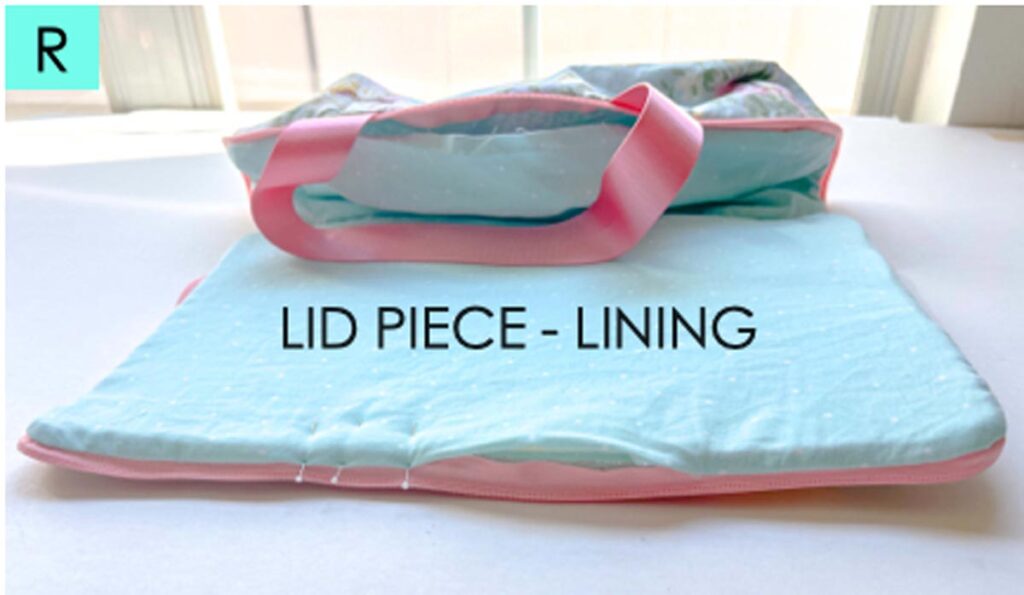
Next, pin LID-LINING to rest of carrier. Stitch together at1/2”(1.27cm) seam allowance, leaving an opening about 4-5”(10cm – 13cm) wide on the front of the carrier (the side without CONNECTOR PIECE). Light green rectangle on top indicates where the CONNECTOR PIECE is.
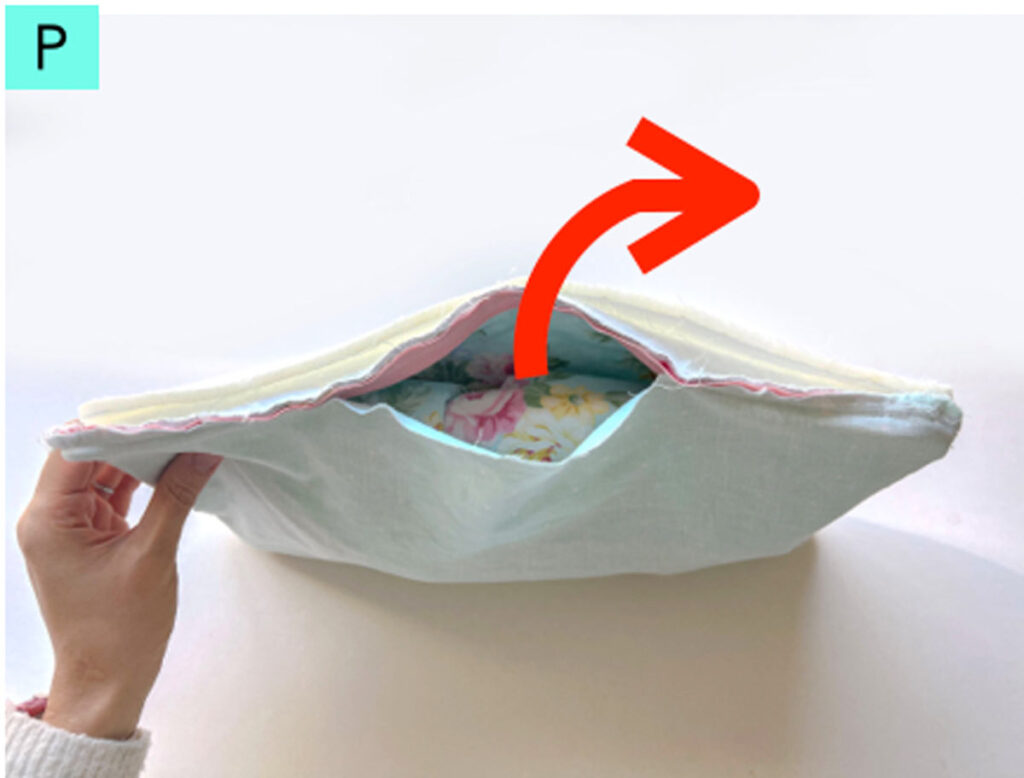
View of carrier after sewing. Next, turn carrier to right side through opening (red arrow).

Your carrier will look something like this photo with two openings, one on the lid, and one on the bottom piece.
Now on the lid side, close opening by folding seams in and pinning opening closed.

For a neater finish, I recommend first hand closing the opening with invisible ladder stitch.
Next, top stitch around entire lid (red dotted line), 1/8-1/4”(3mm – 6mm) from edge.

Now, I recommend top stitching LID PIECE with the exterior fabric facing towards you. That way, when you get to where the bag straps are, you can pull it away towards BOTTOM PIECE so you don’t accidentally sew it (see photo).

(U) & (V): View of LID PIECE after it’s been top stitched.
Closing Carrier Bottom Piece

First, we are going to insert BOTTOM PIECE – FOAM into bottom of carrier through the opening. Second, continue adjusting until foam piece sits correctly inside bottom of carrier.

Next, hold BOTTOM PIECE-FOAM in the correct place using pins.
NOTE: There is a reason we didn’t first adhesive baste BOTTOM PIECE – FOAM to the rest of the fabric prior to sewing onto the zipper (like we did for LID PIECE – FOAM). I find that it is much easier to sew Bottom Lining and Bottom Exterior fabric to zipper first, then tuck in the Bottom Foam Piece at the end.

Again, tuck in seam allowance at the opening and pin it close.

View of FOAM PIECE nicely pinned to bottom of carrier, ready to be sewn.

Now close opening using invisible ladder stitch. Again, this step is optional as you will top stitch the entire edge in the next step. However, I highly recommend it as it gives the carrier a nicer finish.

Photo shows opening on bottom carrier closed.

Again, use matching thread and top stitch around entire edge of carrier bottom piece (black dotted line).


(J) & (K): View of BOTTOM PIECE after it’s been top stitched.

Casserole Carrier is now finished!
Casserole Dish Carrier Sewing Pattern
The casserole carrier pattern along with the ad-free, printer friendly PDF version of this sewing tutorial is available in OUR ETSY SHOP. Additionally, it comes with pattern and tutorial for making the strap handle piece to keep your straps together for easy carry on the go. Print a copy and keep it by your sewing table for easy reference!

How to Sew a DIY Casserole Carrier

Use your favorite fabric to make a stylish DIY casserole carrier that keeps your favorite dish warm (or cold) on the go!
Materials
- CASSEROLE CARRIER TOTE PATTERN
- FABRIC - 2/3 Yard (0.6M) 100% Cotton or Cotton Blend Fabric
- INSUL-BRIGHT - 1/2 Yard (0.46M)
- FLEX-FOAM - 3/4 Yard (0.69M) if 20”wide
- MATCHING THREAD
- ZIPPER BY THE YARD - you will need about 39.5" in length
- BASTING ADHESIVE
- WEBBING - 1' or 1.5" wide both work
Tools
Instructions
PREPARING FABRIC PIECES
- First, print and cut out all paper pattern pieces.
- Piece together LID PIECE 1 and 2, and also LID INTERFACING PIECE 1 & 2, matching at the black arrows. Use tape to keep the pieces together.
- Cut out all pattern pieces on appropriate fabric.
BASTING & APPLYING INTERFACING
- Apply basting adhesive to INSUL-BRIGHT BOTTOM PIECE and stick it to wrong side of BOTTOM PIECE-EXTERIOR FABRIC.
- Flip piece over so INSUL-BRIGHT is facing up. Align corner of Dart Tracing Piece Pattern with corner of INSUL-BRIGHT. Trace pattern onto liner. Repeat on all 4 corners.
- Repeat this process on the wrong side of all 4 corners of LINING.
- In the same way, trace dart on FOAM LINER PIECE.
- Apply basting adhesive to INSUL-BRIGHT LID PIECE and stick it to wrong side of LID PIECE-EXTERIOR FABRIC.
- Apply basting adhesive to FLEX FOAM - LID PIECE and stick it to wrong side of LID PIECE - EXTERIOR FABRIC (the side with the INSUL-BRIGHT).
- Apply fusible interfacing with iron to wrong side of CONNECTOR PIECE - EXTERIOR FABRIC.
- Repeat applying fusible interfacing for CONNECTOR PIECE -LINING.
SEWING DARTS
- Sew corner darts together by matching the marked lines on BOTTOM PIECE - EXTERIOR. Pin in place and sew. Back stitch on both ends.
- Repeat sewing all 4 corner darts.
- Trim off excess dart fabric so seam allowance is about ¼”(6mm). Repeat for all 4 darts.
- Repeat same process for BOTTOM PIECE - LINING. Make sure you are sewing the darts together on the wrong side of fabric. Trim off excess dart.
- Repeat sewing darts on FLEX FOAM and trim excess darts. This piece will now be referred to as BOTTOM PIECE - FOAM
MARKING MIDPOINT
- Mark midpoint of BOTTOM PIECE by folding it in half length-wise, matching dart to dart.
- Make a tiny snip along the fold line on both sides. This will mark the midline.
- Repeat marking midpoint on the following pieces: LID PIECE - EXTERIOR, LID PIECE - LINING, BOTTOM PIECE - LINING, CONNECTOR PIECE - EXTERIOR, and CONNECTOR PIECE - LINING.
- Fold in both sides 1/2”(12mm) on CONNECTOR PIECES to wrong side of fabric and press with steam.
SEWING STRAPS TO LINING AND BAG
- First cut 2 pieces of webbing, each measuring 22”(55.88 cm).
- Place webbing over right side of BOTTOM PIECE - EXTERIOR, 3.5” (8.89cm) away from dart and 1” (2.54cm) above edge. Hold in place with clips.
- Repeat on other side of BOTTOM PIECE-EXTERIOR.
- Baste webbing to BOTTOM PIECE - EXTERIOR.
- Pin/clip CONNECTOR PIECE - EXTERIOR to BOTTOM PIECE - EXTERIOR, right sides together, matching at the midline. Baste in place.
- Pin zipper to BOTTOM PIECE - EXTERIOR, right sides together, around top edge. Note that zipper overlaps CONNECTOR PIECE about 1/2” (1.27cm).
- Pin zipper around entire top edge and use zipper foot and stitch zipper down.
- Place CONNECTOR PIECE - LINING over CONNECTOR PIECE - EXTERIOR and zipper, matching at midline. The right side of CONNECTOR PIECE - LINING will be facing towards you. Clip and baste in place.
- Pin/clip BOTTOM PIECE - LINING over CONNECTOR PIECE - LINING from dart to dart, right sides together. Match at the midline and also at the darts. Sew from dart to dart at
- Next, sew the extra 1 inch of webbing to BOTTOM PIECE - EXTERIOR by sewing a box with an ‘X’ to secure it.
- Repeat sewing all the straps down to BOTTOM PIECE - EXTERIOR.
- Next, turn lining under BOTTOM PIECE - EXTERIOR so right sides are together.
- Now pin BOTTOM PIECE - LINING to zipper, matching at darts and midline (see note 1).
- Sew lining to BOTTOM PIECE- EXTERIOR at 1/2” (1.27cm) seam allowance. Leave an opening between the webbing at the front of the carrier. Back stitch on both ends.
- Turn casserole carrier to right side through the opening.
SEWING LID OF CASSEROLE CARRIER
- Mark midpoint of all 4 curved corners of LID-LINING by folding curved corners in half to make a mark. Depending on your fabric, the creased mark may be enough to see. Otherwise, use fabric chalk or make a small snip to mark the midline.
- Repeat marking midpoint of curved corners on LID-EXTERIOR.
- Now flip the carrier bottom so the exterior fabric is facing you.
- Pin or clip LID-EXTERIOR to carrier bottom, right sides together so that exterior fabric faces exterior fabric (see Note 2). At the corners, you want the marked midpoint to match with the dart seam.
- Repeat pinning/clipping entire LID-EXTERIOR to carrier bottom.
- Sew at 1/2” (1.27cm) seam allowance.
- Next, turn the carrier so the LID-EXTERIOR wrong side faces up. Partially close the zipper so the carrier holds its rectangular shape.
- Pin or clip LID PIECE - LINING to the zipper, right sides of lining together, matching at the curved midpoints.
- Stitch together at 1/2” (1.27cm) seam allowance, leaving an opening about 4-5” (10cm - 13cm) wide on the front of the carrier (the side without CONNECTOR PIECE).
- Turn carrier to right side through opening.
- On the lid side, close opening by folding seams in and pinning opening closed. For a neater finish, I recommend first hand closing the opening with invisible ladder stitch.
- Next, top stitch around entire lid (red dotted line), 1/8-1/4” (3mm - 6mm) from edge (see note 3).
CLOSING CARRIER BOTTOM PIECE
- First, we are going to insert BOTTOM PIECE - FOAM into bottom of carrier through the opening. Continue adjusting until foam piece sits correctly inside bottom of carrier (see note 4).
- Next, hold BOTTOM PIECE-FOAM in place using pins.
- Again, tuck in seam allowance at the opening and pin it close.
- Close opening using invisible ladder stitch. Again, this step is optional as you will top stitch the entire edge in the next step. However, I highly recommend it as it gives the carrier a nicer finish.
- Use matching thread and top stitch around entire edge of carrier bottom piece.
- You are finished!
Notes
Note 1: As you pin, you may find that your lining appears wider than your BOTTOM PIECE-EXTERIOR (there is excess lining). If that is the case, feel free to take in the dart lines so that the lining fits the BOTTOM PIECE-EXTERIOR better.
Note 2: Please note that at the CONNECTOR PIECE, only pin LID-EXTERIOR to CONNECTOR PIECE - EXTERIOR. Make sure you don’t accidentally pin it to the CONNECTOR PIECE - LINING.
Note 3: I recommend top stitching LID PIECE with the exterior fabric facing towards you. That way, when you get to where the bag straps are, you can pull it away towards BOTTOM PIECE so you don’t accidentally sew it.
Note 4: The reason we didn’t first baste BOTTOM PIECE - FOAM to the rest of the fabric prior to sewing onto the zipper (like we did for LID PIECE - FOAM) is that I find it much easier to sew this way. This is due to the 3D nature of casserole carrier bottom piece.