How to Make a DIY Cowboy Vest for Kids
This post may contain affiliate links. Please read my disclosure policy for details. As an Amazon Associate, I earn from qualifying purchases.
Before becoming a mom, I always imagined myself pulling all-nighters sewing last minute outfits for my kids, and that was actually something I looked forward to. Now that I am a mom…well, there is no all-nighter (my body can’t handle it), but it was a last minute project for sure.
Apparently in Houston, to mark off the start of the Rodeo, there’s “Texan Day” at schools, where students can come dressed in their favorite western gear. When I first saw the email for “Texan Day”, I thought it was to wear Houston Texan Football Team gear, so I didn’t think much of it. Luckily a friend mentioned that it was to wear Western gear, so I set to work researching what Texan wear is all about (and this all happened 3 days prior to the dress up day)

Luckily Barnaby already owned a pair of jeans and a light blue shirt, so I decided to make him a little vest since I knew it was doable. I was also hopeful to make him some suede chaps, since that didn’t look hard either. But alas, Barnaby refused his nap the day before my deadline, so perhaps next year, suede chaps!
SIMPLE DIY COWBOY VEST
Because this is a last minute costume, there are a few “shortcuts” I took to make it a quick and easy sewing project. First, to create a vest pattern, you will use an existing vest of appropriate size (I show you how in the step-by-step tutorial).
Next, the cowboy vest is only lined at the top yoke and completely unlined on the bottom. Suede is a great fabric for this project as it is non-fraying. This is why the bottom part of the vest is made with suede.
On the other hand, if you choose to use suede for the entire vest, you don’t even need to bother with lining. The entire project took about 2 hours from start to finish!
Finally, I added Velcro straps to the front my toddler kept taking off the vest when I tried it on him. However, if you have a cooperative child who won’t rip off vests, I don’t think it’s necessary.
MATERIALS:
- Existing Vest (used to create pattern)
- 3/8 – 1/2 Yard Brown Suede Fabric
- 3/8 Yard Cow Print Cotton Fabric
- 1/8 Yard Gold Faux Leather
- Black Velcro (optional)
- Embroidery Stabilizer – for sewing Sheriff Star to Vest
TOOLS:
- SEWING MACHINE
- SERGER (optional)
- FABRIC SCISSORS – these Ginghers are my favorite.
- CLEAR RULER – I have the DRITZ See-Through Sewing Ruler
- FABRIC CHALK – These Chaco Liners by Clover are my absolute favorite
- SEWING PINS and SEWING CLIPS
- HAND SEWING NEEDLES
- MATCHING THREAD
- FABRIC GLUE
- FRENCH CURVE
- MECHANICAL PENCIL – for drawing pattern
- PATTERN PAPER
NOTE: *I used lightweight paper (36″ wide) sold by the yard at a local art store. Try to find white paper that is slightly opaque so you are able to see through it when you need to trace something.
DIY Cowboy Vest – Step by Step TUTORIAL
How to Make Cowboy Vest Pattern
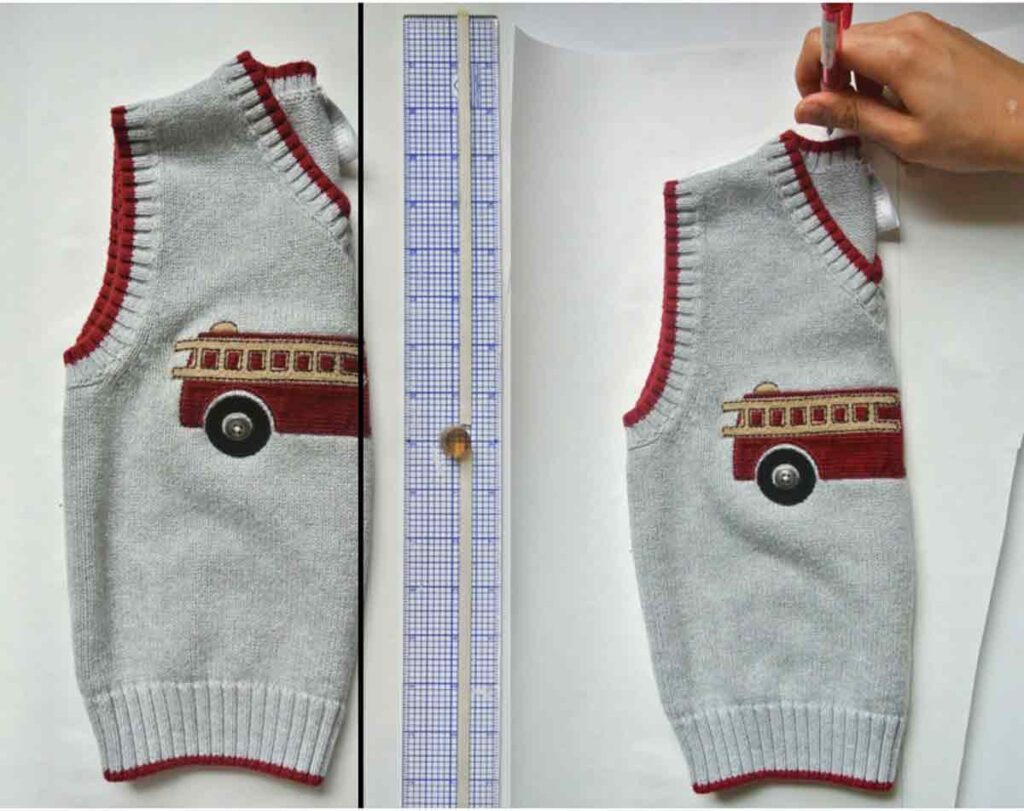
LEFT: Draw a straight line on paper. Fold existing vest in half and approximately place mid line of vest against straight line. Notice in the photo the vest slightly extends beyond the straight line and that’s ok.
RIGHT: Trace folded half of vest on paper

RIGHT: View of trace vest
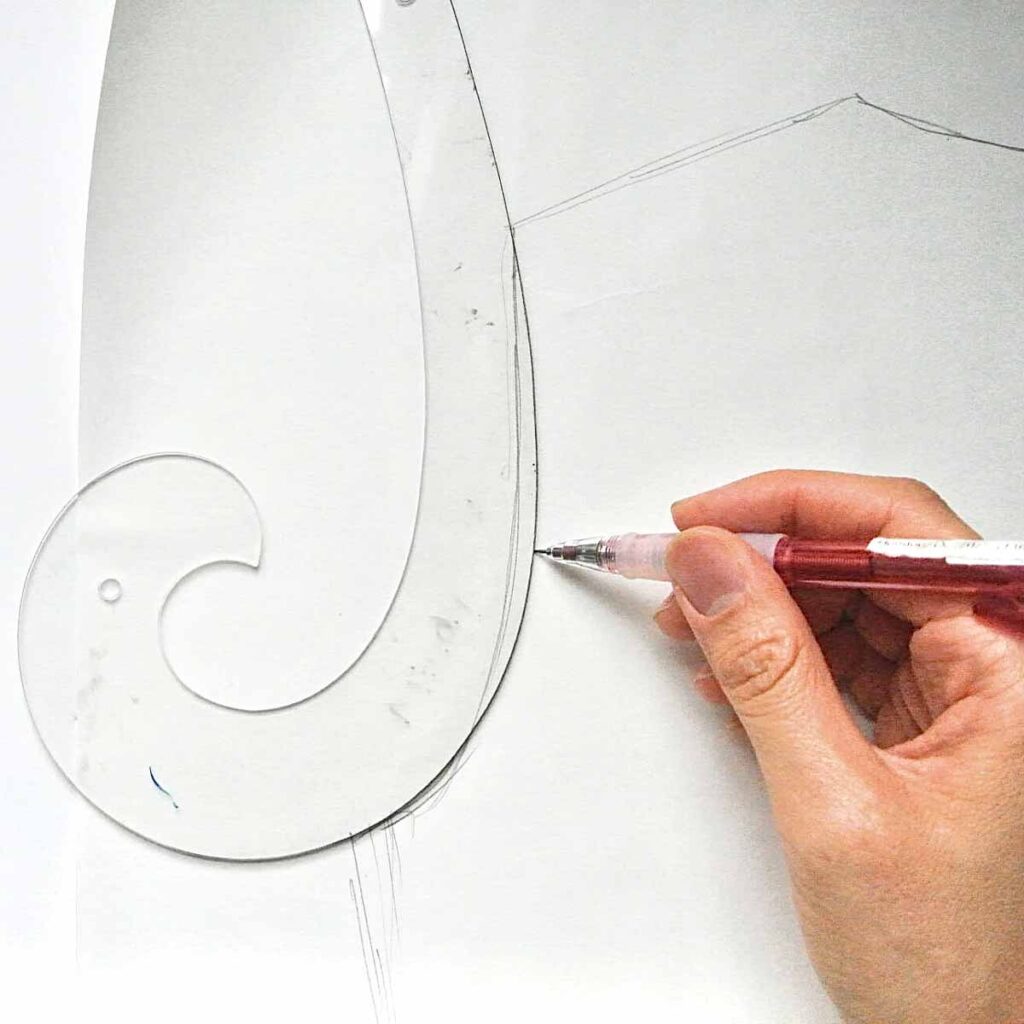
Use a french curve to round out armhole curve.
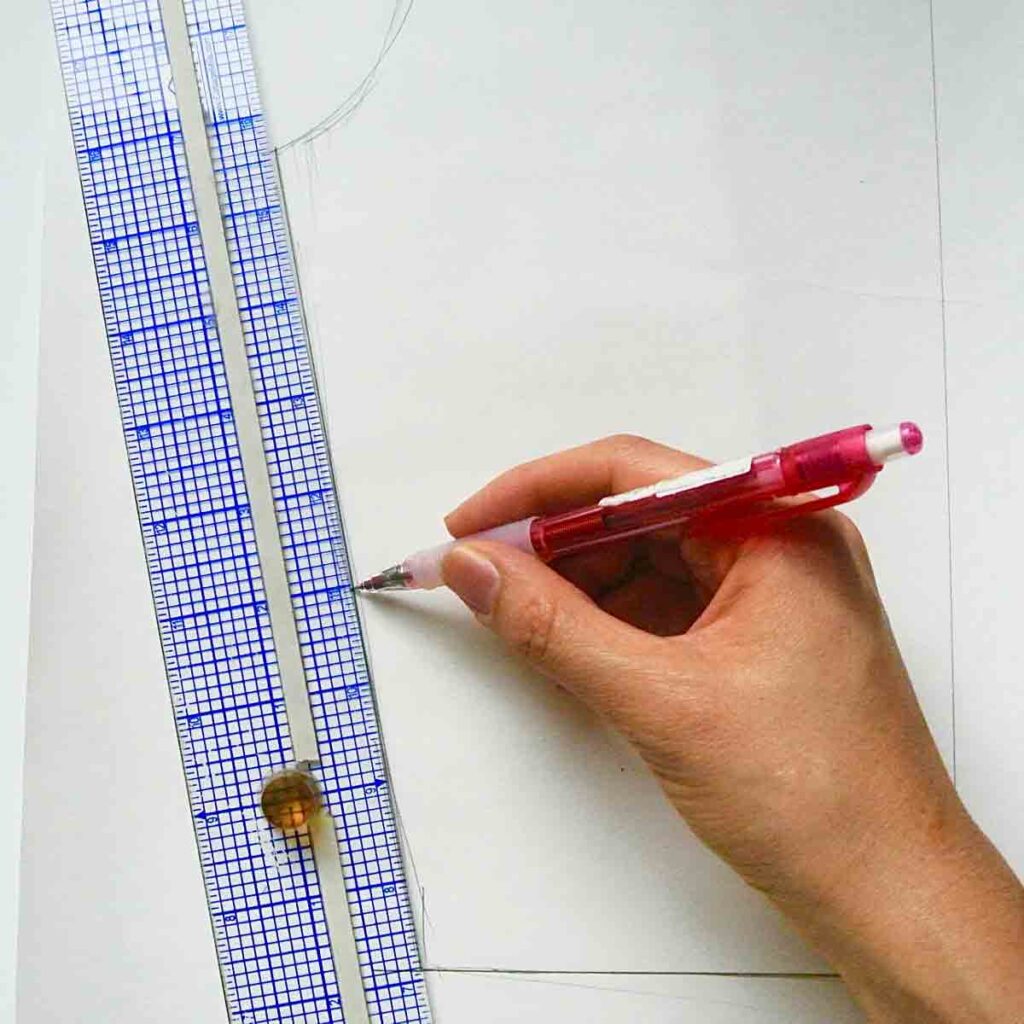
Straighten side seam with ruler
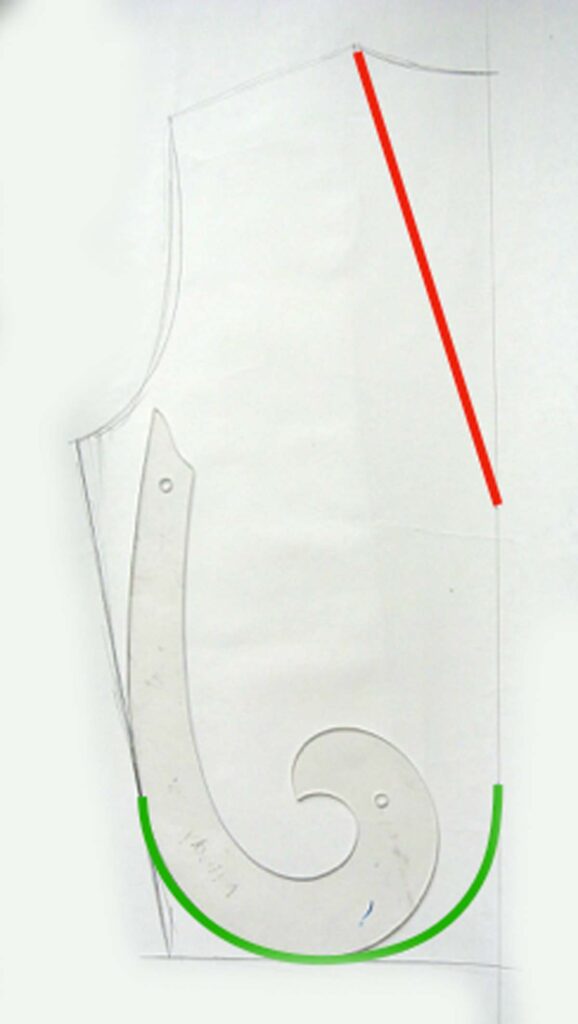
Draw a straight line from neck of shoulder seam to mid line of vest (red line). This determines how deep the front opening of the vest extends. Use a french curve to round bottom corners of vest (green curve) if desired.
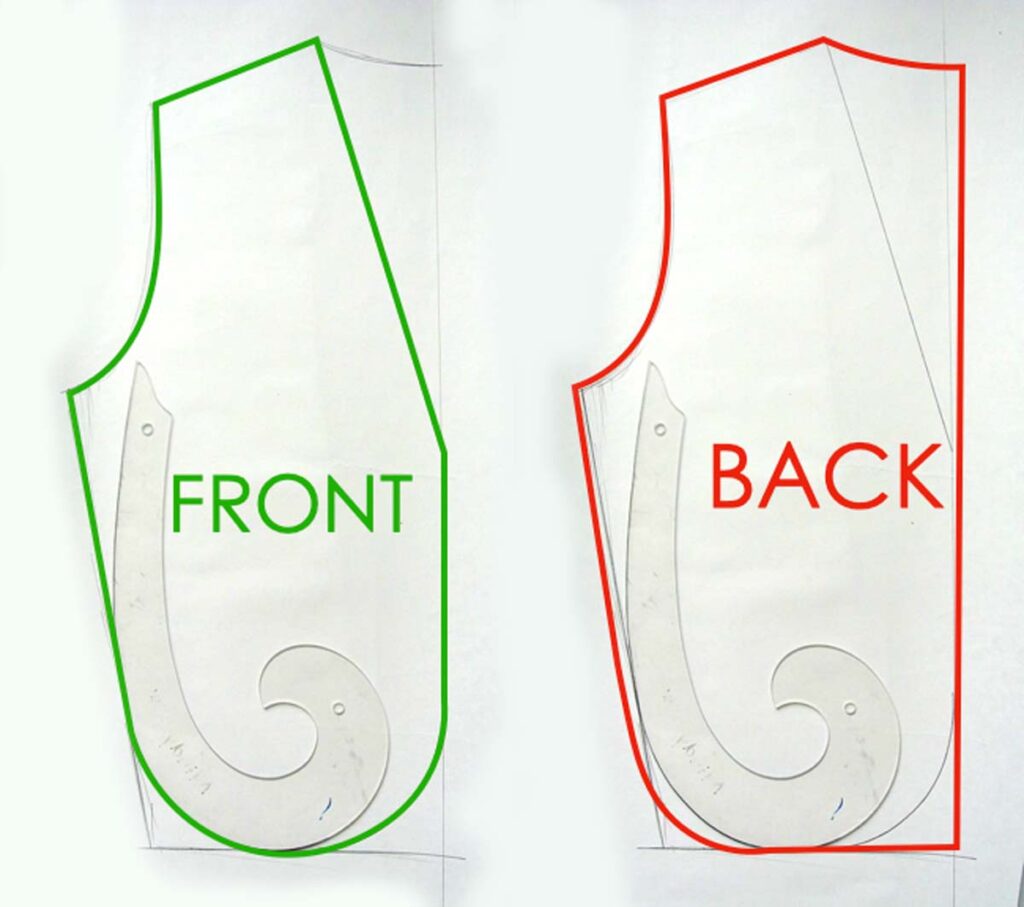
Take your vest pattern and create a Front Piece (green) and a Back Piece (red) by tracing the original pattern piece.
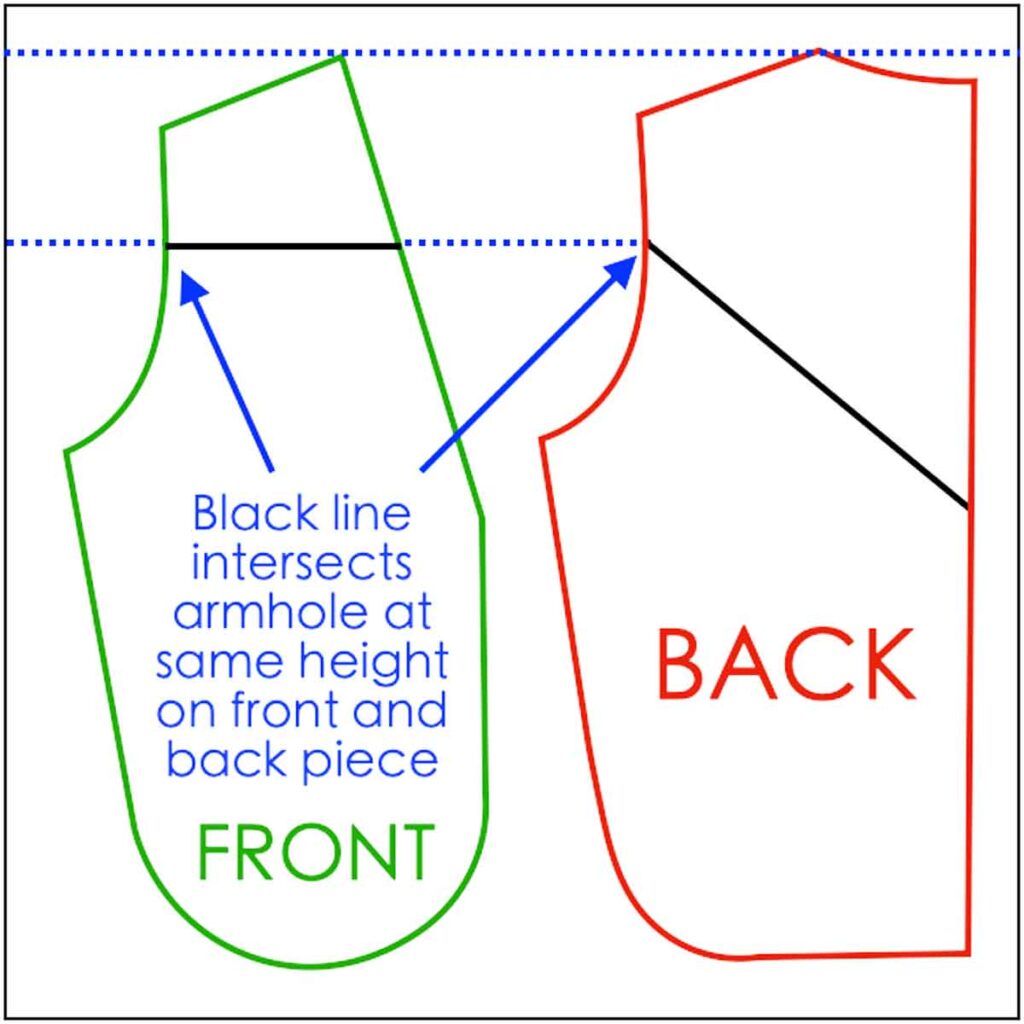
Draw a line perpendicular to the midline through the armhole of FRONT PIECE (see note 1). This will create the front yoke pattern. Make sure this line intersects the front and back armhole at the same level (blue arrows). Mark where this line intersects the back armhole.
On the BACK PIECE, draw another line from this armhole intersection to the mid line (see note 2).
NOTE 1: You can decide where this line goes. Just remember that the area above this line is for the cow fabric.
NOTE 2: Again, you decide how far down the mid line you want this back yoke piece to go.
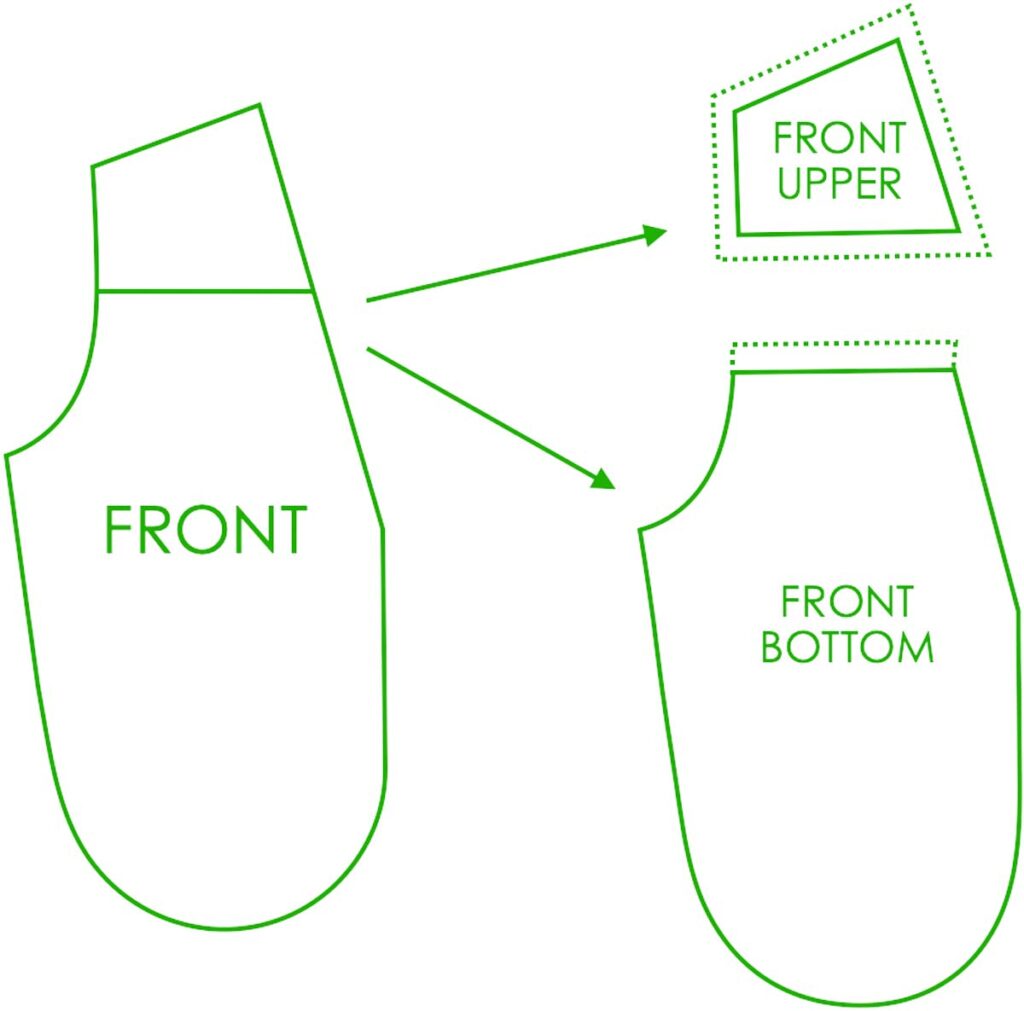
Create two Front Pattern Pieces by cutting pattern piece into FRONT UPPER and FRONT BOTTOM. Add 1/2”seam (12mm) allowance (dotted lines) to pattern piece pieces as shown.
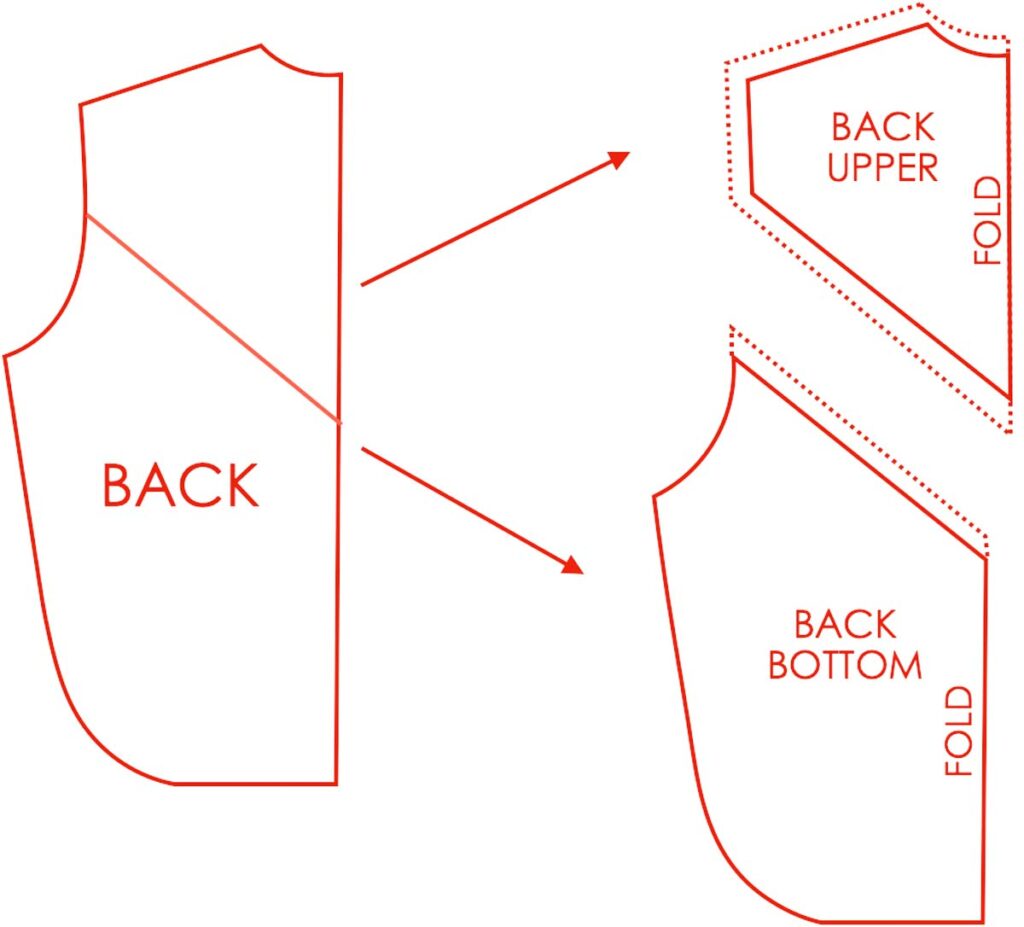
Create two Back Pattern Pieces by cutting pattern piece into BACK UPPER and BACK BOTTOM. Add 1/2” (12mm) seam allowance (dotted lines) to upper and bottom piece pieces as shown.
Sewing DIY Cowboy Vest Together:
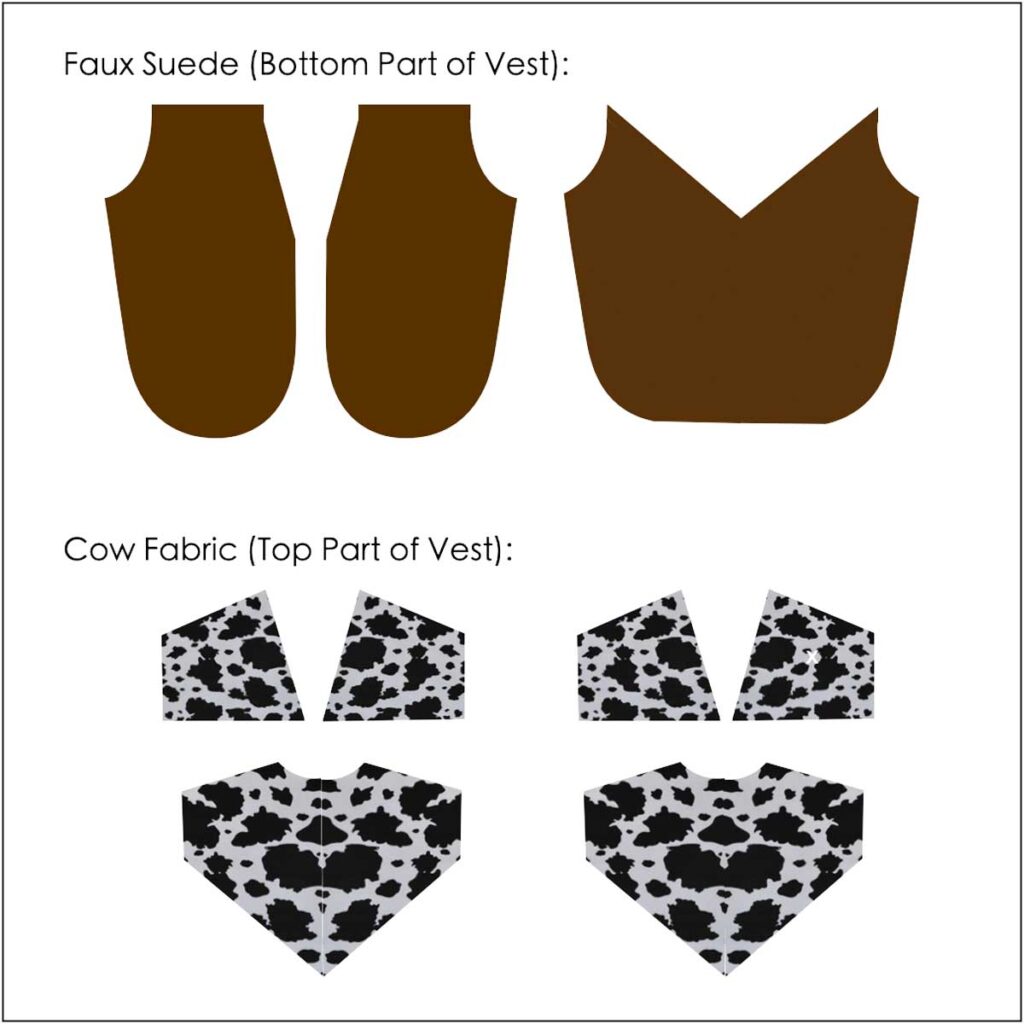
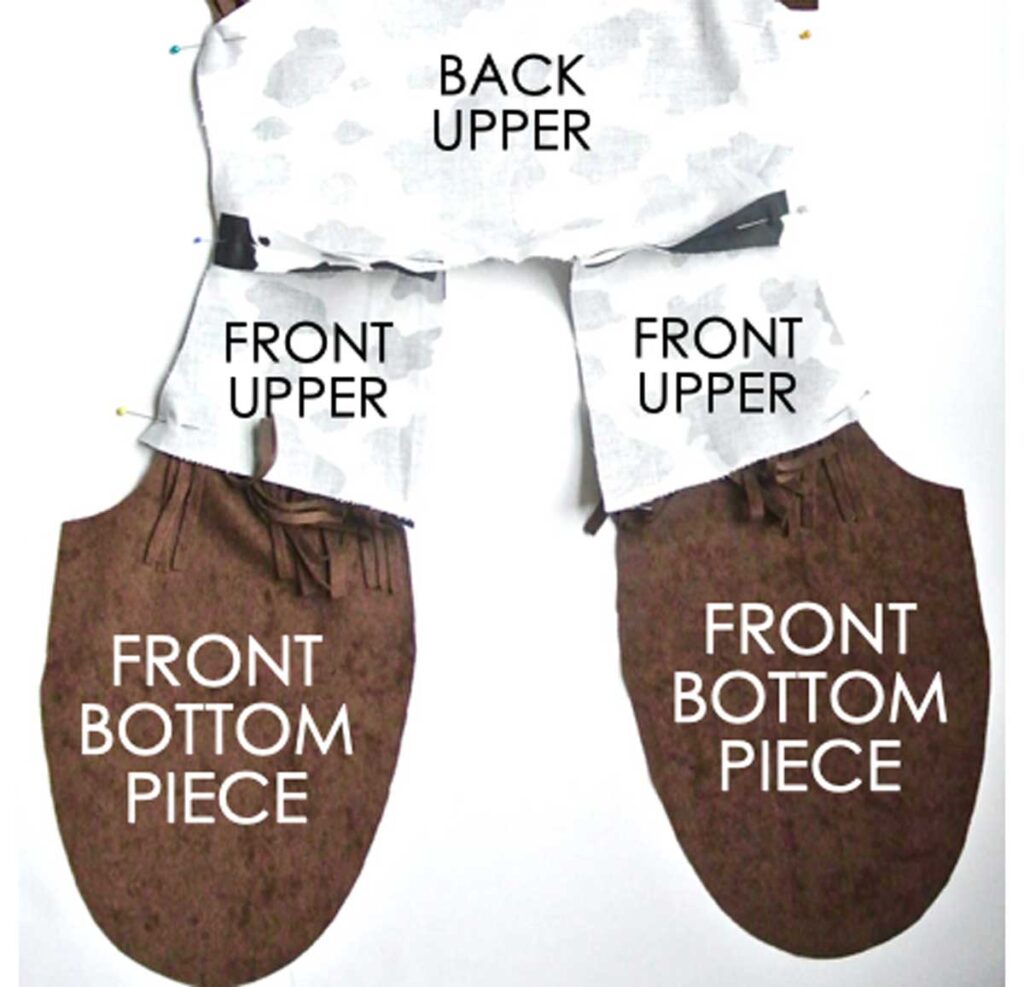
Cut out fabric pieces as shown in diagram. We will cut out two sets of cow fabric, one for the exterior of vest, and one for the lining.
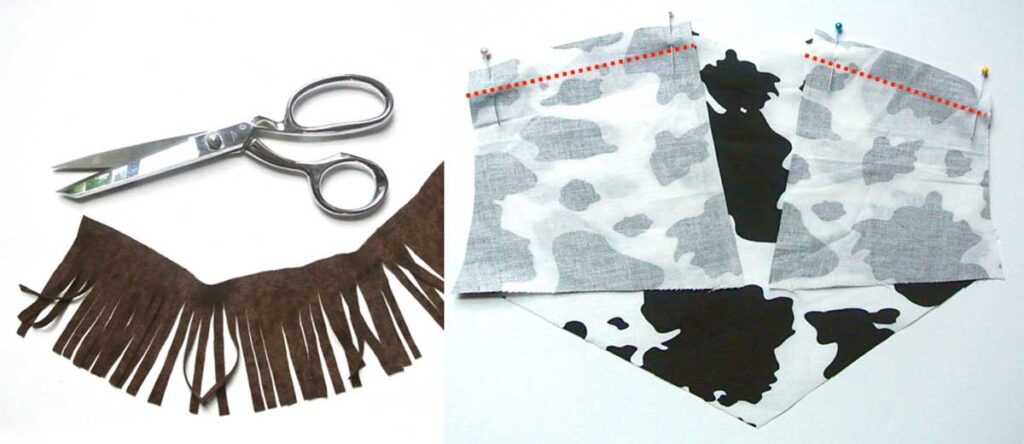
LEFT: To make fringes, cut a strip of suede 3.5” (9cm) wide. The length depends on how much fringe you need. Make small cuts along the width of the strip about 1/4” (6mm) wide and 3” (76mm) long. Just eyeball, as it does not need to be exact.
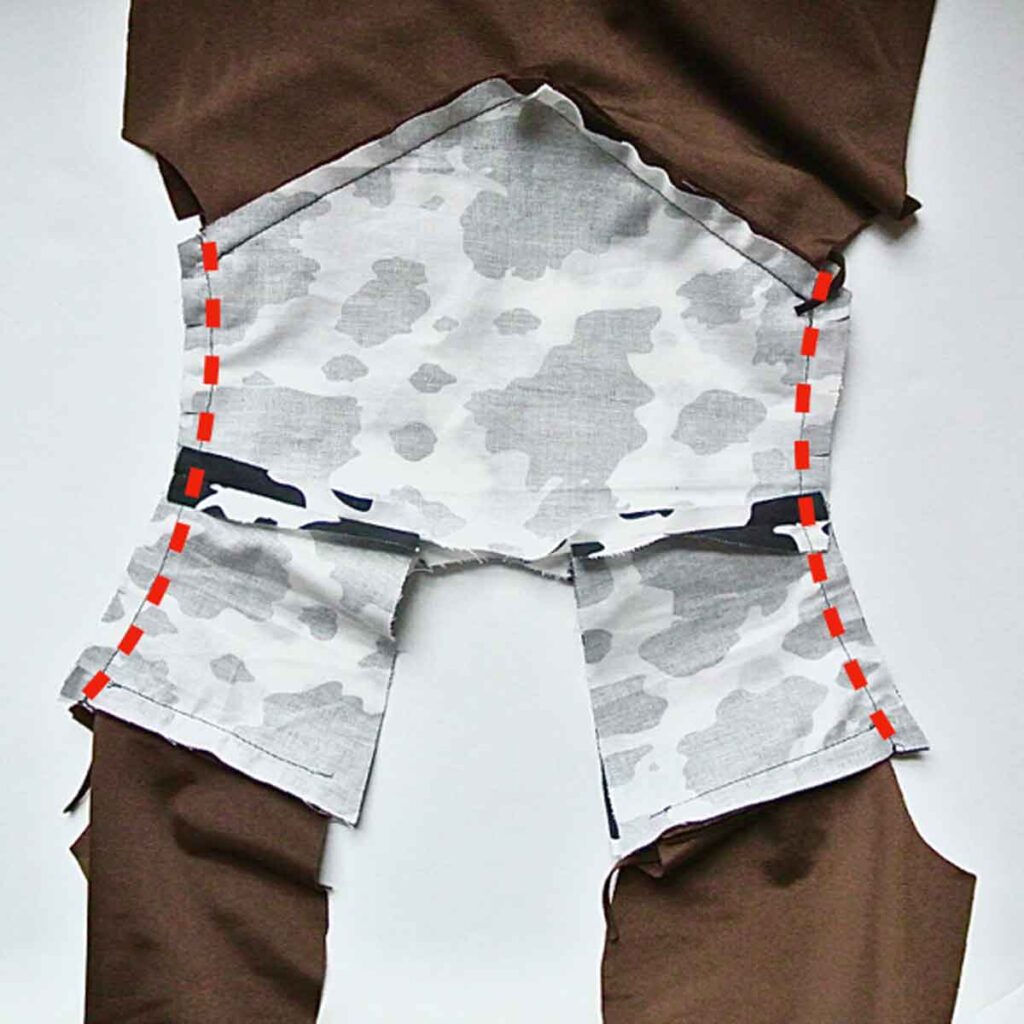
RIGHT: Pin and sew FRONT UPPER PIECE and BACK UPPER PIECE together at shoulder line (red dotted line) at 1/2” (12mm) seam allowance. Repeat for lining.
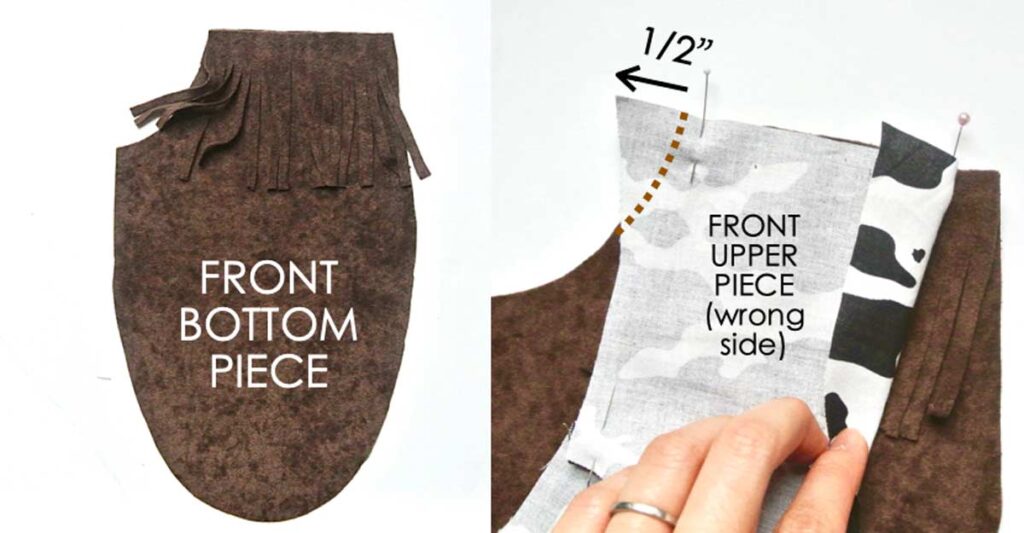
LEFT: Cut a piece of fringe that is the same length as the top edge of FRONT BOTTOM PIECE. Place wrong side of fringe over right side of FRONT BOTTOM PIECE.
RIGHT: Place right side of FRONT UPPER PIECE (cow fabric) over right side of fringe and FRONT BOTTOM PIECE (suede). Pin and sew in place. (see note 3).
NOTE 3: The cow fabric extends 1/2” (12mm) past suede fabric on both sides. This is expected as it accounts for the seam allowance you need to later on to sew the lining to. Brown dotted line shows where suede fabric ends.
Repeat on other side of vest.
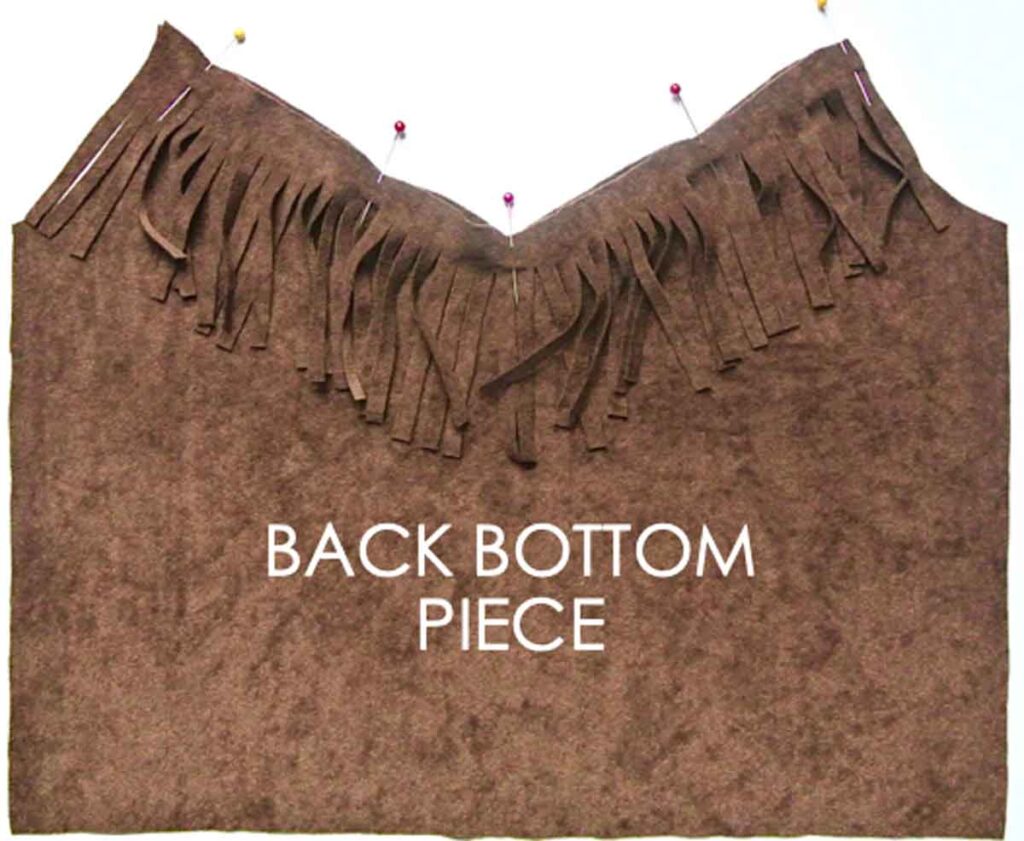
Cut another piece of fringe the same length as the top part of BACK BOTTOM PIECE. Place fringe on top, making sure right side of fringe and [BACK BOTTOM PIECE] are both facing up.
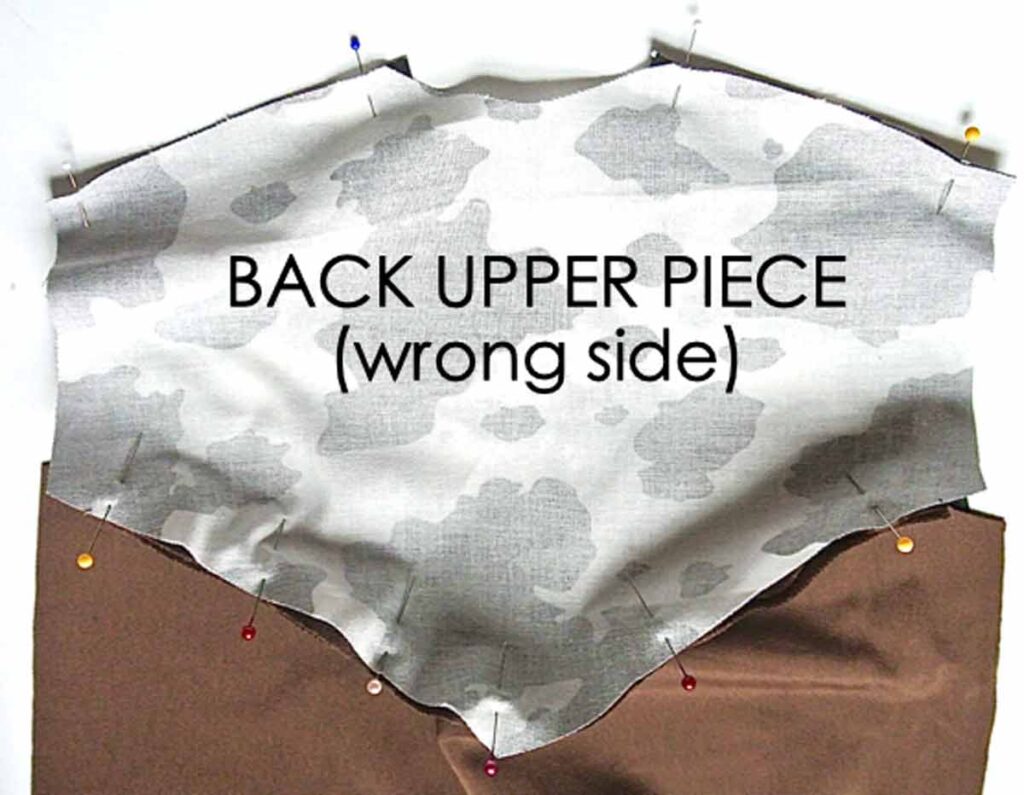
Place BACK UPPER PIECE over fringe + BACK BOTTOM PIECE, right sides together. Pin and sew in place.
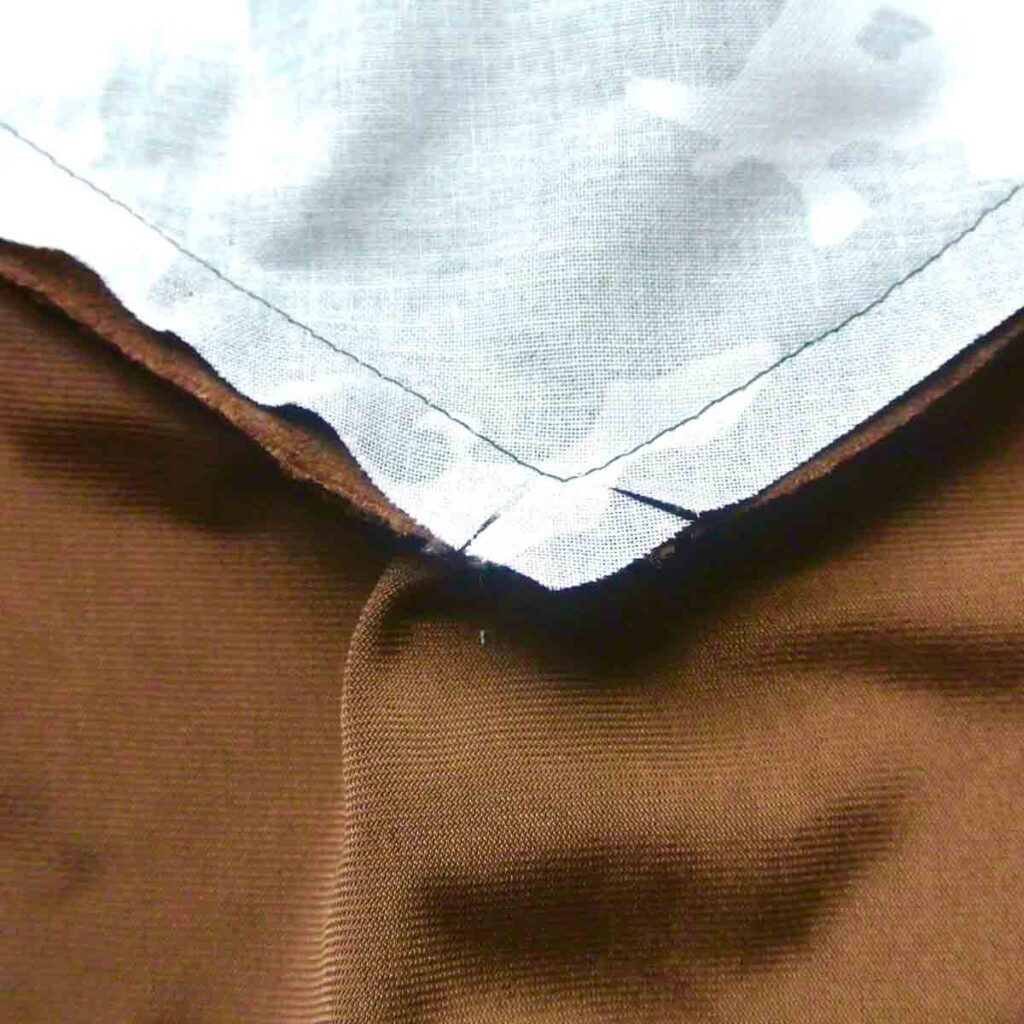
Clip point at center back.

LEFT: Pin armhole of cow fabric to armhole of lining
RIGHT: Match shoulder seams together. Note that the seam allowances at the shoulder is pressed open.
RIGHT: Sew armhole together on both sides (red dotted line) and clip curve.
Your vest will looking something like this at this point. Notice bottom edge of [BACK BOTTOM PIECE] is not curved because I didn’t decide to create the curve on the pattern until after finishing the entire project!
Sewing Front and Back Neckline of DIY Cowboy Vest

With right side of the vest facing up, pull FRONT UPPER LINING PIECE out.
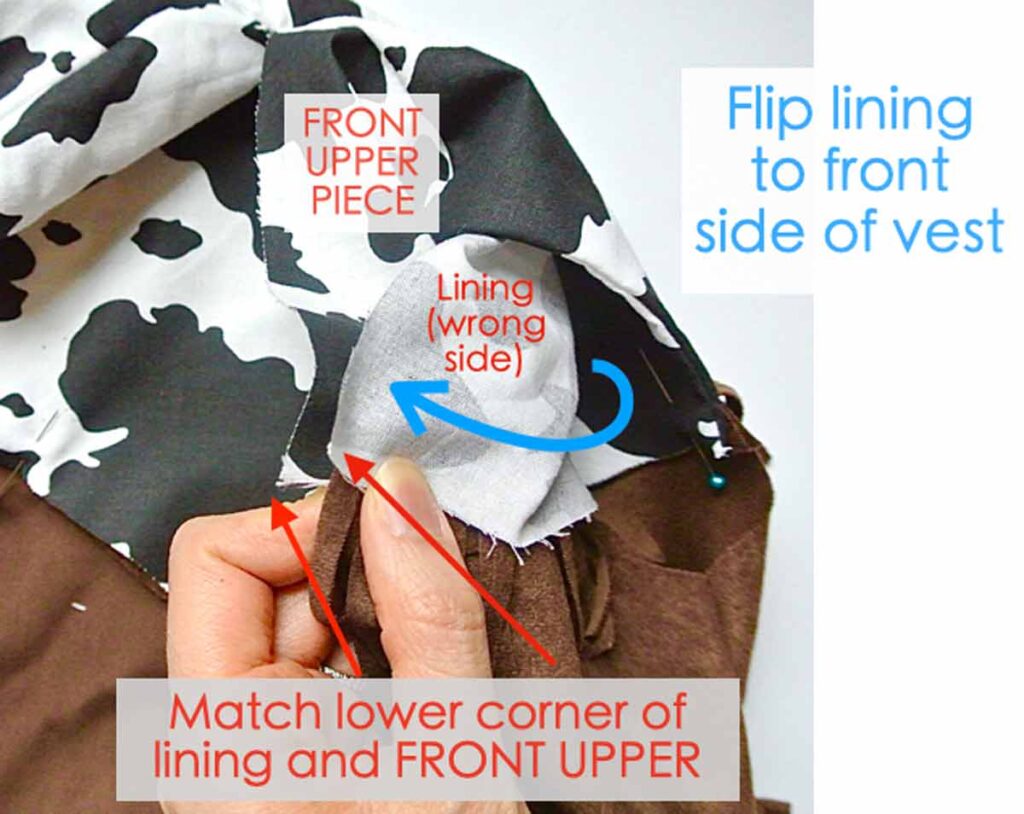
Pull lining to the front of vest so the right side of lining meets right side of FRONT UPPER PIECE. Match lower corners of FRONT UPPER PIECE to lining.
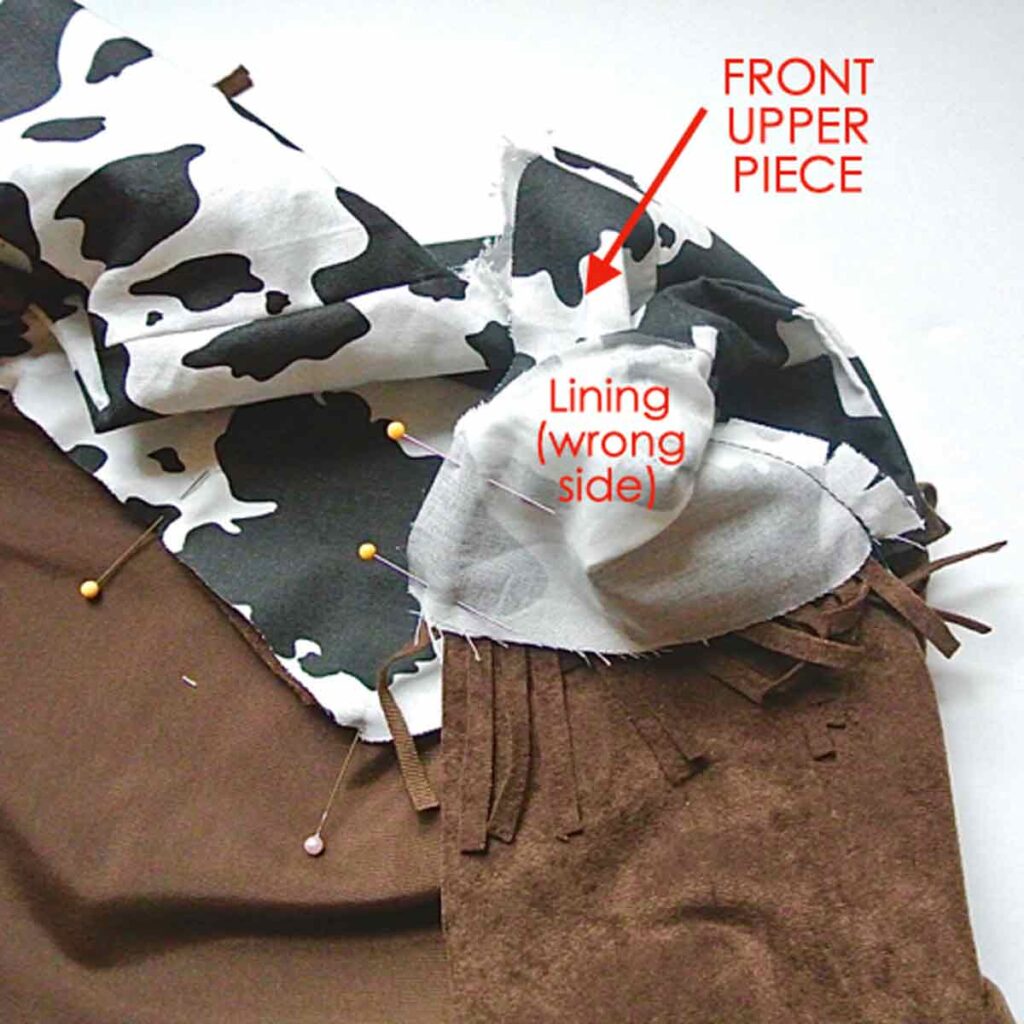
Pin front neckline together starting from lower corner up to shoulder seam
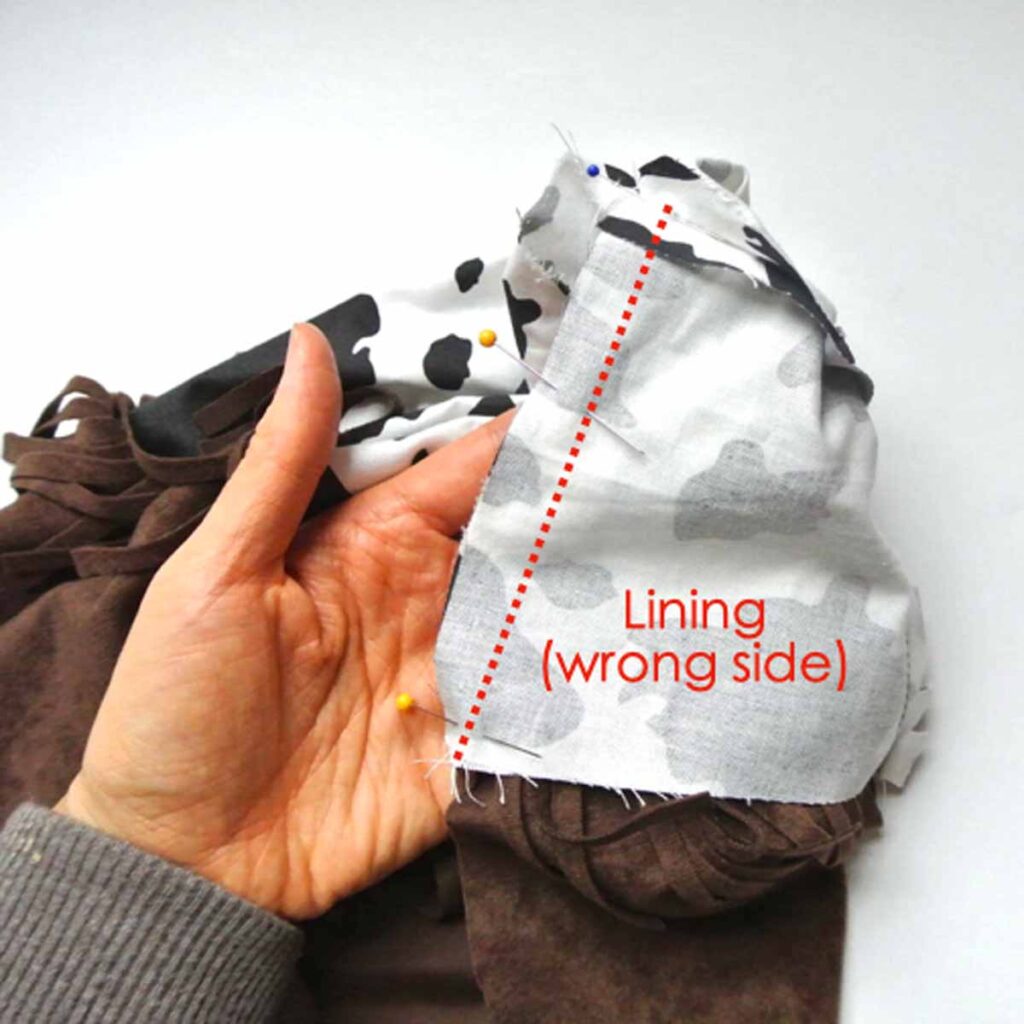
Stitch front neckline together from lower corner to shoulder seam (red dotted line) at 1/2” (12mm) seam allowance. Repeat on other side of vest.
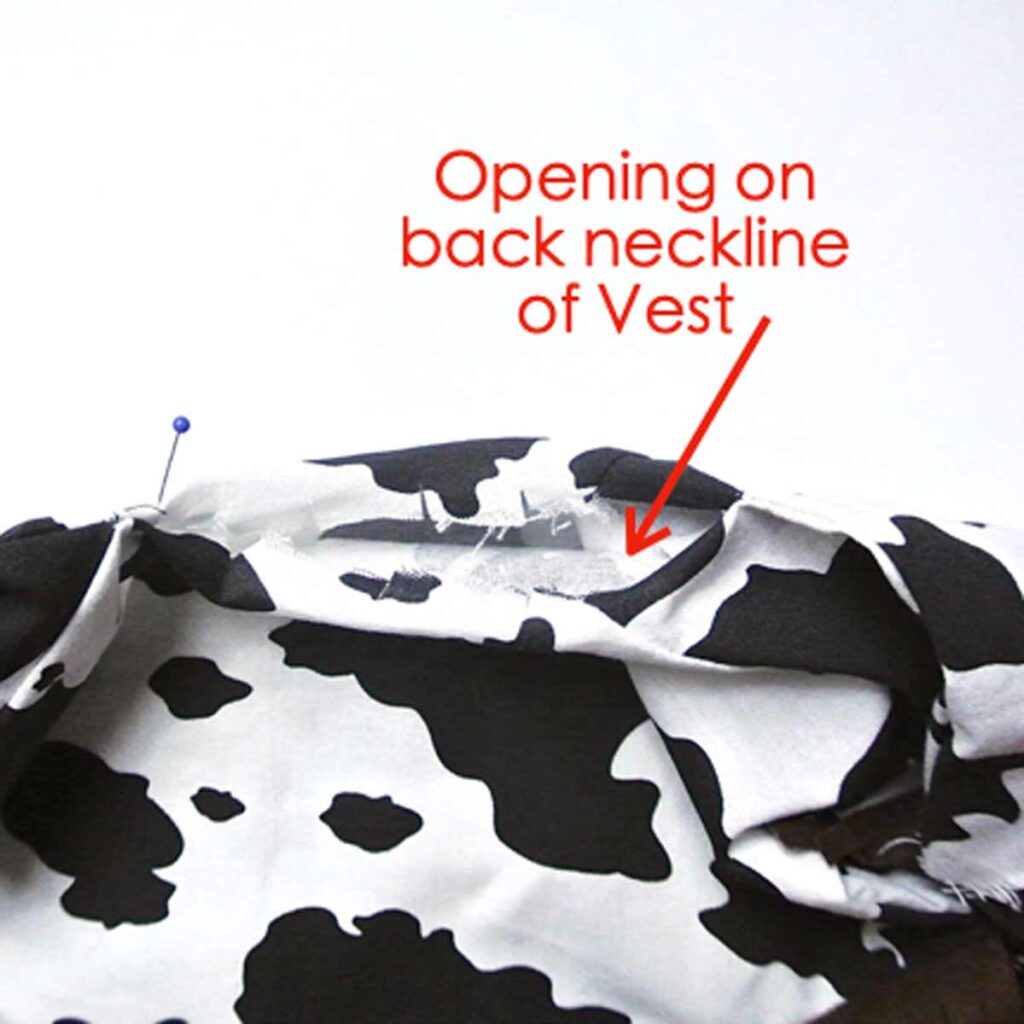
Turn vest to right side. There will be an opening on the top back neckline. Clip curves on front and back of neckline (make sure your clips do not extend past the seam allowance). The purpose of clipping makes it easy to form neckline curve when pinning together in the next step.
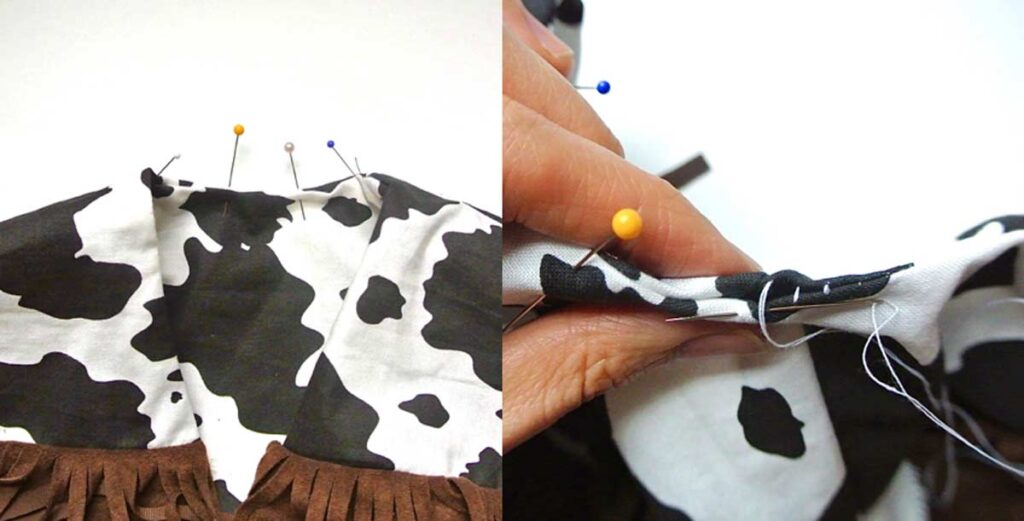
LEFT: Pin lining and BACK UPPER PIECE together.
RIGHT: Close the opening with invisible ladder stitch
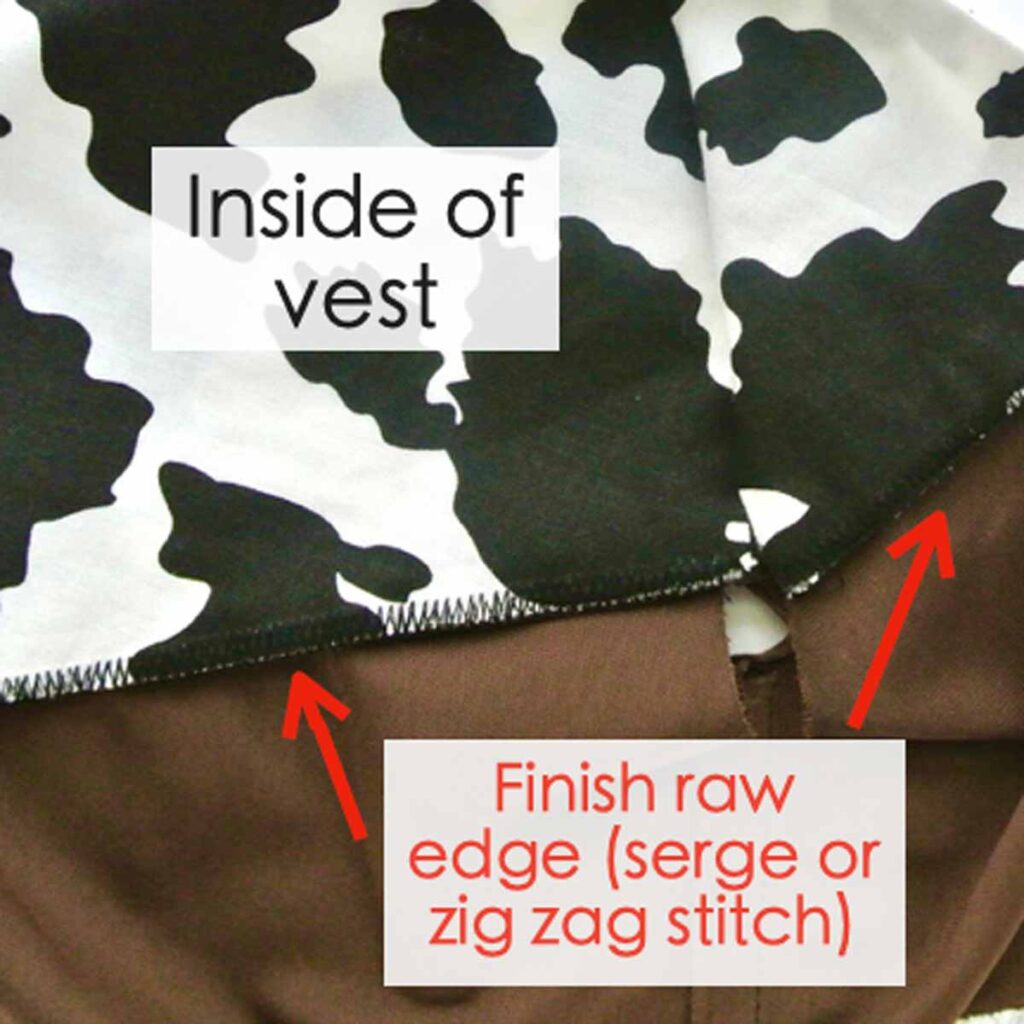
On the inside of vest, serge the raw edges of cow fabric (where UPPER PIECE meets BOTTOM PIECE). If you don’t own a serger, finish the edge using the zigzag stitch on a home sewing machine.

LEFT: Push seam allowance of FRONT UPPER PIECE (cow fabric) towards FRONT BOTTOM PIECE (suede) and stitch it down (red dotted line) with matching brown thread. Make sure to flip up the fringes towards cow fabric when you are stay stitching so you don’t accidentally sew the fringes.
RIGHT: View of stitch from right side of vest. You will only see the stitch when fringes are flipped up. Repeat for BACK PIECE of vest.
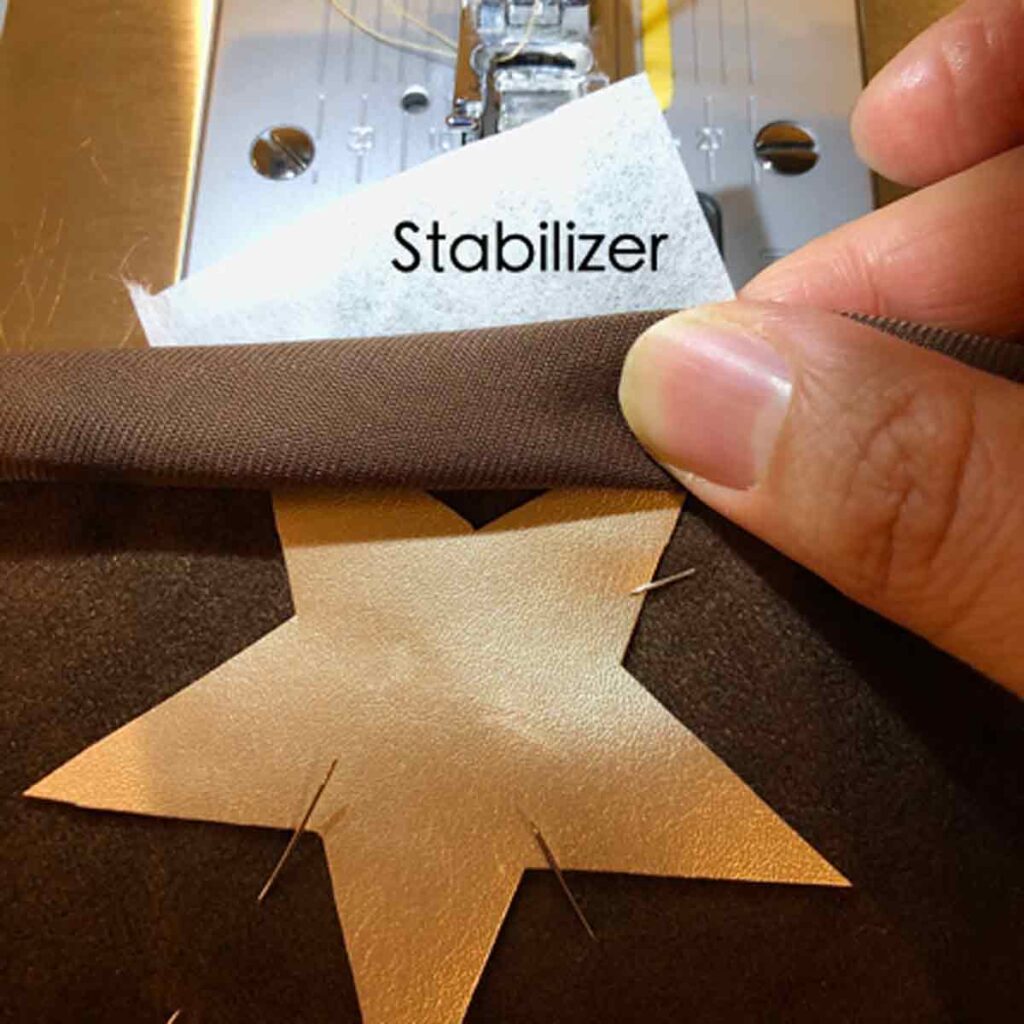
Cut out star pattern and fabric glue it to the suede part of vest. You can place it wherever you like. Pin a piece of stabilizer under the suede where you will be sewing the star.
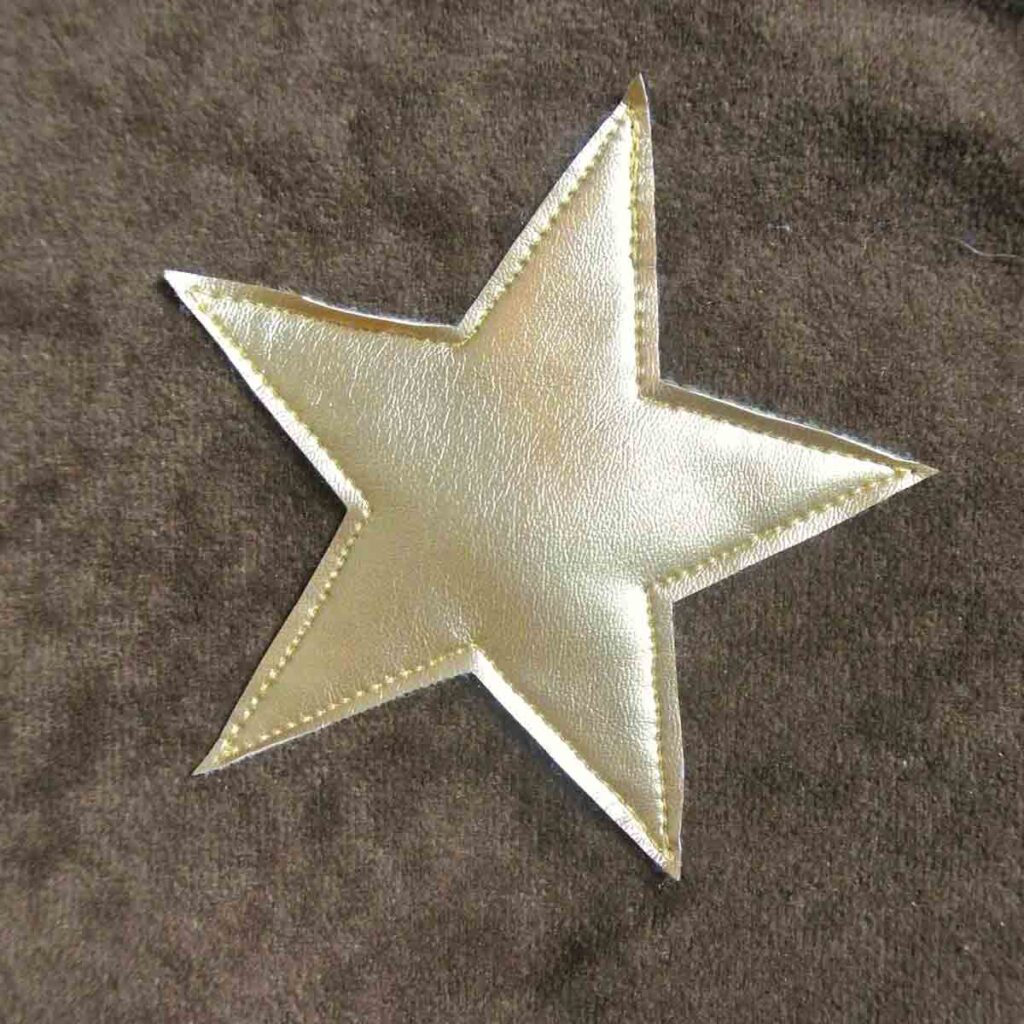
Sew star to vest using straight stitch
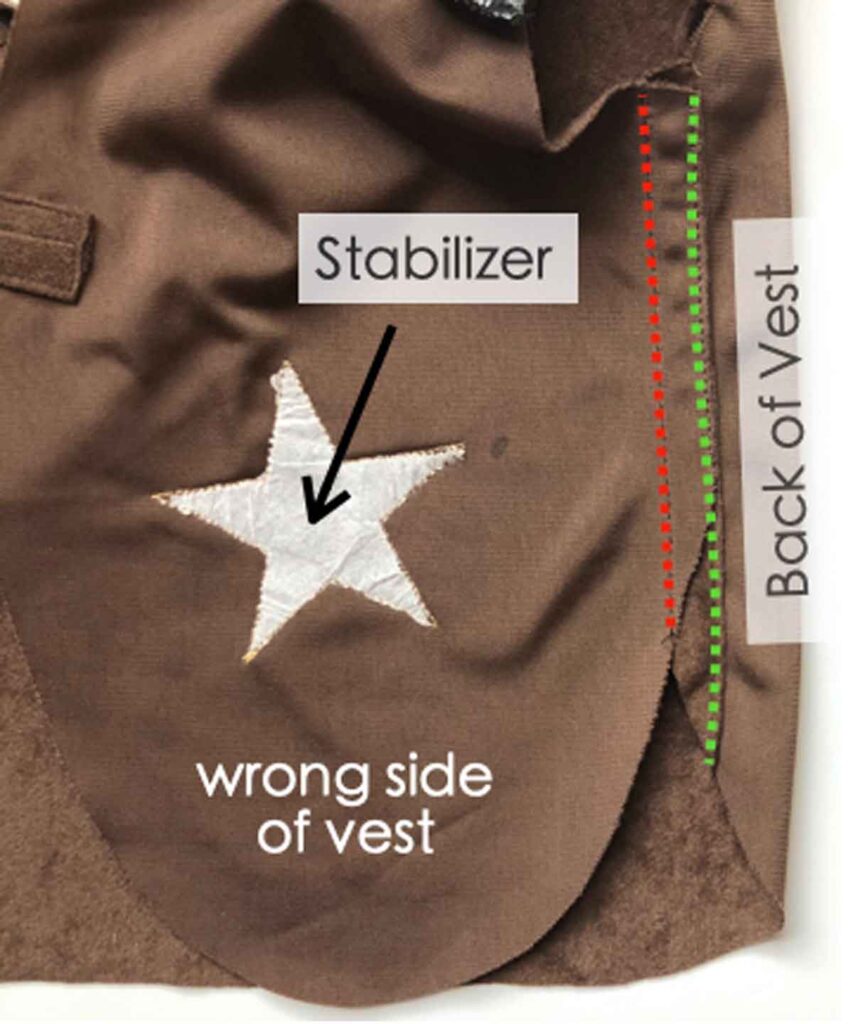
Remove excess stabilizer around star on wrong side of vest by gently tearing it away. Stitch side seams together (red dotted line). Lean seam allowance towards back of vest and stitch it down (green dotted line). Repeat on other side.
How to Sew Velcro Straps (Optional)
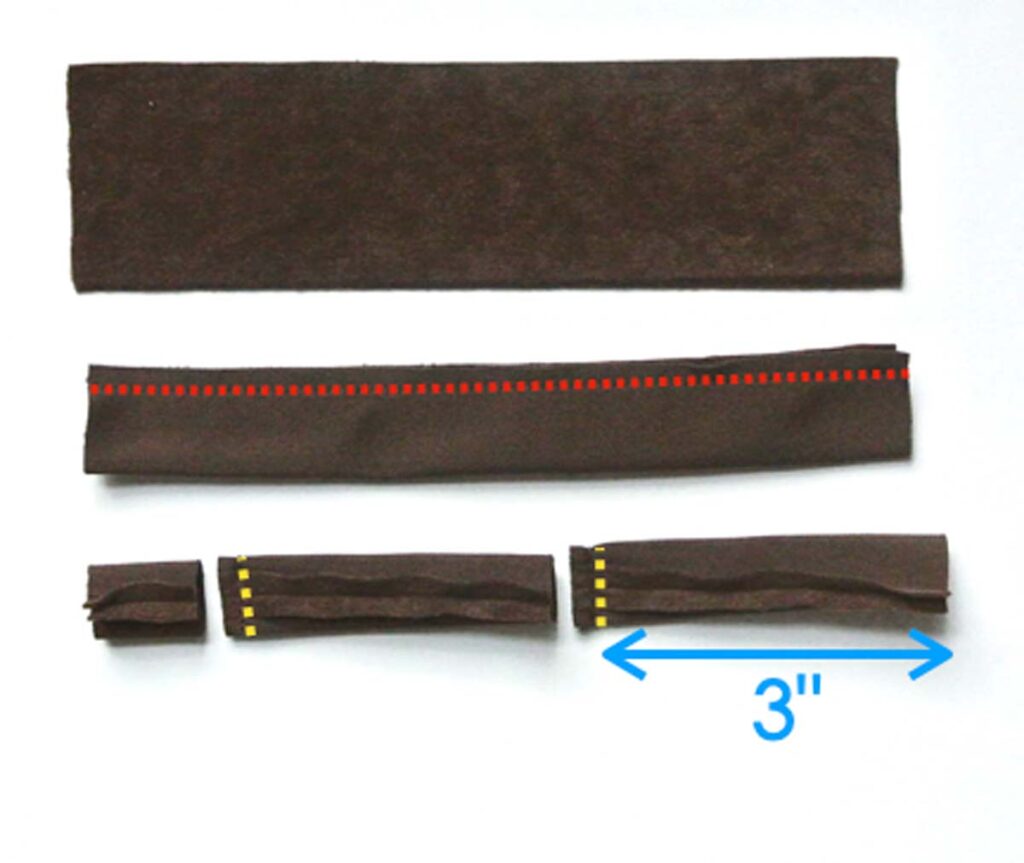
Cut a strip of suede that measures 2”x 7” (5cm x 18cm). Fold in half along the shorter edge and stitch at 1/4” (6mm) seam allowance (red dotted line). Press open seam allowance so that the seam allowance lies in the center and is facing up. Cut strip into two 3″ (7.62cm) long pieces and stitch one end closed 1/4″ (6mm) from the end. Repeat on other side.

Turn 3” (7.62cm) pieces to right side. I used a pair of scissors with a blunt end.
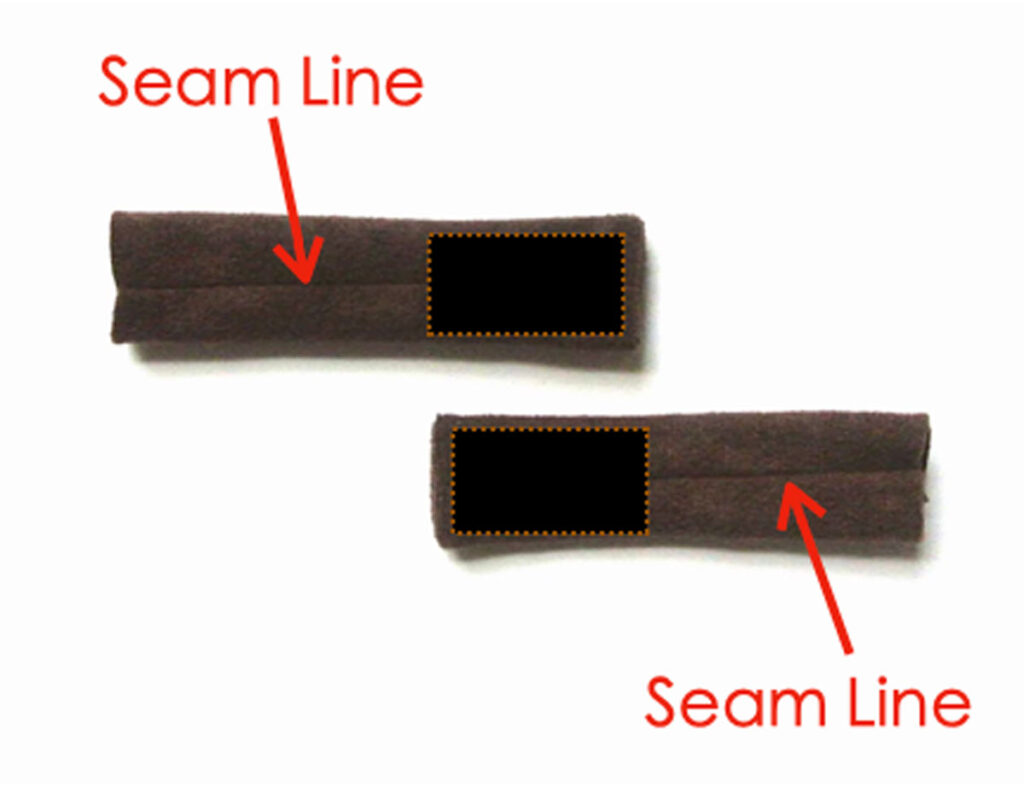
Sew in a piece of 1″ (2.54cm) long black Velcro at the closed end of the straps. Repeat for other piece. Make sure to sew the Velcro over the side where the seam runs.
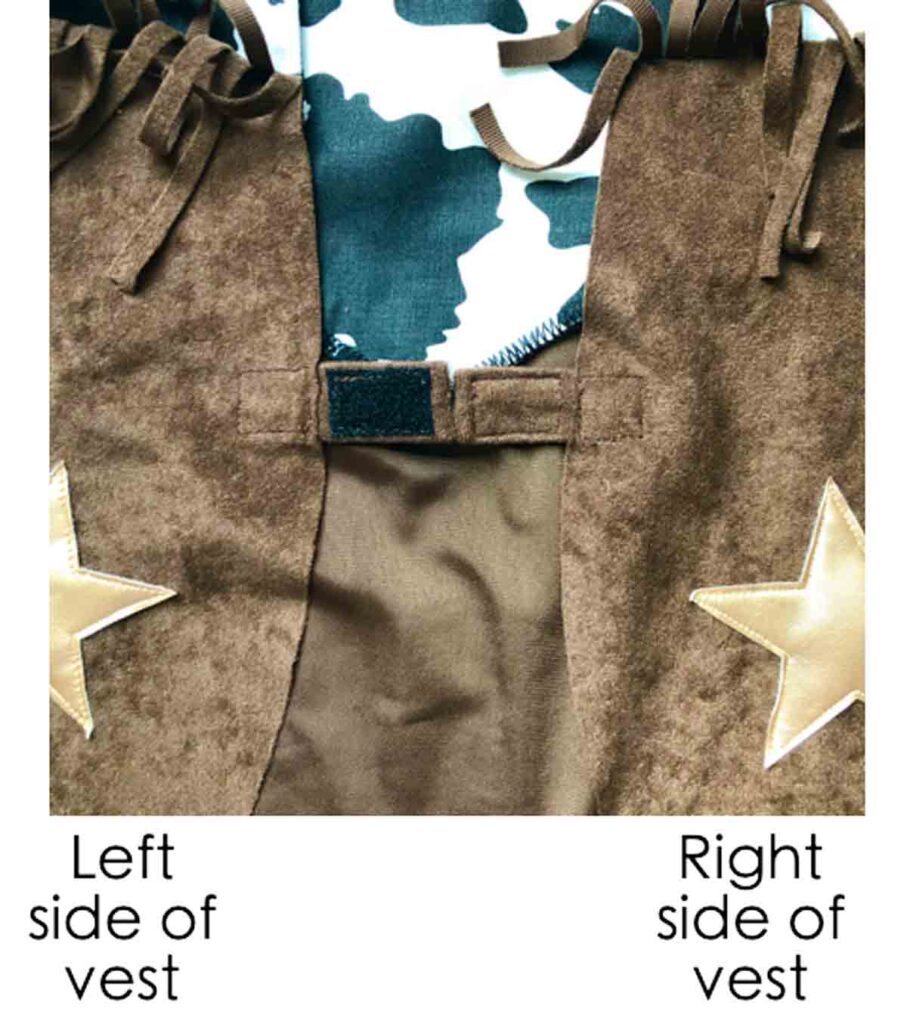
On the left side of vest, sew strip with loop side of Velcro facing up with a box. On right side of vest sew strip with hook side of Velcro facing down with a box shape.
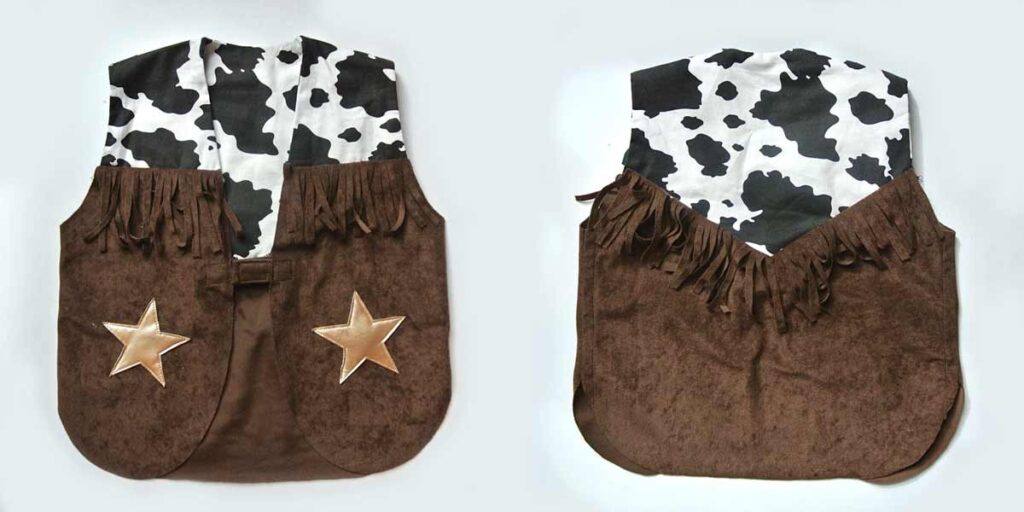
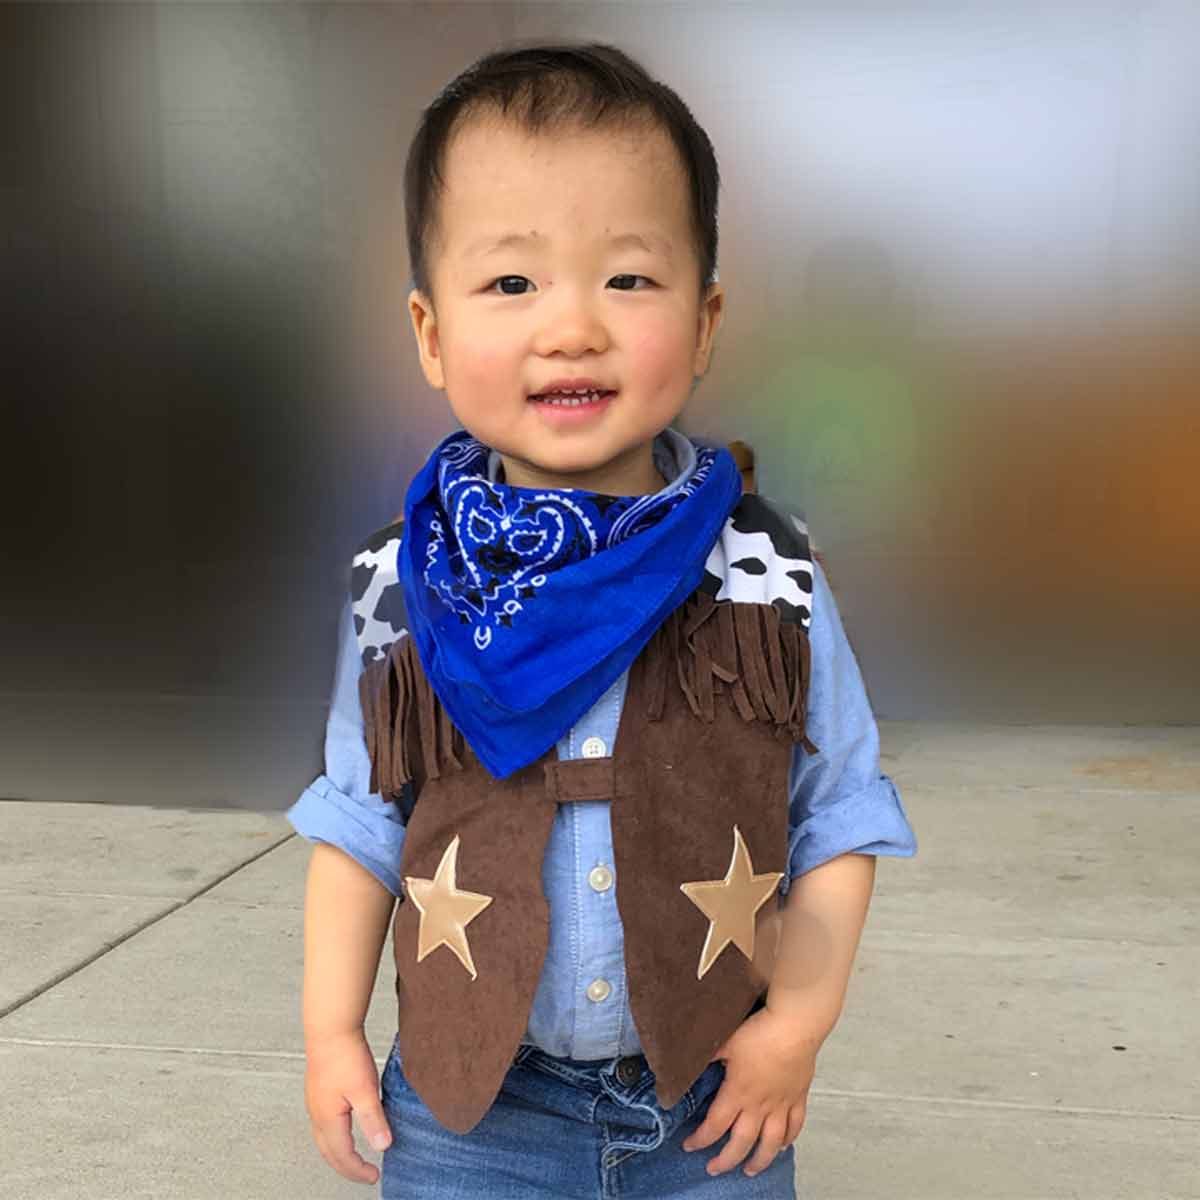
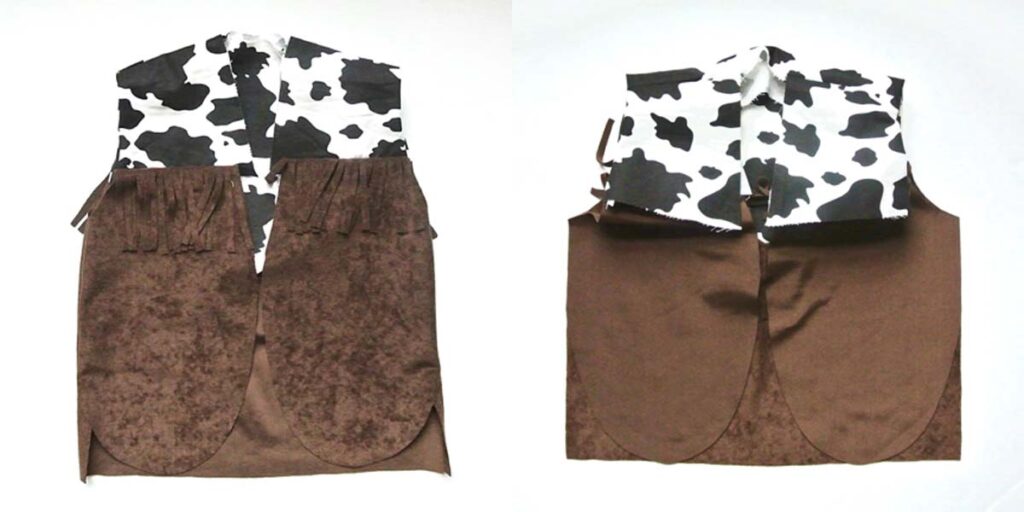
Finished! Completed Views of vest, front and back.


Hee haw! This happy little cowboy is ready for the Rodeo! Let me know in the comments below if you made this project. Happy sewing!
DIY Cowboy Vest for Kids
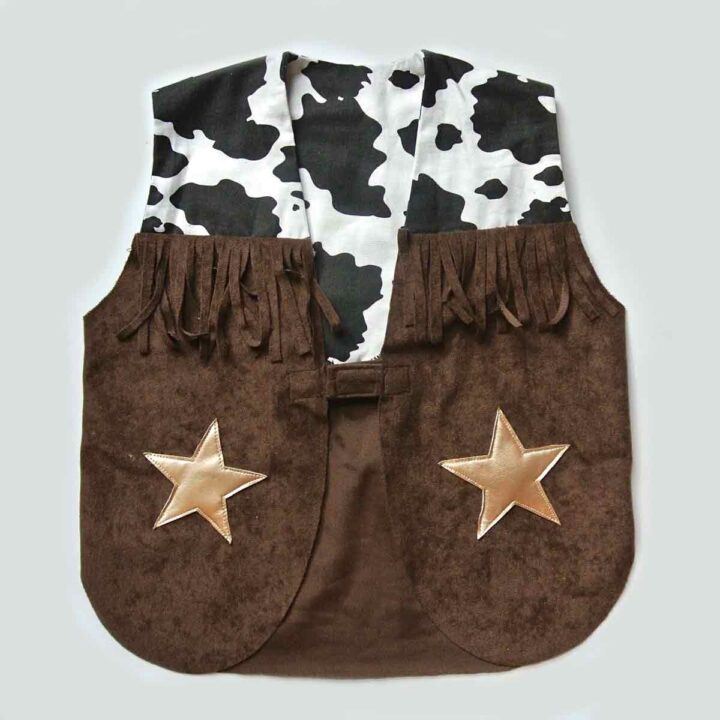
Make a simple cowboy vest this costume season by lifting the pattern of an existing vest you already own.
Materials
- VEST OF APPROPRIATE SIZE
- BROWN SUEDE FABRIC: 3/8 - 1/2 Yard
- COW PRINT FABRIC: 3/8 - 1/2 Yard
- GOLD FAUX LEATHER - 1/8 yard
- BLACK VELCRO
- EMBROIDERY STABILIZER
Tools
- SEWING MACHINE
- SERGER (optional)
- FABRIC CHALK
- SEWING PINS or SEWING CLIPS
- FABRIC SCISSORS
- HAND SEWING NEEDLES
- MATCHING THREAD
- FABRIC GLUE
- CLEAR RULER
- FRENCH CURVE
- MECHANICAL PENCIL
- PATTERN PAPER (see note 1)
Instructions
HOW TO LIFT PATTERN OF EXISTING VEST
- Draw a straight line on paper slightly longer than the length of vest. Fold existing vest in half and approximately place mid line of vest against straight line.
- Trace half of vest on paper.
- Use a french curve to round out armhole curve.
- Straighten side seam with ruler.
- Draw a straight line from neck of shoulder seam to mid line of vest This determines how deep the front opening of the vest extends.
- Use a french curve to round bottom corners of vest if desired.
- Place another piece of pattern paper over what you have so far. Create a front pattern piece and a back pattern piece by tracing. The front pattern piece will have the slanted neckline whereas the back pattern piece will have the curved neckline.
- Create top and bottom sections for front and back piece by drawing a line across the armhole that is perpendicular to the mid line. Make sure the point where this line intersects armhole is at the same height on both front and back piece.
- Cut front pattern piece into Front Upper and Front Bottom. Add 1/2” (12mm) seam allowance around entire Front Upper Piece. Add 1/2" (12 mm) seam allowance only to the top of Front Bottom Piece.
- Cut Back Pattern Piece into Back Upper and Back Bottom. Add 1/2” (12mm)seam allowance around neckline, armhole, and bottom side of Back Upper Piece (see note 2). Add 1/2" (12mm) seam allowance only to the top of Back Bottom Piece.
- Your cowboy vest pattern pieces are done! You will have 4 pattern pieces:
- Front Upper Piece
- Front Bottom Piece
- Back Upper Piece
- Back Bottom Piece
HOW TO SEW VEST TOGETHER
- Cut out all pattern pieces on fabric. You will need to cut out 2 sets of Front Upper Piece and Back Upper Piece. One set will be for the outside of the vest, the other set will be used as lining.
- To make fringes, cut a strip of suede 3.5” (9 cm) wide. The length depends on how much fringe you need. Make small cuts along the width of the strip about 1/4” (6mm) wide and 3” (76mm) long. Just eyeball, as it does not need to be exact.
- Pin and sew Front Top Piece and Front Bottom Piece together at shoulder line - 1/2” (12mm) seam allowance. Repeat for lining.
- Cut a piece of fringe the same length as the top edge of Front Bottom Piece and place right side of fringe over right side of Front Bottom Piece.
- Now place wrong side of Front Top Piece (cow fabric) facing over right side of fringe and Front Bottom Piece (suede). Pin and sew in place (see note 3).
- Cut another piece of fringe the same length as the top of Back Bottom Piece.
- Place fringe over Front Bottom Piece (right side of suede facing up) . Place right side of Back Upper Piece over right side of fringe and Back Bottom Piece. Pin and sew.
- Clip point at center back.
- Pin armhole of Upper Piece to armhole of Upper Piece Lining, right sides together. Make sure to match at the shoulder seams.
- Sew armhole together on both sides and clip curves.
- Turn vest to right side.
- Pull [FRONT UPPER LINING PIECE] out to front of vest so the right side of lining meets right side of [FRONT UPPER PIECE].
- Match lower corners of [FRONT UPPER PIECE] to lining.
- Pin together starting from lower corner up to shoulder seam4. Stitch from lower corner to shoulder seam at 1/2” (12mm) seam allowance. Repeat on other side of vest.
- Turn vest to right side. There will be an opening on the top back
neckline. - Clip curves on front and back of neckline. Make sure you do not clip past the seam allowance. (see note 4).
- Pin lining and [BACK UPPER PIECE] together.
- Close the opening with invisible ladder stitch
- Serge seam allowance on wrong side of vest. If you don't own a serger, finish the edge using the zigzag stitch on a home sewing machine.
- Stay stitch seam allowance on wrong side of vest with matching thread. Make sure to flip up the fringes towards cow fabric when you are stay stitching so you don't accidentally sew the fringes.
- Cut out star pattern and fabric glue it to the suede part of vest. You can place it wherever you like. (see note 5). Pin a piece of stabilizer under the suede where you will be sewing the star.
- Sew star to vest using straight stitch.
- Remove excess stabilizer around star on wrong side of vest by gently tearing it off.
- Stitch side seams together, lean seam allowance towards back of vest and stitch down. Repeat on other side.
HOW TO SEW VELCRO STRAP (OPTIONAL)
- Cut a strip of suede that measures 2”x 7” (5cm x 18cm).
- Fold in half along the shorter edge and stitch at 1/4” (6mm)
seam allowance. - Press open seam allowance so that the seam allowance lies in the center and is facing up.
- Cut strip into two 3" (7.62cm) long pieces and stitch one end closed 1/4" (6mm) from the end. Repeat on other side.
- Turn 3” (7.62cm) pieces to right side. I used a pair of scissors with a blunt end.
- Sew in a piece of 1" (2.54cm) long black Velcro at the closed end of the straps. Repeat for other piece. Make sure to sew the Velcro over the side where the seam runs.
- On the left side of vest, sew strip to vest with loop side of Velcro facing up. Sew a box to secure the Velcro strip.
- On right side of vest, sew strip to vest with hook side of Velcro facing down. Again, sew a box to secure the Velcro strip.
- Cowboy vest is finished!
Notes
- I used lightweight paper (36" wide) sold by the yard at a local art store. Try to find white paper that is slightly opaque so you are able to see through it when you need to trace something.
- Don't add seam allowance to the mid line of Back Upper Piece as this is the fold line. Later on you will cut Back Upper Piece on fold so you don't want to add extra seam allowance to it.
- The cow fabric extends 1/2” (12mm) past suede fabric on both sides. This is expected as it accounts for the seam allowance you need to later on to sew the lining to. Brown dotted line shows where suede fabric ends.
- The reason we clip is so it makes it easy to form the neckline curve when pinning together.
More Sewing Projects for Kids
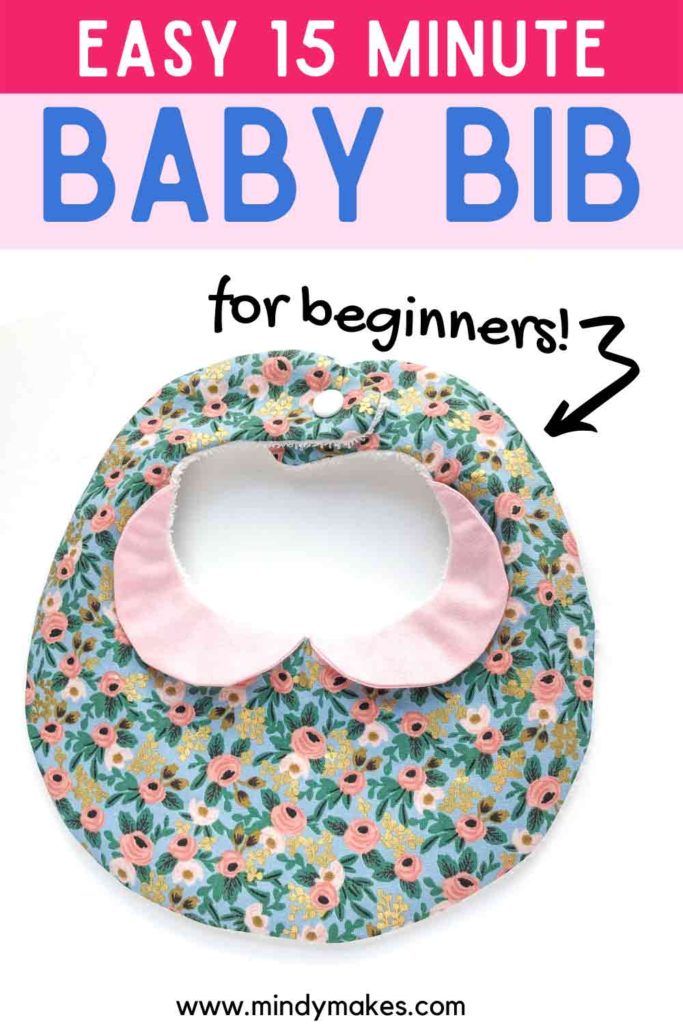
A easy towel bib with a peter pan collar that is both stylish and ready for big messes!
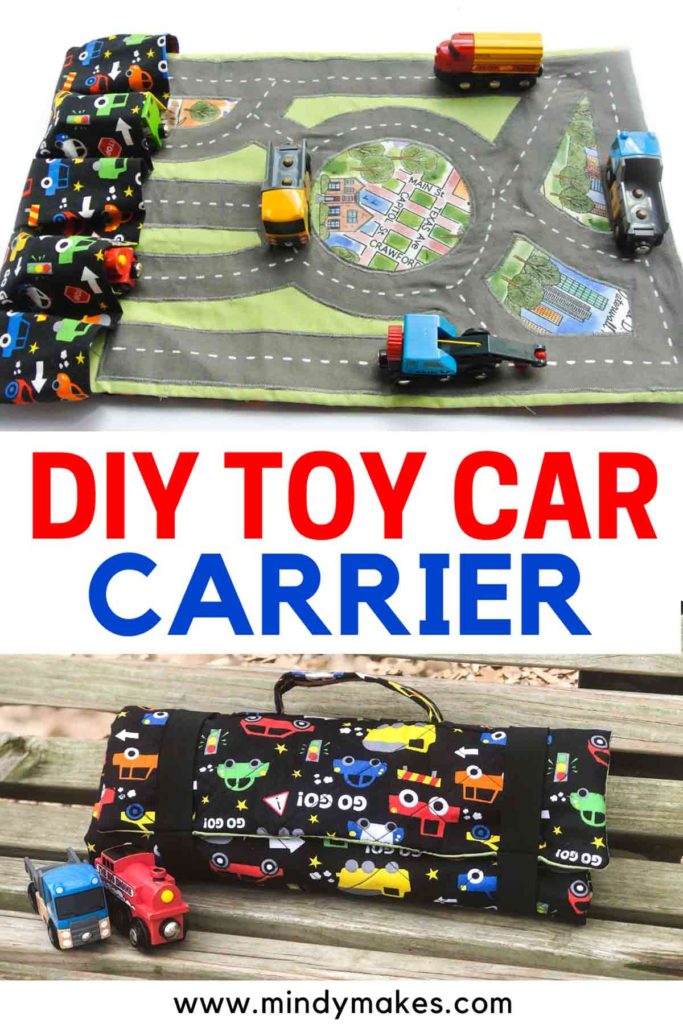
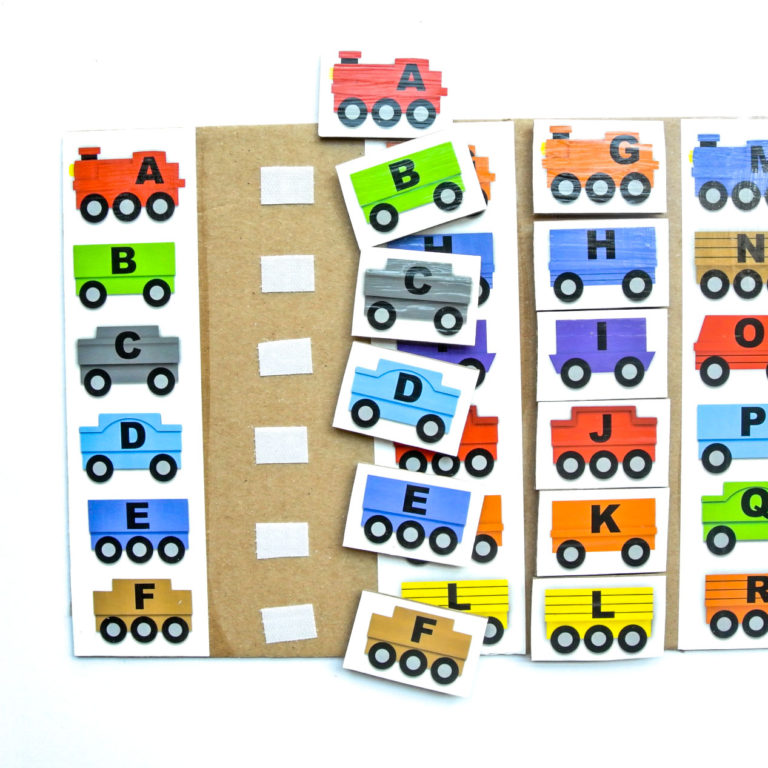
This portably car caddy houses 5 toy cars and comes with a playmat for on-the-go fun.

A tote that holds coloring pencils/crayons and an activity book is great for quiet play.