How to Sew a Coloring Book and Crayon Holder (Free Pattern)
This DIY coloring book and crayon holder is the perfect gift for kids to keep them busy and entertained. It’s super portable and provides endless hours of quiet play on the go. Step-by-step tutorial is great for beginners and comes with free pattern.
First of all, my 3 year old has finally developed a liking for coloring and activity books (yay!). This is great because he can actually happily entertain himself when left alone with some crayons and coloring books.
Coloring inside the lines…now that’s another story. Nevertheless, I’m overjoyed that he can sit still and color!
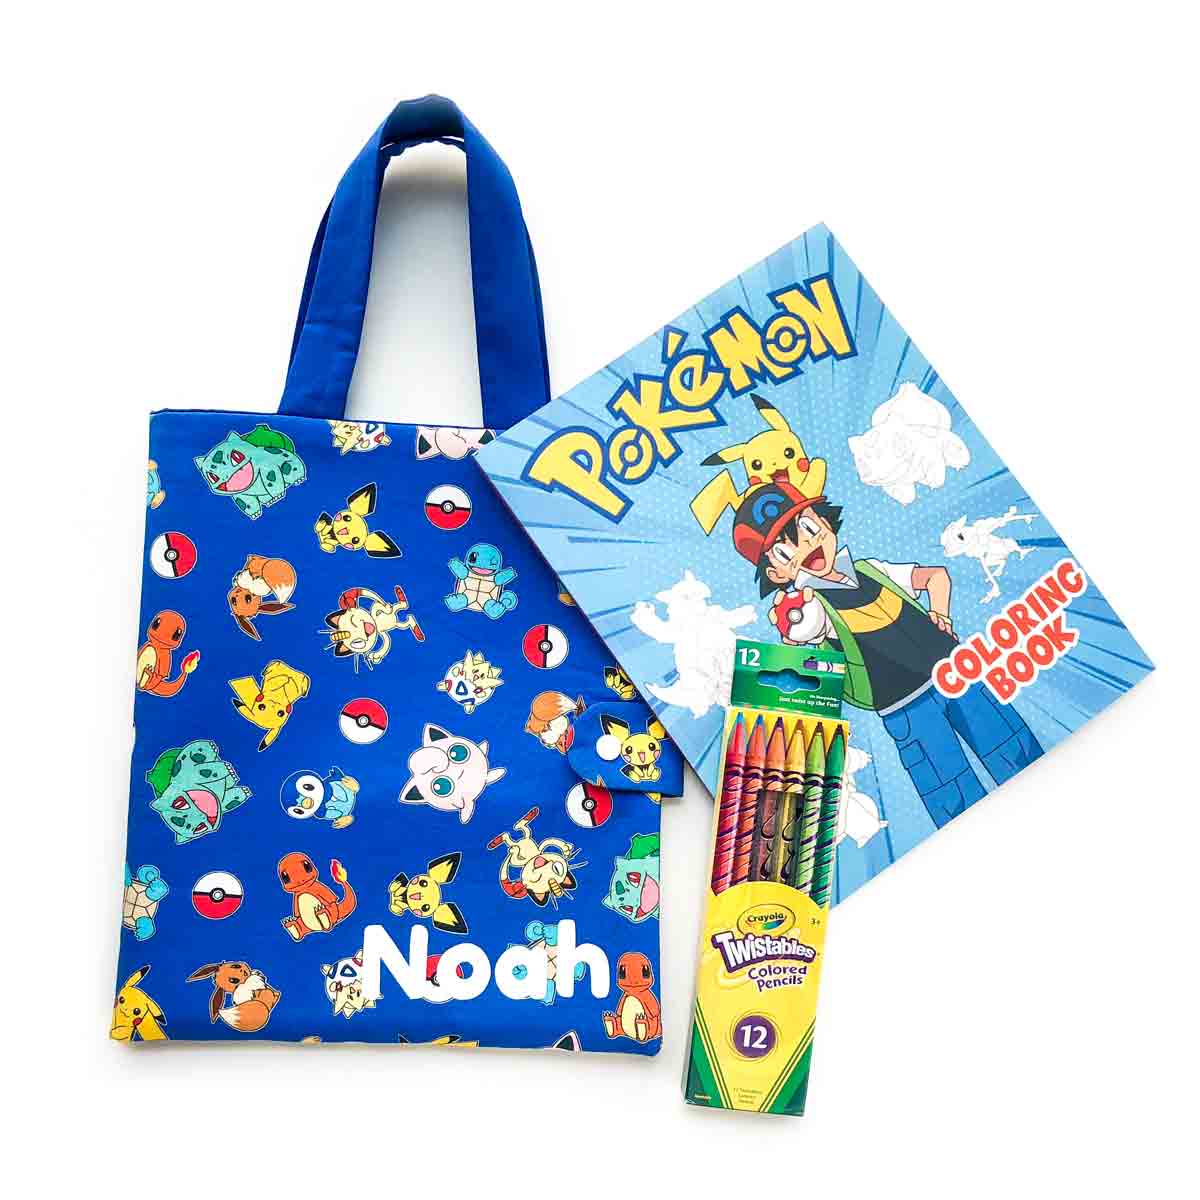
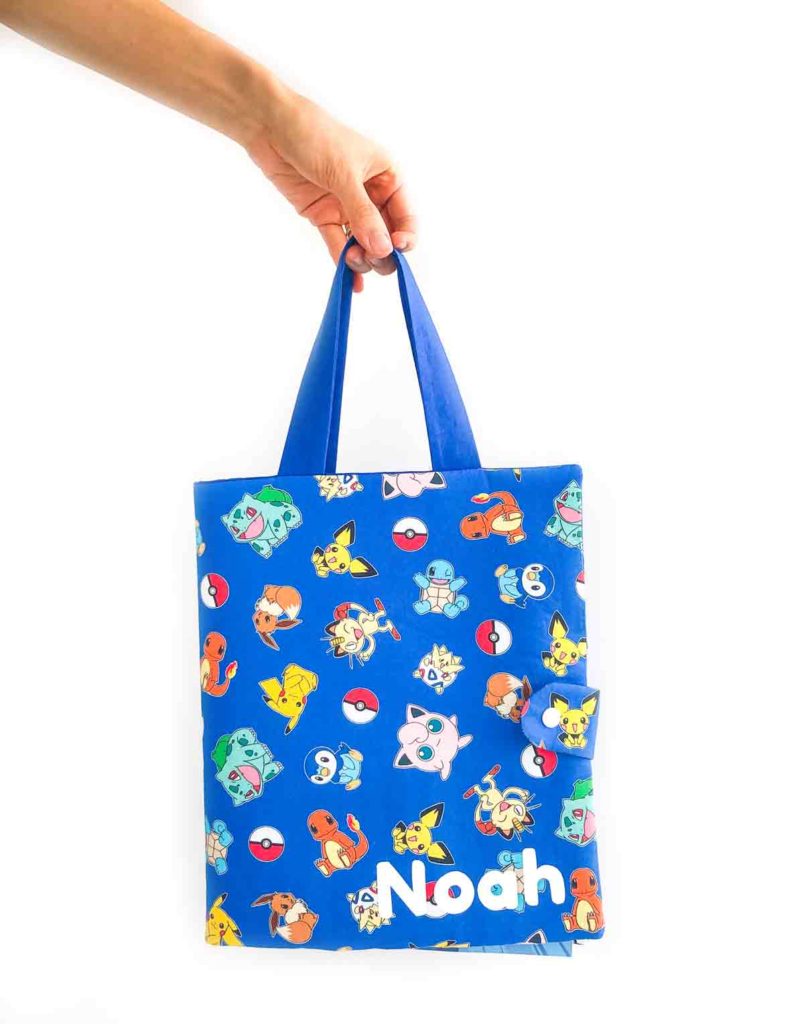
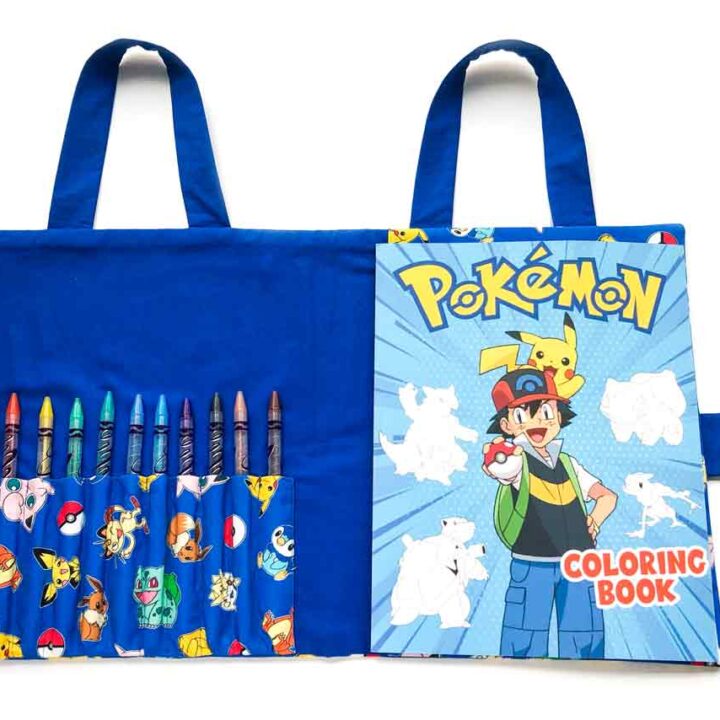
I love this coloring book and crayon holder tote because first, it comes with a handle for kids to carry it around. Next, there is a large pocket on one side for storing the coloring or activity book. On the other side there are little pockets to hold each individual crayon (or coloring pencil). That way, you can tell if you are missing a crayon or pencil when you are packing up to go.
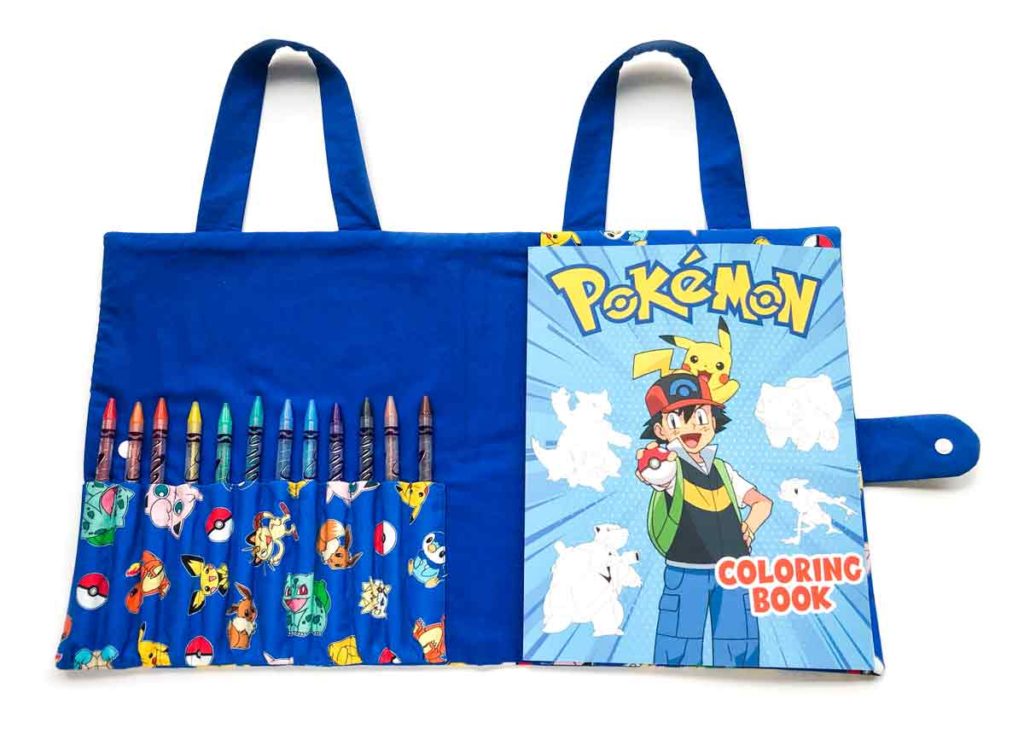
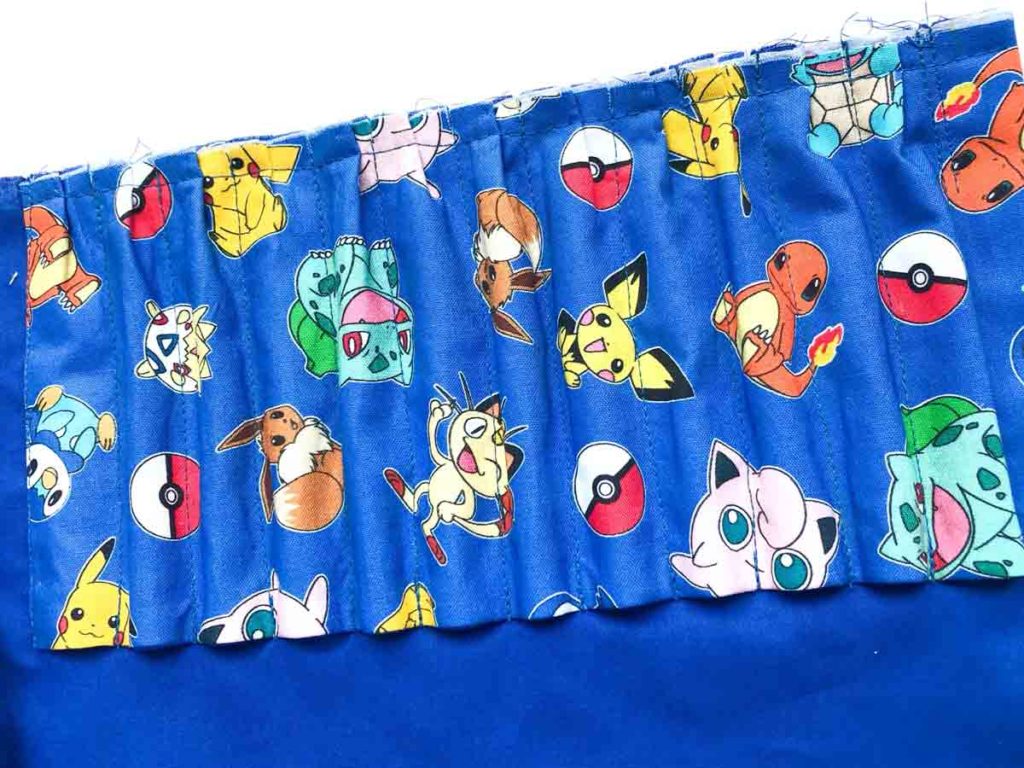
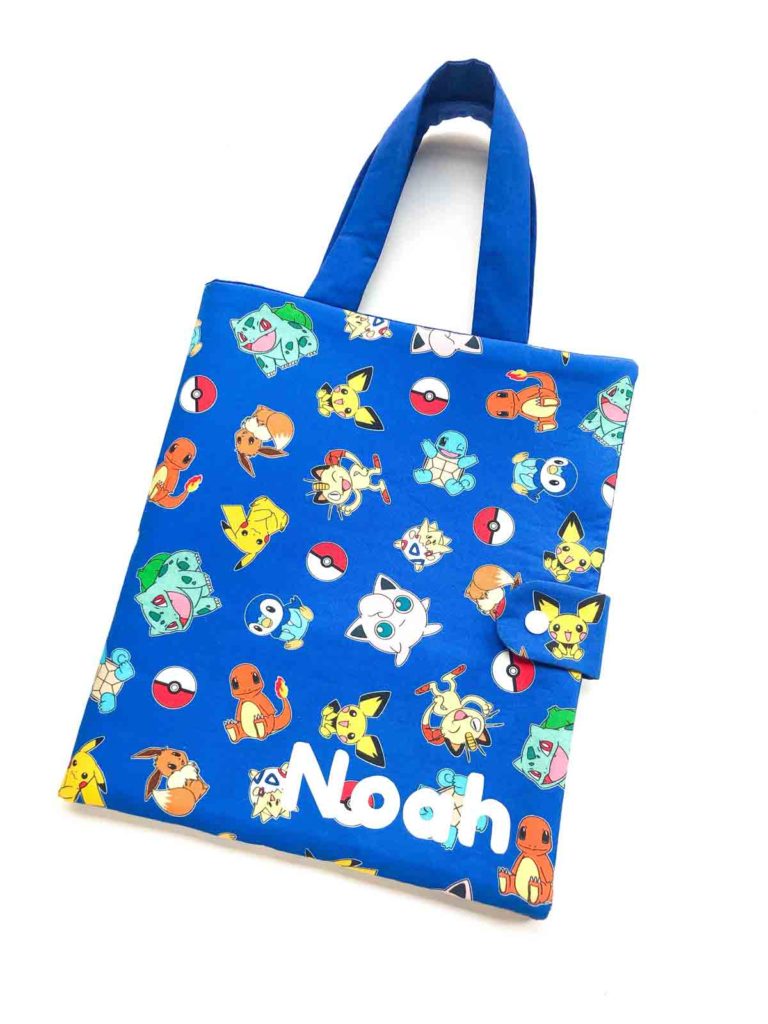
For this tutorial, I made one for a friend’s 5 year old who as you can see, is a Pokemon fan. I was able to find Pokemon fabric at Joann’s and complete it with a Pokemon coloring book. On the left side, there are 12 pockets for holding coloring pencils. The pockets are purposefully designed with a little give so you can actually hold up to 24 coloring pencils if you put 2 pencils in each pocket.
Personalize The Crayon TOTE
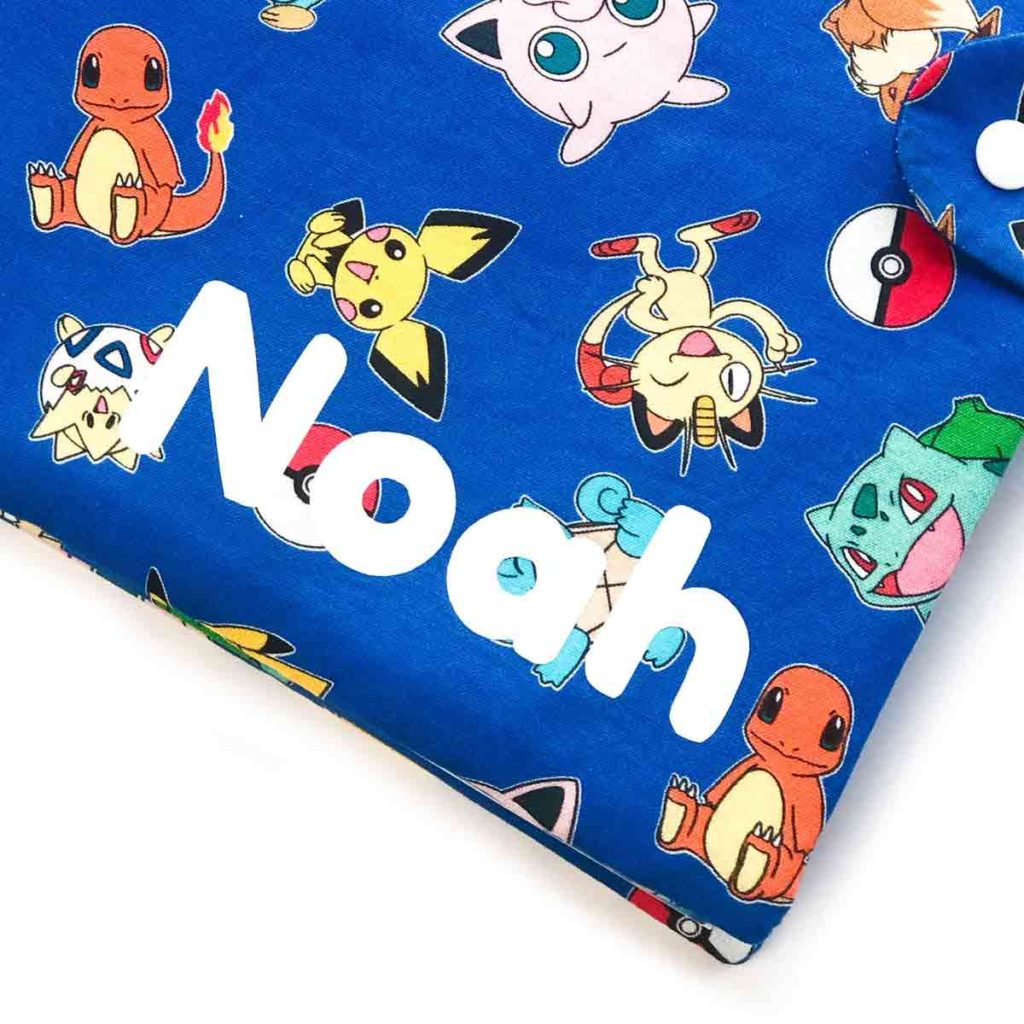
To make it extra special, I added his name on the front just so he knows it’s his (this little guy has 2 brothers).
If you have a Cricut or silhouette machine, this is the perfect time to bring it out. However, since I don’t own one (believe me it’s on my wish list), I just cut out the name using iron-on-vinyl and ironed it on instead. This is a great way to personalize any sewing gift if you don’t own a cutting machine and it’s super simple. The tutorial below will show you exactly how to do this step-by step.
There is also a PDF template for the letters (available in my free resource library) if you decide you also want to personalize your project too. Do it! Do it! Kids absolutely LOVE getting something with their names on it.
Supplies for Making DIY Coloring Book and Crayon Holder
For this project you will need:
- Outer Piece – 1/2 Yard of Cotton Print Fabric. I used this Pokemon one
- Lining Piece – 1/2 Yard of Cotton Fabric. I used a matching solid cotton fabric
- Fusible Fleece – 1/2 Yard
- Fusible Interfacing – 1/2 Yard. I used Pellon ultra lightweight Fusible Interfacing
- Free Pattern (See Below)
- Snaps and Snaps Plier
- Iron-on Vinyl (optional, if you want to personalize the project) – I used the Solid white Iron-on-vinyl from the Paper Source, available at Hobby Lobby. You can also order online.
- Sewing machine
- Fabric Scissors – these Ginghers are my favorite.
- See-Through Sewing Ruler
- Fabric Chalk – These Chaco Liners by Clover are my absolute favorite
- Pins or Sewing Clips – Sewing clips are great for holding thick fabrics together
- Matching Thread
Pattern For Coloring book and crayon Holder
Firstly, to make this easy sewing project, you will need to cut out the following pattern pieces:
- OUTER PIECE (x1): 21”(53.34cm) wide x 13”(33cm) Tall
- LINING PIECE (x1): 21”(53.34cm) wide x 13”(33cm) Tall
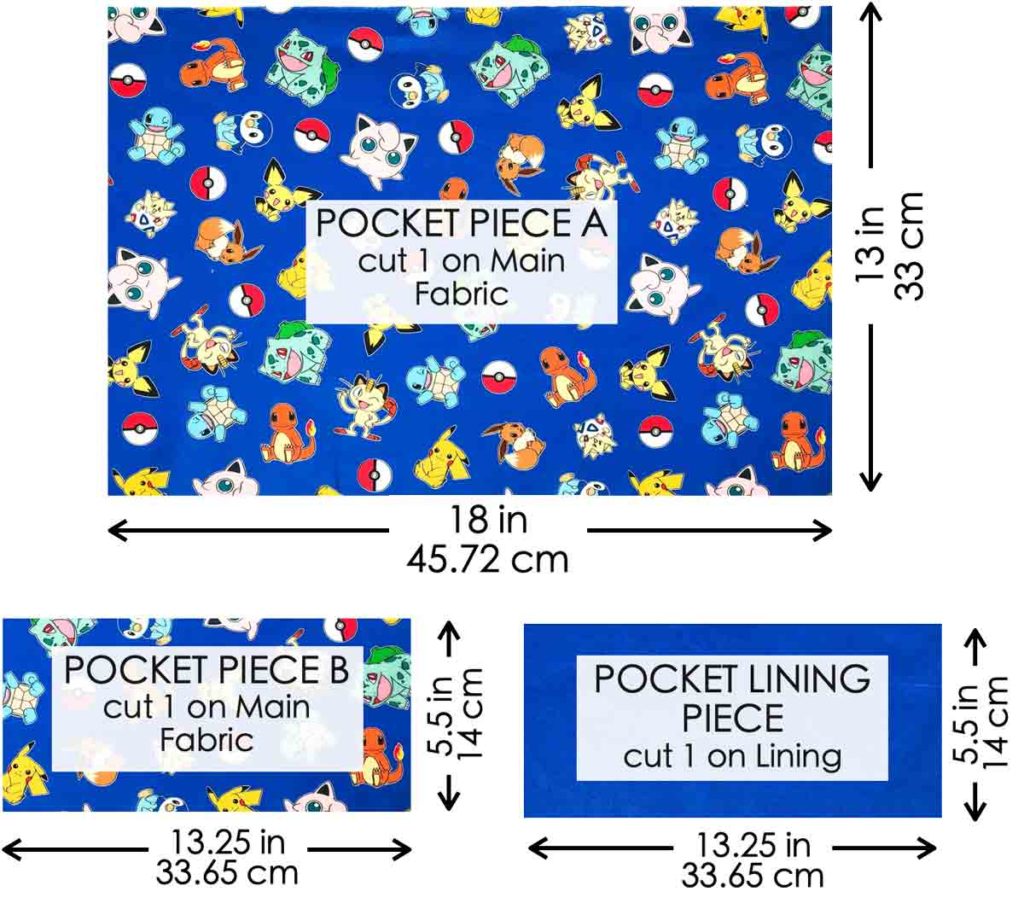
- POCKET PIECE A on Main Fabric (x1): 18” (45.72cm) wide x 13”(33cm) Tall
- POCKET PIECE B on Main Fabric (x1): 13.25”(33.65cm) wide x 5.5”(14cm) Tall
- POCKET PIECE B on Lining Fabric (x1): 13.25”(33.65cm) wide x 5.5”(14cm) Tall
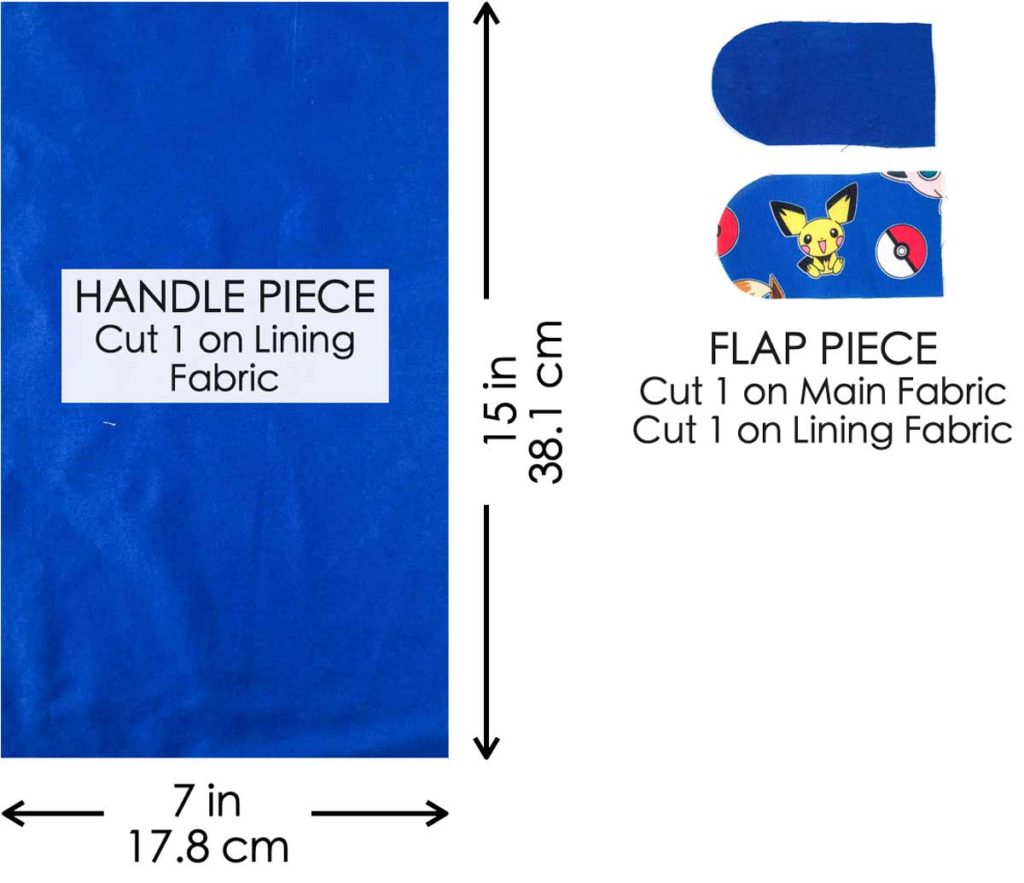
- HANDLE PIECE (x1): 7” (17.8cm) wide x 15”(38.1cm) Tall
- FLAP PIECE: Cut 1 on Main Fabric and 1 on Lining Fabric – Pattern Available in my Free Resource Library

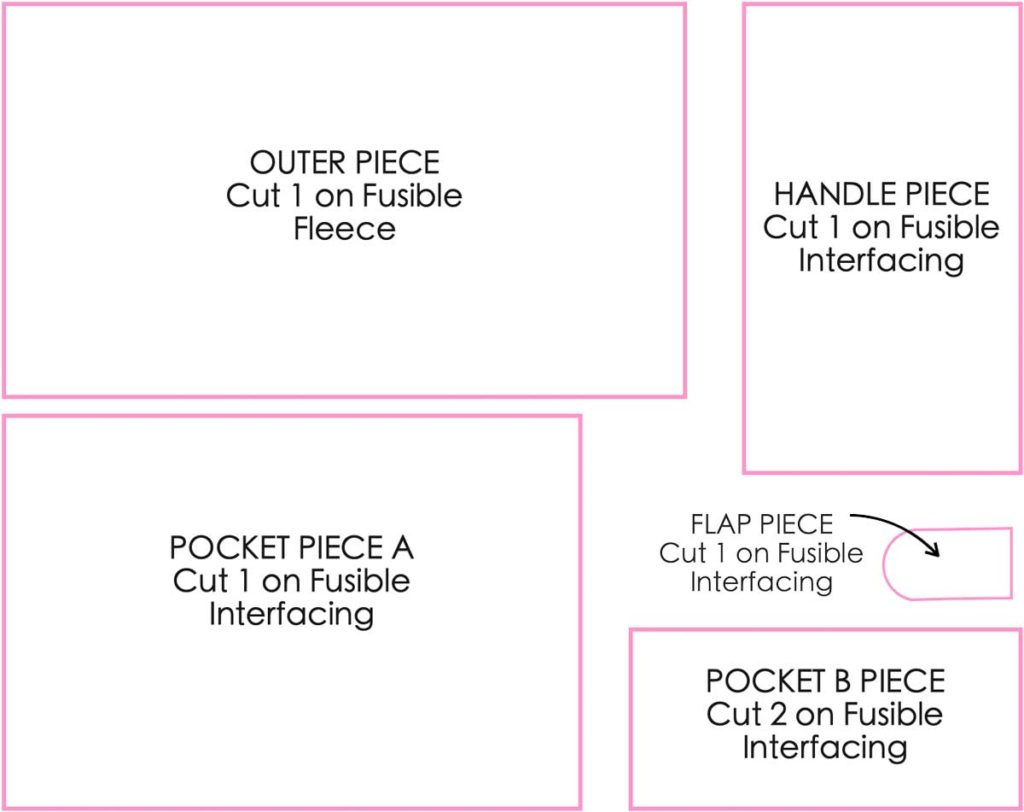
Next cut out the following Interfacing Pieces:
OUTER PIECE on Fusible Fleece (x1): 21”(53.34cm) wide x 13”(33cm) Tall
POCKET PIECE A on Fusible Interfacing (x1): 18” (45.72cm) wide x 13”(33cm) Tall
POCKET PIECE B on Fusible Interfacing (x2): 13.25”(33.65cm) wide x 5.5”(14cm) Tall
HANDLE PIECE on Fusible Interfacing (x1): 7” (17.8cm) wide x 15”(38.1cm) Tall
FLAP PIECE on Fusible Interfacing (x2)
Step-By-Step: How Do You Make Coloring Book and Crayon Holder
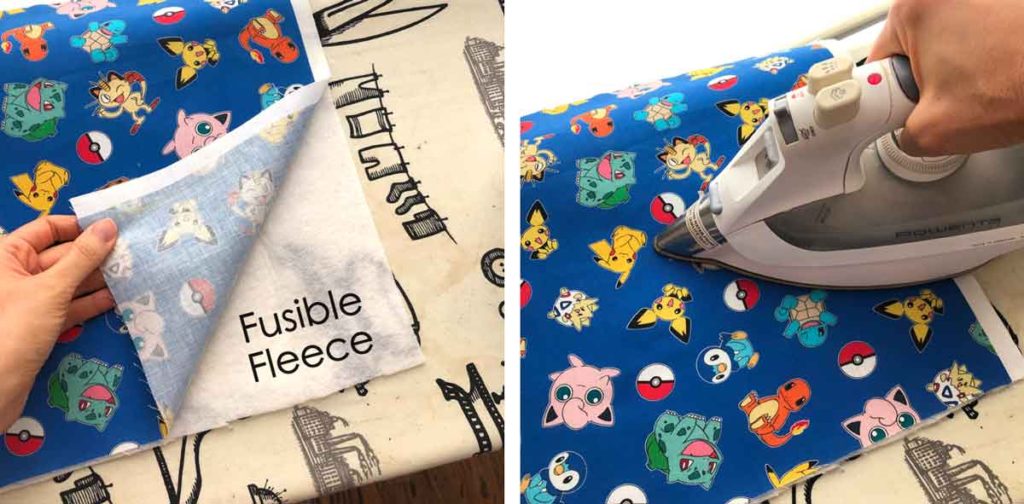
First, start off by ironing Fusible Fleece to wrong side of OUTER PIECE.
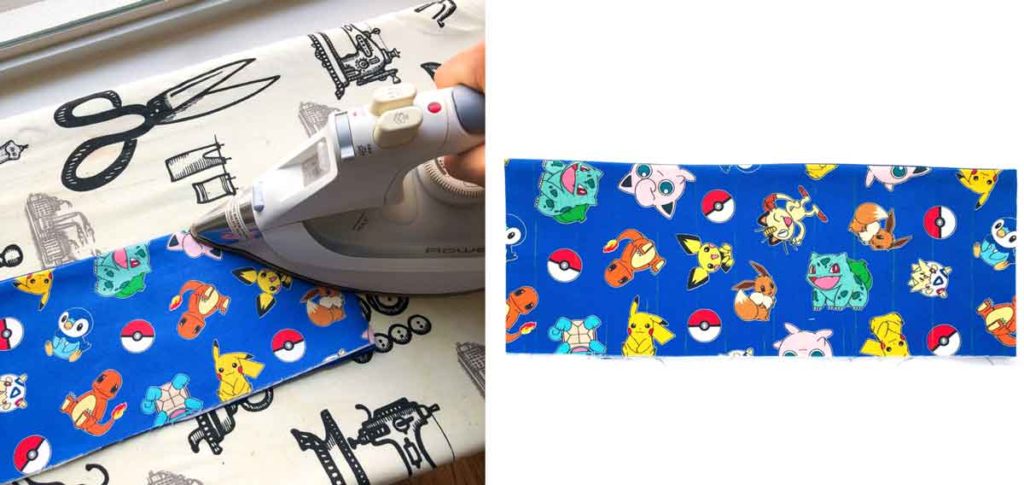
Adding Name Using Iron-on-Vinyl (No Cricut necessary) – Optional
Jump to How to Make Flap, if not planning to add name or personalization.
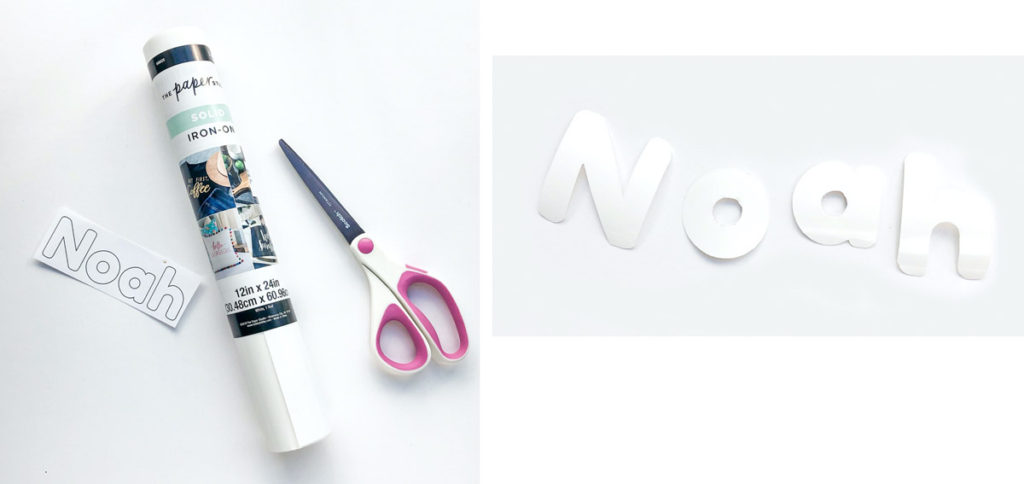
To personalize the coloring book and crayon holder, first print out the letters that you need (available in my free resource library). Next, cut the letters out on iron-on vinyl.
Be sure to follow the instructions given on the iron-on vinyl so that you cut out the letters correctly (and not the mirror image). For the vinyl that I used, the side with the clear plastic layer (that gets peeled off at the end) is the side that needs to face up.

LEFT: First place the letters where you want and iron it on. Note: For this project I’m putting the letters on the bottom right corner. I also recommend using a ruler to make sure your letters are aligned straight.
RIGHT: The directions on mine asks you to iron the letters on over a thin piece of cotton fabric.
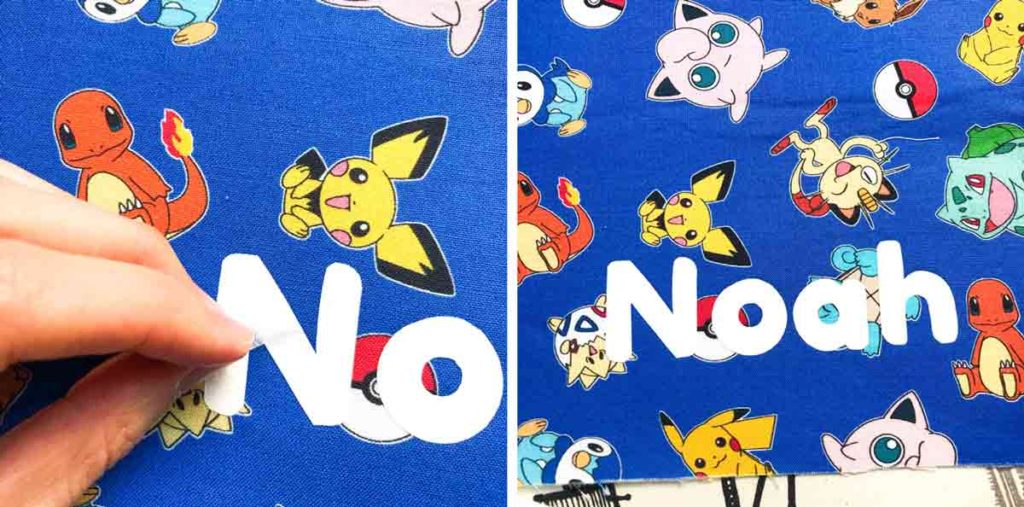
Secondly, peel the clear plastic layer off on each letter and you are done!
How to Make Closure Flap

Iron fusible interfacing to both sides of FLAP PIECE. Sew right sides together, trim seams and clip curves. Turn to the right side and press flat.
Sewing Tote Handles

First iron fusible interfacing on wrong side of HANDLE PIECE
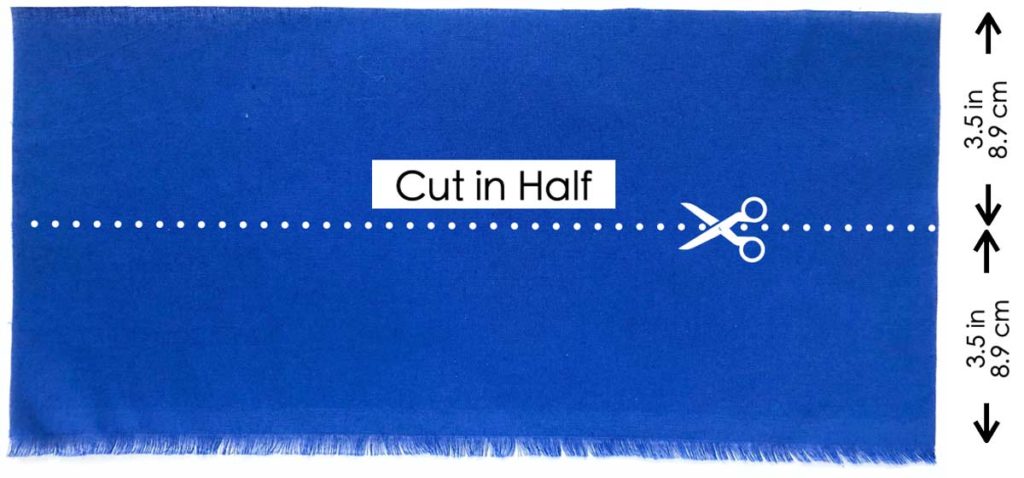
Secondly, cut the HANDLE PIECE in half along the width so you end up with two pieces that are each 3.5” (8.9cm) wide
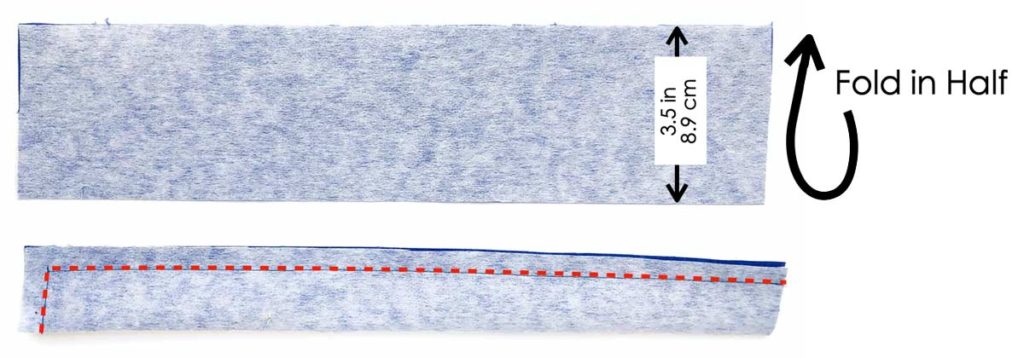
Thirdly, take one of the HANDLE PIECE and fold it in half again and sew the top and one of the sides at 1/2” (1.27cm) seam allowance (red dotted done). Repeat for other piece.
Note: I like to sew one side of the handle together because it makes it easier to turn the handles with a blunt scissor later on. If you plan to use a bodkin or loop turner, you only need to sew the top of the handle piece together.

Fourthly, cut corner at a diagonal and trim seam allowance to 1/4”(6mm)

Finally, turn handles to right side using blunt scissors (you can also use a loop turner or bodkin) and press it flat.
Making Pocket A and B
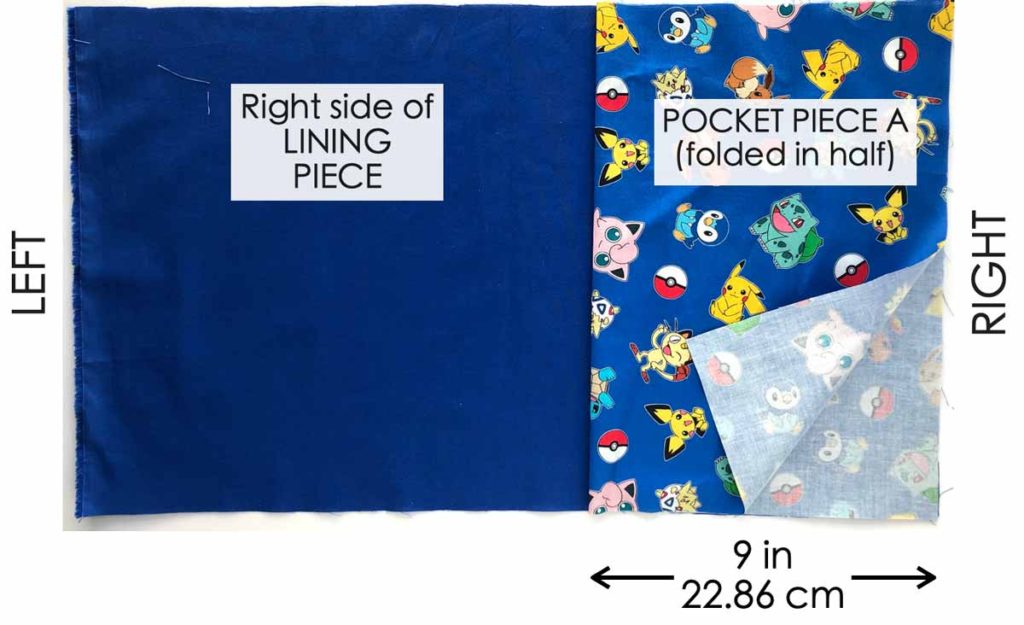
First, iron Fusible interfacing onto POCKET PIECE A. Secondly, fold POCKET PIECE A in half along the width so that it measures 9”(22.86cm). Thirdly, with right side of LINING PIECE facing up, place POCKET PIECE A (that’s been folded in half) on the LINING PIECE, matching at the right hand corners.
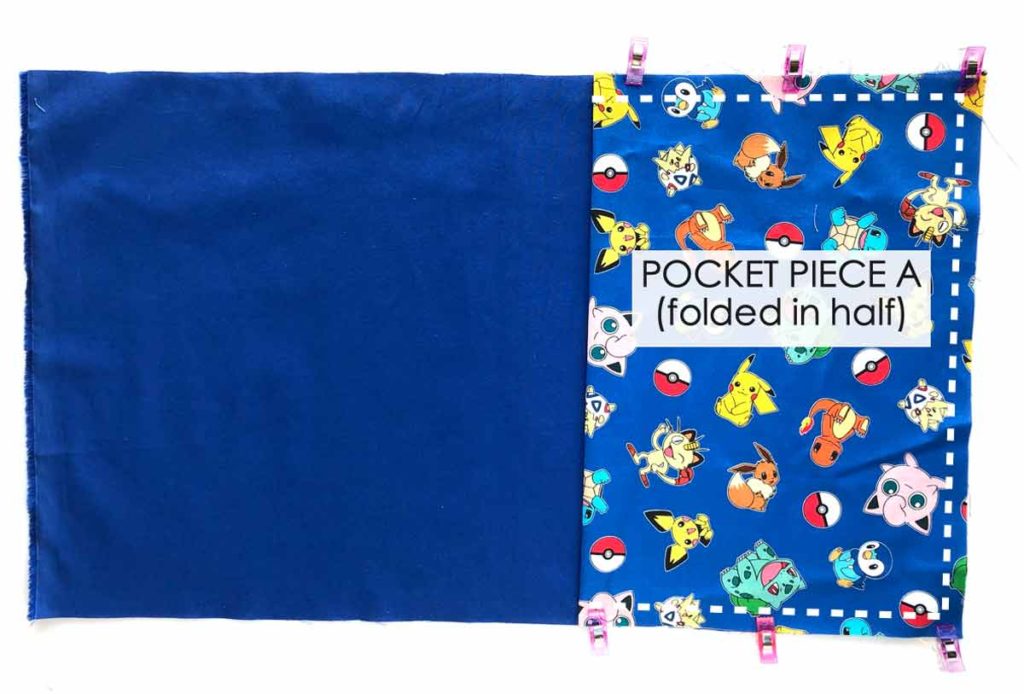
Fourthly, pin POCKET PIECE A to LINING PIECE and baste together (white dotted lines)
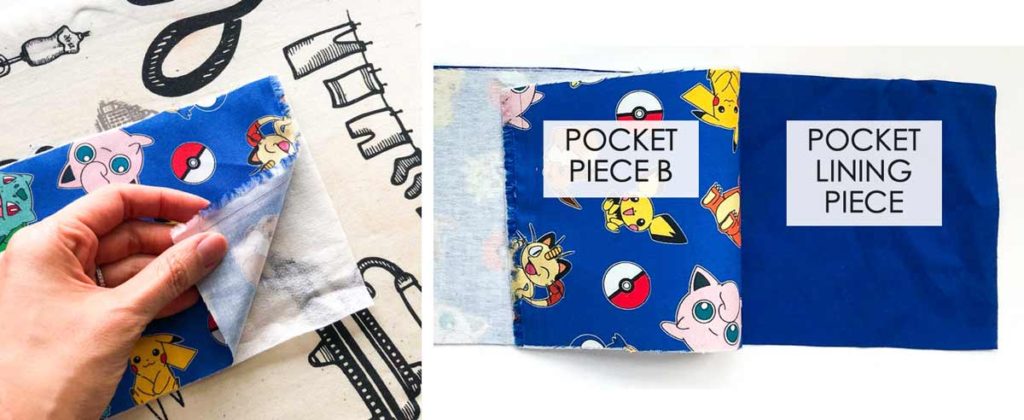
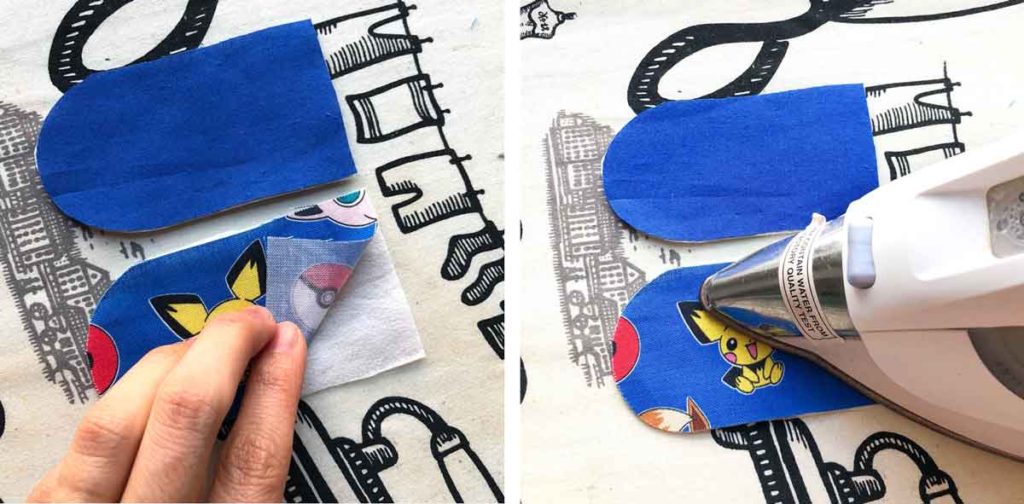
Now fuse interfacing to both POCKET PIECE B and POCKET LINING PIECE. Place POCKET PIECE B and POCKET LINING PIECE right sides together
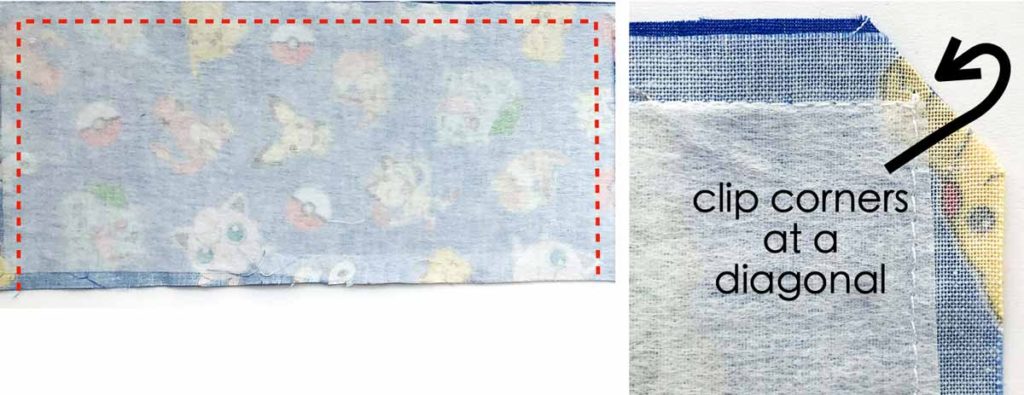
Sew POCKET PIECE B to POCKET LINING PIECE at 1/2”(1.27cm) seam allowance along the two sides and top (no need to sew the bottom. Clip each of the corners at a diagonal
Turn POCKET PIECE B to right side and press it flat.
Sewing Coloring Pencil Pocket to Holder
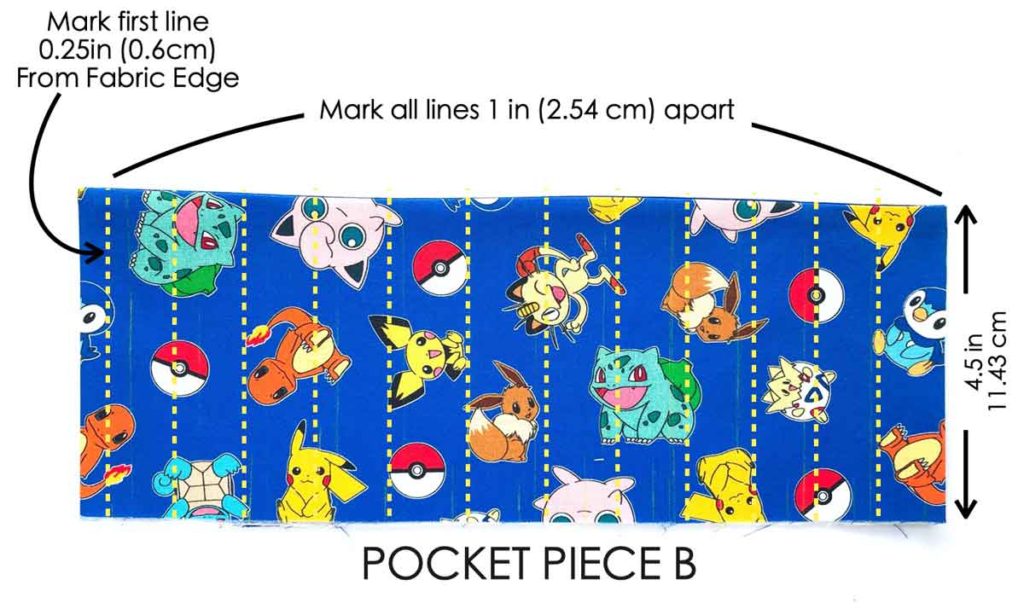
First, use fabric chalk to mark POCKET PIECE B with the following lines:
- First Line: 0.25”(6mm) from left edge
- Eleven lines that are spaced 1”(2.54cm) apart from First Line
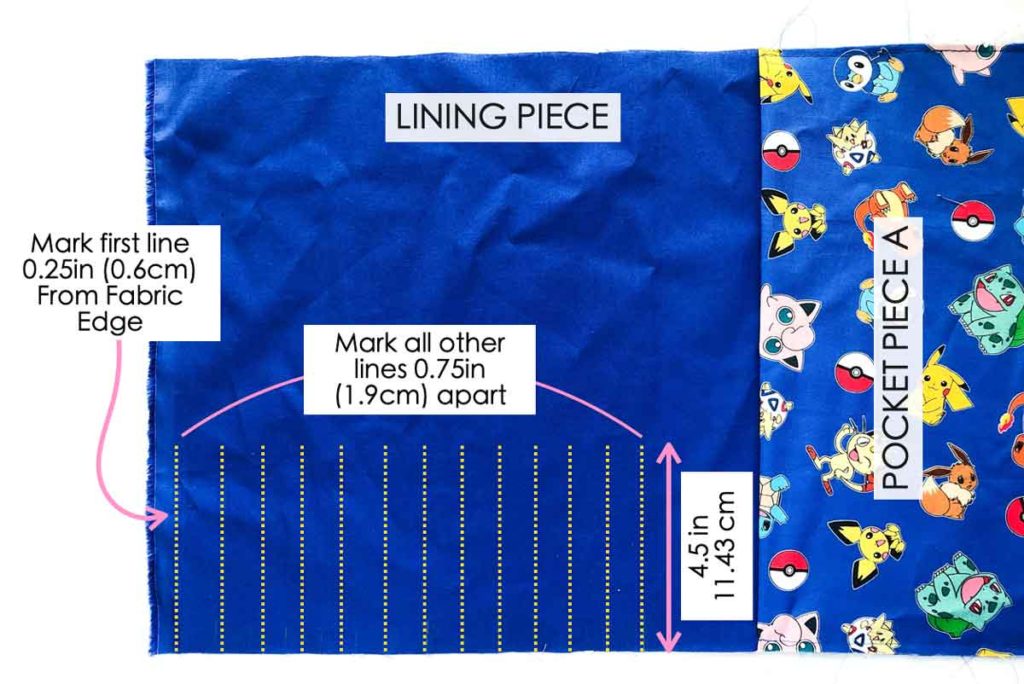
Second, mark LINING PIECE with the following lines:
- First Line: 0.25”(6mm) from left edge, 4.5”(11.43cm) Tall
- Twelve lines that are spaced 0.75”(1.9cm) apart from First Line, all 4.5”(11.43cm) Tall
Note that the lines on the POCKET PIECE B are marked 1″ (2.54cm) apart, whereas the lines on LINING PIECE are marked 0.75″(1.9cm) apart. The excess fabric on POCKET PIECE B creates a “channel” to fit the colored pencils.
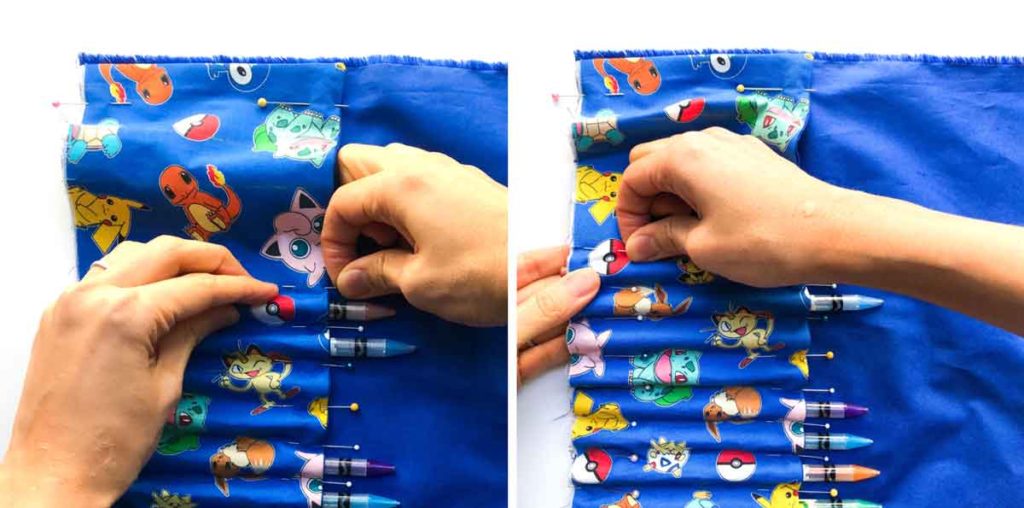
Thirdly, pin POCKET PIECE B to LINING PIECE, matching at the marked lines.
TIP: I recommend putting a pencil in the pouch before pinning. This way, the pencil shapes the fabric into a tunnel, making it easier to pin.
As you pin, make sure the bottom of the pin faces the bottom of the crayon holder. This makes it easier to remove the pins as you sew in the next step.

View of POCKET PIECE B all pinned to LINING PIECE
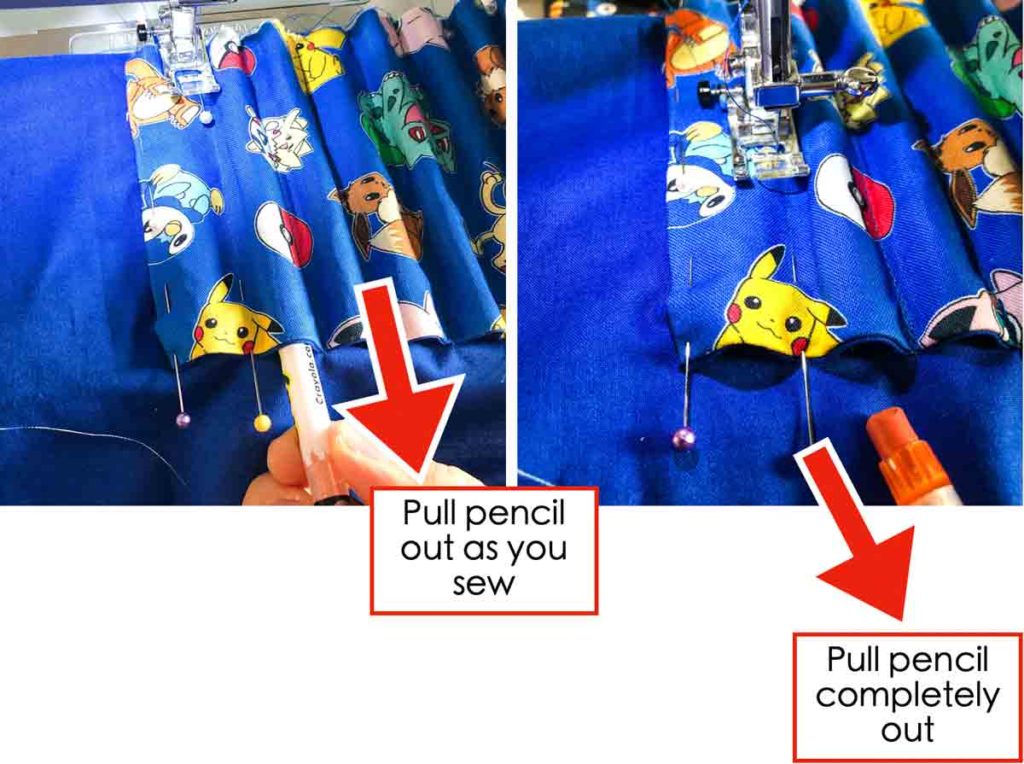
Now sew each of the pockets at the marked lines on POCKET PIECE B.
TIP: To sew each pocket, start from the bottom, removing the pins as you go (hence why it’s better to pin the pins facing towards the bottom). I also find it easiest to sew the channel with the pencil inside and pull the pencil out as you sew. Be sure to back stitch a few times to reinforce the seam at the top of the pocket.
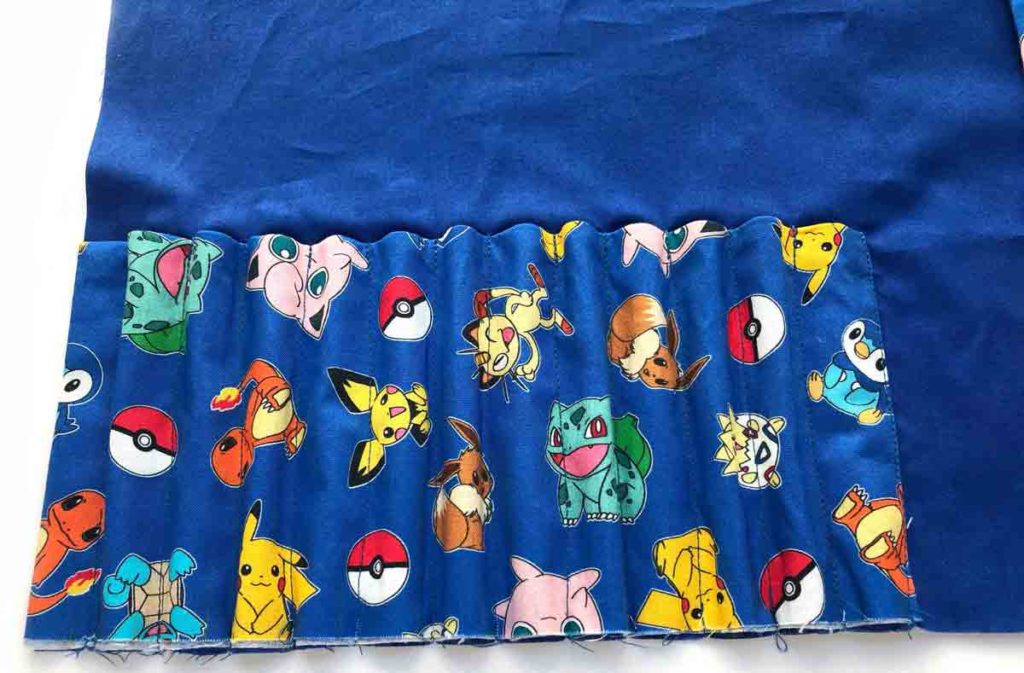
View of crayon pockets all sewn in!
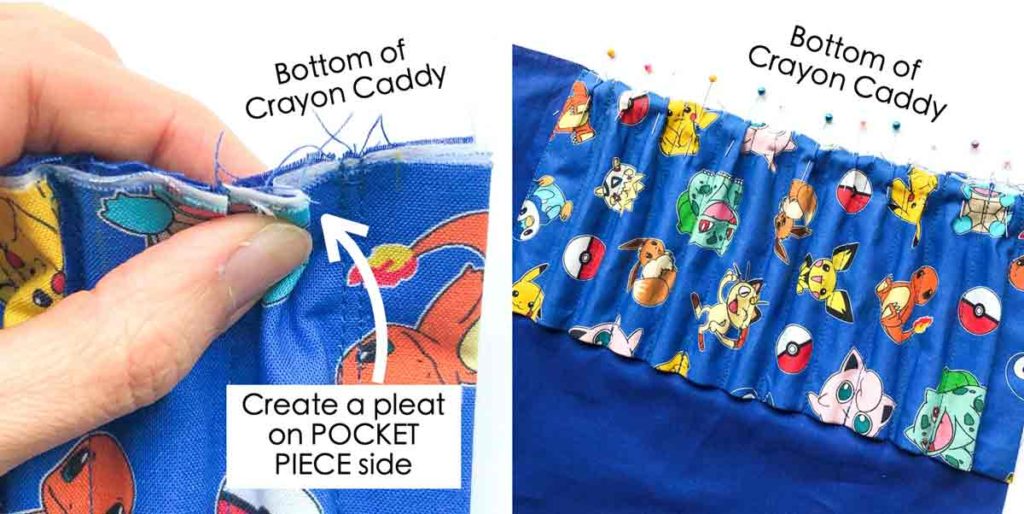
On the bottom of the crayon caddy, make a small pleat over each of the crayon pocket so that it is flushed with the lining. Pin each of the pleats.
Baste the pleats in place. For more information on basting, check out How to Make Basting Stitches
Sewing it All Together

First, place the handles and flap piece on OUTER PIECE as shown in the photo (Dimensions are approximate):
- HANDLES: 3”(7.62cm) from the left and right corner. Distance between two handles is 5.25”(13.3cm)
- FLAP PIECE: 5.5”(14cm) from top and bottom
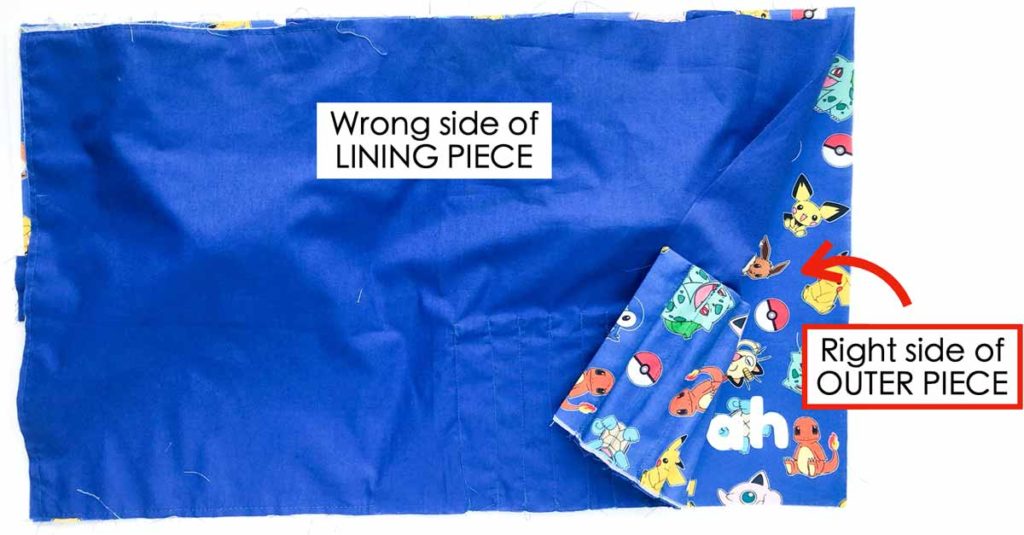
Next, place wrong side of LINING PIECE over right side OUTER PIECE, so the right sides face each other.
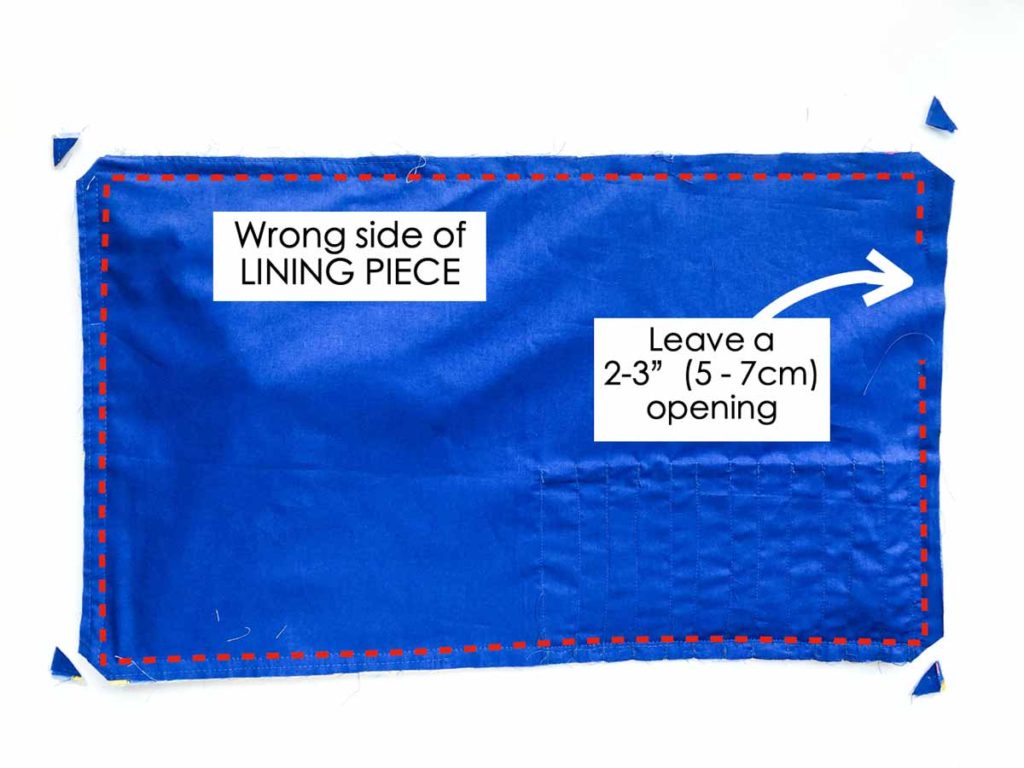
Third, pin or clip the LINING PIECE to the OUTER PIECE. Stitch at 1/2” (1.27cm) seam allowance (red dotted line), leaving a 2-3”(5-7cm) opening on the side. Cut diagonals at all four corners.
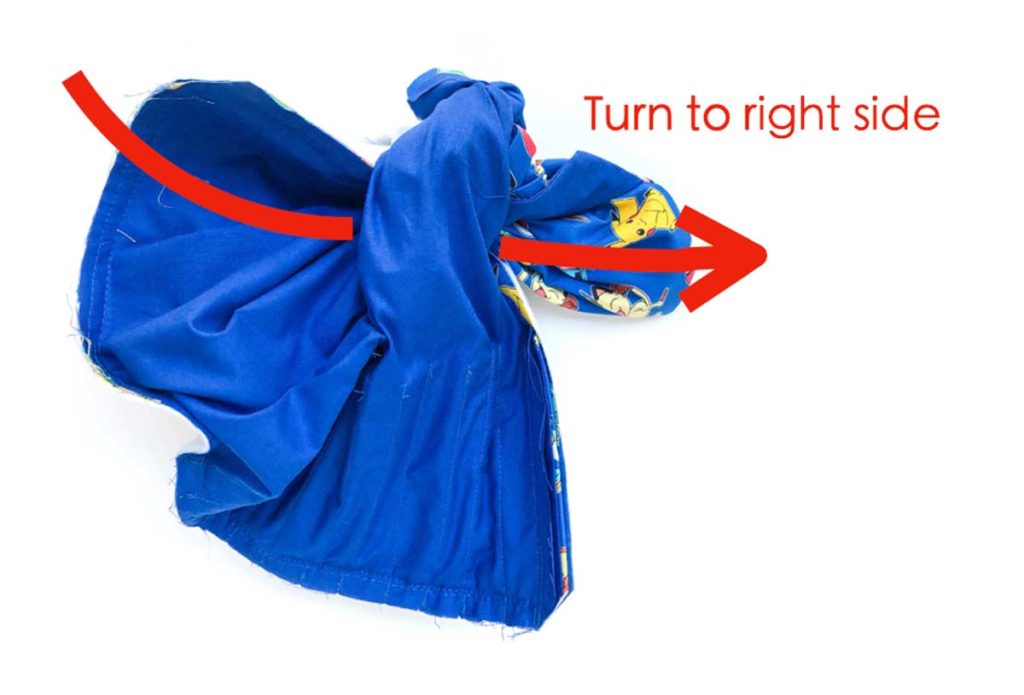
Fourth, turn crayon tote to right side through opening.
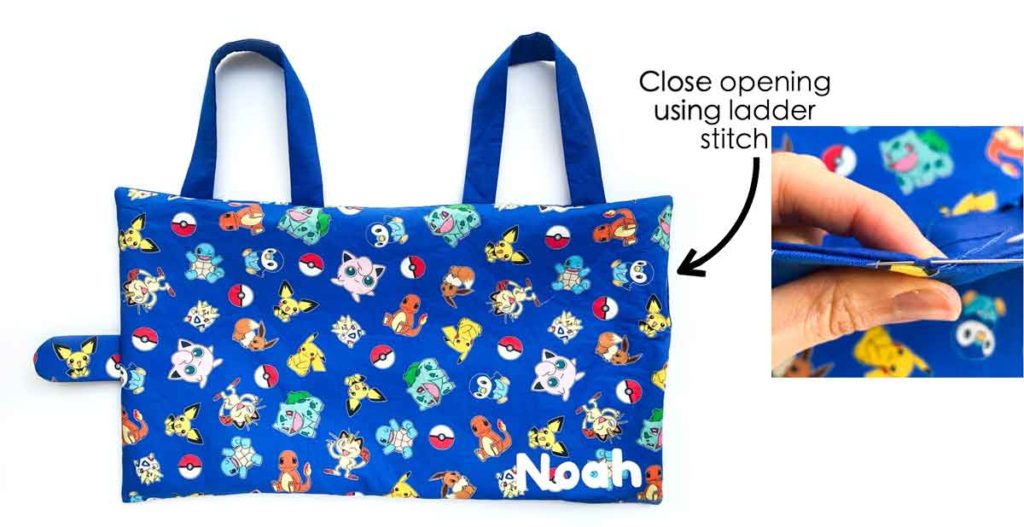
Crayon tote turned to right side. Close the opening using invisible ladder stitch.
Applying Snaps
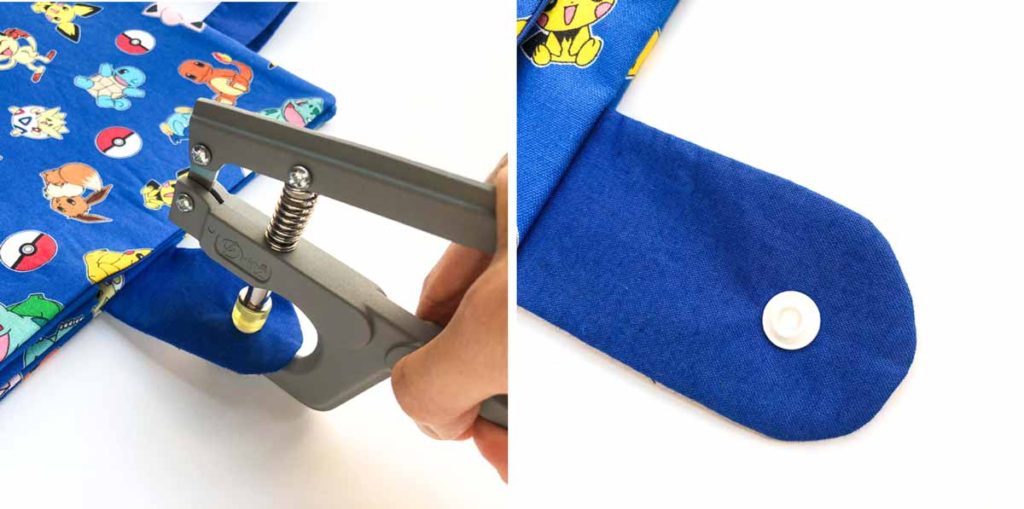

Apply snaps on your crayon tote and you are done!
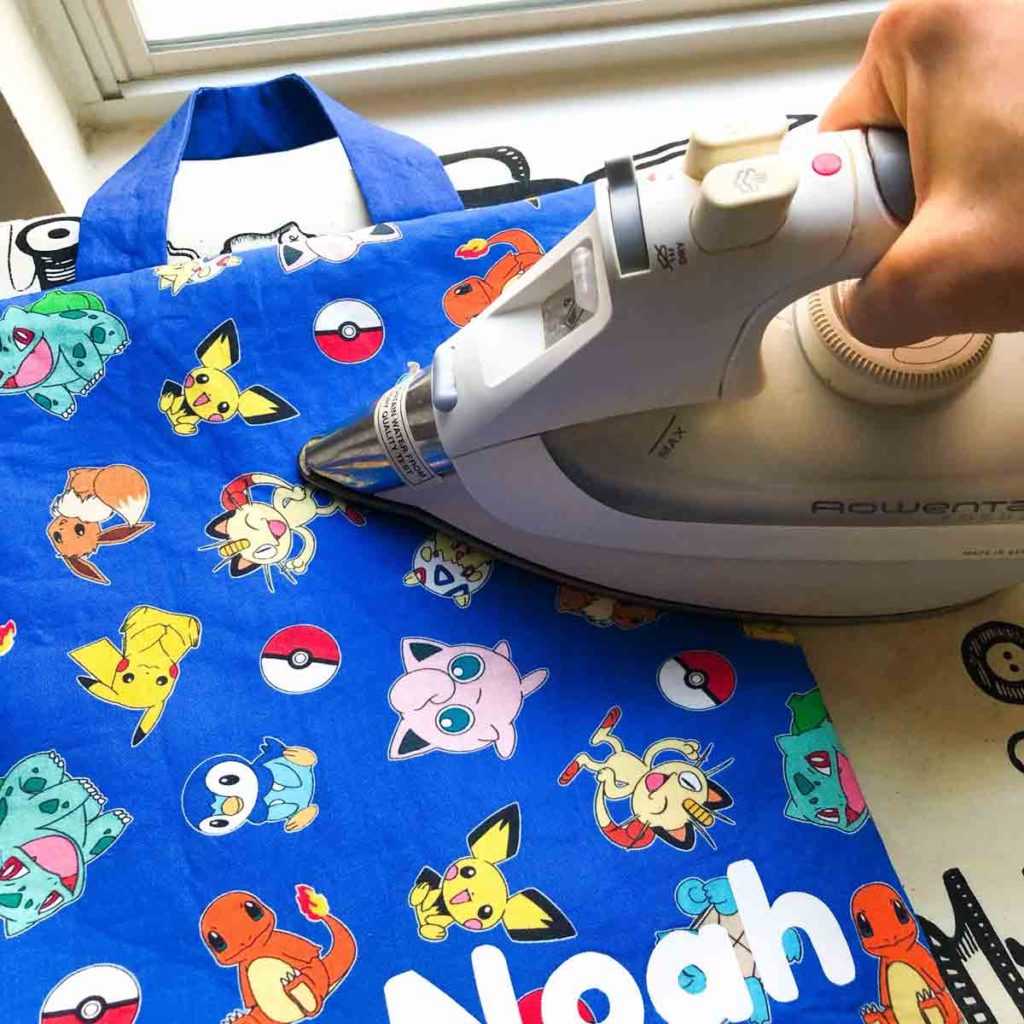
Give it a good press.
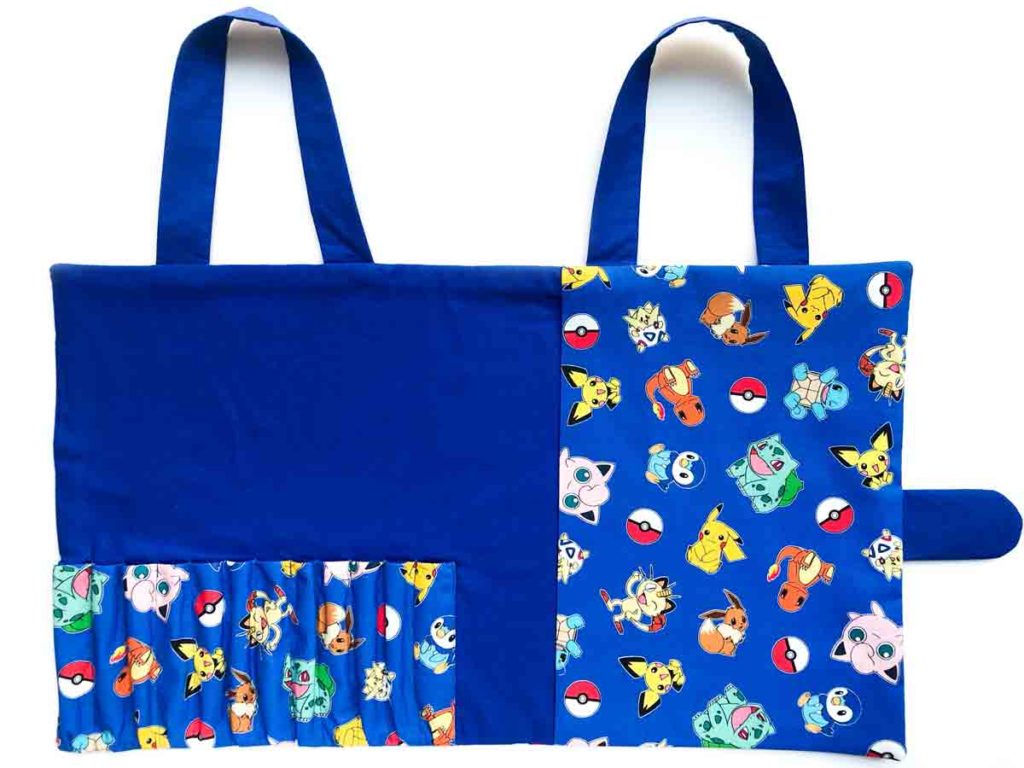
Inside of coloring book and crayon tote.
Which little artist won’t be so happy to receive such a special gift! Don’t forget to pin the image to save it for later. Happy Sewing!

How to Sew A Crayon and Coloring Book Tote
This handy tote bag can hold a coloring book and crayons (or coloring pencils) for the little artist. Great for travel and on-to-go, this crayon tote is perfect gift for hours of quiet play.
Materials
- EXTERIOR FABRIC – 1/2 Yard of Cotton Print Fabric
- LINING – 1/2 Yard of Cotton Fabric
- FUSIBLE INTERFACING – 1/2 Yard
- SNAPS
- SNAP PLIERS
- IRON-ON VINYL
Tools
Instructions
- Cut out all pattern pieces on fabric and fusible interfacing
- Iron fusible fleece to wrong side of Exterior Fabric
(Optional) ADDING NAME USING IRON-ON-VINYL
- Print out the letters that you need (available in my free resource library).
- Cut the letters out on iron-on vinyl*
- Place the letters where you want and iron it on, following directions on your packing. The directions on my vinyl asks you to iron the letters on over a thin piece of cotton fabric.
- Peel the clear plastic layer off on each letter and you are done!
HOW TO MAKE CLOSURE FLAP
- Iron fusible interfacing to both sides of FLAP PIECE.
- Sew right sides together, trim seams and clip curves.
- Turn to the right side and press flat.
SEWING TOTE HANDLES
- First iron fusible interfacing on wrong side of HANDLE PIECE.
- Cut the HANDLE PIECE in half along the width so you end up with two pieces that are each 3.5” (8.9cm) wide
- Take one of the HANDLE PIECE and fold it in half again and sew the top and one of the sides at 1/2” (1.27cm) seam allowance.
- Repeat for other piece.
- Cut corner at a diagonal and trim seam allowance to 1/4”(6mm)
- Turn handles to right side using blunt scissors (you can also use a loop turner or bodkin) and press it flat.
MAKING POCKETS
- iron Fusible interfacing onto POCKET PIECE A (the pocket for holding coloring book).
- Fold POCKET PIECE A in half along the width so that it measures 9”(22.86cm).
- With right side of LINING PIECE facing up, place POCKET PIECE A (that’s been folded in half) on the LINING PIECE, matching at the right hand corners.
- Pin POCKET PIECE A to LINING PIECE and baste together.
- Fuse interfacing to both POCKET PIECE B and POCKET LINING PIECE.
- Place POCKET PIECE B and POCKET LINING PIECE right sides together.
- Sew POCKET PIECE B to POCKET LINING PIECE at 1/2”(1.27cm) seam allowance along the two sides and top (no need to sew the bottom.
- Clip each of the corners at a diagonal.
- Turn POCKET PIECE B to right side and press it flat.
SEWING COLORING PENCIL POCKET TO TOTE
- Use fabric chalk to mark lines on POCKET PIECE B (See Notes**)
- Mark lines on LINING PIECE (See Notes***)
- Pin POCKET PIECE B to LINING PIECE, matching at the marked lines.
- Sew each of the pockets at the marked lines on POCKET PIECE B****
- On the bottom of the crayon caddy, make a small pleat over each of the crayon pocket so that it is flushed with the lining. Pin each of the pleats.
- Baste the pleats in place.
SEWING IT ALL TOGETHER
- Pin the HANDLES 3”(7.62cm) from the left and right corner. Distance between two handles is 5.25”(13.3cm)
- Pin the FLAP PIECE: 5.5”(14cm) from top and bottom.
- Pin or clip the LINING PIECE to the OUTER PIECE, right sides together.
- Stitch at 1/2” (1.27cm) seam allowance, leaving a 2-3”(5-7cm) opening on one of the side.
- Cut diagonals at all four corners.
- Turn crayon tote to right side through opening and give it a good press.
- Close the opening using invisible ladder stitch.
- Apply snaps and you are done!
Notes
*Be sure to follow the instructions given on the iron-on vinyl so that you cut out the letters correctly (and not the mirror image). For the vinyl that I used, the side with the clear plastic layer (that gets peeled off at the end) is the side that needs to face up.
** Lines to mark on POCKET PIECE B:
- First Line: 0.25”(6mm) from left edge.
- Eleven lines that are spaced 1”(2.54cm) apart from First Line
*** Lines to mark on LINING PIECE:
- First Line: 0.25”(6mm) from left edge, 4.5”(11.43cm) Tall
- Twelve lines that are spaced 0.75”(1.9cm) apart from First Line, all 4.5”(11.43cm) Tall
**** To sew each pocket, start from the bottom, removing the pins as you go (hence why it’s better to pin the pins facing towards the bottom). I also find it easiest to sew the channel with the pencil inside and pull the pencil out as you sew. Be sure to back stitch a few times to reinforce the seam at the top of the pocket.

Great project! It’s super useful for keeping coloring books and crayons together on the go and easy enough for beginners to make.
Hi Kimberly,
I’m glad you enjoyed the project. Yes I’ve made several of these as gifts as well.
I cannot find the pattern pieces with the bag measurements
Hi Janel,
The bag pattern measurements are found in the post under the heading “PATTERN“. You will need to measure and draw the pattern pieces on fabric. Hope that helps!