Cute Toy Car Carrier with Play Mat (Free Sewing Pattern)
This post may contain affiliate links. Please read my disclosure policy for details. As an Amazon Associate, I earn from qualifying purchases.
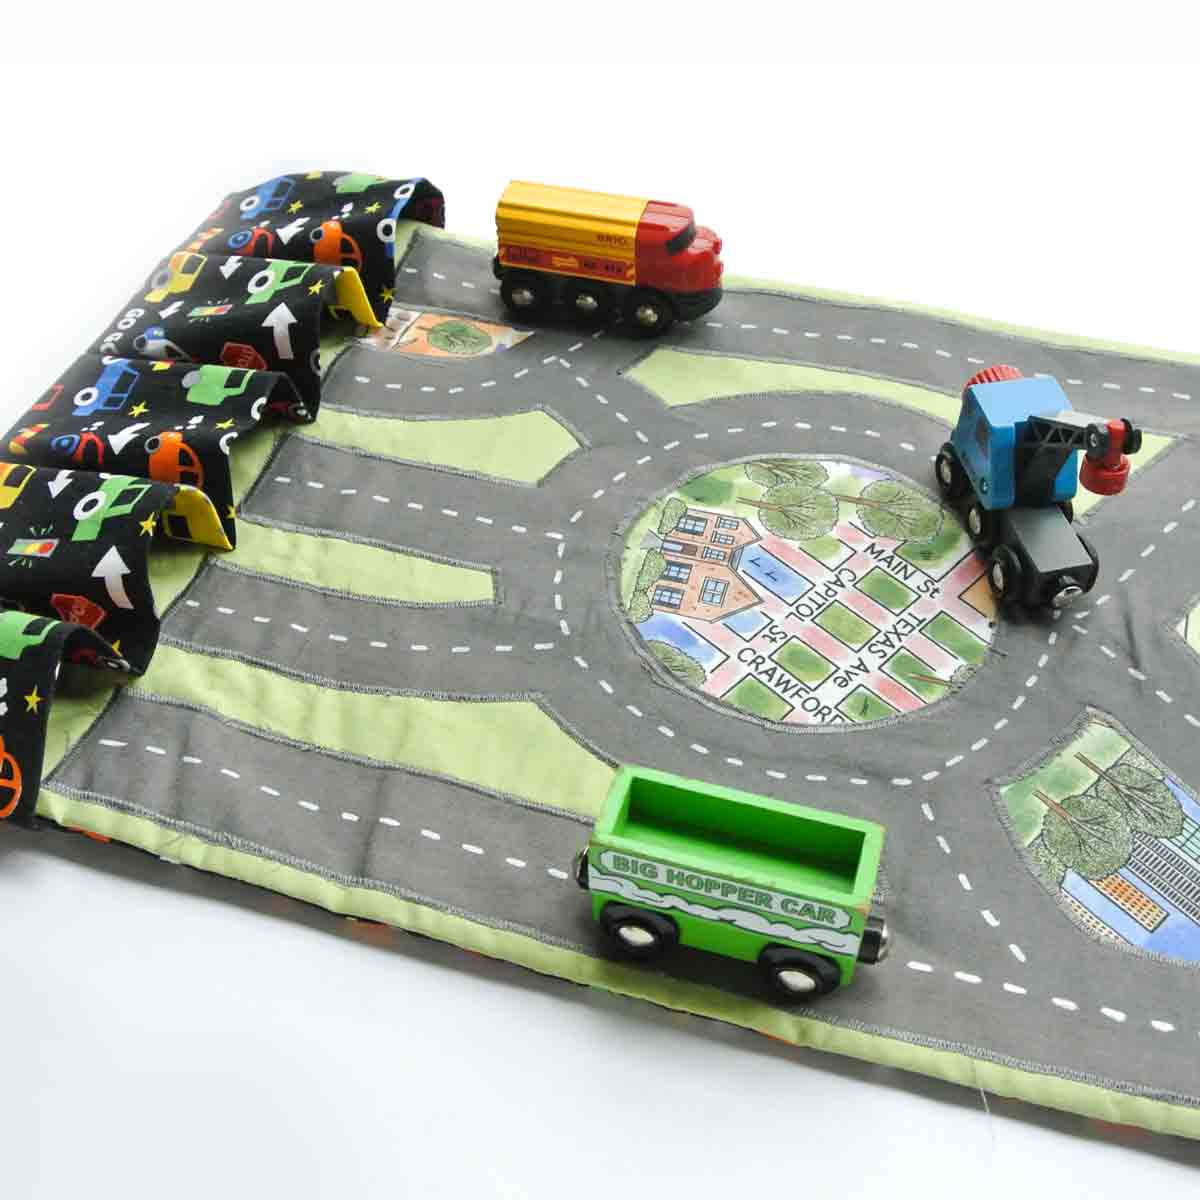
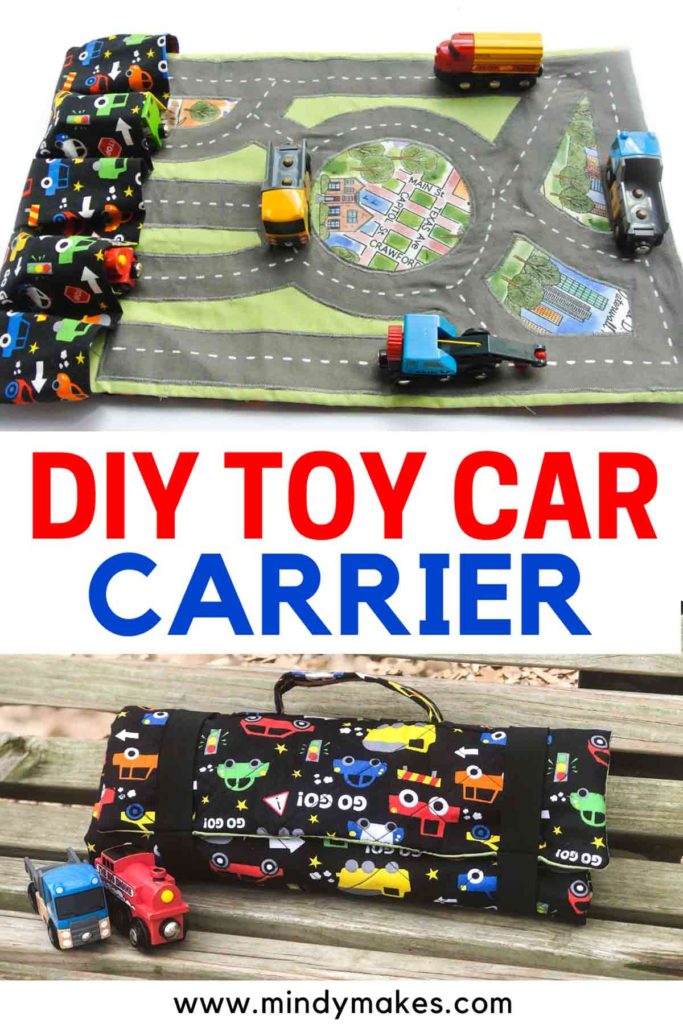
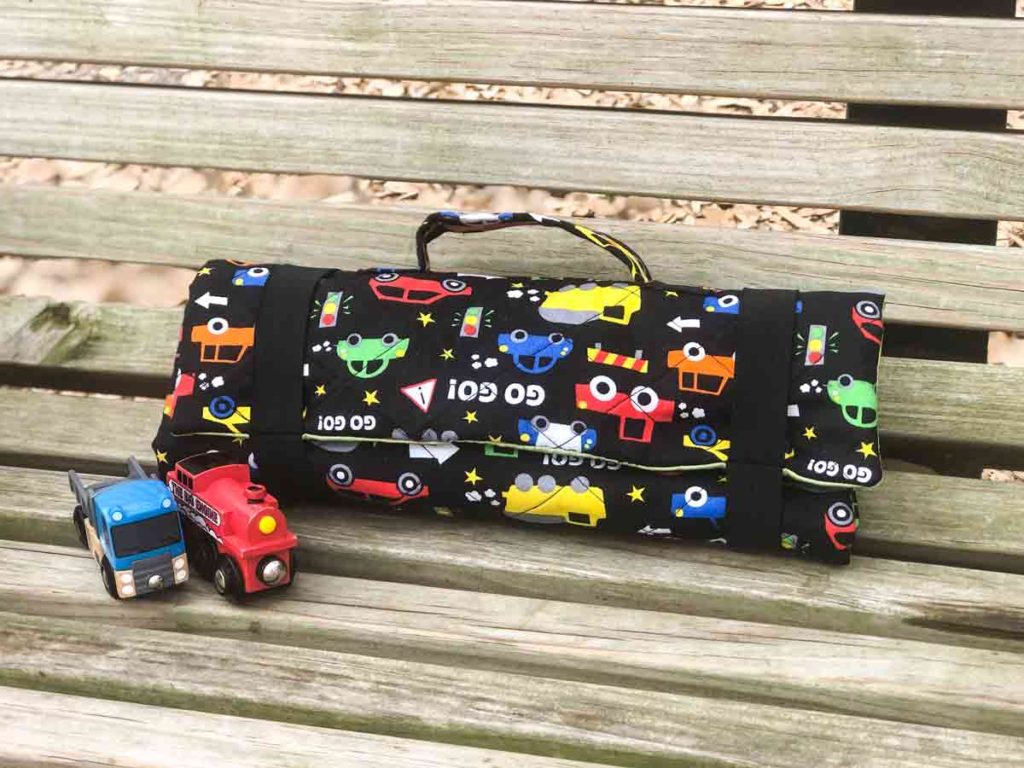
This easy DIY Toy Car Carrying Case is perfect for stowing matchbox cars, trucks, and trains on the go. Great for kids when going out to eat, play dates, and traveling. Carry Case comes with play mat with roads for endless fun and creativity.
- What do I Need to Make This Sewing Project?
- Toy Car Carrier Pattern
- Preparing Outer Piece
- Making Carrying Handle
- Sewing Handle and Elastic to Toy Car Carrier
- Preparing Fabric to Make Toy Car Pockets
- Assembling Car Road Pattern and Cutting on Fabric
- Sewing Car Play Mat
- Sewing Toy Car Carrier Together
Do you have a vehicle obsessed toddler? And by obsessed I mean OBSESSED! Every time we go out, my toddler always wants to bring one, two, three…or ALL of his little magnetic trains and cars out.
For awhile we let him do that. However, we would forget trains in the car seat, trains in my purse, trains in the stroller. Later on, he would get upset because he couldn’t find his trains…*sigh* toddlers!
Finally one day I decided it was time to sew him his own little toy train baggie.
At first it was just going to be a simple zipper pouch (like a makeup bag). However, I knew if I just threw all his cars in there, I wouldn’t be able to keep track of them. How many trains did we bring? Is Thomas in the house or did we bring it?
After doing some research on ways to pack toy trains, I came across a Toy Car Caddy Play Mat and BINGO! This is EXACTLY what I need!
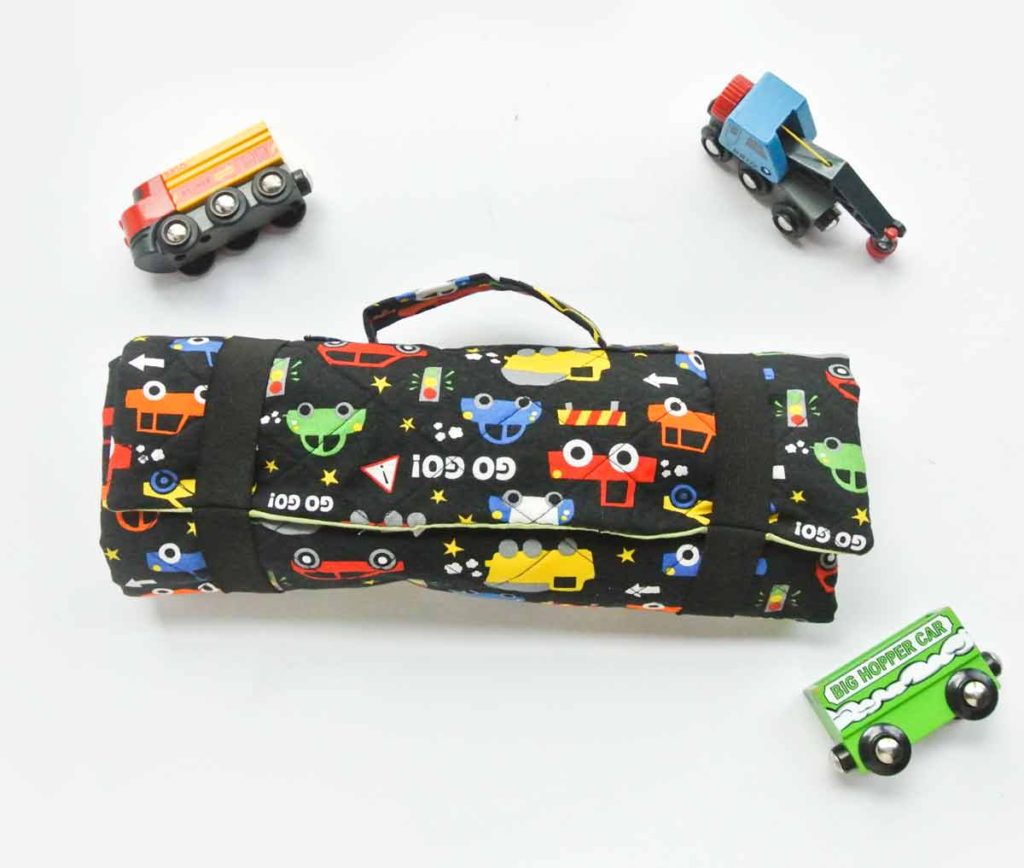
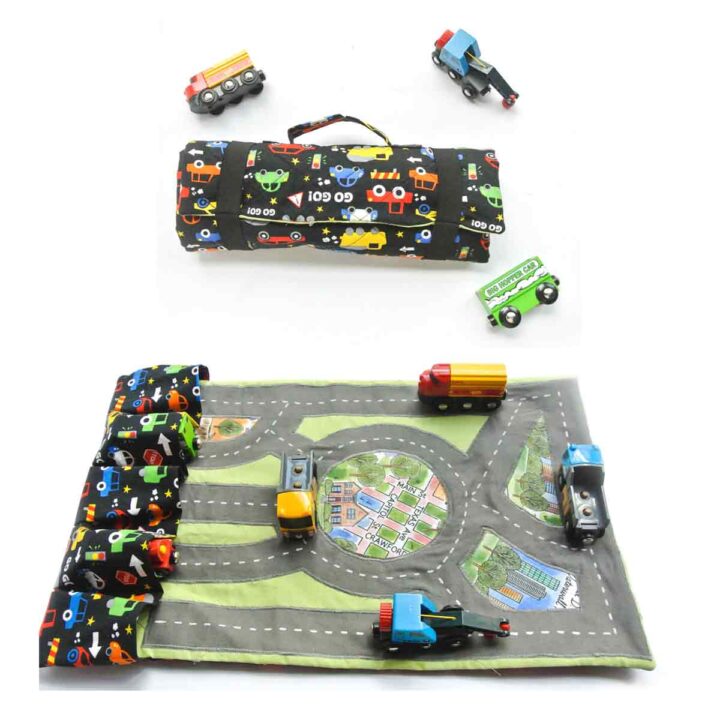
In today’s’ tutorial, I will be showing you guys how to make this very easy and handy Toy Car Carrier with Play Mat for the cars to drive around. There are 5 pockets to stow 5 little vehicles, and there’s also a handle for easy carry. When you are ready to go, simply pack your 5 little vehicles, roll up the bag and you are all set!
The carrier is closed via two 1” elastic bands. This allows more flexibility as the toy cars may be different in height. This carrying case is also perfect for matchbox cars or hot wheels!
If you are new here, please don’t be intimidated by the number of photos in this tutorial! This is an easy sewing project and I always post lots of photos to make sure you can follow along. The most time consuming part is appliquéing the road to the play mat. However, you can always cut and sew an oval shaped race track to simplify 🙂
What do I Need to Make THIS SEWING PROJECT?
MATERIALS:
- PATTERN: Toy Car Carrier Road Map Pattern (available in my free resource library) – get the password by subscribing, I promise no spam! Just occasional updates of new projects I’m working on.
- VEHICLE PRINT COTTON FABRIC (for exterior)- 2/3 of a yard (24″ or 61cm). Fat Quarters are great too!
The car fabric in this tutorial is a 100% cotton fabric I found on clearance at Joann’s Fabric. However, they have a good selection of cute car printed fabric. Otherwise your local fabric store may carry some nice prints as well. - COTTON FABRIC (for play mat) – 2/3 of a yard (24″ or 61cm). Can also use fat quarters
I used Kona Cotton Solid Quilt Fabric in tarragon for the play mat. You can also use a car/train print cotton fabric that’s same or different than #2. Even better, find a fabric that has a road/track print on it because then you don’t need to separately sew on the roads! - GRAY COTTON FABRIC (for play mat road) – 2/3 of a yard (24″ or 61cm). Can also use fat quarters
I used Sew Classic Solid Cotton in Grey. I’ve also used Gray fleece fabric for another play mat and I liked the way it turned out too (soft and fleecy feel) - FUSIBLE FLEECE – 2/3 of a yard (24″ or 61cm)
This gives the play mat extra padding. I used Pellon fusible fleece. I love fusible fleece because you can just iron it on without having to baste first. Alternatively, you can also use a low loft batting. - FUSIBLE INTERFACING – 1/8 of a yard
Helps to stiffen the carrier handle. I used ultra lightweight fusible interfacing - APPLIQUE STABILIZER – Very important to help stabilize sewing when you appliqué the road fabric onto the play mat. I use embroidery stabilizer because that’s what I have on hand. However, I recommend using Iron-on Adhesive to make sure the roads sew nice and flat on the play mat.
- 1″ WIDE BLACK ELASTIC – you will need two pieces that are 11″ (28cm) long
TOOLS:
- SEWING MACHINE
- FABRIC SCISSORS – these Ginghers are my favorite.
- ROTARY CUTTERS (optional) – great for making quick, clean straight lines.
- CLEAR RULER – I have the DRITZ See-Through Sewing Ruler
- FABRIC CHALK – These Chaco Liners by Clover are my absolute favorite
- WHITE FABRIC MARKER – For marking dotted lines on road. I used Deco Fabric Fine Tip Marker in White.
- SEWING PINS
- IRON – for pressing
- MATCHING THREAD
- SCOTCH TAPE/CLEAR TAPE – for sticking pattern piece together
- PAPER SCISSORS – for cutting pattern out
TOY CAR CARRIER PATTERN
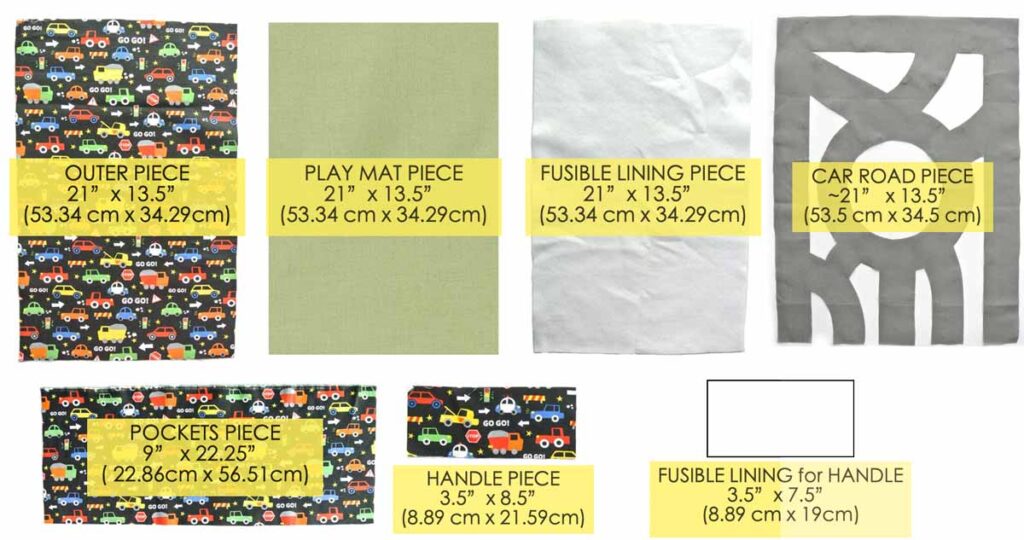
Cut out the Following Fabric Pieces:
- 1 OUTER PIECE – this is the exterior of the carrier bag. I used 100% cotton fabric with car print.
21” x 13.5” (53.34 cm x 34.29 cm) - 1 PLAY MAT PIECE – this is the piece your road will be sewn on.
21” x 13.5” (53.34 cm x 34.29 cm) - (Optional – not pictured) Fabric with trees, building, etc if you want to add extra details to the area between the roads.
Alternatively, you can also create trees, ponds, buildings, etc by sewing solid felt/cotton fabric. - 1 FUSIBLE LINING PIECE – I used Pellon fusible fleece, which helps to add more padding to the play mat. If you use fleece fabric for the PLAY MAT PIECE you will not need this.
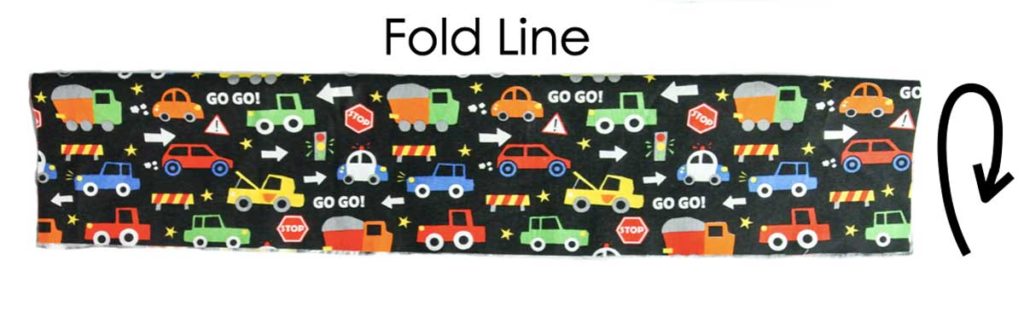
21” x 13.5” (53.34 cm x 34.29 cm) - 1 PLAY MAT ROAD – You will need a fabric that measures about 21” x 13.5” (53.34 cm x 34.29 cm). Fat quarters work great for this!
Download the pattern in my free resource library - 1 POCKET PIECE – this will make the pockets where the cars will be stowed. I used the same cotton print as the OUTER PIECE
9” x 22.25” (22.86 cm x 56.51 cm) - 1 HANDLE PIECE – this makes the handle for the toy car carrier. I used the same cotton print as the OUTER PIECE
3.5” x 8.5” (8.89 cm x 21.59 cm) - 1 FUSIBLE LINING for HANDLE
3.5” x 7.5” (8.89 cm x 19 cm)
Preparing Outer Piece


Iron fusible fleece to wrong side of OUTER PIECE fabric. You can leave outer fabric as is, or do a simple quilt design like I did (completely optional)
Making Carrying Handle


- Apply fusible lining to HANDLE PIECE. I cut 1″ off the length of the fusible lining as you don’t need the seam allowance to be fused.
- Fold HANDLE PIECE in half length-wise and stitch at 1/2″ (1.27cm) seam allowance
- Press open seams
- Sew one end at 1/2″ (1.27cm) seam and trim seam allowance.


Turn HANDLE PIECE to right side and fold in fabric 1/2″ (1.27cm) at opening.
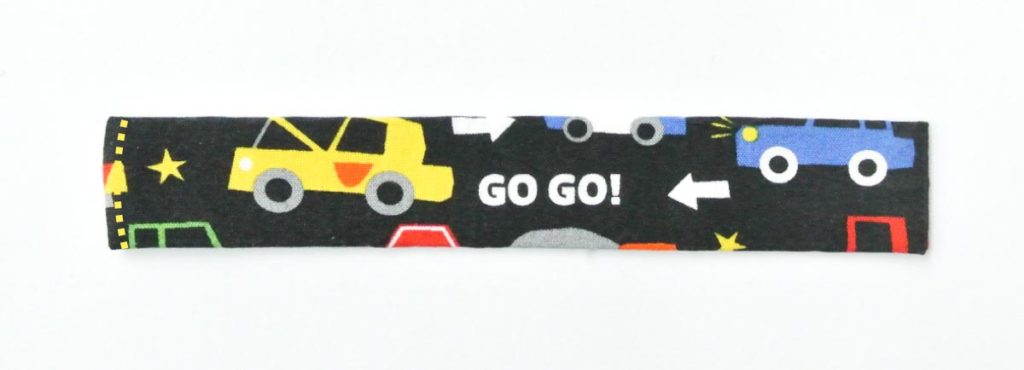
Sew opening closed from right side of HANDLE PIECE at 1/8″ (~3mm) from edge (indicated by yellow dotted line, but please use matching thread color!)
Sewing Handle and Elastic to Toy Car Carrier

Pin the HANDLE PIECE to OUTER PIECE as shown in diagram. It will be 3.5″ (8.89 cm) from the top edge, and 3.5″ (8.89cm) from both left and right edge.
NOTE: The placement of the handle is designed for carrying magnetic toy trains. If you are making this to carry matchbox cars (shorter in height), you will need to adjust the handle placement so it’s centered when the case is rolled up.


Sew HANDLE PIECE down by stitching a 1″ square with a ‘X’ inside on both sides of HANDLE PIECE. Make sure to back stitch where you start sewing and where you end.

Fold each 11″ (28cm) piece of elastic in half. Pin 2″ (5cm) in from the sides of OUTER PIECE and machine baste in place.
Preparing Fabric to Make Toy Car Pockets

Fold POCKETS PIECE in half lengthwise and use chalk to mark the measurements as shown. Mark the fabric lightly, just enough to see the line, as some chalk may leave a residue.
Assembling Car Road Pattern and Cutting on Fabric


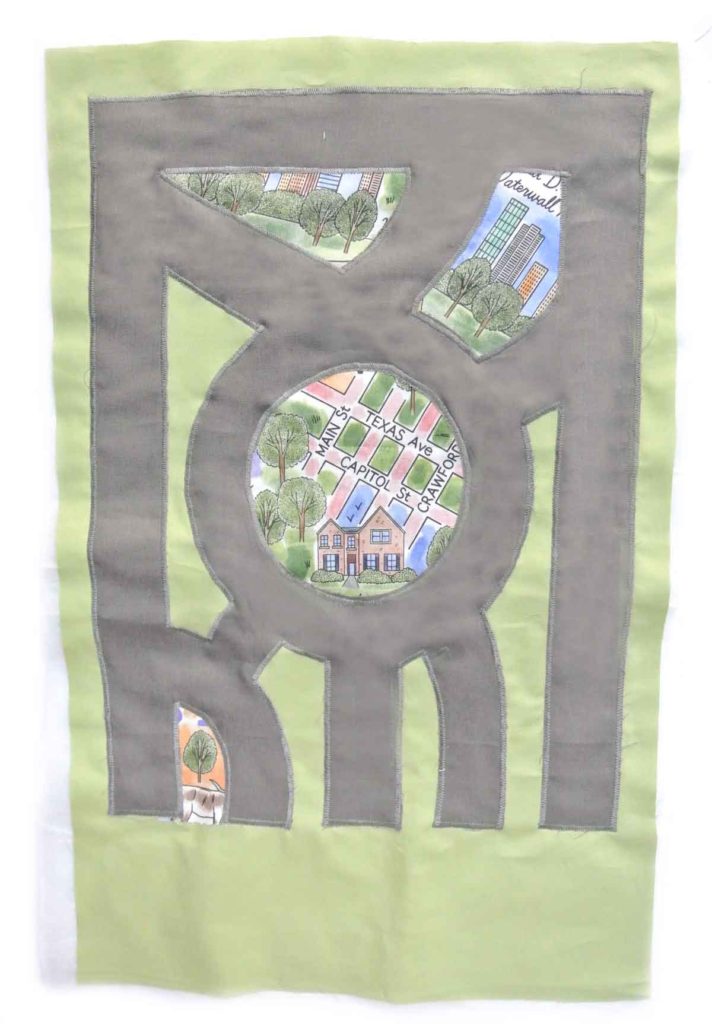
Print and cut out ROAD PATTERN (available in my free resource library). Match arrows as indicated and tape the pattern together.
NOTE: The white area of the pattern is where the road is. The area shaded in Light Gray is the area between the roads and needs to be cut out.
Pin Pattern to Fabric. I’m using a piece of dark gray solid cotton fat quarter in the photo.


Cut out pattern on fabric.
NOTE: I use a pair of fabric scissors from the dollar store that I use to cut paper and fabric together at the same time. Otherwise, please don’t use your nice fabric shears and cut on paper as it will dull your fabric scissors! In this case you should cut out the light gray area on the pattern with paper scissors first, then trace the pattern onto the fabric and cut the fabric out with fabric scissors.
Sewing Car Play Mat


LEFT: ROAD PIECE once it’s cut out
RIGHT: Pin ROAD PIECE to PLAY MAT PIECE, leaving about 3/4″ (1.9cm) border around the sides and top. I found a series of “state pride” fabrics from joann.com that has buildings and trees so I cut out a few pieces and pinned it to the play mat. Alternatively, you can also sew some buildings, trees, pond, etc in the area between the roads.
Applique ROAD PIECE to PLAY MAT PIECE. I used stitch length 1 and stitch width 4 for this project. Check out this post to learn more about how to Applique.
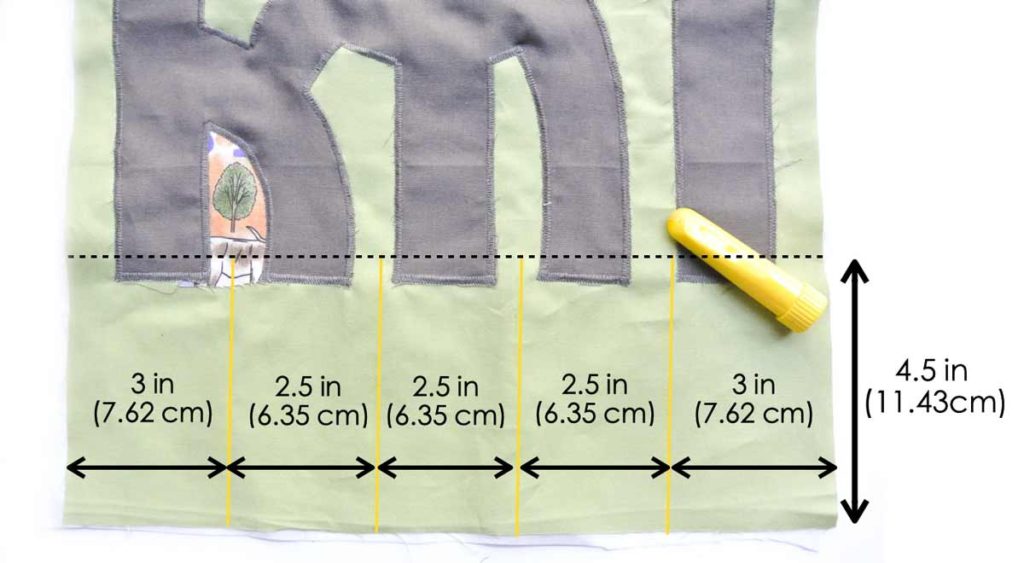
Next, use Chalk to mark the yellow lines on the bottom of the PLAY MAT PIECE as shown in photo. In the next step we will pin the POCKETS PIECE to the PLAY MAT PIECE, matching at the sides and the yellow lines.
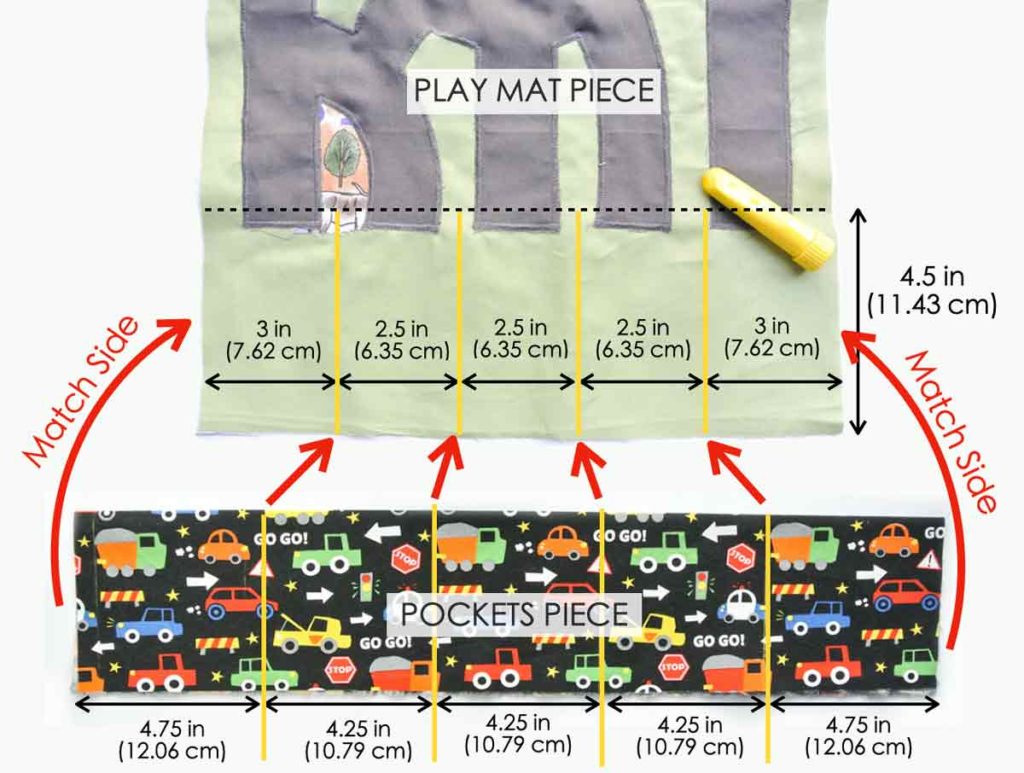
Match PLAY MAT PIECE to POCKETS PIECE at marked chalk lines as shown.
NOTE: POCKET PIECE is wider than PLAY MAT PIECE, so you will essentially be creating pleats along each side of the pocket to make a more 3-dimensional pocket.


Match marked lines on POCKET PIECE to PLAY MAT PIECE and pin in place.
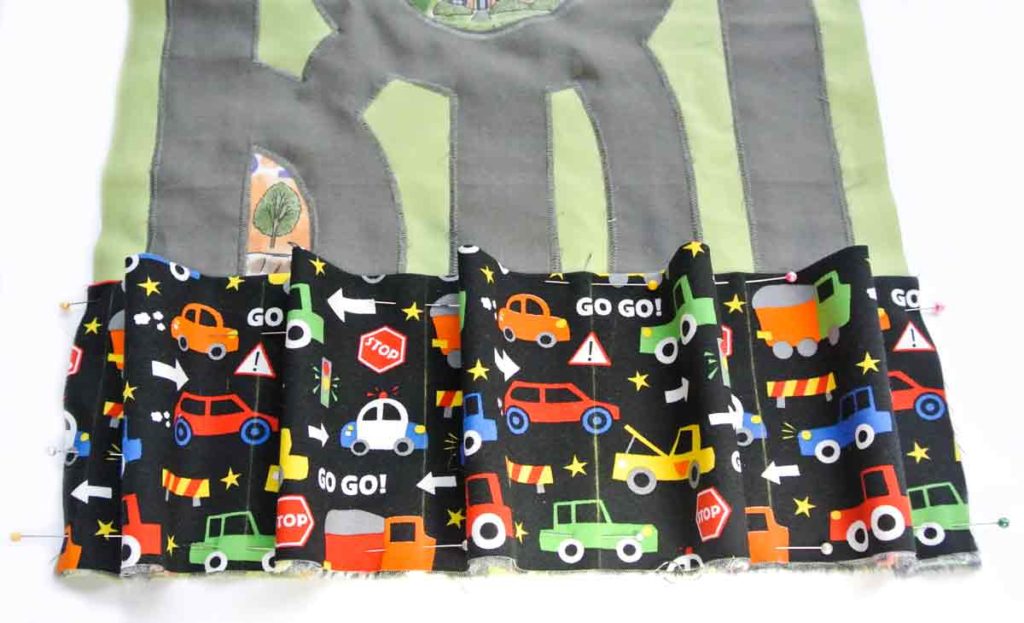
Photo shows POCKETS PIECE pinned to PLAY MAT PIECE. Sew at chalk lines, making sure to back stitch at top of pocket.
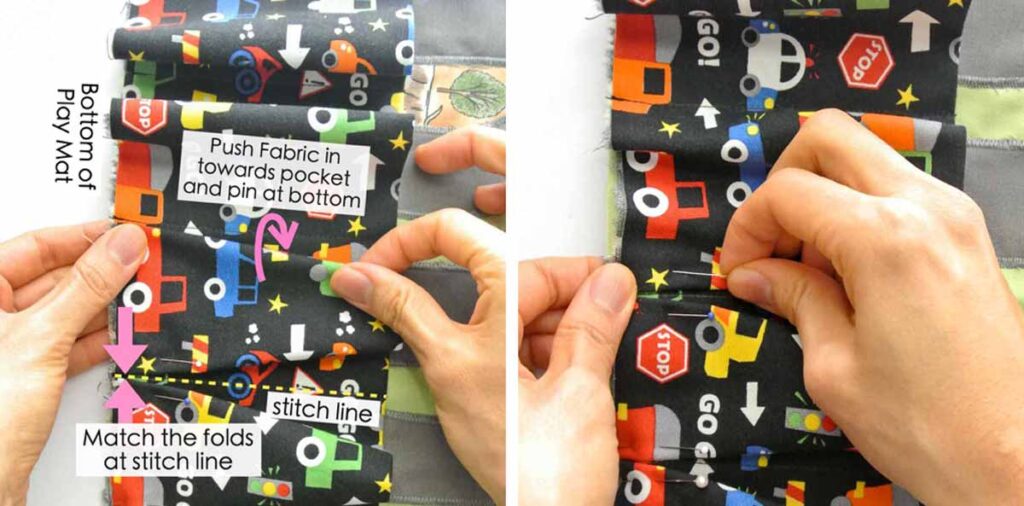
LEFT: Create pleats around the pockets with the excess fabric next to the stitch line. Do this by tucking the excess fabric approximately 0.4″ (1cm) in on both side of every pocket.
RIGHT: Pin each pocket pleat at the bottom to the play mat
NOTE: The amount you tuck in to make each pleat doesn’t have to be exact as long as you it’s equal on both sides of the pocket. Match the pocket pleats at the stitch line (yellow dotted line)
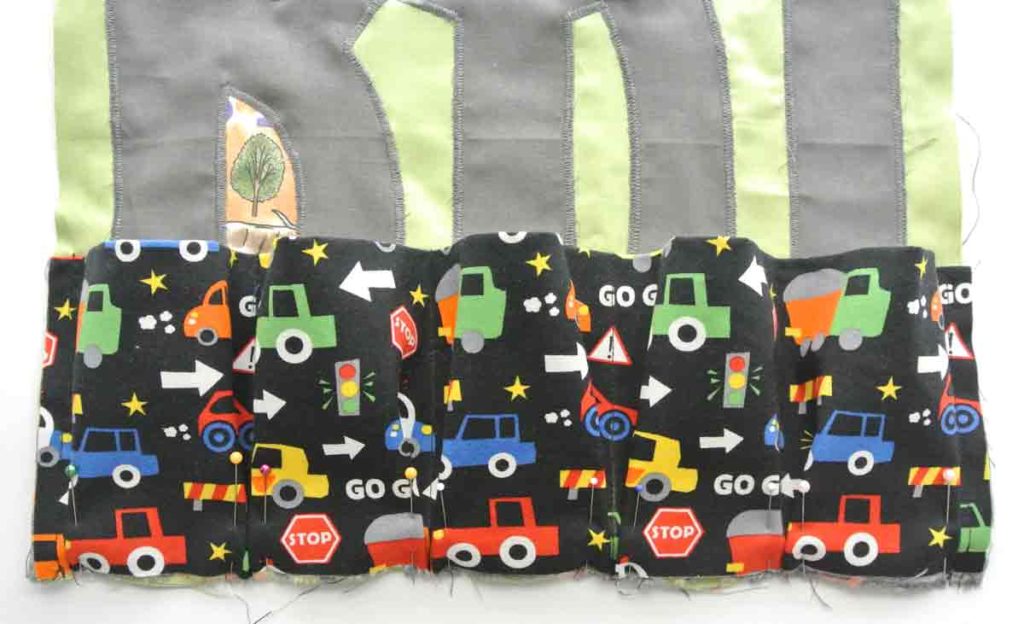
This is what your pleated pockets will look like once they are all pinned in place. Baste at the bottom of play mat to keep pleats in place.
Sewing Toy Car Carrier Together
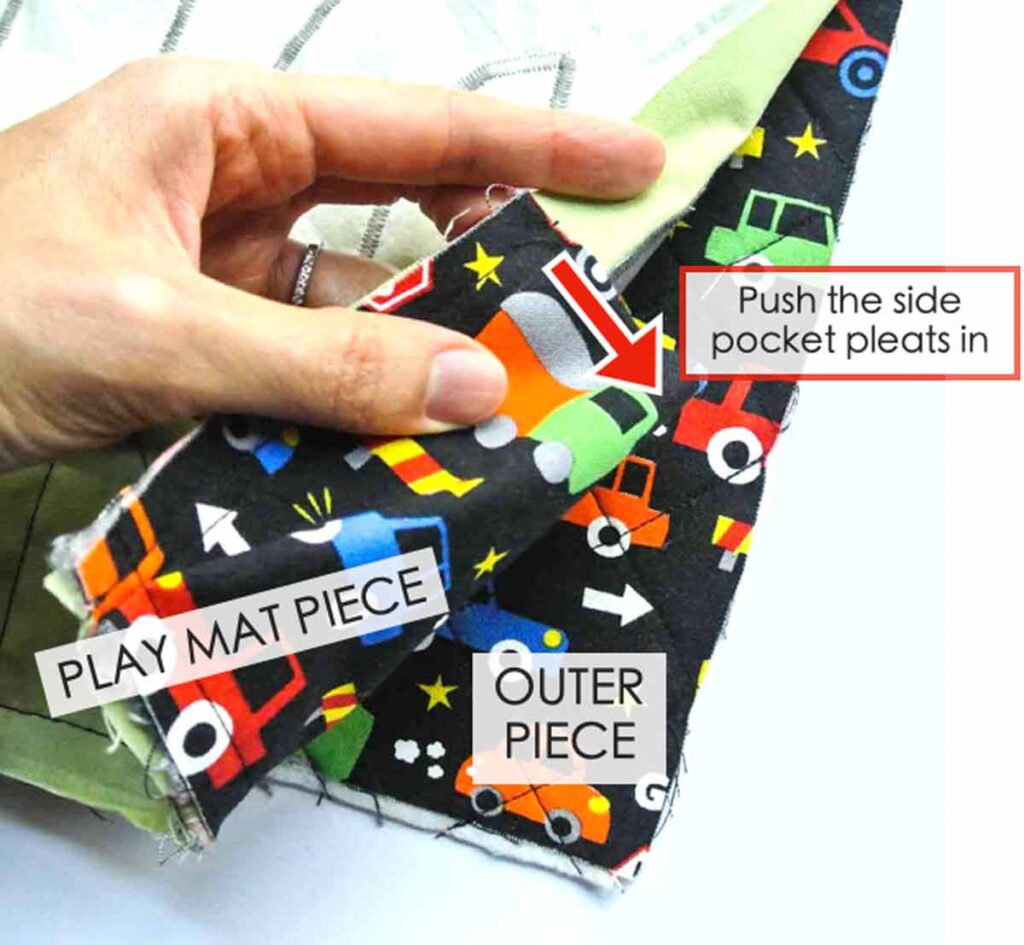
In the next step, we’re going to sew the PLAY MAT PIECE to OUTER PIECE. Prior to sewing, make sure to push the sides of your car pockets in (red arrow with white outline) so that you don’t accidentally sew into those side pockets.
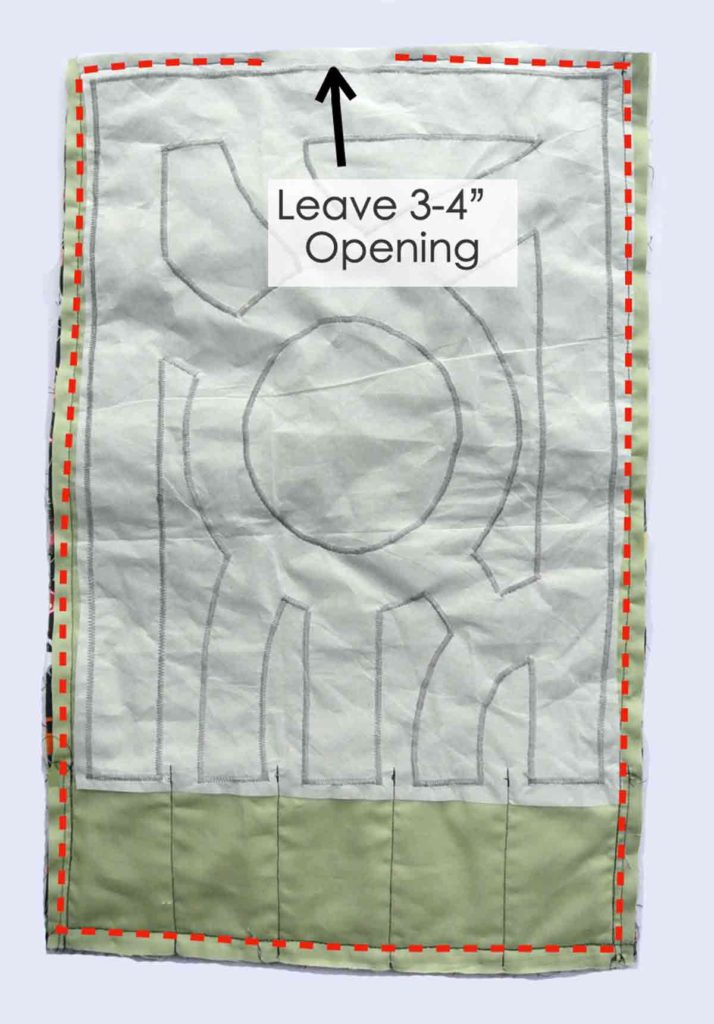
Sew PLAY MAT PIECE to OUTER PIECE right sides together at 1/2″ (1.27 cm) seam allowance (red dotted line). Make sure to leave a 3-4″ opening at the top so you can turn the mat to the right side.
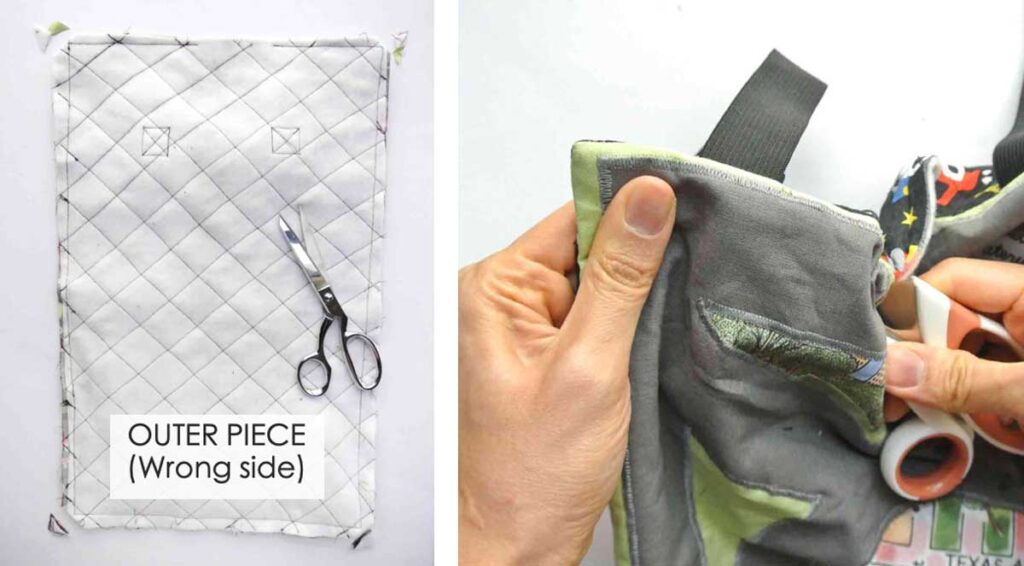
LEFT: Make diagonal cuts at all 4 corners, making sure not to cut into the stitch line. Turn project to right side through opening.
RIGHT: Use a blunt tool to poke out the corners.


Your toy car carrier turned to right side, almost done! Give it a good press and close opening using invisible ladder stitch.


Use a fabric marker to draw in the white dotted line of the road. I used Deco Fabric Fine Tip Marker in White. If you would like to be super exact use a ruler. The lines are about 0.25″ (6.3mm) long and 0.25″ (6.3mm) spaced apart.
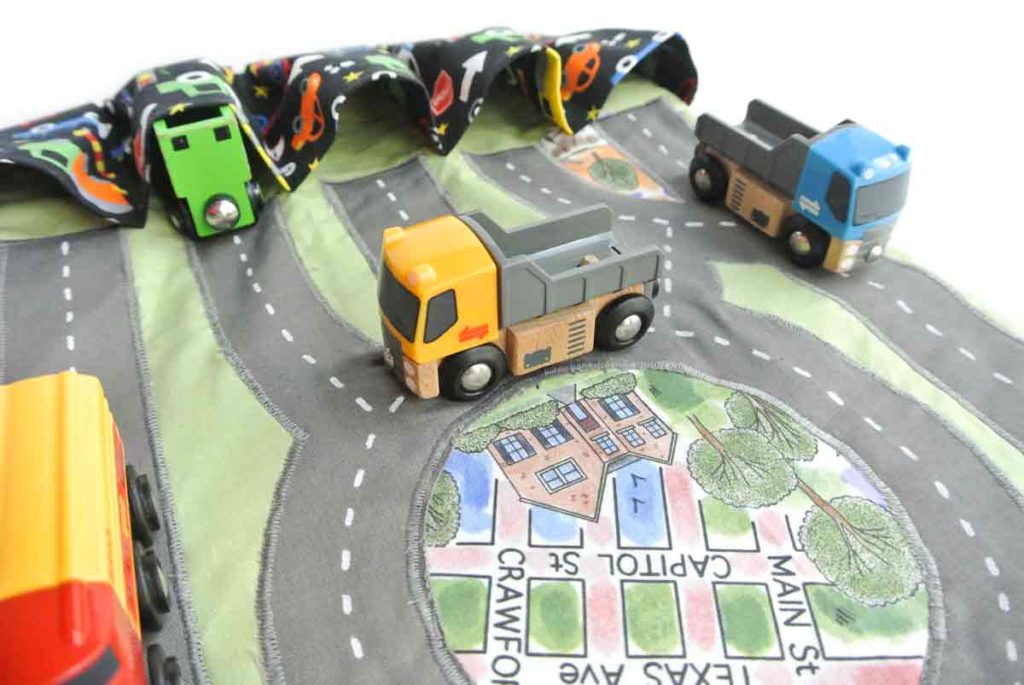
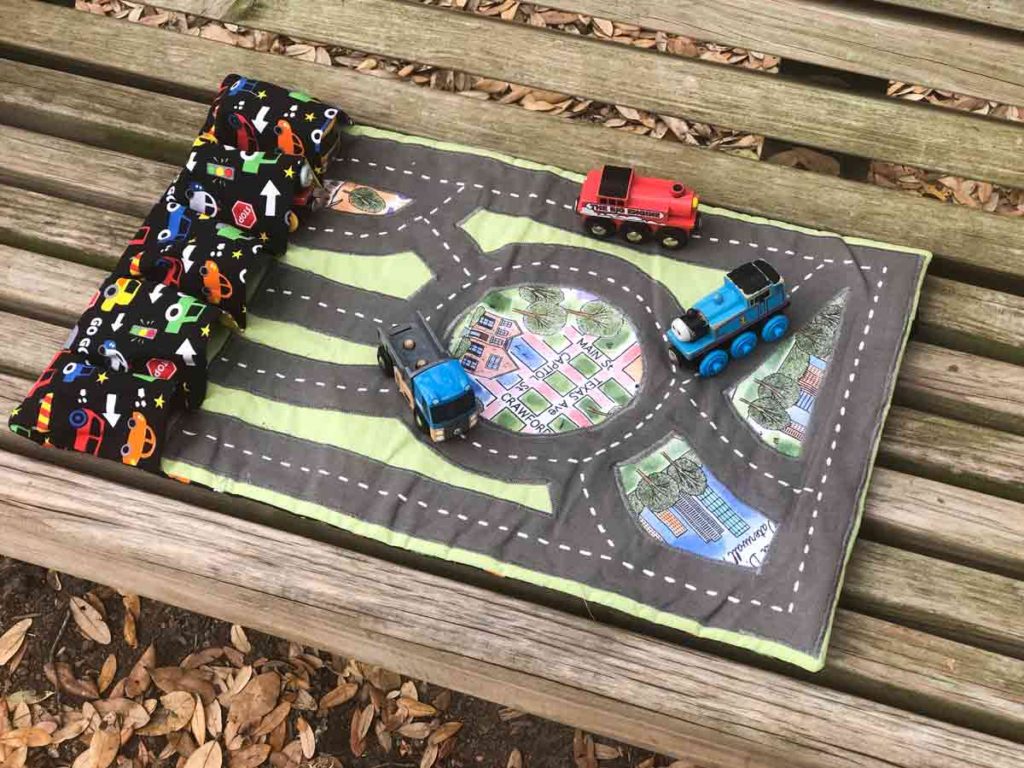
Finished! Which vehicle loving child can resist their very own toy car carrier play mat?
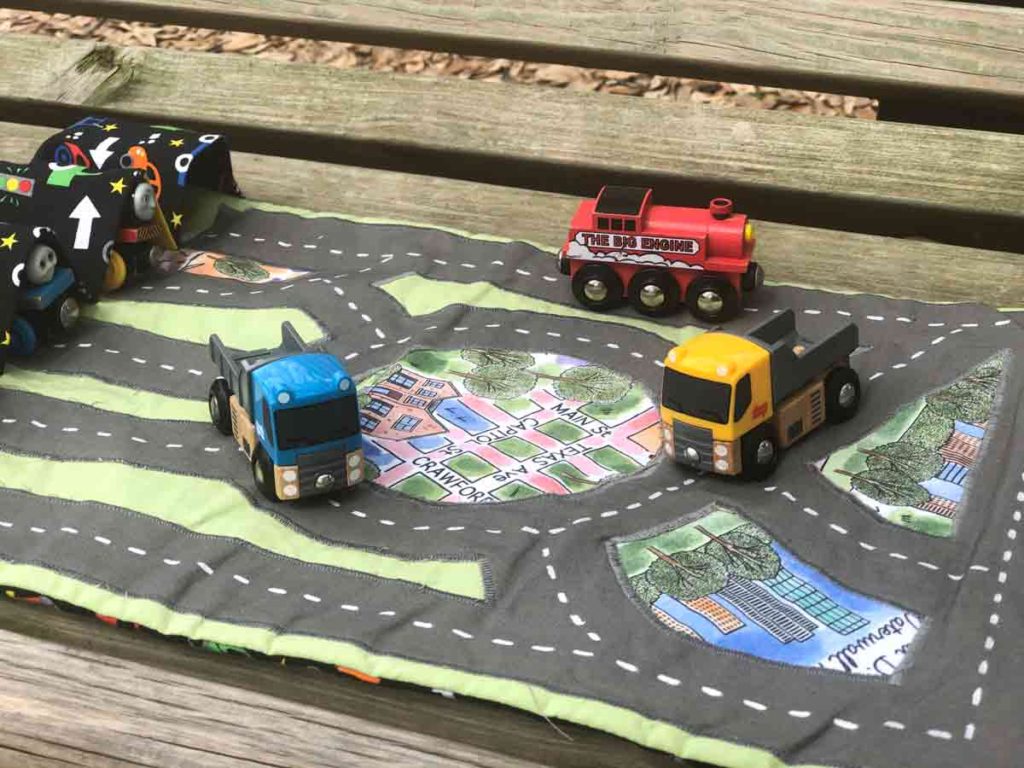
Trucks and trains driving around town. Vroom Vroom! Choo Choo!


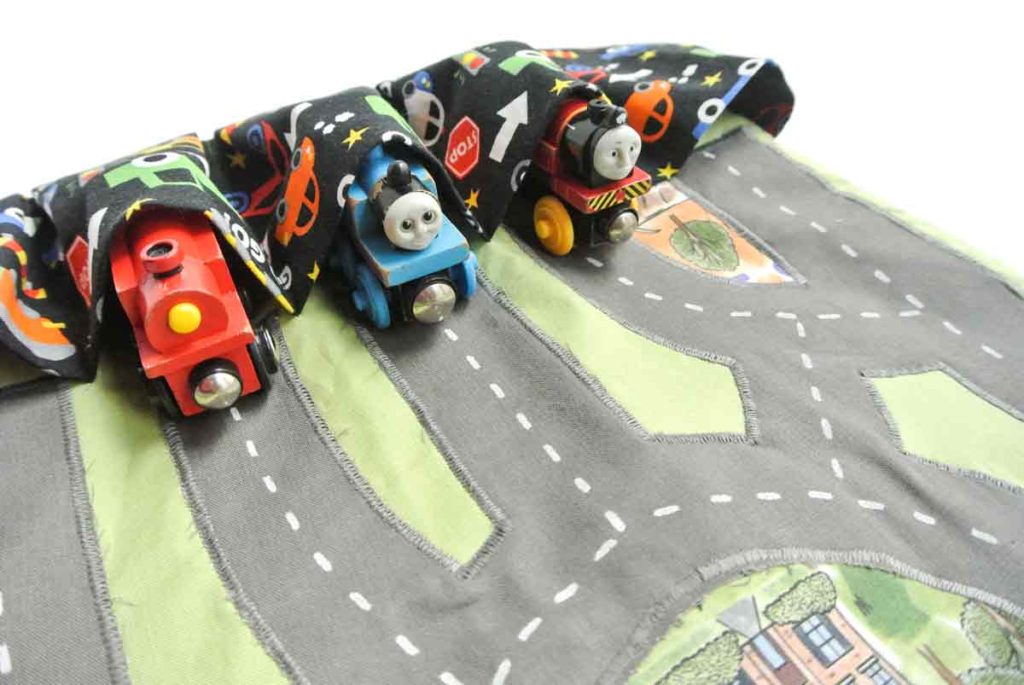
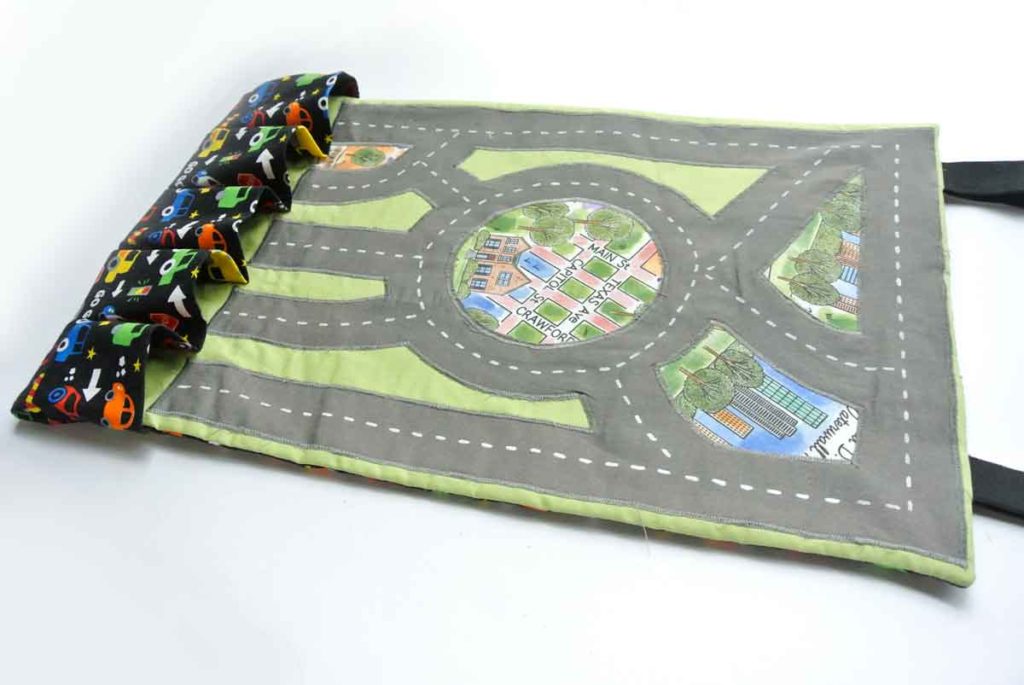
And when it’s time to go…everyone back into their pockets. We roll, roll, roll it up!
Toy vehicles are all packed up and ready to go…until next time!

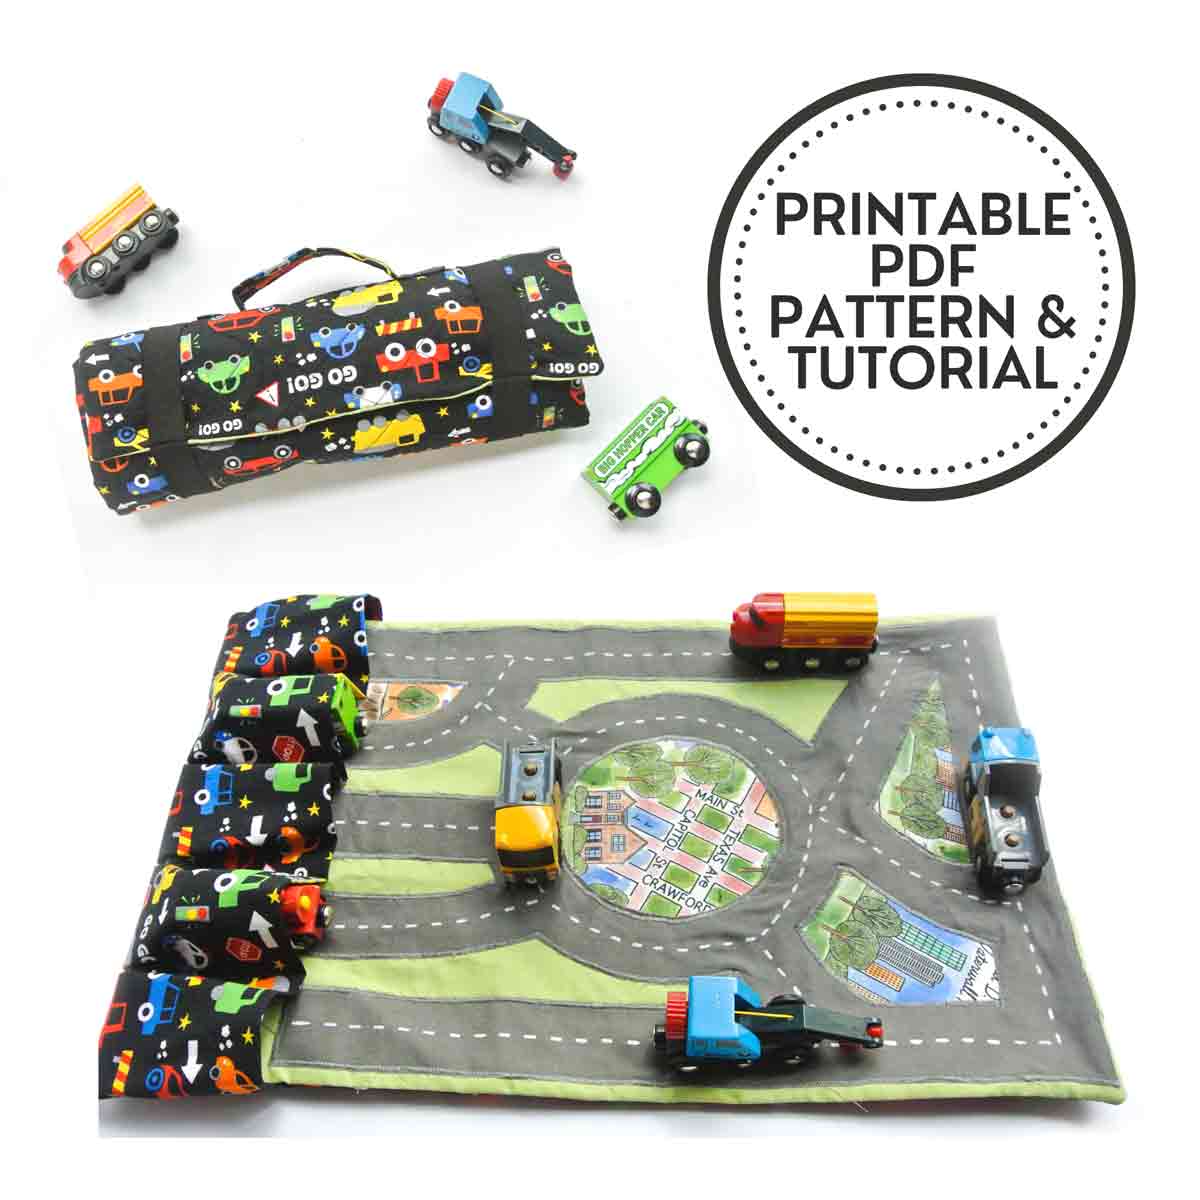
The ad-free printer friendly version of this sewing tutorial is available for purchase in our shop. The digital PDF file includes ready-to-print toy car road pattern AND 14 pages of color tutorial with step-by-step photos and clear instructions. This way, you can print a copy and keep it next to you as you sew for quick and easy reference!
I hope you enjoyed this project! My toddler loves this toy car carrier and driving his toy cars and trains around the play mat. It also makes a great gift for any vehicle loving child, not to mention it will last for several years even into the elementary school years. Let me know in the comments below if you made this, happy sewing 🙂
DIY Toy Car Carrier
This fun Toy Car Carrying Case holds matchbox cars, toy trucks and trains on the go. The perfect gift for kids to keep them occupied while dining in a resturant, waiting in line, or traveling.
Materials
- TOY CAR CARRIER FREE PATTERN
- VEHICLE PRINT COTTON FABRIC - 2/3 yard (24" or 61cm), for exterior
- COTTON FABRIC - 2/3 yard (24" or 61cm), for play mat
- GRAY COTTON FABRIC - 2/3 yard (24" or 61cm) - for play mat road
- FUSIBLE FLEECE
- FUSIBLE INTERFACING
- IRON-ON ADHESIVE
- 1" WIDE BLACK ELASTIC - two pieces, each 11" (28 CM)
Tools
- SEWING MACHINE
- FABRIC SCISSORS
- ROTARY CUTTER (optional)
- CLEAR RULER
- FABRIC CHALK
- WHITE FABRIC MARKER
- SEWING PINS
- IRON
- MATCHING THREAD
- PAPER SCISSORS - for cutting pattern
- SCOTCH TAPE/CLEAR TAPE - for taping pattern together
Instructions
- Cut out all pattern pieces on fabric and interfacing.
- Print and cut out road pattern.
- Match arrows as indicated and tape the pattern together. The white area of the pattern is where the road is. The area shaded in Light Gray is the area between the roads and needs to be cut out.
- Cut out roads pattern on gray cotton fabric.
HOW TO SEW EXTERIOR OF CAR CARRIER
- Iron fusible fleece to wrong side of OUTER PIECE fabric. (optional) quilt outer fabric in any design you like (squares, lines, etc).
- Apply fusible lining to HANDLE PIECE.
- Fold HANDLE PIECE in half length-wise and stitch at 1/2" (1.27cm) seam allowance.
- Press open seams.
- Sew one end at 1/2" (1.27cm) seam and trim seam allowance.
- Turn HANDLE PIECE to right side and fold in fabric 1/2" (1.27cm) at opening.
- Use matching color thread to sew opening closed from right side of HANDLE PIECE at 1/8" (~3mm) from edge.
- Pin the HANDLE PIECE to OUTER PIECE (see notes 1).
- Sew HANDLE PIECE down by stitching a 1" square with a 'X' inside on both sides of HANDLE PIECE. Make sure to back stitch where you start sewing and where you end.
- Fold each 11" (28cm) piece of elastic in half. Pin 2' (5cm) in from the sides of OUTER PIECE and machine baste in place.
HOW TO SEW ROAD TO CAR MAT
- Pin or iron (if using iron on adhesive) ROAD PIECE to PLAY MAT PIECE, leaving about 3/4" (1.9cm) border around the sides and top.
- Applique ROAD PIECE to PLAY MAT PIECE using zig-zag stitch. I used stitch length 1 and stitch width 4.
SEWING POCKETS
- Use Chalk to mark the yellow lines on the bottom of the PLAY MAT PIECE (see note 2). In the next step we will pin the POCKETS PIECE to the PLAY MAT PIECE, matching at the sides and the yellow lines.
- Fold POCKETS PIECE in half lengthwise and use chalk to mark measurements (see note 3). Mark the fabric lightly, just enough to see the line, as some chalk may leave a residue.
- Match PLAY MAT PIECE to POCKETS PIECE at marked chalk line (see note 4).
- Match marked lines on POCKET PIECE to PLAY MAT PIECE and pin in place.
- Sew at chalk lines, making sure to back stitch at top of pocket.
- Create pleats around the pockets with the excess fabric next to the stitch line. Do this by tucking the excess fabric approximately 0.4" (1cm) in on both side of every pocket.
- Pin each pocket pleat at the bottom to the play mat (see note 5).
- Machine Baste at the bottom of play mat to keep pleats in place.
SEWING CAR CARRIER TOGETHER
- Prior to sewing, make sure to push the sides of your car pockets in so that you don't accidentally sew into those side pockets.
- Sew PLAY MAT PIECE to OUTER PIECE right sides together at 1/2" (1.27 cm) seam allowance. Make sure to leave a 3-4" opening at the top so you can turn the mat to the right side.
- Make diagonal cuts at all 4 corners, making sure not to cut into the stitch line. Turn project to right side through opening.
- Use a blunt tool to poke out the corners.
- Give it a good press and close opening using invisible ladder stitch.
- Use fabric marker to draw in the white dotted line of the road (see note 6).
- Finished!
Notes
- The left and right tip of handle will be 3.5" (8.89 cm) from the top edge, and 3.5" (8.89cm) from both left and right edge of outer fabric. Also note that The placement of the handle is designed for carrying magnetic toy trains. If you are making this to carry matchbox cars (shorter in height), you will need to adjust the handle placement so it’s centered when the case is rolled up.
- Mark 3" (7.62cm ) in from left and right sides. Then mark 3 lines in between, each a distance of 2.5" (6.35cm) apart. The height of the markings are 4.5" (11.43cm) from bottom edge. See diagram in photo tutorial.
- Mark 4.75" (12.06cm) in from left and right side. Then mark 3 lines in between, each a distance of 4.25" (10.8cm) apart. See diagram in photo tutorial.
- POCKET PIECE is wider than PLAY MAT PIECE, so you will essentially be creating pleats along each side of the pocket to make a more 3-dimensional pocket.
- The amount you tuck in to make each pleat doesn't have to be exact as long as you it's equal on both sides of the pocket. Match the pocket pleats at the stitch line
- If you would like to be super exact use a ruler. The lines are about 0.25" (6.3mm) long and 0.25" (6.3mm) spaced apart.
Recommended Products
As an Amazon Associate and member of other affiliate programs, I earn from qualifying purchases.
More Sewing Projects You Will Love:
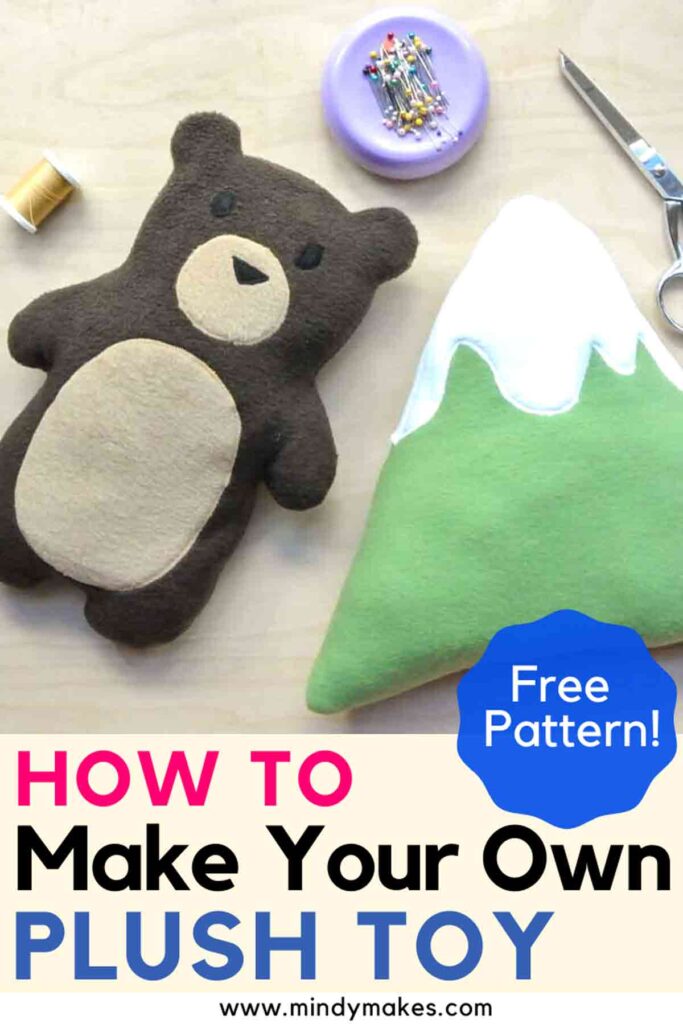
Learn how to design and make your own stuffed plushies.
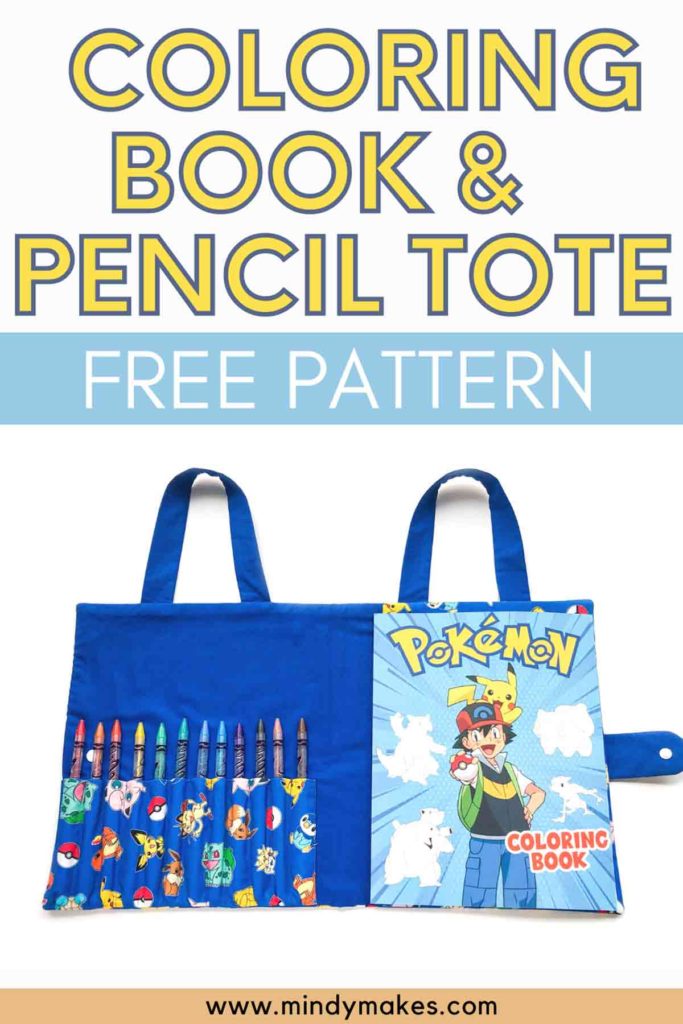
This coloring book and pencil tote is great for quiet play on-the-go.
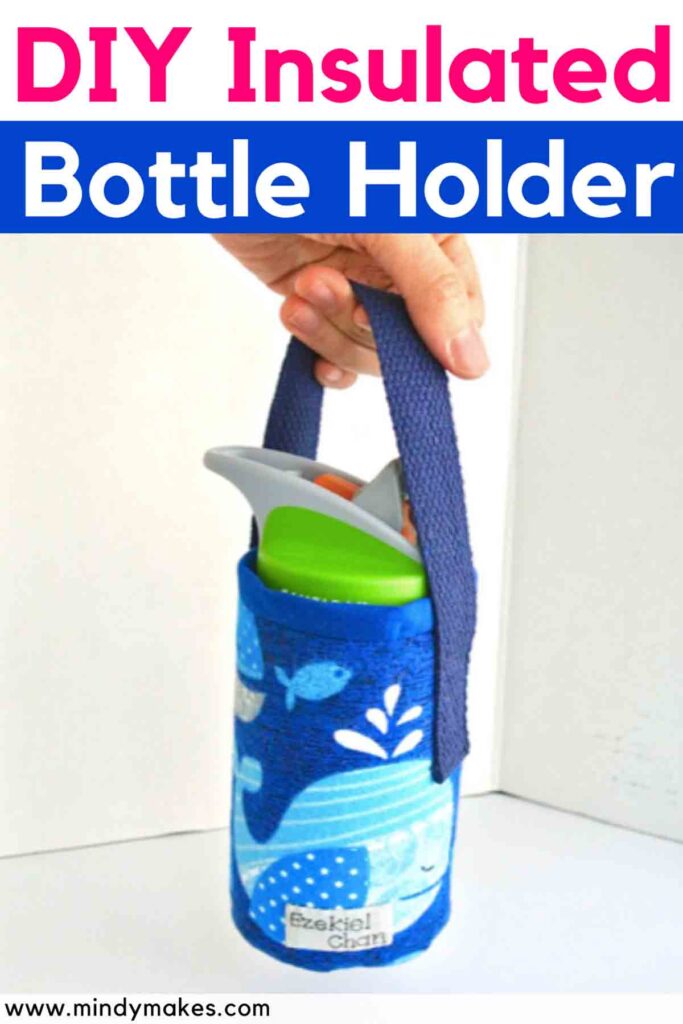
An Insulated Water Bottle holder to keeps drinks cool for the summer.


Just want to say a great big thank you for the step by step instructions. I used this idea and combined it with other car mat ideas to create a felt mat for my grandson’s birthday. It really helped to have such good instructions to work with.
Hi Sharyn,
You are so very welcome! I’m so glad you found the instructions helpful! I’m sure your grandson was super excited to receive the gift 🙂
Thank you for the tutorial! I made one for my sons and they love it!
Bye from the Netherlands!
Xandra
Hi Xandra,
Thank you for your kind words! And so glad to hear your sons love it! Mine does too!
This is sooooo adorable!
Thank you so much for your amazing free patterns, I’ve made the slouch bag, the tiny purse, two of pencil & colouring book carrier & the matchbox car & Road carrier, your instructions are so easy to follow. Can’t wait to find & try others..
How do i subscribe to receive your free pattern?
Hi Teri,
Follow this step-by-step guide which shows you exactly how to subscribe and grab the free pattern.
Amazing tutorial! I just made one for a friend’s son. I’m sure he will love it. I sewed in the white lines of the roads instead of drawing them, as I used felt for the grey road and the paint marker would not have worked very well. But I am sooo pleased with how it turned out. Thank you for the detailed instructions and easy to follow pictures and explanations.
Thank you for your kind words Mara! And I’m so glad you are pleased with the results!
Hi, I don’t see the Road Pattern in your Resource Library. Has it been removed?
Hi Megan,
The Road patterns is listed in the Resource library under section “T” as “Toy Car Carrier”. Hope that helps!
I made this for my godson, it turned out so cute! Hope he loves it. Thank you so much for the instructions!
Hi Karla,
You are so welcome! I hope your godson loves it too!
Hello! These instructions are wonderful! Thank you for sharing. I am planning on making one for my son for Christmas. His would be for hot wheels cars and my brain just cannot “see” how to adjust the handle to make it work better for the thinner vehicle. What I’m thinking is the handle further down from the top but don’t want to get too far along and realize I was mistaken. Could you please clarify that for me? Thank you so much for your help!
Brooke
Hi Brooke,
I don’t think you have to make any adjustments for hot wheel cars, as we’ve used the carrier for those too. Hope that helps!