
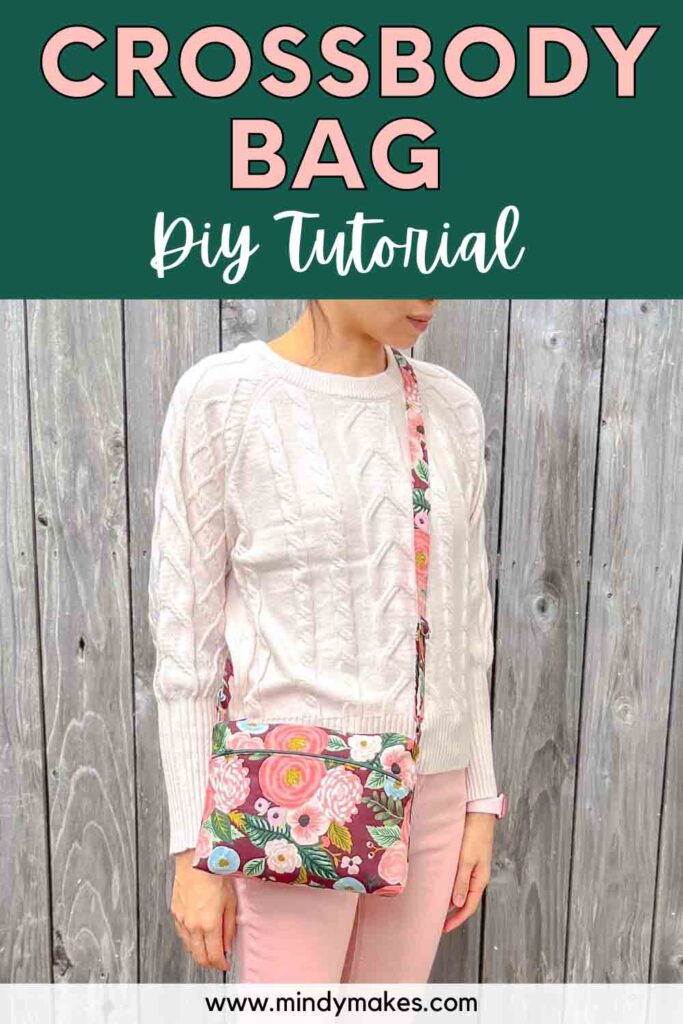
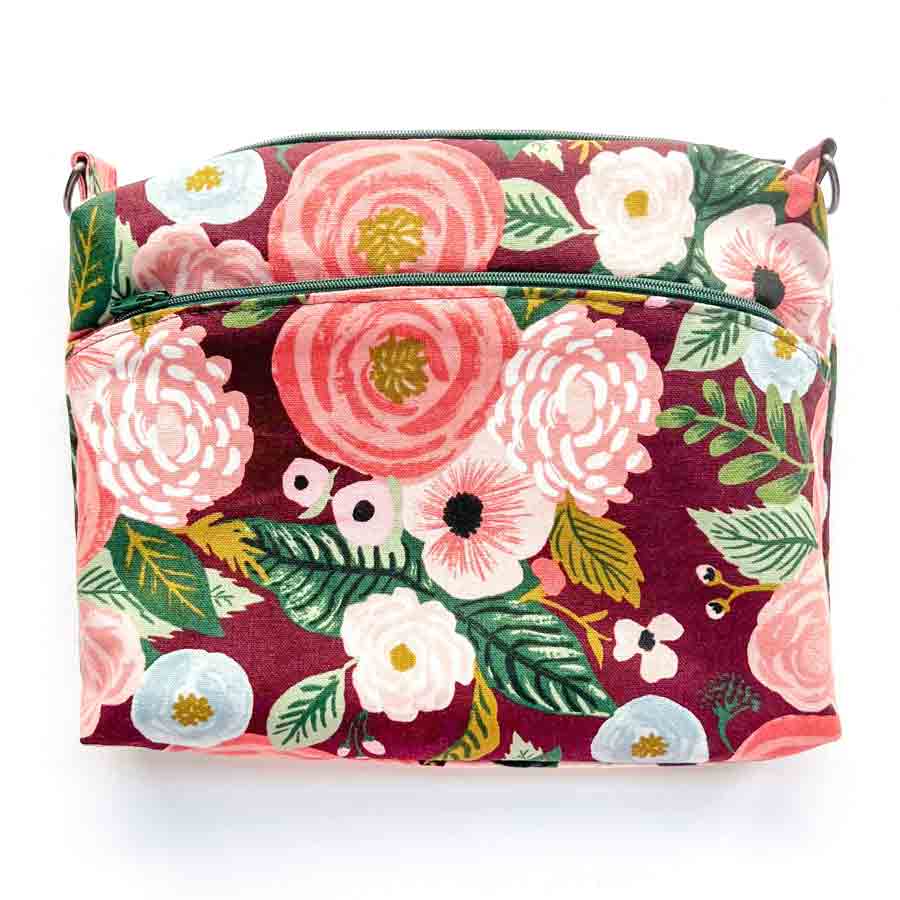
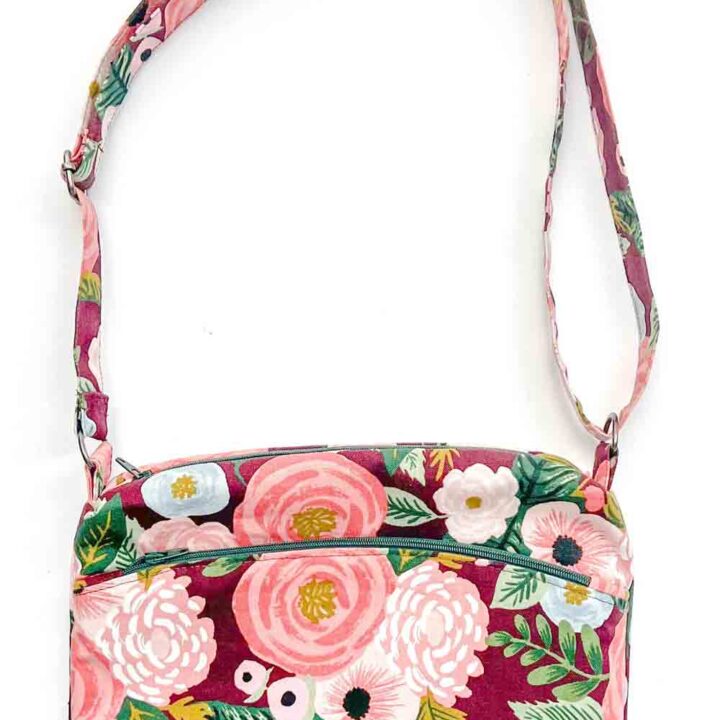
How to Sew a Crossbody Bag (Free Pattern)
This simple crossbody bag pattern has two zipper compartments and is the perfect size for holding all your essentials while on the go!
This post may contain affiliate links. Please read my disclosure policy for details. As an Amazon Associate, I earn from qualifying purchases.
What is the Size of Crossbody Bag?
Please note that all measurements are approximate and not exact. The final dimension of your bag may differ slightly from what is listed here.
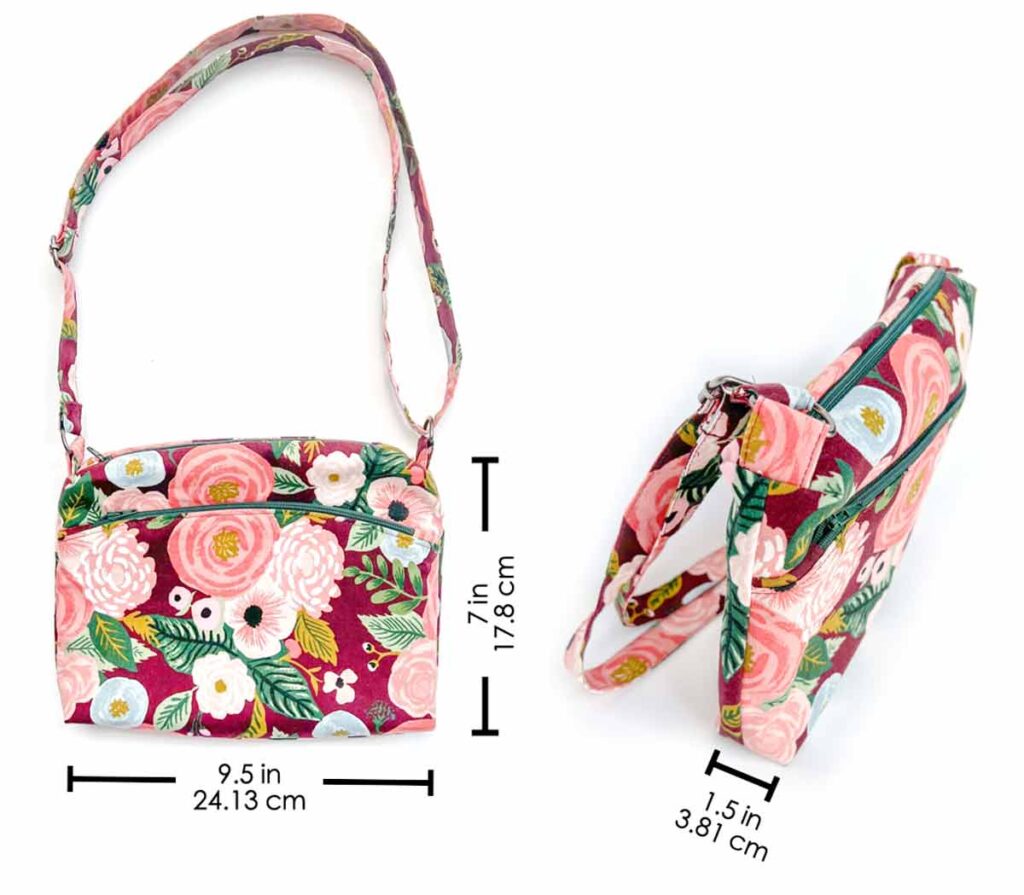
- Cross body bag measures 9.5″ (24.13cm) wide and 7″ (17.8 cm) tall.
- Side of bag has a depth of approximately 1.5″ (3.81cm).
- Bag strap is approximately 53″ (134.62 cm) when fully extended.
What is the Best Crossbody Bag Length?
In this tutorial I will show you how to make an adjustable bag strap so that you can wear the crossbody bag at your most suitable length.
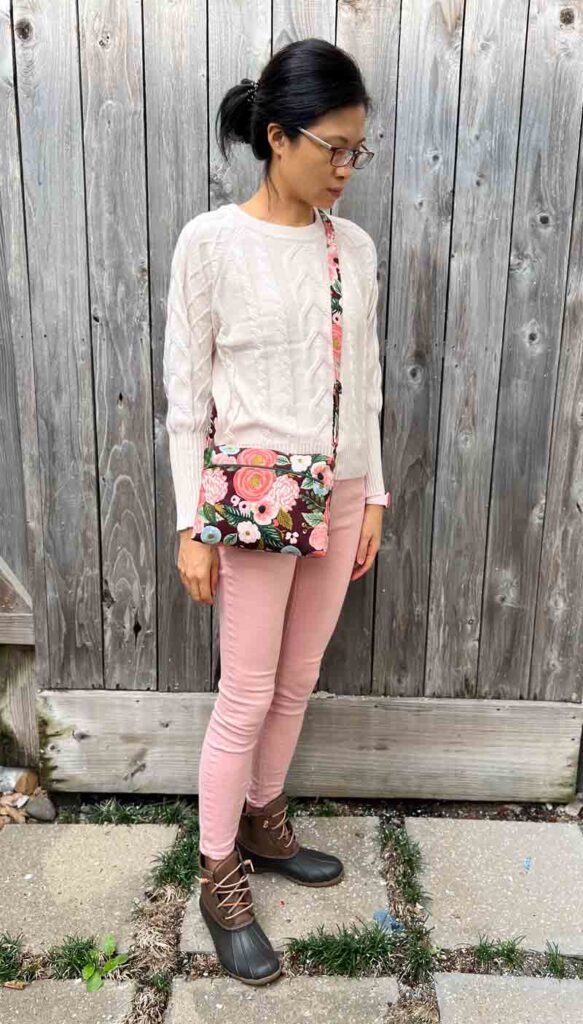
Generally speaking, crossbody bag straps are adjusted to the length so the bag will fall at the hip.
If you are right handed, you should wear your bag on the left shoulder so the bag drapes over the right hip. This allows easy access for your right hand to grab whatever you need from the bag. If you are left-handed, wear it on your right shoulder.
Nevertheless, you do you and and wear the bag however and wherever you want. Don’t let fashion styles dictate what is most convenient and comfortable for you.
How to Sew a Crossbody Bag with Zipper?
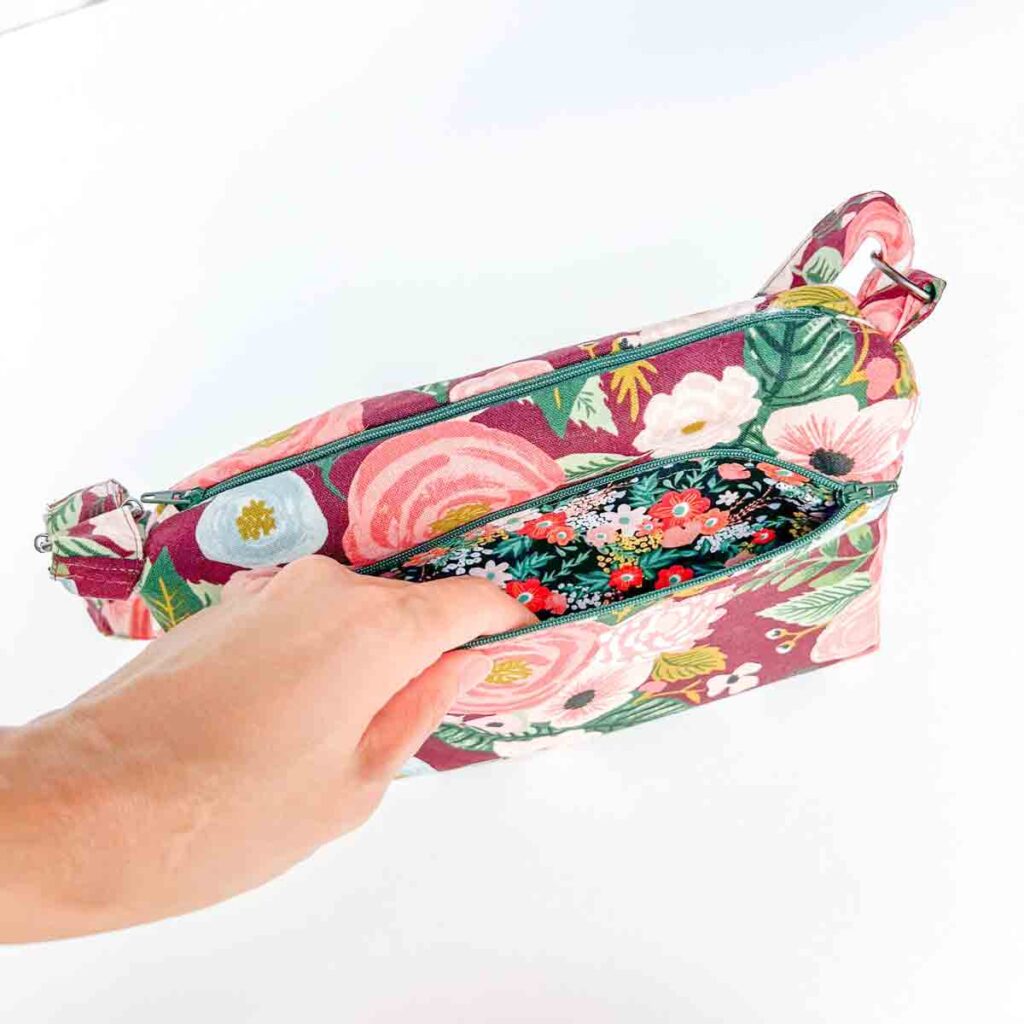
This stylish crossbody bag pattern is designed with 2 zippers. One zipper at the top that opens into the main body of the bag, and there is one at the front of the bag for an extra compartment.
If you consider yourself a beginner, or if you just want to sew a super simple no-fuss crossbody, feel free to omit the front zipper. You will end up with a basic crossbody bag pattern with just one zipper compartment, but it will be super cute and easy to use!
Crossbody Bag Pattern
To get a copy of the FREE PDF Crossbody Bag Pattern, subscribe to the MindyMakes Email List to receive the password for the Mindy Makes Free Resource Library. The Crossbody Bag Pattern is listed under section ‘C’ of the library as “Crossbody Bag”.
Once you click “submit”, the password will show up on the next page. You will also receive a welcome email with the password in case you forget.
Please allow up to an hour for the welcome email to fly through cyberspace and travel into your inbox. If you still don’t receive the email, make sure to check your junk or spam folders and add my email to your safe list!
Need more help? Be sure to check out this step-by-step guide that shows you exactly how to get the password, enter the library, and download the PDF.
Need additional help? Be sure to check out this step-by-step guide that will show you exactly how to get the password, enter the library, and download the PDF.
More Variations of Crossbody Bag
Want to learn how to make a color-block version of this stylish crossbody bag? The PDF Pattern & Tutorial is available in MY SHOP.
With your purchase, you will receive the following PDFs:
- Ready to print PDF PATTERN for Regular Crossbody Bag (9 pages)
- Ready to print PDF PATTERN for Color Block Version of Crossbody Bag (17 pages)
- 2 PDF TUTORIALS, fully color with step-by-step photos and clear instructions:
- CROSSBODY BAG TUTORIAL (47 pages)
- CROSSBODY BAG COLOR BLOCK TUTORIAL (19 pages)

What Do I Need To Sew This Bag?
Materials
- CROSSBODY BAG PATTERN – available in the Free MindyMakes Library
- EXTERIOR FABRIC – if using 44″ wide fabric, you will need 1.5 yards (1.4 meters), see note 1
- LINING – 1/3 yard (0.3 meters)
- FUSIBLE INTERFACING – I like to use a medium weight interfacing.
- 9″ ZIPPER (x2)
- MATCHING THREAD
- 1″ D-RING (x2)
- 1″ TRIGLIDE SLIDER
- 1″ SWIVEL CLIPS (x2) – Optional, if you want to make removable belt straps
NOTE 1: If your fabric is 55-60″ wide, you will only need 1/2 yard (0.457M) of exterior fabric. This is because you can cut the bag strap along the width (perpendicular to the selvedge) of the fabric. If your fabric is 44″ wide, you will need 1.5 yards (1.4M) in order to cut a 55″ length piece to make the bag strap.
Tools
- HOME SEWING MACHINE – I LOVE my SINGER HEAVY DUTY SEWING MACHINE
- FABRIC SCISSORS – GINGHERS are my favorite. I’ve tried other brands such as Fiskars, but they just don’t compare.
- SEWING PINS and/or SEWING CLIPS
- CLEAR RULER
- FABRIC CHALK
- HAND SEWING NEEDLES
- THAT PURPLE THANG – optional, but extremely useful for guiding fabric into machine
Pattern for Crossbody Bag
First, download, print, and attach the paper pattern pieces. Then, cut out all pieces on your exterior fabric, lining, and fusible interfacing.

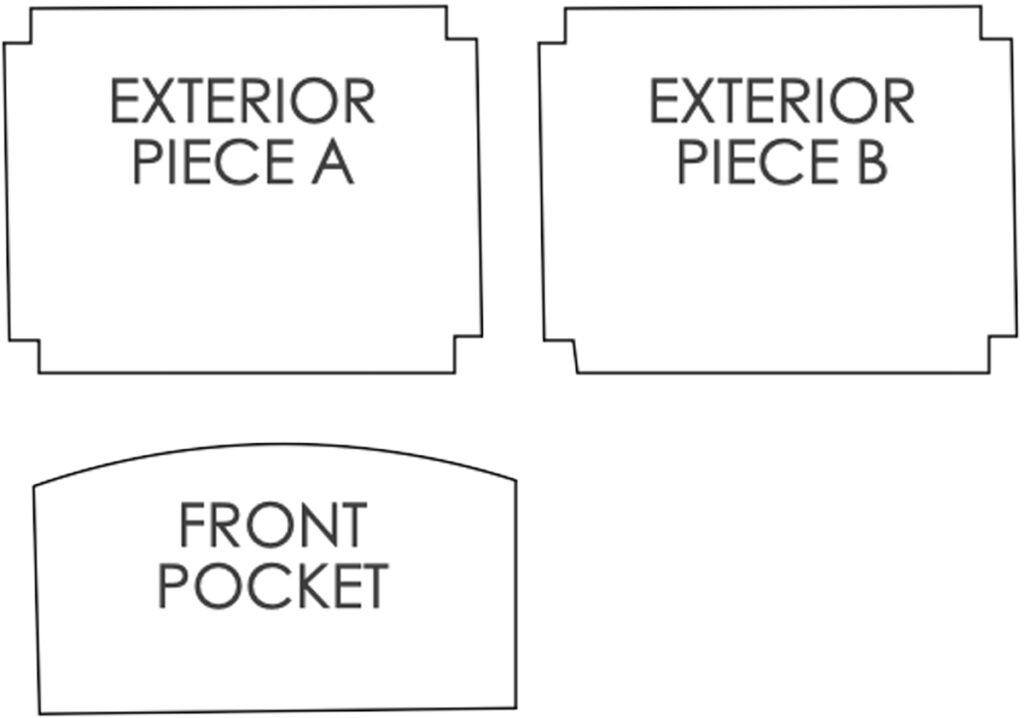
EXTERIOR FABRIC – Cut out the Following Pieces:
- EXTERIOR PIECE A
- EXTERIOR PIECE B
- FRONT POCKET
- ZIPPER ENDS (X4) – each piece measures 4” x 1” (10 cm x 2.54cm)
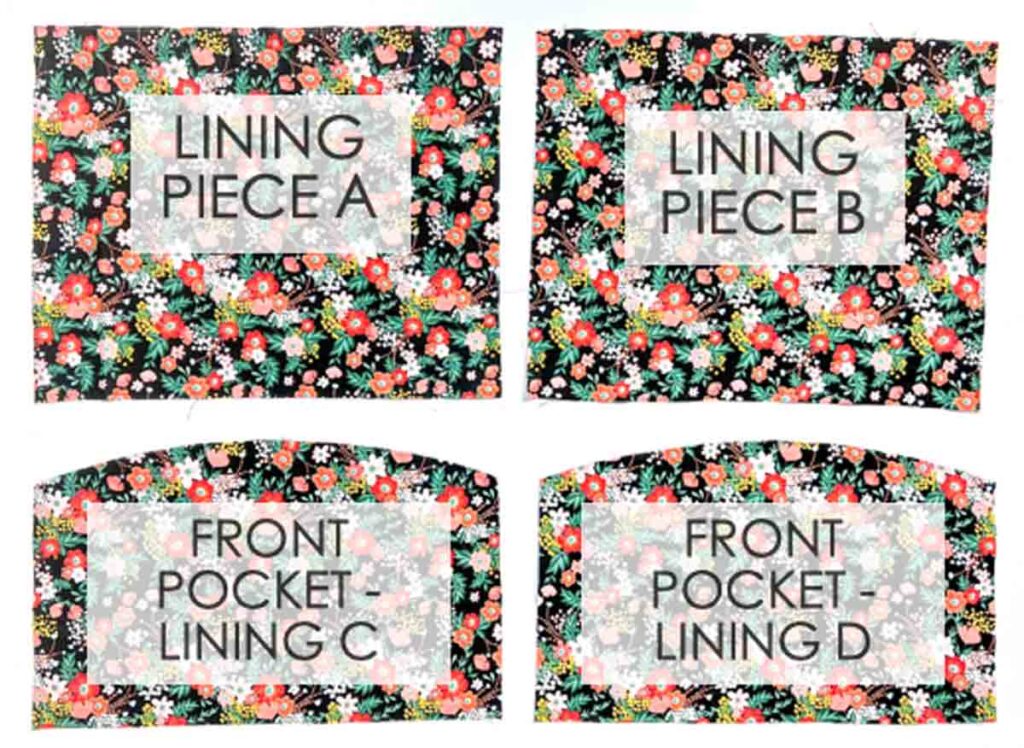
LINING – Cut out the Following Pieces:
- LINING PIECE A
- LINING PIECE B
- FRONT POCKET – LINING C
- FRONT POCKET – LINING D
FUSIBLE INTERFACING – Cut out the following pieces:
- EXTERIOR PIECE A
- EXTERIOR PIECE B
- FRONT ZIPPER POCKET
Next, fuse interfacing to wrong side of EXTERIOR FABRIC pieces.

How to Sew a Crossbody Bag
Sewing Side Straps

First, cut one piece of fabric that measures 5” (12.7cm) wide and 3” (7.62cm) tall.
Second, fold top and bottom edges 1/2” (1.27cm) in towards center and press.
Next, fold entire side strap in half and press.
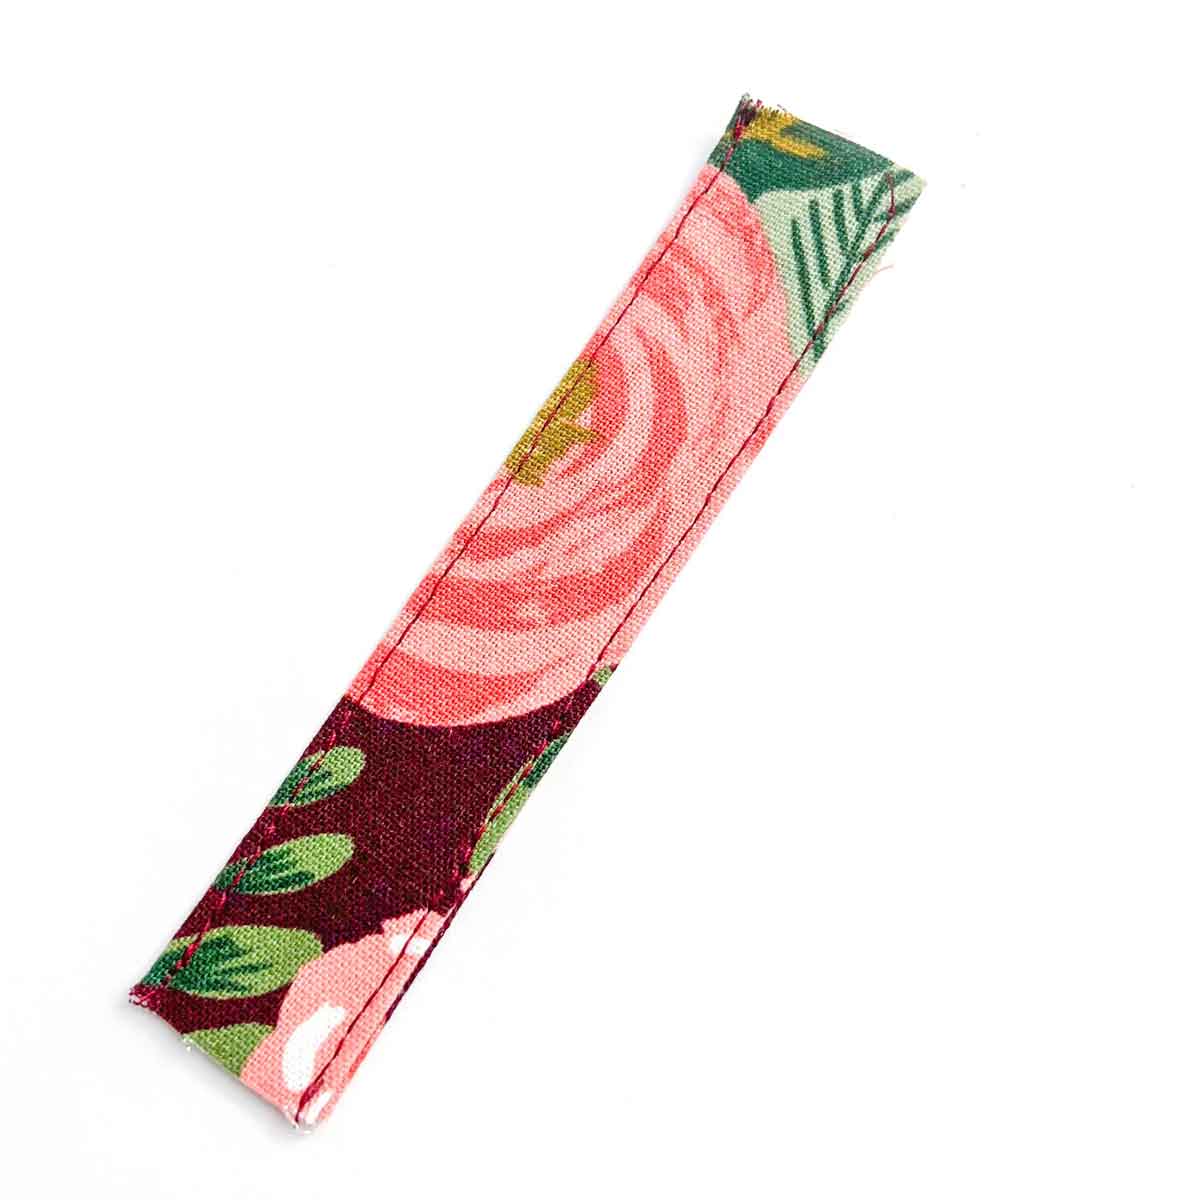
Then stitch both sides of strap together, 1/8” (3mm) from edge.
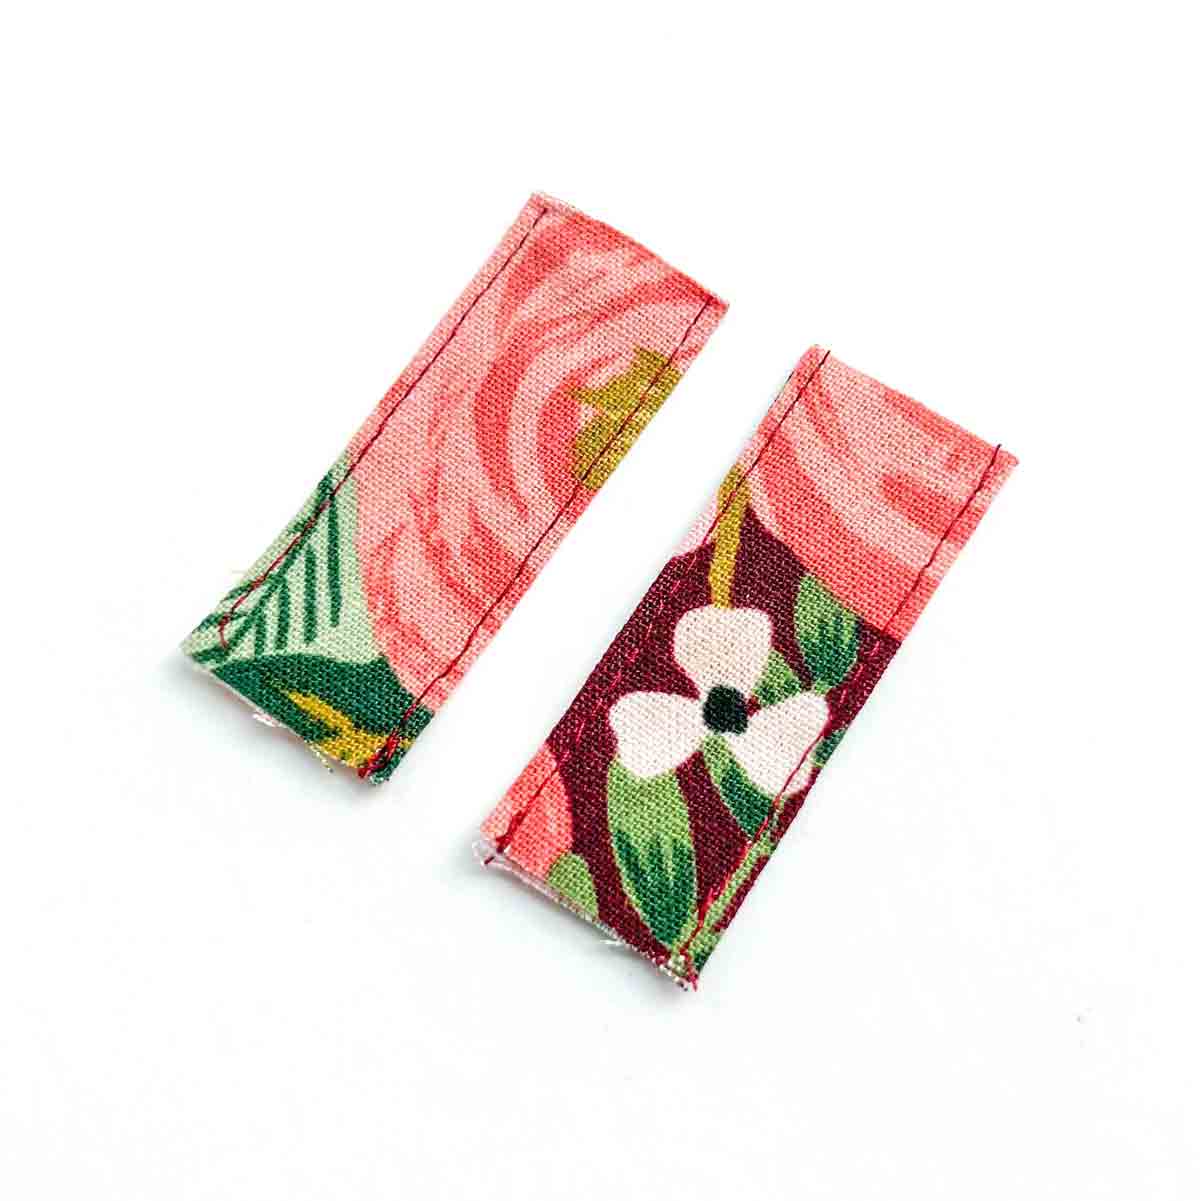
Now cut your side strap in half along the width (the longest part of the strap) so you end up with two pieces of equal size.
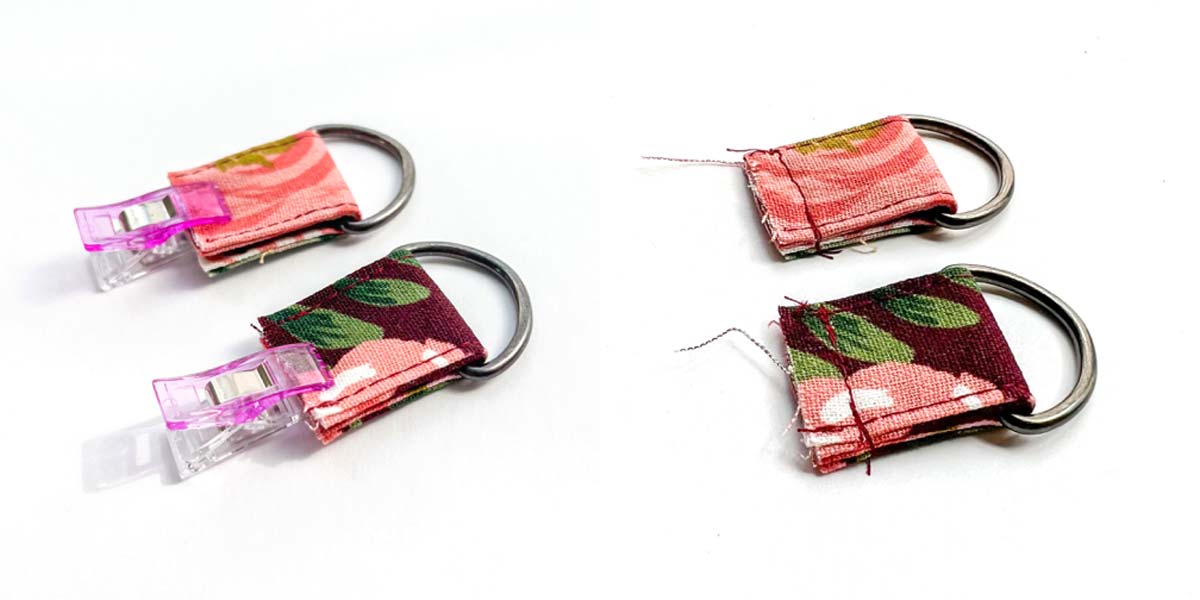
Finally, loop side strap around D-ring, fold in half, clip and baste in place. Repeat for other strap. Your side straps are now done!
How to Sew Front Pocket
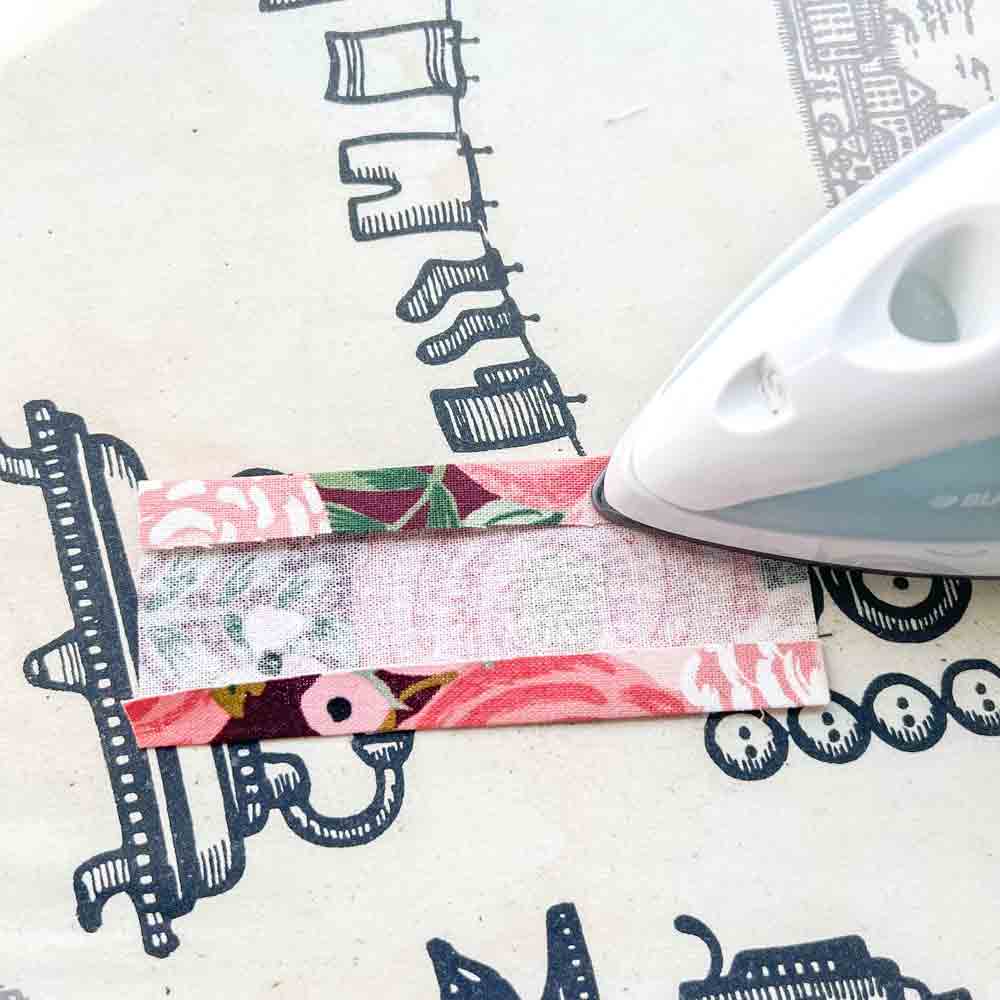
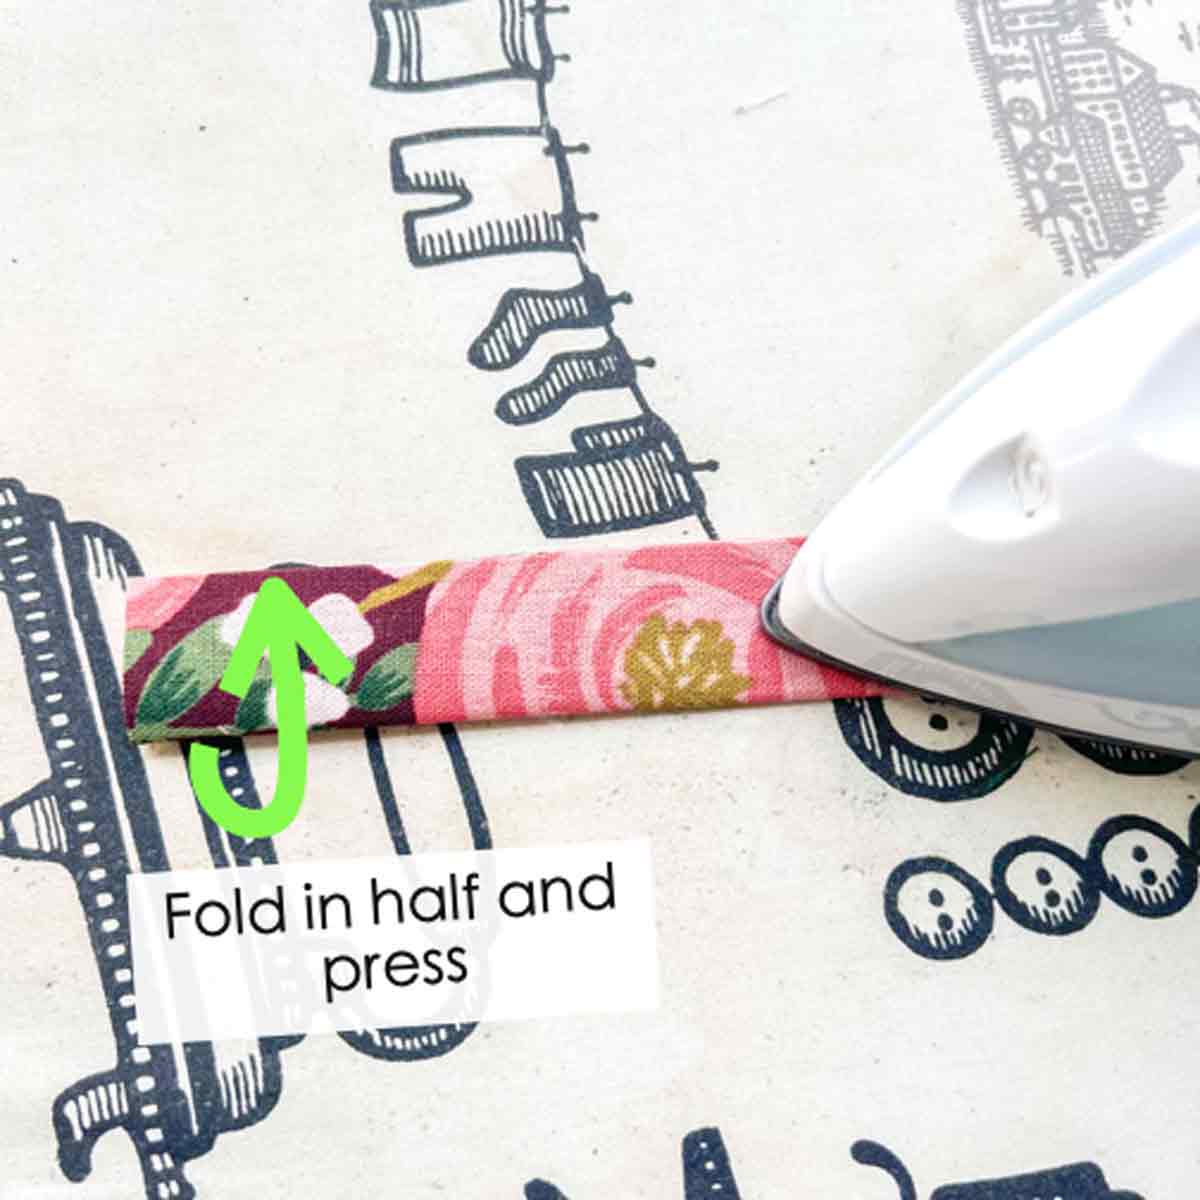
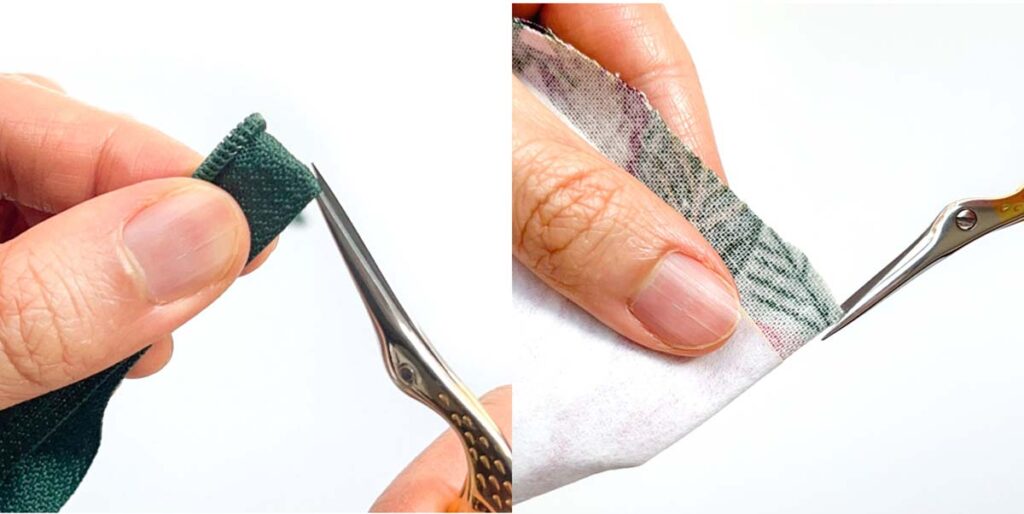
First, fold zipper ends in half lengthwise and press.

Next, get your fabric pieces and zipper ready: 2 zipper ends with folded edge pointing towards center, and [FRONT POCKET] piece.
Then, mark midline of zipper and [FRONT POCKET] by folding each in half and making a snip at the center.
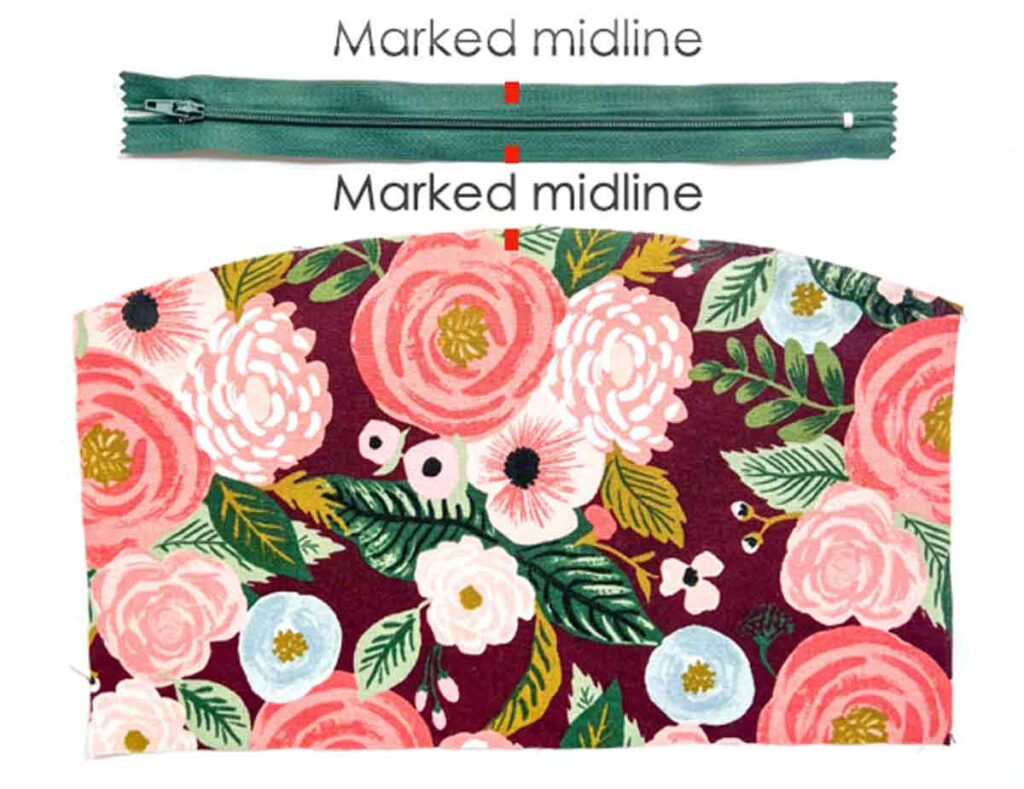
Zipper and fabric with marked midline (red line).
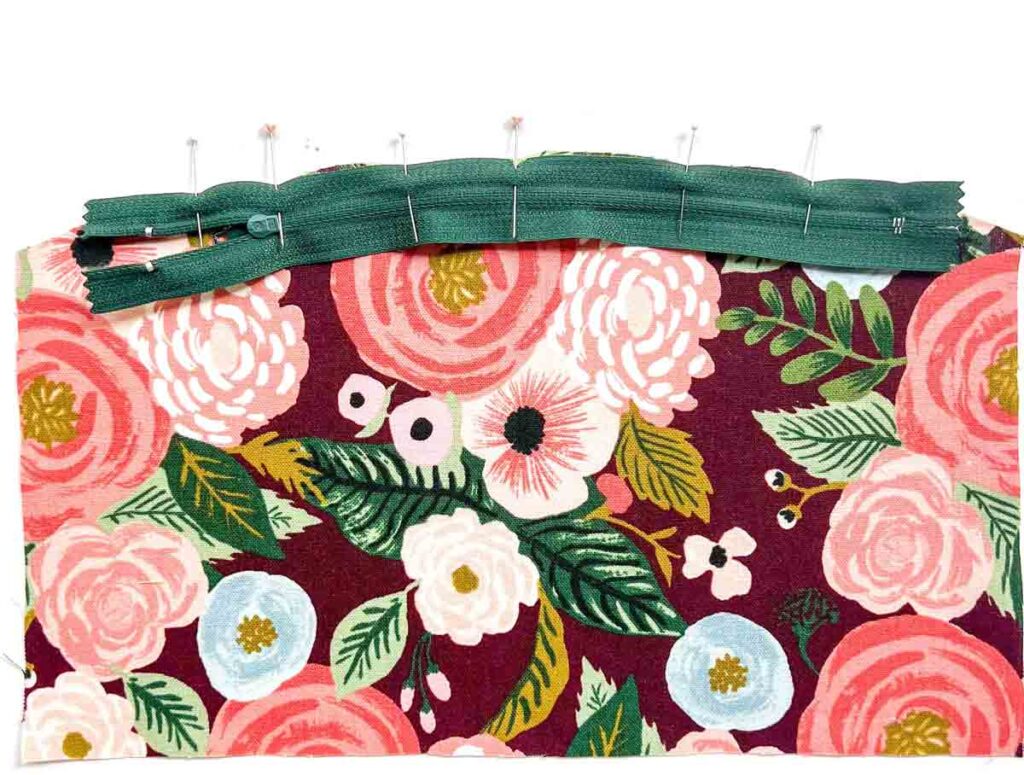
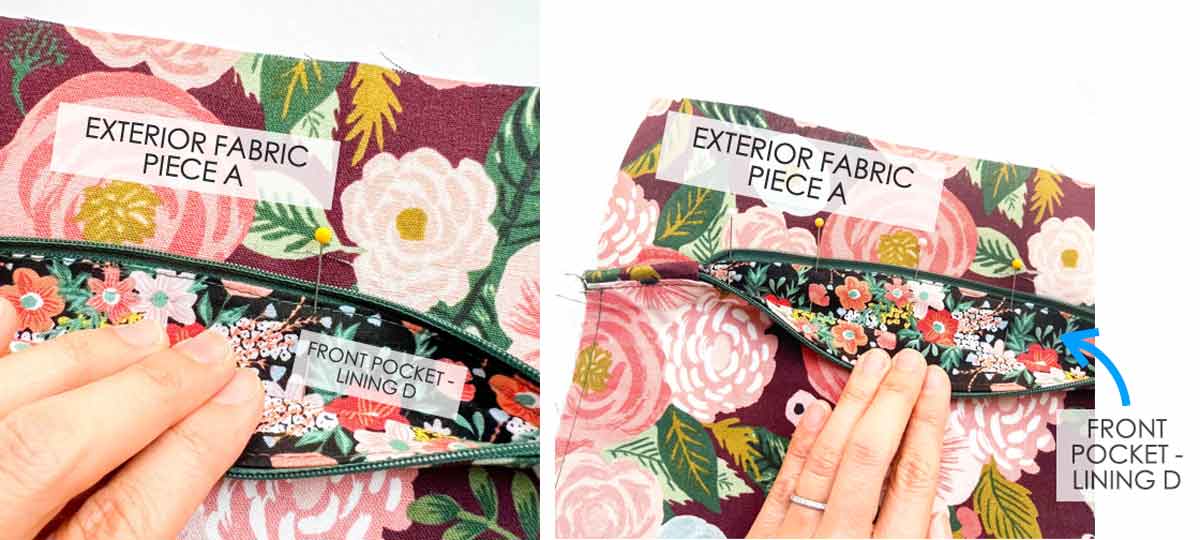
Next, place zipper and [FRONT POCKET] right sides together, matching at midline. Pin in place. Leave both ends of zipper unpinned.

Now pull end of zipper away and put one piece of [ZIPPER END] over [FRONT POCKET]. Match bottom corner of [ZIPPER END] to straight edge of [FRONT POCKET] (red arrow).

Then, lay zipper back over [ZIPPER END] and pin in place.

Next, repeat inserting zipper end onto other side of zipper. Match bottom corner of zipper to straight edge of [FRONT POCKET].
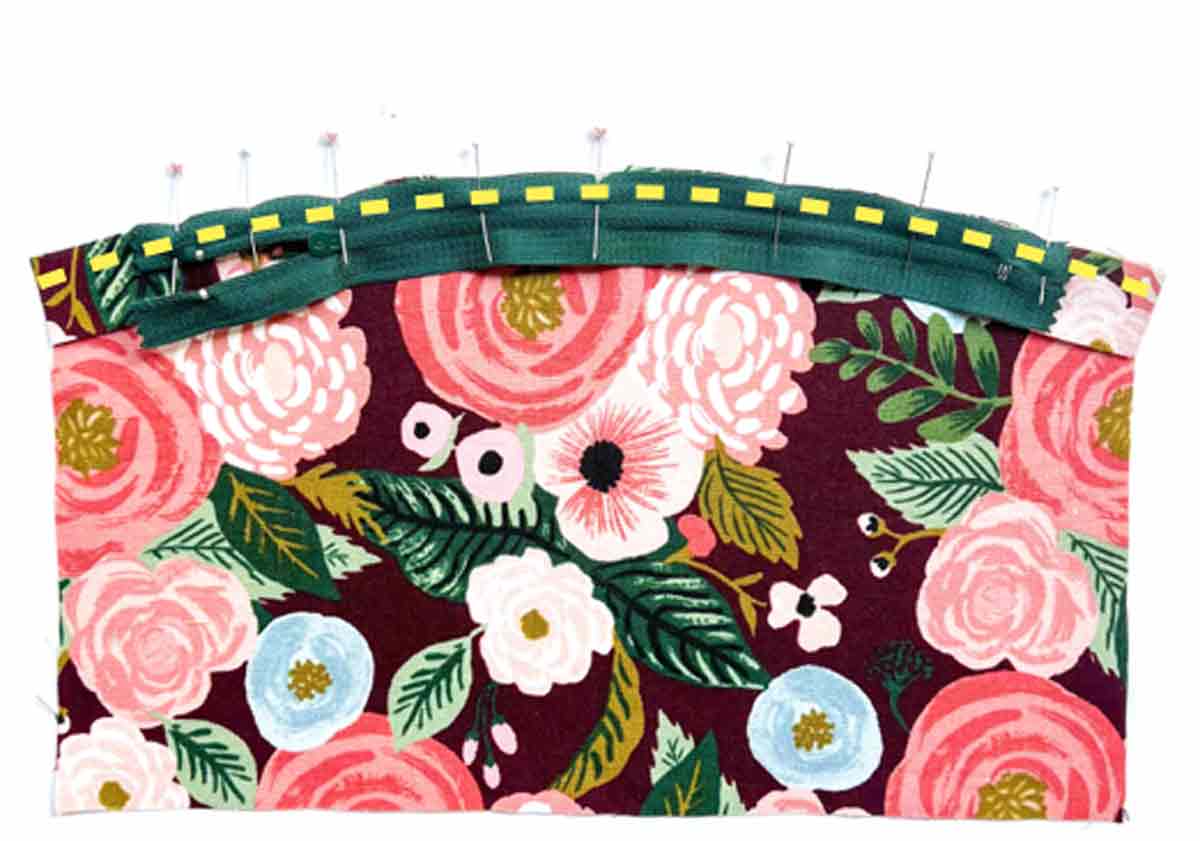
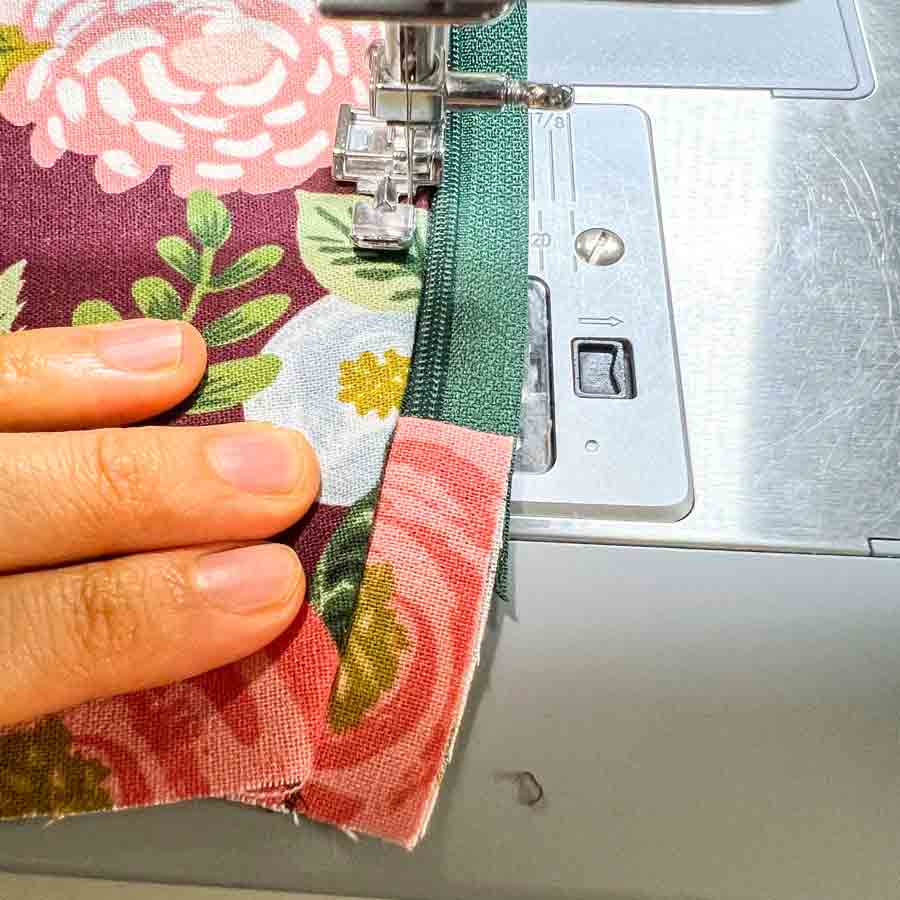
Then pin in place and use zipper foot to sew along zipper (yellow dotted line). Your seam allowance will be approximately 3/8” from zipper edge.

We will now refer to this piece as [FRONT POCKET – EXTERIOR].

Next, place [FRONT POCKET – LINING C] over [FRONT POCKET – EXTERIOR], right sides together.
Then pin and sew in place using zipper foot, about 3/8” from edge of fabric. (red dotted line).
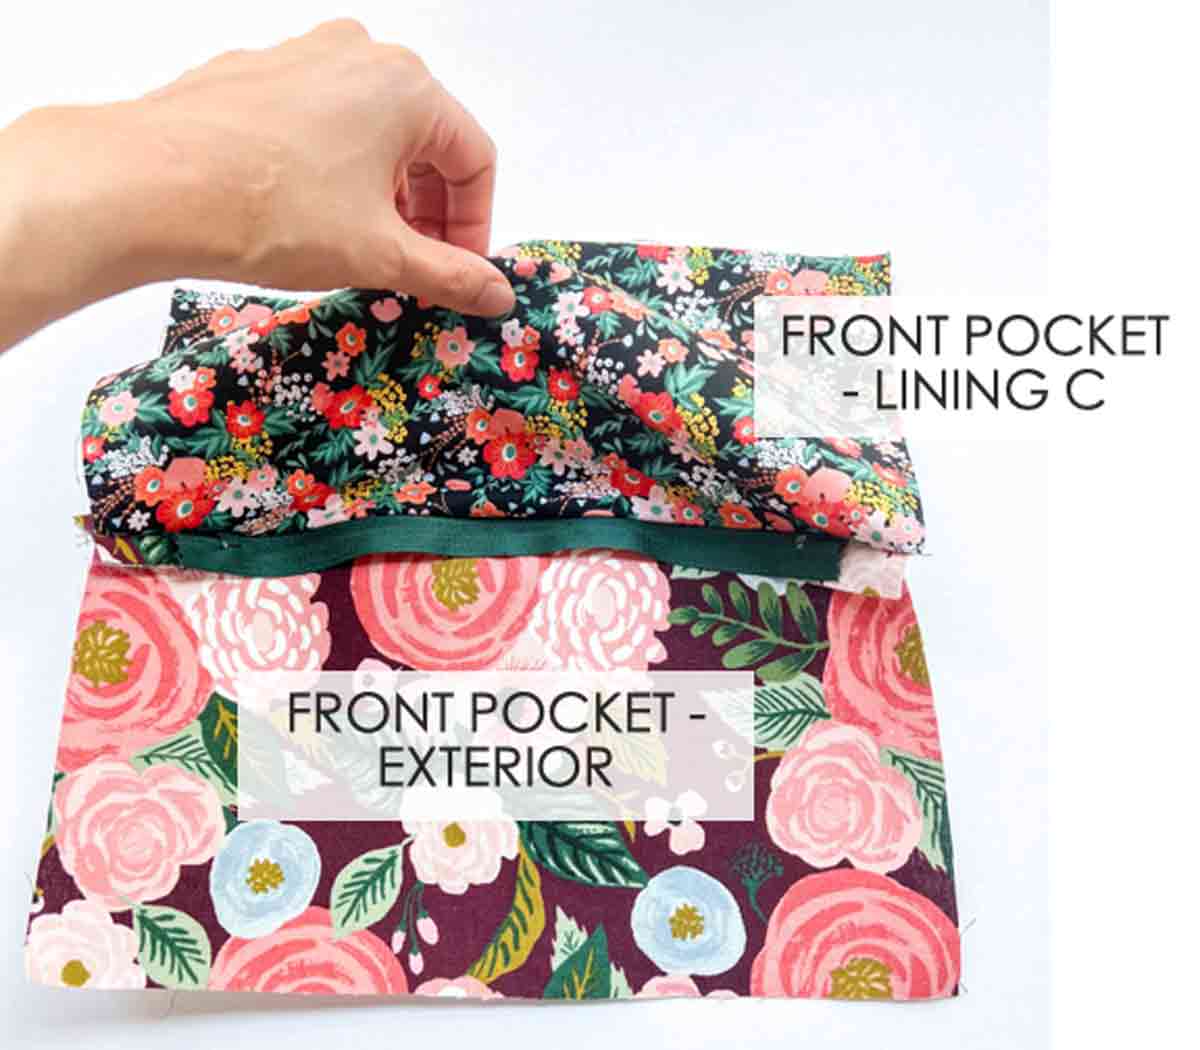
Your front pocket will look like the photo at this point
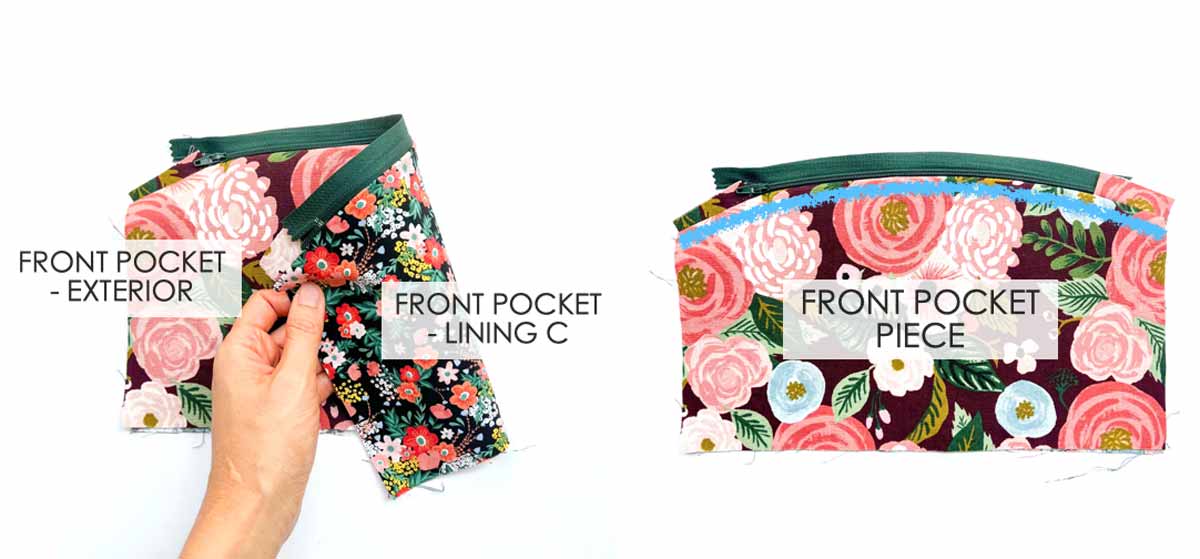
LEFT: Now flip [FRONT POCKET – LINING C] to the back so that it is behind [FRONT POCKET – EXTERIOR]. We will now call this piece [FRONT POCKET PIECE]
RIGHT: Next, give your fabric a good press and then topstitch the upper part of [FRONT POCKET PIECE], 1/8″ below zipper (blue line).
A view of topstitching the [FRONT POCKET PIECE].
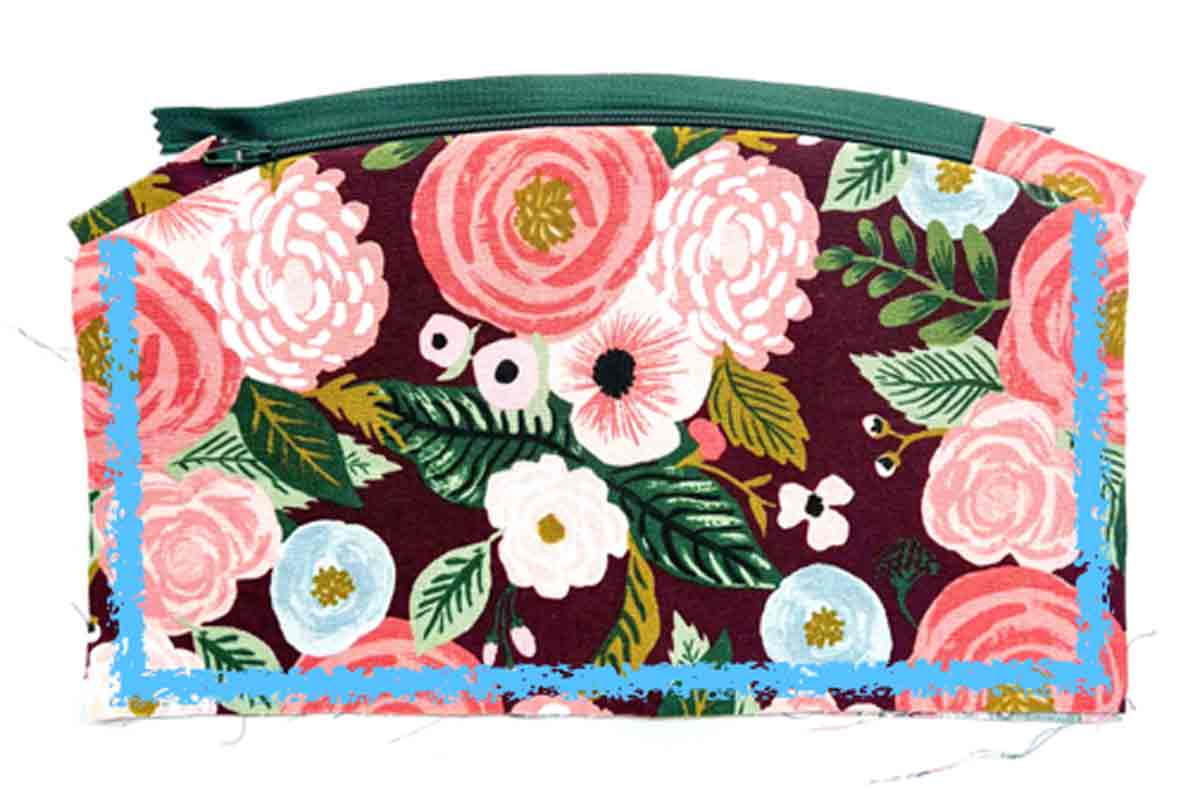
Next, baste [FRONT POCKET PIECE] together (blue line) on the sides and bottom.

Then, place your [FRONT POCKET PIECE] over [FRONT POCKET – LINING D], right sides of lining together.
Next, pin top seam of zipper to [FRONT POCKET- LINING D].

Sew together using zipper foot.

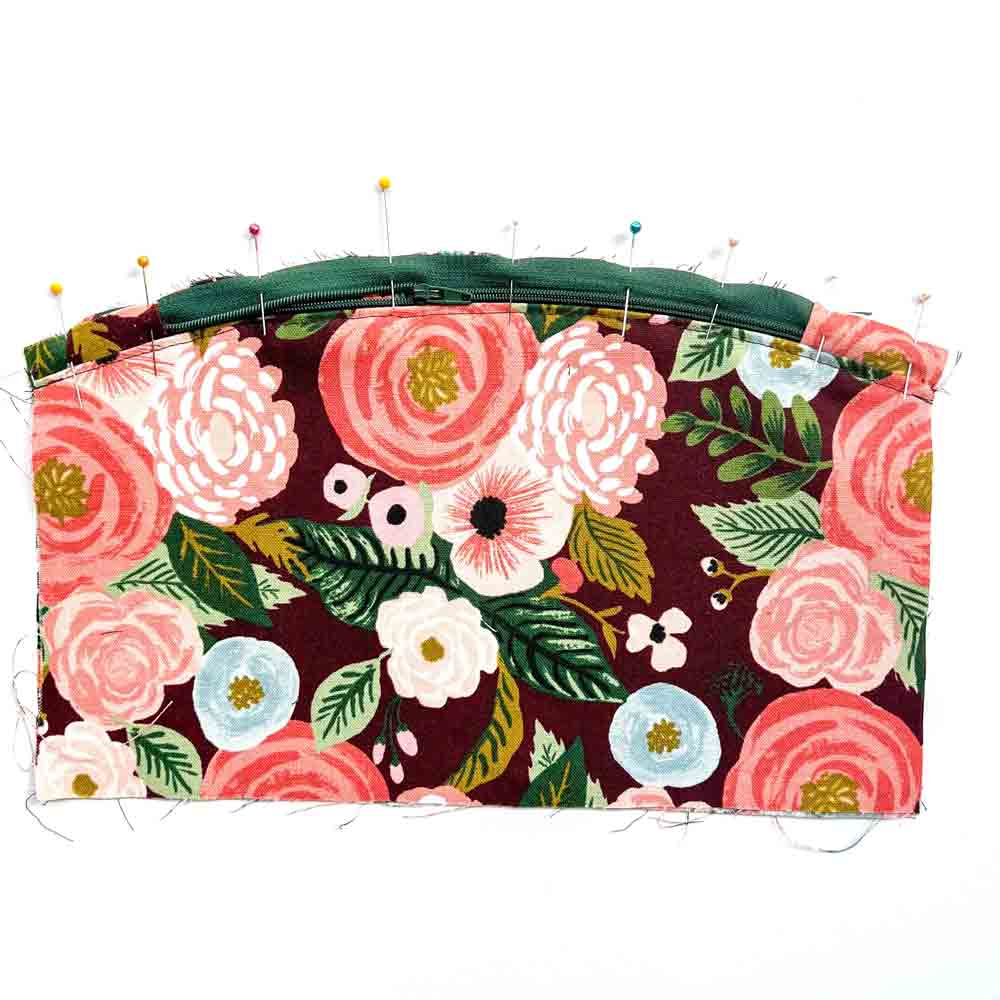
Now, fold the entire top seam of the zipper so it’s behind the zipper teeth.

LEFT: Now, press the fold down using medium heat. Make sure your iron isn’t set on high heat otherwise you may melt the zipper!
RIGHT: Back view of front zipper pocket.
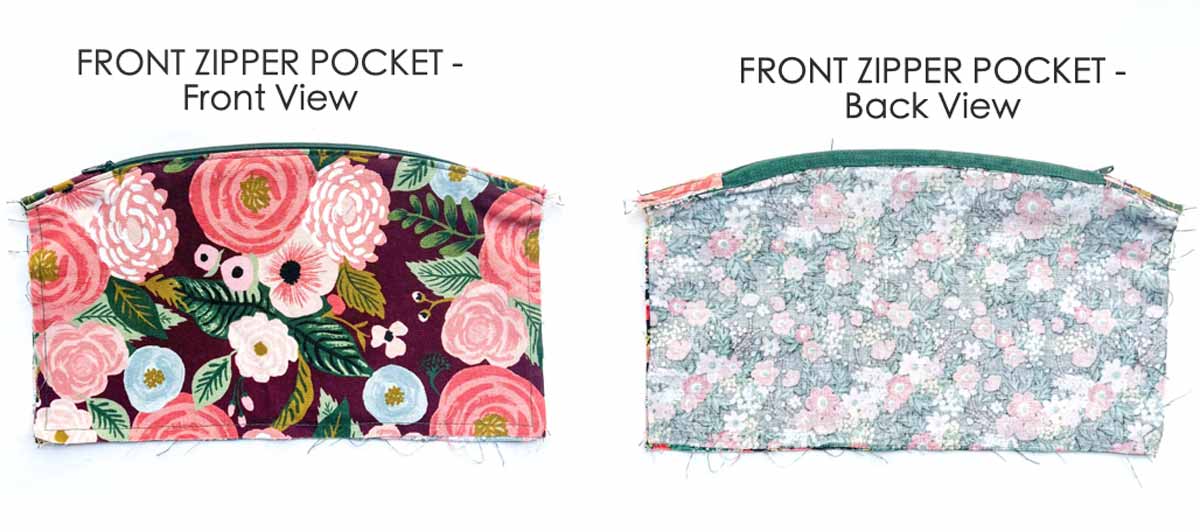
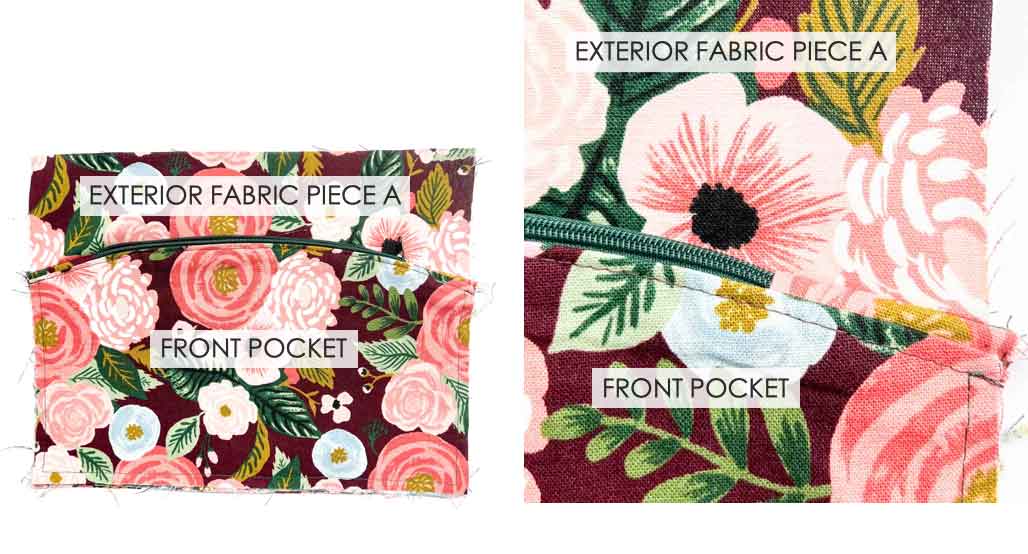
Front and back view of [FRONT ZIPPER POCKET]. We will now sew the front zipper pocket to the front of the bag.
Sewing Front Zipper Pocket to Bag

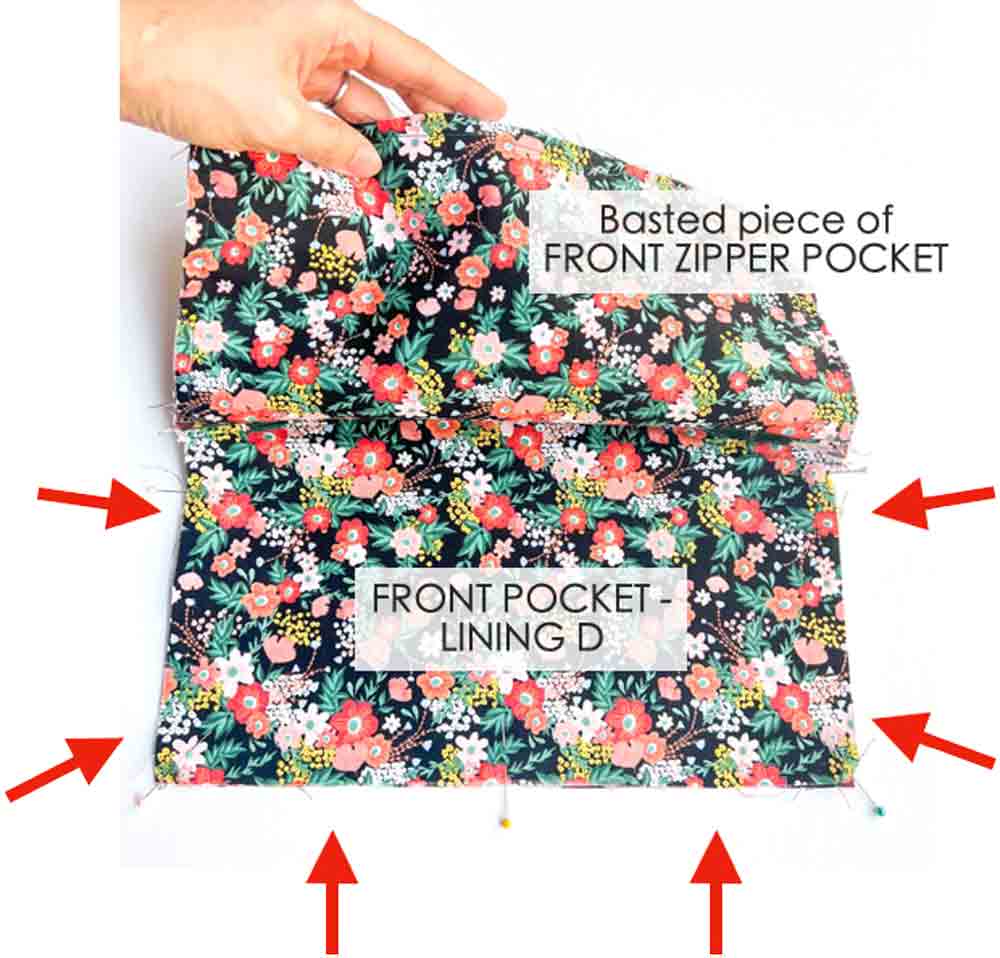
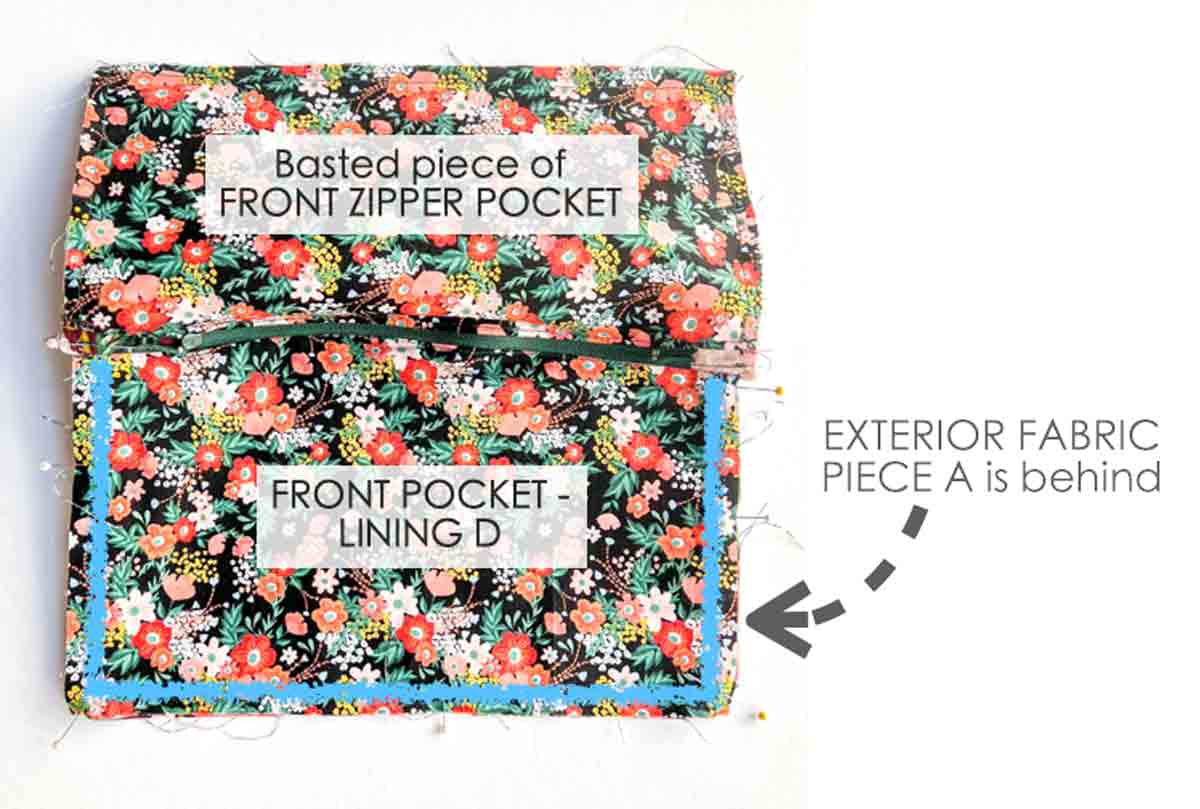
First, place [FRONT ZIPPER POCKET] over [EXTERIOR FABRIC PIECE A] as pictured, matching at the sides and bottom.
![hand lifting up basted piece of [FRONT ZIPPER POCKET] away from [FRONT POCKET - LINING D].](https://mindymakes.com/wp-content/uploads/2023/12/Crossbody-bag-sewing-front-pocket-to-bag-2.jpg)
Then, lift up basted piece of [FRONT ZIPPER POCKET] away from [FRONT POCKET – LINING D].
![hand lifting up basted piece of [FRONT ZIPPER POCKET] away from [FRONT POCKET - LINING D].](https://mindymakes.com/wp-content/uploads/2023/12/Crossbody-bag-sewing-front-pocket-to-bag-3a.jpg)
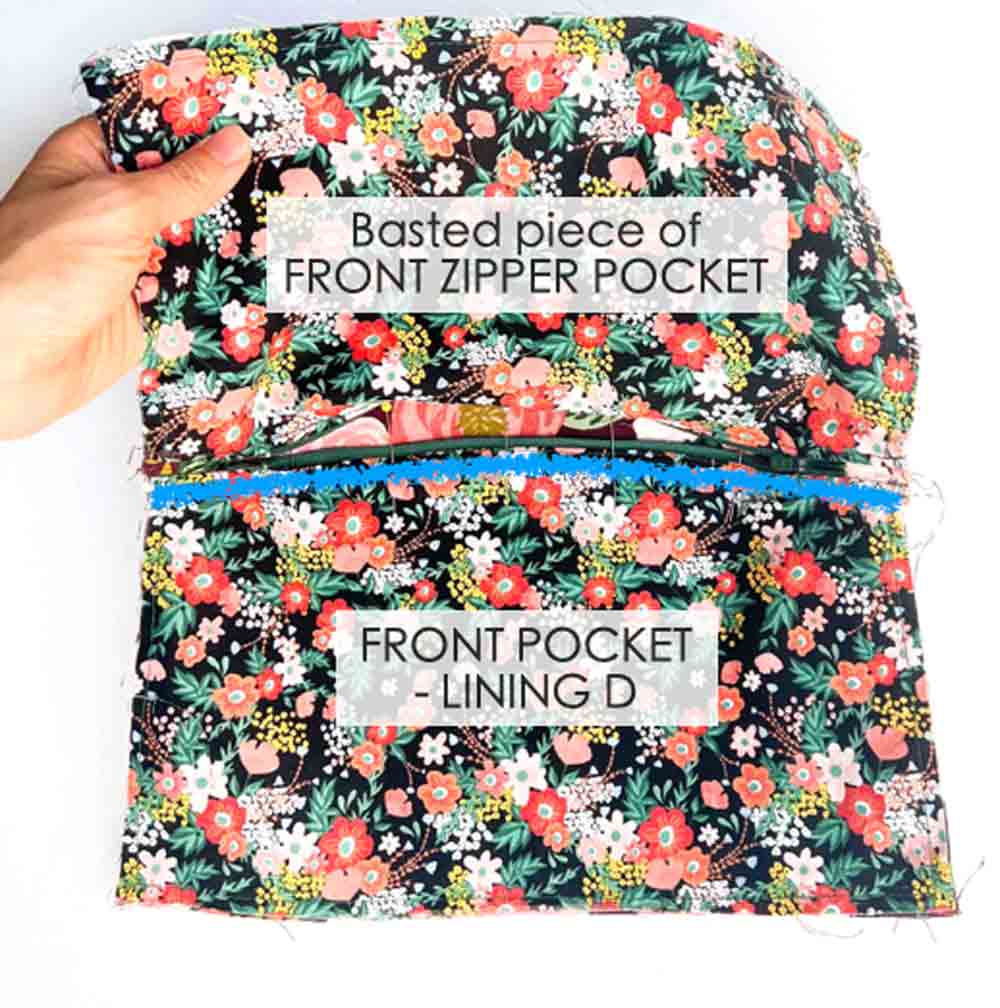
Next, continue pulling up basted piece of [FRONT ZIPPER POCKET] until [FRONT POCKET -LINING D] is fully exposed.
Then, pin [FRONT POCKET – LINING D] to [EXTERIOR FABRIC PIECE A] on the sides and bottom.
Next, baste [FRONT ZIPPER POCKET – LINING D] to [EXTERIOR FABRIC PIECE A], as indicated by blue line.
Now open the zipper and pin [FRONT ZIPPER POCKET – LINING D] to [EXTERIOR FABRIC PIECE A]
![hand lifting up basted piece of [FRONT ZIPPER POCKET] until it is completely away from [FRONT POCKET - LINING D].](https://mindymakes.com/wp-content/uploads/2023/12/Crossbody-bag-sewing-front-pocket-to-bag-6.jpg)
Then, lift up basted piece of [FRONT ZIPPER POCKET] until it is completely away from [FRONT POCKET – LINING D].
Next, sew [FRONT POCKET – LINING D] down, following the curve of the zipper (blue line).
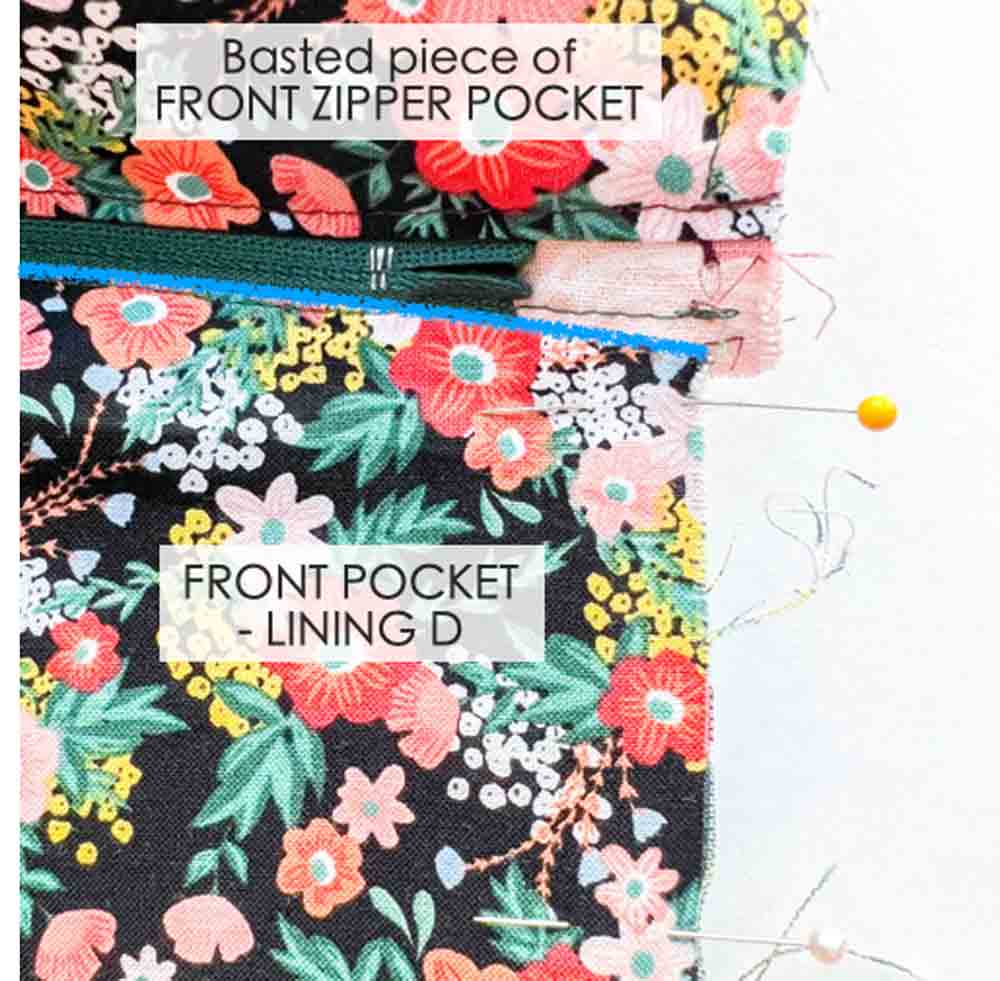
You will be stitching in the ditch at the junction where bottom zipper meets [FRONT POCKET – LINING D] (blue line). Make sure to back stitch on both ends.
NOTE: Remember that you are sewing [FRONT POCKET-LINING D] down to [EXTERIOR FABRIC PIECE A], following the curve along the zipper.
Your [FRONT POCKET] is now sewn to [EXTERIOR FABRIC PIECE A].

Next, pin the entire front pocket to [EXTERIOR FABRIC PIECE A] and baste at the sides and bottom (blue line).
How to Sew Crossbody Bag Zipper

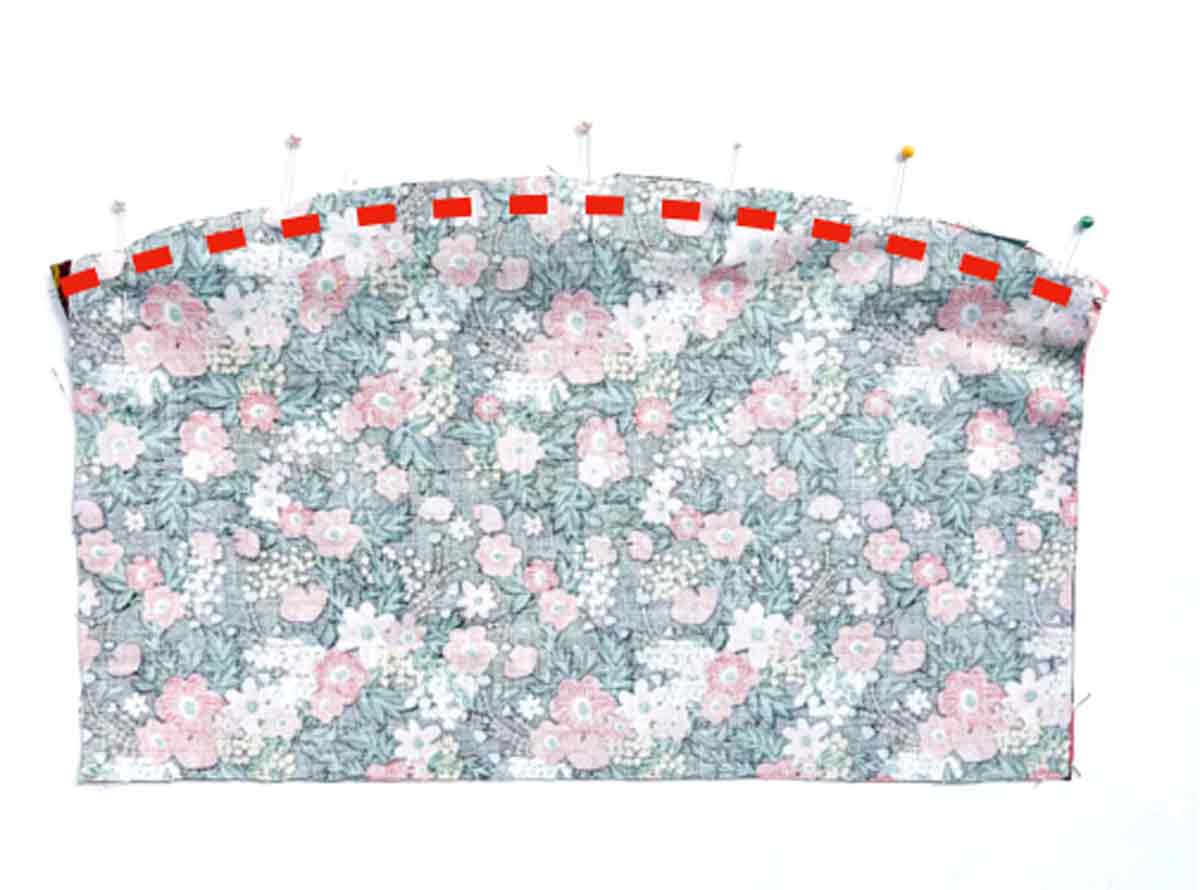
First, mark midline on zipper and [EXTERIOR FABRIC PIECE A] (red markings).

Next, place [ZIPPER END] on top edge of [EXTERIOR FABRIC PIECE A], one on each side. Make sure folded edge of [ZIPPER END] are facing the center.

Now put zipper and [EXTERIOR FABRIC PIECE A] right sides together, matching at the midpoint. Next, pin in place.
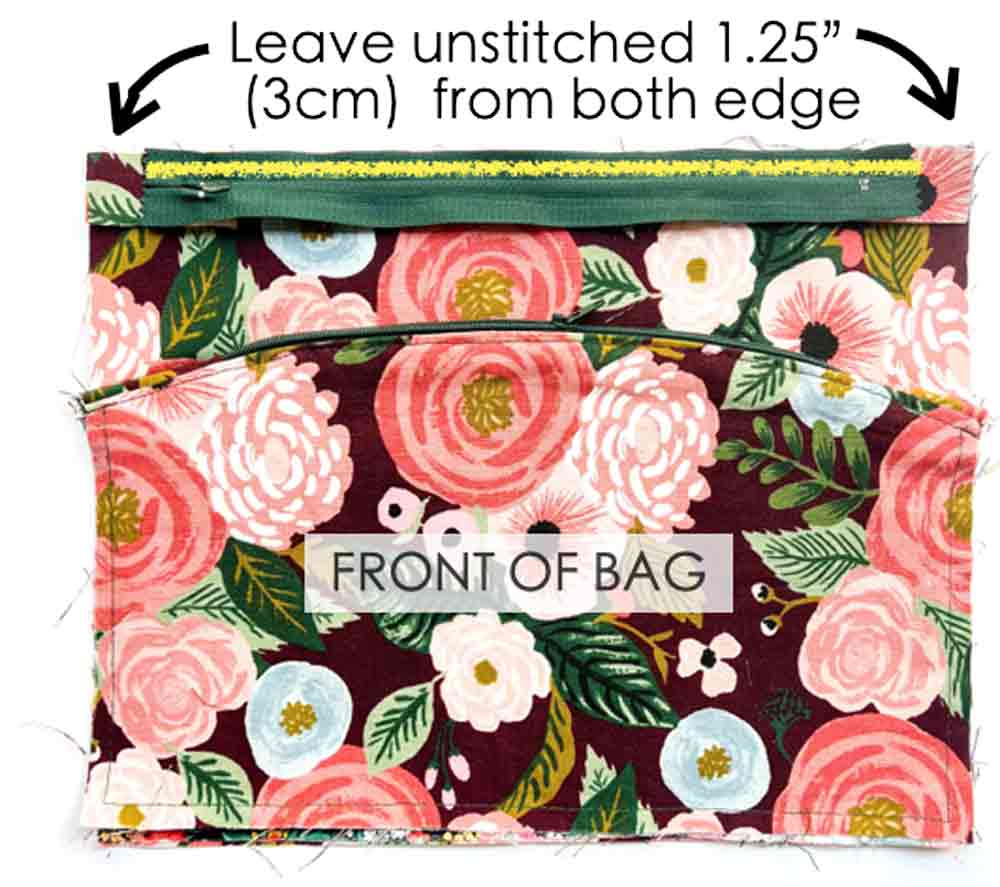
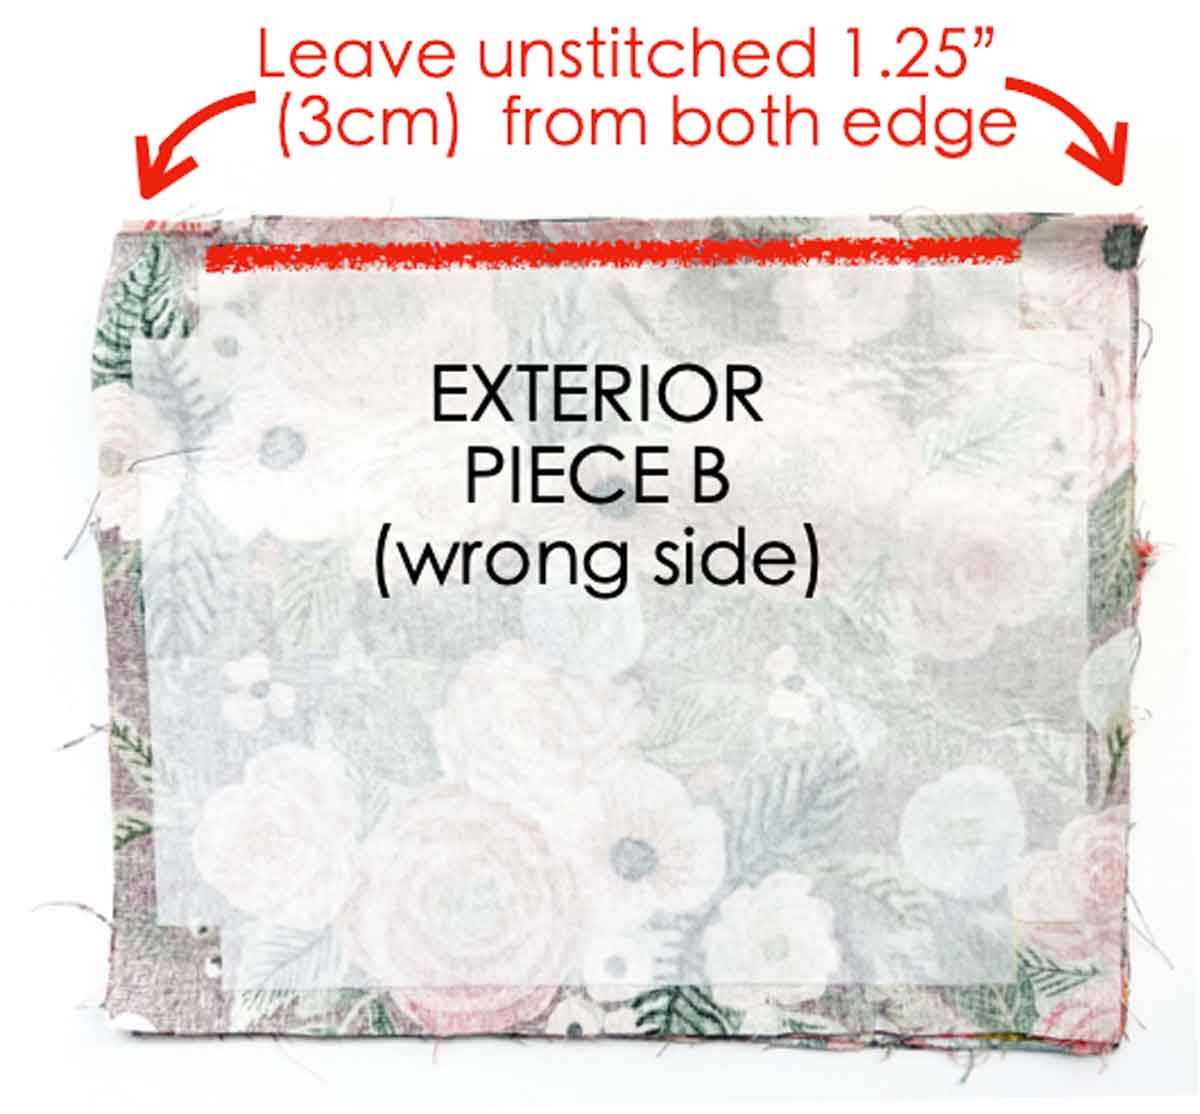
Then, use zipper foot and sew zipper (yellow line), leaving both ends unstitched, 1.25 inch (3cm) from the edge. We will now call this piece [FRONT OF BAG].
NOTE: The piece we now refer to as [FRONT OF BAG] consists of: Zipper, Zipper ends (1 on each side), EXTERIOR FABRIC PIECE A, and Front zipper pocket

Next, place [LINING PIECE A] over [FRONT OF BAG], right sides together.

Then pin and sew together (red line), leaving both ends unstitched, 1.25” (3cm) from the edge. Be sure to back stitch on both ends.
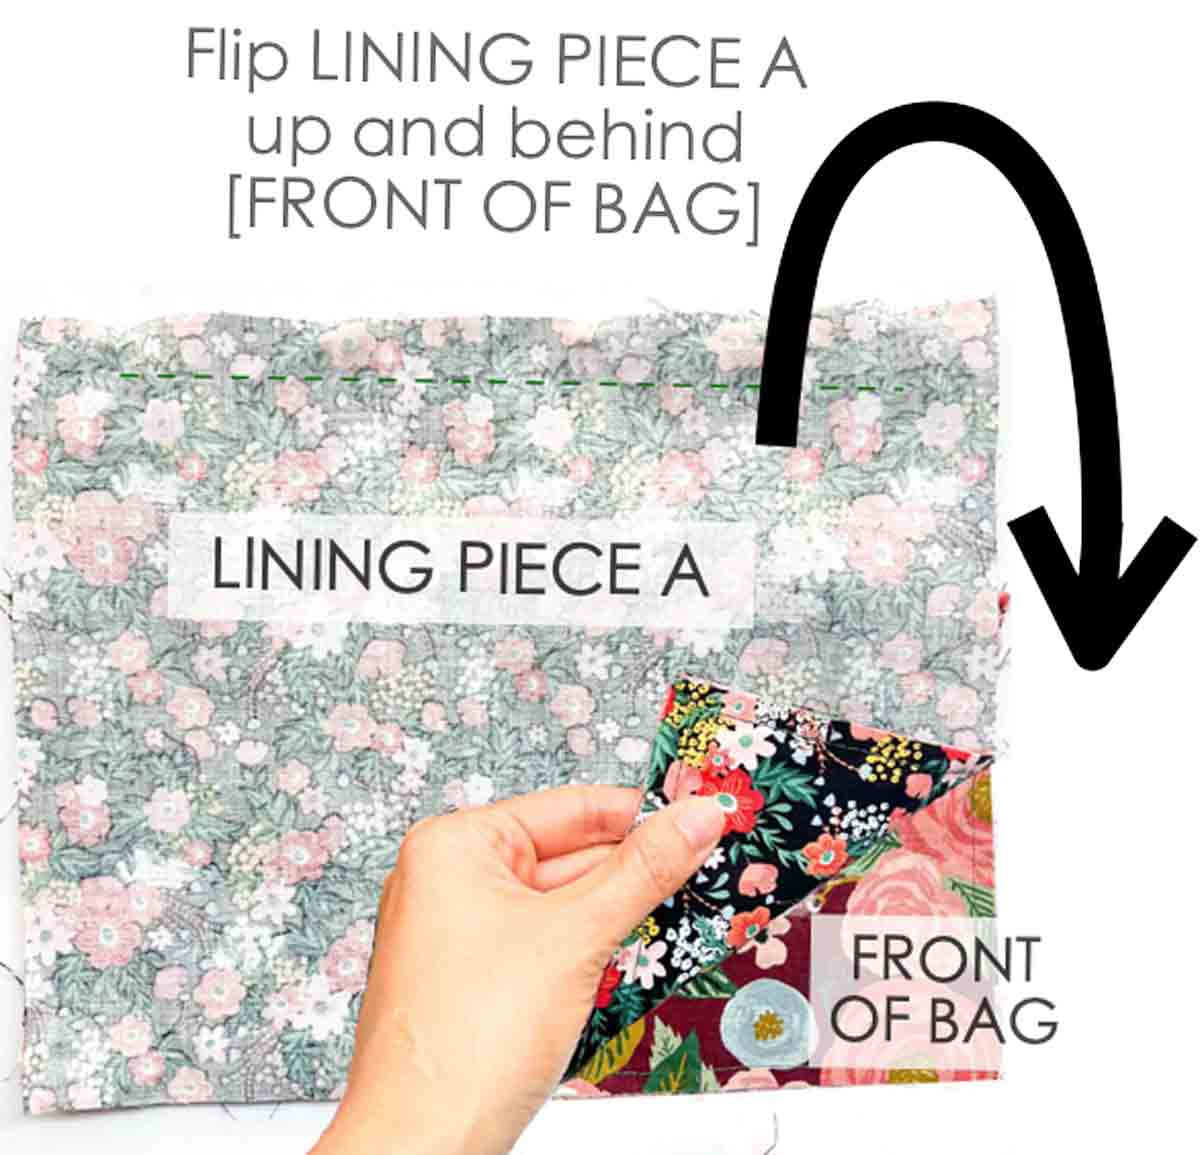
Next, flip [LINING PIECE A] up and to the back of [FRONT OF BAG].

The zipper and zipper ends will point upwards once [LINING PIECE A] is behind [FRONT OF BAG].
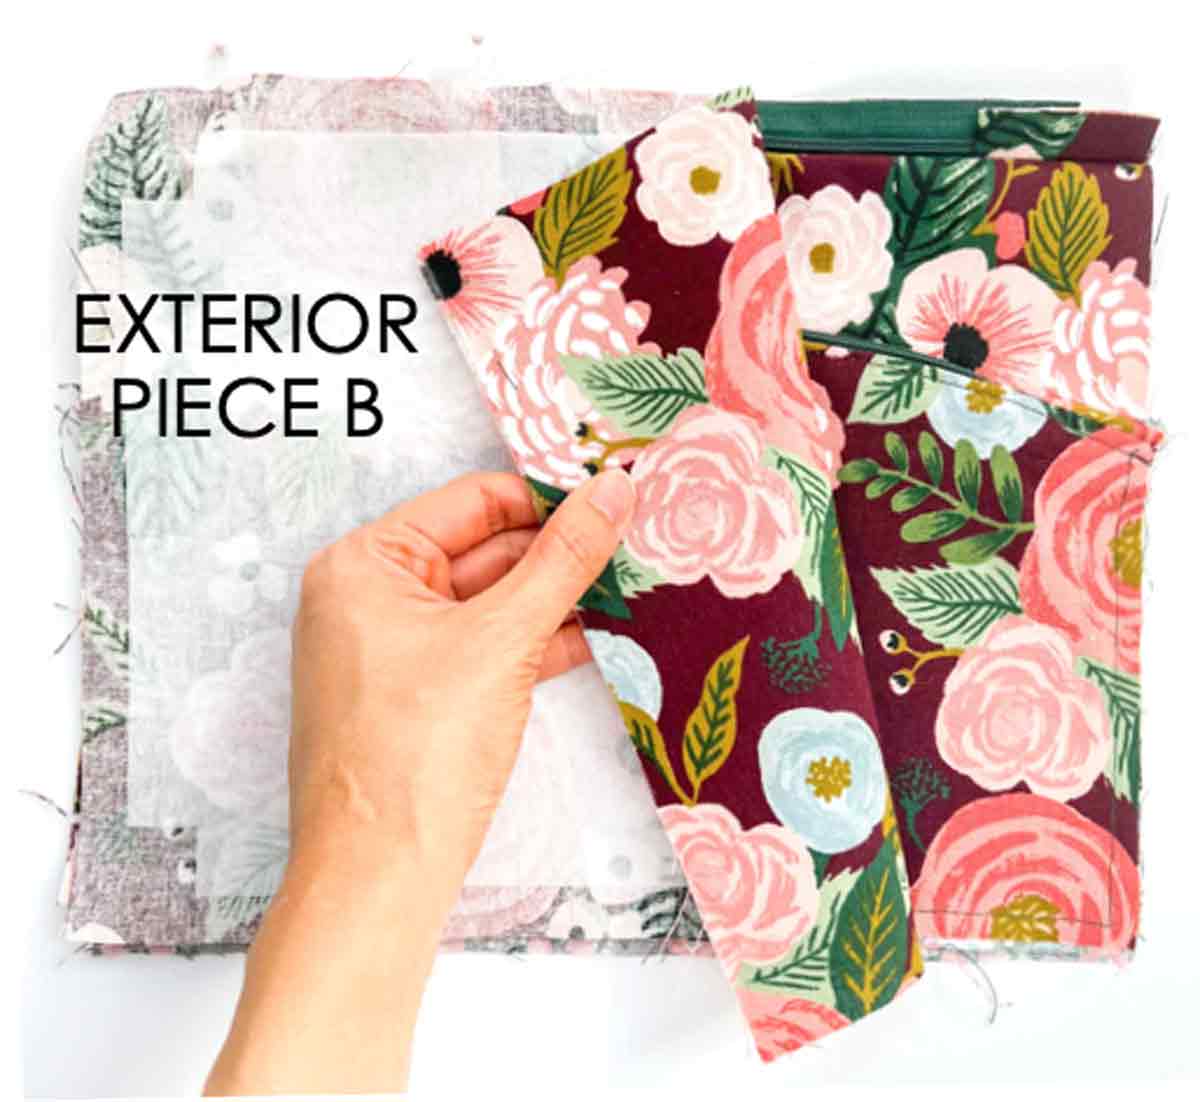
Next, place [EXTERIOR PIECE B] over, right sides together.
Then pin and sew together (red line), leaving both ends unstitched, 1.25” (3cm) from the edge. Back stitch on both ends.
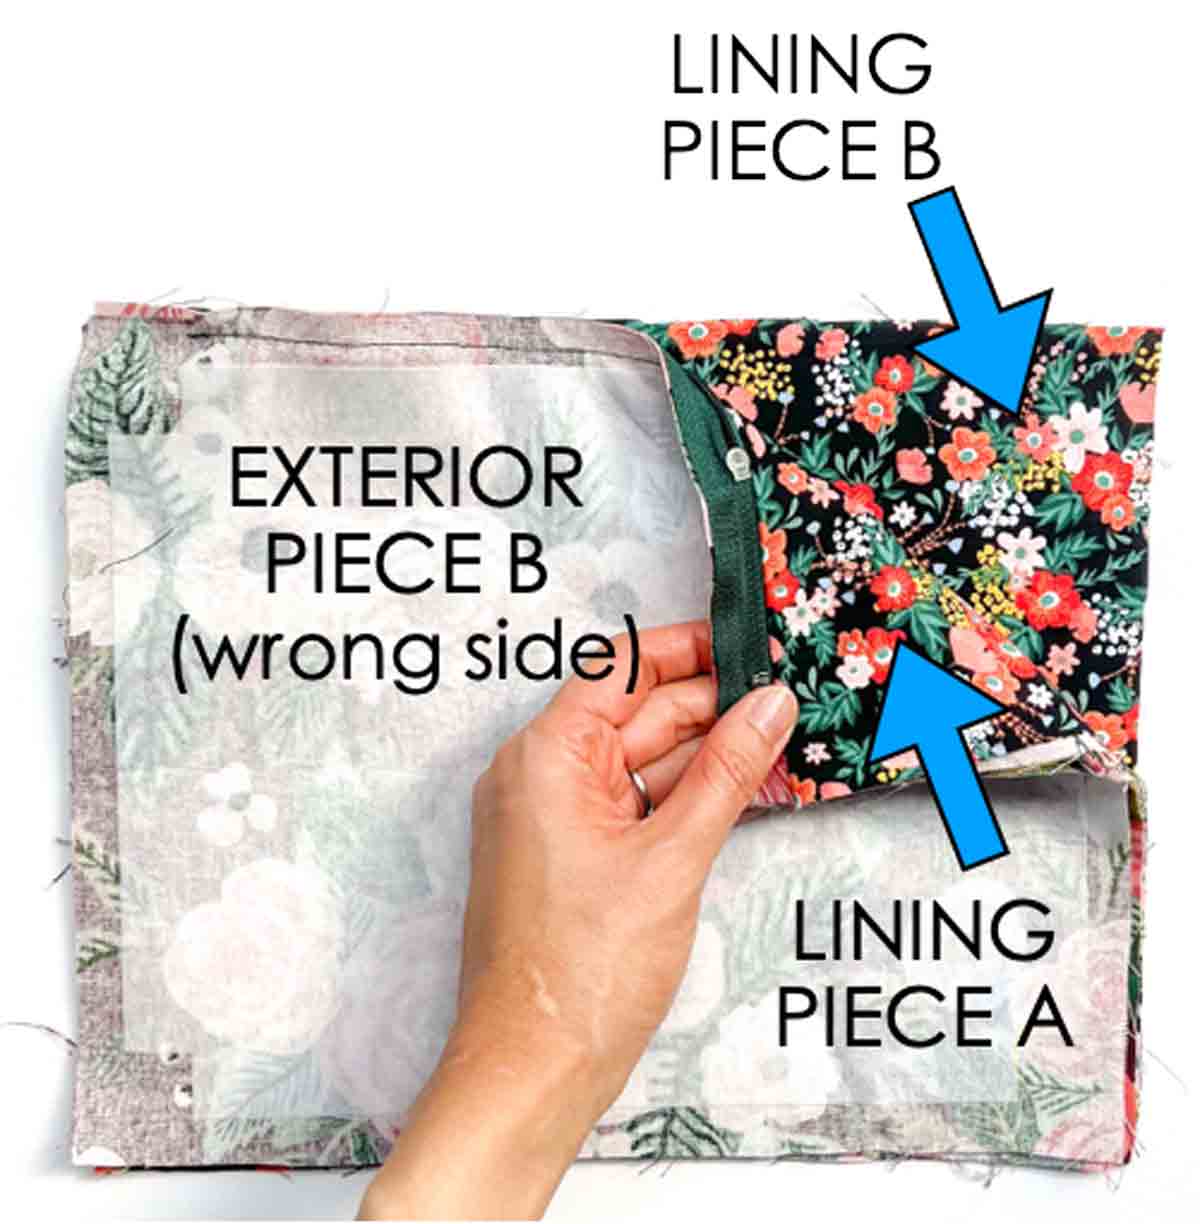
Now place this entire fabric piece over [LINING PIECE B], right sides of lining together.

Then pin and sew together (red line), leaving both ends unstitched, 1.25” (3cm) from edge. Back stitch at both ends.
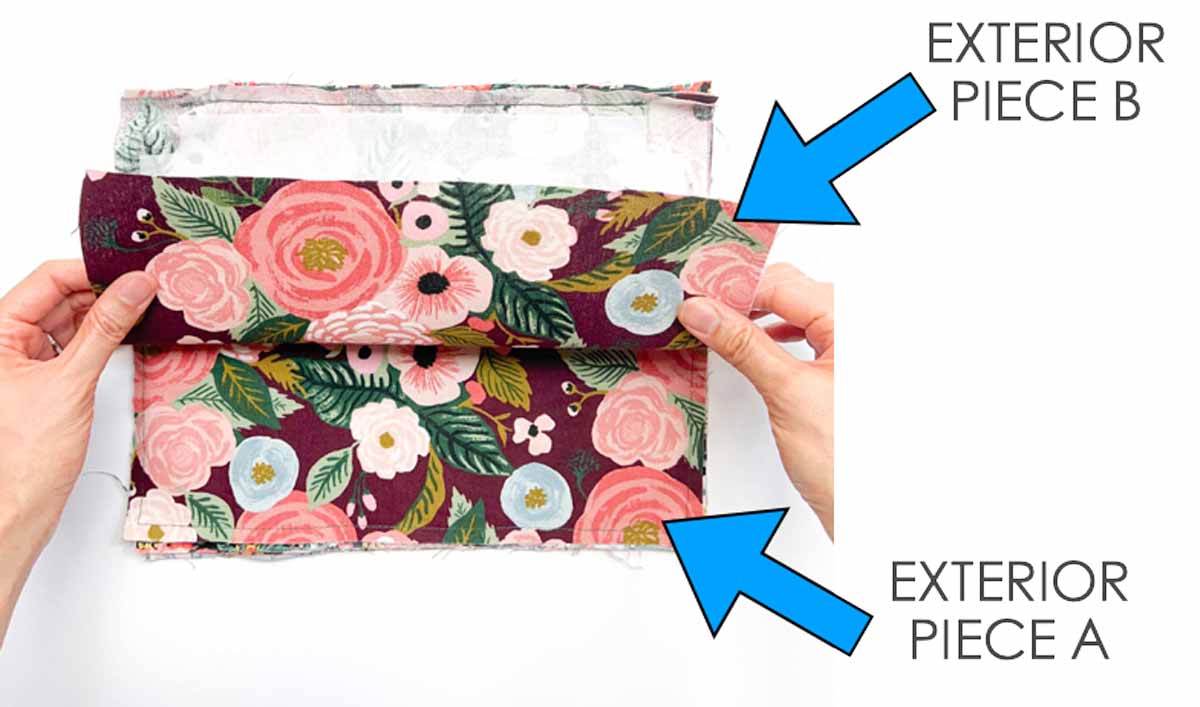
Now, lift [EXTERIOR PIECE B] up and away from [EXTERIOR PIECE A].
Continue lifting [EXTERIOR PIECE B] away from [EXTERIOR PIECE A] until they are completely separated (right photo)
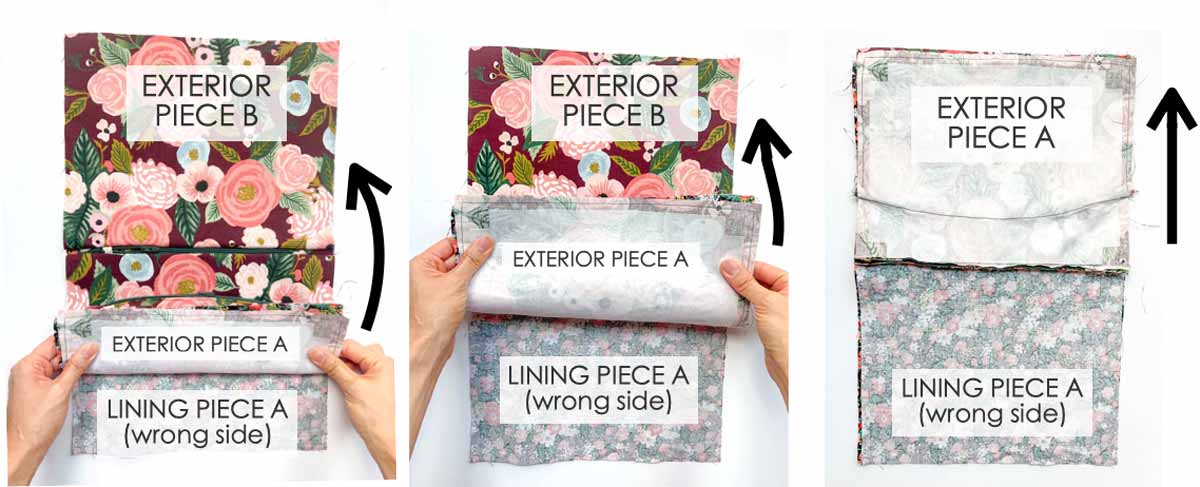
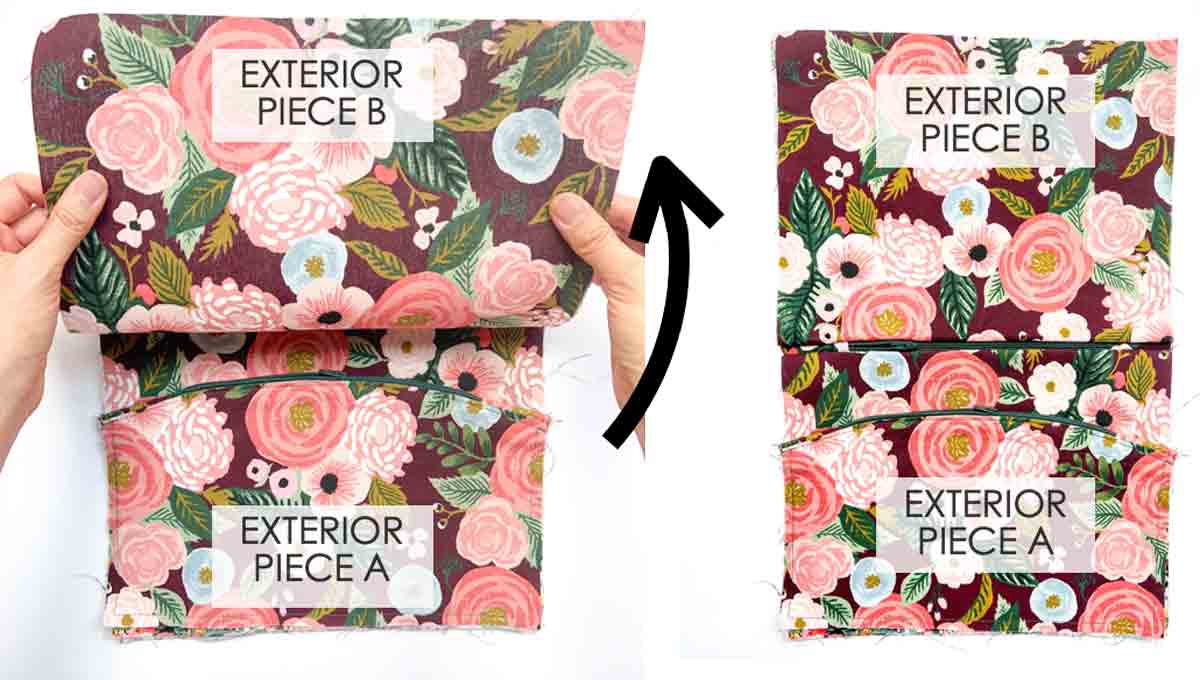
Next, lift [EXTERIOR PIECE A] up so that it is facing [EXTERIOR PIECE B], right sides together. The wrong side of [LINING PIECE A] will be on the bottom.

Here is another view of what your fabric pieces should look like. The right sides of EXTERIOR PIECES face each other on the top, and the right side of LINING PIECES face each other on the bottom.

Now, at the zipper line, point the seam allowance towards [EXTERIOR PIECE A].

Then clip (or pin) in place.

Next, repeat pointing seam allowance towards [EXTERIOR PIECE B] on other side.
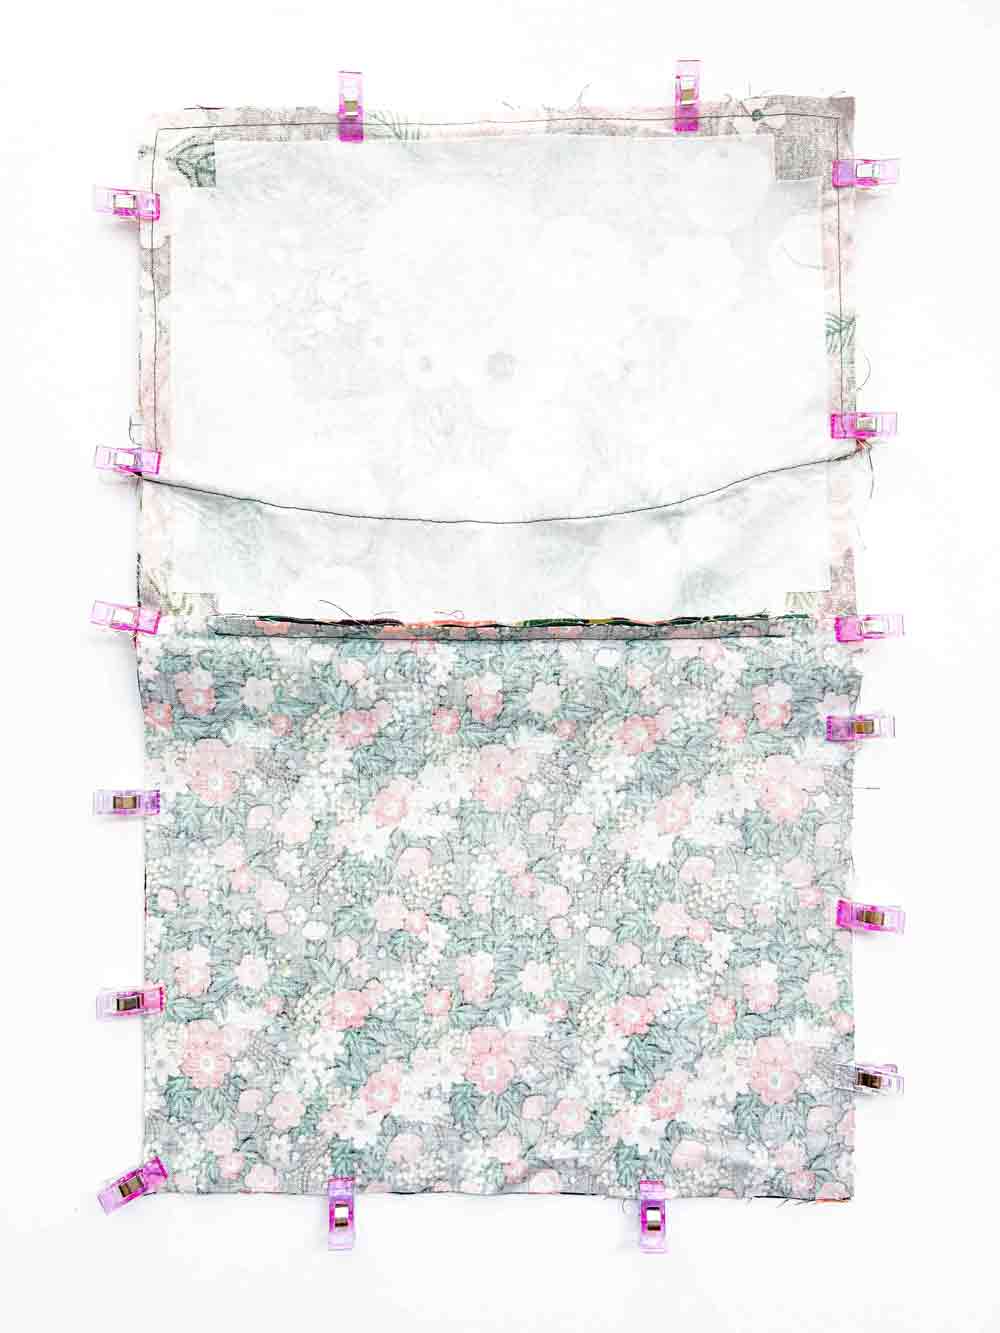
Then, point seam allowance up (towards EXTERIOR FABRIC) on other side of crossbody bag. Clip (or pin) entire bag together.

Stitch entire bag together at 1/2” (1.27cm) seam allowance (red dotted line), leaving a 3” (7.62cm) opening at the bottom of lining. Back stitch on both ends of opening.
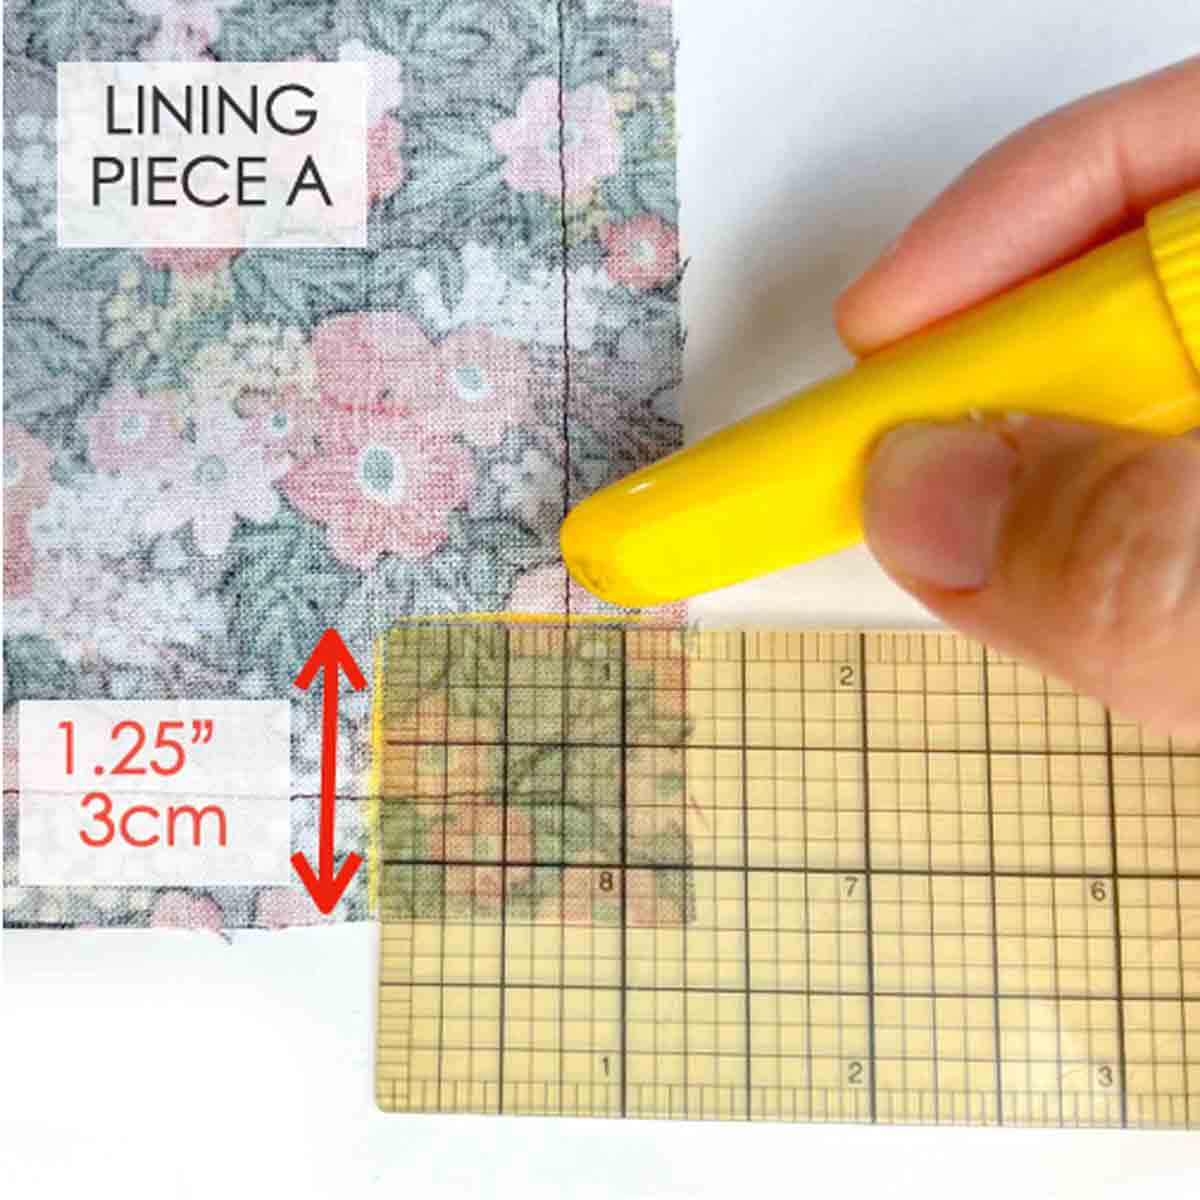
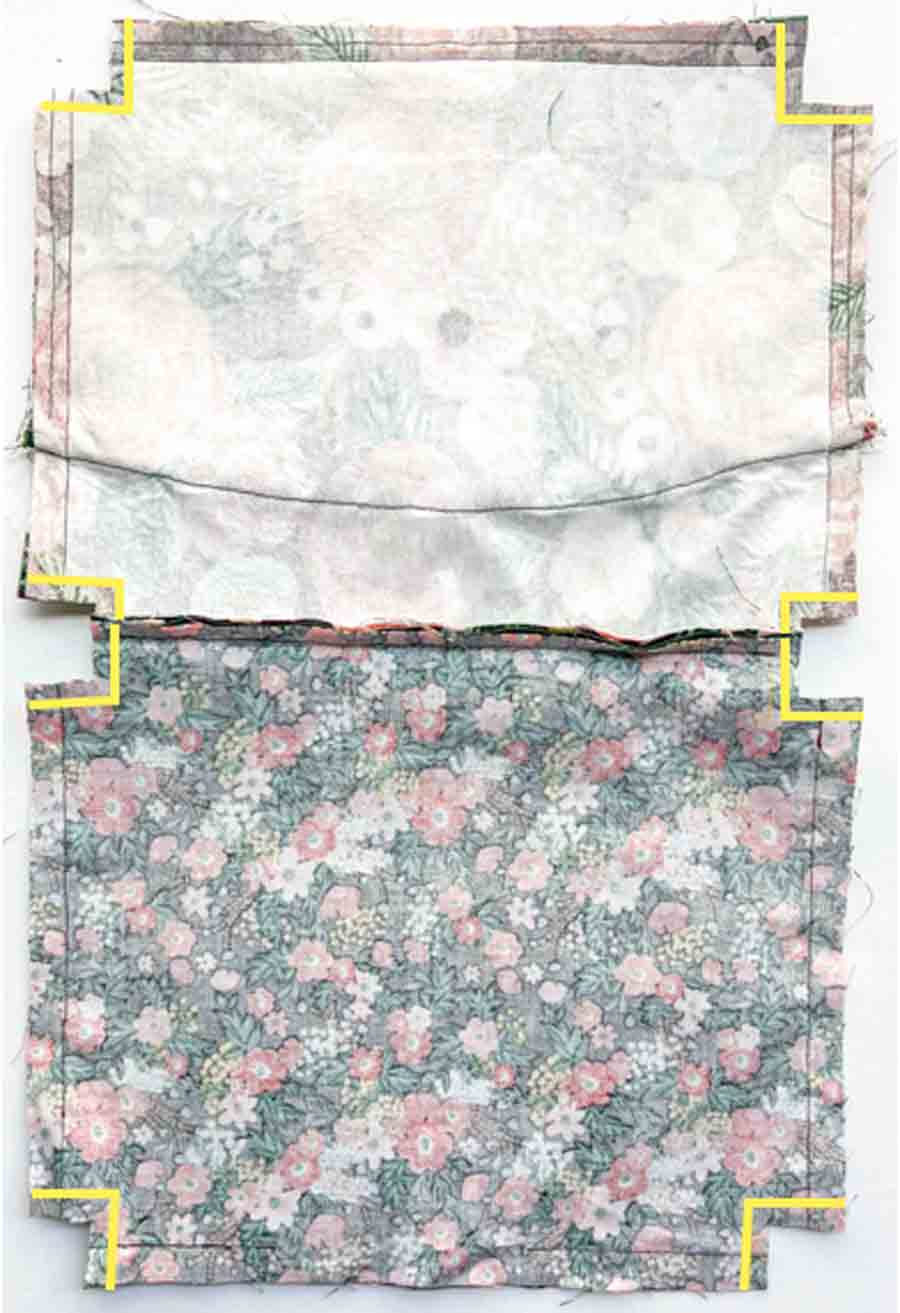
Next, on the bottom corner of lining, use fabric chalk and clear ruler to mark a 1.25” (3cm) square, as pictured.
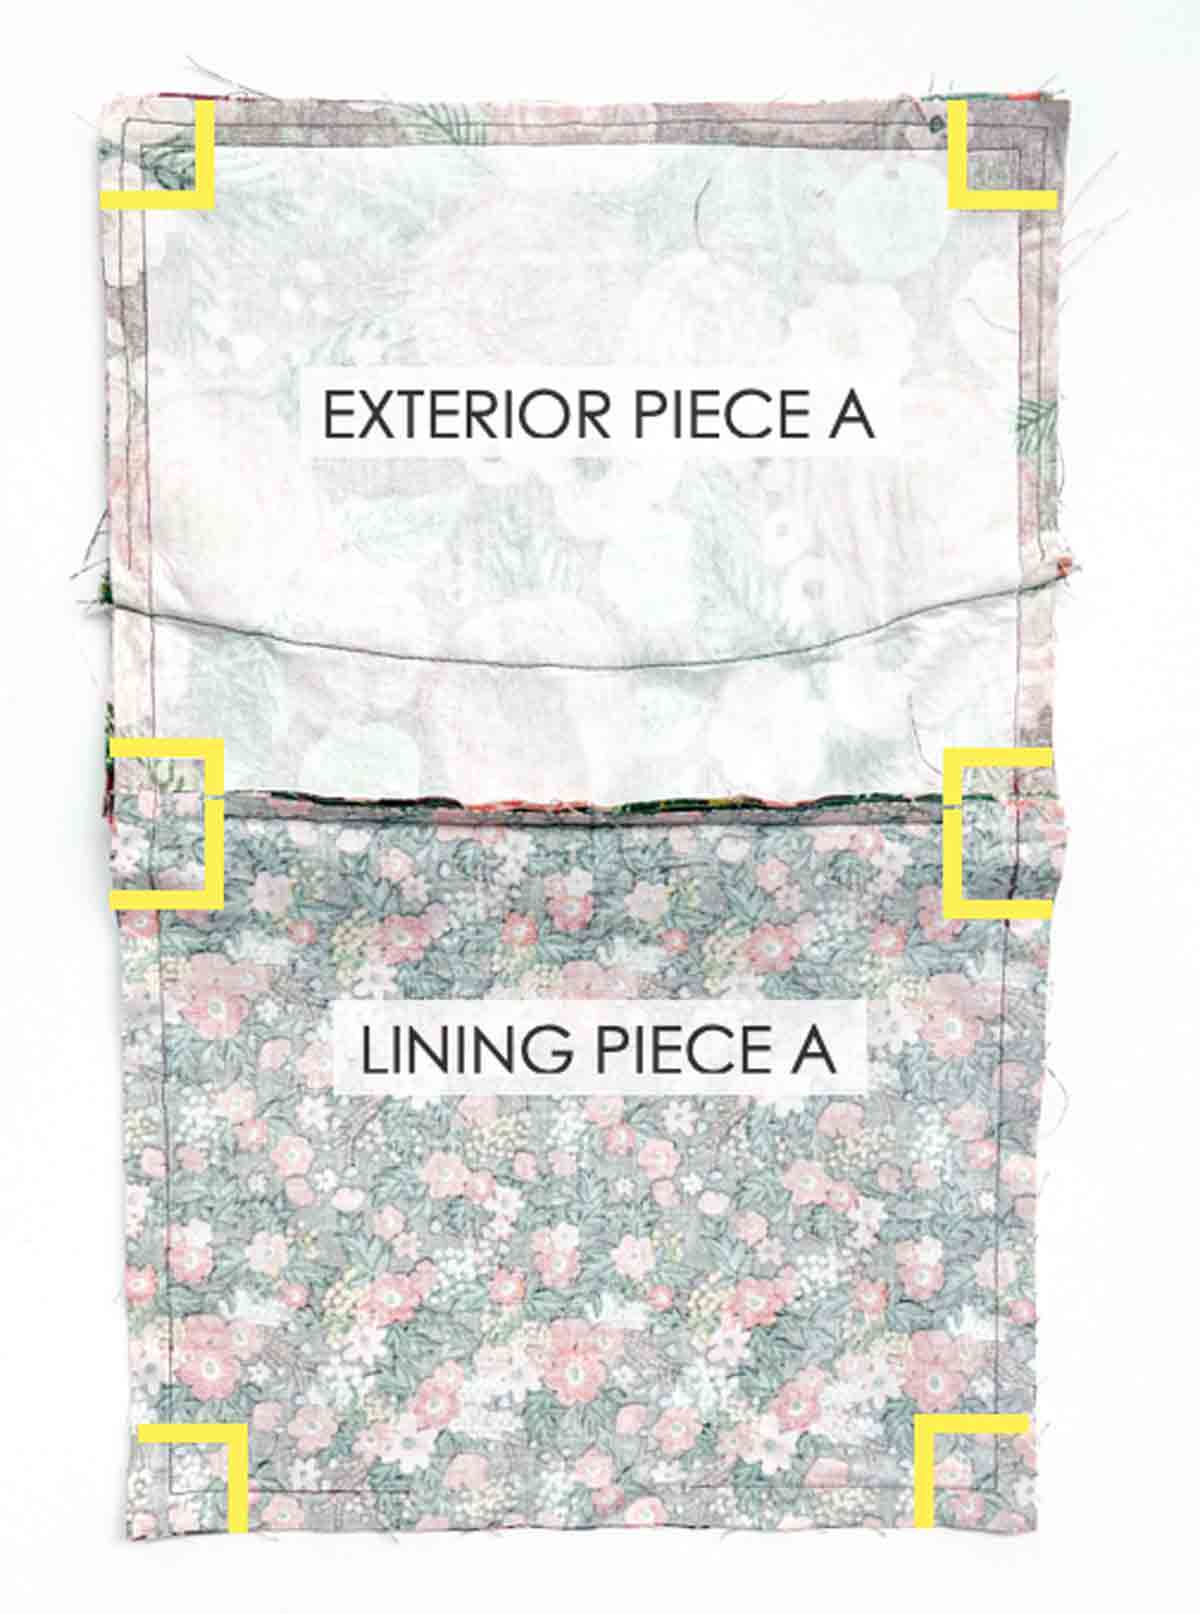
Repeat on all the corners, both on lining and exterior fabric (yellow right angles).

Repeat marking corners on other side of bag ([LINING PIECE B] and [EXTERIOR PIECE B]).
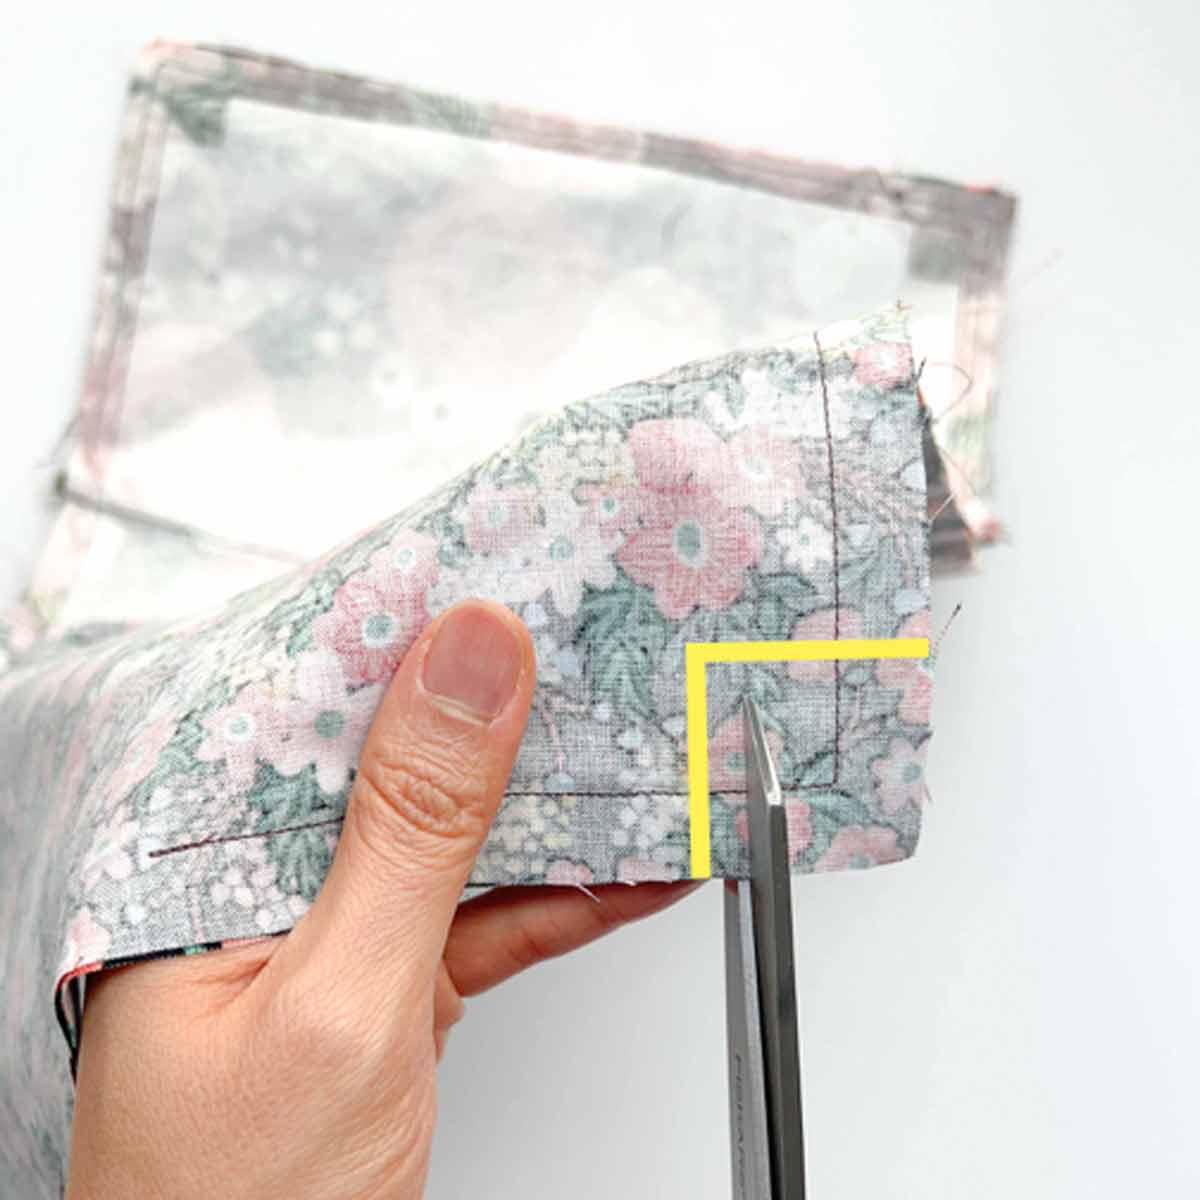
Cut out the corners, approximately 0.25” (6mm) shy of the marked corners
Repeat cutting out all the marked corners.

Trim seam allowance to 0.25 in (6mm).
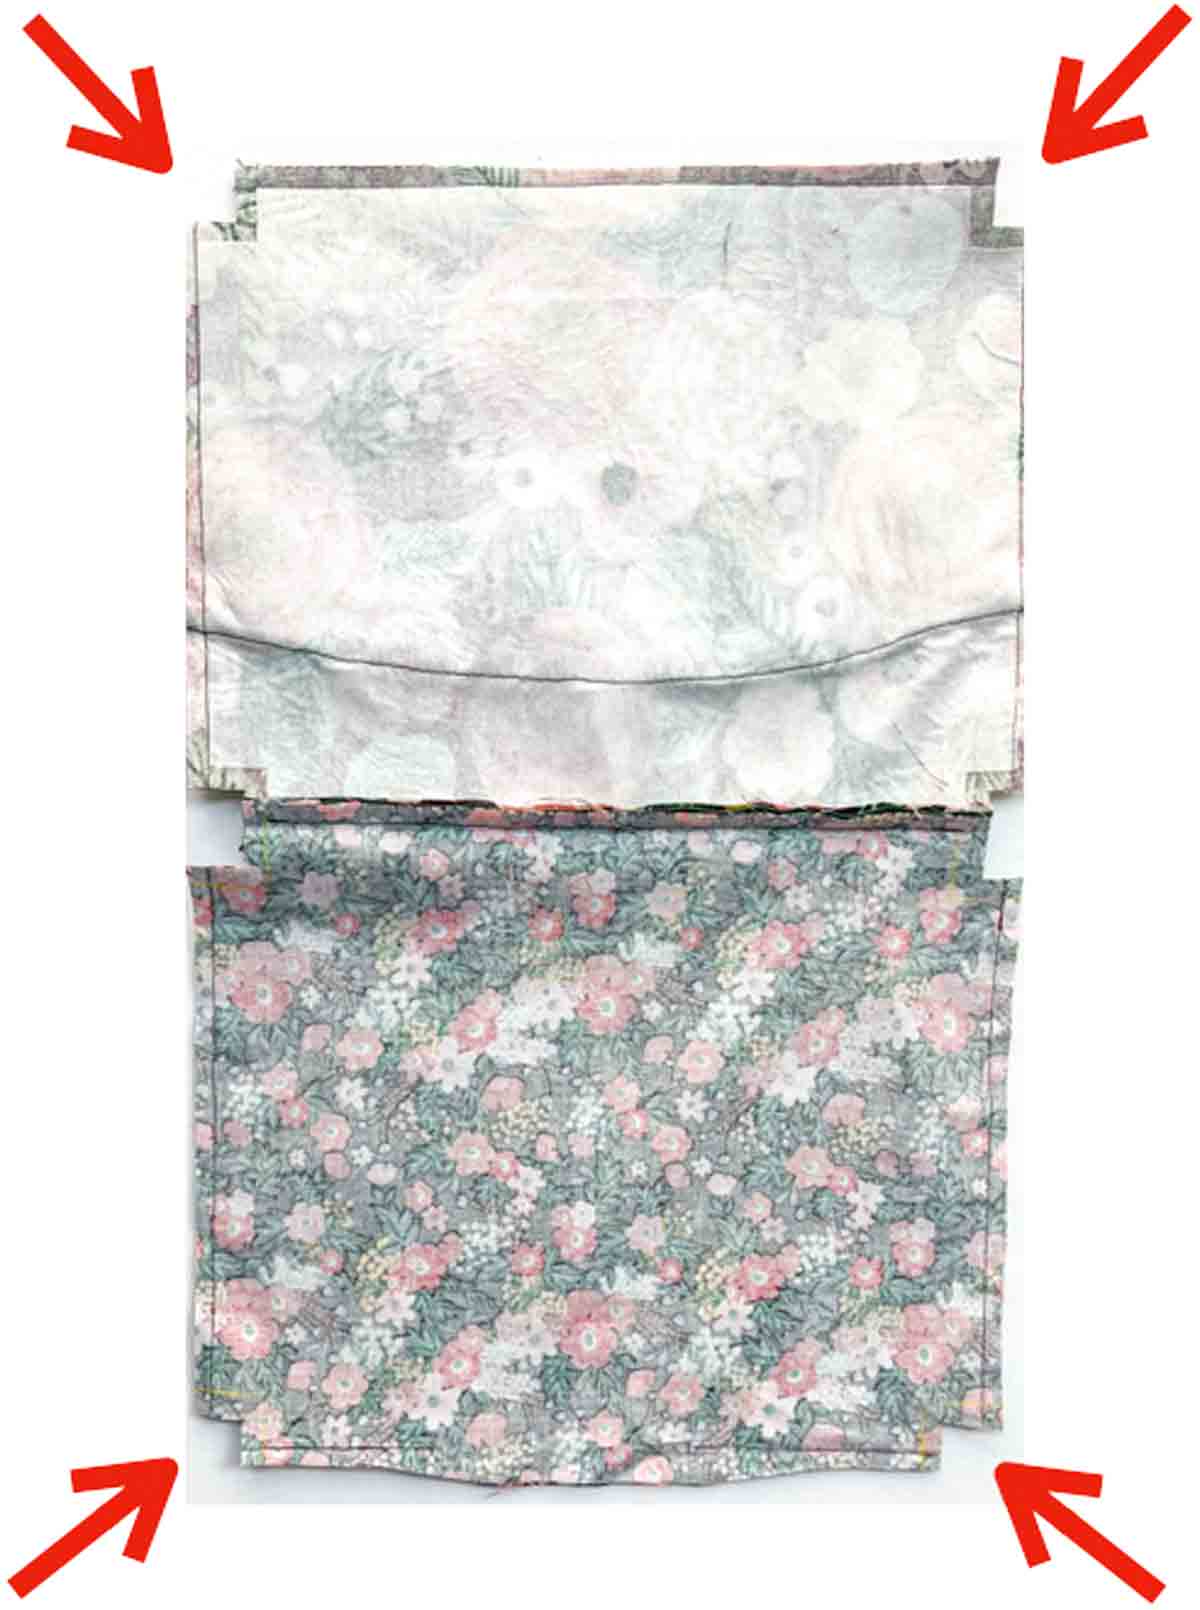
Next, we’re going to box all the 4 corners (red arrows) first. Continue reading to learn how.
How to Box Corners Along Bottom of Bag

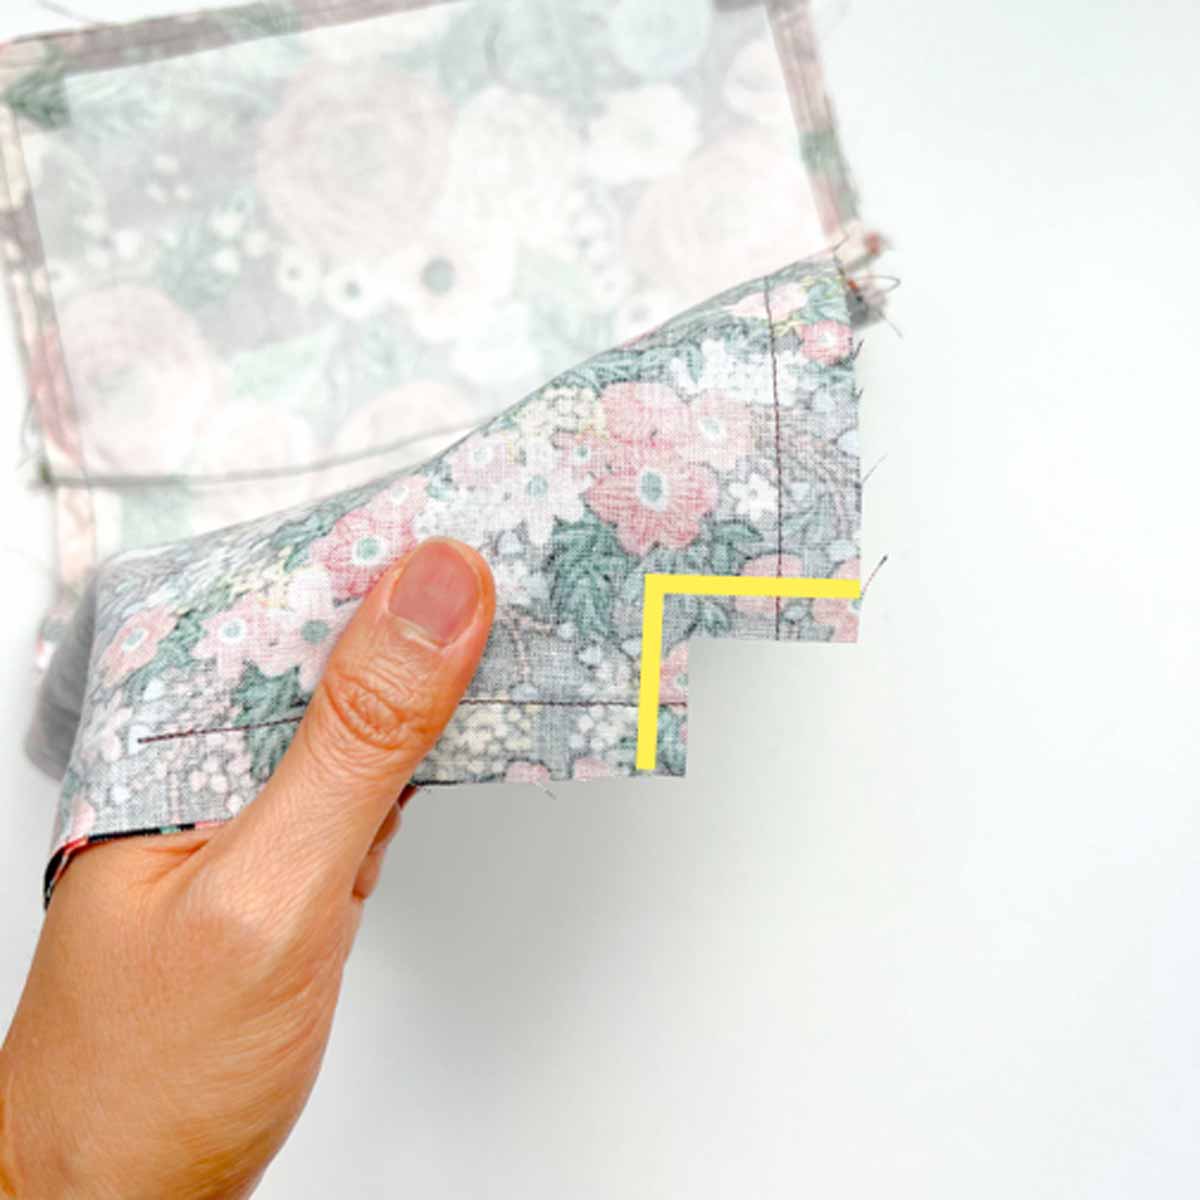
First pull open the corners and make it flat, matching at the side seams.

Second, make sure your seam allowances are matching and open.

Next, pin corners in place.
Another view of the boxed corners with pins in place and seam allowances opened on both sides of the corner.
Sew corners together along marking (yellow line) you previously made.
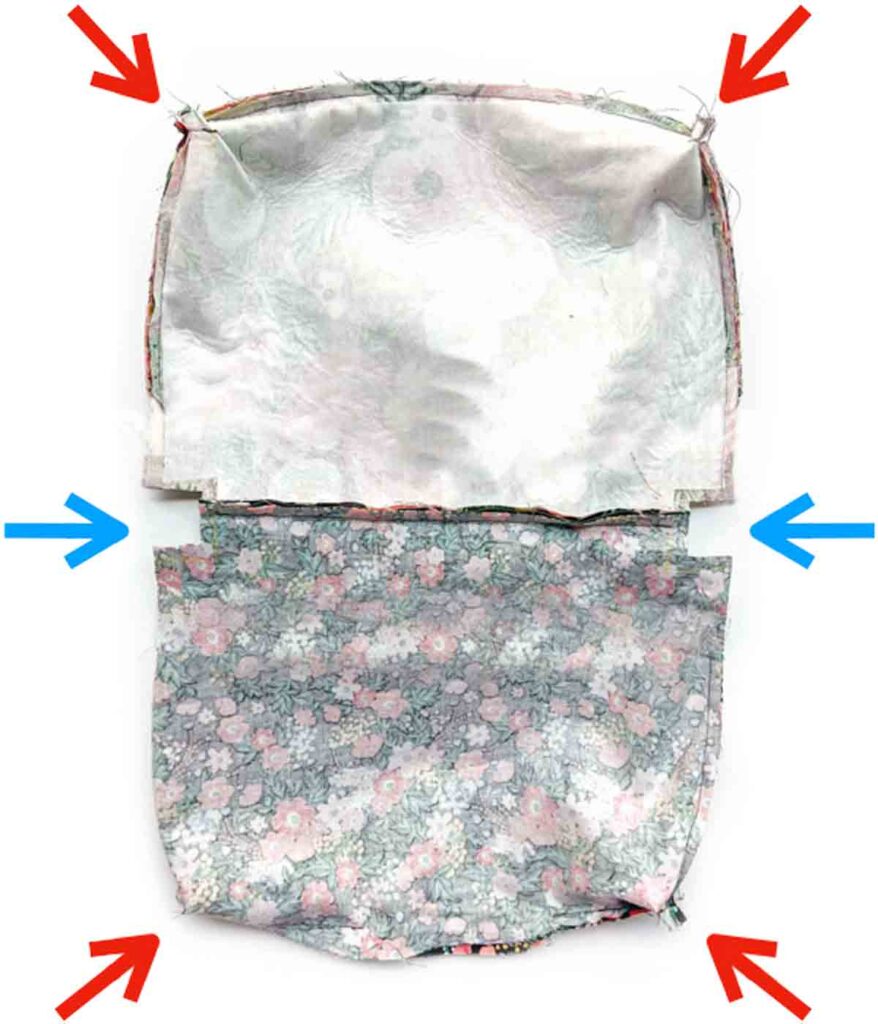
Repeat boxing other 3 corners that make up the bottom of the bag (red arrows). Next, we will proceed to box the corners along the top of the bag, where the zipper is (blue arrows).
How to Box Corners Along Top of Bag
First, pull open the corner on lining side.

Second, flatten the corner and match the side seam. Don’t forget to open up your seam allowance.
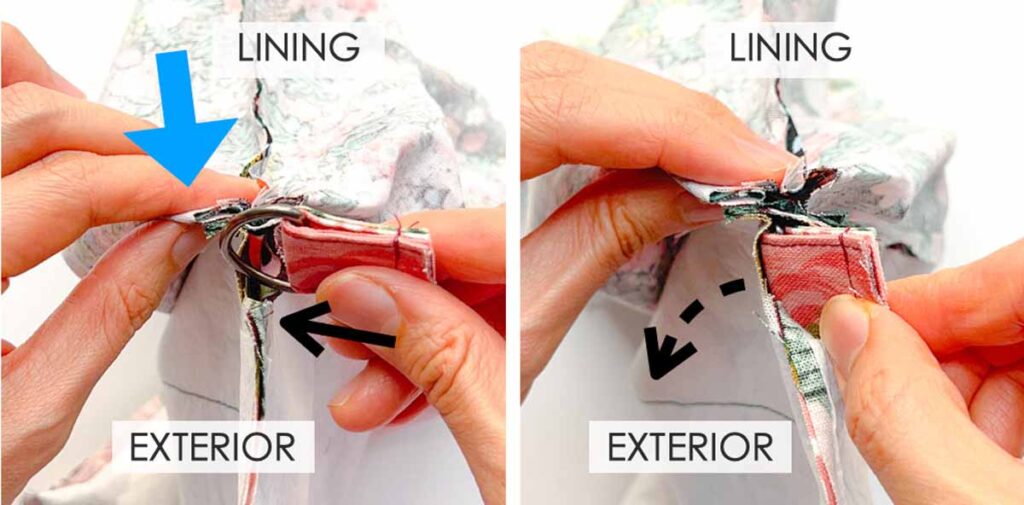
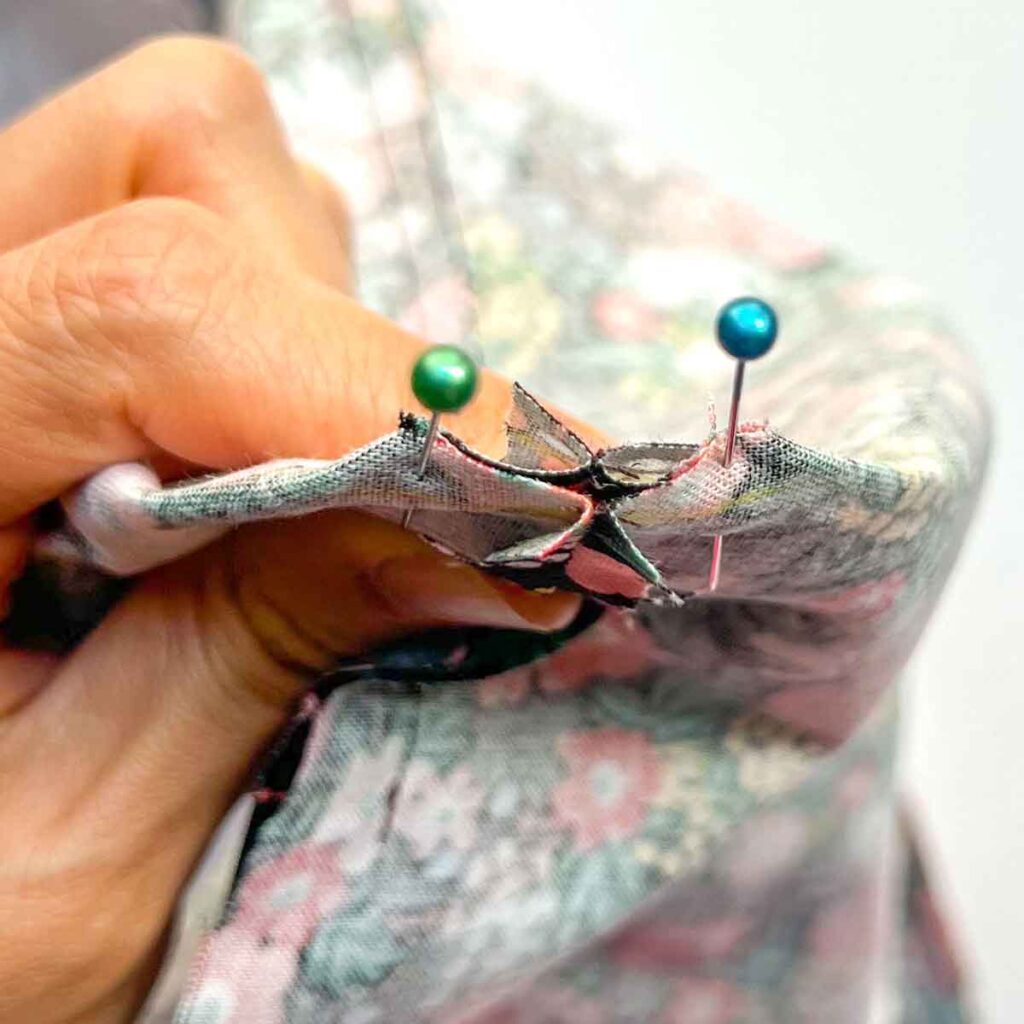
Next, keep holding the lining to keep it flat. Then take your side loop (with D-ring facing down), and slide it into the opening on the exterior side (black arrow).
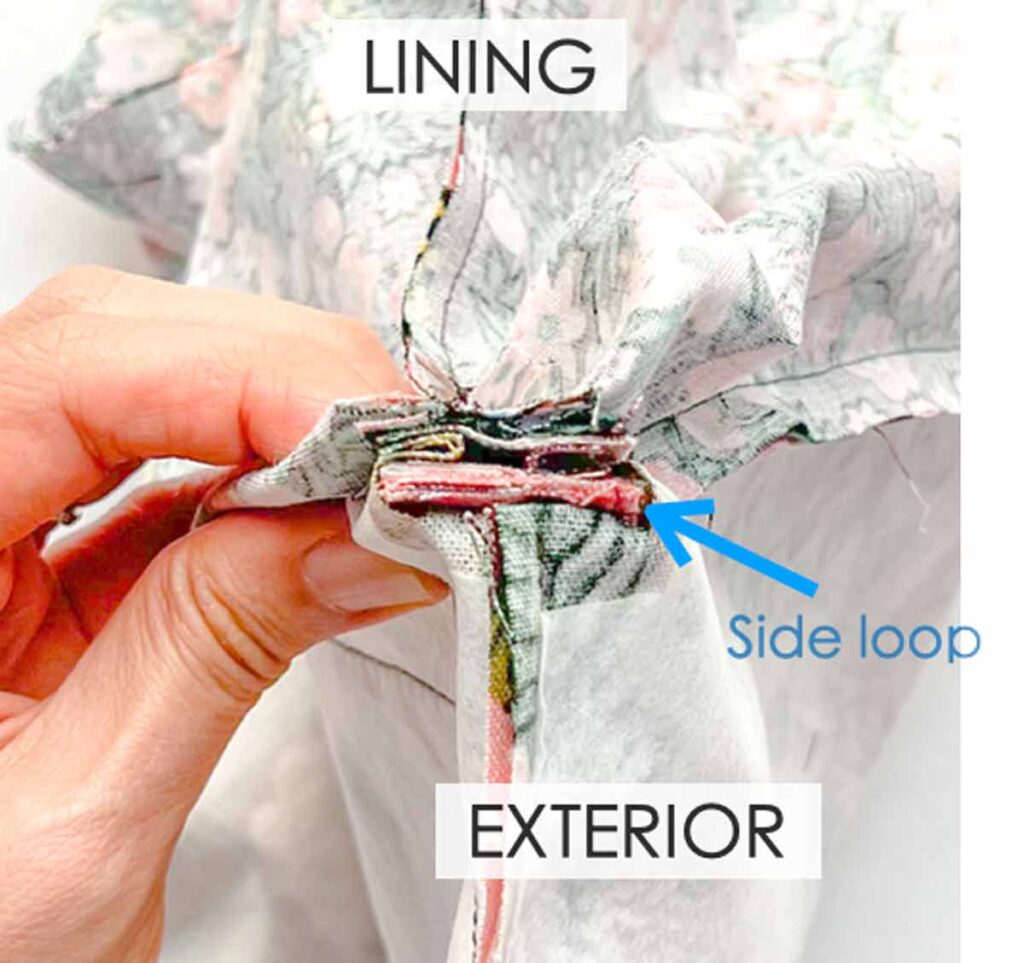
Then, slide side loop all the way into the opening on exterior of bag.

Next, place a clip to hold the lining and side loop in place.
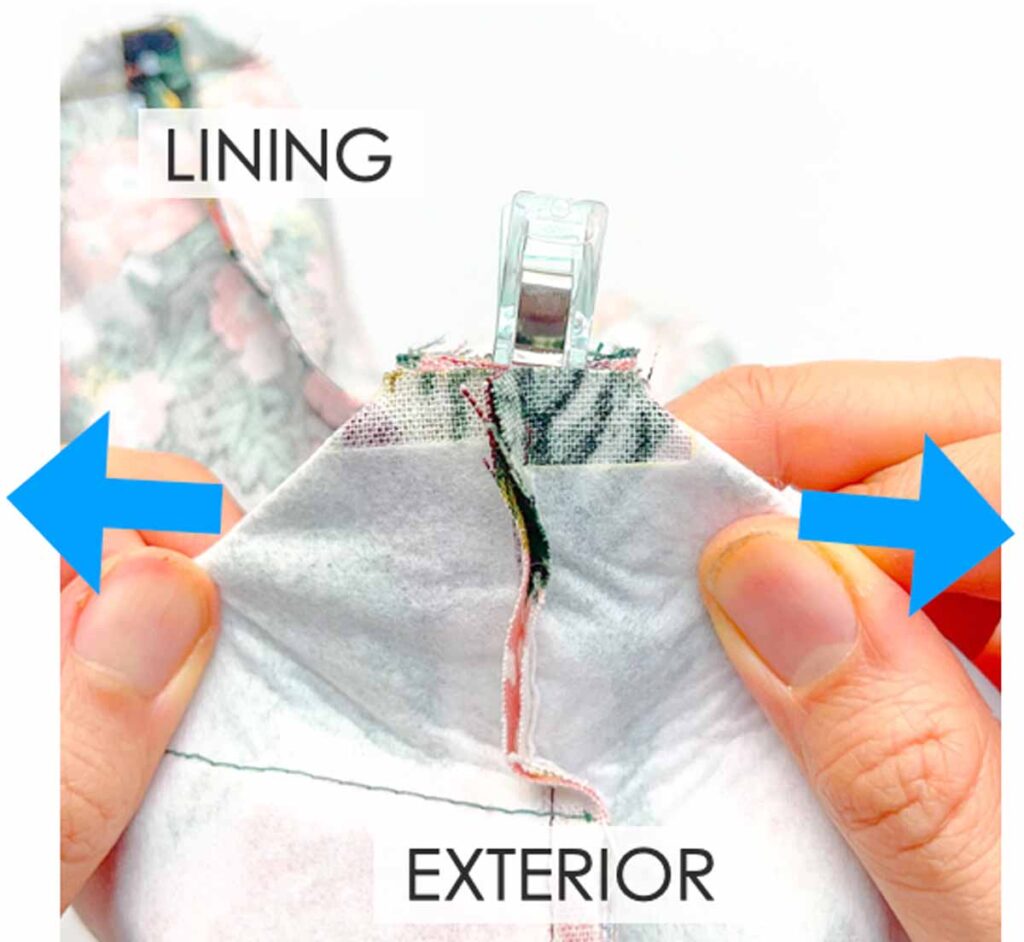
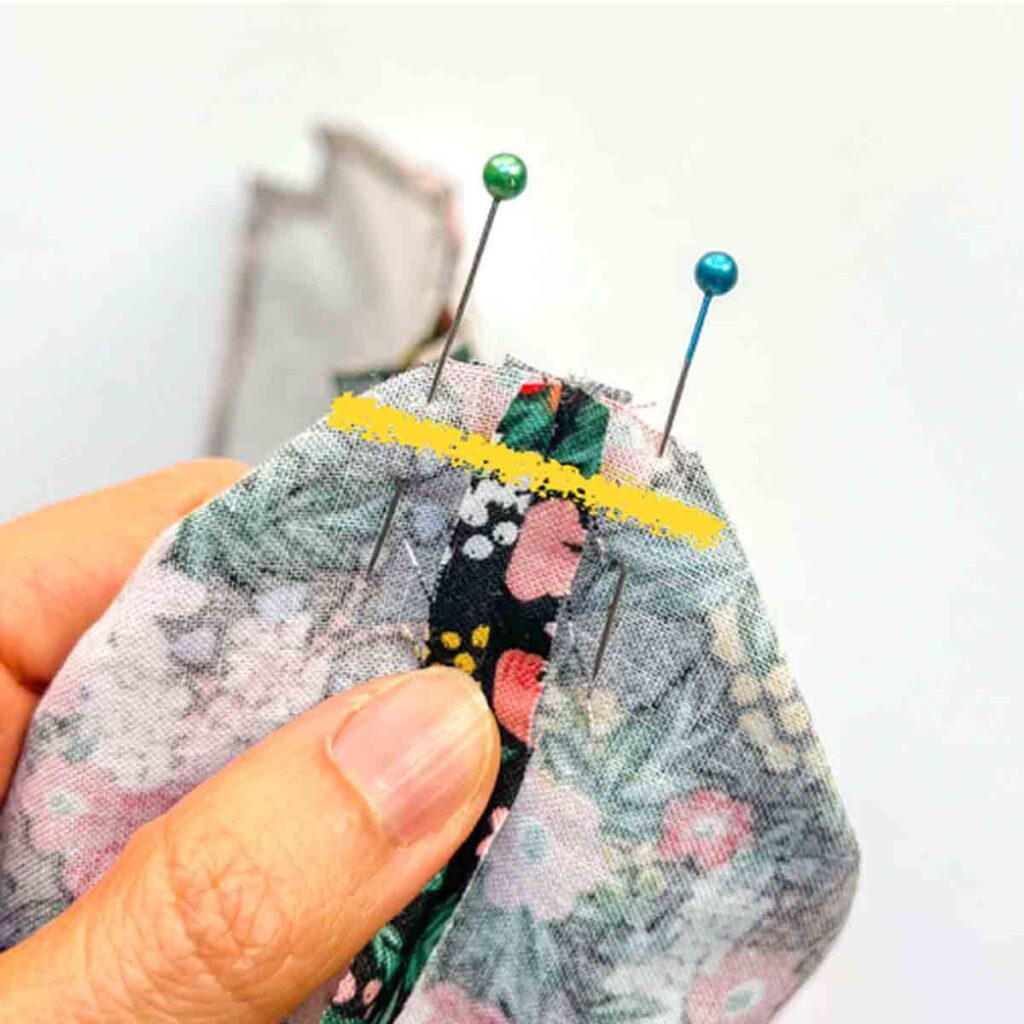
Then, pull open exterior fabric corner and flatten it.
Now match side seam (as best as you can, I know there are MANY layers of fabric it’s hard to see), and open the seam allowance.

Hold the exterior corner in place by moving the clip so that it holds all the pieces together. Next, box the corner by sewing along marking (yellow line). Make sure to backstitch on both ends.

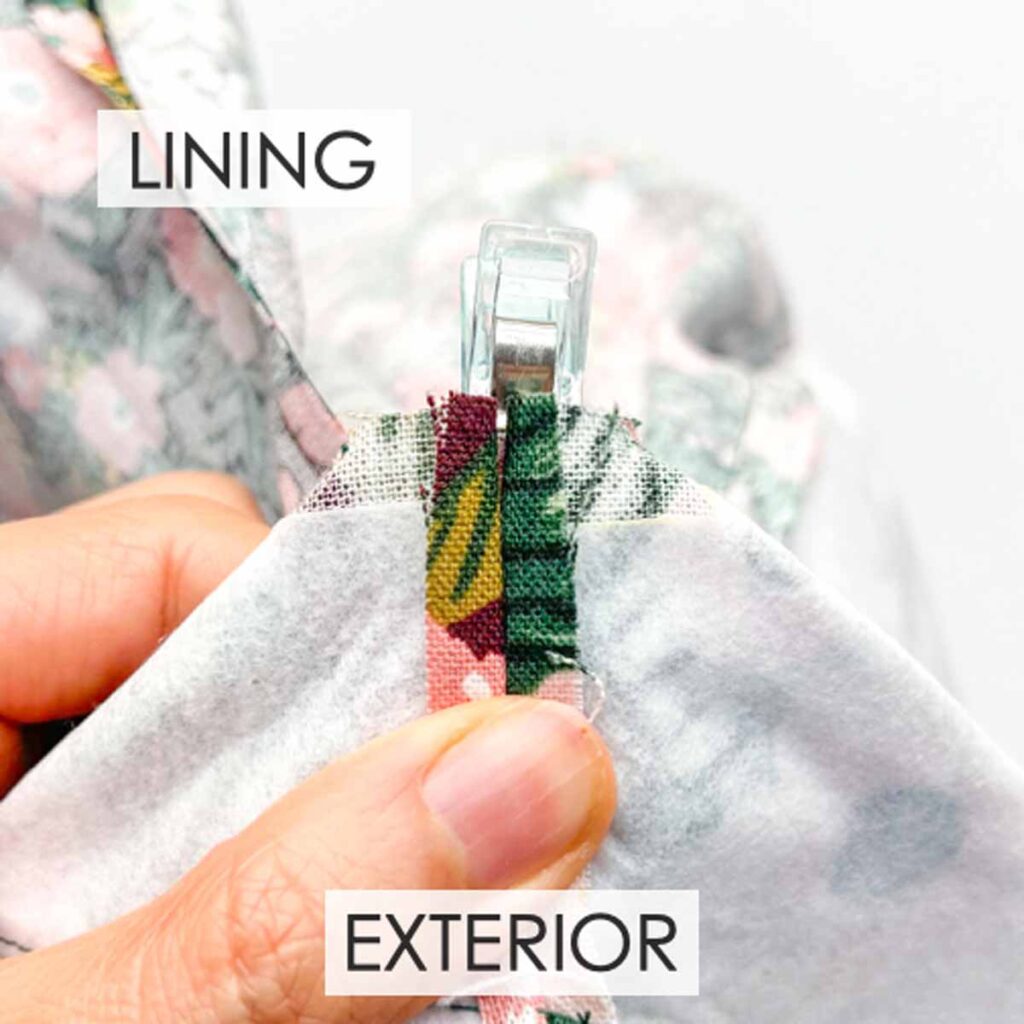
View of boxed corner. Repeat boxing other corner in the same way.

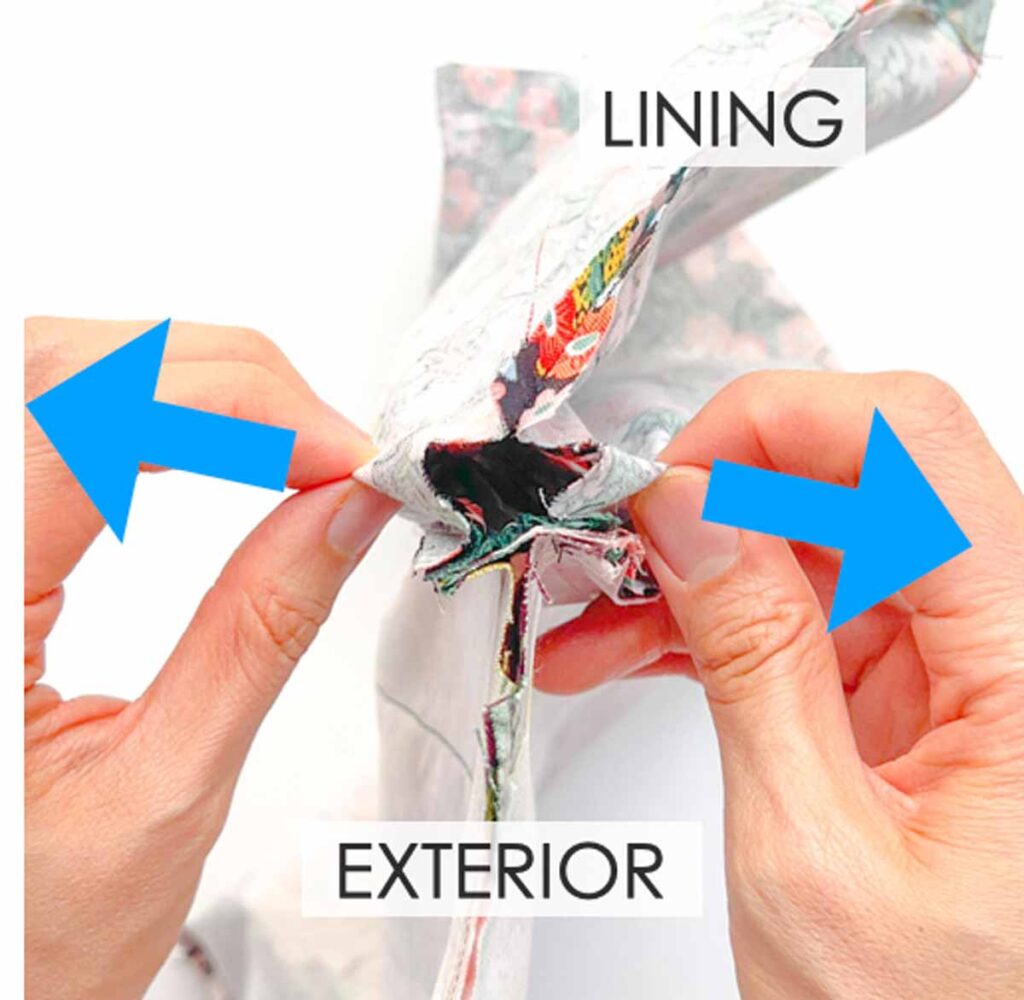
LEFT: Now that all the corners are boxed, we are ready to turn the bag to the right side!
RIGHT: First, stick your hand through the opening at the bottom of the lining and grab one of the top corners (red arrow) and start pulling it through.

Next, keep pulling the bag to the right side through the opening.

Finally, keep going until your bag is pulled all the way to right side.

Then, close opening on lining using invisible ladder stitch.

Finally, tuck lining into exterior of bag.
Now your bag is done! Yay! All we need to do now is make the straps!
How to Sew Bag Strap

Cut a long strip of fabric that measures 55” x 3” (140cm x 7.62cm).
NOTE: Cut your fabric strip so that the 55” (140 cm) is measured along (parallel to) the selvedge. I don’t recommend piecing together two fabric strips to get the 55” (140 cm) length as the seam allowance creates bulk which makes it harder to maneuver the strap slider.

Next, cut a long strip of interfacing that measures 54” x 2”(137cm x 5cm). This is recommended if you are using a thin cotton to make the strap). Fuse interfacing to wrong side of fabric.
NOTE: In the example below I do not use interfacing as my fabric is a light weight canvas.
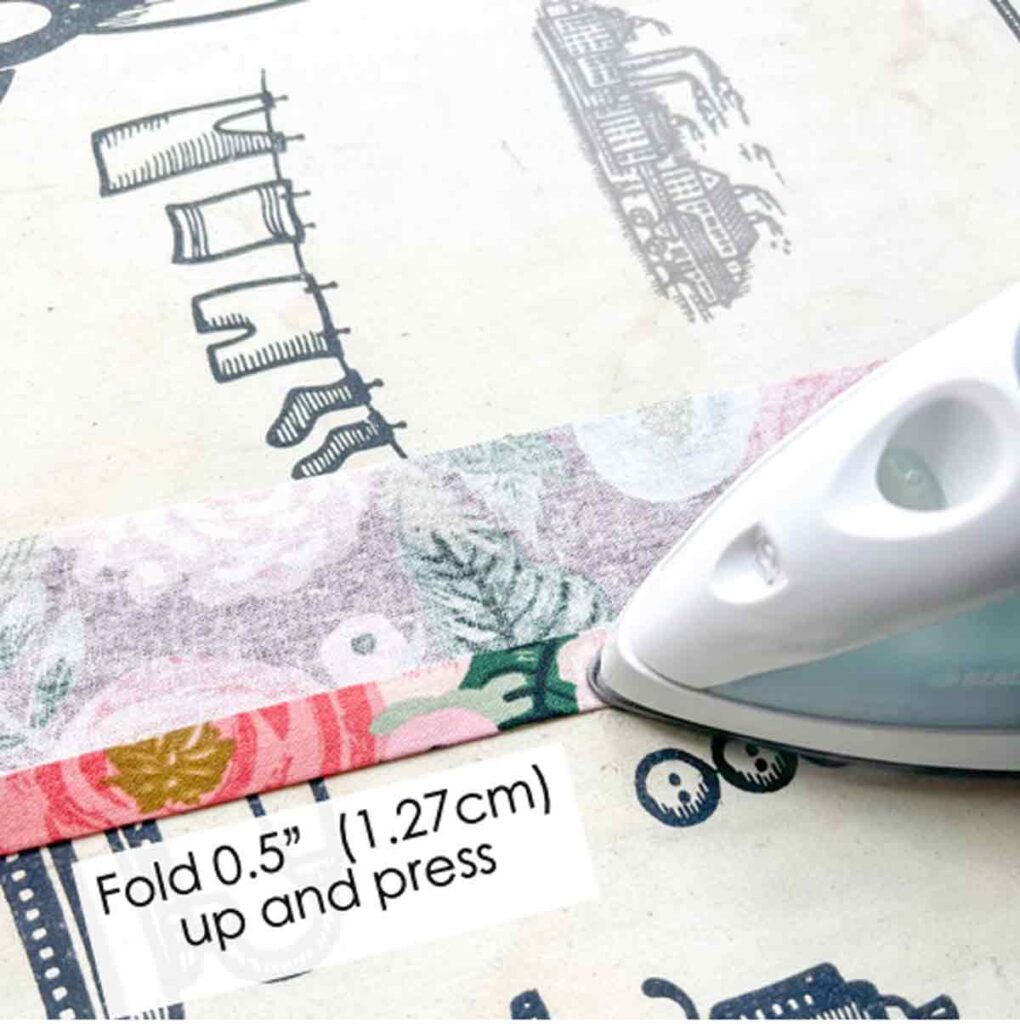
Next, fold fabric strip up 0.5” (1.27cm) and press.

Then fold fabric strip down 0.5” (1.27cm) and press.
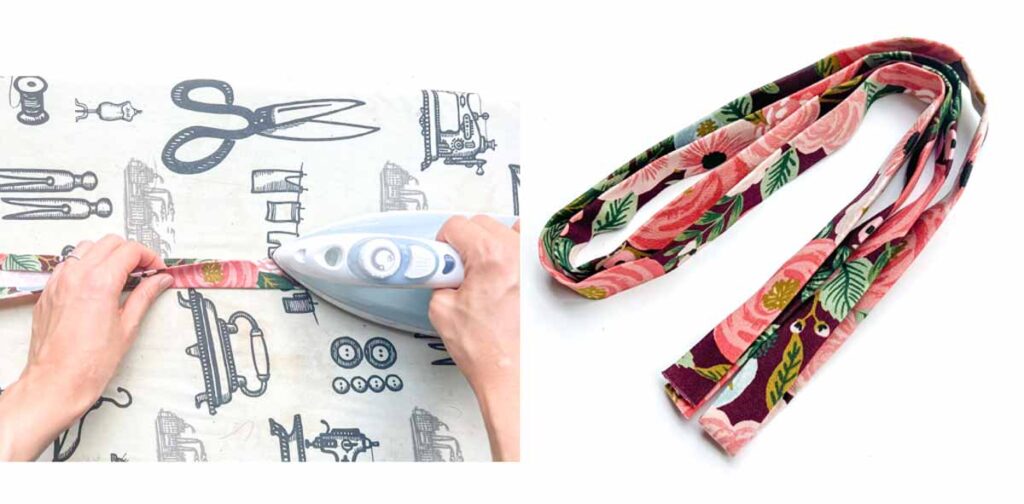
Then, fold entire fabric strip in half along the center and press.

Next, top stitch first along the open end of the strap. Then, do another row of top stitch along the other long edge. Your top stitch should be about 1/8” (3mm) from the edge.

Your bag strap is now finished.
Threading Bag Strap

First gather your supplies. You will need the long strap you just sewed and a strap slider.
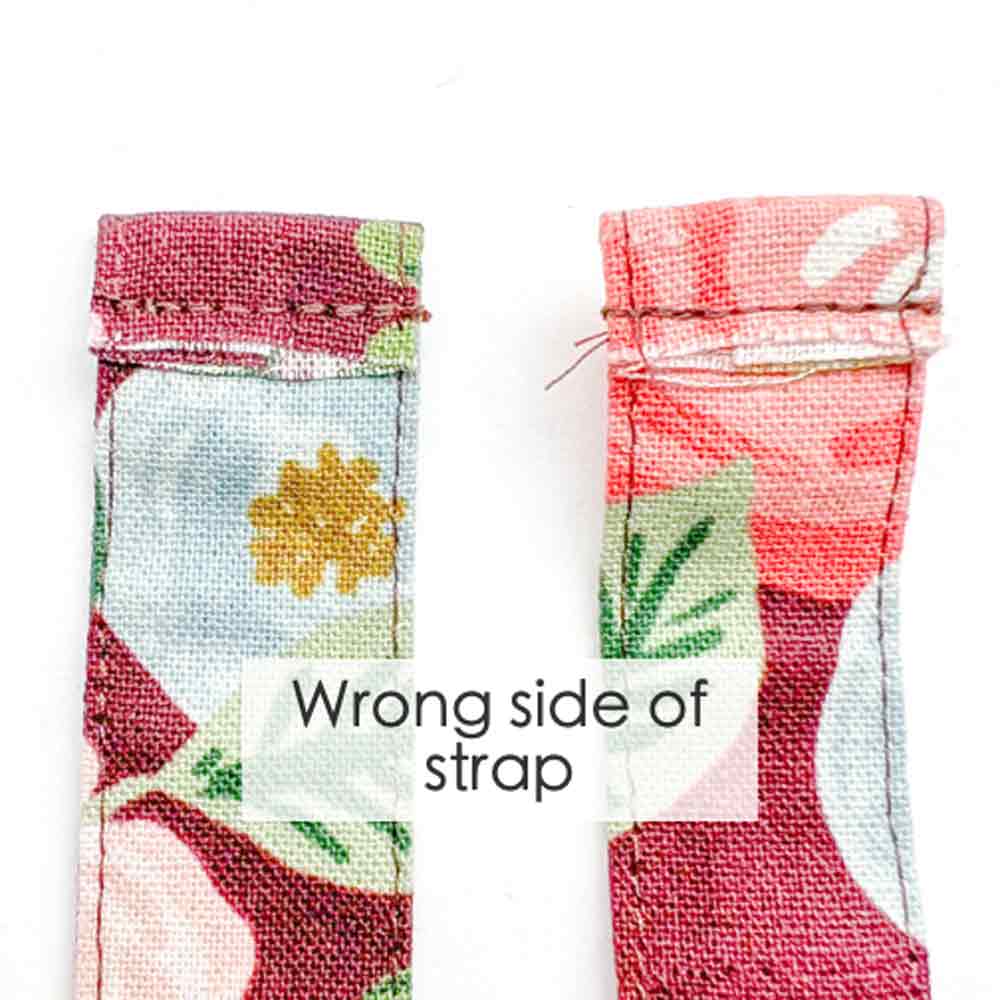
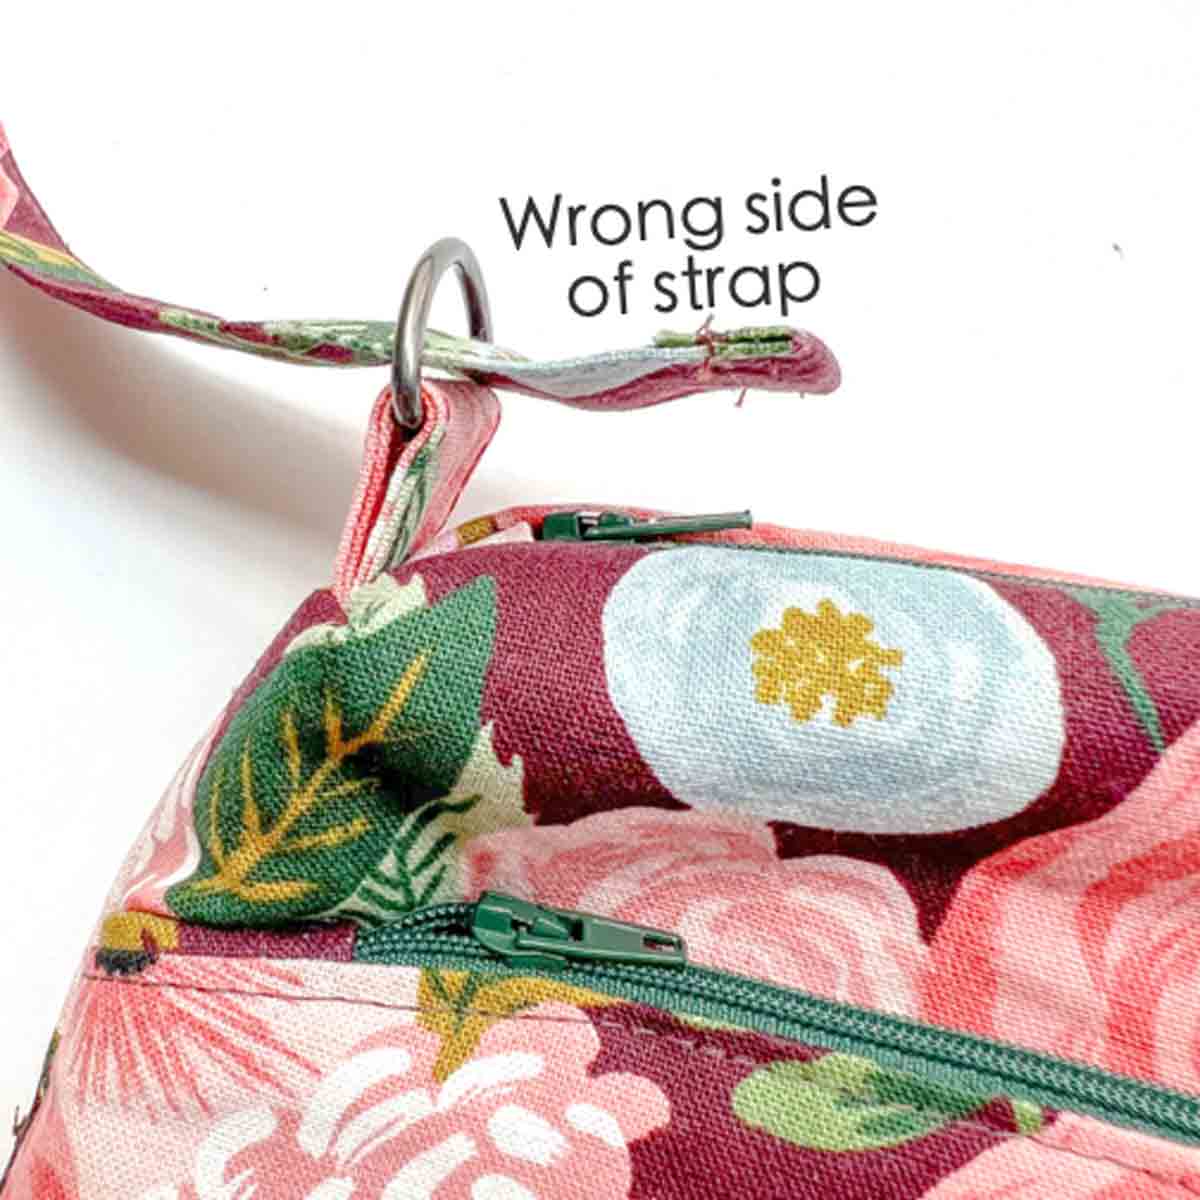
Next, fold one end of the strap down 1/2” (1.27cm) and stitch. Repeat on other end. The stitched down side of the strap with the raw edges will be referred to as the wrong side of strap.

Then, take one end of of bag strap and slide it up and over the middle bar of the strap slider. The right side of the strap will be facing up.

Another view of the long strap correctly going over the center bar of the strap slider.
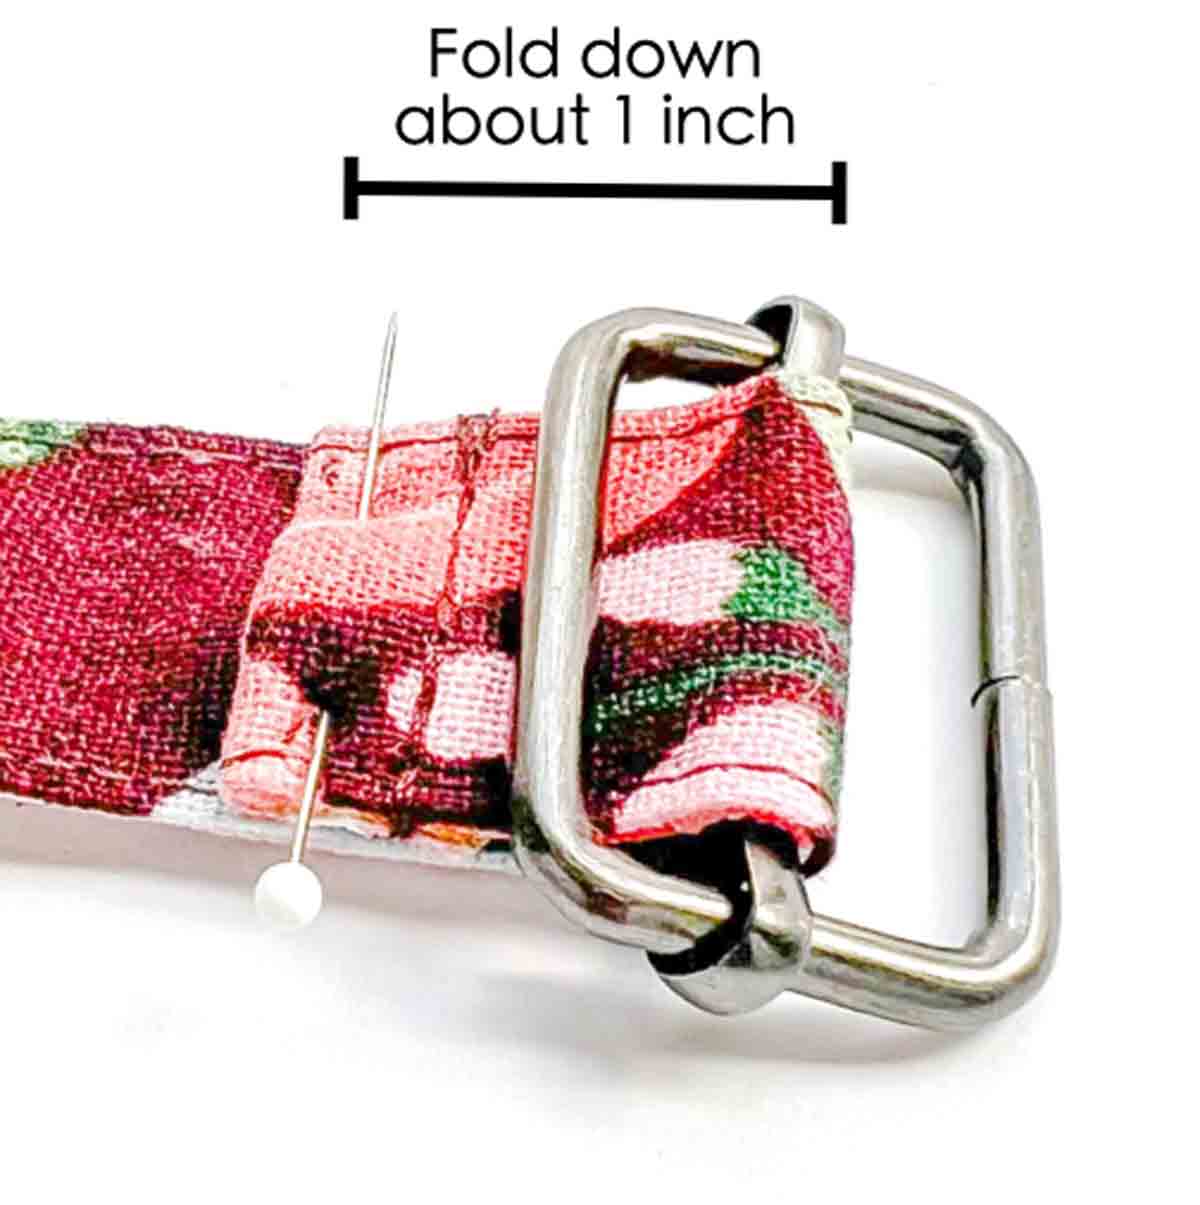
Next, fold strap over itself, wrong sides together, about 1 inch (2.54cm) and pin in place.

Now stitch strap down, making sure to back stitch a few times to reinforce. That purple thang is a super handy tool to help guide the fabric into the machine.
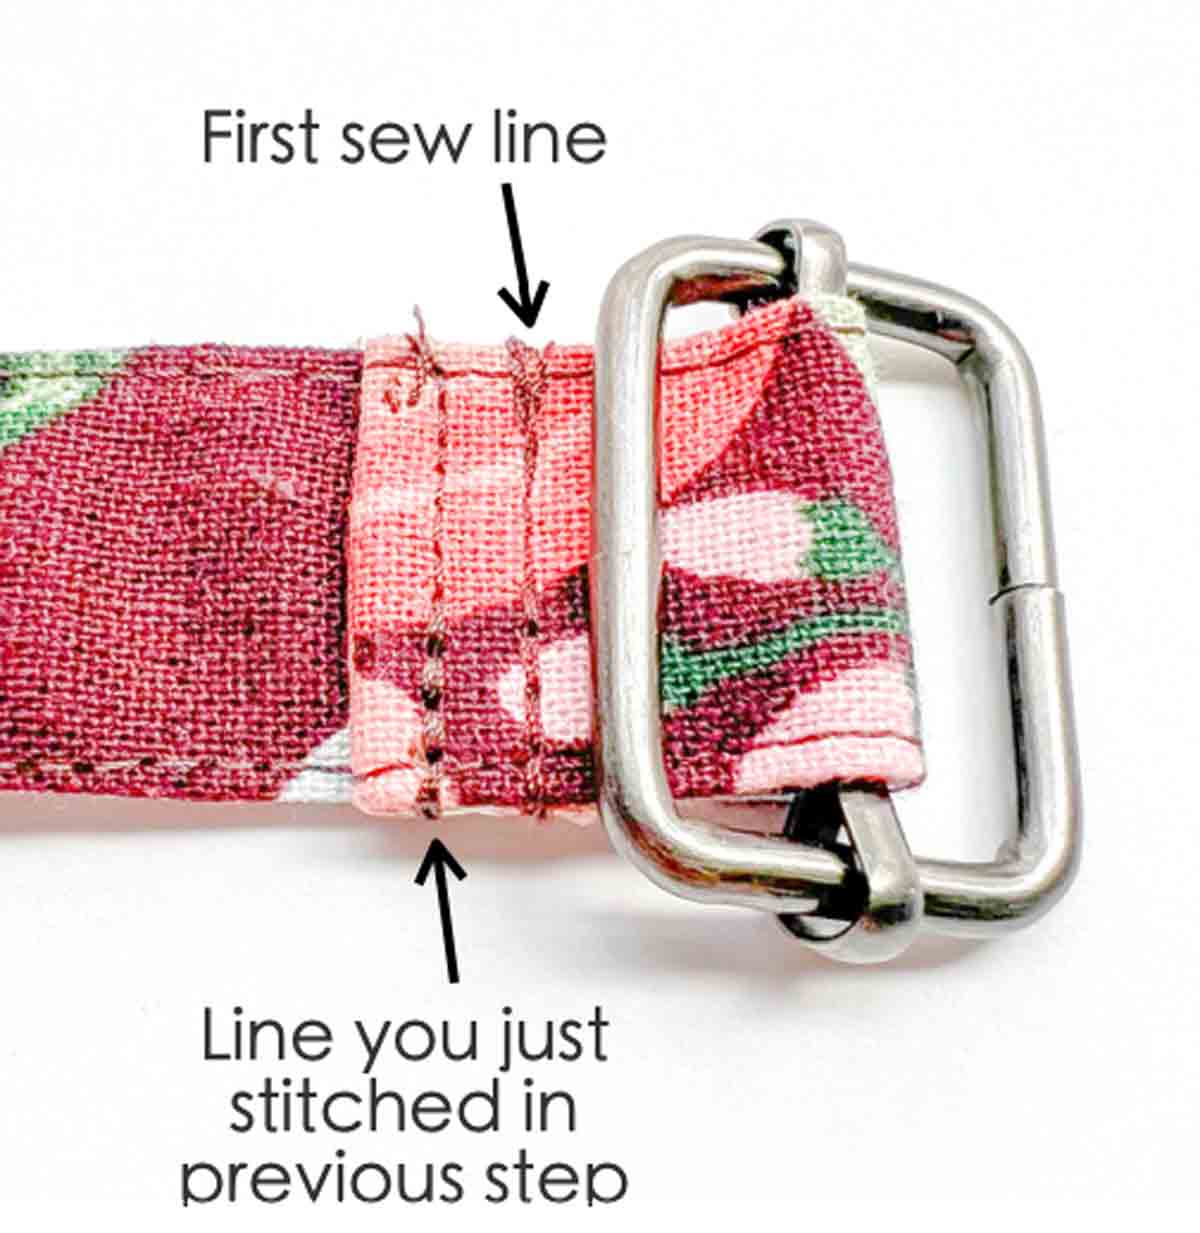
View of strap sewn to itself. Don’t forget to also stitch down the first sew line for extra reinforcement.

Now take other end of strap, wrong side up, and slide it through one of the D rings. For reference, I threaded the strap over right side strap of the bag (your side right if viewing the bag with the front facing up).
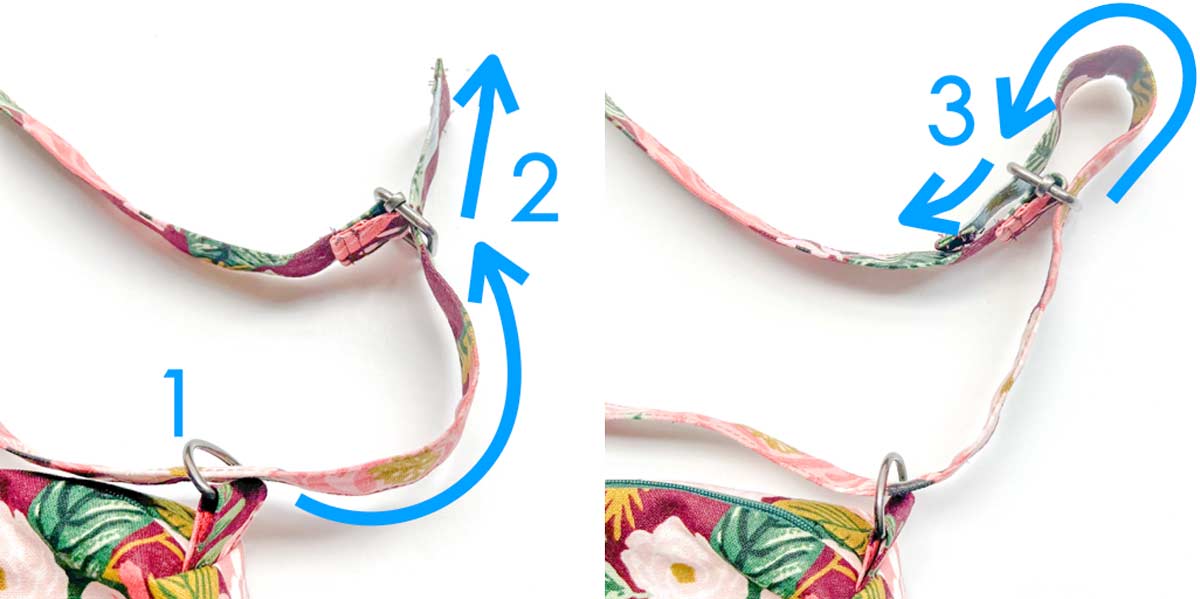
Then pull the strap through (1) and thread it under (2) and over (3) bag slider.
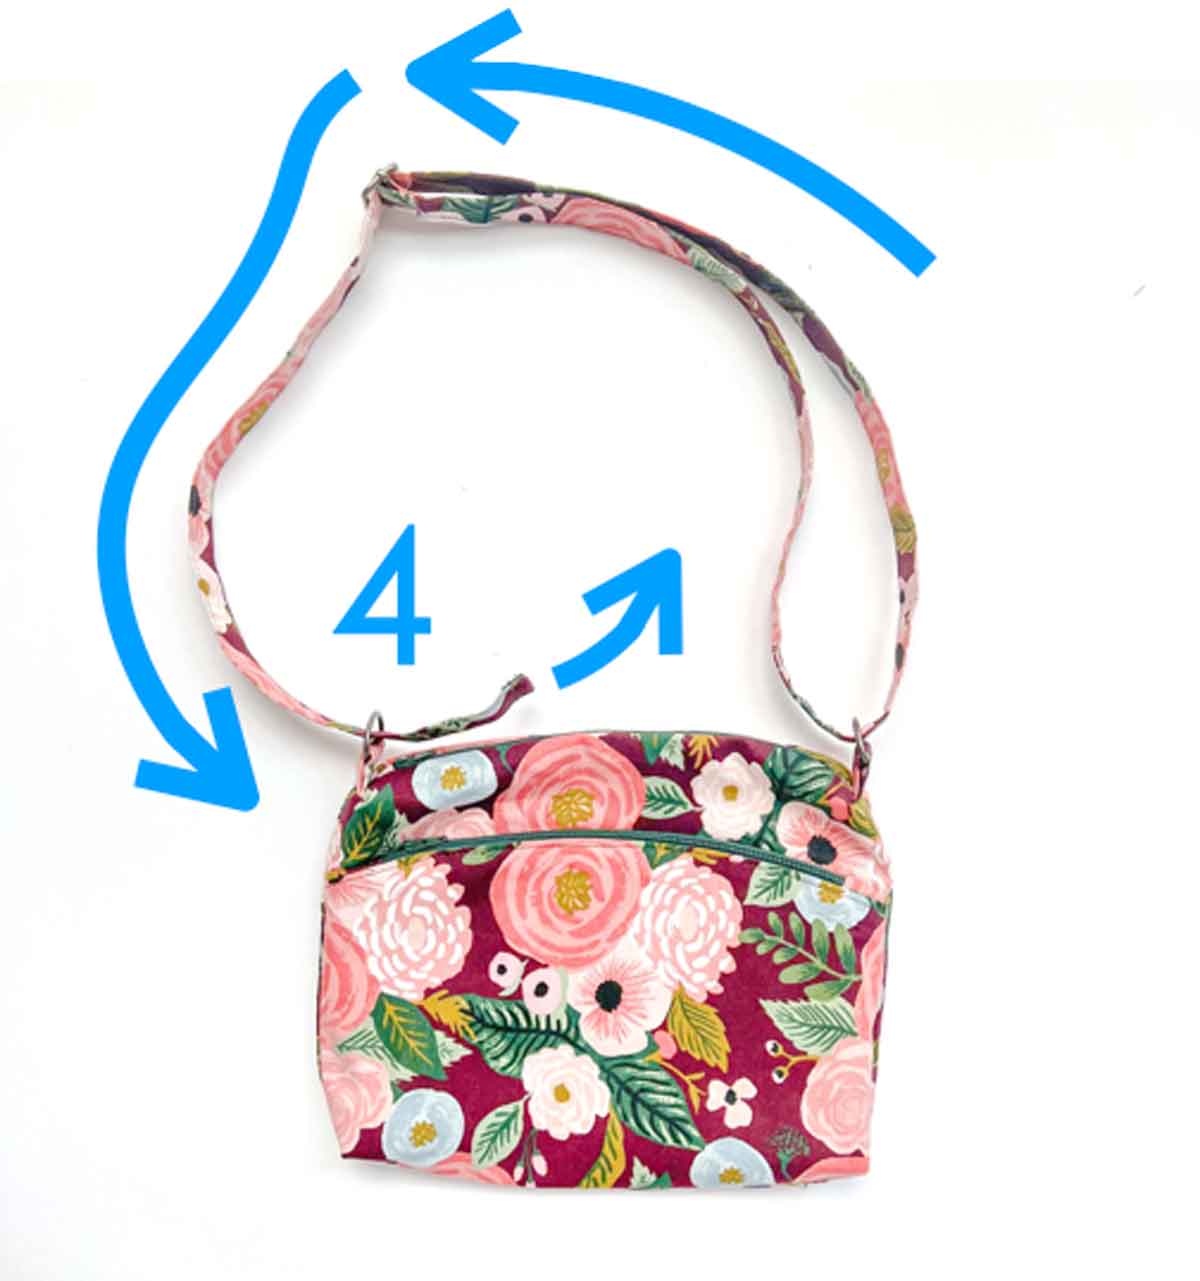
Next, keep pulling the strap through slider. Then thread the strap through D-ring on other side (4), wrong side facing up.
Close up view of strap end threaded through left D-ring. See how the wrong side of the strap is facing the curve of D-ring.
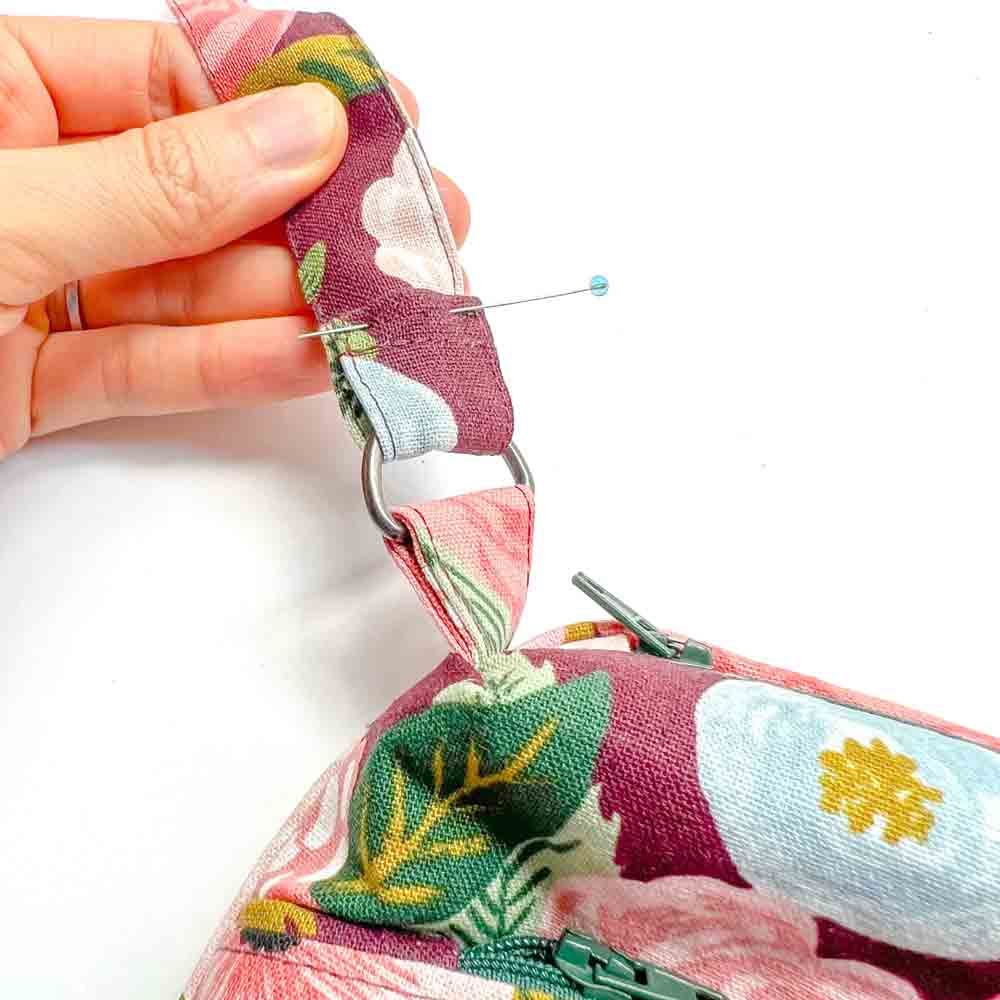
Next, fold strap over itself 1” (1.27cm) and pin in place.

Then sew strap over itself as you did previously. Make sure to backstitch a few times to reinforce.
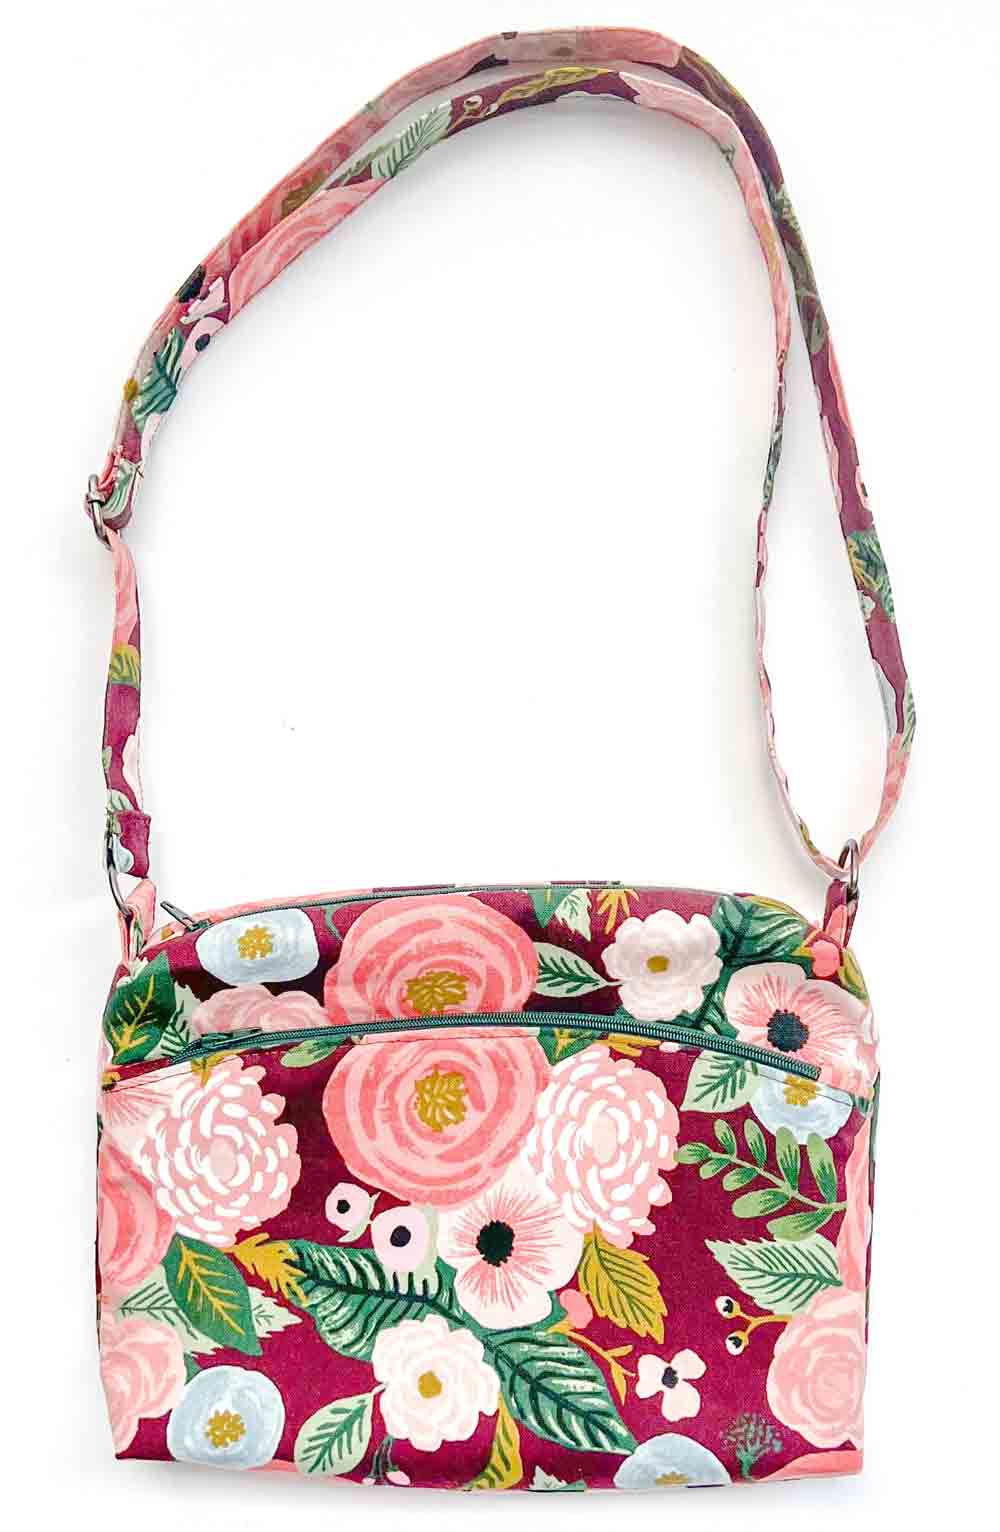
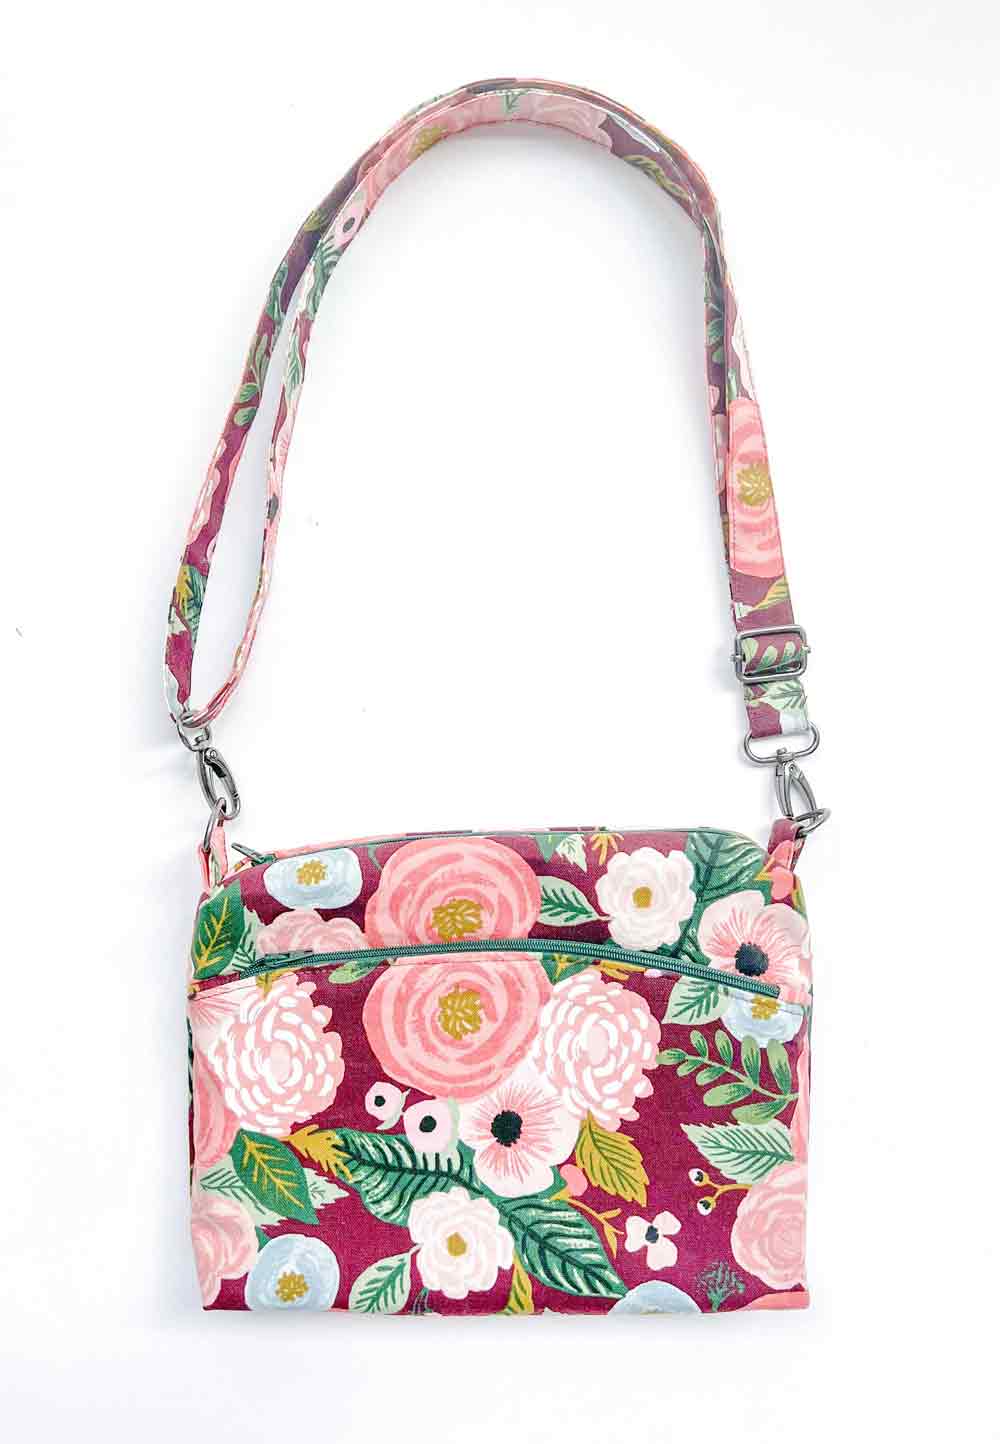
Tada! Bag is finished! Good job, you did it!
Alternatively, you can also make a removable bag strap with the addition of 2 swivel clips. Check out “How to Sew Shoulder Straps” of this duffel bag Tutorial to learn how to make it!
The ad-free, printer friendly PDF Pattern & Tutorial is available in MY SHOP. Print a copy today for easy reference as you sew. Additionally, you will also receive the PDF Pattern & Tutorial for making the color block version of crossbody bag on the left. Grab a copy today!
How to Sew a Crossbody Bag
A chic and stylish crossbody bag that is simple to make and comes with two zippers compartments.
Materials
- EXTERIOR FABRIC - 1.5 yards (1.4 meters) if using 44" wide fabric, see note 1
- LINING - 1/3 yard (0.3 meters)
- FUSIBLE INTERFACING
- MATCHING THREAD
- 9" ZIPPERS (x2)
- 1" D-RING (x2)
- 1" TRIGLIDE SLIDER
- 1" SWIVEL CLIPS (x2) - optional, see note 2
Tools
Instructions
- Cut and print out all pattern pieces from the MindyMakes Library
- Cut out all pattern pieces on fabric and interfacing.
- Cut one piece of fabric that measures 5” (12.7cm) wide and 3” (7.62cm) tall.
- Fold top and bottom edges 1/2” (1.27cm) in towards center and press.
- Fold entire side strap in half and press.
- Stitch both sides of strap together, 1/8” (3mm) from edge.
- Cut your side strap in half along the width (the longest part of the strap). You will end up with two pieces of equal size.
- Loop side strap around D-ring, fold in half, clip and baste in place. Repeat for other strap.
- Fold one piece of [ZIPPER END] in half lengthwise and press. Repeat on second piece.
- Get your fabric pieces and zipper ready: 2 zipper ends with folded edge pointing towards center, and FRONT POCKET.
- Mark midline of zipper and [FRONT POCKET] by folding each in half and making a snip at the center.
- Place zipper and [FRONT POCKET] right sides together, matching at midline. Pin in place, leaving the ends unpinned.
- Pull end of zipper away and put one piece of [ZIPPER END] over [FRONT POCKET].
- Match bottom corner of zipper end to side edge of [FRONT POCKET] and place zipper back over [ZIPPER END]. Pin in place. Make sure folded edge of [ZIPPER END] faces center.
- Repeat inserting zipper end onto other side of zipper.
- Use zipper foot to sew along zipper. Your seam allowance will be approximately 3/8” (0.95cm) from zipper edge, as that's the size of the zipper seam. This new piece with the zipper sewn in will now be referred to as [FRONT POCKET - EXTERIOR].
- Place [FRONT POCKET - LINING C] over [FRONT POCKET - EXTERIOR], right sides together.
- Pin and sew in place using zipper foot, about 3/8” (0.95cm) from edge of fabric.
- Now flip [FRONT POCKET - LINING C] to the back so that it is behind [FRONT POCKET - EXTERIOR]. This piece with LINING C sewn to it will now be called [FRONT POCKET PIECE].
- Next, give your fabric a good press and then top stitch the upper part of [FRONT POCKET PIECE], about 1/8" (3mm) below zipper.
- Baste [FRONT POCKET PIECE] together on the sides and bottom.
- Place [FRONT POCKET PIECE] over [FRONT POCKET - LINING D], right sides of lining together.
- Pin top seam of zipper to [FRONT POCKET- LINING D] and sew together.
- Now, fold the entire top seam of the zipper down so it’s behind the zipper teeth and press down using medium heat. Make sure your iron isn’t set on high heat otherwise you may melt the zipper!
- Place [FRONT ZIPPER POCKET] over [EXTERIOR FABRIC PIECE A] matching at the sides and bottom.
- Lift up basted piece of [FRONT ZIPPER POCKET] until [FRONT POCKET -LINING D] is fully exposed.
- Pin [FRONT POCKET - LINING D] to [EXTERIOR FABRIC PIECE A] and baste on the sides and bottom.
- Open the zipper and pin [FRONT ZIPPER POCKET - LINING D] to [EXTERIOR FABRIC PIECE A].
- Lift up basted piece of [FRONT ZIPPER POCKET] completely away from [FRONT POCKET - LINING D] and sew [FRONT POCKET - LINING D] down to [EXTERIOR FABRIC PIECE A] along the junction where bottom zipper meets [FRONT POCKET - LINING D], see note 3.
- Finally, pin the entire front pocket to [EXTERIOR FABRIC PIECE A] and baste at the sides and bottom.
- Mark midline on zipper and [EXTERIOR FABRIC PIECE A].
- Place [ZIPPER END] on top edge of [EXTERIOR FABRIC PIECE A], one on each side. Make sure folded edge of [ZIPPER END] are both facing the center.
- Put zipper and [EXTERIOR FABRIC PIECE A] right sides together, matching at the midpoint. Pin and sew in place, leaving both ends unstitched, 1.25 inch (3cm) from the edge of [EXTERIOR FABRIC PIECE A]. This piece will now be referred to as [FRONT OF BAG], see note 4.
- Place [LINING PIECE A] over [FRONT OF BAG], right sides together.
- Pin and sew together leaving both ends unstitched, 1.25” (3cm) from the edge. Make sure to back stitch on both ends.
- Flip [LINING PIECE A] up and to the back of [FRONT OF BAG]. The zipper and zipper ends will point upwards once [LINING PIECE A] is behind [FRONT OF BAG].
- Place [EXTERIOR PIECE B] over this fabric (from step 6), right sides together.
- Pin and sew together, again leaving both ends unstitched, 1.25” (3cm) from the edge. Back stitch on both ends.
- Now place fabric piece (from step 7) over [LINING PIECE B], right sides of lining together.
- Pin and sew together,, leaving both ends unstitched, 1.25" (3cm) from edge. Back stitch at both ends.
- Lift [EXTERIOR PIECE B] up so it is away from [EXTERIOR PIECE A].
- Next, lift [EXTERIOR PIECE A] up so that it is facing [EXTERIOR PIECE B], right sides together. The wrong side of [LINING PIECE A] will be on the bottom.
- At the zipper line, point the seam allowances towards [EXTERIOR PIECE A] and clip (or pin) in place. Do this on the other side as well.
- Turn fabric piece so [EXTERIOR PIECE B] is facing you and again point seam allowance towards [EXTERIOR PIECE B].
- Clip (or pin) entire bag together, lining to lining and exterior fabric to exterior fabric.
- Stitch entire bag together at 1/2” (1.27cm) seam allowance, leaving a 3” (7.62cm) opening at the bottom of lining. Back stitch on both ends of opening.
- On the bottom corner of lining, use fabric chalk and clear ruler to mark a 1.25” (3cm) square.
- Repeat marking 1.25" (3cm) square on all the corners, both on lining and exterior fabric.
- Flip bag to other side so [LINING PIECE B] and [EXTERIOR PIECE B] are facing up and repeat marking corners in the same way.
- Cut out all the corners approximately 0.25" (6cm) shy of the corners where you marked (step 17 - 19).
- Trim seam allowance to 0.25 in (6mm).
- Pull open the corners and make it flat, matching at the side seams.
- Match your seam allowances, open them and pin corner in place.
- Sew corners together along marking you previously made (step 17 of "HOW TO SEW CROSSBODY BAG ZIPPER").
- Repeat in the same way to box other 3 corners that make up bottom of crossbody bag.
- Pull open the corner on lining side, flatten the corner and match the side seam. Don’t forget to open up your seam allowance.
- Keep holding the lining to keep it flat. Then take your side loop (with D-ring facing down), and slide it into the opening on the exterior side.
- Slide side loop all the way into the corner opening on exterior of bag.
- Pull open and flatten corner on exterior fabric, making sure to match side seam and open the seam allowance.
- Use a clip to hold all the pieces (lining corner, side loop, and exterior corner) together.
- Sew corners together along marking you previously made (step 17 of "HOW TO SEW CROSSBODY BAG ZIPPER"). Back stitch a few times to reinforce.
- Repeat in the same way and box corner on other side of zipper.
- Turn crossbody bag to right side through opening on lining (step 16 of "HOW TO SEW CROSSBODY BAG ZIPPER")
- Close opening using invisible ladder stitch.
- Tuck lining into exterior of bag and your bag is done!
- Cut a long strip of fabric that measures 55” x 3” (140cm x 7.62cm), see note 5.
- Next, cut a long strip of interfacing that measures 54” x 2” (137cm x 5cm) and fuse it to the wrong side of fabric.
- Fold fabric strip up 0.5”(1.27cm) and press.
- Fold fabric strip down 0.5” (1.27cm) and press.
- Then, fold entire fabric strip in half along the center and press.
- Top stitch first along the open end of the strap. Then, do another row of top stitch along the other long edge. Your top stitch should be about 1/8” (3mm) from the edge.
- Bag strap is now finished.
- Gather your supplies to make your strap. You will need the long strap you just sewed and a strap slider.
- Fold one end of the strap down 1/2” (1.27cm) and stitch. Repeat on other end. The folded down side of the strap with the raw edges will be referred to as the wrong side of strap.
- Take one end of of bag strap and slide it up and over the middle bar of the strap slider. The right side of the strap should be facing up.
- Fold strap over itself, wrong sides together, about 1 inch (2.54cm) and pin in place.
- Stitch strap down, making sure to back stitch a few times to reinforce.
- Also stitch down the first sew line for extra reinforcement.
- Take other end of strap, wrong side up, and slide it through one of the D rings on the side loops of bag (doesn’t matter which one).
- Pull the strap through and thread it under and over bag slider.
- Continue pulling the strap through the slider. Then thread the strap through D-ring on other side of bag, wrong side facing up.
- Fold strap over itself 1” (1.27cm) and pin in place.
- Sew strap over itself as you did previously. Make sure to backstitch a few times to reinforce.
- Your bag is now finished and ready to use!
PREPARATION
SEWING SIDE STRAPS
HOW TO SEW FRONT POCKET
SEWING FRONT ZIPPER POCKET TO BAG
HOW TO SEW CROSSBODY BAG ZIPPER
HOW TO BOX CORNERS ALONG BOTTOM OF BAG
HOW TO BOX CORNERS ALONG TOP OF BAG
FINISHING BAG
HOW TO SEW BAG STRAP
THREADING BAG STRAP
Notes
NOTE 1: If your fabric is 55-60" wide, you will only need 1/2 yard (0.457M) of exterior fabric. This is because you can cut the bag strap along the width (perpendicular to the selvedge) of the fabric. If your fabric is 44" wide, you will need 1.5 yards (1.4M) in order to cut a 55" length piece to make the bag strap.
NOTE 2: Swivel clips are only necessary if you want to make removable belt strap:
NOTE 3: Remember that you are sewing [FRONT POCKET-LINING D] down to [EXTERIOR FABRIC PIECE A] following the curve along the zipper.
Note 4: The piece we now refer to as [FRONT OF BAG] consists of:
• Zipper
• Zipper ends (1 on each side)
• EXTERIOR FABRIC PIECE A
• Front zipper pocket
NOTE 5: If you are using 44" wide fabric, cut your fabric strip so that the 55” is measured along (parallel to) the selvedge. I don’t recommend piecing together two fabric strips to get the 55” length as the seam allowance creates bulk which makes it harder to maneuver the strap slider.
If your fabric is 55" or wider, you can cut the fabric strip along the width (parallel to the selvedge) of the fabric.
More Sewing Projects You will Love!
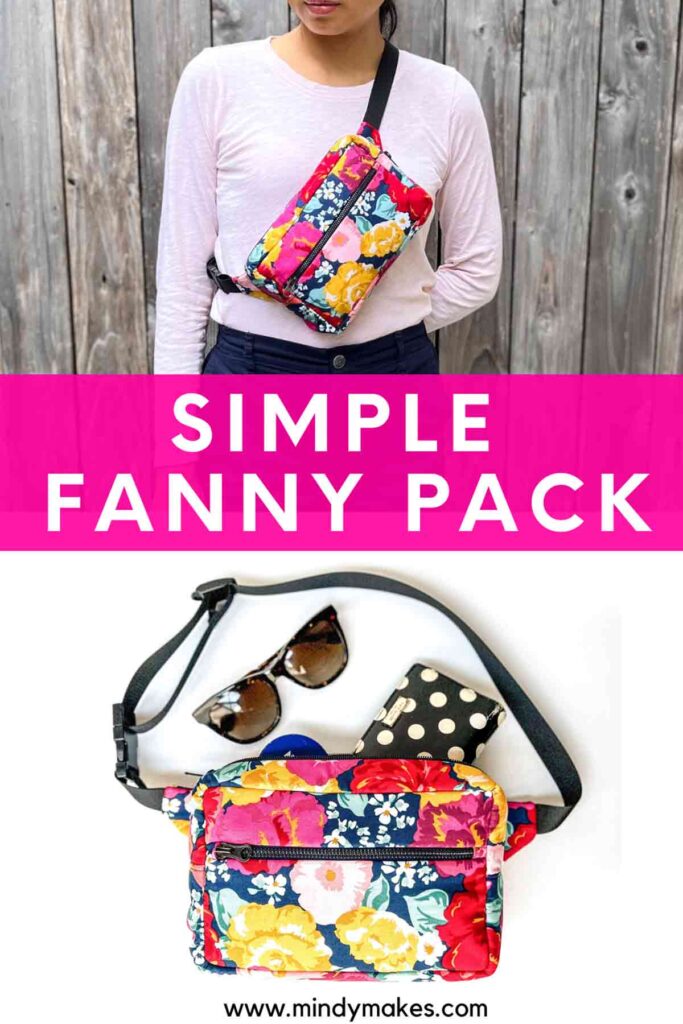
This pretty little fanny pack is your perfect companion for running errands, traveling, and more.
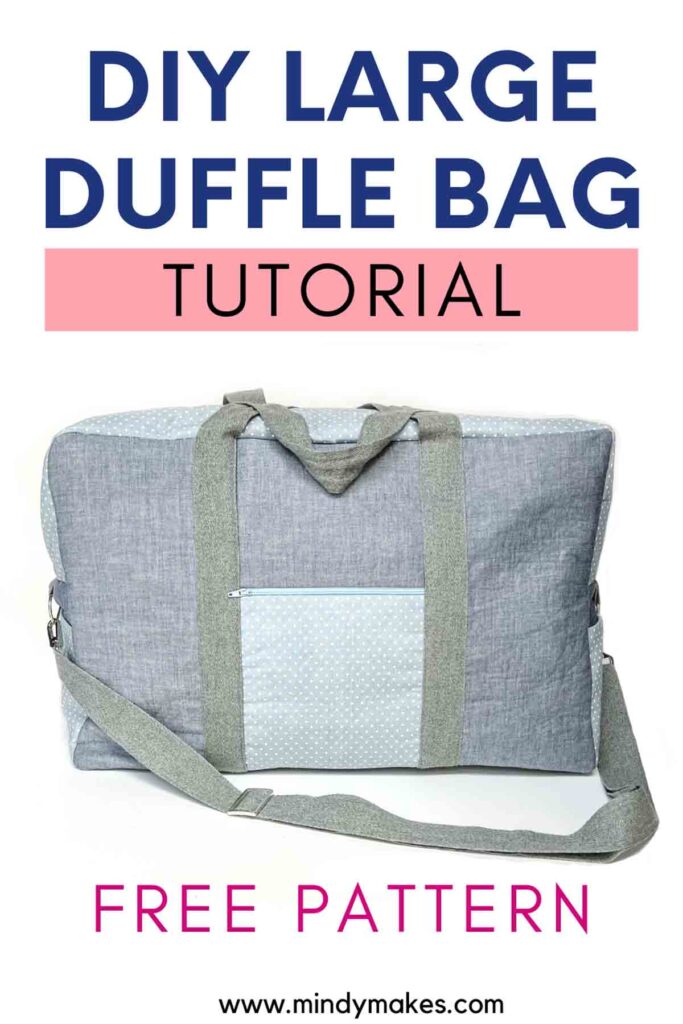
A large duffle bag with lots of storage space for trips and weekend getaways.

A mini snap pouch to stow away keys, credit cards, earphones and more.


Where did you get your fabric?
Hi Mandy,
The fabrics are from riflepaperco.com
Thank you!
Do you have a video tutorial my daughter can follow along with?
Also, the pattern says “Cut 2 on Exterior Fabric” does that imply you cut the pattern twice? I don’t see in your example 2 pieces of the same pattern. My daughter’s other question is if the seam allowance is included in the pattern or not?
Thank you
Hi Myla,
Unfortunately I do not have a video tutorial for this crossbody bag. and yes “Cut 2 on Exterior Fabric” means you cut 2 pieces of the pattern on exterior fabric. If you look at the image under the section “Pattern for Crossbody Bag”, you will see that there are 2 EXTERIOR PIECES cut out, indicated as “Exterior Piece A” and “Exterior Piece B”.
Also, yes 1/2″ seam allowance is already built into the paper pattern so no need to add seam allowance. Hope that helps!