How to Sew an Easy Key Fob (Free Pattern)
Always wanted to know how to make key fobs out of fabric? This simple diy key fobs tutorial will show you exactly how. A quick and easy sewing project perfect even for beginners!
This post may contain affiliate links. Please read my disclosure policy for details. As an Amazon Associate, I earn from qualifying purchases.

What are Fabric Key Fobs Used For?
Every wanted to go out without having to carry your entire purse? These fabric key fobs are exactly what you need! They go around your wrist so you can hold on to your keys without needing to carry a purse.
Additionally, you can use them as zipper extenders by clipping them to zippers on backpacks, duffel bags, or luggage. This way, there will be more surface to grab onto next time you need to pull open the zipper.
Fabric Key Fobs

These fabric key fob wristlets measure about 7.25″ (18.4cm) across and are 7/8″ (2.22cm) wide. Each key fob has a lobster claw clasp at the end.
Please note that dimensions are approximate and your finished project may differ slightly from the measurements listed.
I know these days you can purchase key fob hardware which also looks nice and sleek. Nevertheless, I like how the lobster clasp allows you to immediately clip your key fob to key rings, zippers, hooks, and other things. The key fob hardware doesn’t allow for this function.
On top of that, I didn’t want to have to purchase an extra set of pliers just to close the key fob hardware. Additionally, I like the lobster clasps because I can use it in other sewing projects as well.
Enough said about why I prefer the lobster clasp!
How to Make Key Fobs Out of Fabric
Today, I will be showing you step-by-step how to sew a quick and easy fabric key fob. The entire project is done on the sewing machine. No hand sewing required. You can make one from start to finish in about 10 minutes!
These fabric key fobs also make great gifts. They are perfect as stocking stuffers, teacher appreciation gifts, party favors, and more. Once you realize how quick and easy they are, you’re going to want to sew a whole bunch!
How to Make My Own Key Fob?

In today’s tutorial, I will first show you how to make a basic key fob out of fabric. You will need an OUTER FABRIC and an INNER FABRIC if you want to have contrasting colors. Otherwise, you can also use the same fabric for both the outside and inside.
Then, if you want to add a personal touch to your key fob, I will also show you how to add text to the key fob after it is made. This is done with heat transfer vinyl (HTV) on a cutting machine (i.e. Silhouette or Cricut).
MORE Variety of Key Fobs

Want to make a colorblock variety of this simple key fob wristlet? The Regular and Colorblock Key Fob Patterns are available in My Shop.
This version features 3 extra pattern pieces for you to create color-blocked stripes at the bottom of the key fob. Use a variety of colors and print fabrics to create your own unique and beautiful key fob wristlets!
In addition to your purchase, you will receive an ad-free, printer friendly PDF version of the Key Fob Wristlet Tutorial. This way, you can easily print a copy and keep it next to you as sew!

Key Fob Sewing Pattern
For this easy sewing project, there are no paper patterns to print. All you have to do is draw out the following dimensions on fabric:

- OUTER FABRIC (x1) – 15”x 2” (38.1 cm x 5.08 cm)
- INNER FABRIC (x1) – 15”x 2” (38.1 cm x 5.08 cm)
- FUSIBLE INTERFACING (x1) – 15”x 1.75” (38.1 cm x 4.44 cm)
NOTES:
1. If using the same fabric for the inside and outside of key fob, just cut 2 pieces each measuring 15″ x 2″ (38.1cm x 5.08cm).
2. Make sure to cut the longer length of the fabric (the side measuring 15”) along the selvedge of the fabric*. The selvedge is the least stretchy direction of the fabric. This minimizes the possibility of your fabric stretching (causing distortion) as you sew.
*The selvedge is the edge of the fabric that has a different colored border, usually (though not always) printed with information about the fabric manufacturer. Cutting along the selvedge means you are cutting parallel to this border.
Materials & Tools
Materials
- OUTER FABRIC -100% Cotton, see key fob sewing pattern for amount.
- INNER FABRIC – 100% Cotton, see key fob sewing pattern for amount.
- FUSIBLE INTERFACING – light or medium weight
- MATCHING THREAD
- LOBSTER CLAW CLASP – 0.78” or 1” wide. I use the 0.78” wide clasp in this tutorial
- HEAT TRANSFER VINYL (optional, for adding text) – I am using White HTV
Tools
- HOME SEWING MACHINE – I LOVE my SINGER HEAVY DUTY SEWING MACHINE
- FABRIC SCISSORS – GINGHERS are my favorite. I’ve tried other brands such as Fiskars, but they just don’t compare.
- ROTARY CUTTERS (optional, very handy for cutting rectangular strips of fabric, perfect if you are wanting to make in bulk for gifts).
- SEWING PINS and/or SEWING CLIPS
- CLEAR RULER
- FABRIC CHALK
- THAT PURPLE THANG – great for feeding fabric into machine so it doesn’t get eaten up!
- IRON – for pressing
- CUTTING MACHINE – such as Silhouette or Cricut
- CUTTING MAT (optional, for adding text)
- WEEDING TOOL (optional, for adding text)
How to Sew an Easy Key Fob

Gather your fabric pieces, interfacing, and lobster claw.
Sewing Fabric Pieces Together

First, place outer fabric and inner fabric right sides together. Sew together at 1/4”(6mm), as indicated by red line.

Press open seams with iron.

Next, fold inner fabric to seam line and press down.

This creates a crease line once you open the inner fabric.

Then, take your fusible interfacing (fusible side facing fabric, see note 1) and line it up with the crease line. Fuse interfacing to fabric.
Note 1: The fusible side is the side of interfacing that feels rough. This “roughness” is due to the presence of fusible glue.

Next, fold inner fabric up to midline and press.

Then, repeat for outer fabric.

You will now end up with a strip of fabric that looks something like this.

Now fold fabric strip in half and press down again.
Sewing Key Fob Loop

First, thread fabric strip through lobster clasp loop. Make sure the outer fabric is facing towards the lobster clasp.

Next, pull lobster clasp (red arrow) to about the middle of fabric strip.

Then, open both ends of fabric strip as shown in photo. Next, we are going to pull end A to meet end B (red arrow).

Now match ends together, right sides together.

Then, use a pin to match seam allowance of end A to seam allowance of end B.

Then sew together in place at 1/4” (6mm) seam allowance (red line).

That Purple Thang is very handy tool for guiding the fabric strip into the machine so the machine doesn’t eat up your fabric at the start!

View of your key fob loop with ends stitched together.

Next, press open seams.

Now turn and adjust your fabric strip so the wrong side of fabric faces together. You will end up with a closed loop with a lobster clasp threaded through like in the photo.
Top stitching key Fob Loop
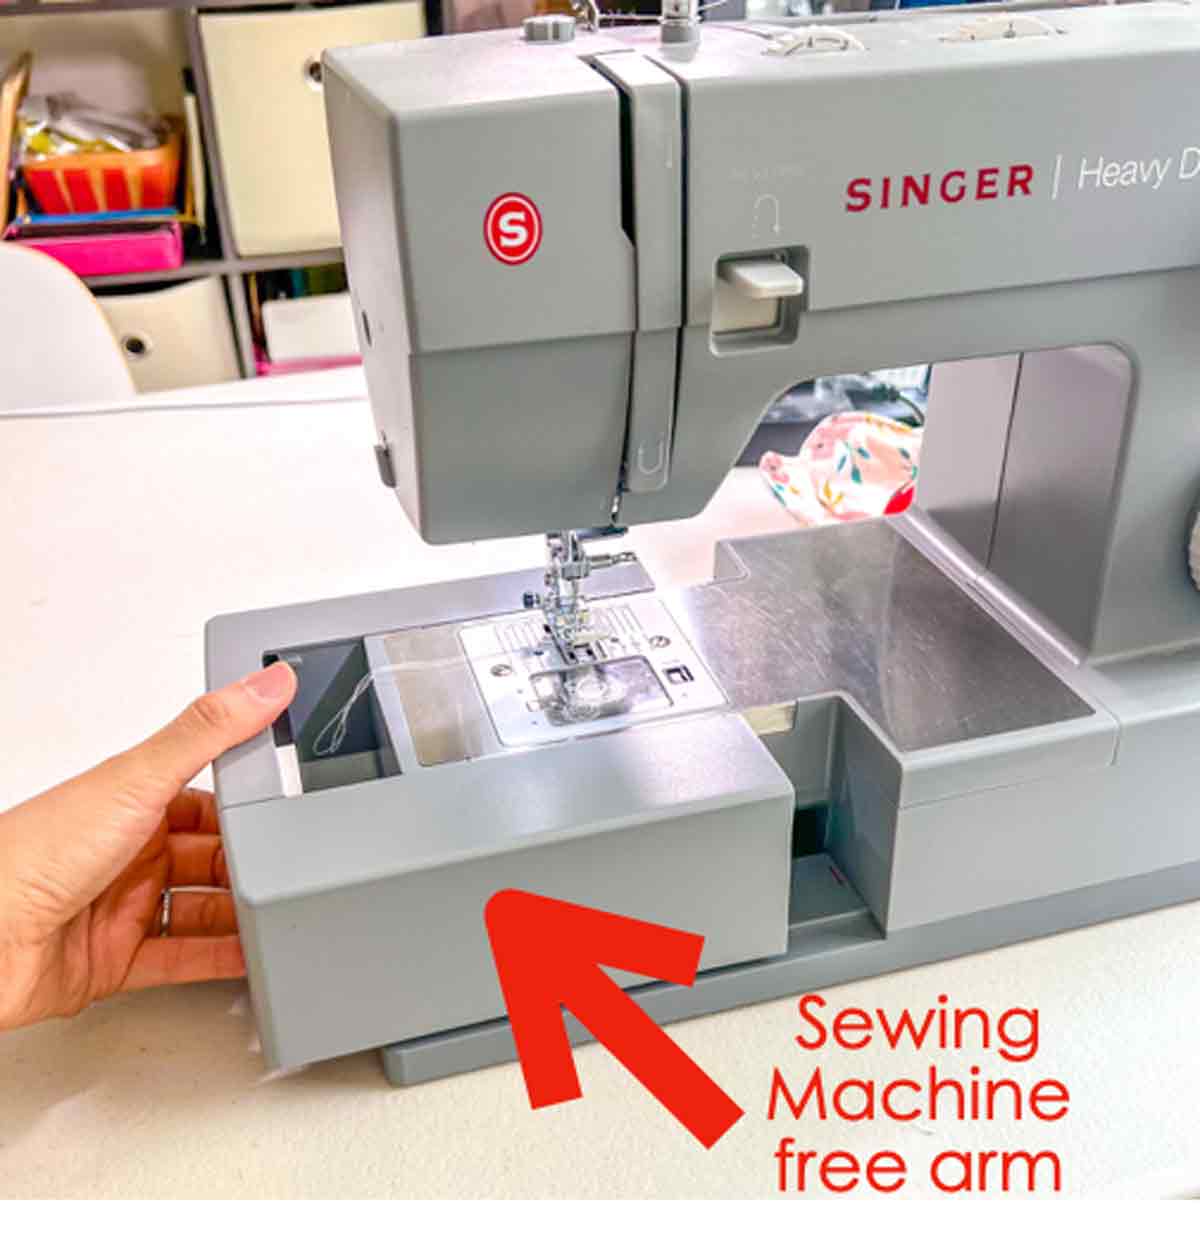
First, remove free arm of sewing machine.

Then, we are are going sew outer fabric to inner fabric, 1/8” (3mm) from edge (yellow lines).

Do this by looping key fob through machine and sewing. Once you reach the end of the loop, sew a few stitches past where you originally started. Be sure to backstitch.

Next, position lobster clasp loop so that it is at the top midline of loop. The bottom midline of loop is the seamline.

Then, we are going to stitch a line at the top (red line) right below the lobster clasp to keep it in place.

Again, That Purple Thang is super handy to feed the fabric into the machine. Finally, make sure to backstitch and forward stitch a coupe times across the width of key fob to reinforce.

Finished! You have just learned how to sew a key fob from start to finish! Wasn’t that easy?
Now…I know since you bought a big bag of lobster clasps, go make a whole bunch as gifts! These make great presents as stocking stuffers, teacher appreciation gifts, and more!
How to Personalize Fabric Key Fob
In this section I am going to show you how to add text (using heat transfer vinyl) to your key fob. You will need either a Silhouette, Cricut, or other cutting machine to be able to this.
You can add a name, a motivational phrase, or any text you like to personalize the key fob.

Notes:
▲ I recommend making the key fob using solid colored fabrics so the text shows up better. Otherwise, choose a fabric with a light colored print (see bottom key fob in photo).
▲ If you want your text on both sides of your key fob, make sure to cut 2 sets. Otherwise, just cut 1 set.
First, open your cutting machine software (I’m using Silhouette Studios) and type in the name or phrase you want written on your key fob. In this example my text is “Pray without Ceasing”.

Once you have the text you want, we will need to make sure it fits on the key fob. As you can see in this example (see photo), my text measures about 5/8” (1.58cm) in height and 5” (12.7cm) length.
Just note that you don’t want your text to be taller than 5/8”(1.58 cm) or longer than about 6.25”(15.8 cm) in width. Otherwise, it won’t fit on your key fob. However, please note that these measurements are approximate. It is always a good idea to measure your own key fob to determine your max length and height.

Also note that I created some extra cut lines around the text to make it easier for me to know where the border of the text is. However, this is completely optional.

Don’t forget to mirror your text before hitting send!
Applying HTV To Key Fob

Once you have cut and weeded out the text, place it on the center of your key fob with the lobster clasp to the left. You can use a ruler for accuracy or just eyeball it (like I did).

Next, place teflon paper over and iron the vinyl on (be sure to follow the manufacturer heat transfer setting).

Then, flip the key fob to the other side.

Note that after your flip the fabric, the lobster clasp is still to the left of the key fob. Now apply and heat transfer the text on this side in the same way

Once your vinyl is cool to the touch, carefully remove the plastic sheet.

You are done! Your key fob is now personalized!
Grab the ad-free, printer friendly PDF Pattern and Tutorial of the Key Fob Wristlet today! Print a copy and keep it next to your sewing machine for easy reference as you sew. Additionally, you will receive patterns and step-by-step tutorial for the color-block version.
DIY Fabric Key Fob

Learn how to make a simple DIY key fob that goes over your wrist to keep your keys in place. Add a name or inspirational phrase for an extra personal touch!
Materials
- OUTER FABRIC - 100% Cotton, 1 piece measuring 15" x 2" (38.1 cm x 5.08 cm). See Note 1
- INNER FABRIC - 100% Cotton, 1 Piece measuring 15" x 2" (38.1 cm x 5.08 cm). See Note 1
- FUSIBLE INTERFACING - light or medium weight
- LOBSTER CLAW CLASP - 0.78" or 1" wide
- HEAT TRANSFER VINYL - (optional, for adding text).
Tools
- HOME SEWING MACHINE
- FABRIC SCISSORS or
- ROTARY CUTTERS
- THAT PURPLE THANG
- SEWING PINS or
- SEWING CLIPS
- CLEAR RULER
- FABRIC CHALK
- IRON - for pressing
- CUTTING MACHINE (optional, for adding text) - such as Silhouette or Cricut
- CUTTING MAT
- WEDDING TOOL
Instructions
- Gather your fabric pieces, interfacing, and lobster claw.
- Place outer fabric and inner fabric right sides together. Sew together at 1/4” (6mm).
- Press open seams with iron.
- Fold inner fabric to seam line and press down. This creates a crease line once you open the inner fabric.
- Take your fusible interfacing (fusible side facing fabric (see note 1) and line it up with the crease line. Fuse interfacing to fabric.
- Next, fold inner fabric up to midline and press. Repeat for outer fabric.
- Fold fabric strip in half and press down again.
- Thread fabric strip through lobster clasp loop. Make sure the outer fabric is facing towards the lobster clasp.
- Pull lobster clasp to about the middle of fabric strip.
- Open both ends of fabric strip so the wrong sides aren’t facing each other anymore
- Pull end A to meet end B, right sides together.
- Use pin to match seam allowance of end A to seam allowance of end B.
- Sew together in place at 1/4” (6mm) seam allowance. Press open seams.
- Turn and adjust your fabric strip so the wrong side of fabric faces together. You will end up with a closed loop with a lobster clasp threaded through.
- Remove free arm of sewing machine.
- Loop key fob through machine and sew outer fabric to inner fabric, 1/8” (3mm) from both edges. Once you reach the end of the loop, sew a few stitches past where you originally started. Be sure to backstitch.
- Position lobster clasp loop so that it is at the top midline of loop. The bottom midline of loop is the seamline.
- Stitch a line at the top right below the lobster clasp to keep it in place.
- Backstitch and forward stitch a coupe times across to reinforce.
- Open your cutting machine software (I’m using Silhouette Studios) and type in the name or phrase you want written on your key fob (See Note 2).
- Once you have the text you want, we will need to make sure it fits within the dimensions of the key fob (See Note 3).
- Once you are happy with the size of your text, mirror it and send it to be cut.
- Weed out your text and place it on the center of your key fob with the lobster clasp to the left. You can use a ruler for accuracy or just eyeball it (like I did).
- Place teflon paper over and iron the vinyl on (be sure to follow the manufacturer heat transfer setting).
- Flip key fob to other side and apply and heat transfer the text on the other side in the same way
- Once your vinyl is cool to the touch, carefully remove the plastic sheet.
- You are done!
SEWING KEY FOB LOOP
TOP STITCHING KEY FOB LOOP
Personalizing Key Fob
Notes
Note 1: The fusible side is the side of interfacing that feels rough. This “roughness” is due to the presence of fusible glue.
Note 2: Cut two pieces of the same text if you want the key fob to have the text on both sides. Otherwise, you'll only need to cut 1 piece of the text.
Note 3: You don’t want your text to be taller than 5/8” (1.58 cm) or longer than about 6.25” (15.8 cm) in width. Otherwise, it won’t fit on your key fob. However, please note that these measurements are approximate. It is always a good idea to measure your own key fob to determine your max length and height.