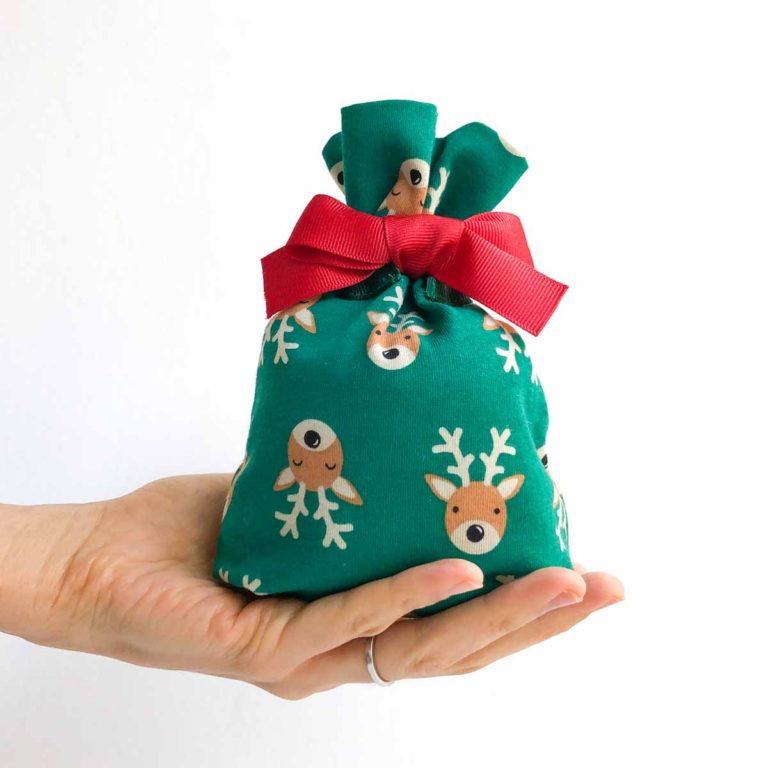
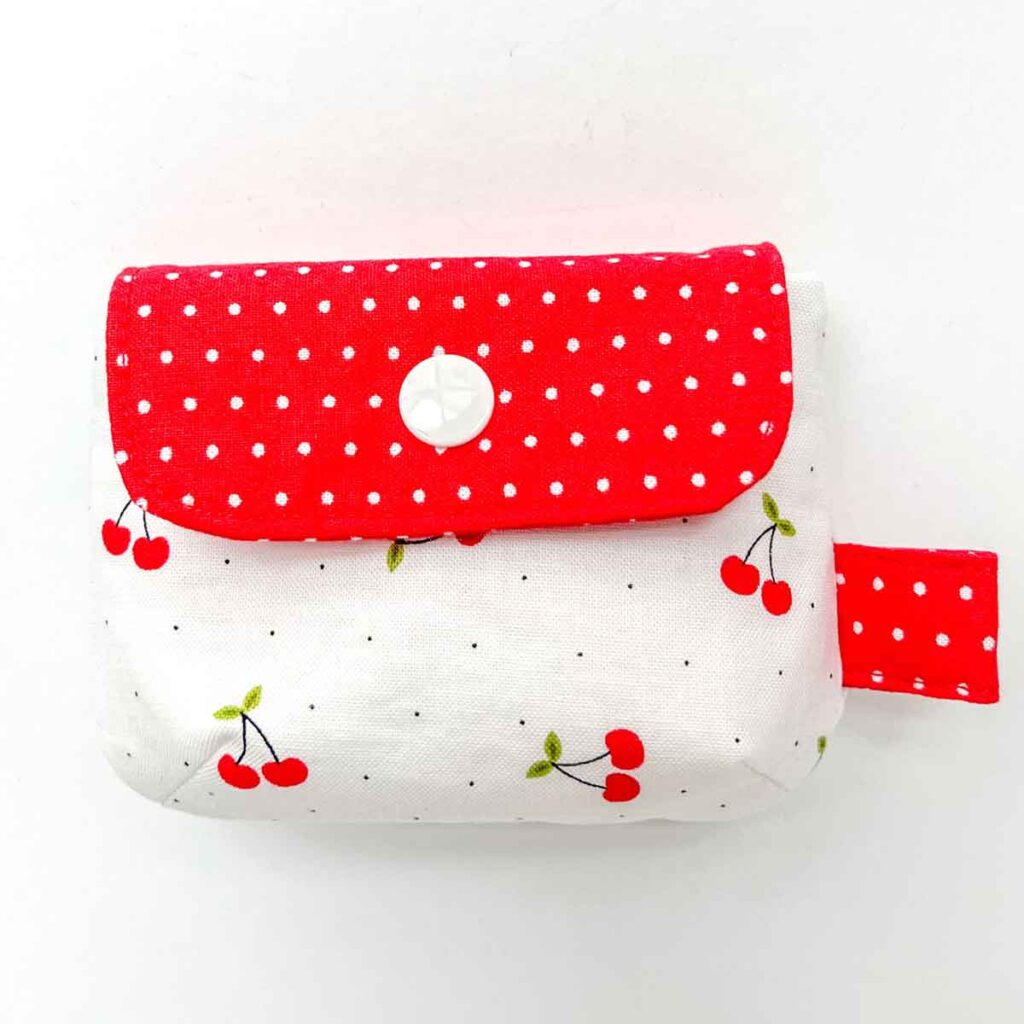
How to Make a Small Snap Pouch (Free Sewing Pattern)
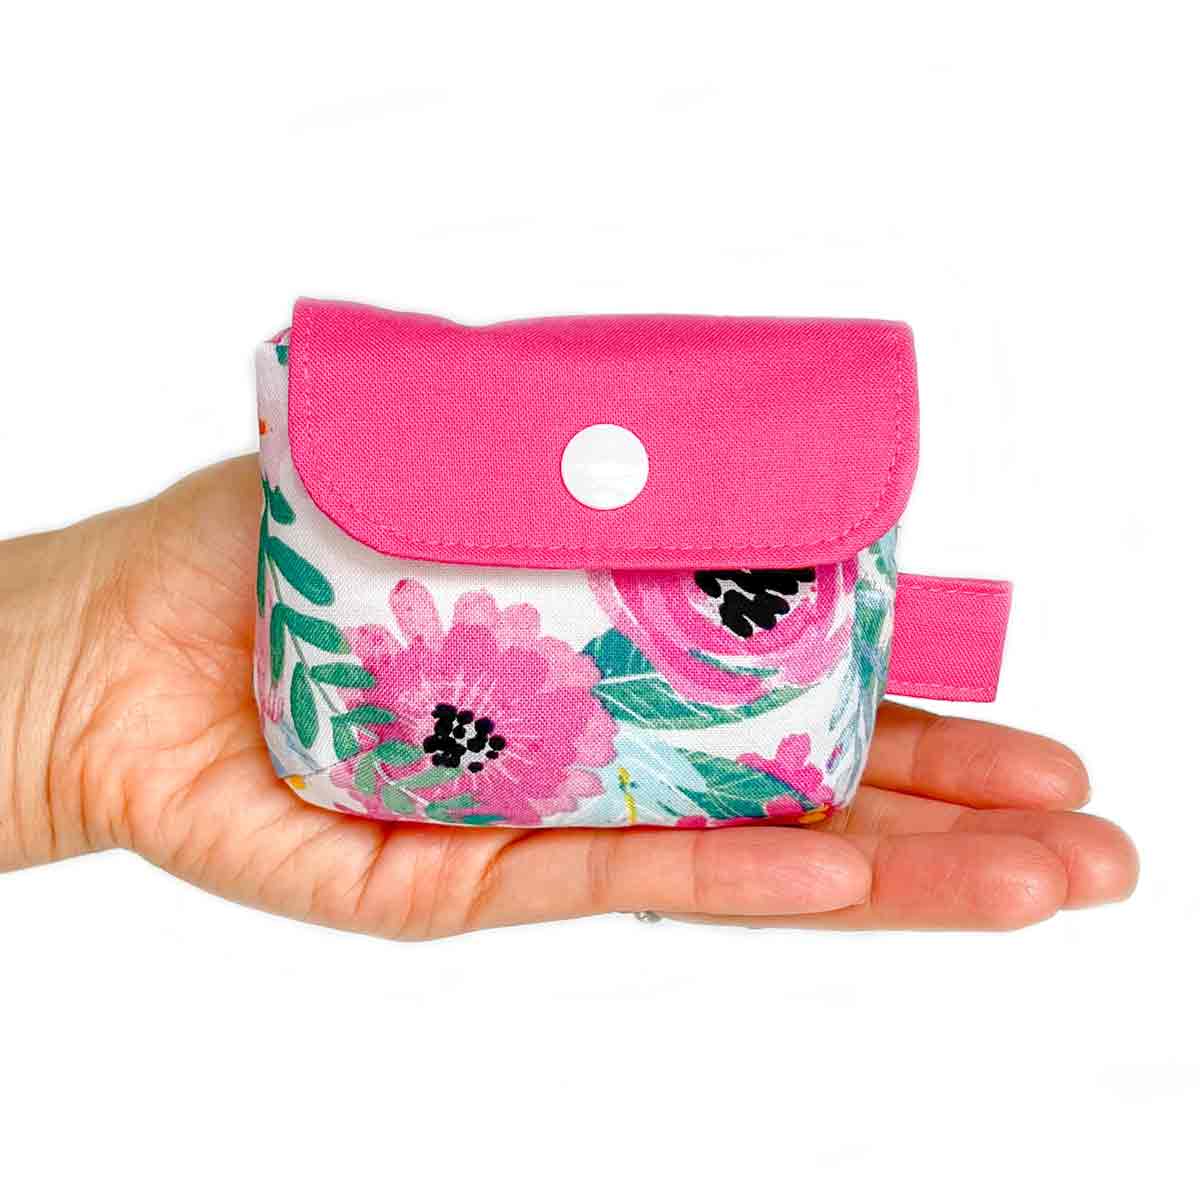
This easy snap pouch pattern is a great sewing project for beginners. Mini pouch is perfect for holding keys, hairpins, coins, lipstick, and more!
This post may contain affiliate links. Please read my disclosure policy for details. As an Amazon Associate, I earn from qualifying purchases.

Always wanted to know “how do you make a snap pouch” ? This step-by-step tutorial will show you exactly how to sew a mini snap pouch from start to finish.
This cute little snap pouch is the perfect bag to stow away all your small belongings so you can find things when you need them. The Mini snap pouch is fully lined and keeps everything safe with a front snap button flap.
Additionally, the loop on the side can be used to hang your keys or simply to hook it onto your bag.
Another bonus? This snap pouch is a great scrap-buster sewing project! All those leftover small pieces of fabric you’ve been saving “just in case” can now be put to good use.
As a not-even-trying-to-recover fabric hoarder…this mini snap pouch is the bomb sewing project!!! Now I just have more excuse to keep those fabric scraps because you just never know. LOL.
How do you Make a Simple Pouch at Home?
The mini snap pouch is very simple to sew, making it a perfect easy sewing project for beginners. In a nutshell, we will first sew the front flap, then sew the four darts at the bottom.
After that, we will sew the lining to the exterior pouch. Then, we will sew those two pieces together. Finally, apply the snaps and you are done!
Follow along my step-by-step tutorial below which will show you exactly how to make this pouch from start to finish. Once you learn how to make one, you won’t want to stop!
What Can I put in a Small pouch?
The mini snap pouch is the perfect size for holding earbuds, flash drives, credit cards, coins, lipstick, and more! You can also put your keys and key fob in it if you prefer not to hang it on the outside loop.


I was even able to stow my lap top charger and cord in it, which made it so handy for my recent travel! I am really loving this snap pouch.
What Are the Measurements For a Snap Bag?
Please note that all measurements are approximate and not exact. The final dimension of your backpack may differ slightly from what is listed here.

This little snap pouch measures approximately 4″ (10.1cm) wide and 3″ (7.62cm) tall.

At the widest part on the side, mini snap pouch is approximately 1.75″ (4.44cm) wide.
What Do I Need to Sew a Snap Pouch?
Measurements of fabric pieces are listed as width by height.
Materials
- EXTERIOR FABRIC (for body of Pouch) – two pieces of fabric scraps that measure at least 6″ x 5″ (15.24 cm x 12.7 cm) each, or one piece that measures 12″ x 5″ (30.48cm x 12.7 cm).
- LINING – two pieces of fabric scraps that measure at least 6″ x 5″ (15.24 cm x 12.7 cm) each, or one piece that measures 12″ x 5″ (30.48cm x 12.7 cm).
- FRONT FLAP FABRIC – two pieces of fabric scraps that measure at least 5″ x 4″ (12.7cm x 10.16cm) each, or one piece that measures 10″ x 5″ (25.4cm x 12.7cm).
- FUSIBLE INTERFACING – 1/8 Yard (0.11M). I used the Heat n Bond Medium Weight Iron on Interfacing
- FUSIBLE FLEECE – 1/8 Yard (0.11M) – I’m using Pellon 987F Fusible Fleece
Tools
- HOME SEWING MACHINE – I LOVE my SINGER HEAVY DUTY SEWING MACHINE
- FABRIC SCISSORS – GINGHERS are my favorite. I’ve tried other brands such as Fiskars, but they just don’t compare.
- SEWING PINS and/or SEWING CLIPS
- PLASTIC SNAPS & SNAP PLIERS
- HAND SEWING NEEDLES
- IRON – for pressing
Free Small Snap Pouch Bag pattern
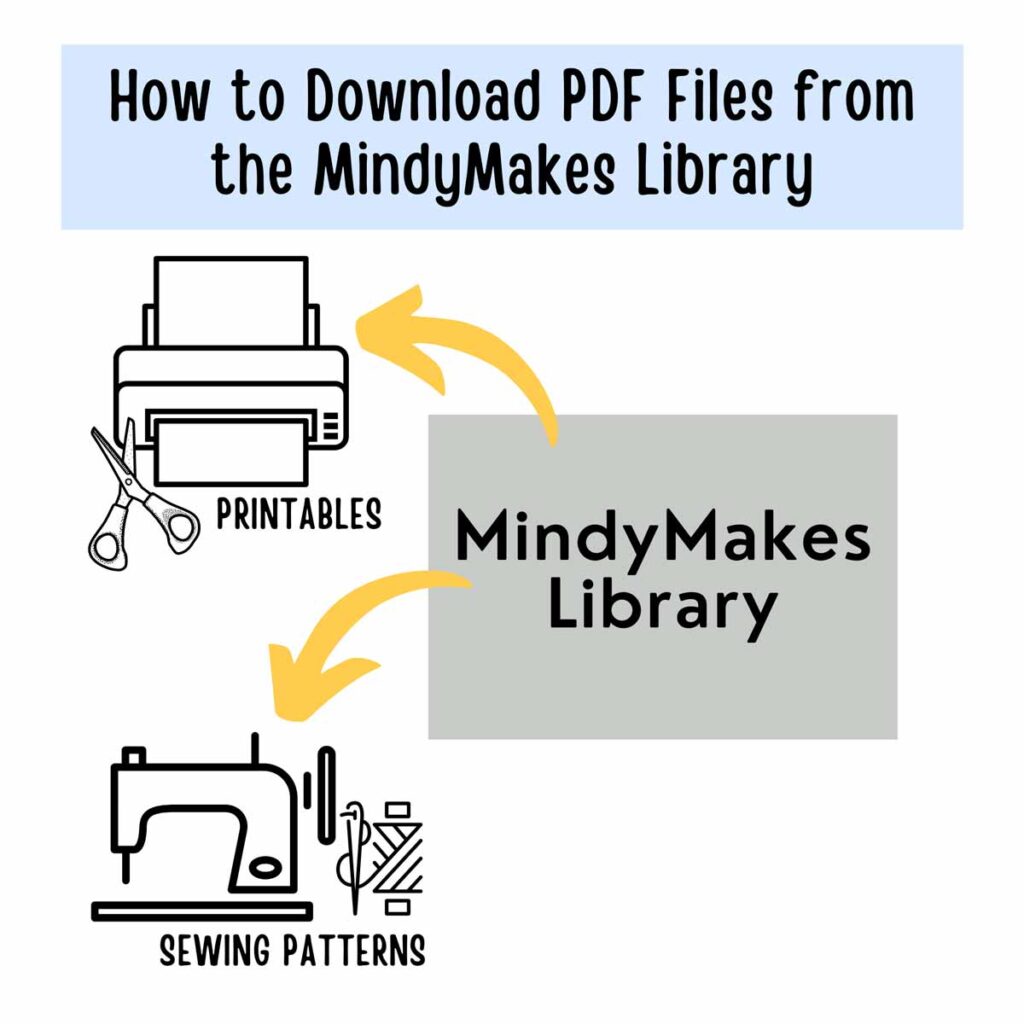
To download the PDF Mini Snap Pouch Bag Pattern, subscribe to the MindyMakes Email List to receive the password for the Mindy Makes Free Resource Library. The small snap pouch pattern is listed under section ‘S’ of the library.
Once you click “submit”, the password will show up on the next page. You will also receive a welcome email with the password in case you forget.
Please allow up to an hour for the welcome email to fly through cyberspace and travel into your inbox. If you still don’t receive the email, make sure to check your junk or spam folders and add my email to your safe list!
Need more help? Be sure to check out this step-by-step guide that shows you exactly how to get the password, enter the library, and download the PDF.
Need additional help? Be sure to check out this step-by-step guide that will show you exactly how to get the password, enter the library, and download the PDF.
Snap Pouch Sewing Pattern

Cut out all fabric pieces. You will need to cut out the following:
- EXTERIOR PIECE (x2)
- LINING PIECE (x2)
- FLAP EXTERIOR PIECE (x1)
- FLAP LINING PIECE (x1)
- KEY CHAIN LOOP PIECE (X1)

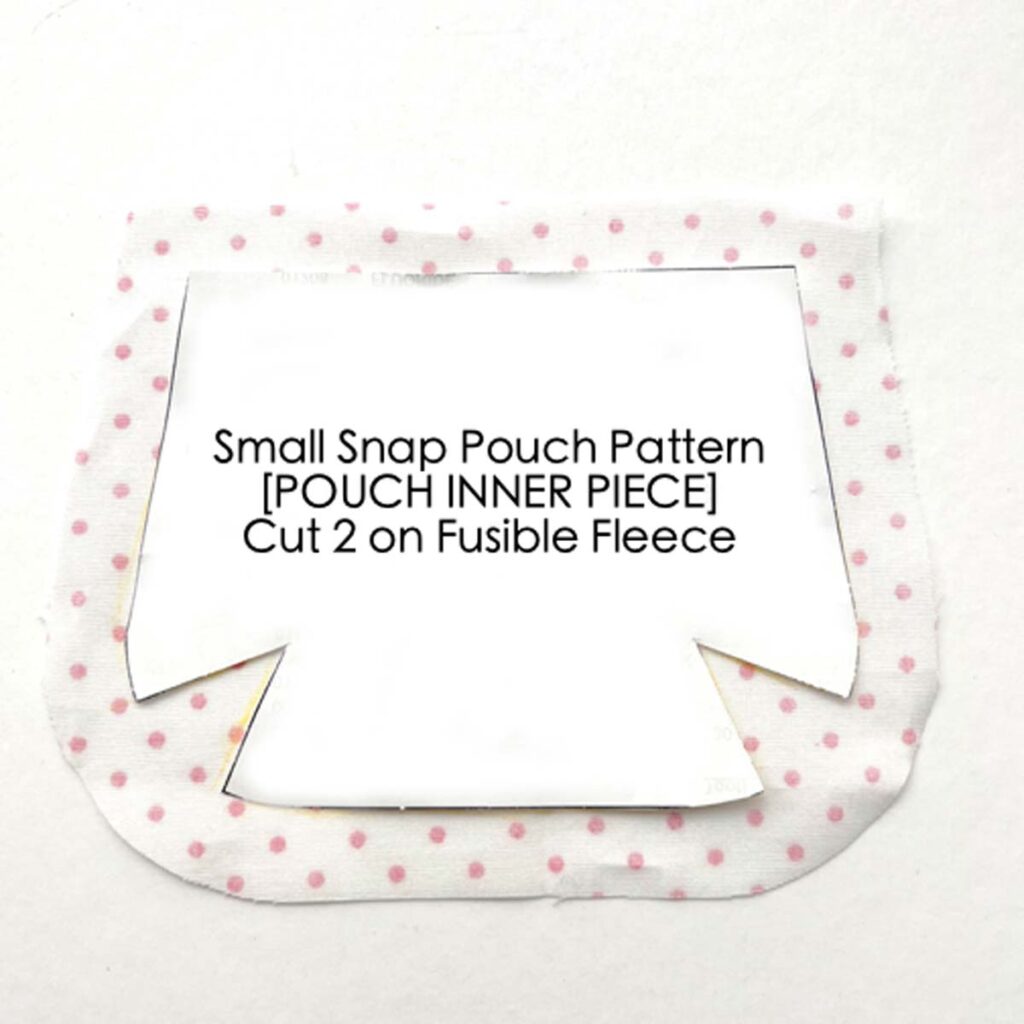
Cut out all interfacing. You will need to cut out the following:
- POUCH FUSIBLE FLEECE (x2)
- FLAP INTERFACING (x2)
- KEY CHAIN LOOP INTERFACING (X1)
How do you Make a Pouch Step By Step
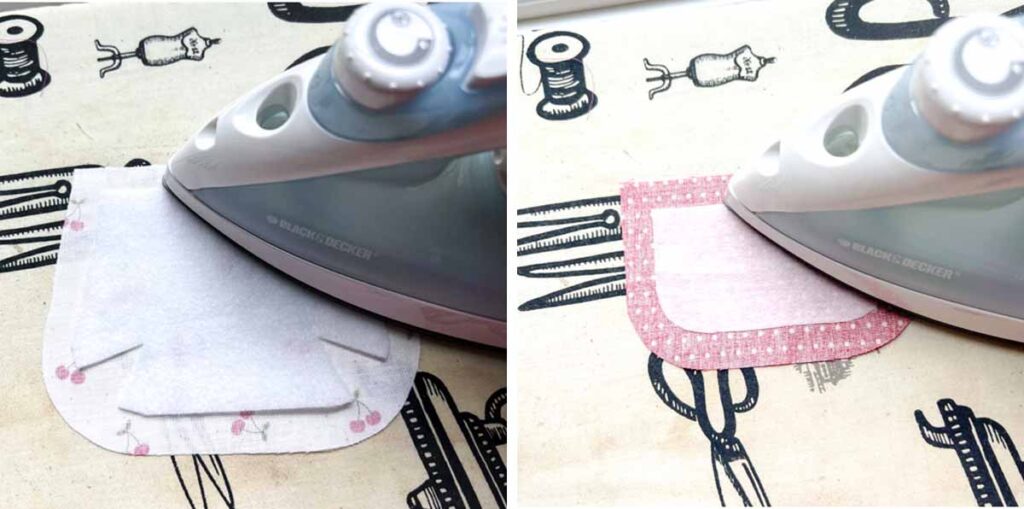
First, we will apply fusible interfacing to wrong side of EXTERIOR PIECE and FLAP EXTERIOR PIECE, leaving a 1/2” (1.27cm) border all around.
NOTE: You can just eyeball the 1/2”(1.27cm) border.

Next, repeat for other EXTERIOR PIECE and FLAP LINING PIECE.
How to Sew Key Chain Loop

First, apply key chain loop interfacing to wrong side of KEYCHAIN LOOP PIECE, leaving a 1/2”(1.27cm) all around.

Second, fold and press bottom 1/2”(1.27cm) seam allowance up.

Next, press top 1/2”(1.27cm) seam allowance down.
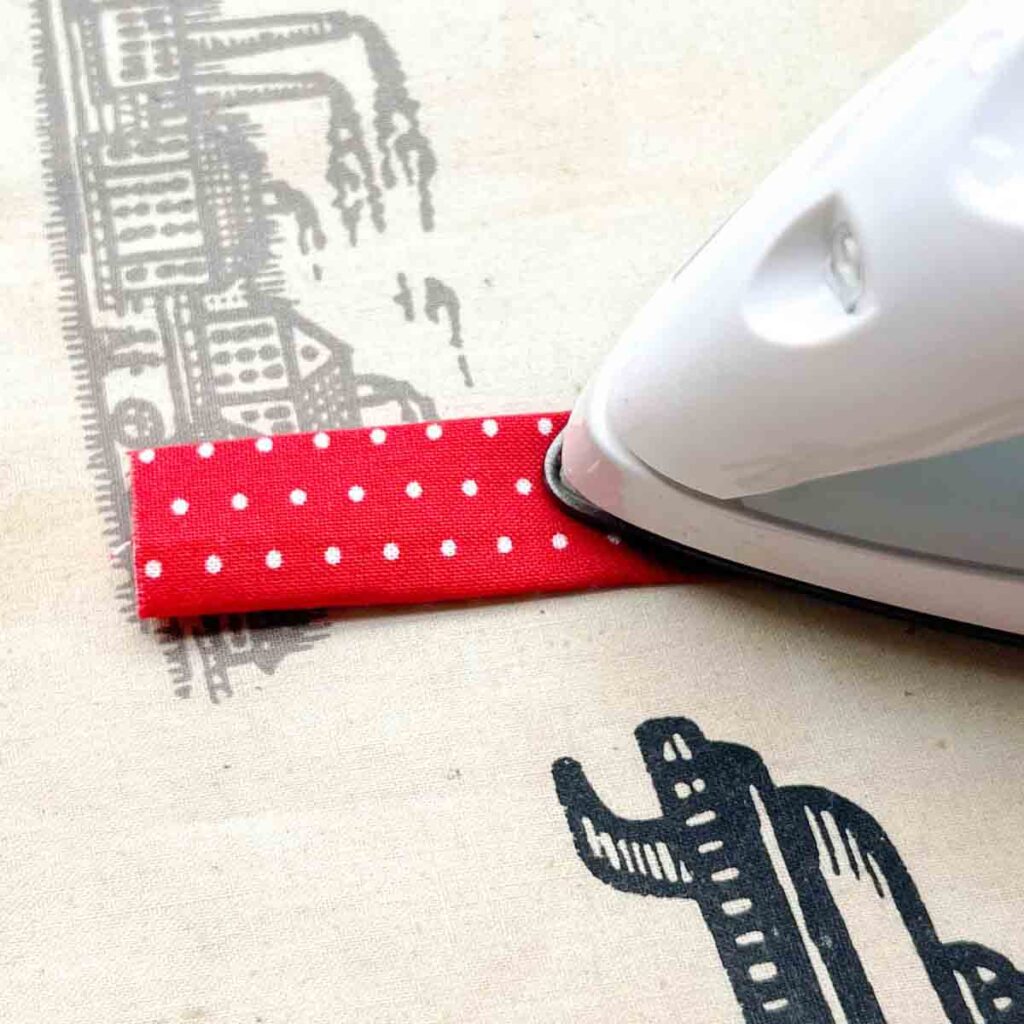
Then, press KEYCHAIN LOOP PIECE in half

Your KEYCHAIN LOOP PIECE will now look like this.
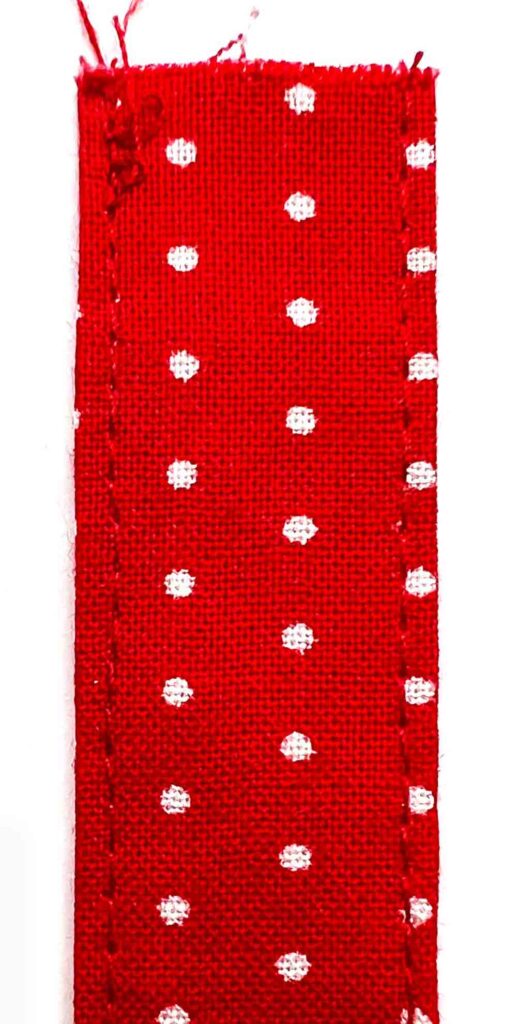
Finally, stitch down both sides at 1/8” (3mm) from edge. Your KEY CHAIN LOOP PIECE is now done.
How to Sew Front Flap

First, place FLAP EXTERIOR PIECE and FLAP LINING PIECE right sides together. Second, Stitch at 1/2” (1.27cm) seam allowance (yellow line), leaving the top open. Back stitch at both ends
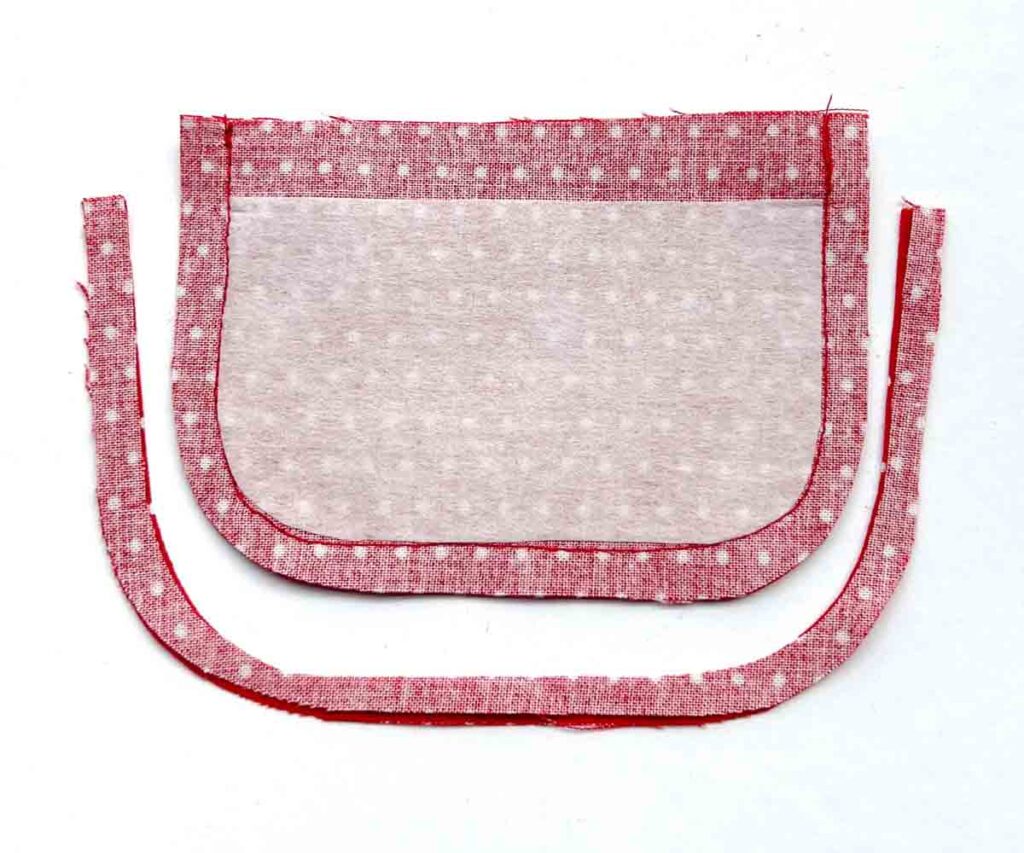
Next, trim seam allowance down to 1/4”(6mm)

Then, clip curves

Next, turn flap to right side.

Push out the ends of the flap.

Finally, use matching thread and top stitch at 1/8” (3mm) from edge (yellow dotted line). Leave top open.
Sewing Flap and Key Chain Loop
We will now sew the FLAP and the KEYCHAIN LOOP to the EXTERIOR PIECE that will become the back of the pouch.

First, with EXTERIOR PIECE right side up, place FLAP on top, in the center. Mine was approximately 5/8”(1.58cm) from both sides. I suggest eyeballing to determine that the flap is centered.
Second, fold KEYCHAIN LOOP in half and place it 2” (5.8cm) from top left edge of EXTERIOR PIECE. Make sure the folded edge of loop faces the middle of the pouch

Next, pin or clip KEYCHAIN LOOP and FLAP in place and machine basted (right photo).
Sewing Small Snap Pouch Pattern Darts – Preparation
First, place BAG INTERFACING PIECE on wrong side of LINING PIECE, leaving a 1/2” (1.27cm) border all around.

Next, use fabric chalk and trace darts at the bottom onto LINING PIECE.

View of traced darts (red lines). You don’t need to trace the entire BAG INTERFACING PIECE, just the darts.
Then, repeat on other LINING PIECE.
Sewing Snap Pouch Pattern Darts
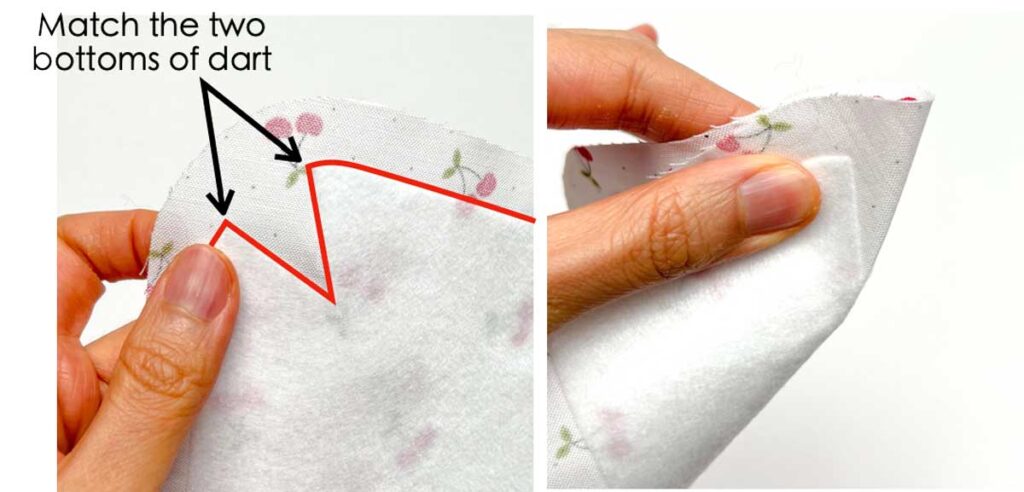
First, match the two bottom tips of the dart together by folding dart in half.

Next, place a pin to secure the two bottom dart tips together and sew (black dotted line).
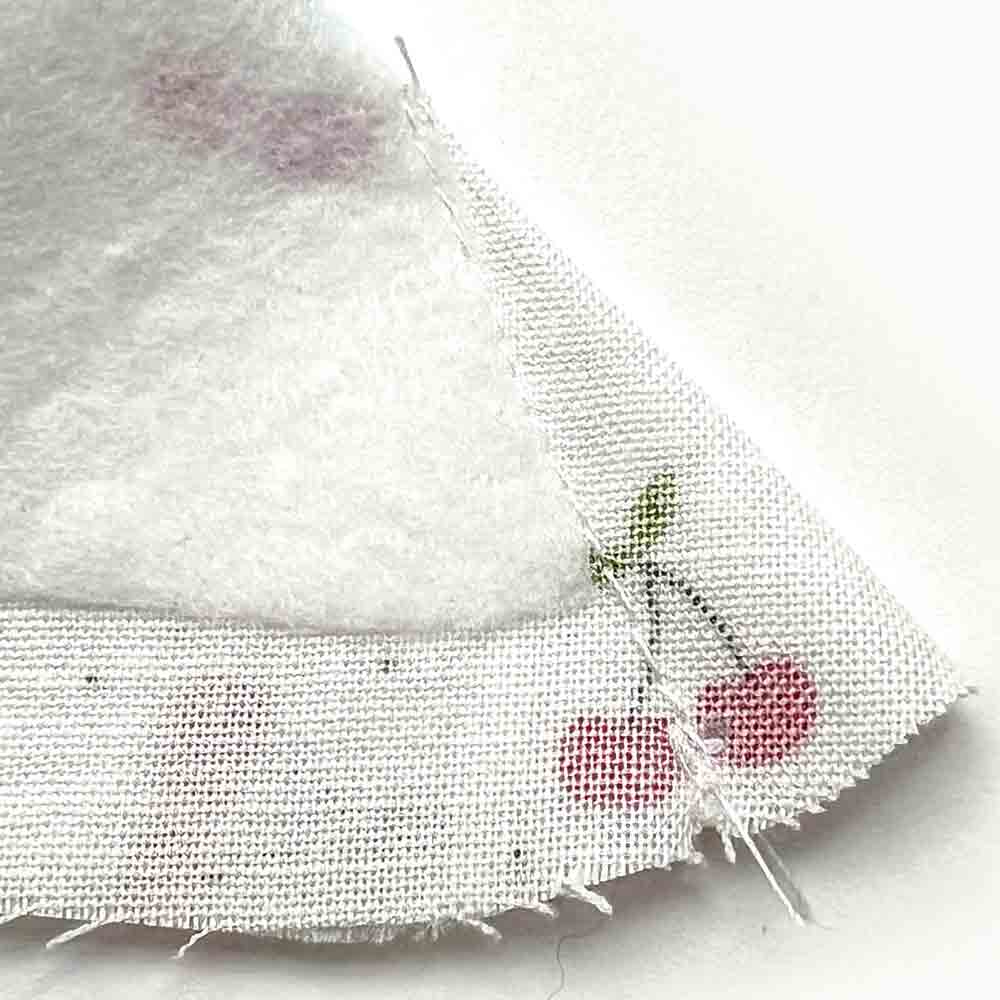
View of dart sewn together.

Then, sew dart on other side of fabric.
Repeat sewing all the darts on EXTERIOR PIECE and LINING PIECE.
Sewing Snap Pouch Pattern Together

First place LINING PIECE and EXTERIOR PIECE right sides together.

Then, pin together at the top. Next, repeat on other LINING and EXTERIOR PIECE.

Then, sew LINING PIECE to EXTERIOR PIECE at the top, 1/2”(1.27cm) seam allowance (blue dotted line). Back stitch at both ends.
Next, flip lining up so the seam allowance faces the lining.

Then, we will top stitch seam allowance to lining at 1/8”(3mm) from edge, as indicated by black dotted line.

Use matching thread to top stitching lining down. Make sure to back stitch at both ends.

View of top stitch. Now repeat on other side of pouch.

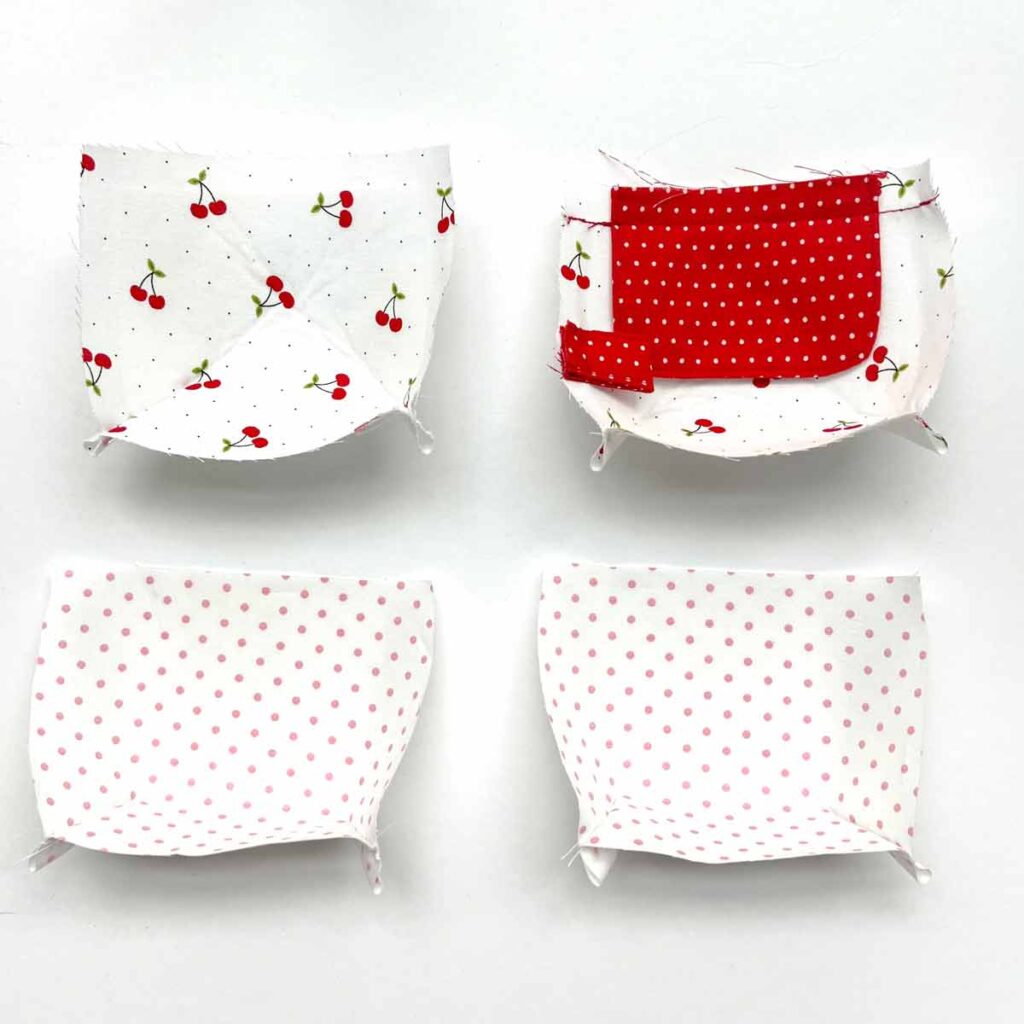
Now, you will have two pieces of the pouch, front and back.
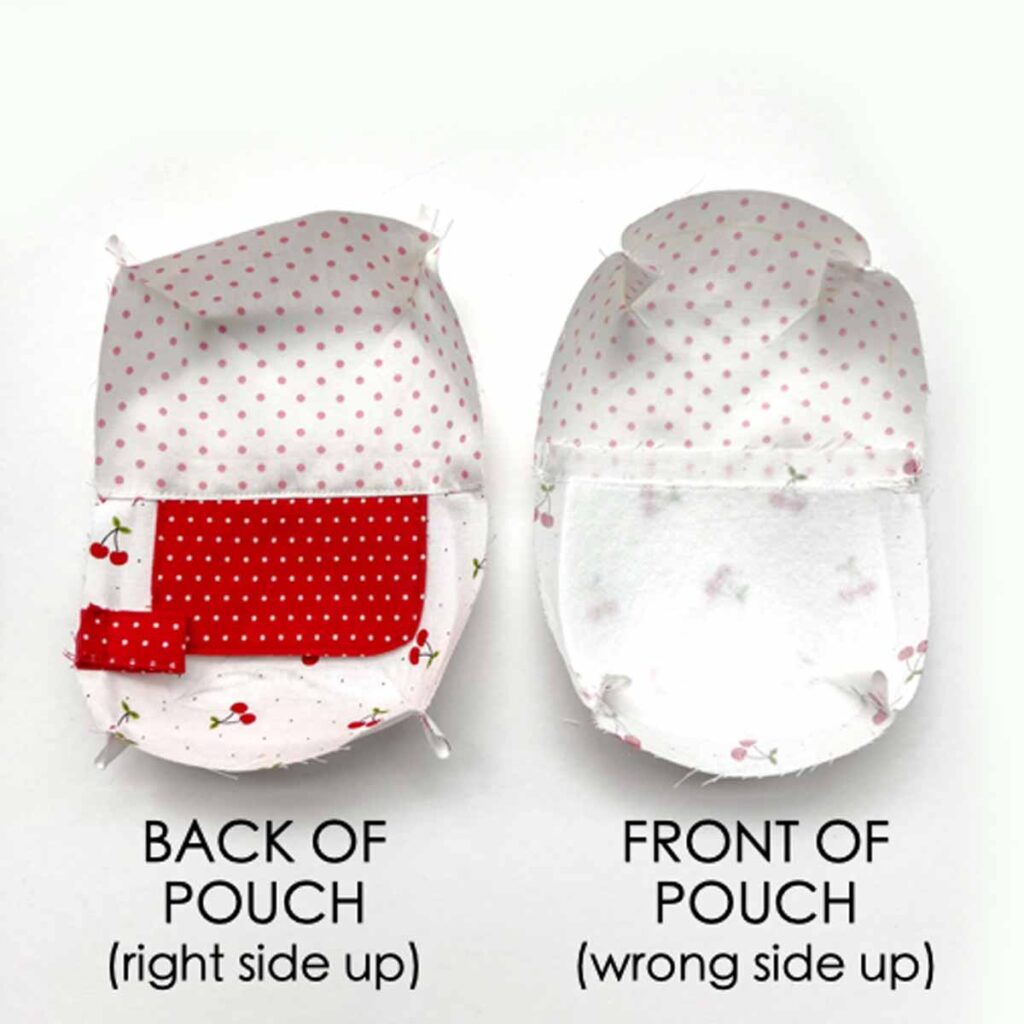
Next, turn FRONT OF POUCH so wrong side faces up.

Then, place FRONT OF POUCH to BACK OF POUCH, right sides together.

Make sure to match at the seam where EXTERIOR and LINING are sewn together.
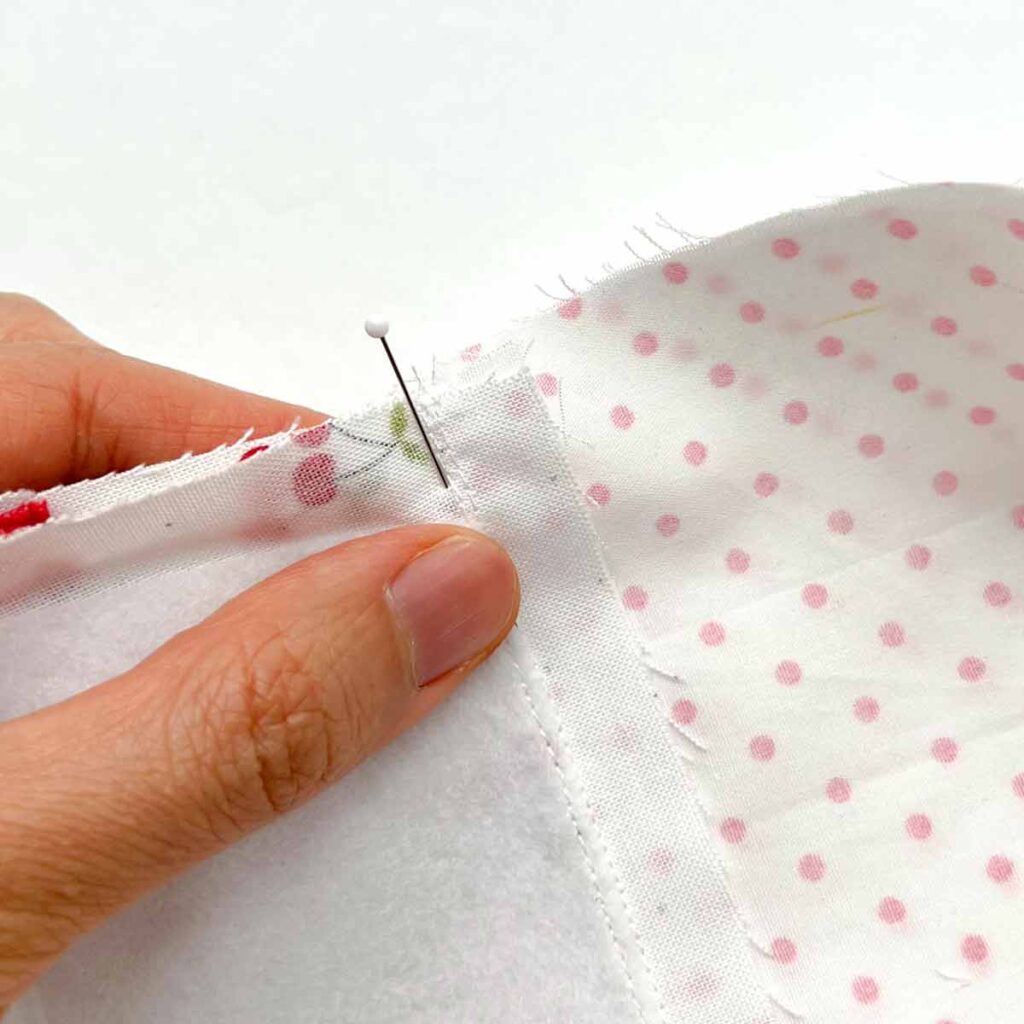
Next, place a pin to secure seam where EXTERIOR and LINING are sewn together.

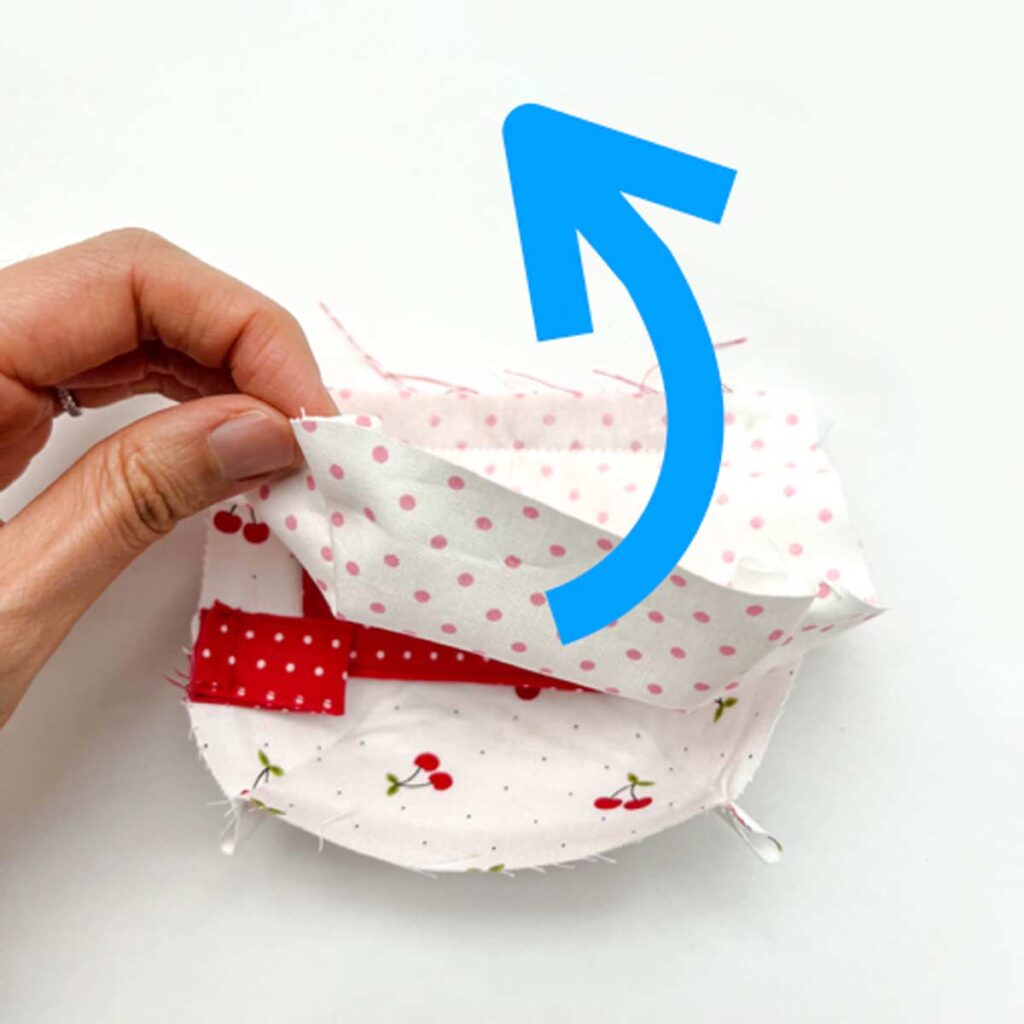
Match at seam of dart, making sure to point the darts in opposite direction.
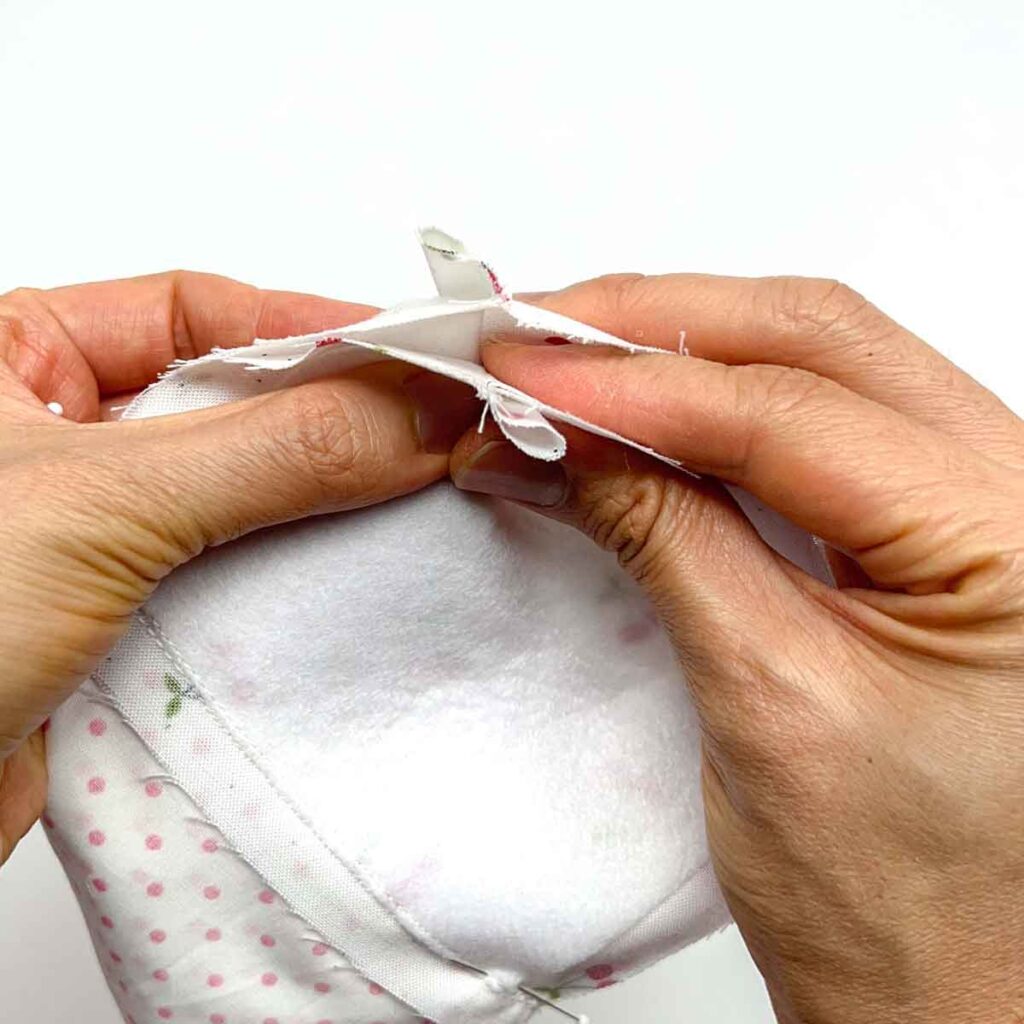
Another view showing darts pointing in opposite direction.

Then, place a pin to secure the darts.
Now, repeat matching all darts and pinning in place.
NOTE: Make sure to point both sides of darts facing opposite directions. This helps eliminate bulk at the bottom of the pouch.
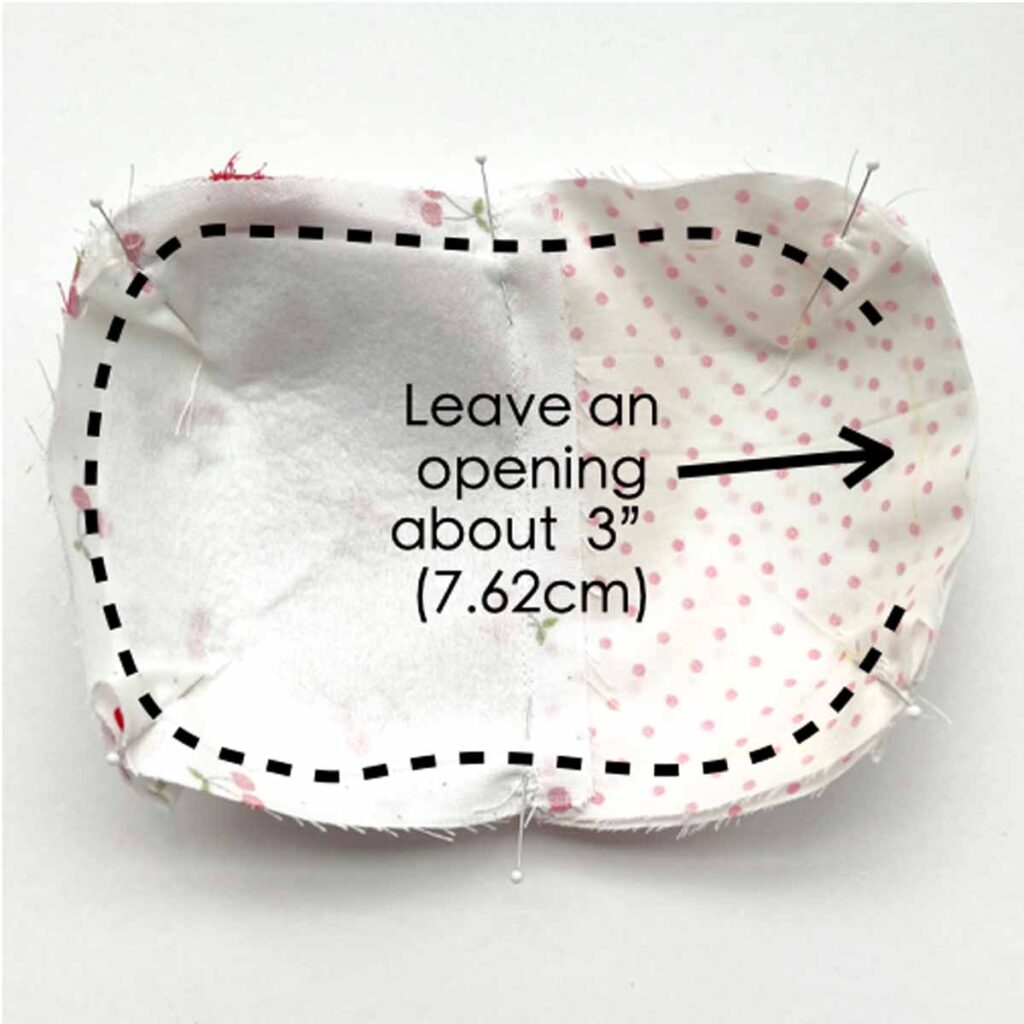
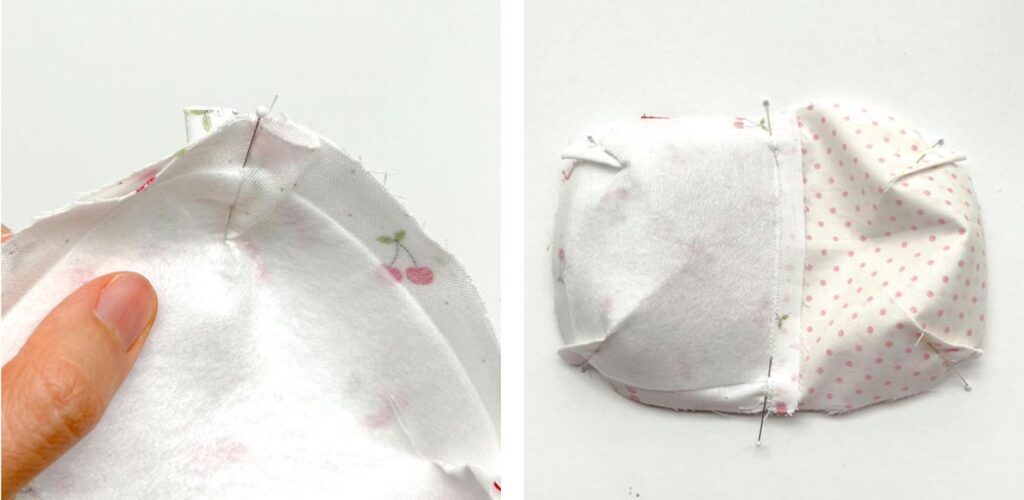
Next, sew FRONT OF POUCH to BACK OF POUCH at 1/2”(1.27cm) seam allowance. Leave an opening about 3” (7.62cm) wide at the bottom of lining, in between the darts. Back stitch at both sides of the opening.
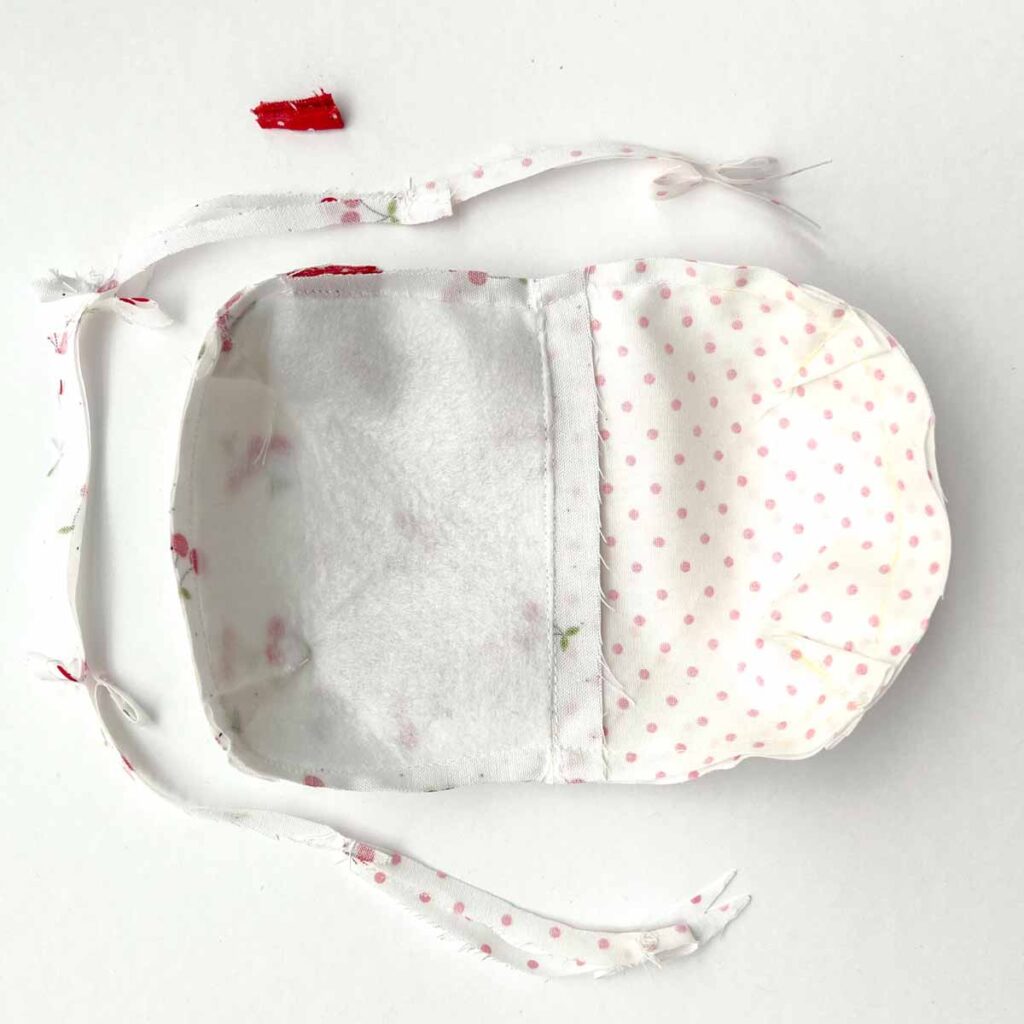
Then, trim seam allowance down to 1/4” (6mm).
Now clip curves and turn pouch to right side through opening.

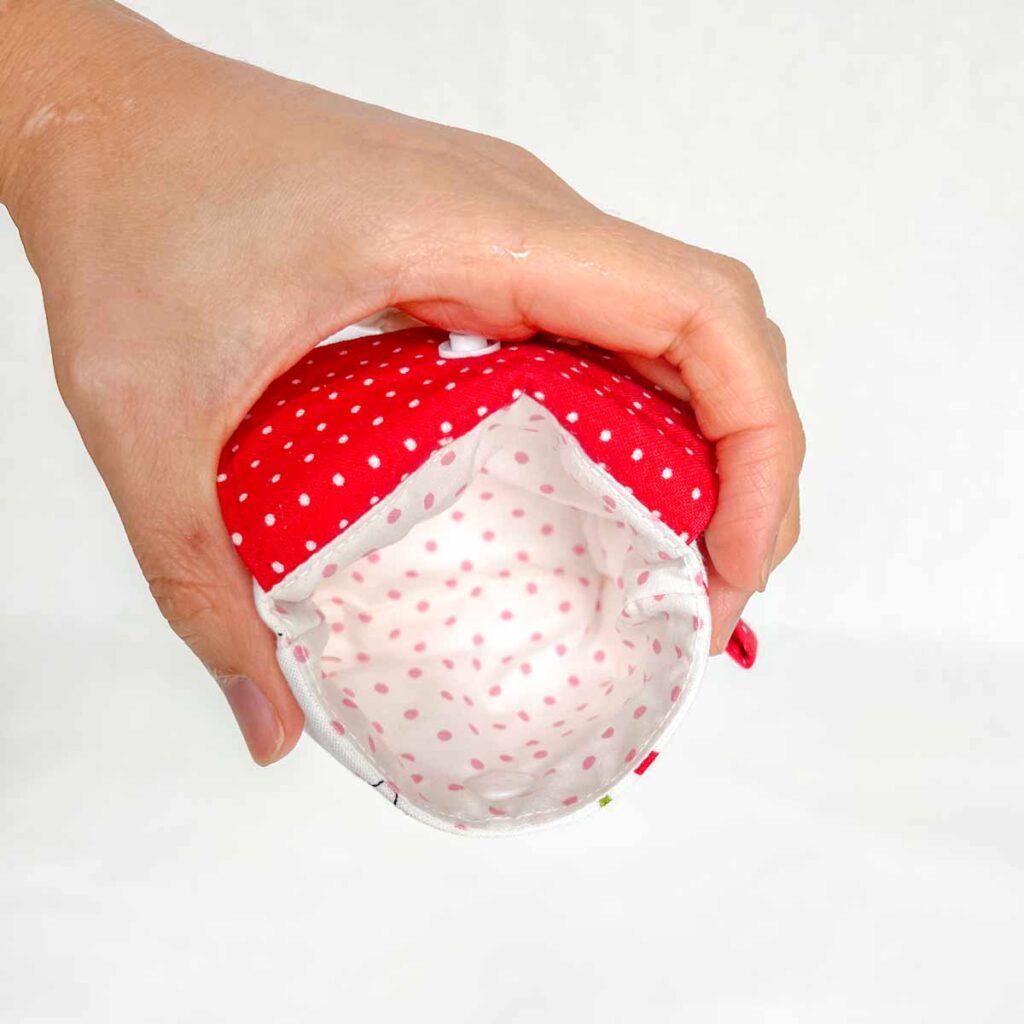
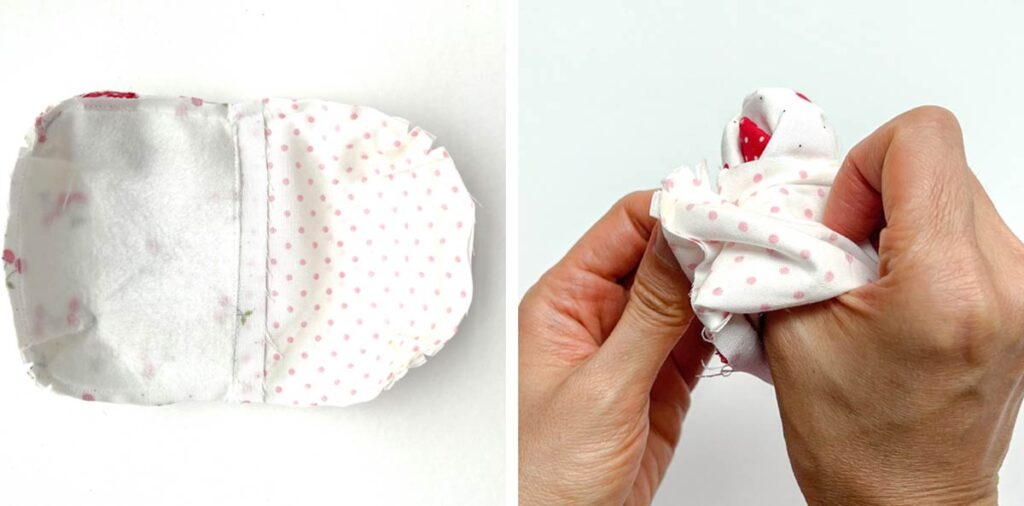
View of pouch turned to the right side.
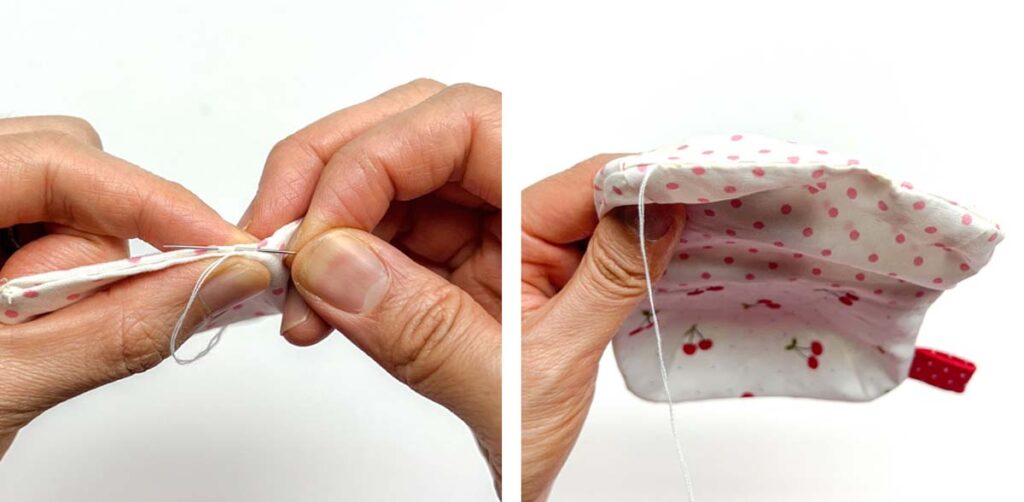
Now, use Invisible Ladder Stitch to close the opening in the lining.
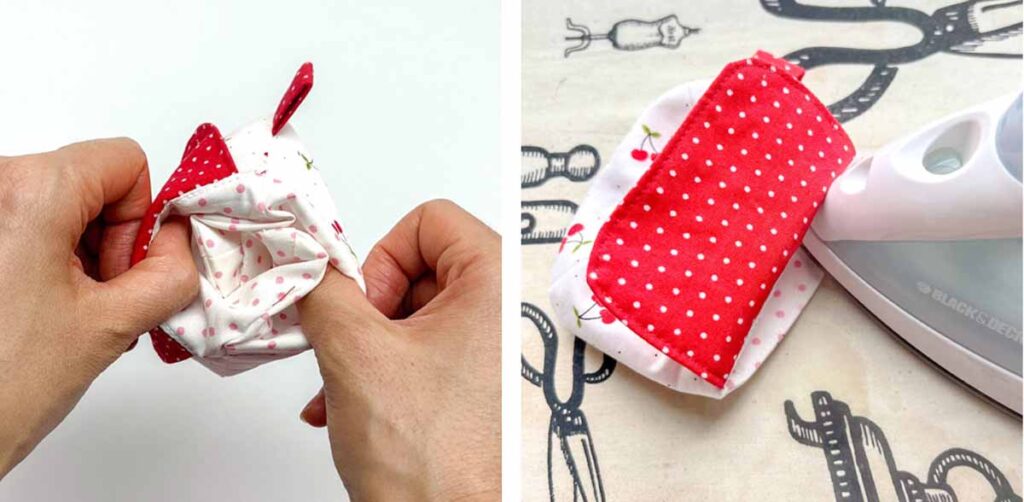
Finally, tuck the lining into the pouch and give it a good press.
How to Apply Plastic Snaps
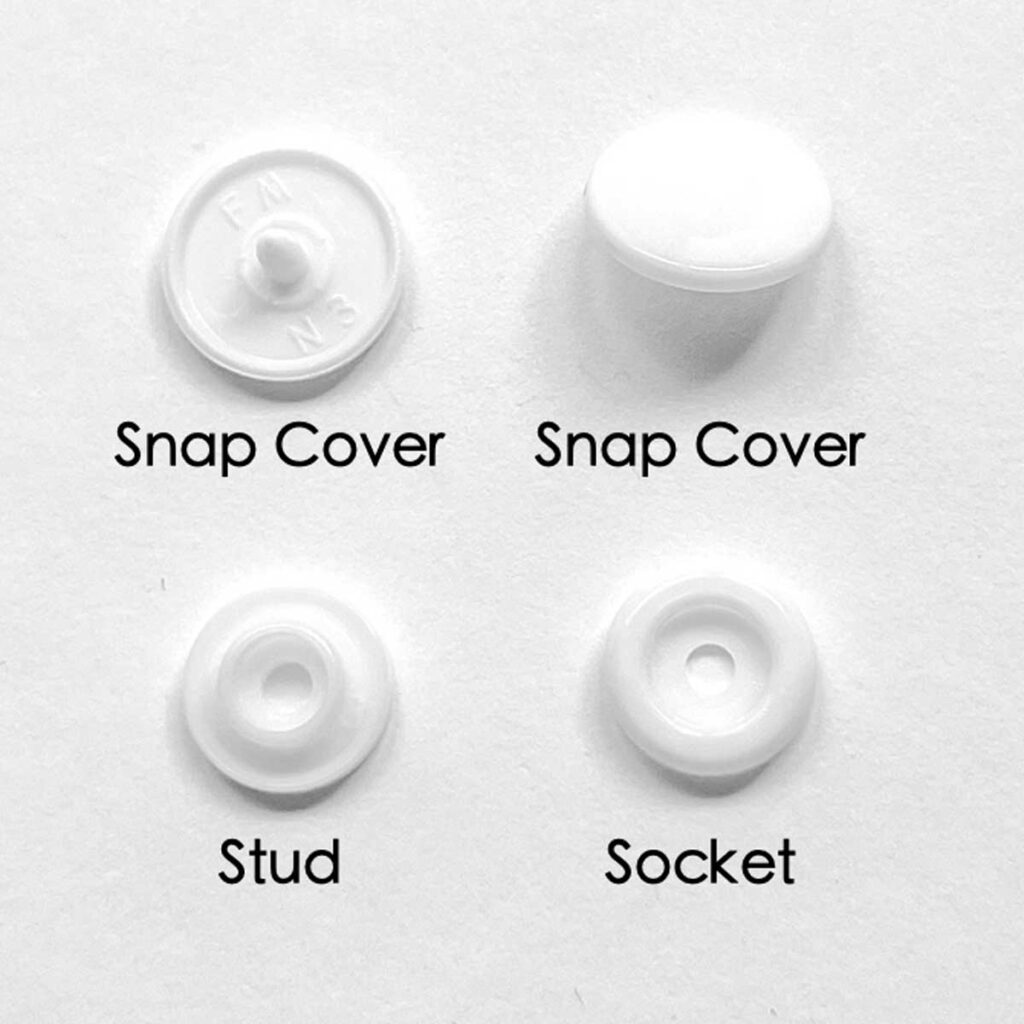
First, let’s take a look at the anatomy of the snap covers. To install snaps, you will need 2 pieces of snap covers, 1 piece of the snap stud, and 1 piece of snap socket. Note how the snap cover has a smooth side (upper right) and a pointy side with a prong (upper left).

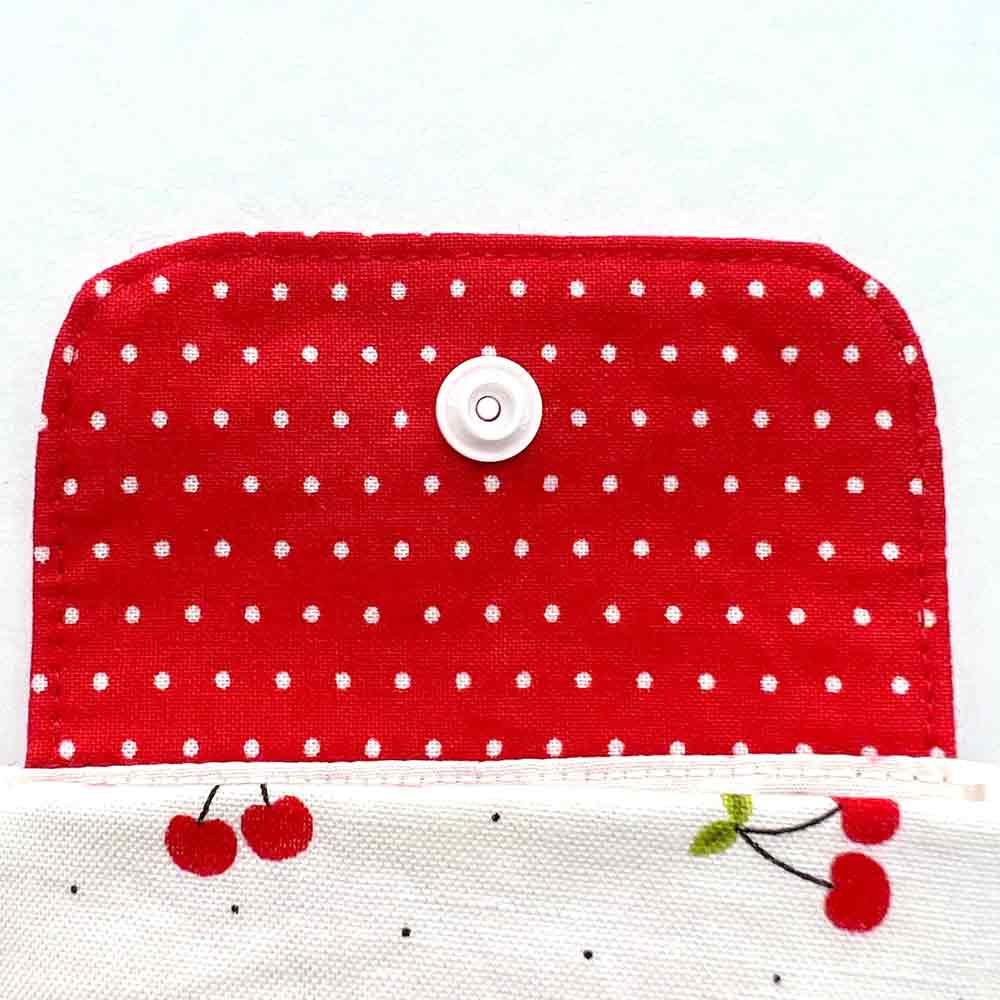
Second, Insert snap cover from the exterior of flap so that the prong (pointy end) comes out on the inside of the flap.

The snap is inserted (from the pointy end) about ¾” (1.9cm) from the top and 1¾ inch (1.58cm) from both sides.
NOTE: Your distance of how far the snap cover is from the sides may vary slightly from mine. As long as cover is centered on the flap you will be fine.
Next, place the snap stud over the exposed prong.

Now press it together with pliers. Note that the rubber head of pliers goes over the stud, and the black part of the pliers goes over the snap cover. Give it a good squeeze.
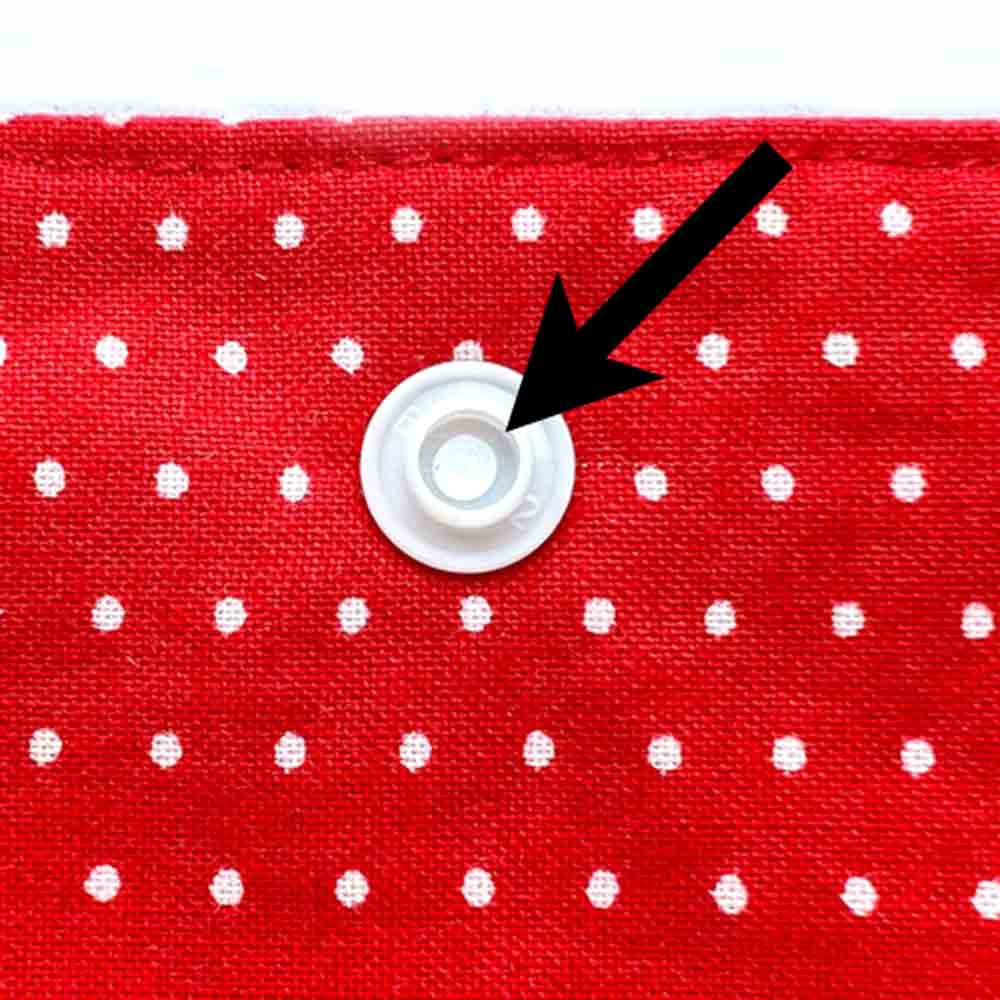
See how the pointy end of the prong has now been squished flat (black arrow). This lets you know that the snaps have been successfully applied.

Next, poke the second cover from the inside of the pouch through to expose the prong, about ⅝ inch (1.58cm) from the top and centered from the sides.
NOTE: My distance from the side of the pouch is about 2⅛ inch (5.4cm). However, yours could vary slightly from mine. Just make sure your snap cover is centered.

Now, slide the socket over the exposed prong.

Finally, press it secure with the pliers.

Again, see how the tip of the prong has been squished flat (black arrow). This indicates that the snap has been correctly applied.
Finished! You have just completed your very own mini snap pouch. Whoo hoo! You can do a little happy dance and pat yourself on the back. Now go ahead and sew 20 more of these!
Your friends and family will absolutely LOVE receiving this little pouch as gifts.
How to Make a Snap Pouch

This adorable mini snap pouch is perfect for holding credit cards, hairpins, lipstick, coins, and more! An easy sewing project that is great for beginners.
Materials
- EXTERIOR FABRIC - See Note 1
- LINING - See Note 2
- FRONT FLAP FABRIC - See Note 3
- FUSIBLE INTERFACING - 1/8 Yard (0.11 M)
- FUSIBLE FLEECE - 1/8 Yard (0.11M)
Tools
- HOME SEWING MACHINE
- FABRIC SCISSORS
- SEWING PINS and or
- SEWING CLIPS
- PLASTIC SNAPS & SNAP PLIERS
- HAND SEWING NEEDLES
- IRON - for pressing
Instructions
- Cut out all fabric pieces. You will need to cut out the following:
• EXTERIOR PIECE (x2)
• LINING PIECE (x2)
• FLAP EXTERIOR PIECE (x1)
• FLAP LINING PIECE (x1)
• KEYCHAIN LOOP PIECE (X1) - Cut out all interfacing. You will need to cut out the following:
• POUCH FUSIBLE FLEECE (x2)
• FLAP INTERFACING (x2)
• KEYCHAIN LOOP INTERFACING (X1) - Apply fusible interfacing to wrong side of EXTERIOR PIECE and FLAP EXTERIOR PIECE, leaving a 1/2” (1.27cm) border all around (see note 4).
- Apply keychain loop interfacing to wrong side of KEYCHAIN LOOP PIECE, leaving a 1/2”(1.27cm) all around.
- Press bottom 1/2”(1.27cm) seam allowance up and press top 1/2”(1.27cm) seam allowance down.
- Press KEYCHAIN LOOP PIECE in half.
- Stitch down both sides at 1/8” (3 mm) from edge. Your KEYCHAIN LOOP PIECE is now done.
- Place FLAP EXTERIOR PIECE and FLAP LINING PIECE right sides together. Stitch at 1/2” (1.27cm) seam allowance, leaving the top open. Back stitch at both ends.
- Trim seam allowance down to 1/4”(6mm).
- Clip curves and turn flap to right side.
- Use matching thread and top stitch at 1/8” (3mm) from edge, leaving top open.
- First, with EXTERIOR PIECE right side up, place FLAP on top, in the center. Mine was approximately 5/8” (1.58cm) from both sides. I suggest eyeballing to determine that the flap is centered.
- Fold KEYCHAIN LOOP in half and place it 2” (5.8cm) from top left edge of EXTERIOR PIECE. Make sure the folded edge of loop faces the middle of the pouch.
- Pin or clip KEYCHAIN LOOP and FLAP in place and machine basted.
- Place BAG INTERFACING PIECE on wrong side of LINING PIECE, leaving a 1/2” (1.27cm) border all around.
- Use fabric chalk and trace darts at the bottom onto LINING PIECE (see note 5).
- Repeat on other LINING PIECE.
- Match the two bottom tips of the dart together by folding dart in half.
- Place a pin to secure the two bottom dart tips together and stitch. Sew dart on other side of fabric.
- Repeat sewing all the darts on EXTERIOR PIECE and LINING PIECE.
- Place LINING PIECE and EXTERIOR PIECE right sides together. Pin together at the top. Repeat on other LINING and EXTERIOR PIECE.
- Sew LINING PIECE to EXTERIOR PIECE at the top, 1/2” (1.27cm) seam allowance. Back stitch at both ends.
- Flip lining side up so your seam allowance faces the lining.
- Top stitch seam allowance to lining at 1/8” (3mm) from edge.
- Use matching thread to top stitch lining down. Make sure to back stitch at both ends. Repeat on other side of pouch.
- Place FRONT OF POUCH to BACK OF POUCH, right sides together. Match at the seam where EXTERIOR and LINING are sewn together. Place a pin to secure.
- Match darts of FRONT POUCH and BACK POUCH together, making sure to point the darts in opposite direction. Place a pin to secure the darts.
- Repeat matching all darts and pinning in place.
- Sew FRONT OF POUCH to BACK OF POUCH at 1/2” (1.27cm) seam allowance. Leave an opening about 3” (7.62cm) wide at the bottom of lining, in between the darts. Back stitch at both sides of the opening.
- Trim seam allowance down to 1/4” (6mm).
- Clip curves and turn pouch to right side through opening.
- Use invisible ladder stitch to close the opening in the lining.
- Tuck the lining into the pouch and give it a good press.
- Insert snap cover from the exterior of flap so that the prong (pointy end) comes out on the inside of the flap. The snap is inserted (from the pointy end) about ¾” (1.9cm) from the top and 1 ¾ inch (1.58cm) from both sides.
- Place the snap stud over the exposed prong. Then press it together with snap pliers.
- Poke the second cover from the inside of the pouch through to expose the prong, about ⅝ inch (1.58cm) from the top and centered from the sides.
- Place the socket over the exposed prong and press it secure with the pliers.
- Your little snap pouch is now done!
BEFORE YOU START....
HOW TO SEW KEYCHAIN LOOP
HOW TO SEW FRONT POUCH
SEWING FLAP AND KEYCHAIN LOOP
SEWING DARTS
SEWING POUCH TOGETHER
HOW TO APPLY PLASTIC SNAPS
Notes
Note 1: You will need two pieces of fabric scraps that measure at least 6" x 5" (15.24 cm x 12.7 cm) each, or one piece that measures 12" x 5" (30.48cm x 12.7 cm).
Note 2: You will need two pieces of fabric scraps that measure at least 6" x 5" (15.24 cm x 12.7 cm) each, or one piece that measures 12" x 5" (30.48cm x 12.7 cm).
Note 3: You will need two pieces of fabric scraps that measure at least 5" x 4" (12.7cm x 10.16cm) each, or one piece that measures 10" x 5" (25.4cm x 12.7cm)
Note 4: Just eyeball the 1/2” (1.27cm) border.
Note 5: You don’t need to trace the entire BAG INTERFACING PIECE, just the darts.
More Easy Sewing Projects You will Love!

These simple drawstring bags are super easy to sew. The perfect sewing project for beginners.
This microwave bowl cozy will keep your hands from burning on hot bowls!

Learn how to make a lined, flat bottom drawstring bag to hold dices and more.