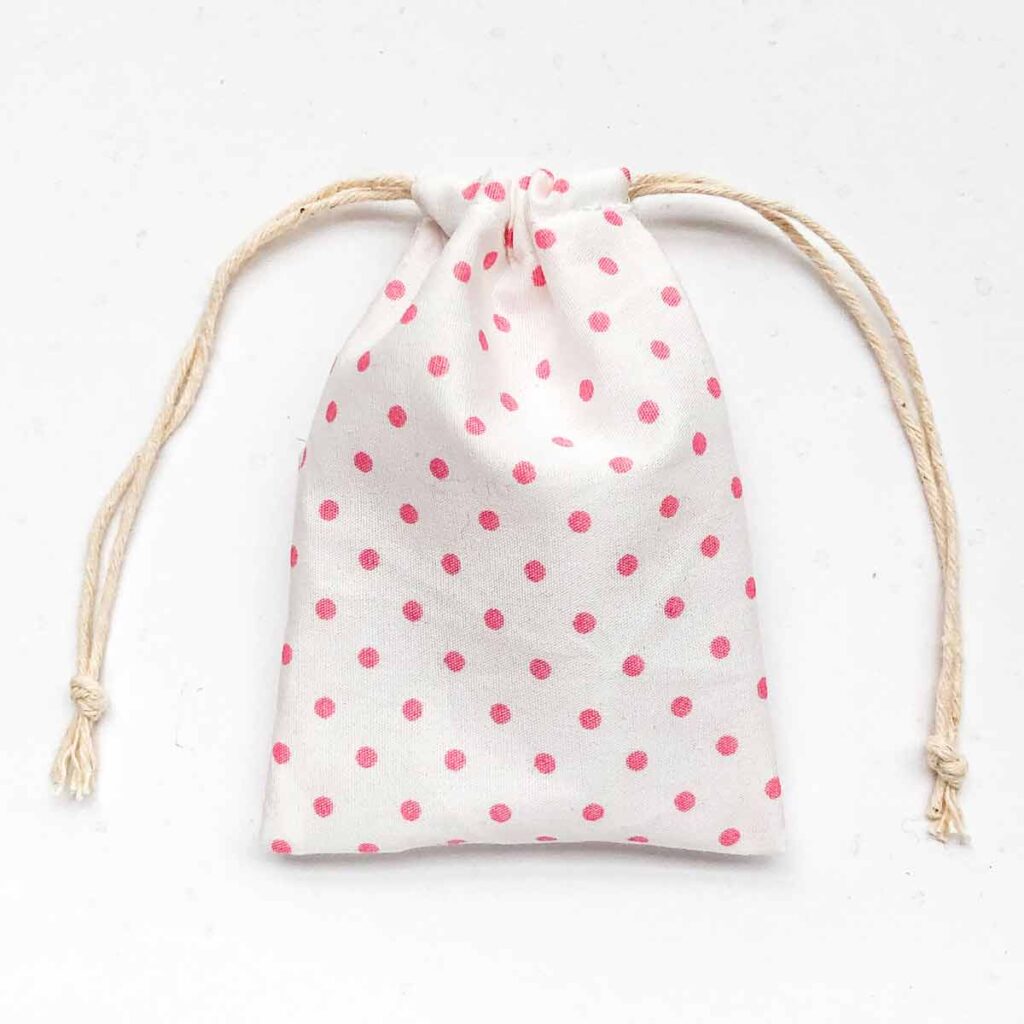
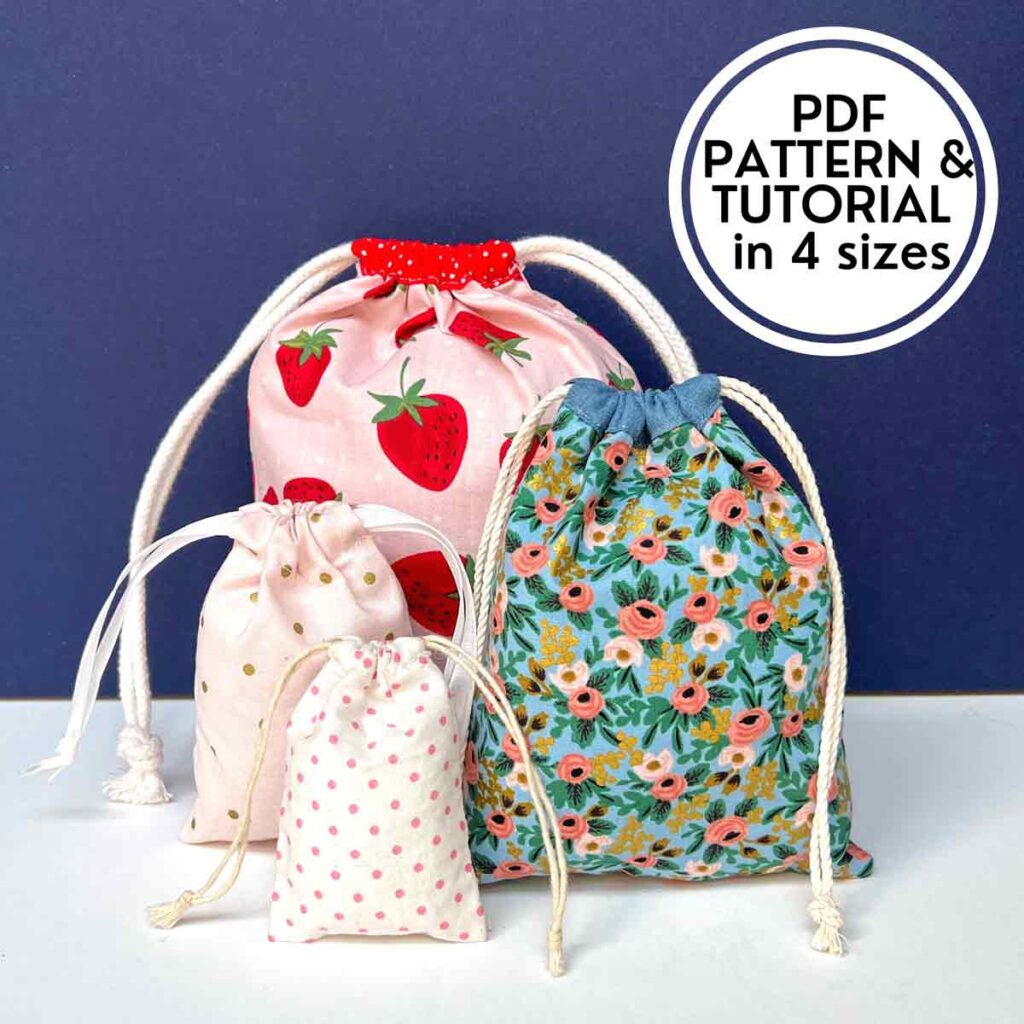
How to Make a Very Easy Drawstring Bag (Free Pattern in 4 Sizes)
These DIY drawstring bags have a double pull and are perfect for holding just about everything! The best part? They are incredibly easy to make only take minutes to sew! Step-by-step tutorial includes free pattern in 4 sizes to make it convenient for you. A great sewing project for beginners!

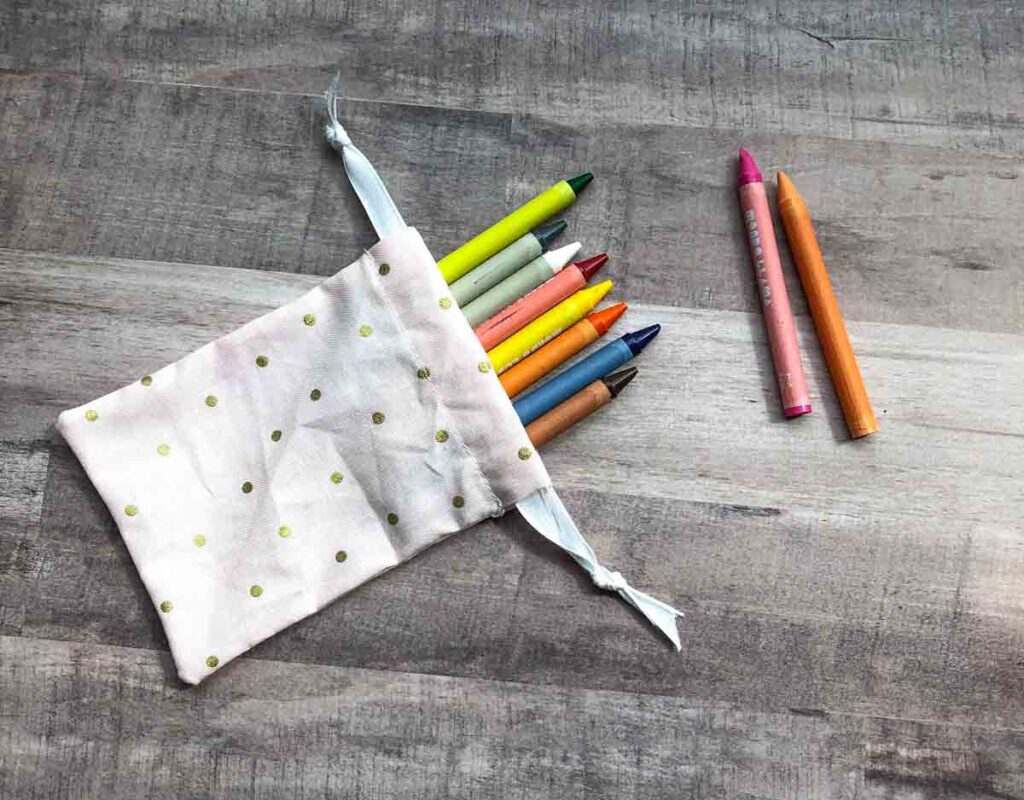
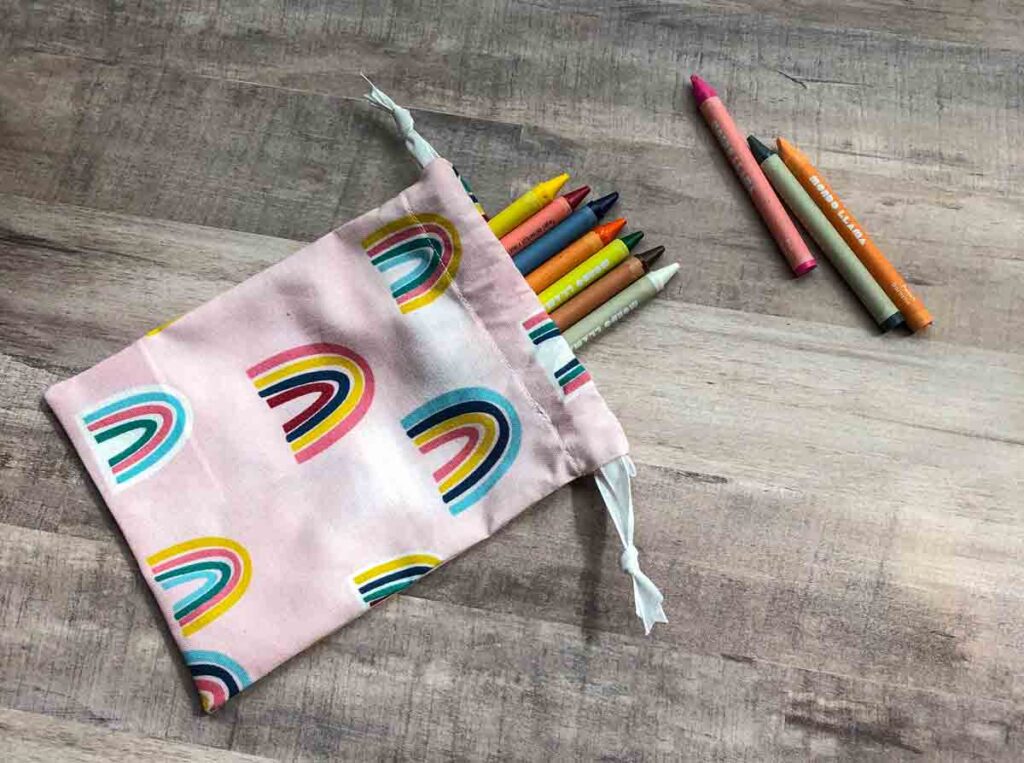
Drawstring bags are seriously one of the easiest and most satisfying sewing projects to make. First, they literally take minutes, so you get instant gratification for finishing a sewing project instead of letting it drag on (before you know it, you’ve just added another unfinished sewing project collecting dust in the corner…) Second, you can use fabric scraps to make these, especially the small and mini sized bags. Another feel-goodie for using up those small fabric pieces you don’t know what to do with! Finally, they are such useful DIY projects. You can hold anything from ear buds, crayons, hair pins, to you-name-it. They are also great as a quick fabric gift bags when you need one in a pinch. I can’t ever seem to have too many drawstring bags, and I’m sure you will enjoy them too!
Can’t get enough of DIY drawstring pouches? Check out these other fun drawstring bag tutorials!
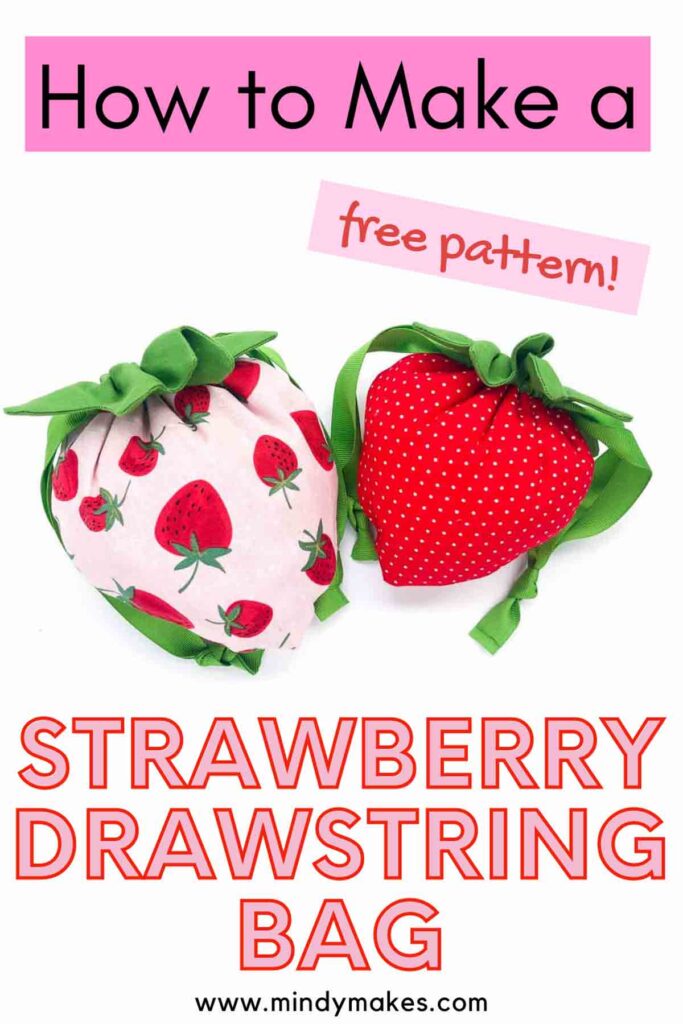
These cute little drawstring treat bags closes up into a strawberry. Guests and friends will be delighted!
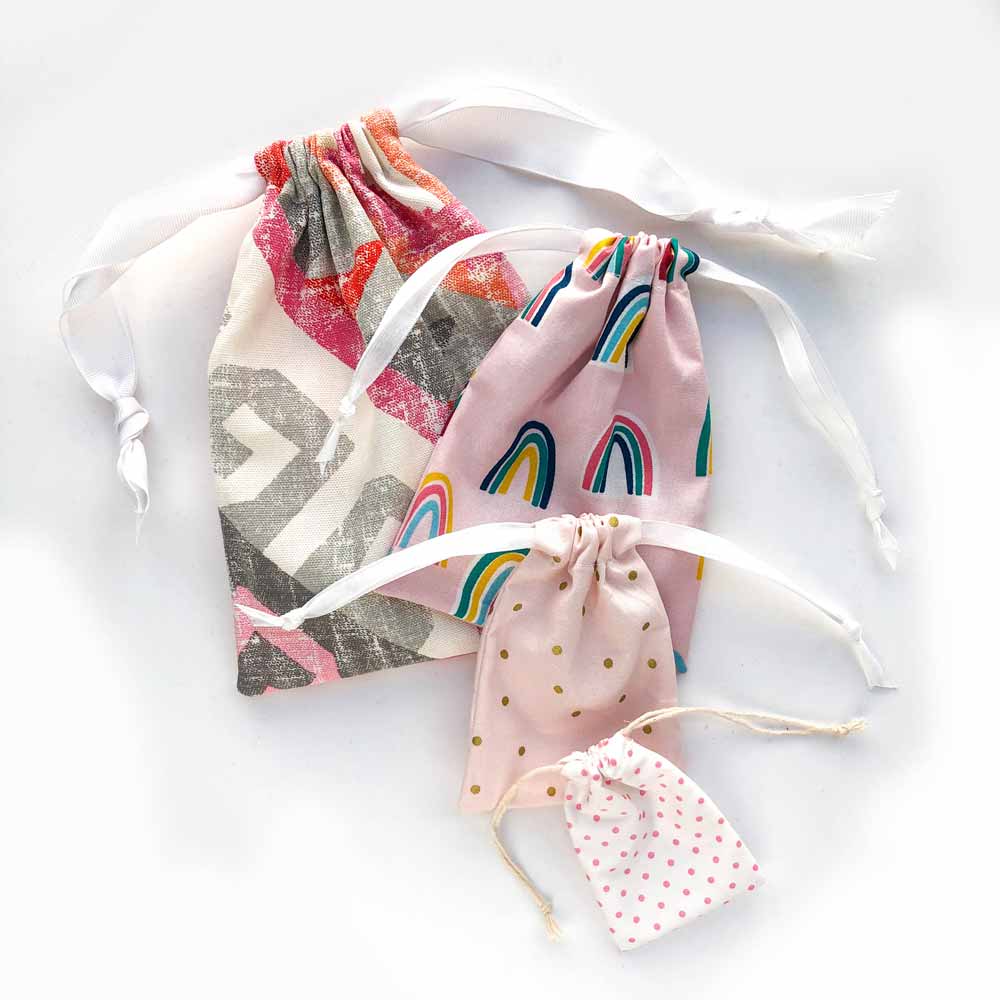
These adorable fabric drawstring gift bags are easy to sew up in a pinch and 100% reusable.
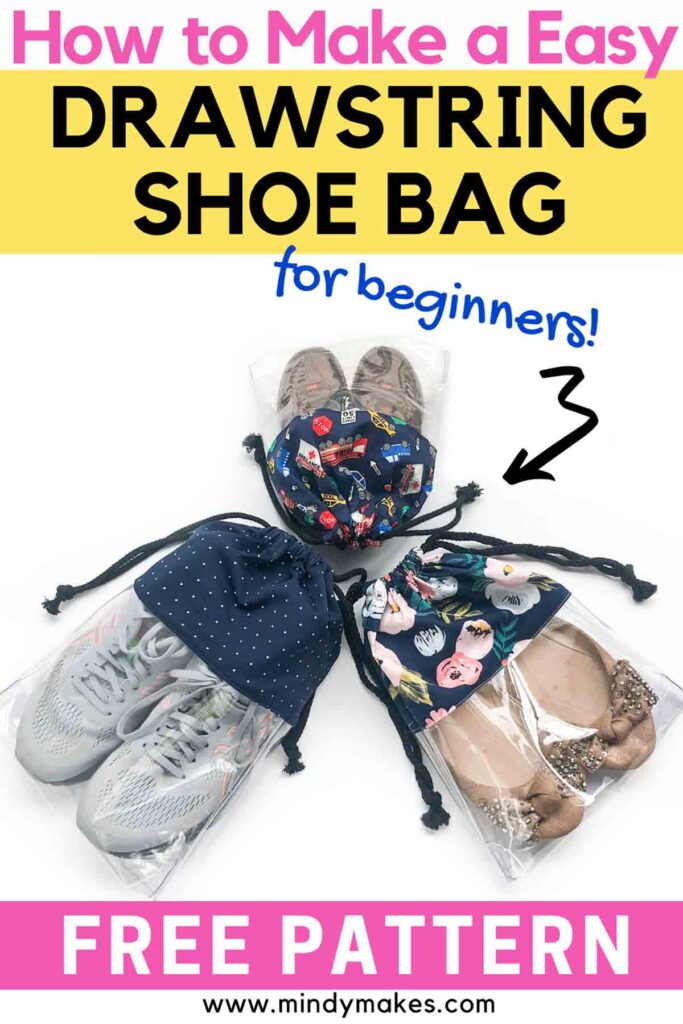
A no fuss drawstring shoe bag with clear vinyl to keep those shoes protected and organized.
How Do You Make a Quick Drawstring Bag?
This drawstring bag is unlined, making it a quick and easy sewing project. In the tutorial below, I will show you two ways to finish off the raw seam on the inside. The first way is simply by pinking the raw edges once your bag is done. (Alternatively, you can also serge the edges if you have a serger). The second way is to create beautiful french seams that will encase the raw edges within the seam allowance. These two methods are both super duper easy, and my step-by-step tutorial will show you exactly how to do that!
Want to learn to sew a lined drawstring bag? Check out How To Sew a Flat Bottom Drawstring Dice Bag
What are the Dimensions of DIY Drawstring Pouch?
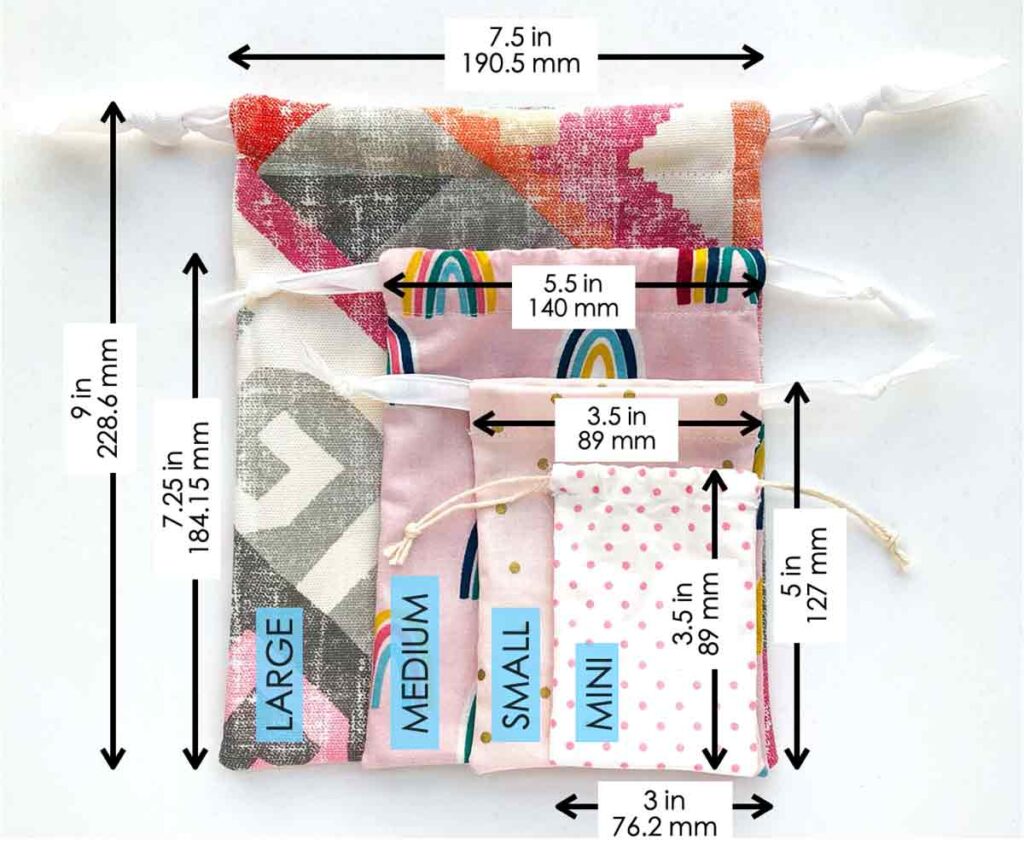
The measurements of the Drawstring Bag are as Follows:
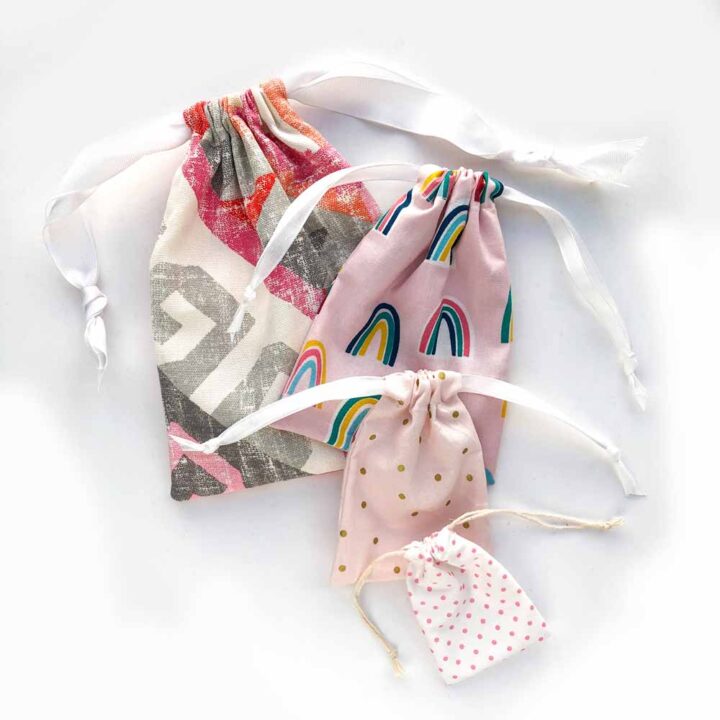
- Mini: 2.5″ x 3.25″ (63.5 mm x 83 mm)
- Small: 3.5″ x 5″ (89 mm x 127 mm)
- Medium: 5.5″ x 7″ (140 mm x 177.8 mm)
- Large: 7.5″ x 9″ (190.5 mm x 228.6 mm)
How do you make a mini drawstring bag?
In this tutorial, I will show you two versions of how to make make a simple DIY drawstring pouch. As you can see from the photo below, the only difference is at the back of the drawstring casings.
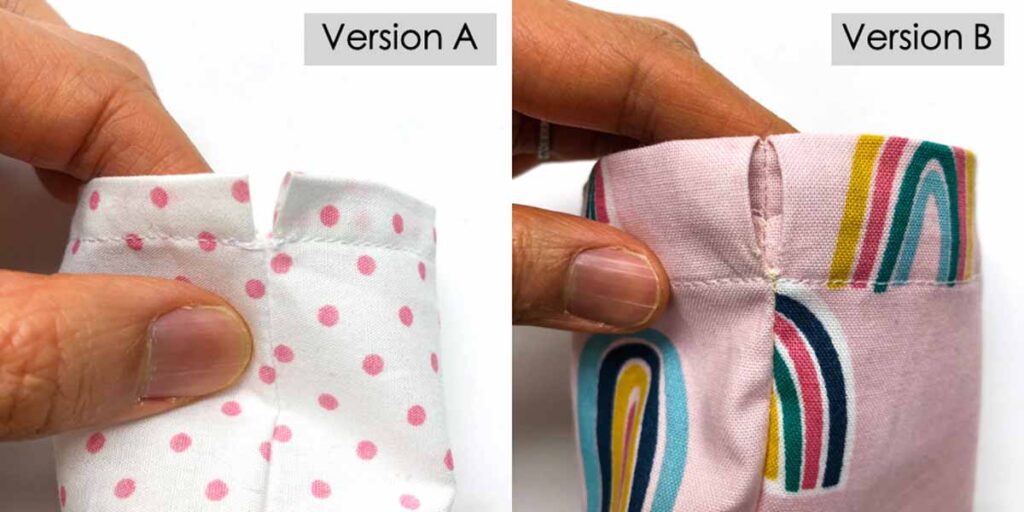
Version A (LEFT) has a drawstring casing that is detached from each other at the back (on the side seam). Version B (on the right) has the back of the drawstring casing (at the side seam) sewn together.
Both these versions are extremely simple to make and it really is a matter of user preference which “look” you like more. However, please note that in order to make a drawstring bag with an opening smaller than 5.5″ (14cm), the small and mini drawstring bag, you will need to make Version A.
This is because in Version A, you finish the drawstring casings first, and then you sew the side seams together. Version B, on the other hand, is finished by pulling entire bag over the sewing table to finish the drawstring casing. The sewing machine has a limitation for sewing openings that are less than 5.5” (14cm) wide. In other words, you physically cannot fit anything smaller than that over the sewing table, even after removing your free arm.
Thus, Version B is good for drawstring bags that have an opening wider than 5.5” (14cm) wide.
How much fabric Do I need to make a drawstring bag?
- Mini Bag: One piece of fabric about 5″ x 10″ or 127 mm x 254 mm (width x length)
- Small Bag: One piece of fabric about 5″ x 13″ or 127 mm x 330 mm (width x length)
- Medium Bag: Two pieces of fabric about 7″ x 9″ or 178mm x 229 mm (width x length)
- Large Bag: Two pieces of fabric about 9″ x 11″ or 229mm x 280 mm (width x length)
Drawstring Bag Sewing Pattern
Mini Drawstring Bag: Cut 1 Piece of Fabric 9.5”x 4”(241.3 mm x 101.6 mm)
Medium Drawstring Bag: Cut 2 Pieces of fabric Each 6.5” x 9”(165.1 mm x 228.6 mm)
Printable PDF Sewing Pattern* Dimensions of ALL the bag sizes (mini, small, medium, and large) are Available in the MindyMakes FREE RESOURCE LIBRARY. Get the password when you SUBSCRIBE.
*Please note that the Sewing Patterns lists the exact dimension for you to draw and cut out on fabric, not actual paper pattern pieces.
The ad-free, printer-friendly PDF version of this step-by-step sewing tutorial is now available for purchase in our SHOP. PDF tutorial includes actual patterns for you to just print and use. No need to measure and draw them out on fabric!
Additional patterns (color block drawstring casing) are also included in your purchase that are not available in the free resource library. Print a copy today to keep next to your sewing machine for easy reference!
MATERIALS
- DRAWSTRING BAG PATTERN – Available in the MindyMakes free resource library.
- COTTON FABRIC – see above for how much fabric you need
- 3/8″ – 1/2″ Ribbon – For drawstring
TOOLS
- SEWING MACHINE
- FABRIC SCISSORS – these Ginghers are my favorite.
- BODKIN – alternatively, can also use safety pins
- CLEAR RULER – I have the DRITZ See-Through Sewing Ruler
- FABRIC CHALK – These Chaco Liners by Clover are my absolute favorite
- SEWING PINS
- MATCHING THREAD
How do you make a SIMPLE drawstring bag?
Version A
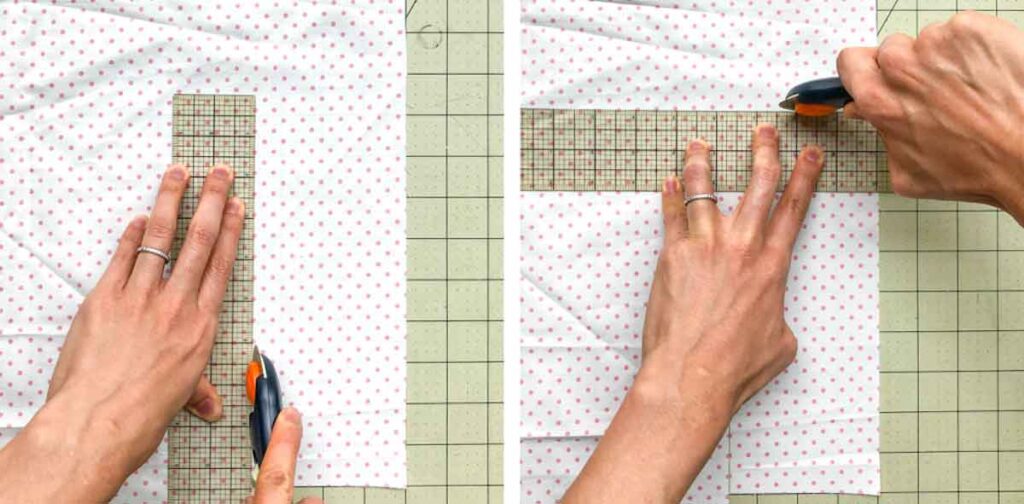
Cut a piece of fabric that measures 9.5”x 4”(24.13cm x 10.16cm). A rotary cutter with cutting mat is especially useful for this. For more tips on how to use a rotary cutter, check out this post.
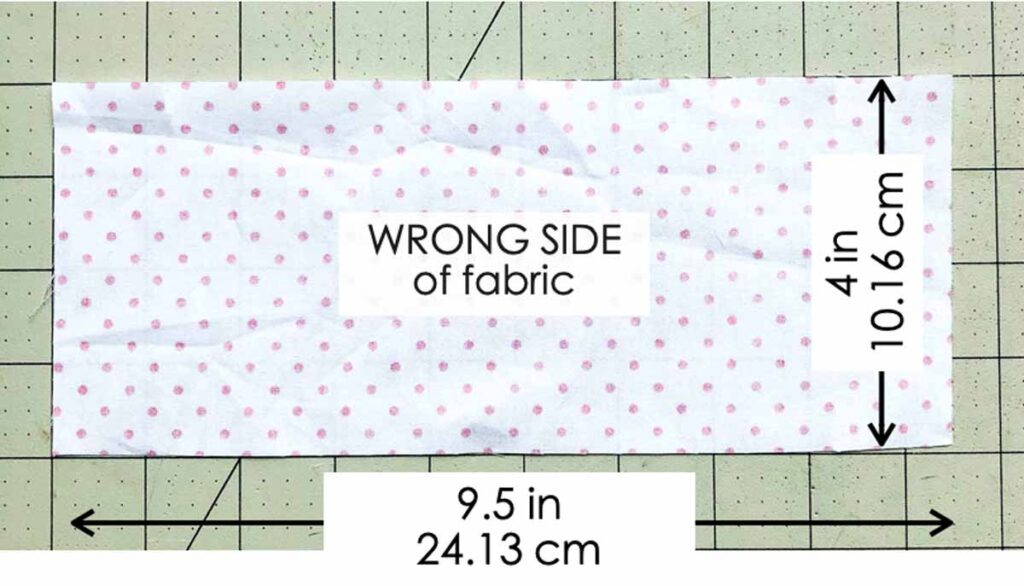
Orient the fabric so that the longer side (the side that measures 9.5”) is placed horizontally and the shorter side is placed vertically, as pictured. Place the wrong side of fabric face up.
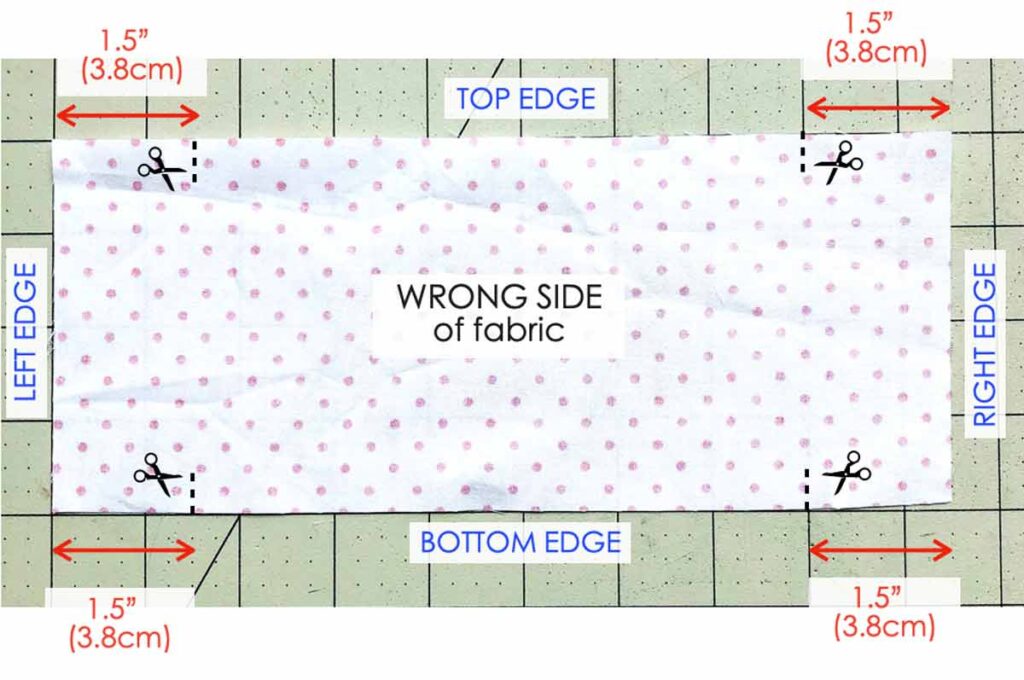
Make 4 cuts at each of the 4 corners of the fabric. Each of the cuts are 1.5”(3.8cm) from the left and right edge, and 0.5”(1.27cm) from the top and bottom edge.

Another view of how to make the cuts.
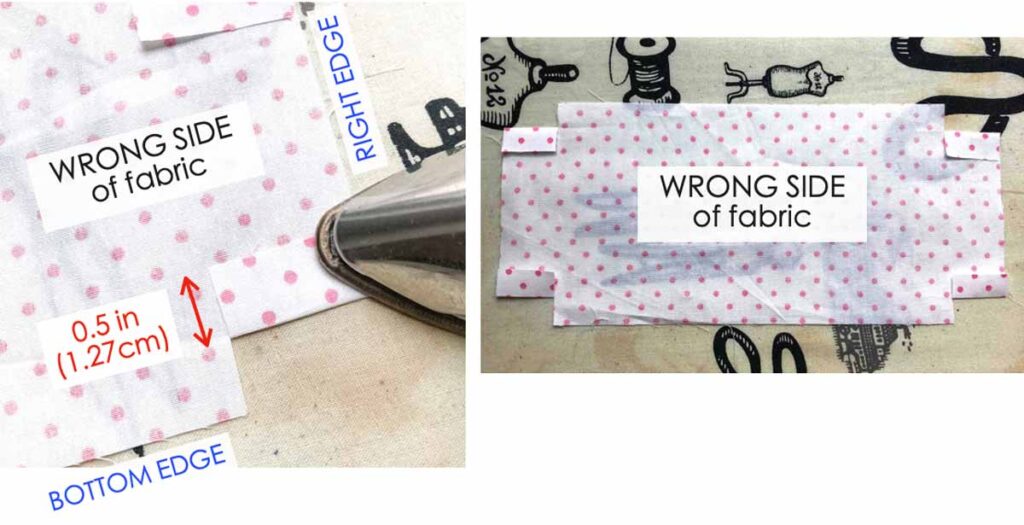
Fold each of the cuts in towards the center of the fabric and press them all down with an iron.
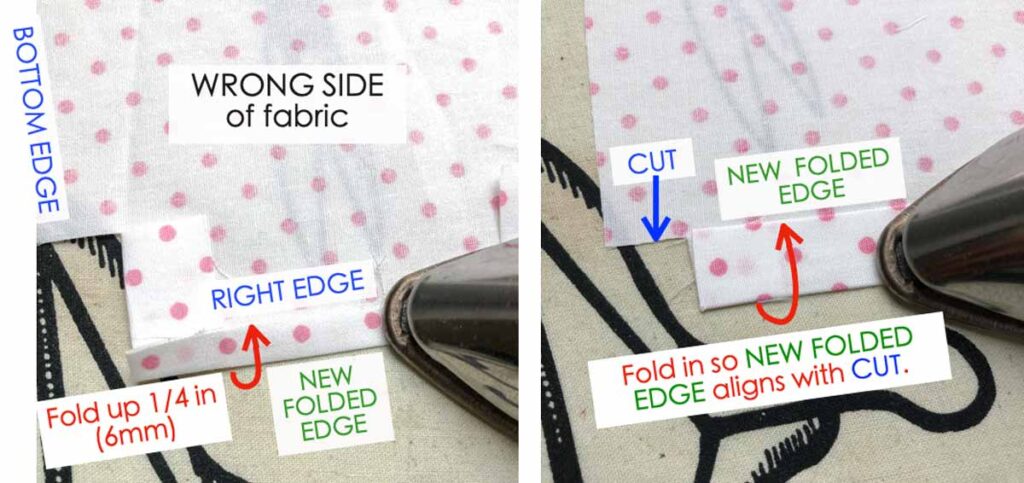
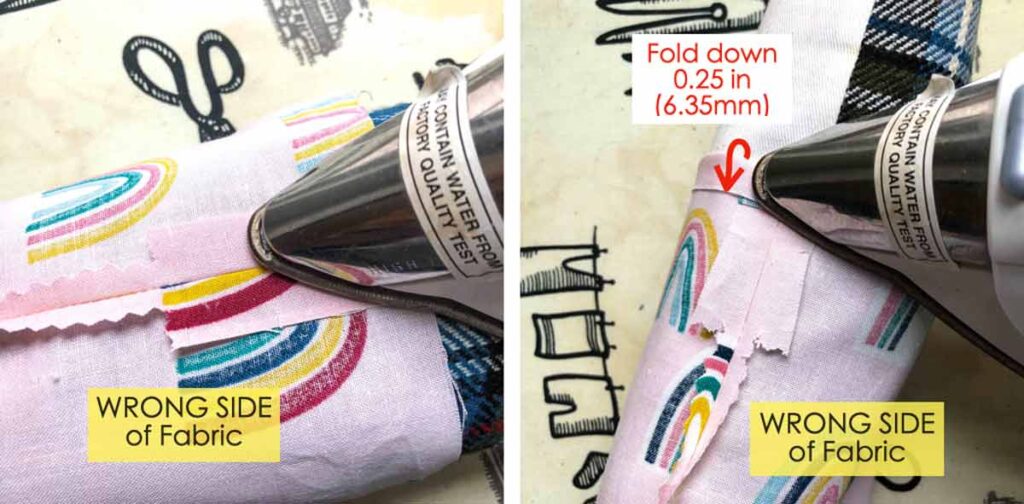
LEFT: Turn the fabric so the RIGHT EDGE faces you and BOTTOM EDGE is to your left. Fold RIGHT EDGE up 1/4” (6mm) and press down.
RIGHT:Next, fold up again so the NEW RIGHT EDGE aligns with the cut. Press down with iron. Repeat on the other side.
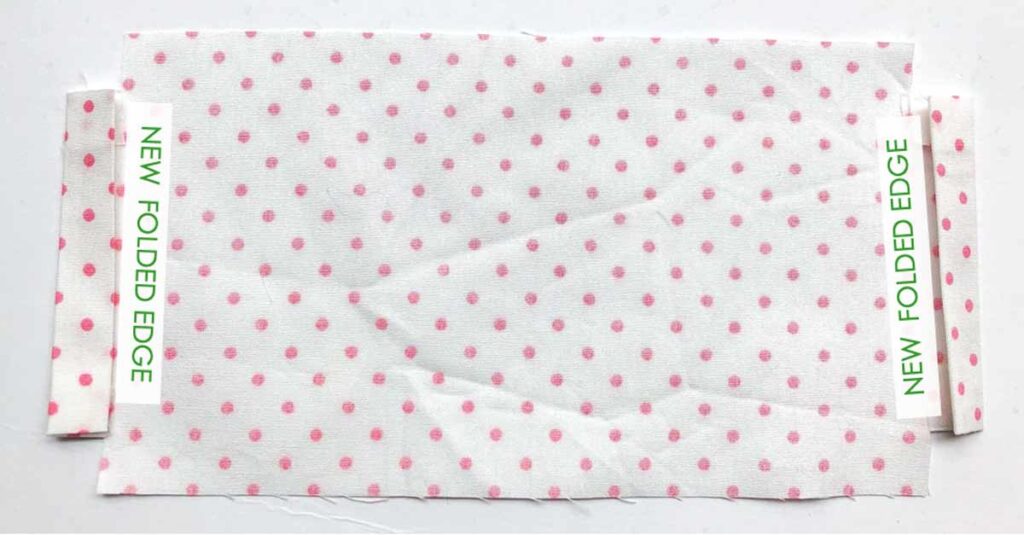
Your fabric will look like this after the edges are pressed in on both the left and right side.

Stitch down at 1/8”(3mm) to NEW FOLDED EDGE (black dotted line). Repeat stitching down on other side.
Method 1: Pinked/Serged Seams
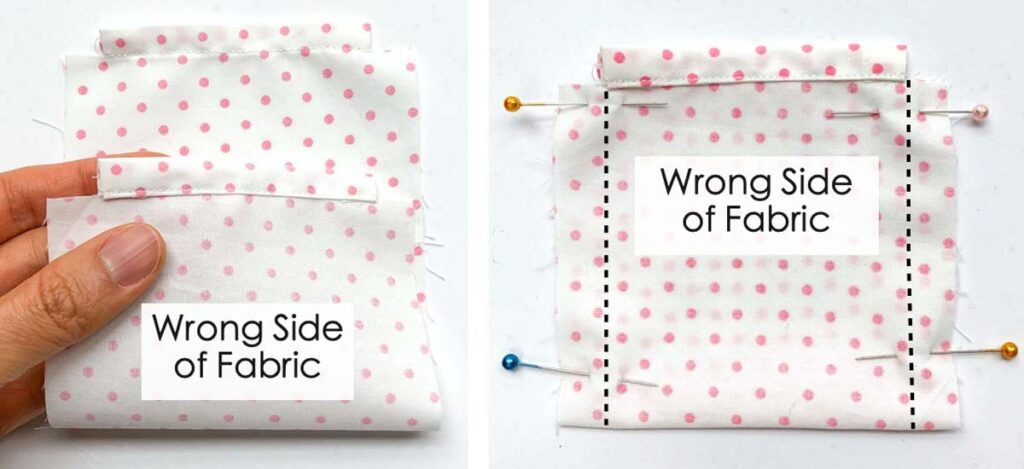
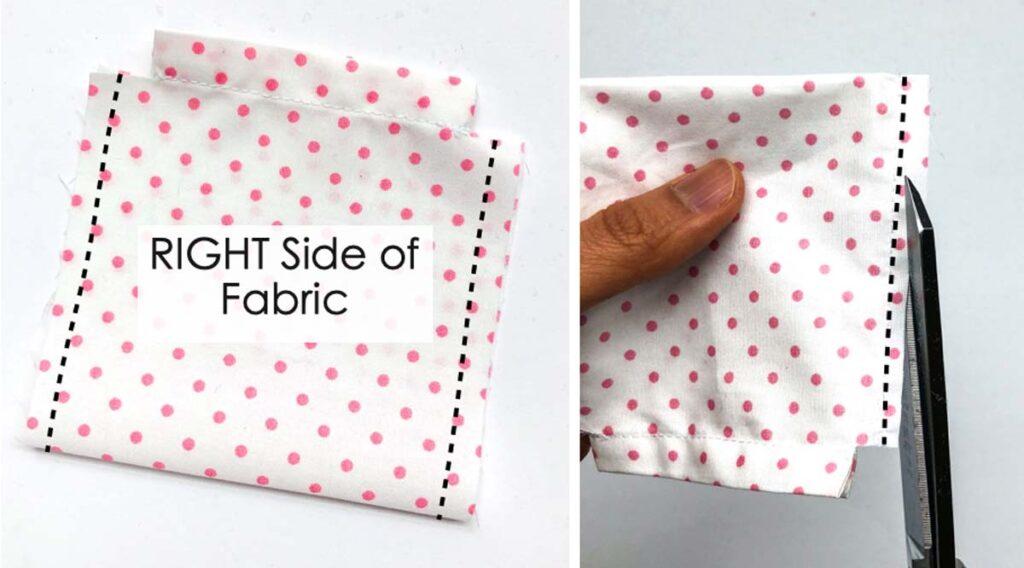
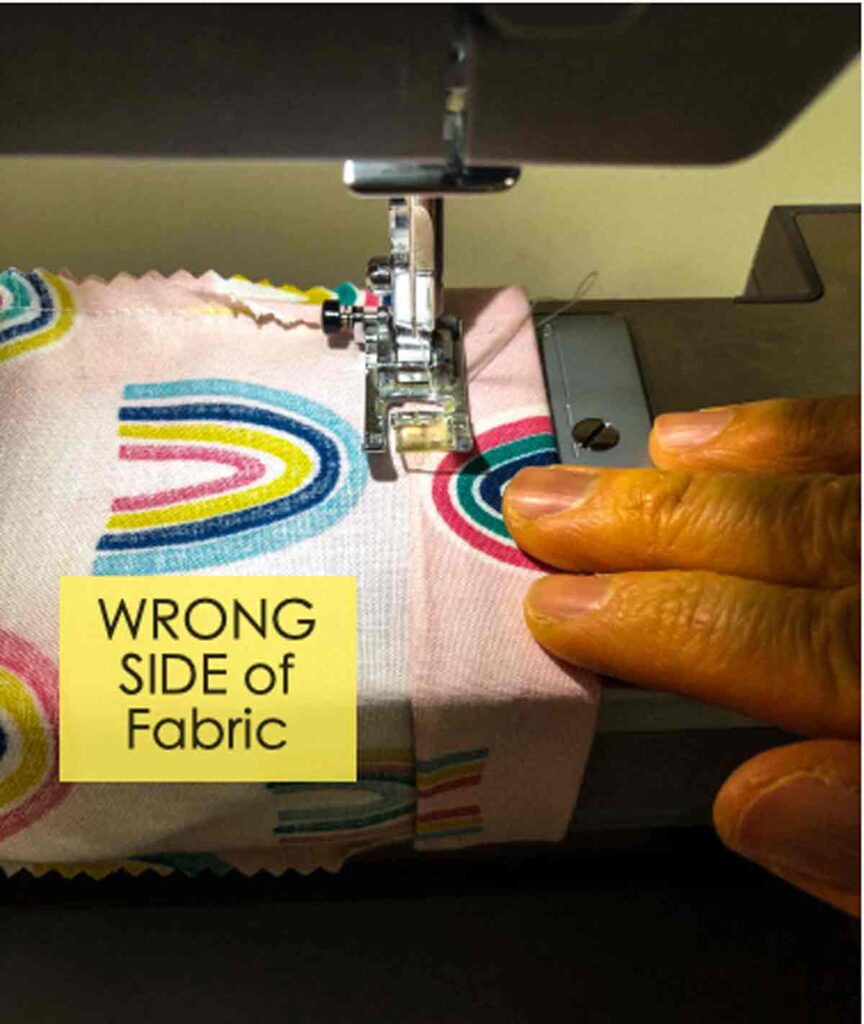
Fold fabric in half, right sides together. Stitch at 1/2” (1.27cm) seam allowance on both side (black dotted line). Make sure to back stitch.
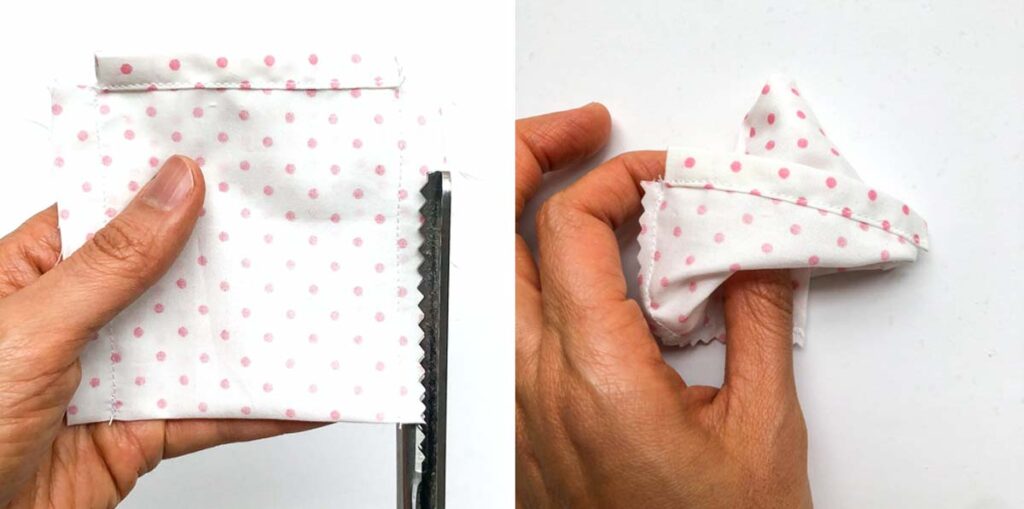
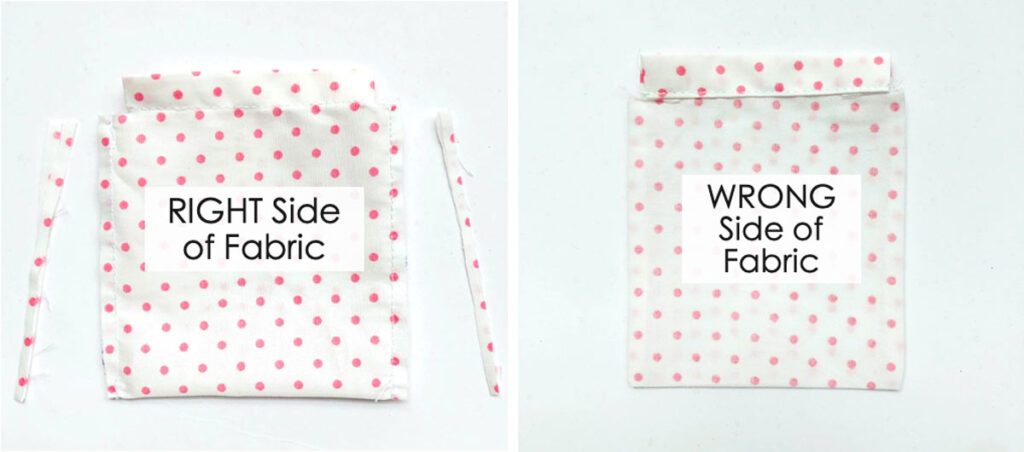
LEFT: Trim down seam allowance to 1/4”(6mm) with pinking shears. Alternatively, serge the edges with a marrow machine (serger).
RIGHT: Turn drawstring pouch to right side.
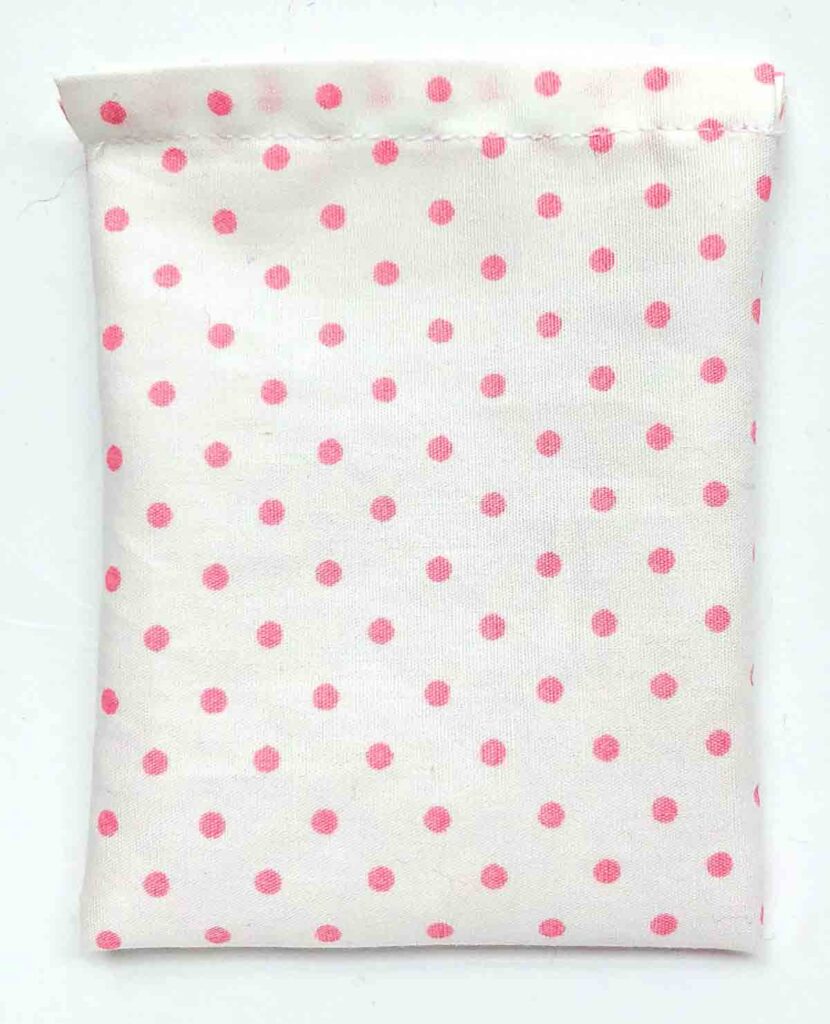
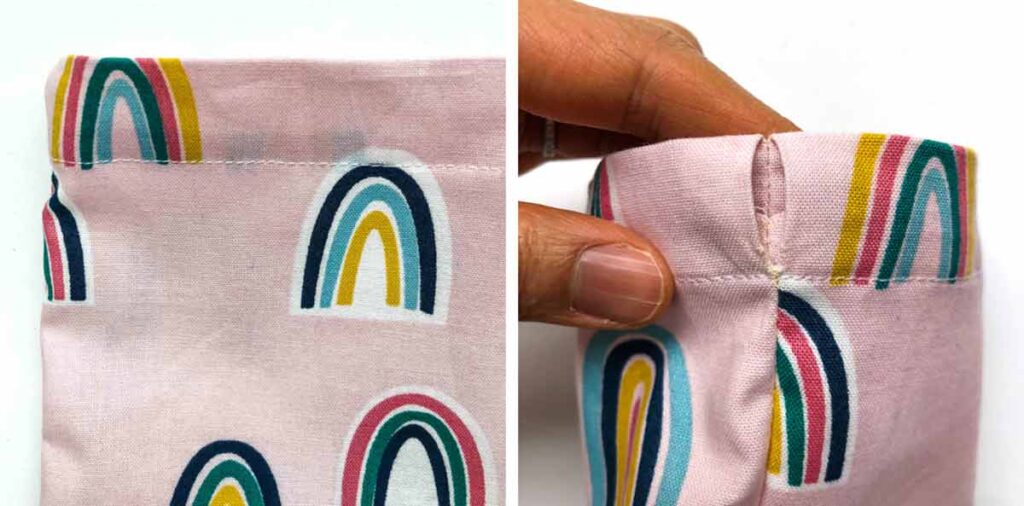
Tada! Your pouch is done!
Method 2: French Seams
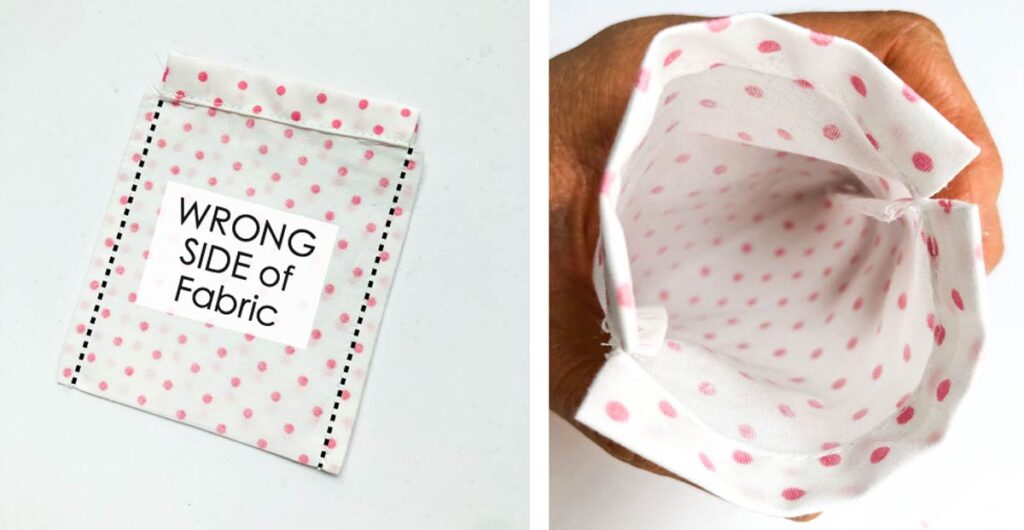
LEFT: To create french seams, fold the drawstring bag in half with wrong sides together. Stitch at 1/4”(6mm) seam allowance (black dotted line)
RIGHT: Once sewn, trim seam allowance down to 1/8” (3mm)
LEFT: Trim seam allowance on both sides of pouch.
RIGHT: Turn drawstring pouch inside out so the wrong side of fabric faces up.
LEFT: Stitch side seam again at 1/4” (6mm), indicated by black dotted line. Turn pouch to the right side.
RIGHT: Easy drawstring pouch finished. See how by sewing the side seams twice you end up hiding the the raw fabric edges within the seam allowance. Beautiful french seam is done!
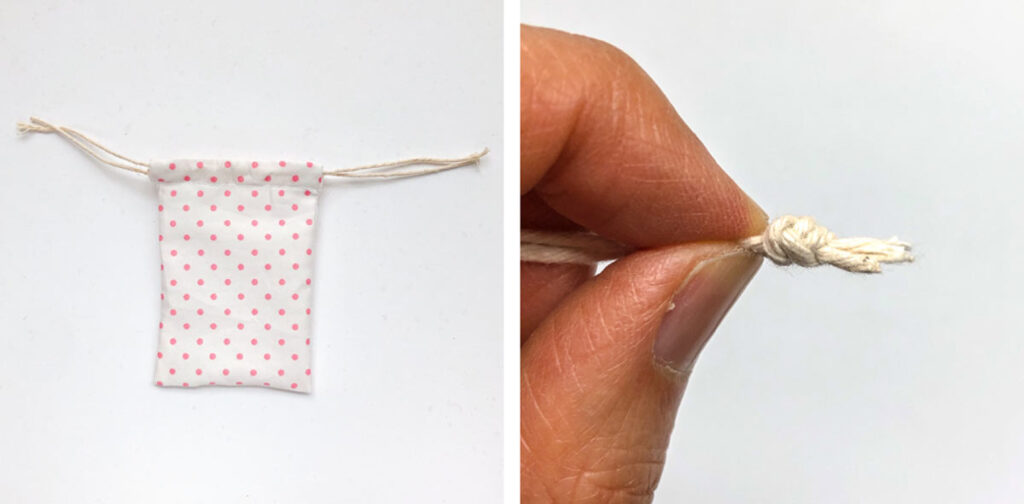
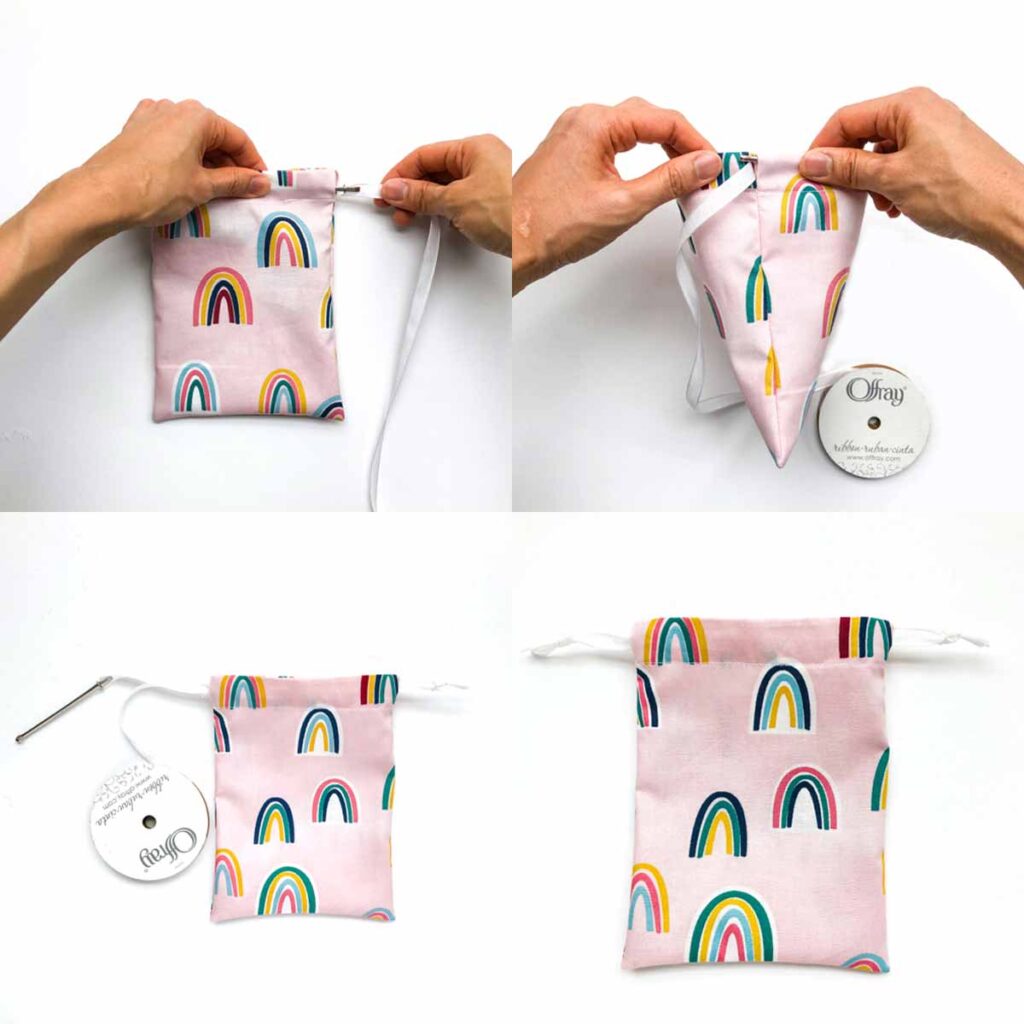
Thread the drawstrings through the casing and tie at knot on both ends. For more information on how to thread a double drawstring, check out How to Make a Flat Bottom Drawstring Dice Bag
Version A easy drawstring bag finished!
Version B

Cut two pieces of fabric that measure 6.5”x 9”(16.51cm x 22.86 cm) each.
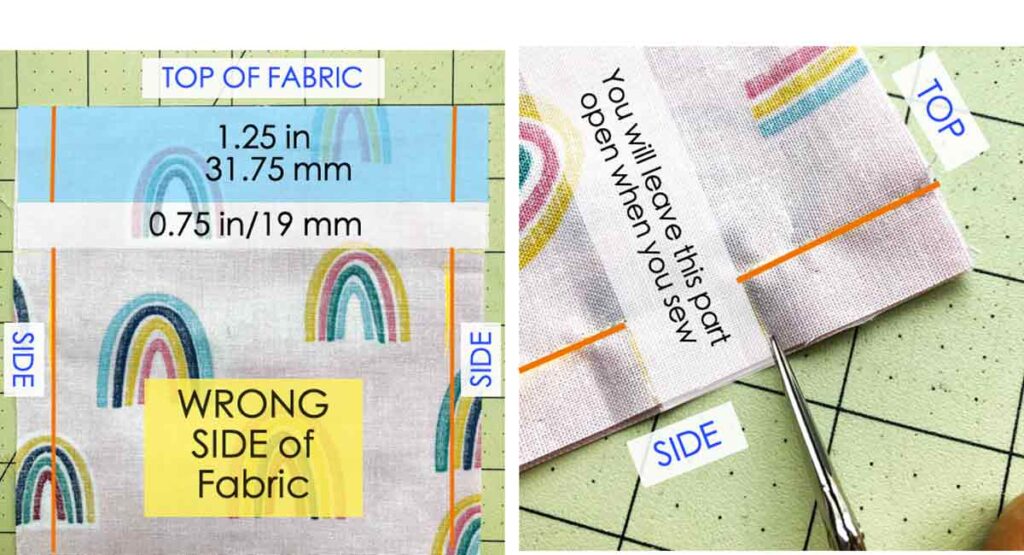
LEFT: Make sure the wrong side of fabric is facing up. First, using fabric chalk, you will mark a line along the seam allowance, which is 1/2”(12.7mm) from sides. The first line you mark will be 1.25” (31.75mm) from the top edge of fabric. Next, leave a gap of 0.75” (19mm), the white shaded area.
Finally, use chalk to mark along the seam allowance again after the 0.75” gap. The orange lines indicate where you should mark with chalk.
RIGHT: Use scissors to make two small snips where the gap is, on both sides of the white shaded box.
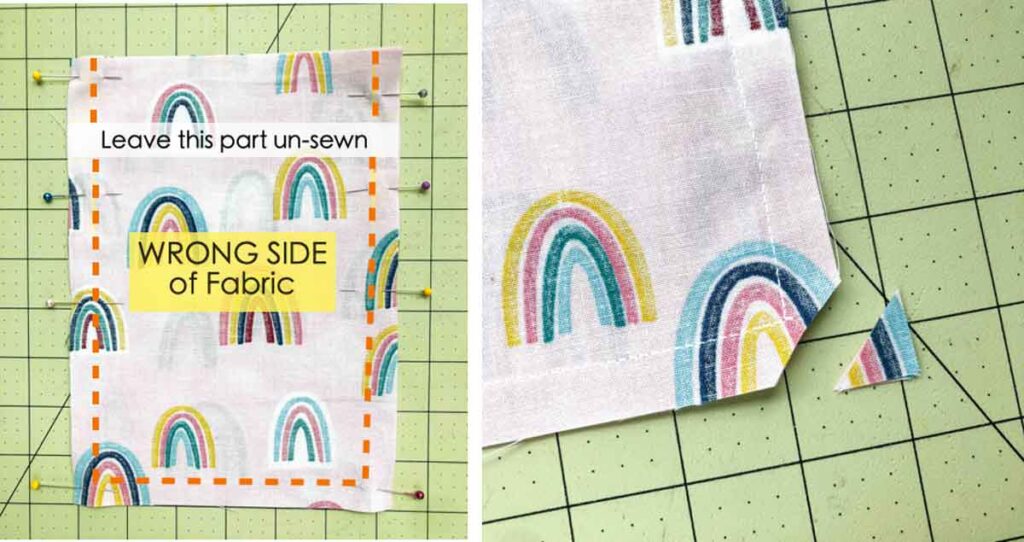
LEFT: Pin second piece of fabric to the one you just marked, right sides together. Sew seam allowance along where you marked (orange dotted line), leaving the white shaded box (the 0.75” gap) open. Make sure to back stitch at both sides of the gap.
RIGHT: Cut bottom corners at a diagonal.
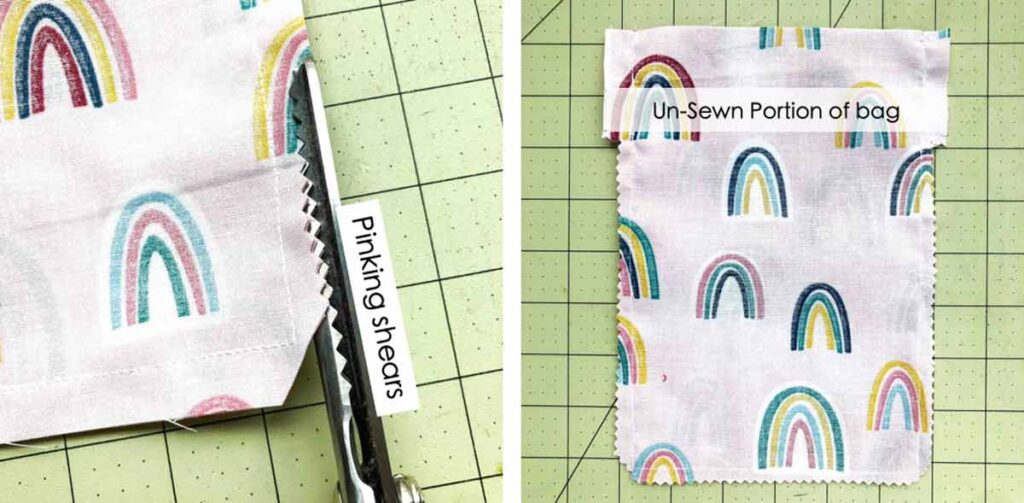
Pink the raw edges all around the pouch. In the photo I only pinked up to right below the un-sewn part of the bag. You can do as I did in the photo or pink all the way to the top of the bag. You won’t need to pink the top edge of the bag as that raw edge gets folded in.
How to Make the Casing for a Drawstring Bag
LEFT: With wrong side of fabric facing up, press open the side seams.
RIGHT: Fold the top down 1/4”(6.35mm) and press all around the entire bag.
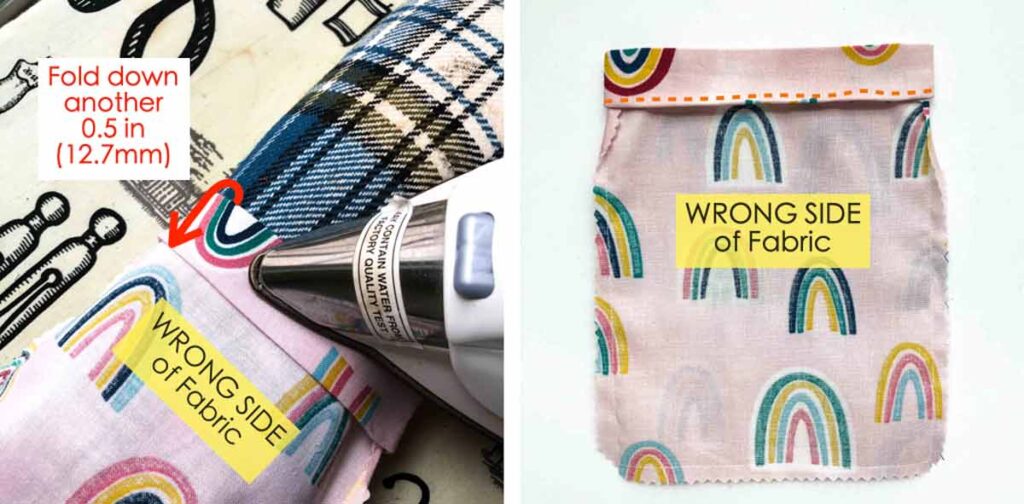
Fold down another 0.5”(12.7mm) and press all around again. Your bag will now look something like the photo on the RIGHT. You will be sewing 1/8” (3mm) from edge of drawstring casing (orange dotted line).
Remove the free arm of sewing machine to sew the drawstring casing down.
View of Version B drawstring bag all sewn together! Now all you have to do is to insert the drawstring cords in and you are done!
Threading Drawstring Bag
Using a bodkin, Insert drawstring through drawstring casing, one on each side. I am using a 3/8”white ribbon as my drawstring. Tie a knot on either side of the drawstring and you are finished!
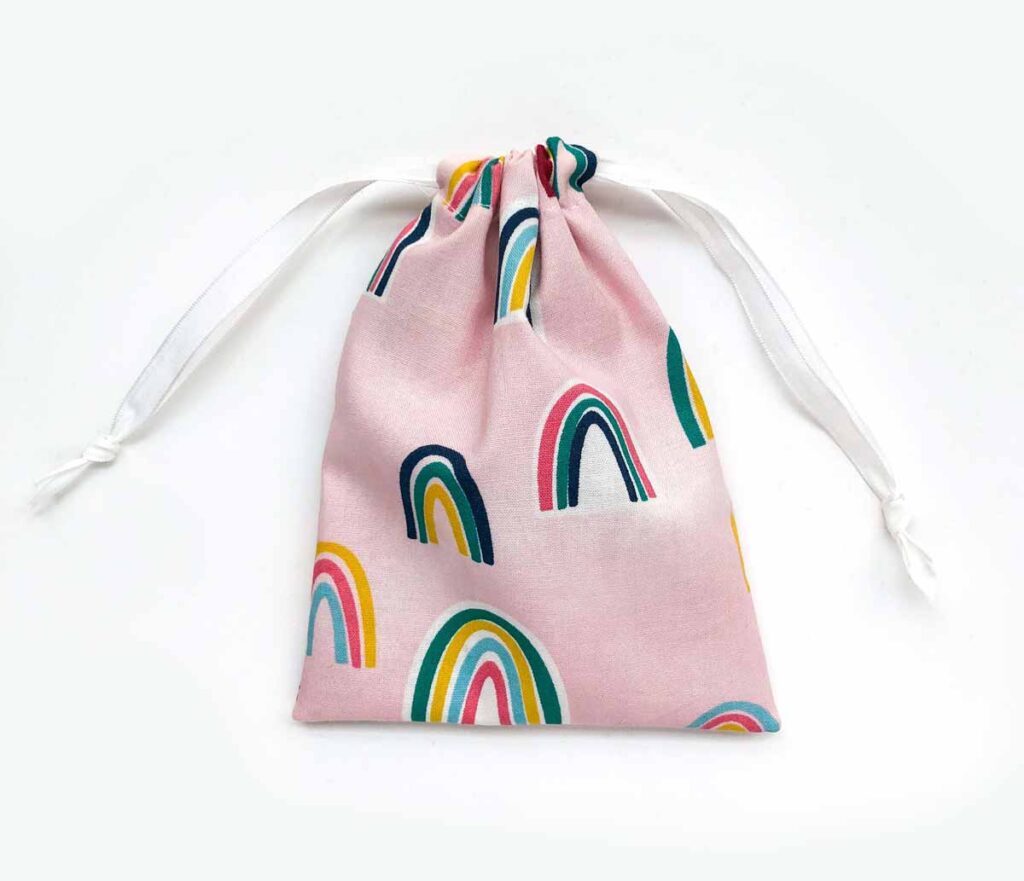
Finished drawstring bag, using Version B Method.
Seriously wasn’t that super duper easy? If this was your first time sewing a drawstring bag, give yourself a BIG pat on the pack and do a happy dance! Congratulations! These drawstring bags are so so handy for holding everything! Let me know in the comments what you use them for!
How to Make Easy Drawstring Bags
These simple drawstring bags are unlined and super easy to make. A great sewing project for all sewing levels. Make them in all 4 sizes to keep all your belongings safely stowed away.
Materials
- DRAWSTRING BAG PATTERN
- COTTON FABRIC (see post for amount for each size)
- 3/8" - 1/2" Ribbon or Cord
Tools
- SEWING MACHINE
- FABRIC SCISSORS
- BODKIN - alternatively, can also use safety pins
- CLEAR RULER
- FABRIC CHALK
- SEWING PINS
- MATCHING THREAD
Instructions
VERSION A
- Cut a piece of fabric according to pattern.
- Orient the fabric so that the longer side is placed horizontally and the shorter side is placed vertically
- Make 4 cuts at each of the 4 corners of the fabric. Each of the cuts are 1.5” (3.8cm) from the left and right edge, and 0.5” (1.27cm) from the top and bottom edge.
- Fold each cut in towards the center of the fabric and press them down with an iron.
- Fold the sides of fabric in towards the center 0.5" (1.27cm) once, then again 0.5" (1.27cm). Press down.
- Stitch down fold at 1/8” (3mm) to the edge.
- Continue making drawstring bag with either Method 1 or 2, as follows
Method 1: Pinked/Serged Edge
- Fold fabric in half along longer side, right sides together. Stitch at 1/2” (1.27cm) seam allowance on both side. Make sure to back stitch.
- Trim down seam allowance to 1/4”(6mm) with pinking shears. Alternatively, serge the edges with a marrow machine (serger).
- Turn drawstring pouch to right side.
- Thread drawstring through casing, tie a knot at the end and you are done.
Method 2: French Seam
- To create french seams, fold the drawstring bag in half with wrong sides together.
- Stitch at 1/4”(6mm) seam allowance.
- Trim seam allowance down to 1/8” (3mm)
- Turn drawstring pouch inside out so the wrong side of fabric faces up.
- Stitch side seam again at 1/4” (6mm).
- Turn pouch to the right side
- Thread drawstring through casing, tie a knot at the end and you are done.
VERSION B
- Cut 2 fabric pieces according to pattern.
- With wrong side of fabric facing up, mark a line along the seam allowance. The first line you mark will be 1.25” (31.75mm) from the top edge of fabric.
- Next, leave a gap of 0.75” (19mm) and continue marking along seam allowance all the way down.
- Pin second piece of fabric to the one you just marked,
right sides together. - Sew seam allowance along where you marked leaving the unmarked 0.75" gap open. Make sure to back stitch at both sides of the gap.
- Cut bottom corners at a diagonal.
- Pink/serge the raw edges on sides and bottom of pouch.
- With wrong side of fabric facing up, press open the side seams.
- Fold the top down 1/4”(6.35mm) and press all around the entire bag.
- Fold down another 0.5”(12.7mm) and press all around again.
- Remove the free arm of sewing machine and sew 1/8” (3mm) from edge of drawstring casing, around entire bag.
- Insert double drawstring cords into drawstring casing, tie a knot at the ends and you are done.
The AD-FREE, PRINTER-FRIENDLY PDF version of this sewing tutorial with all the step-by-step photos is available IN OUR ETSY SHOP. Additionally, you will receive the PDF Pattern of all the drawstring bags in 4 sizes. Simply print and use! BONUS: Receive the COLOR BLOCK PATTERNS (size M and L) with your purchase so you can use a different fabric to make the drawstring casing. Print a copy today to keep next to your sewing machine for easy reference.
Ready for more? Check out these Fun Sewing Projects:

This fully lined tote bag is all you need on the go.
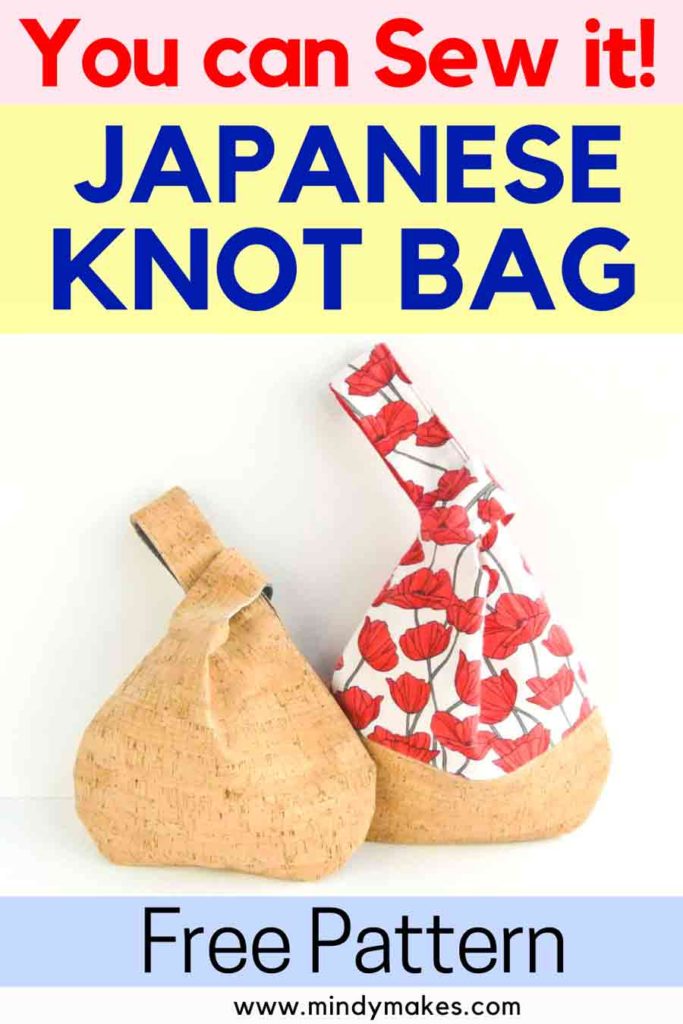
The Japanese knot bag is a super chic accessory.
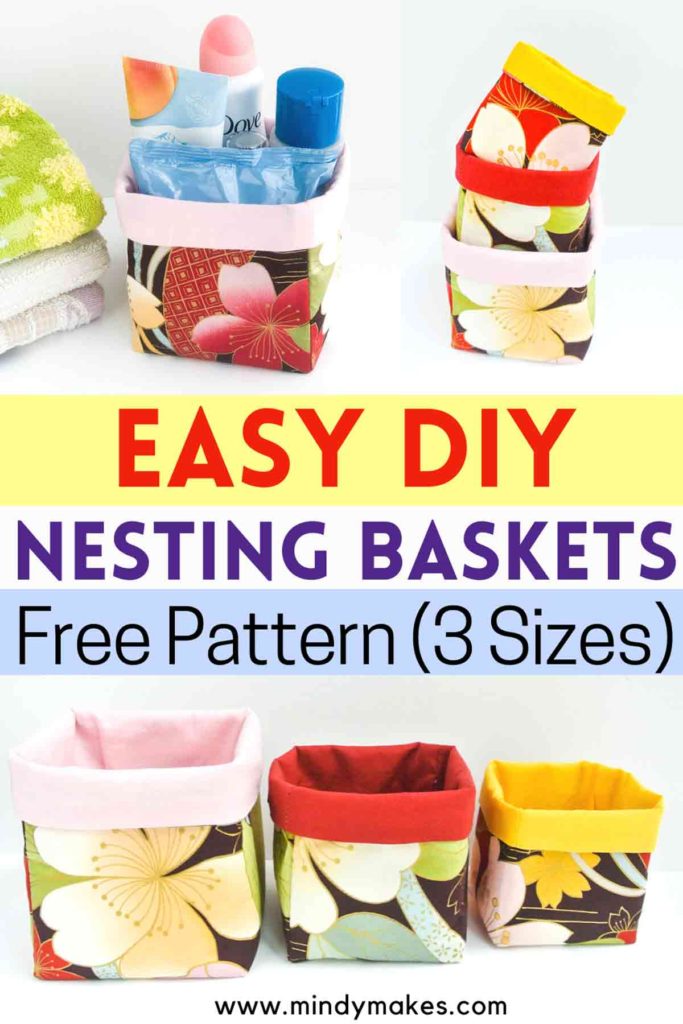
Organize your desk, drawers, and cabinets with these handy fabric bins.

Thank You,
Your art has inspired me. 👍
Well I give up looking for the free sizes of drawstring bags and I get everything else but what
you originally advertised for free. I get your dice bag and everything else. Thanks anyways.
Hi Maggie,
The pattern pieces for the drawstring bags are available for free in the MindyMakesLibrary. Once you subscribe to our mailing list you will receive a welcome email with the password. Hope that helps!
Great tutorial and pattern!! Did I miss how to add the ribbon to make the bag cinch? I added two pieces of ribbon and tied ends together but I have to manually cinch it closed. Thanks for the help!
Hi Kaeli,
Yes that is correct! You have to manually cinch the bag close.