
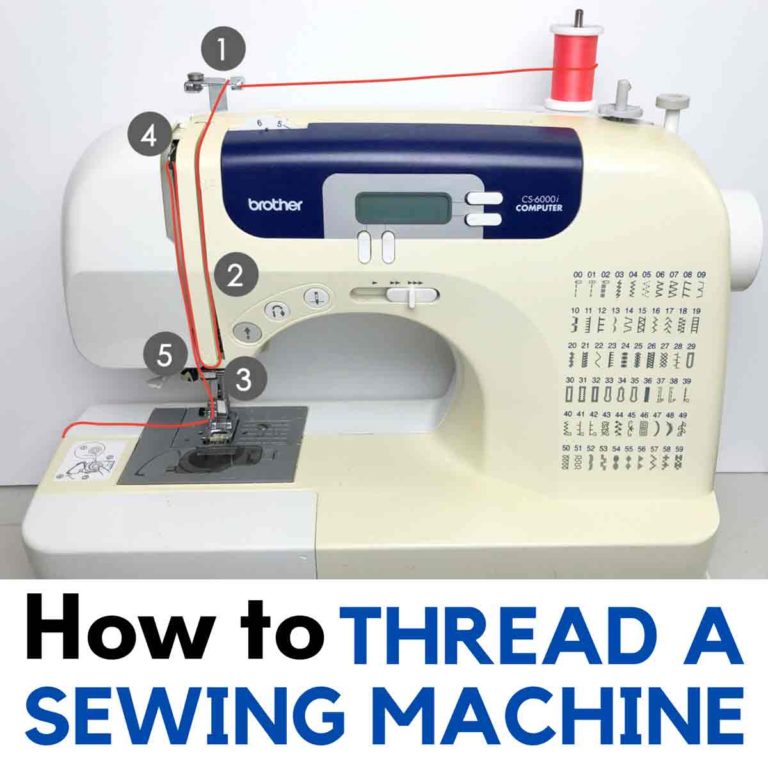
How to Thread & Wind a Bobbin for Beginners
This post may contain affiliate links. Please read my disclosure policy for details. As an Amazon Associate, I earn from qualifying purchases.
In order to start sewing, you must first wind and thread the bobbin correctly. This detailed tutorial with step-by-step instructions will teach you how to properly wind and thread the bobbin so you can start sewing beautiful, even stitches on your sewing machine!

Yes, I know, no one enjoys winding a bobbin, especially when all you want to do is to start sewing already! I’ve definitely experienced that frustration when I am ready to start sewing just to find that the thread has no matching bobbin! Boo!!!
However, don’t be in a rush to start sewing without a nicely wound bobbin. Sometimes the most trivial things make the biggest different in your sewing success later on!
WHY IS BOBBIN THREADING & WINDING SO IMPORTANT?
From all these years of sewing, if there’s anything I’ve learned, is that having your sewing machine properly set up is SO SO IMPORTANT to being able to sew nicely. A bobbin that is properly wound and threaded is part of that crucial set up to creating beautiful stitches later on. And beautiful stitches make amazing looking sewing projects. It really is a chain reaction!

First, a properly wound bobbin prevents thread entanglements, birds nest, thread breakage, and more! All this will take away precious sewing time to untangle and unravel. And I know everyone (myself included) hates having to take stitches out! Therefore, it is worth your time to learn how to wind and thread the bobbin properly the first time. This will save you hours of frustration trying to untangle thread messes, not to mention the possibility of ruining your sewing project *GASP*
Follow along in this detailed tutorial to learn how to wind and thread the bobbin the right way so you won’t have any regrets later!
TABLE OF CONTENTS
- What Do I Need to Wind and Thread the Bobbin?
- How to Set up the Thread For Bobbin Winding
- Setting Up the Bobbin for Winding
- How to Wind the Bobbin
- How to Remove Bobbin Cover
- Placing Bobbin into Bobbin Case
- How to Raise the Bobbin Thread
In this tutorial I will be showing you how to wind a bobbin on my Singer Heavy Duty 4452, which is a top loading sewing machine. Most sewing machines these days are top loading (also known as a Drop-In Sewing Machine). A top loading machine is one where you load the bobbin in from the top, and the bobbin sits horizontally in the bobbin case. This is in contrast to a front loading sewing machine where you insert the bobbin from the side (often times from the front of the machine), and the bobbin sits vertically in the bobbin case. Think of a top loading washing machine versus a front loading washing machine.
I personally prefer the top loading sewing machine, and this was a feature I actively searched for when shopping for a new sewing machine back in 2017. Top loading machine gives you a good view of the bobbin (through the clear plastic cover) so you can see if the thread has come undone or if you are out of thread. On the other hand, front loading machine requires you to remove a plastic case (not see through) before you can see and access the bobbin.
In many front loading machines, the bobbin case also needs to be removed and the bobbin placed in properly before it can be inserted into the machine. For Top Loading Machines, you simply drop in the bobbin (in counterclockwise direction) and and pull the thread through a few slits and you are all set! No wonder the top loading sewing machines are the standard these days!
WHAT DO I NEED TO WIND & THREAD THE BOBBIN?
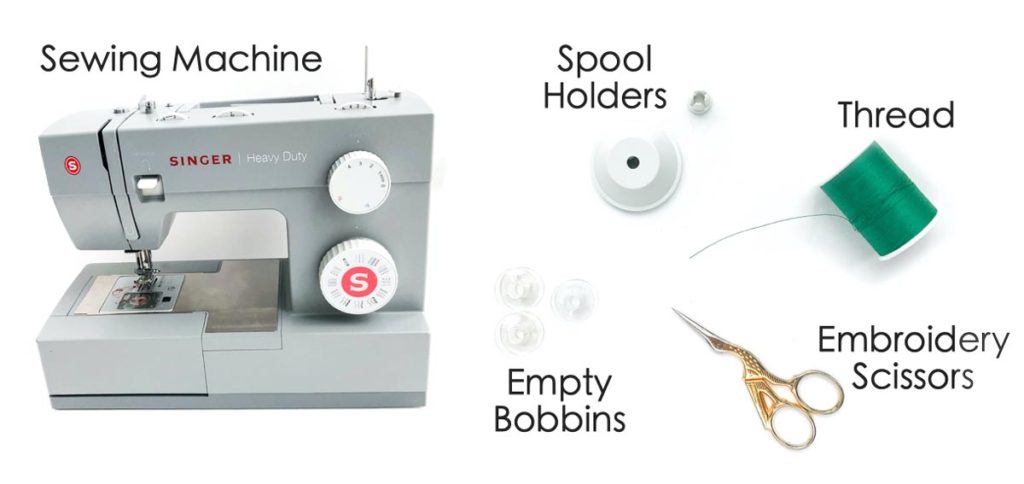
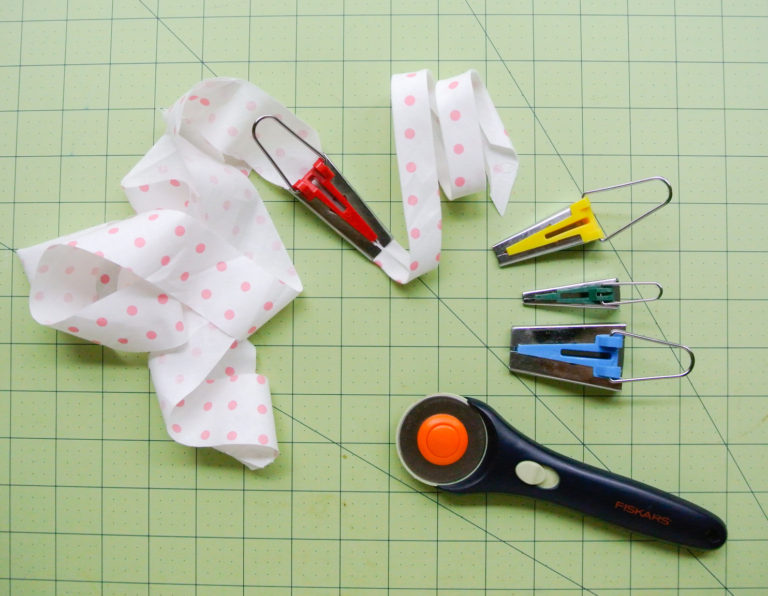
In order to wind and thread a bobbin, you will need the following:
- Sewing Machine – I have the Singer Heavy Duty 4452
- Thread
- Empty Bobbin – Refer to your sewing manual for the bobbin size and type. It is important to use the correct bobbin size as this affects how your machine sews.
- Snips or Scissors to cut thread. (I love my Gingher Stork Embroider Scissors)
- (Optional) Bobbin Winder – Some people prefer this as it allows them to wind extra bobbins while sewing so that you don’t have to stop sewing and wind another bobbin when you run out.
HOW TO SET UP THE THREAD FOR BOBBIN WINDING

Place spool of thread on spool pin. Make sure the spool of spread spins counterclockwise on spool pin when you put it on. Another way to check is to see that the thread end lays over top of the spool.

Push spool holder to the right so that it rests on top of thread spool.

Pull thread towards thread guide
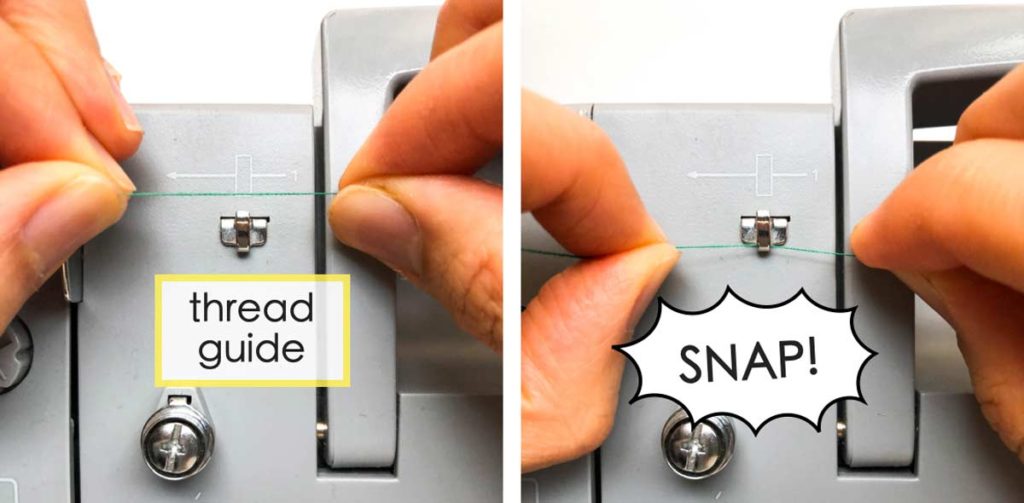
Holding the thread in between two hands (like you’re holding dental floss), snap thread into thread guide.

LEFT: Pull thread down towards bobbin winder tension discs and pull thread from right side of tension disc to bottom.
RIGHT: View of tension discs pulled up. see how the thread is pulled through between the top and bottom discs.

LEFT: Loop thread under tension discs and pull up. I’ve highlighted the green thread and made it thicker so you can see better.
RIGHT: Pull the thread over the tension disc.
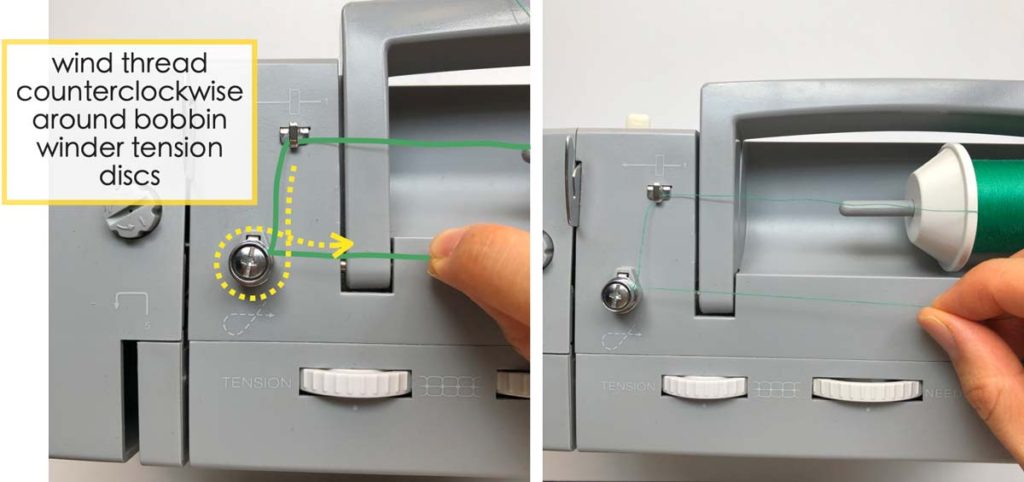
Thread will be wound in counterclockwise direction over tension discs. Pull thread to the right towards bobbin spindle
SETTING UP THE BOBBIN FOR WINDING

LEFT: When you take a look at the bobbin, notice there is a circular opening (white arrow), and a groove (red arrow). The groove on the bobbin should slide over the groove on bobbin spindle when you place it on.
RIGHT: Thread bobbin through circular opening.
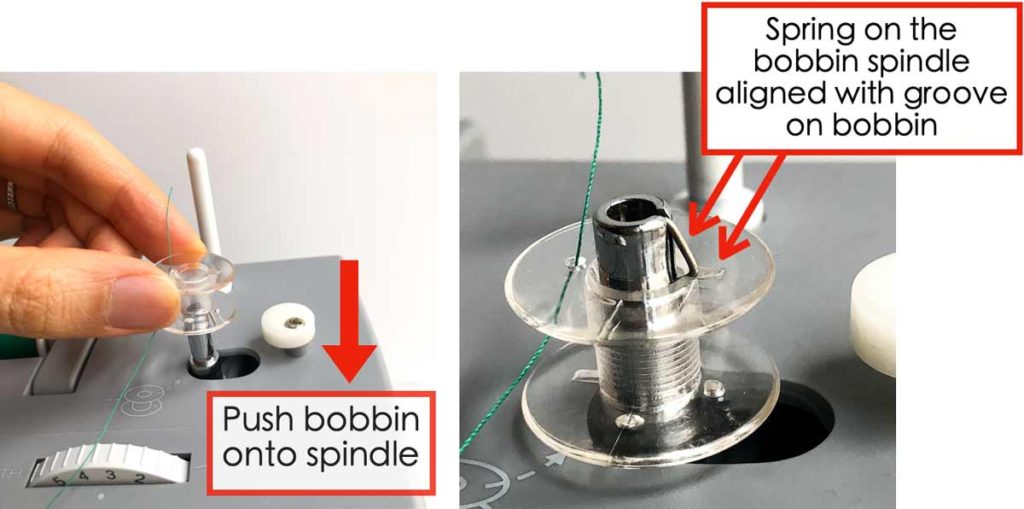
Place threaded bobbin over spindle and push down. Make sure groove on bobbin matches groove on spindle.
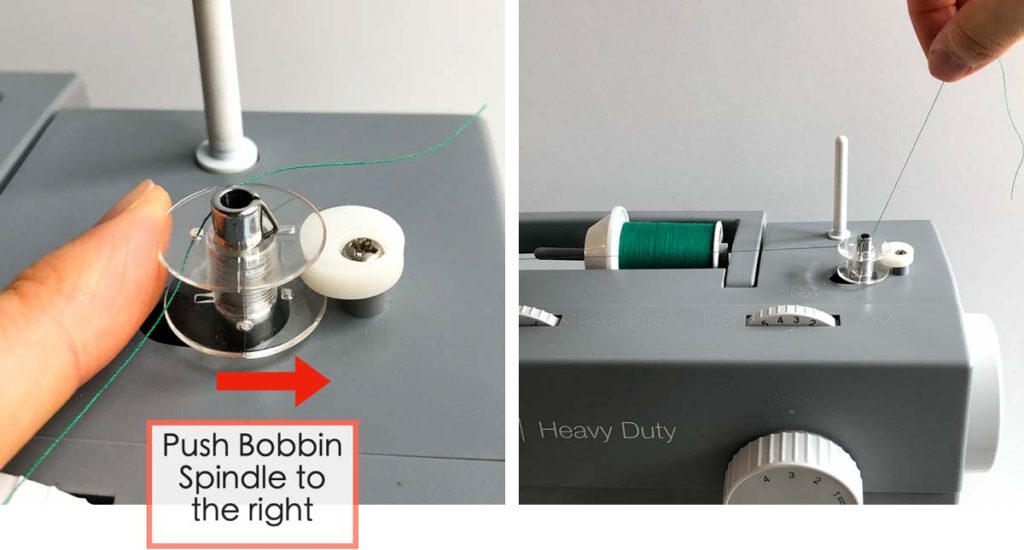
Push bobbin winder spindle to the right, towards the bobbin stopper. This is the “bobbin winding position”. In this position, the machine needle won’t sew and the hand wheel won’t turn.
HOW TO WIND THE BOBBIN

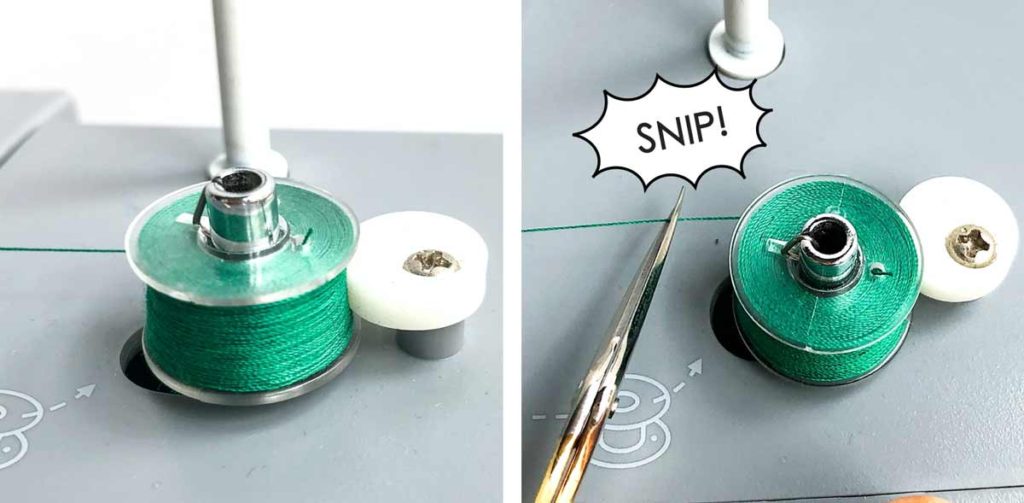
Holding the thread end up and step down on foot pedal. This will cause the bobbin spindle to turn and wind thread over the bobbin. Wind the spindle a few more times until the thread end is secure and won’t unravel (you’ll see that the thread is wound about half to almost full way down the bobbin).

Cut the excess thread end with snips or scissors.

Continue winding by pressing down on foot pedal. the thread will travel up and down the bobbin as it winds. Keep going until you have the amount of bobbin thread you need or until the bobbin is full.
NOTE: Don’t go at full speed (stepping all the way down on the food pedal) when winding your bobbin. Instead, use a moderate pace. Going at full speed may cause stretching in your thread which can distort the bobbin tension. Furthermore, going at a moderate-slow pace allows you to watch and monitor the thread winding around the bobbin. You want to see the thread travel from top of bobbin to bottom of bobbin then back up as the bobbin winds. The ultimate goal is to get a bobbin that is evenly wound from top to bottom. In other words, the amount of thread wound at the top, middle, and bottom of the bobbin should be exactly the same.
LEFT: Once the bobbin is fully wound, the machine will automatically stop.
RIGHT: Snip thread to the left of bobbin

LEFT: Push bobbin spindle back to sew position
RIGHT: Remove Bobbin from spindle
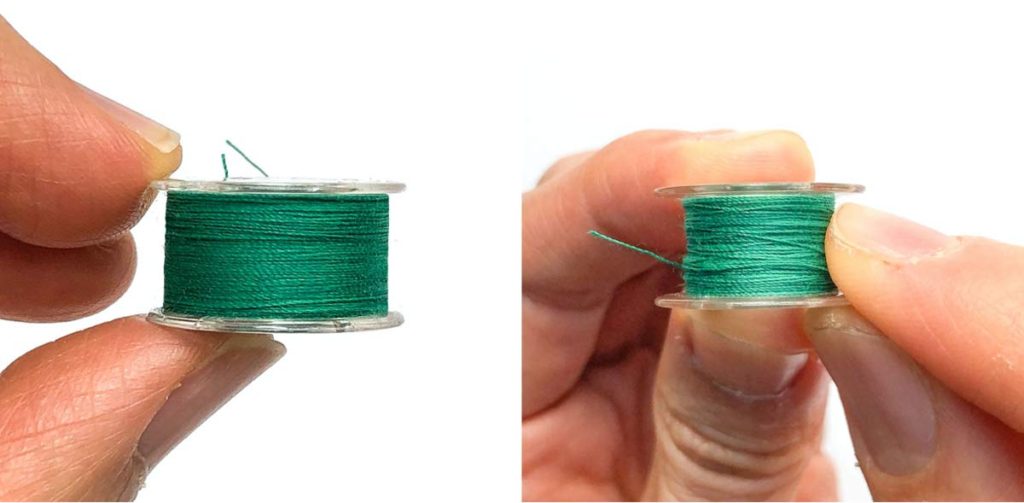
LEFT: View of properly wound bobbin. See how the thread is evenly wound over entire bobbin from top to bottom Compare to improperly wound bobbins (Bottom photos)
RIGHT: When you press on the bobbin, the bobbin thread is firm and doesn’t collapse or sink in.
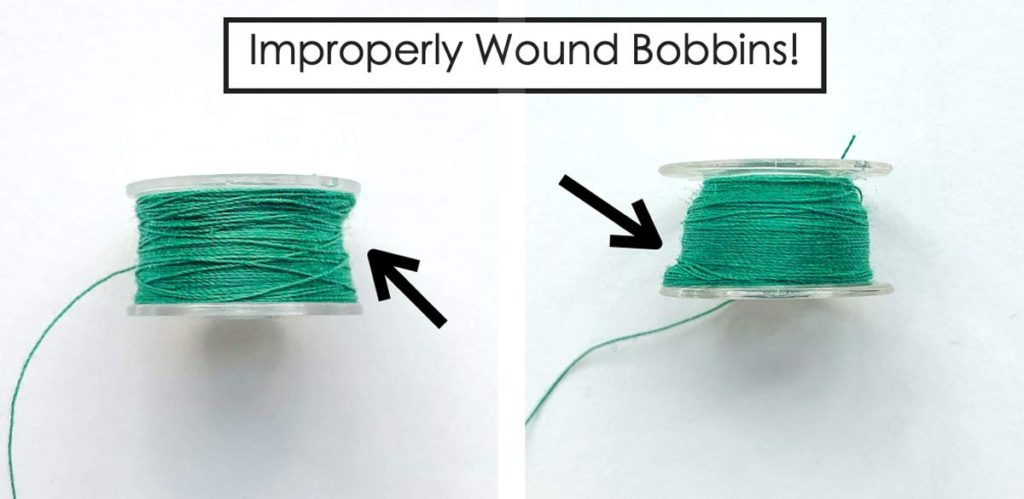
View of improperly wound bobbins. The thread is not evenly wound over entire height of bobbin (black arrows). In these cases, it is important to redo the bobbin winding otherwise you won’t get nice stitches!
HOW TO REMOVE BOBBIN COVER
Now that you have a properly wound bobbin, you are ready to thread it!
NOTE: You should lift the needle to the highest position before inserting or removing the bobbin

First, remove the bobbin case lid by pulling the tab to the right. When you pull the tab, the lid will pop up and out How to remove the case lid will vary by the model of sewing machine you own. Refer to you sewing machine manual if you are unsure.
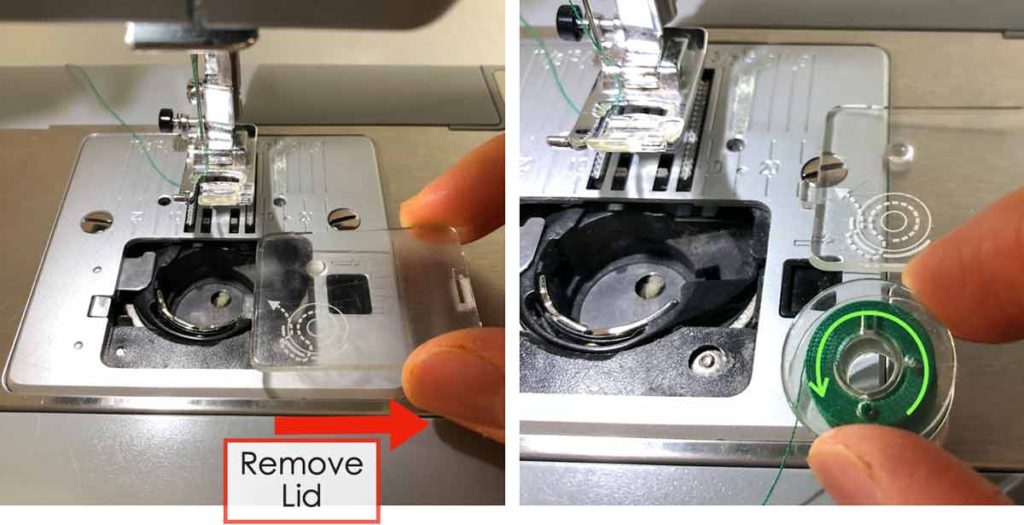
LEFT: Remove bobbin case lid and place it to the side.
RIGHT: On the bobbin case lid (or somewhere near the bobbin case) there should be a diagram of how the bobbin should be placed into the case. Following the diagram, we need to place the bobbin into the case with the thread running clockwise (green arrow)
PLACING THE BOBBIN INTO BOBBIN CASE
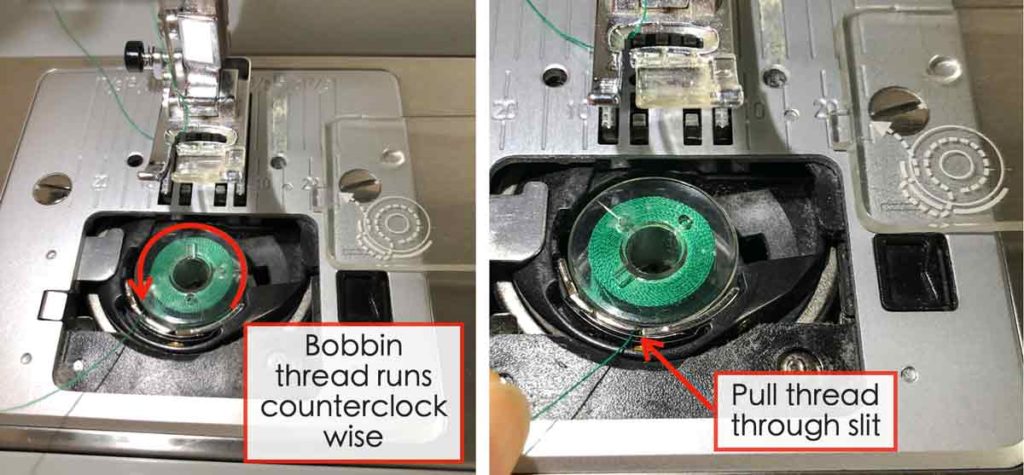
LEFT: Place bobbin into bobbin case
RIGHT: Following the diagram, pull bobbin thread through bottom slit (red arrow).
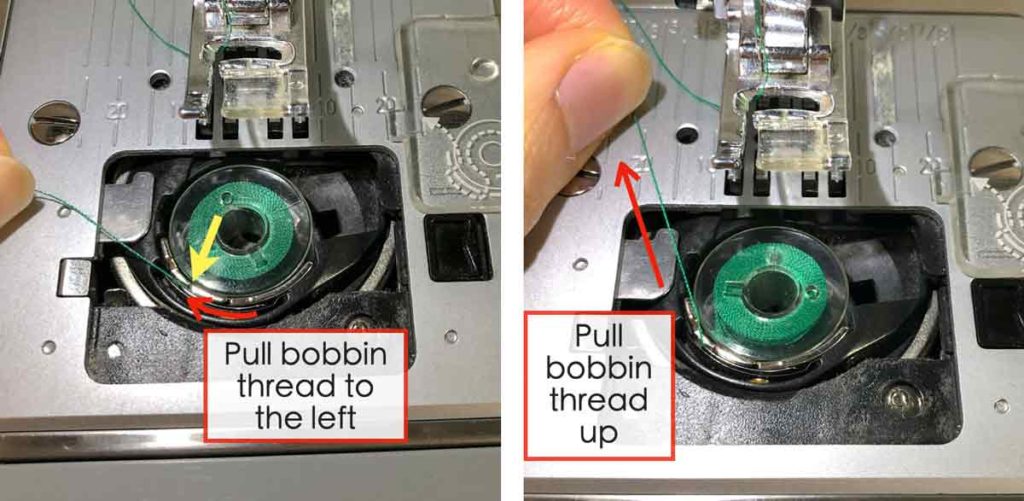
LEFT: Pull bobbin thread to the left (clockwise) until it slips into the notch (yellow arrow)
RIGHT: Pull bobbin thread up (red arrow)
HOW TO RAISE THE BOBBIN THREAD
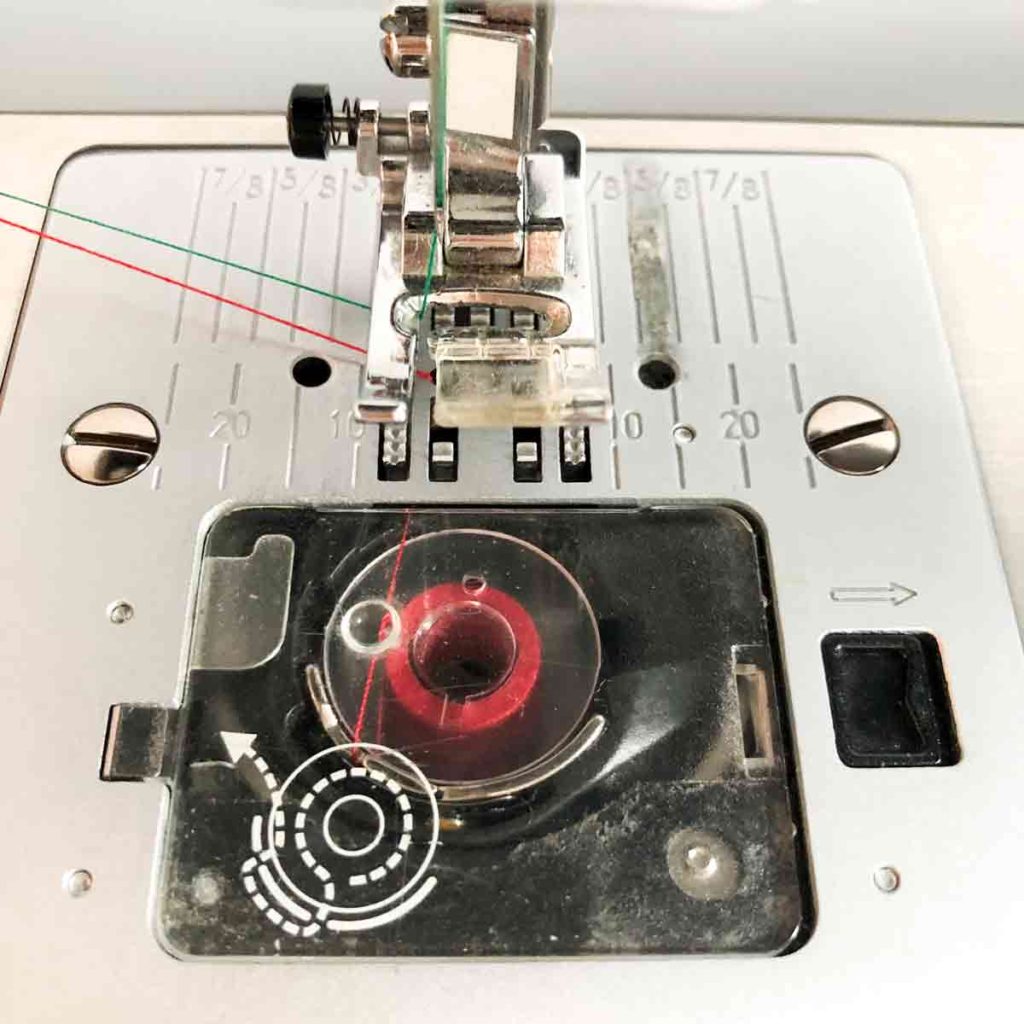
In the photos below, I am using different colored upper thread and bobbin thread (green upper and red bobbin thread) so you can clearly see how to raise the bobbin thread up. Most of the time your upper thread and bobbin thread will be the same color
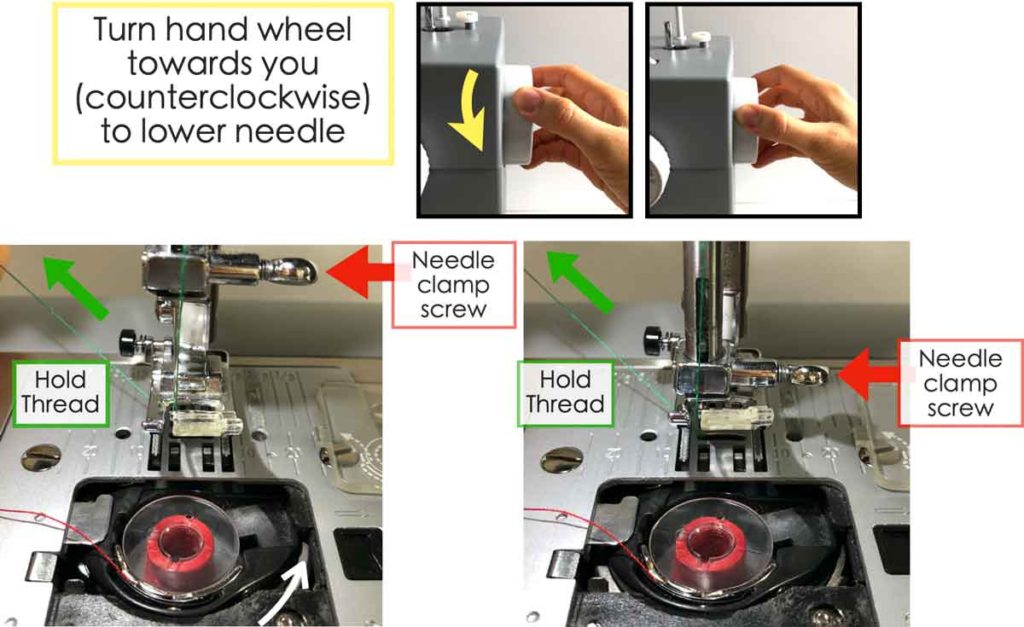
I have removed the bobbin cover for clarity purposes. Hold upper thread with your left hand (green arrow). Turn hand wheel (with your right hand) towards you in counterclockwise direction (yellow arrow) to lower the needle. The photos show the level of the needle clamp screw (red arrows). This is to indicate the that the needle has been lowered.

Continue turning hand wheel towards you (counterclockwise) to raise the needle. As the needle raises, the upper thread (green), will loop around the bobbin thread (red). At this point it looks like the green upper thread overlaps and is on top of the red bobbin thread. I have highlighted the threads to give you a better view.

LEFT: As the needle continues to raise, the upper thread (green) will loop to the right of the bobbin case, pulling bobbin thread (red) with it.
RIGHT: With the needle is fully raised, the green upper thread is now completely above the throat plate. The bobbin thread (red) is also pulled up the throat plate (via the green upper thread). I’ve highlighted the red bobbin thread in the photo so you can more clearly see what it should look like at this point.

LEFT: You can use a pin/needle to pull the bobbin thread out from below the throat plate (through the needle plate hole). Alternatively, gently tug on the upper thread to pull the bobbin thread out
RIGHT: View of bobbin thread correctly pulled through the needle plate hole.
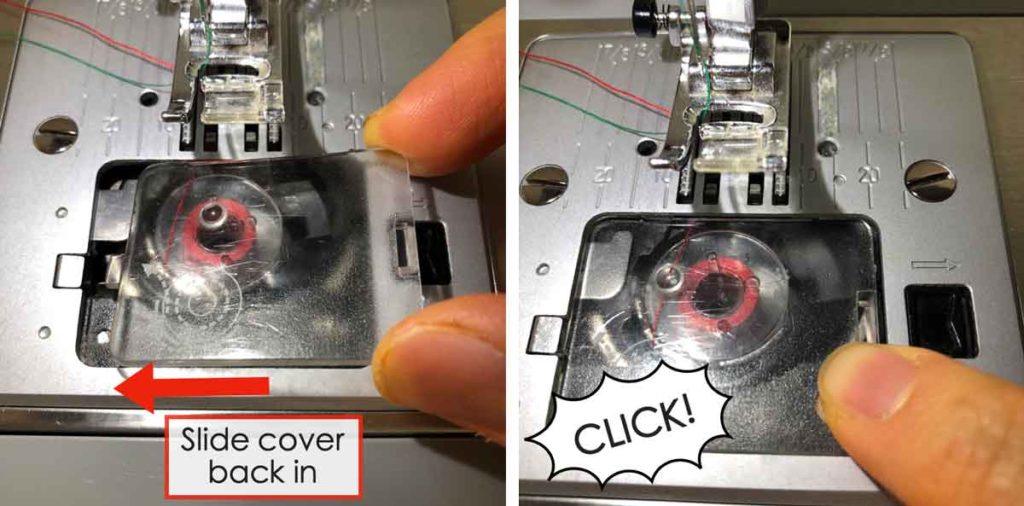
Pull upper thread and bobbin thread either to the side or the back of pressor foot. Slide bobbin cover back in (LEFT) and click it in place (RIGHT)

View of bobbin correctly in place and bobbin thread in correct position. You are now ready to start sewing! Remember, as you sew, the bobbin thread MUST be in the slits (as indicated by the bobbin diagram on the cover), and MUST overlap the bobbin (yellow arrow). Otherwise you will get funky sewing! This is why I prefer the top loading sewing machine as you can clearly see the bobbin as you sew.
And that’s it guys! I hope you found this detailed tutorial helpful. Don’t forget to pin this image for later. Happy Sewing!

How to Wind and Thread the Bobbin

Learn how to properly wind and thread the bobbin so you can start sewing beautiful, even stitches on your sewing machine!
Materials
- SEWING MACHINE
- THREAD
- EMPTY BOBBIN (See note 1)
- SNIPS or SCISSORS - to cut thread
- BOBBIN WINDER (optional)
Instructions
HOW TO SET UP THE THREAD FOR BOBBIN WINDING
- Place spool of thread on spool pin. Make sure the spool of spread spins counterclockwise on spool pin when you put it on. Another way to check is to see that the thread end lays over top of the spool.
- Push spool holder to the right so that it rests on top of thread spool.
- Pull thread towards thread guide.
- Holding the thread in between two hands (like you’re holding dental floss), snap thread into thread guide.
- Pull thread down towards bobbin winder tension discs and pull thread from right side of tension disc to bottom.
- Loop thread under tension discs and pull up.
- Thread will be wound in counterclockwise direction over tension discs. Pull thread to the right towards bobbin spindle.
SETTING UP THE BOBBIN FOR WINDING
- Take a look at the top of the bobbin and notice there is a circular opening and a groove. The groove on the bobbin needs to slide over the groove on bobbin spindle when you place it on.
- Thread bobbin through circular opening.
- Place threaded bobbin over spindle and push down. Make sure groove on bobbin matches groove on spindle.
- Push bobbin winder spindle to the right, towards the bobbin stopper. This is the bobbin winding position. In this position, the machine needle won’t sew and the hand wheel won’t turn.
HOW TO WIND THE BOBBIN
- Hold the thread end up and step down on foot pedal. This will cause the bobbin spindle to turn and wind thread over the bobbin.
- Wind the spindle a few more times until the thread end is secure and won't unravel.
- Cut the excess thread end with snips or scissors.
- Continue winding by pressing down on foot pedal. the thread will travel up and down the bobbin as it winds.
- Keep going until you have the amount of bobbin thread you need or until the bobbin is full (See Note 2).
- Once the bobbin is fully wound, the machine will automatically stop.
- Snip thread to the left of bobbin.
- Push bobbin spindle all the way to the left. This is back to sew position.
- Remove bobbin from spindle.
HOW TO THREAD THE BOBBIN
- Lift the needle to the highest possible position with the hand dial.
- Remove the bobbin case lid by pulling the tab to the right. When you pull the tab, the lid will pop up and out How to remove the case lid will vary by the model of sewing machine you own. Refer to you sewing machine manual if you are unsure.
- Remove cover and place it to the side.
- On the bobbin case lid (or somewhere near the bobbin case) there should be a diagram of how the bobbin should be placed into the case.
- Follow the diagram and place the bobbin into the case with the thread running clockwise.
- Place bobbin into case.
- Following the diagram, pull bobbin thread through bottom slit
- Pull bobbin thread to the left (clockwise) until it slips into the notch.
- Pull bobbin thread up and out of bobbin case.
- Slide bobbin case lid back.
- Hold upper thread with your left hand. Turn hand wheel (with your right hand) towards you in counterclockwise direction to lower the needle.
- Continue turning hand wheel towards you (counterclockwise) to raise the needle. As the needle raises, the upper thread will loop around the bobbin thread.
- As the needle continues to raise, the upper thread will loop to the right of the bobbin case, pulling bobbin thread with it.
- Use a pin/needle to pull the bobbin thread out from below the throat plate (through the needle plate hole). Alternatively, gently tug on the upper thread to pull the bobbin thread out.
- Pull upper thread and bobbin thread either to the side or the back of pressor foot.
- You are now ready to sew. Remember, as you sew, the bobbin thread MUST be in the slits (as indicated by the bobbin diagram on the cover), and MUST overlap the bobbin. Otherwise you will get funky sewing!
Notes
- Refer to your sewing manual for the bobbin size and type. It is important to use the correct bobbin size as this affects how your machine sews.
- Don't go at full speed (stepping all the way down on the food pedal) when winding your bobbin. Instead, use a moderate pace. Going at full speed may cause stretching in your thread which can distort the bobbin tension. Furthermore, going at a moderate-slow pace allows you to watch and monitor the thread winding around the bobbin. You want to see the thread travel from top of bobbin to bottom of bobbin then back up as the bobbin winds. The ultimate goal is to get a bobbin that is evenly wound from top to bottom. In other words, the amount of thread wound at the top, middle, and bottom of the bobbin should be exactly the same.
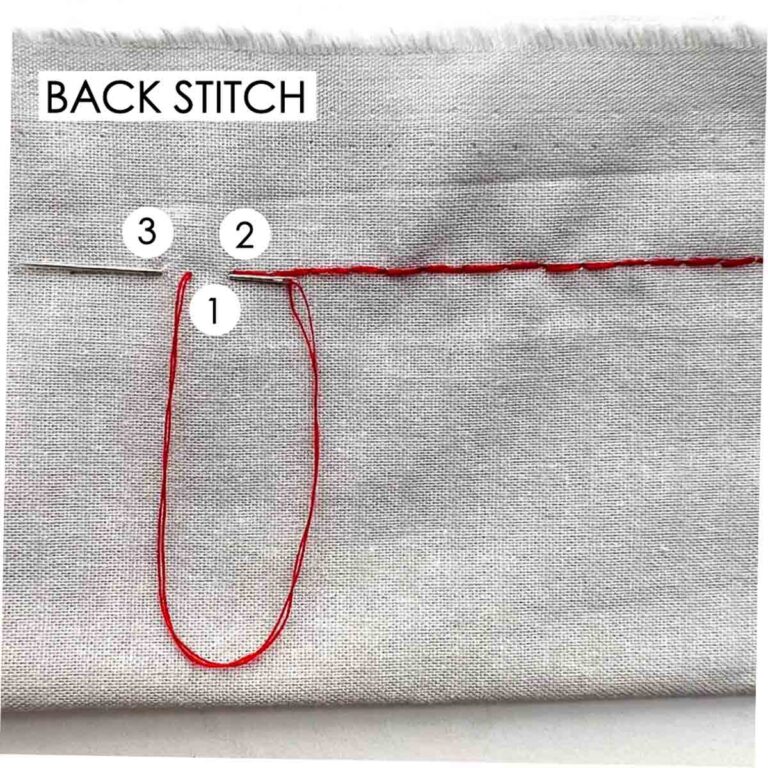
Other Basic Sewing Skills that You may find helpful:


Thank you Mindy for this detailed instruction in winding a bobbin. I really learnt a lot, and I have been sewing for many years.
Hi Maureen,
I’m so glad to hear that! I’ve also been sewing for many years and still I learn new things all the time. Happy Sewing!
This is the best tutorial instructions on how to wind a bobbin. Thank you, I will share it with my students.
Hi Linda,
You are so welcome! I hope your students find it helpful as well.
Thank you so much Mindy for this tutorial. This is the most detailed (better than the manual) illustrating “how to thread a bobbin”. Lucky for me I have the same Singer Model as you have and learned one step I miss each time I thread the bobbin.
Hi Agnes,
You are so welcome! I’m so glad you found the tutorial helpful. And yes I love that Singer Heavy Duty Sewing Machine, it’s been a great buy!
I have been having trouble getting my bobbins to load properly, and your explanation gives me lots of reasons why! Thanks for creating such a clear explanation.
Hi Rebecca,
You are very welcome! And I’m so glad to hear that. Happy Sewing!
Thank you “Sew Much”. Now I understand how to do this properly!
You are “Sew Welcome”!