
How to Make a Flat, Square Bottom Drawstring Dice Bag (Free Pattern)
This post may contain affiliate links. Please read my disclosure policy for details. As an Amazon Associate, I earn from qualifying purchases.
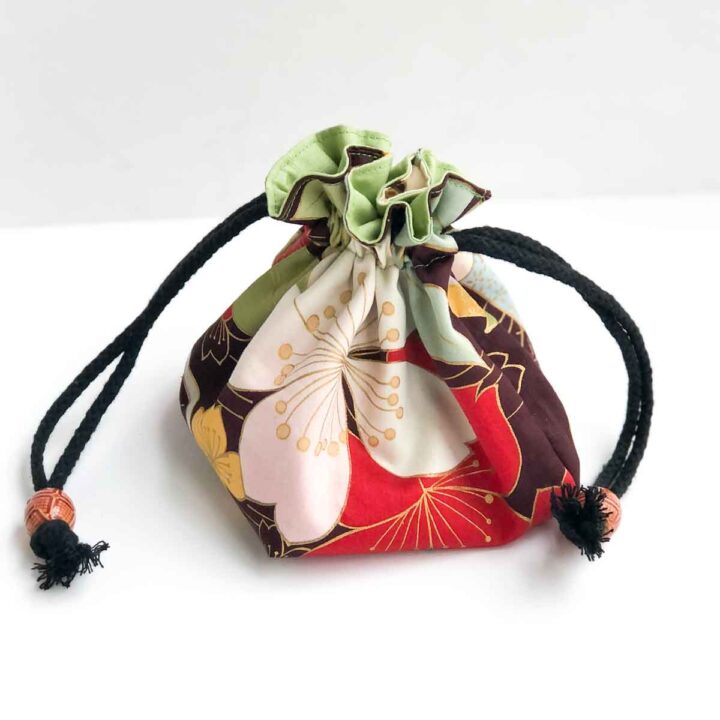
This quick and easy drawstring dice bag pattern is lined and has a square, flat bottom. You can use it to hold anything!
One of the first things I learned to sew on the machine was a drawstring pouch when I was 12. I had scrounged up every penny of my red envelope money to purchase (with the help of my parents) a sewing machine. The purchase came with free sewing lessons, and a drawstring pouch was one of the beginning projects that we learned.
So….if a 12 year old beginner sewist can make a drawstring pouch, so can you!
sewing TUTORIALS for beginners
If you’ve never sewed before, or consider yourself a beginner, check out the following resources before you start:
- How to Thread a Sewing Machine Upper Thread
- How to Wind and Thread a Bobbin
- 10+ Hacks to Thread a Sewing Needle
- 19 Essential Sewing Stitches Every Beginner Should Know
Easy SEWING PROJECT with Free Pattern
This simple drawstring dice bag is fully lined and has a flat, square bottom. Even if you consider yourself a beginner, don’t be intimidated! The detailed step-by-step tutorial below will guide you to success!

The pouch also has two drawstrings, one on each side for easy closure. This way, it securely closes the bag without the need for a cord stopper. You definitely don’t want your treasured dices or other trinkets accidentally falling out the pouch!
Box Bottom Drawstring Bag Pattern
To grab the free medium sized drawstring bag pattern in the regular version (same fabric), simply subscribe to our email list and you will receive the password to the MindyMakes Free Resource library.

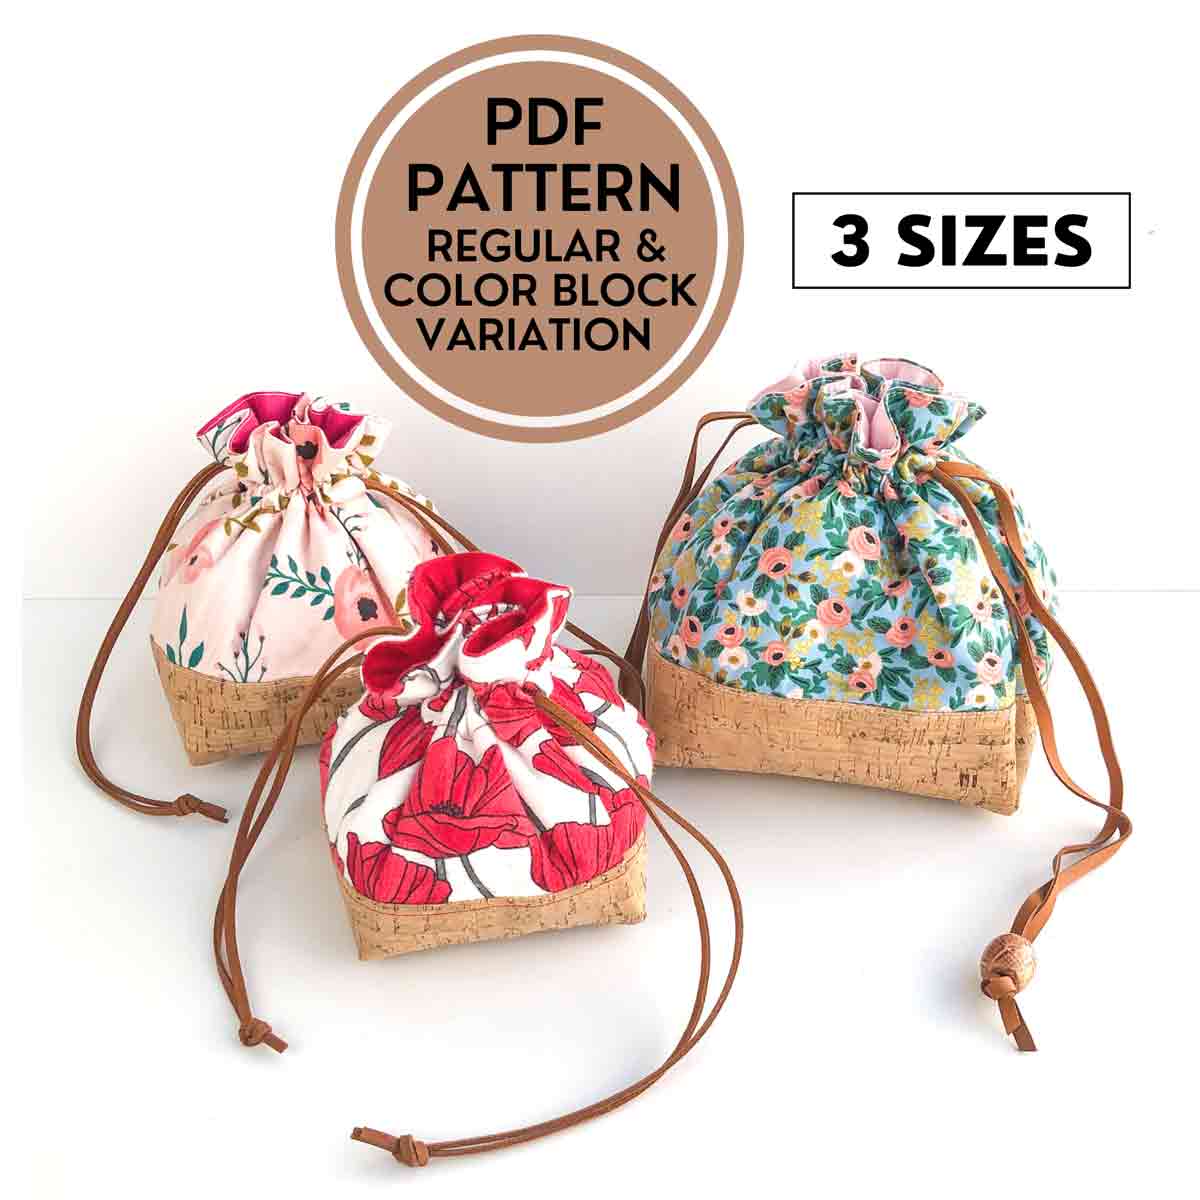
Want more sizes of this nifty box bottom drawstring bag? The PDF Pattern is available IN OUR SHOP and comes with 3 sizes (S, M, L) as well as the COLOR BLOCK pattern for each size. Make them in your favorite fabric combinations to gift away to friends, teachers, families, and more.
HOW DO YOU MAKE A FLAT BOTTOM DRAWSTRING BAG?
First, you will sew two of the (almost) same pattern pieces separately to make a lining and an exterior.
Next, you will sew the lining and exterior pieces together and turn them to the right side. If this sounds confusing, don’t worry. The tutorial and photos will make much more sense once you get started.
SQUARE Bottom Drawstring POUCH – So Handy and Useful
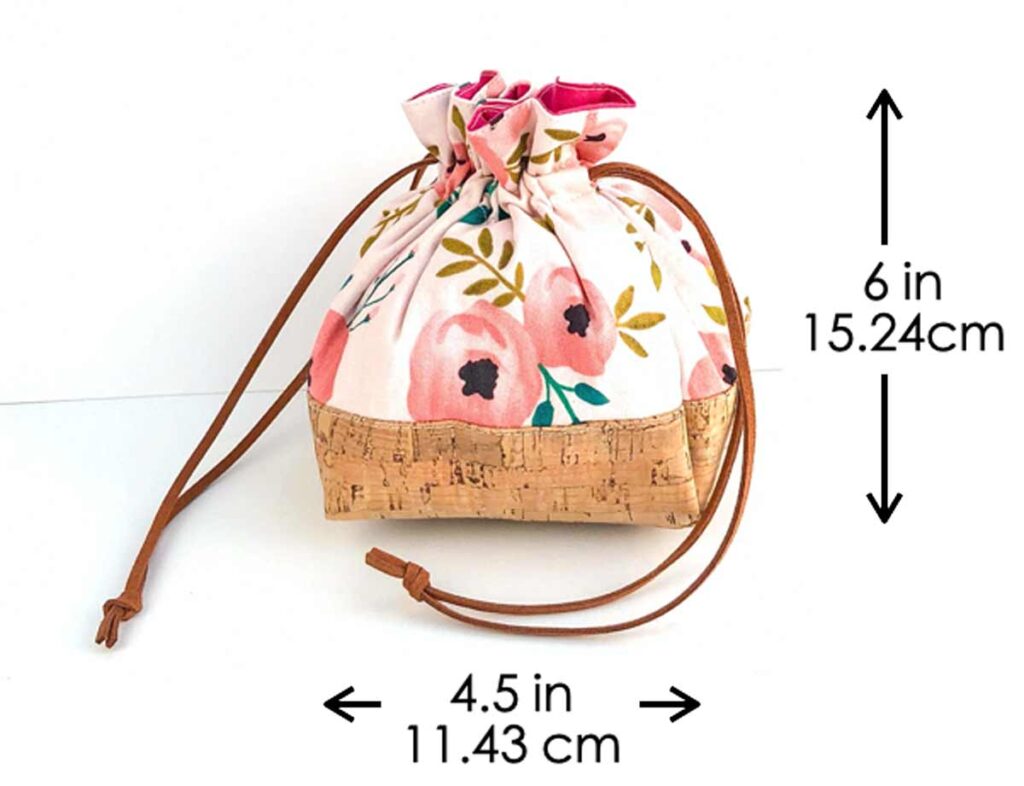
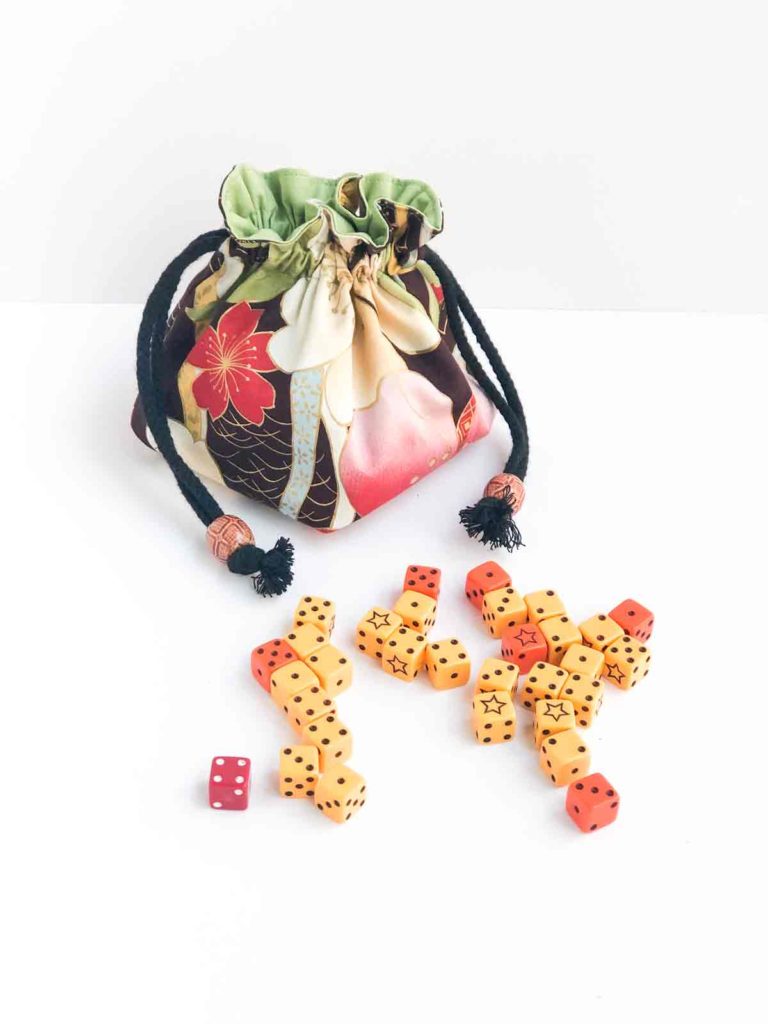
The finished bag is approximately 6” (15.24cm) tall with a bottom that measures 4.5″ x 4.5″ (11.43 cm x 11.43 cm). It will hold 150-200 dice and is also great for toiletries, jewelry, sewing threads, and more!

Additionally, the square bottom bag stands on it’s own whether it’s empty or full. This way, the bag doubles as a container/holder to keep your belongings in place!
Once you sew one (and realize how easy it is), you’re going to want to sew a bunch more to organize other stuff and give away to friends. I love these easy sewing projects that are super useful and quick to make!
What if I need A Different sized Bag?
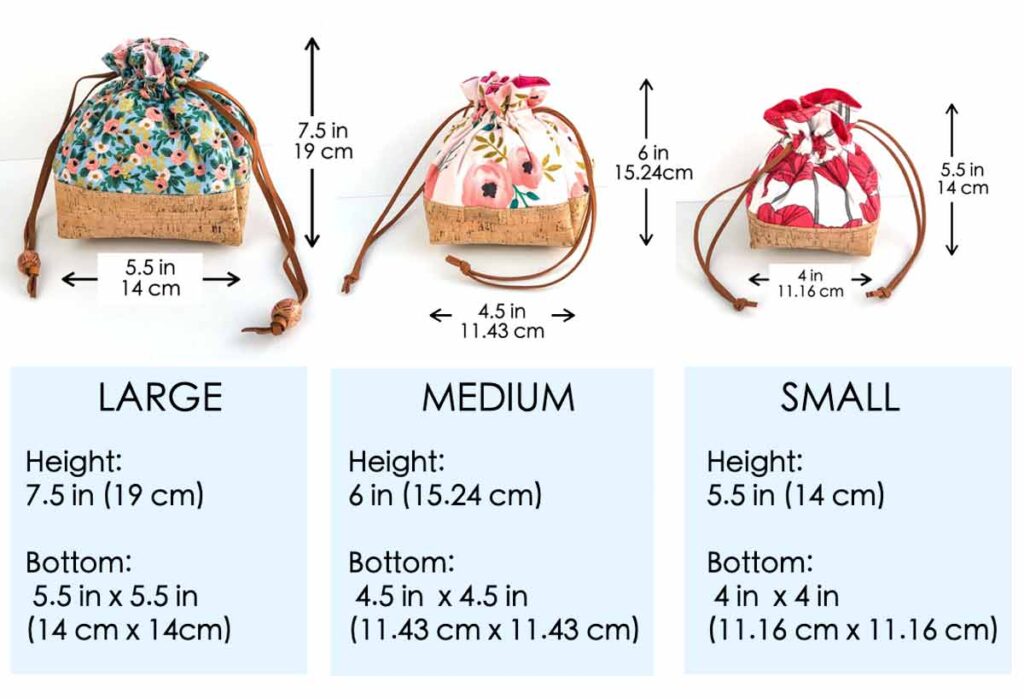
The Dice Bag PDF Pattern is available for purchase in my etsy shop in size SMALL, MEDIUM, and LARGE. PDF pattern also includes an ad-free version of the tutorial so you can easily print it out and refer back to it as you sew.
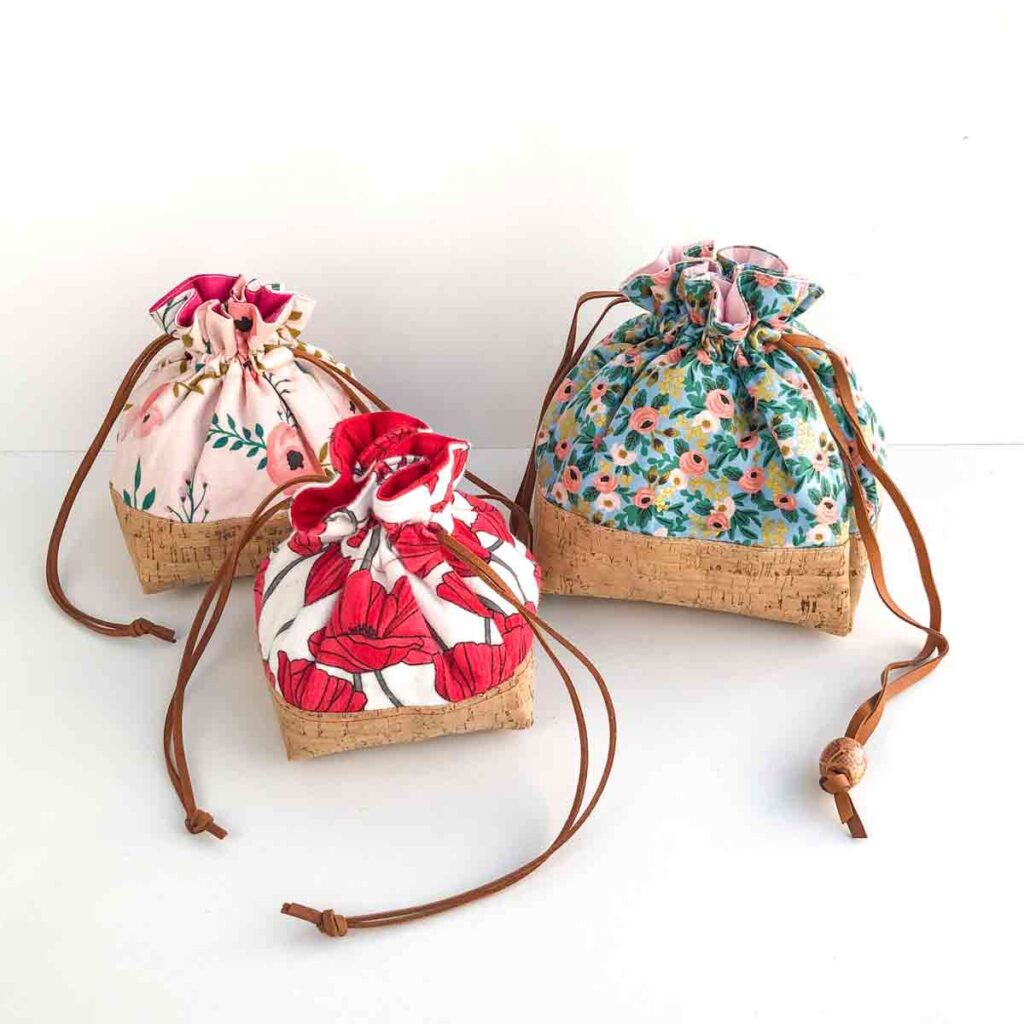
Additionally, PDF Pattern comes with the exact pattern for making color blocked versions of the bag in all 3 sizes, as pictured. Absolutely no need to trim and cut the pattern!
What do I need to Make this Easy Sewing Project?
MATERIALS:
- Pattern: Drawstring Dice Bag Pattern (available in my free resource library) – get the password by subscribing.
- Fabric – I used 100% cotton, but can use other types of fabric (velvet, satin, silk, canvas, denim). If you are a beginner I recommend 100% cotton as they are easy to work with
EXTERIOR: 1/4 of a yard (9″ or 22.86cm). Fat Quarters work great.
LINING: 1/4 of a yard (9″ or 22.86cm). Fat Quarters work great - Fusible Interfacing – optional, 1/4 of a yard (9″ or 22.86 cm)
I didn’t use interfacing for the bag you see in the tutorial and it stands up well , with a little bit of slouch. However, interface it to the exterior fabric if you want your bag to stand more firm. You can also use canvas fabric for the lining and that will stabilize the bag even more. - Cord – Two pieces 24″ (61cm) each. I used a black cotton cord from Joann’s.
- Wooden Beads – optional, for decorative purposes. I used these Printed Wooden Beads from Joann’s.
TOOLS:
- Sewing machine with zigzag function
- Serger (optional) – for finishing the raw edge of fabric
- Fabric Scissors – these Ginghers Fabric Shears are my favorite.
- Pins or Sewing Clips
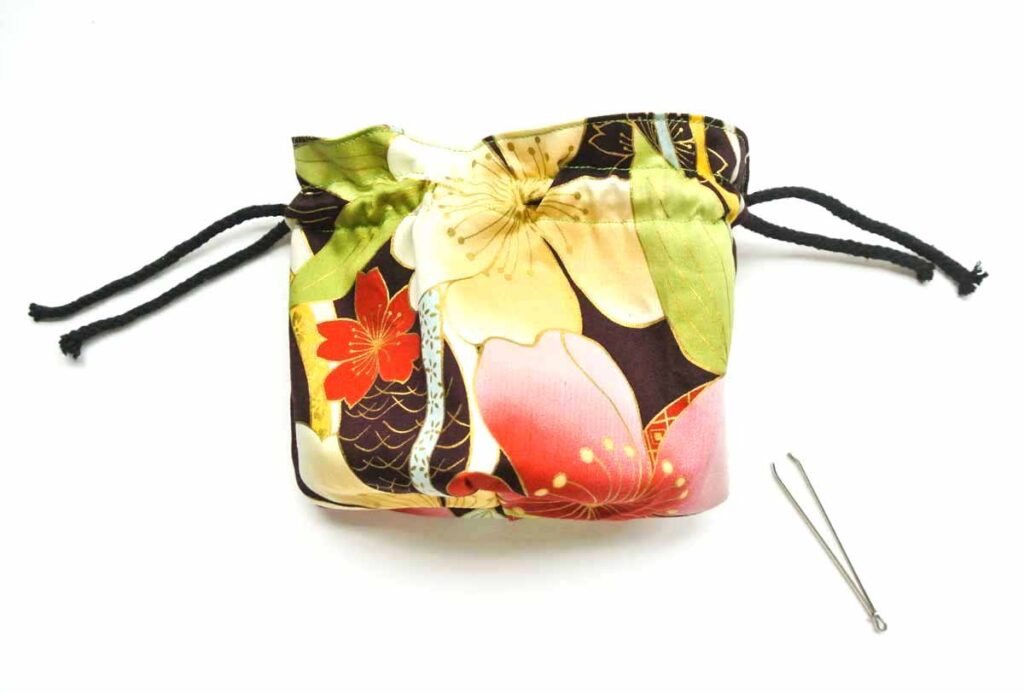
- Bodkin – alternatively, use safety pins
- Chalk – for marking fabric
- Clear Ruler
- Matching Thread
- Iron – for pressing
How Do YoU Make a Dice Drawstring Bag? Easy step-by-step Tutorial With Pictures
Piecing Drawstring Dice Bag Patterns Together
Print drawstring dice bag pattern and cut and paste the pieces together as instructed.
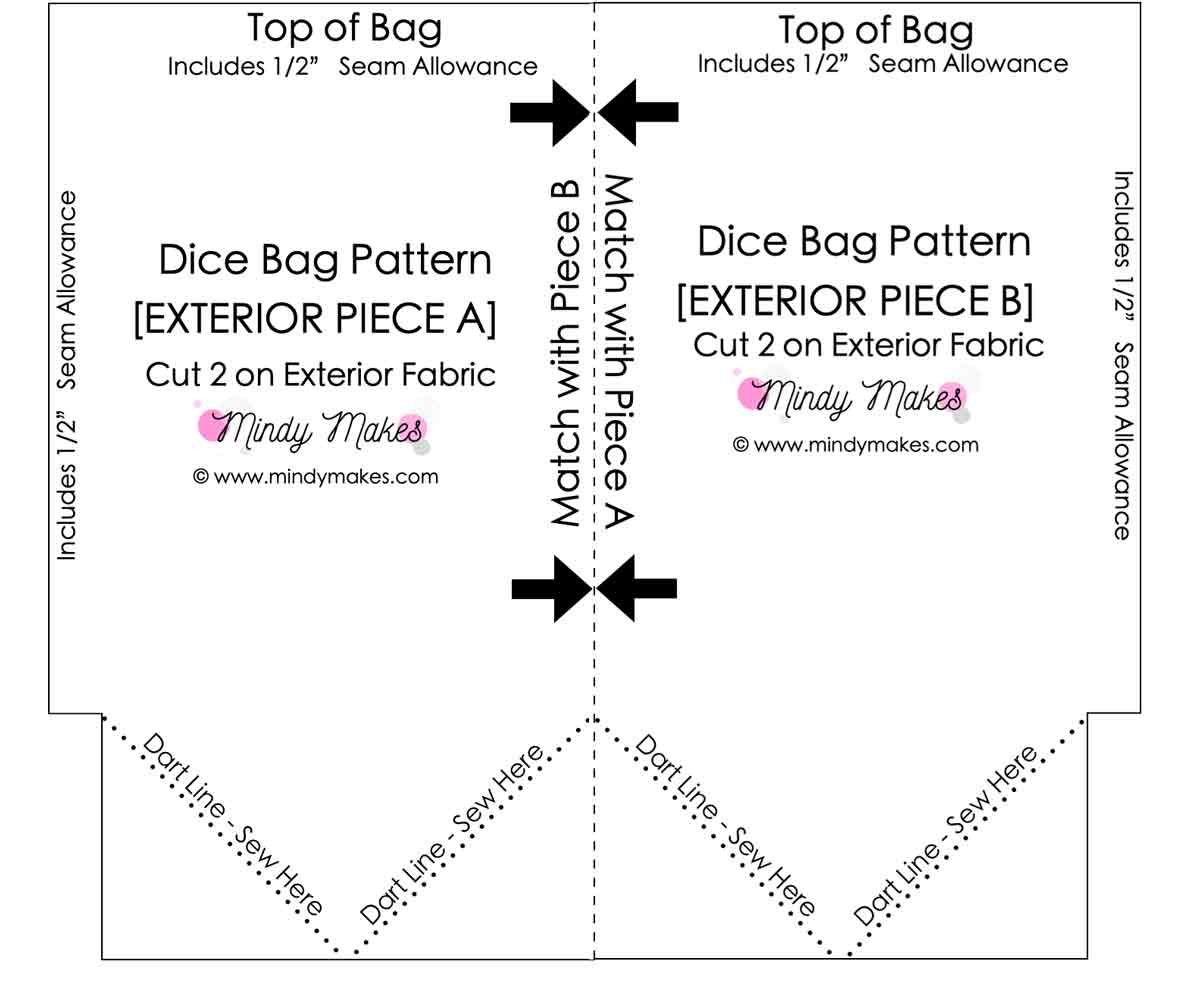
The Exterior Pattern has PIECE A and PIECE B that need to be taped together.

The Lining Pattern has 2 Pieces (PIECE 1 and 2). You will need to cut one piece of lining on fold.
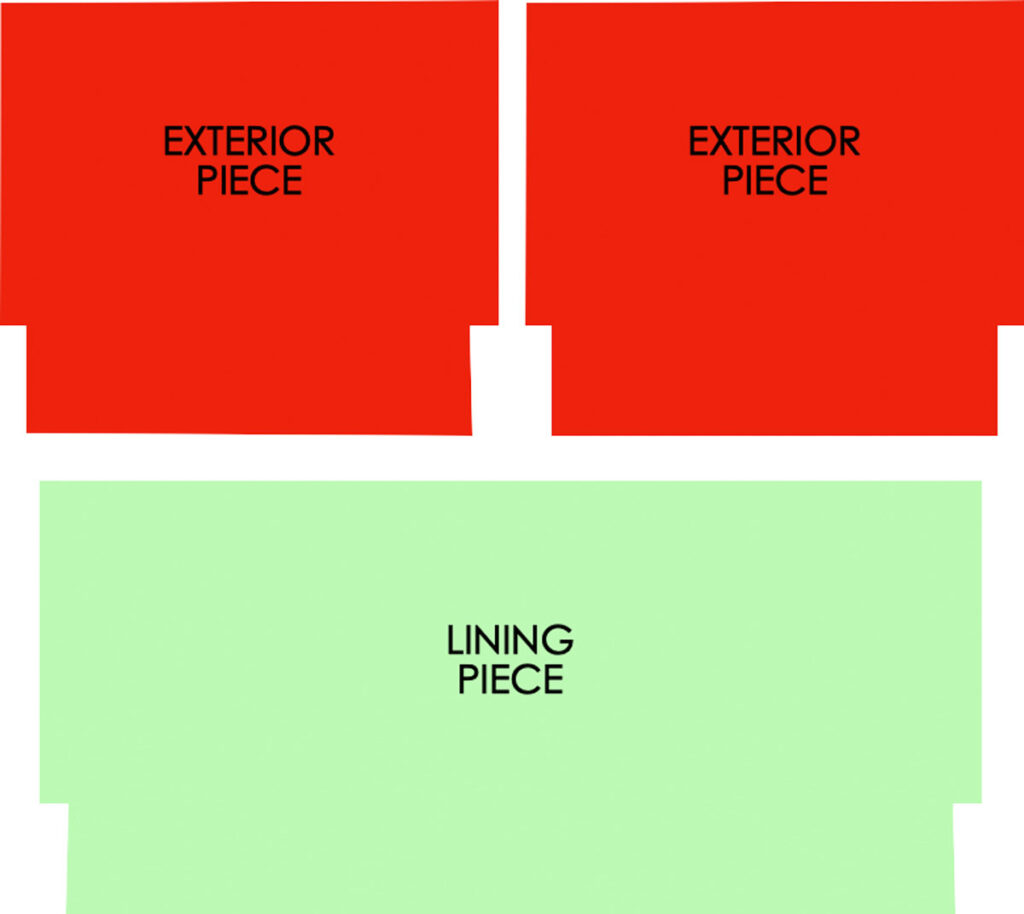
Cut out the paper pattern pieces on fabric. You will have the following pieces of fabric:
- EXTERIOR PIECE (x2)
- LINING PIECE (x1)
How to Sew Bag Lining
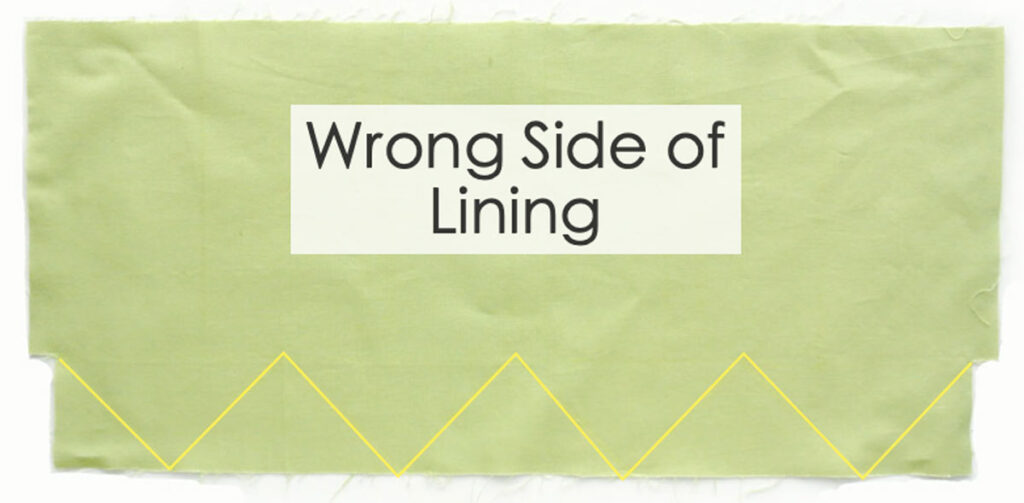
First, mark the triangular dart lines (yellow line) on wrong side of lining.
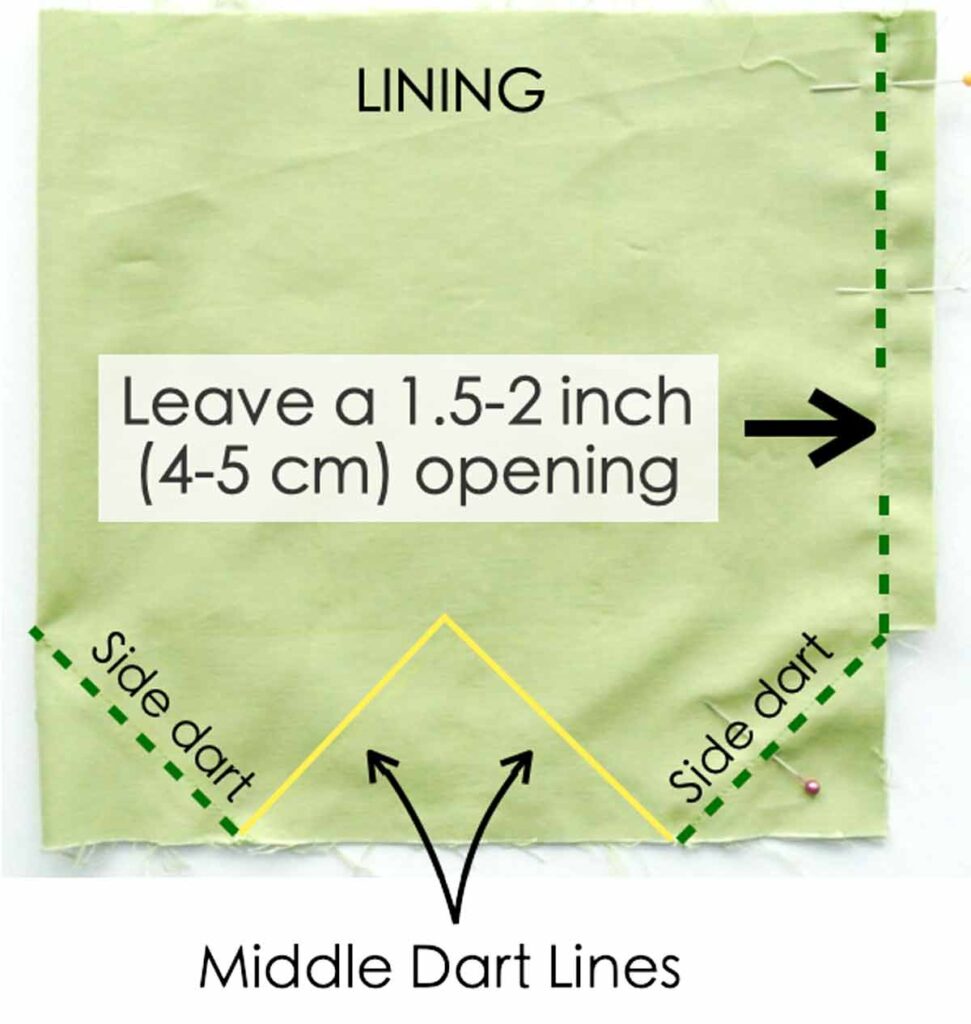
Next, fold lining pattern in half and sew sides together at 1/2” seam allowance. Leave a 1.5-2 inch (4-5 cm) opening on side seam, closer to the bottom of the bag. Making sure to back stitch on both sides of opening. The purpose of this opening is so we can turn the bag to the right side later on.
Third, sew the two side darts together (dotted green line). Do not sew the middle dart lines (solid yellow line) just yet.
Note: Green dotted line indicates where you will need to sew

Now pinch open the bottom of the lining so the middle darts match each other as shown in the photo. Sew middle darts together.
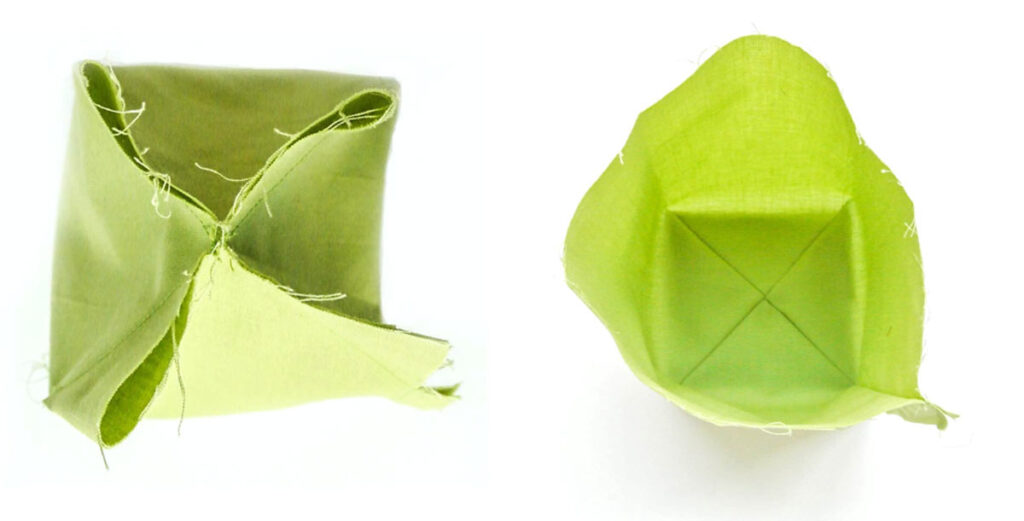
LEFT: Bottom of Lining piece after darts sewn together
RIGHT: Top view
Cutting and Sewing Bag Exterior
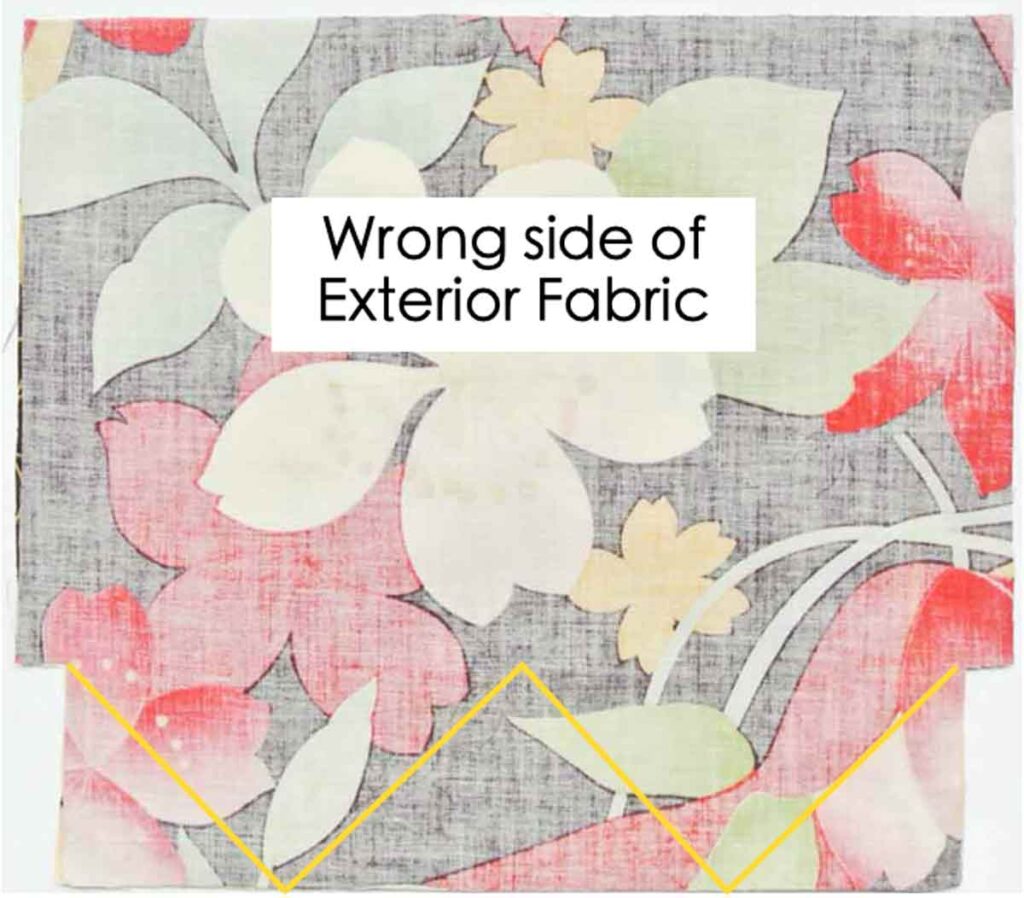
Cut out Dice Bag Exterior Pattern Pieces. Use chalk to mark darts (solid black line) on wrong side of fabric
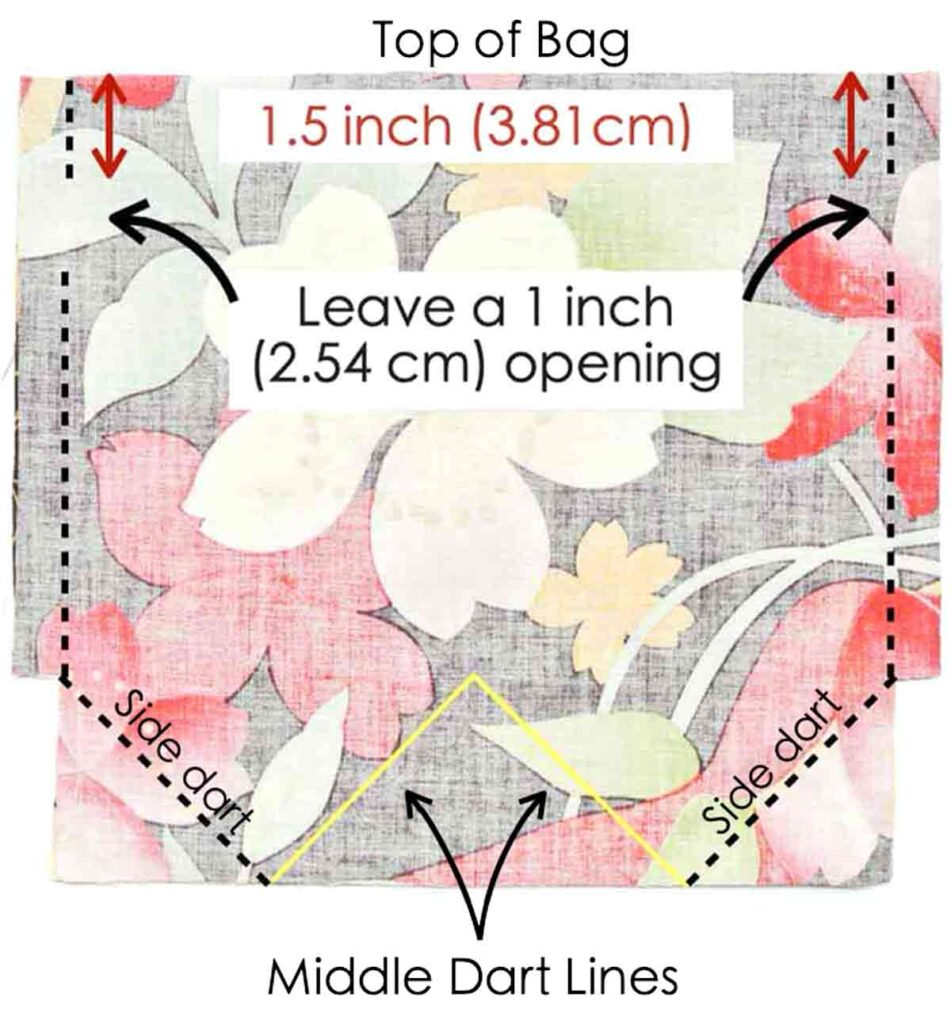
Place Dice Bag Exterior Pieces right sides together and sew at 1/2” seam allowance. Leave a 1” opening on the sides, 1.5” from top edge of fabric. Sew bottom darts on the side together, leaving the middle dart (solid yellow line) open.
Note: Black dotted line in photo indicates where you will be sewing.

View of opening. Make sure you back stitch at both ends of the opening. This opening is where the drawstring will eventually go.
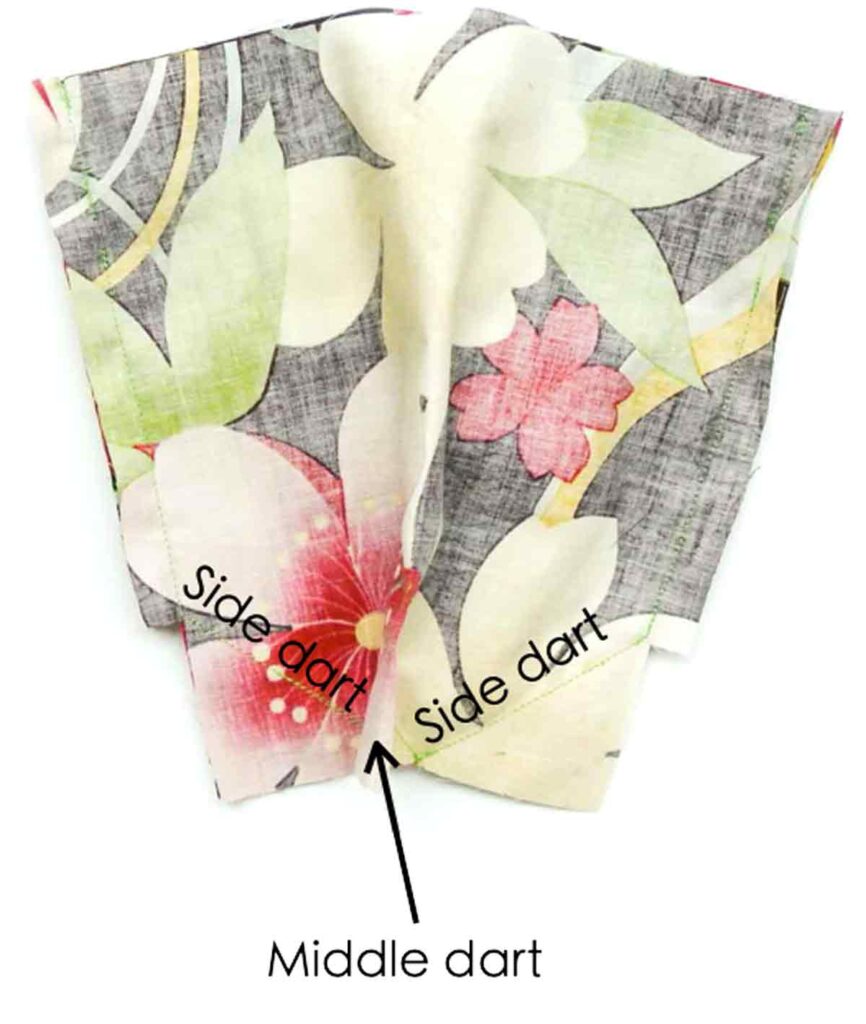
Now sew middle dart lines together (on bottom of bag), just like the way you did for the lining.
Sewing Drawstring Dice Bag Together
(I retook photographs of this section to more clearly document the process, that’s why the fabrics changed. The lining is the solid colored fabric and the exterior fabric has the floral pattern)
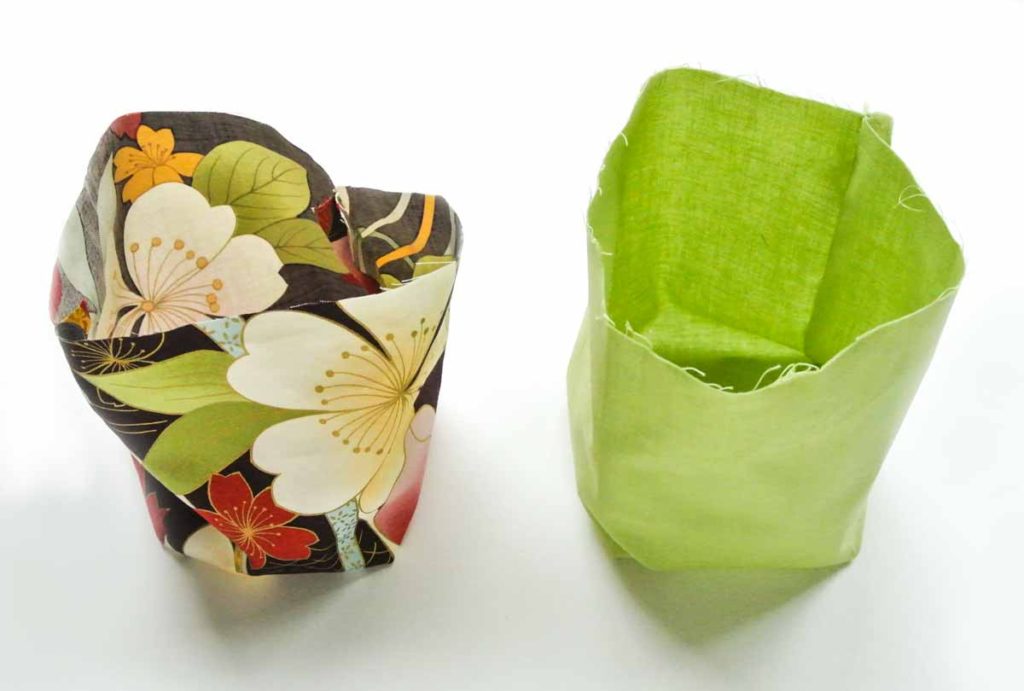
You will now have a bag exterior (left) and bag lining (right)
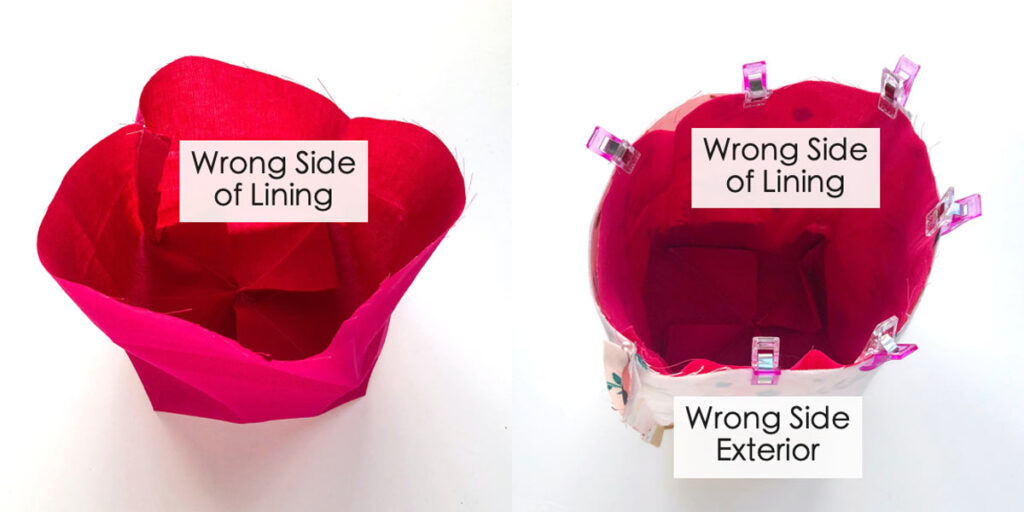
Place bag lining inside of bag exterior, right sides together. The wrong side of lining and wrong side of exterior will both be facing outwards.
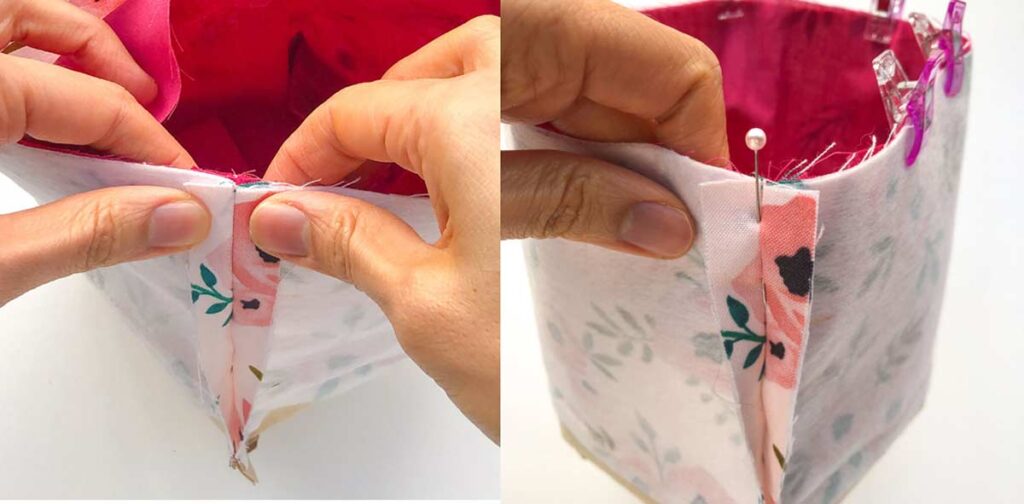
Match side seam of lining (there’s only one) with one of the side seams of exterior piece. Pin/clip all around the top and sew together at 1/2″ (2.57 cm) seam allowance.
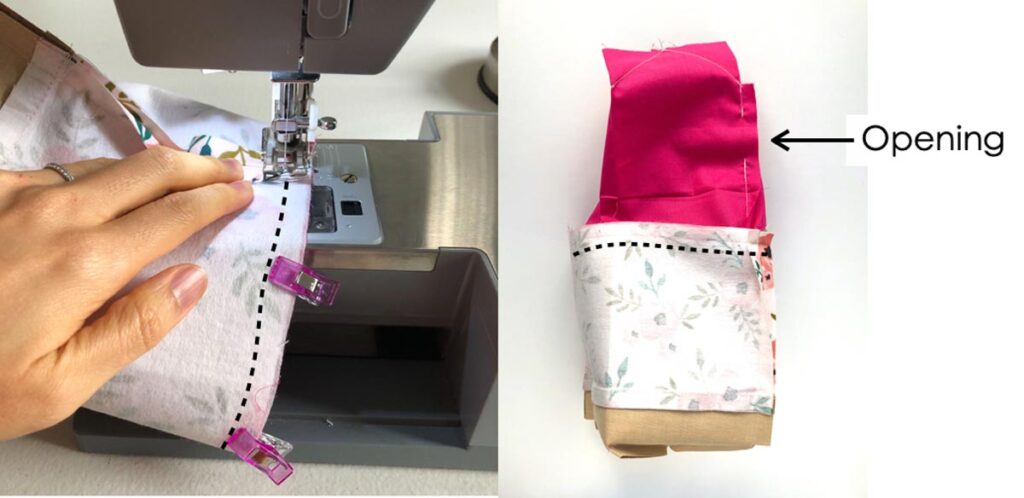
LEFT: Remove the sewing machine extension arm and sew all around the bag at 1/2”(2.57cm) seam allowance (black dotted line).
RIGHT: You will end up with exterior and lining sewn together, with an opening at the lining.
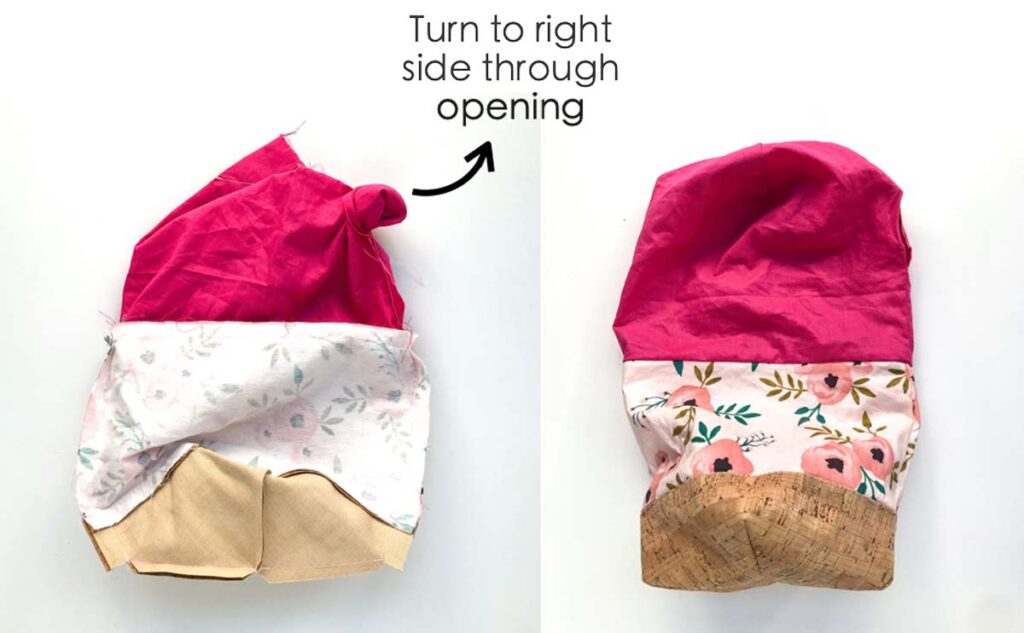
Turn bag to right side through lining opening.
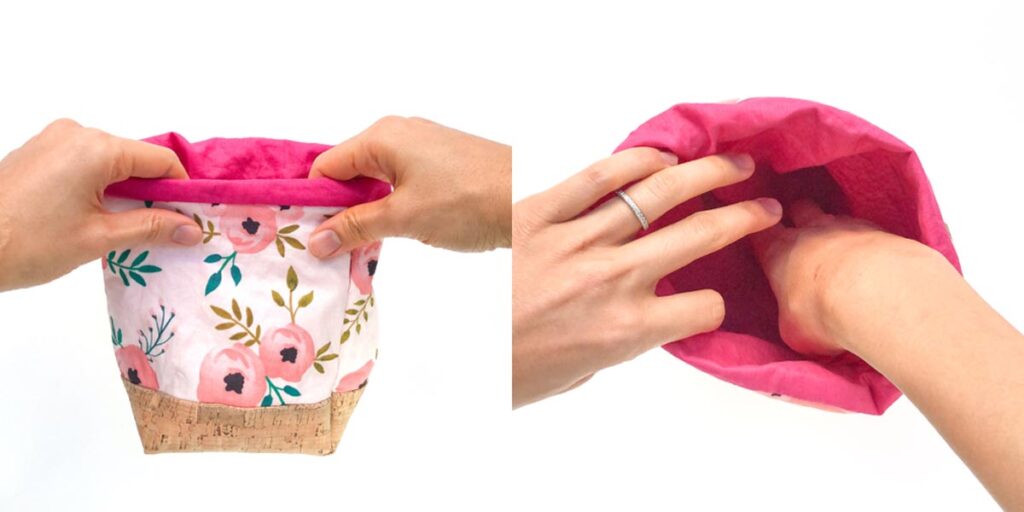
Push lining into bag exterior.

LEFT: View of bag from the top.
RIGHT: Use invisible ladder stitch to close the opening of the lining.
Top Stitch and Sewing Drawstring Channel
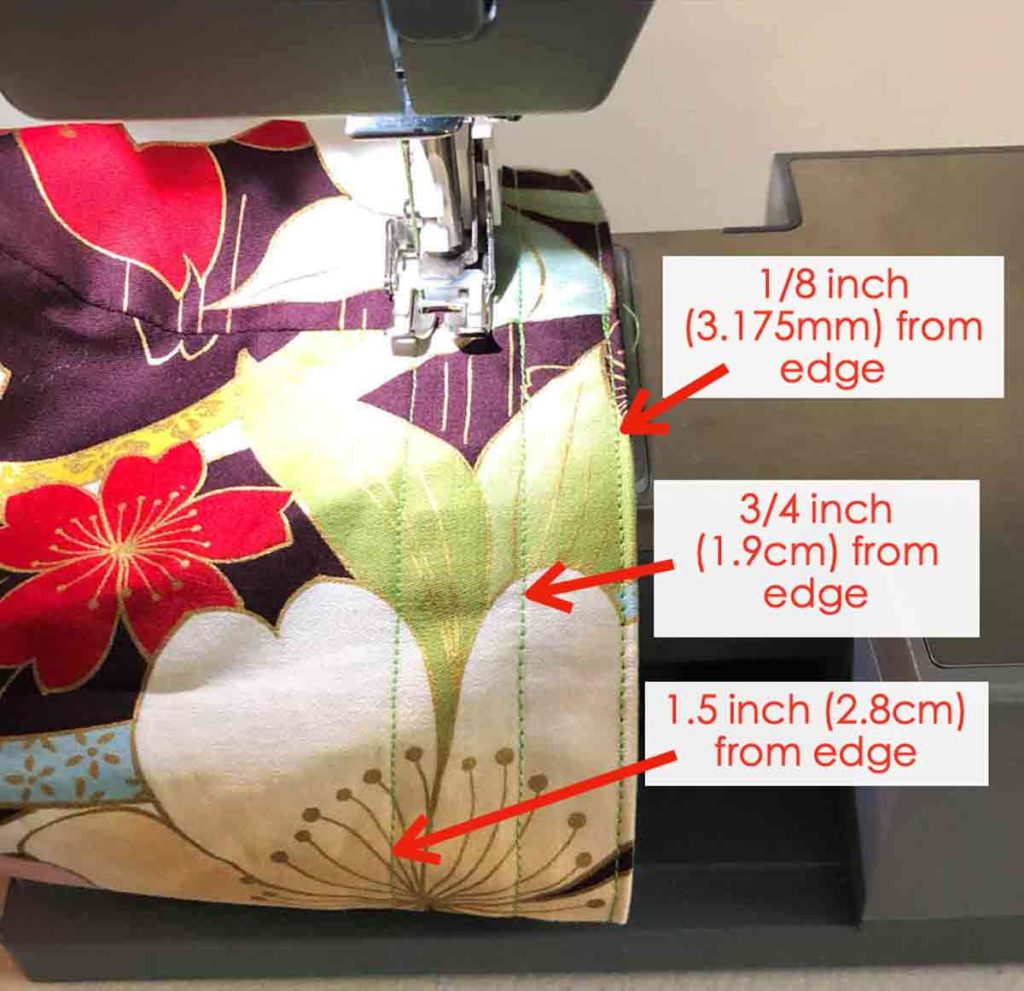
Give the drawstring bag a good press. Then take it to the sewing machine to make 3 straight stitches around the bag:
Line 1: 1/8”(3mm) from top edge, this is the top stitch
Line 2: 3/4”(2cm) from top edge, this creates the top of drawstring channel
Line 3: 1.5” (2.8cm) from top edge, this creates bottom of drawstring channel
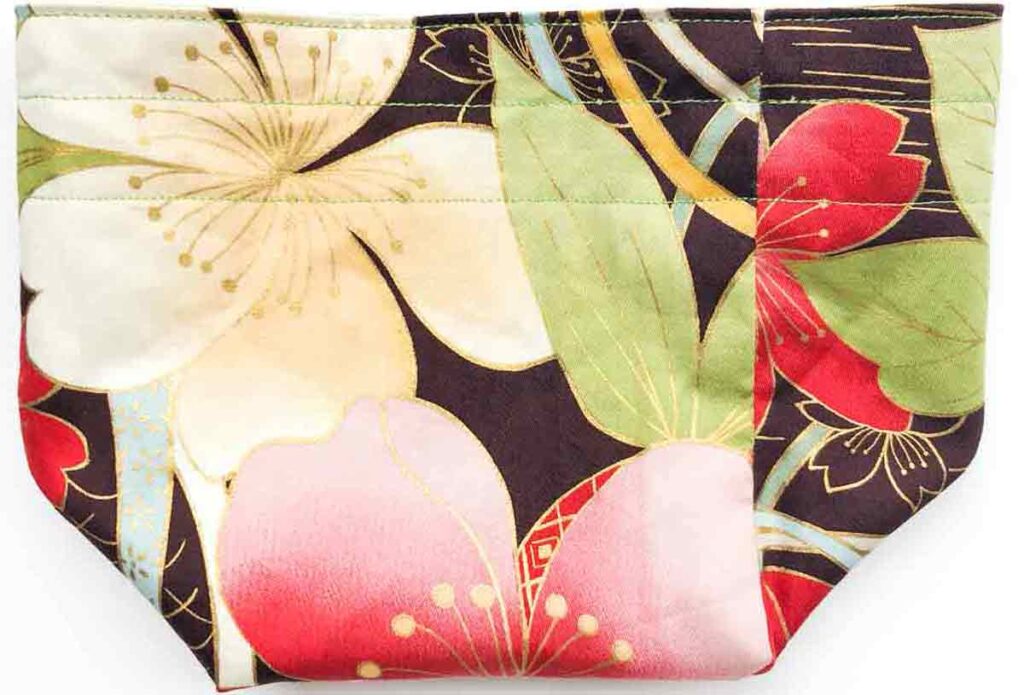
View of drawstring bag after top stitch and drawstring channel stitches are made. Almost done! All you have to do is to insert drawstrings and you will be finished!
Inserting Drawstring Cords
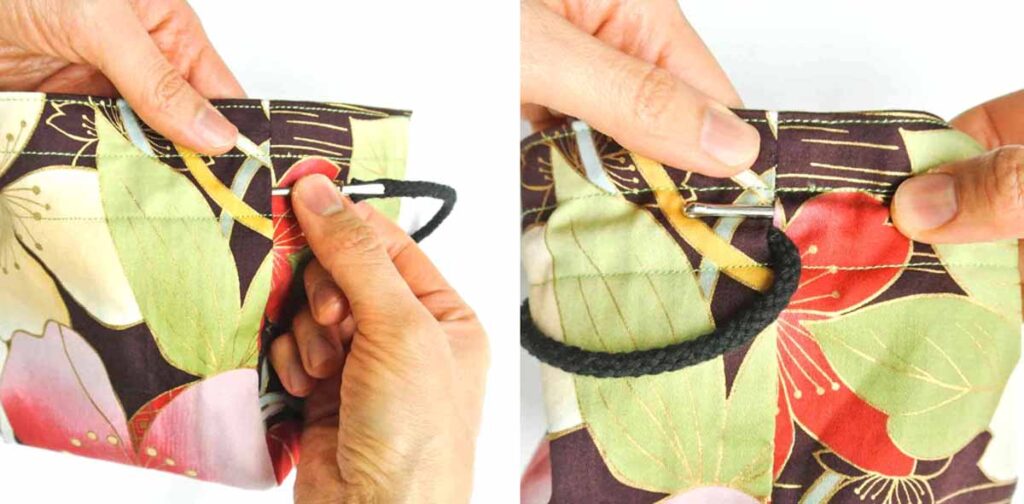
Use a bodkin threader to thread the drawstring. First thread one piece of drawstring cord entering from the left side all the way around the bag and exit left side again.
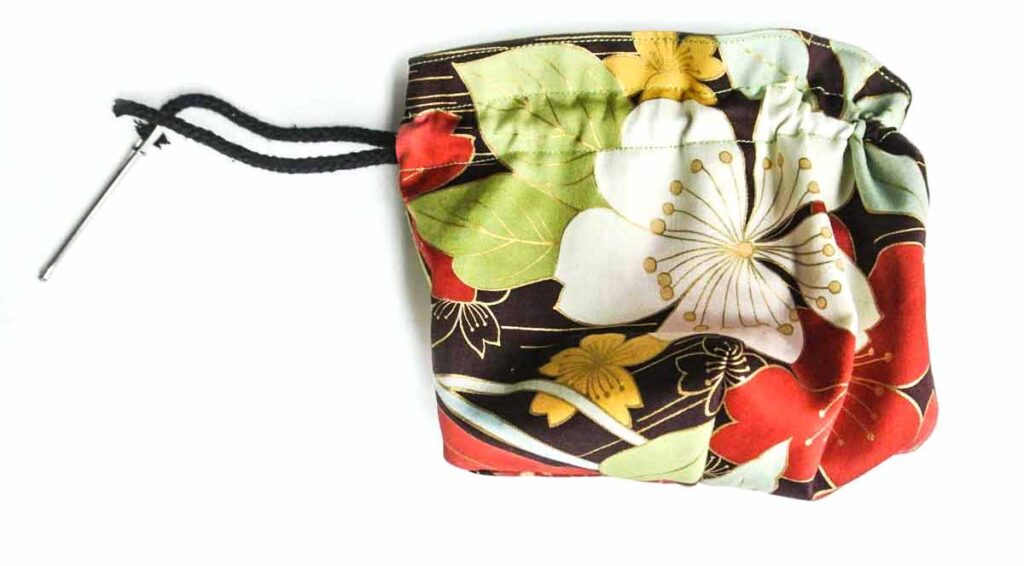
View of bag with one drawstring cord.
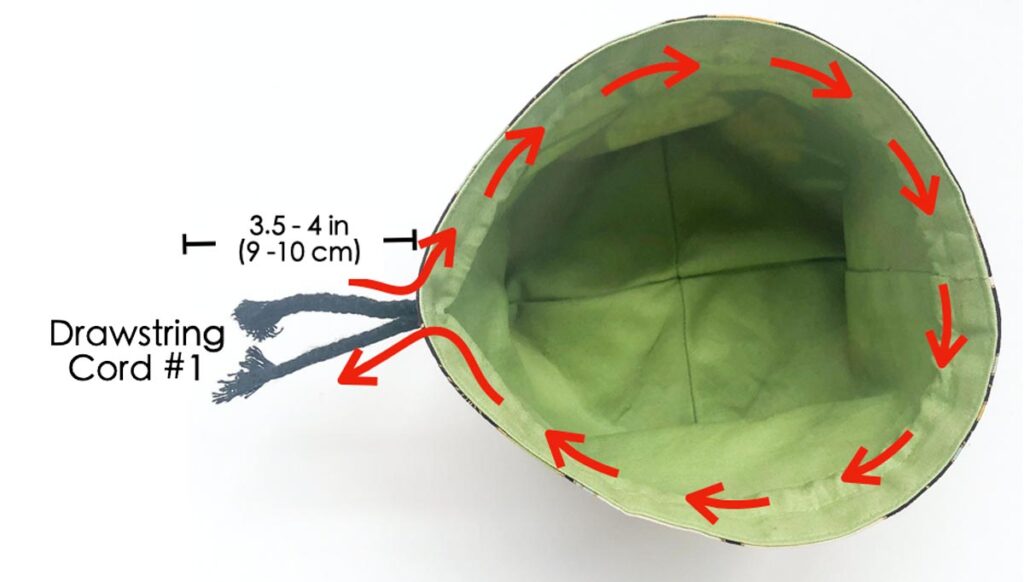
Another view of first drawstring cord threaded through bag. I like to leave about 3.5”-4” (9-10cm) of excess cord length.
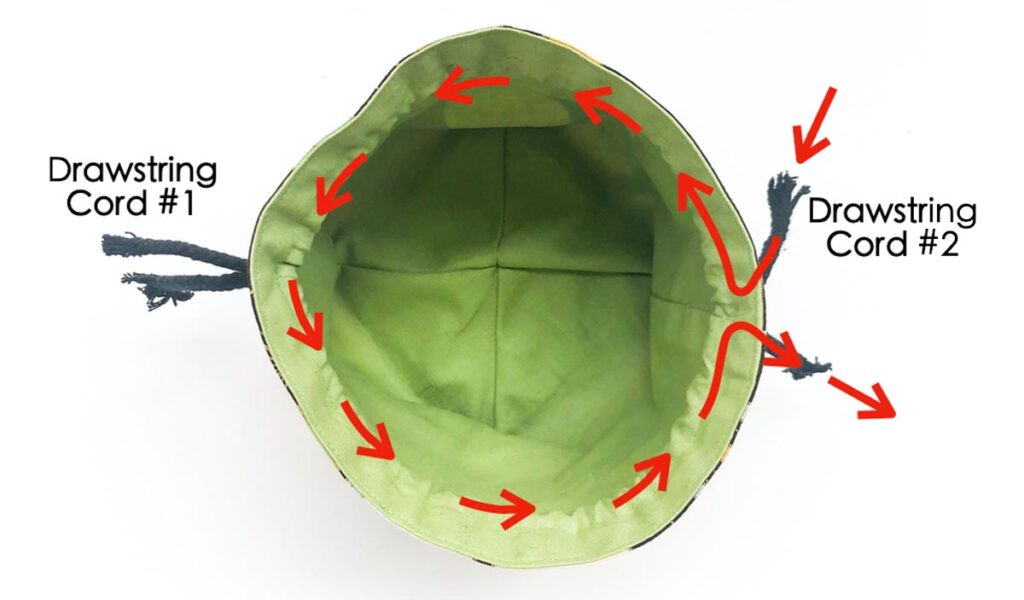
Next, thread second piece of drawstring cord from right side all the way around and exit the right side.
You will end up with two drawstrings, one on each side.
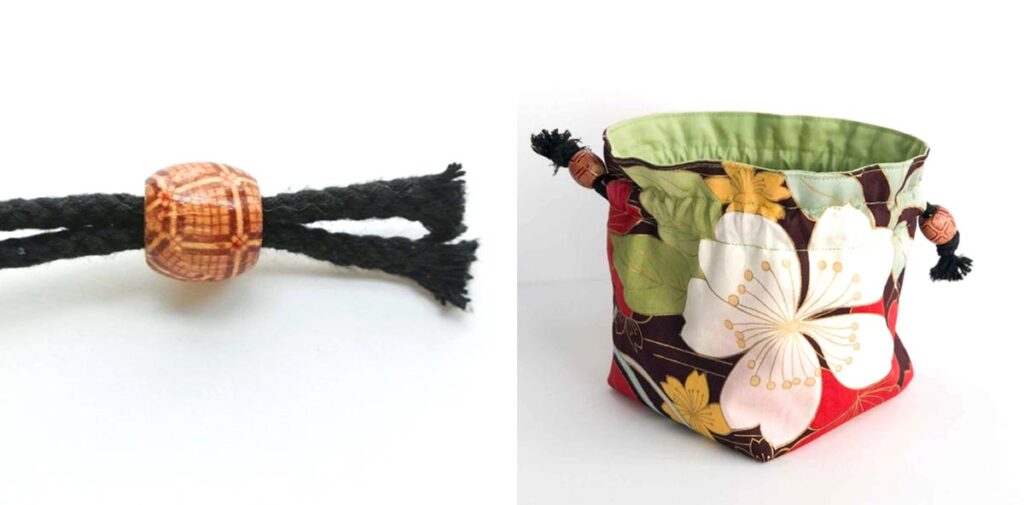
Put a bead at the end of the cord if you like, tie a knot and you are done!
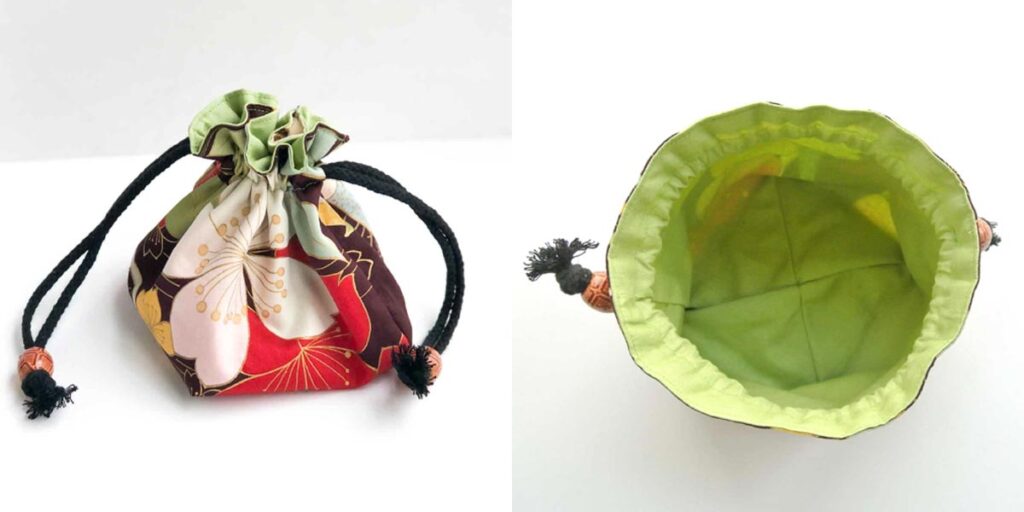
Finished! Wasn’t that easy? My favorite part is that the drawstring bag stands up on its own even when it’s empty. This way, you can easily grab what you need from the bag!
Want the ad-free, printer friendly version of this sewing tutorial? The digital PDF file is available IN OUR SHOP and comes with 15 pages of detailed step-by-step instructions with photos. What’s more, you will receive 3 Sizes of Drawstring Dice Bag Patterns together with Color Block Pattern. This way, you can print a copy in a breeze to keep by your sewing machine for easy reference.
How to Sew a Drawstring Dice Bag
This quick and easy drawstring dice bag pattern is lined and has a square, flat bottom. You can use it to hold anything!
Materials
- DRAWSTRING DICE BAG PATTERN - Available in the Free MindyMakes Library
- EXTERIOR FABRIC - 1/4 Yard (0.23m)
- LINING - 1/4 Yard (0.23m)
- FUSIBLE INTERFACING - 1/4 Yard (0.23m)
- DRAWSTRING CORD - Two pieces 24" (61cm) each
- WOODEN BEADS - optional
Tools
- SEWING MACHINE
- FABRIC SCISSORS
- FABRIC CHALK
- SEWING PINS or SEWING CLIPS
- BODKIN
- IRON - for pressing
Instructions
- Print drawstring dice bag pattern and cut and paste the pieces together as instructed.
- Cut out the paper pattern pieces on fabric.
HOW TO SEW BAG LINING
- First, mark the triangular dart lines on wrong side of lining.
- Next, fold lining pattern in half and sew sides together at 1/2” seam allowance. Leave a 1.5-2 inch (4-5 cm) opening on side seam, closer to the bottom of the bag. Make sure to back stitch on both sides of opening.
- Sew the two side darts together. Do not sew the middle dart lines just yet.
- Now pinch open the bottom of the lining so the middle darts match each other.
- Sew middle darts together.
CUTTING AND SEWING BAG EXTERIOR
- Use chalk to mark darts (solid black line) on wrong side of fabric.
- Place Dice Bag Exterior Pieces right sides together and sew at 1/2” seam allowance.
- Leave a 1” opening on the sides, 1.5” from top edge of fabric. Make sure you back stitch at both ends of the opening
- Sew bottom darts on the side together, leaving the middle dart.
- Now sew middle dart lines together (on bottom of bag) in the same way you did for the lining.
SEWING DICE BAG TOGETHER:
- Place bag lining inside of bag exterior, right sides together. The wrong side of lining and wrong side of exterior will both be facing outwards.
- Match side seam of lining (there’s only one) with one of the side seams of exterior piece.
- Pin/clip all around the top and sew together at 1/2" (2.57 cm) seam allowance.
- Remove the sewing machine extension arm and sew all around the bag at 1/2”(2.57cm) seam allowance.
- Turn bag to right side through lining opening.
- Push lining into bag and use invisible ladder stitch to close the opening of the lining.
HOW TO SEW DRAWSTRING CHANNEL:
- Give the drawstring bag a good press. Then take it to the sewing machine to make 3 straight stitches around the bag:
• Line 1: 1/8”(3mm) from top edge, this is the top stitch
• Line 2: 3/4”(2cm) from top edge, this creates the top of drawstring channel
• Line 3: 1.5” (2.8cm) from top edge, this creates bottom of drawstring channel
INSERTING DRAWSTRING CORDS
- First thread one piece of drawstring cord entering from the left side all the way around the bag and exit left side again.
- Next, thread second piece of drawstring cord from right side all the way around and exit the right side.
- Put a bead at the end of the cord if you like, tie a knot and you are done!
Recommended Products
As an Amazon Associate and member of other affiliate programs, I earn from qualifying purchases.
More Easy Sewing Projects You’ll Love!

Reusable fabric drawstring gift bags with a gusset add a special touch to gift giving.
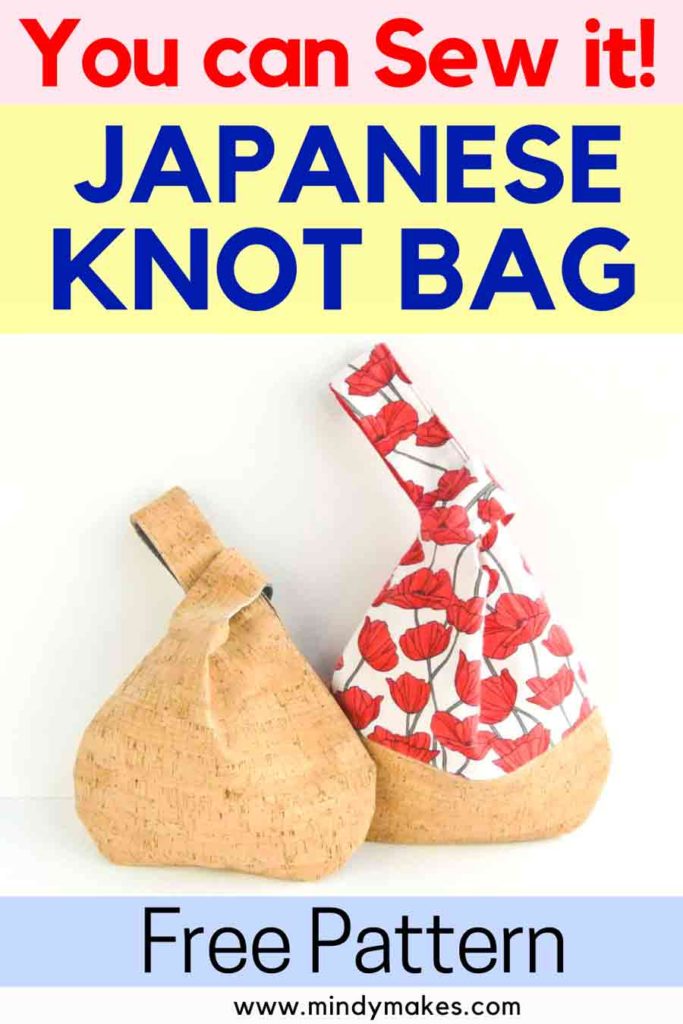
The Japanese knot bag is a super chic accessory.
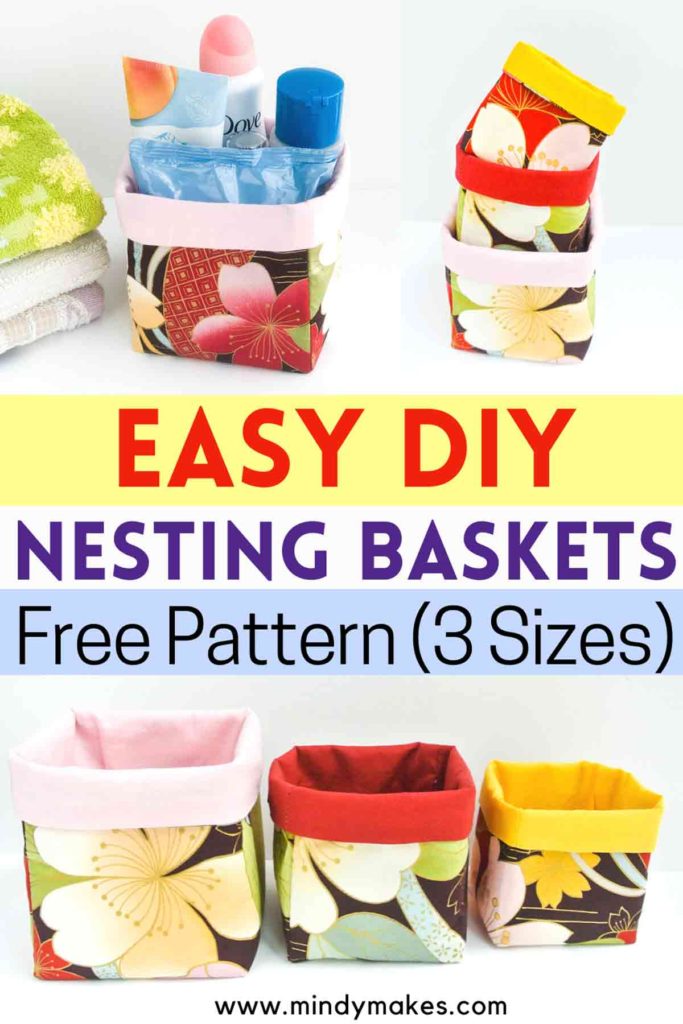
Organize your desk, drawers, and cabinets with these handy fabric bins.
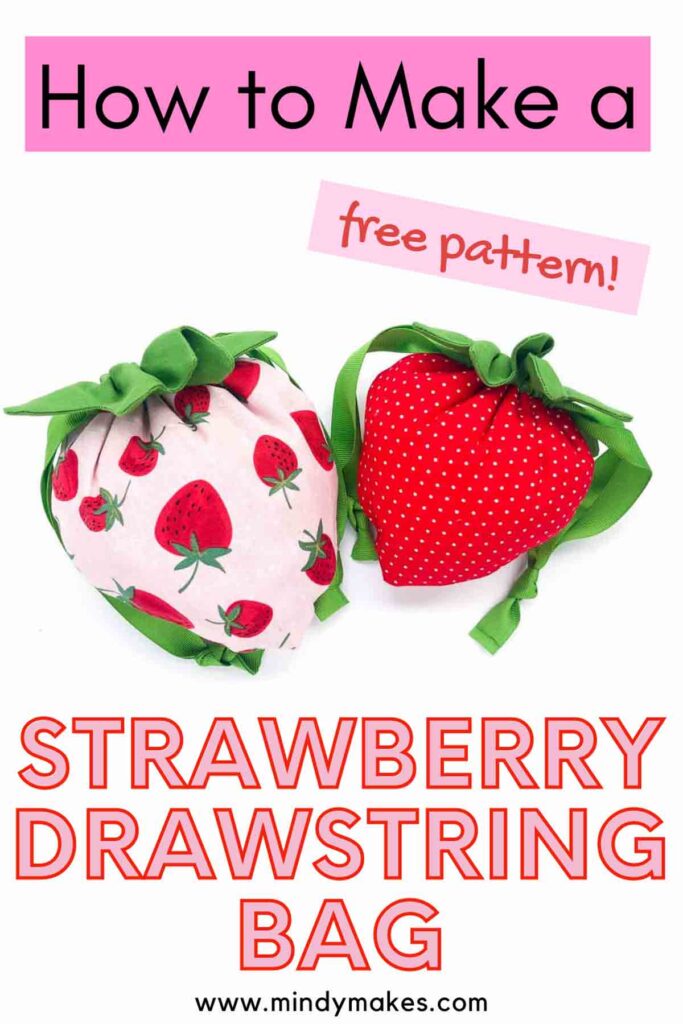
These cute little drawstring treat bags closes up into a strawberry. Guests and friends will be delighted!

This fully lined tote bag is all you need on the go.
A no fuss drawstring shoe bag with clear vinyl to keep those shoes protected and organized.


This looks perfect for another project – I’ll be sizing it up for other things. You’ve explained and illustrated it so beautifully that it seems like even *I* can handle it. Many thanks!
Hi Timmie!
So glad to hear that! And please feel free to to contact me if you have any other questions during the sewing process I’ll be happy to help 🙂
hi – what is the exact measurement of the pattern pieces? thanks!
Hi D!
The pattern is available in PDF format in the free MindyMakes resource library. You can just download it, print, pin it to fabric and cut the fabric. No need to “draw” the pattern at all.
Hey!
Thanks for this tutorial, it was broken down really nicely and I managed to follow and successfully complete my first project. So handy it sitting up on its own.
Thanks for your time and effort.
Hi April,
You are very welcome and thank you so much for your encouraging words! I’m so glad you were able to follow the tutorial and make one for yourself!
Thank you so much! I’ve now made about a dozen in a week. Mine will be used as dice bags for me, my daughter, and my D&D group. They’re so much better than the previous ones I made, round bottom, smaller bags. I added 2 inches to the top to make mine a bit bigger than your pattern, but they will be awesome! Again, thanks!
Hi Jana,
I’m so glad to hear that! Wow a dozen in a week is impressive!
How can I print instructions for making the dice bag?
Hi Rose,
I’ve updated the post with a “How To” at the end. Simply click on the blue “PRINT” button and you can print the instructions. If you would like the PDF version of the sewing tutorial, you can purchase in our shop. It also comes with two additional sizes as well as the color block pattern. Hope that helps!
Your dice bag turned out so cute! What a fantastic idea. Also, I wanted to drop a quick message to let you know that I featured your tutorial on Crafts on Display, a growing community of crafting enthusiasts. You can check it out here – https://craftsondisplay.com/sewing/easy-drawstring-dice-bag-free-pattern-63761/
My bag ended up being pointed at the base… what did I do wrong?? 🙁
Hi Nicole,
The bag being pointed at the base may be due to the triangles at the bottom not being aligned and sewn together correctly. Hope that helps!