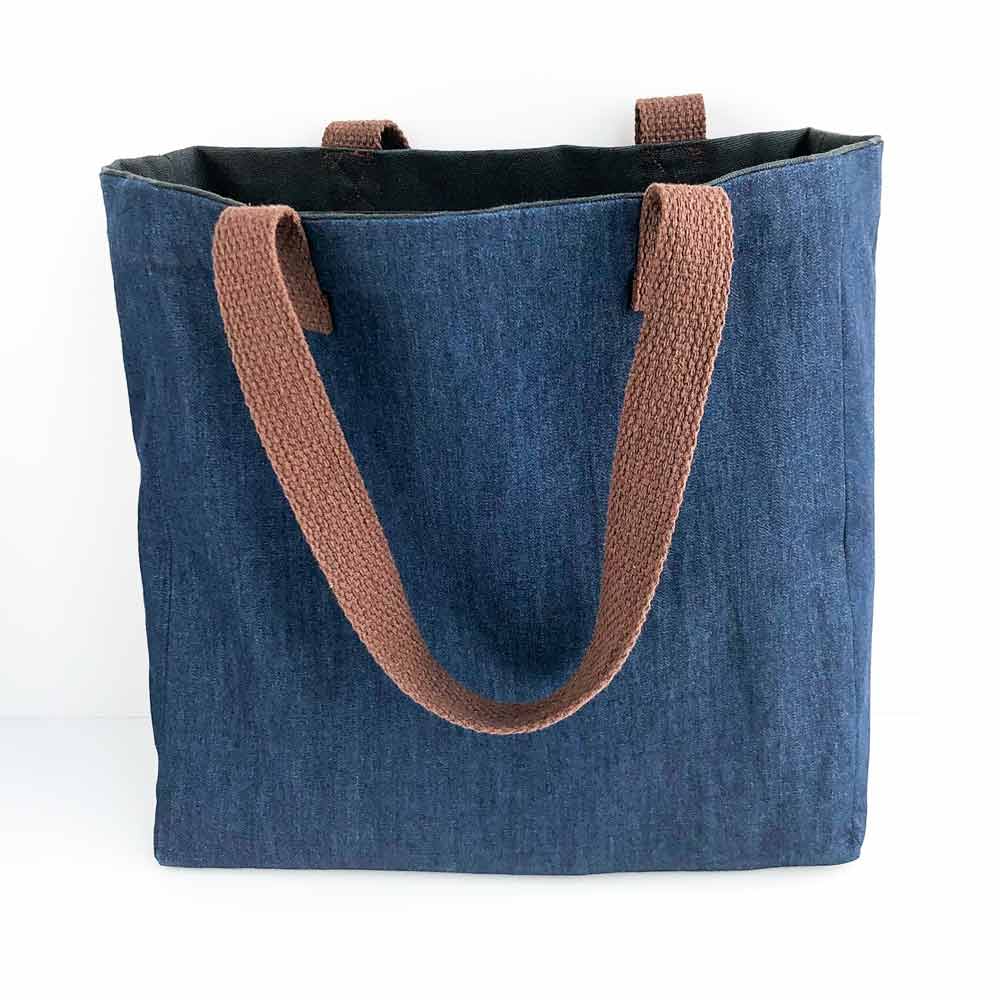
How to Make A Simple Tote Bag (Free Pattern)
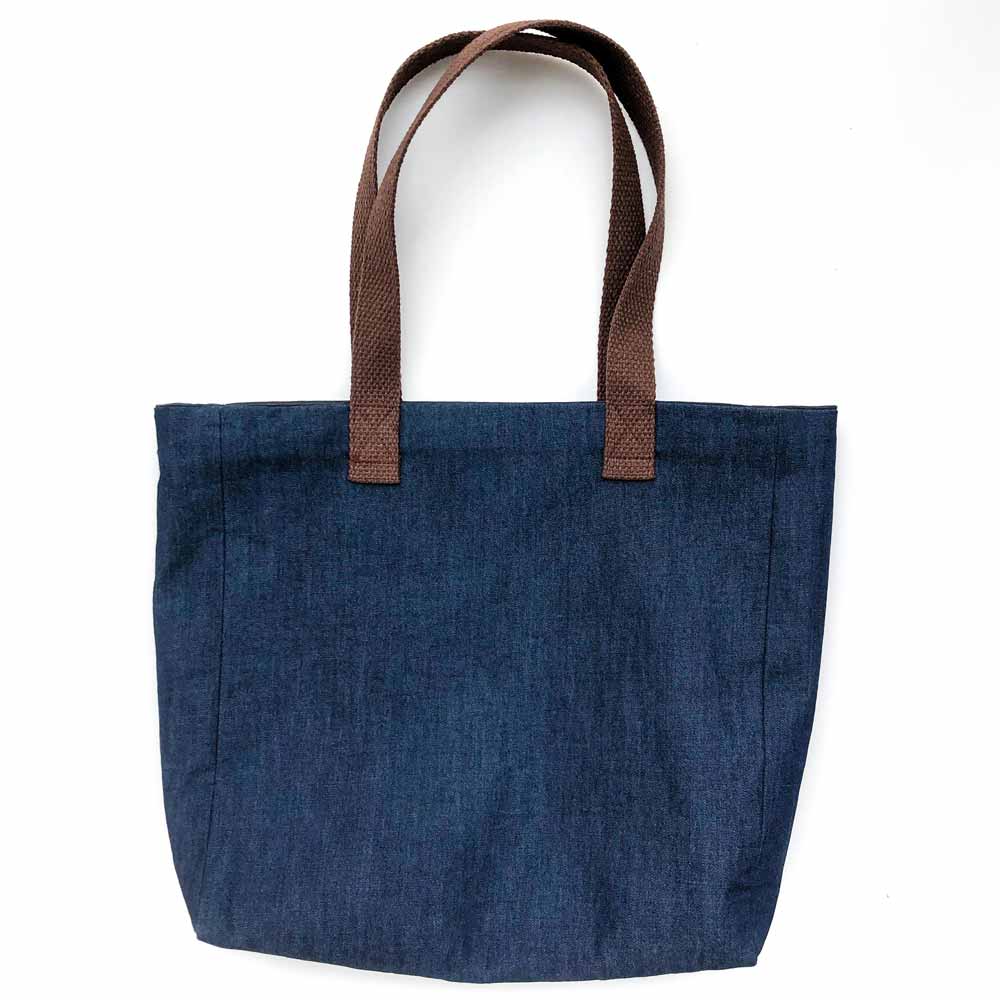
This simple tote bag is fully lined with a flat bottom and side pockets to make it the perfect little bag on-the-go. It is also beginner friendly and only requires sewing straight lines. Follow along this step-by-step tutorial to learn how to make this easy tote!
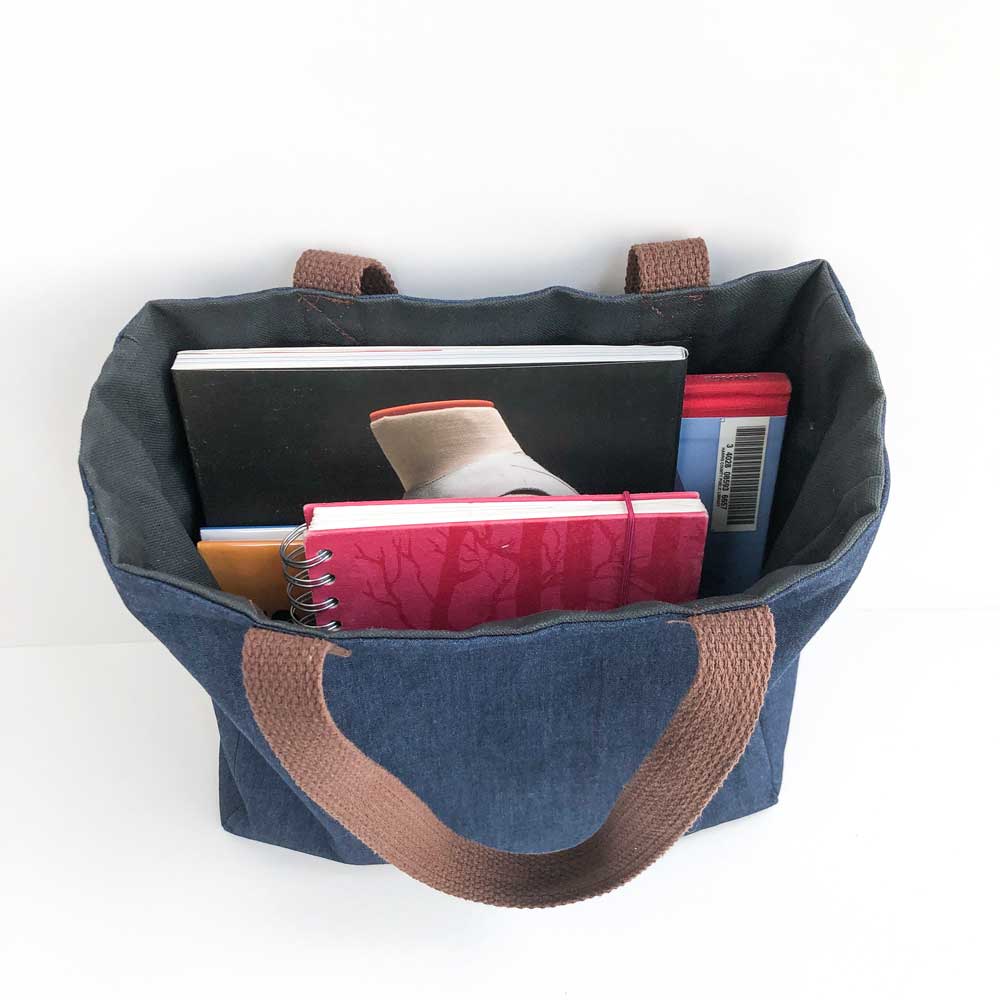
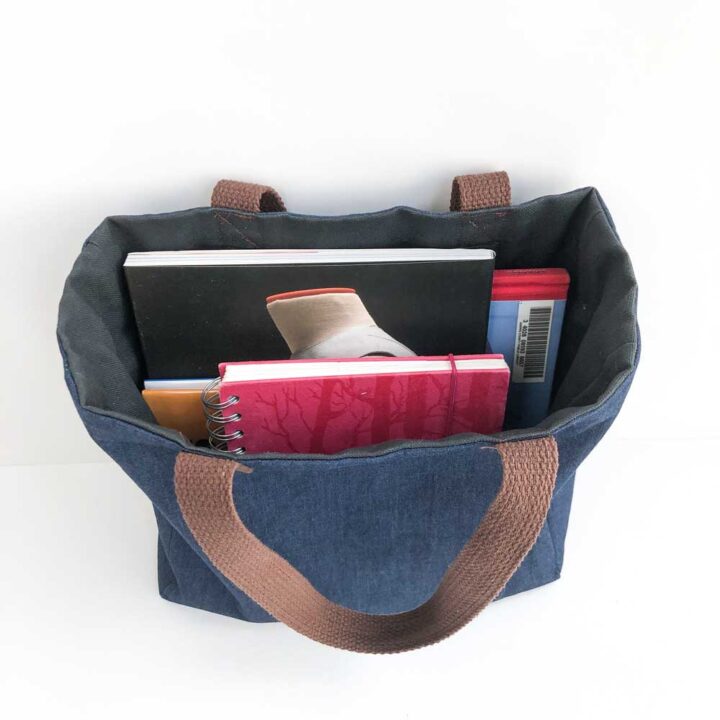
Recently I made a reversible tote bag and it’s been my go-to bag for carrying…everything. Laptop, water bottle, notebooks, change of clothes, you name it. It was such a useful project (not to mention super fun!) that I decided I needed to make another one. This time, I decided to add some panels on the side to make it roomier so that you can stuff more things in it.
Additionally, I used duck canvas for the lining (for extra support), and applied interfacing to the exterior fabric. This makes the bag extra sturdy so it won’t collapse on itself when you set it down.
I also made this tote a bit “manlier” (i.e. no flowers and pink, even though I LOVE those) since I thought my husband needed a tote as well for all his stuff. Not sure about the men in your life, but my special guy always want to carry everything in his pockets. Other than carrying his work bag for work, he stuffs everything in his pockets. When he absolutely needs a bag, he ends up grabbing a reusable grocery tote from the kitchen. LOL. Yes, the ones that have so many mismatched colors and brand logos on them. Maybe, I thought, if he just owned a nice tote, he MIGHT be more inclined to use it.

With that said, this simple tote isn’t just for men. I actually thought about keeping it for myself (or giving it to a girlfriend) after finishing it since I quite liked it! But after I finished the bag, he was all eager to use it. What??!! But hey, Success! Now my husband finally has a tote bag!
What are the Dimensions of tHis Tote Bag?
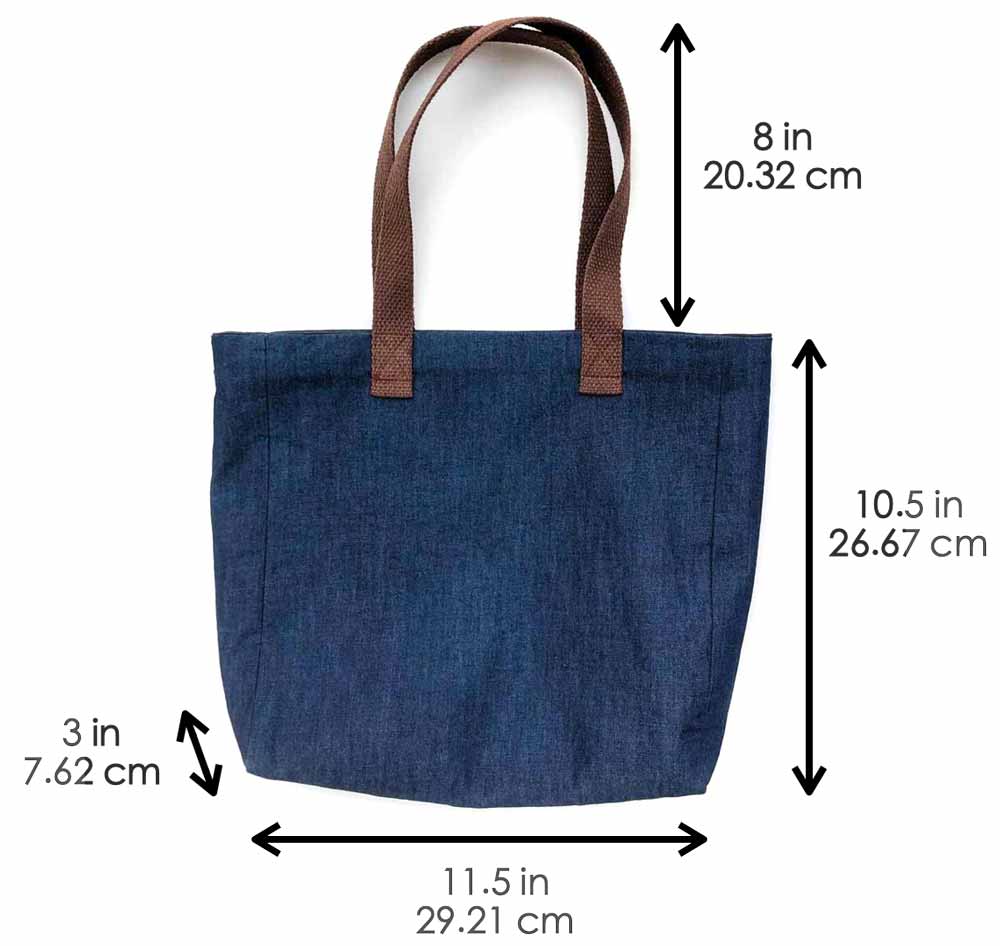
- Length of Tote: 11.5 in (29.21 cm)
- Width of Tote: 3 in (7.62 cm)
- Height of Tote (not including straps): 10.5 in (26.67 cm)
- Height of Straps (from top of Tote): 8 in (20.32 cm)
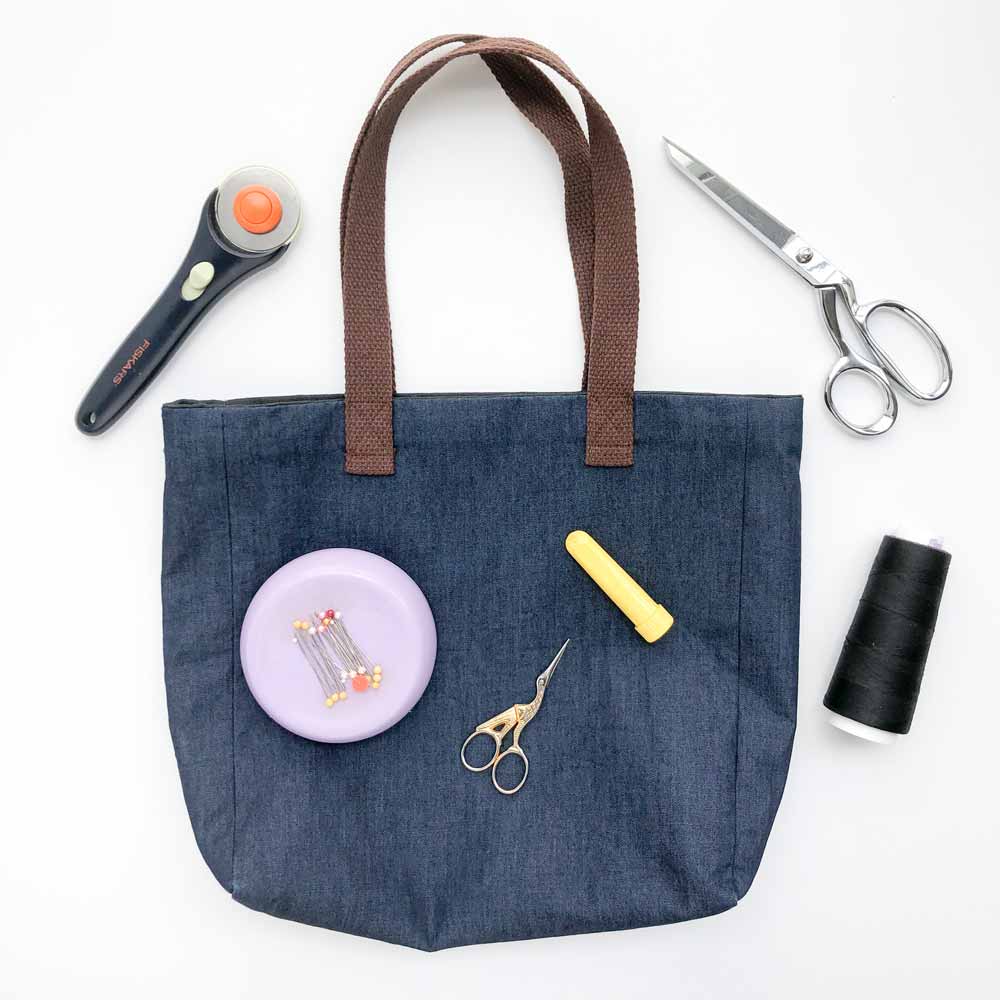
What Do I need to Make This Beginner Sewing Project?
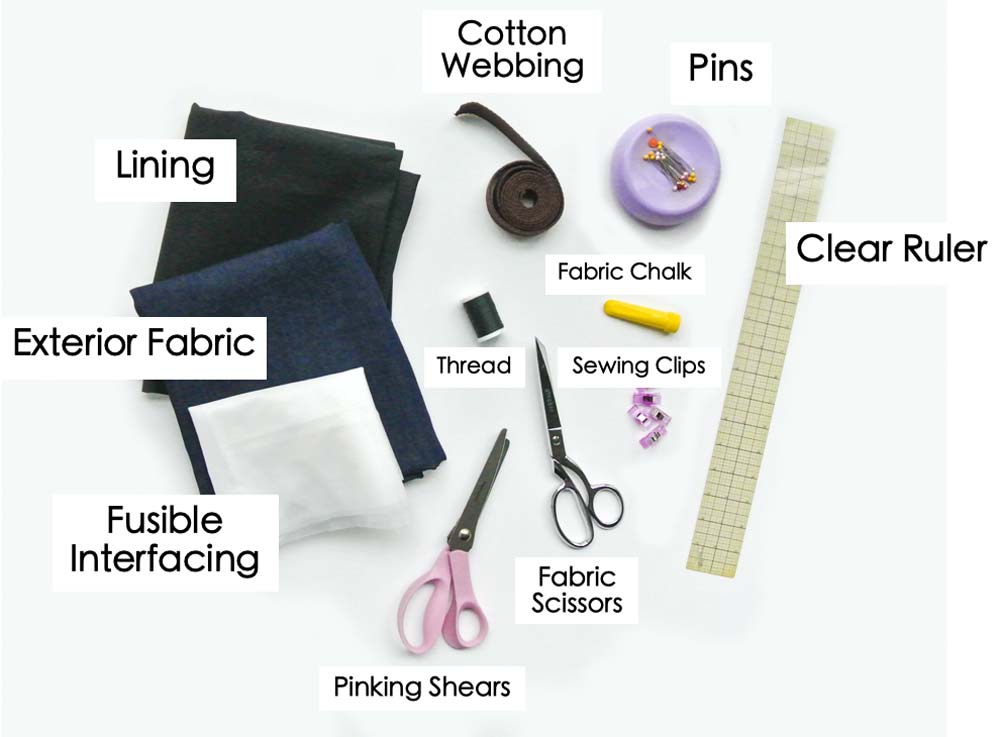
MATERIALS
- Fabric – I recommend using 100% cotton, it’s easy to work with.
- 1 yard* of Exterior Fabric – I used a light weight denim
- 1 Yard* of Lining – I used duck canvas for extra stiffness
- Fusible Interfacing (optional) – I used Fusible Featherweight Interfacing(Pellon 911FF) and only interfaced the exterior fabric. You will need the same amount of fusible as fabric you will be interfacing
- 1″ Cotton Webbing** – 44 inches (112 cm), matching or contrasting colors.
*To be exact, you only need 28.5”of fabric, which is .8 of a yard (0.75 Meters). However, some places may not sell you 0.8 of a yard of fabric, so just ask for 1 yard.
**You can also make your own straps using the tote fabric. Check out this post in the section “HOW TO MAKE REVERSIBLE TOTE STRAPS”
TOOLS
- Sewing machine with zigzag function
- Serger (optional) – for finishing the raw edge of the inner pocket.
- Fabric Scissors – these Ginghers Fabric Shears are my favorite. Alternatively, rotary cutters are also great for this easy project as you will be making a lot of straight line cuts. For more information, see post on Rotary Cutter Vs Scissors
- Sewing Pins or Sewing Clips
- Fabric Chalk – for marking fabric
- Clear Ruler
- Matching Thread
- Hand sewing needles
- Iron – for pressing
- Pinking Shears (optional)
Simple Tote Bag Pattern
NOTE:
- 0.5 in/1.27cm seam allowance included in all measurements
- Make sure to cut the pattern pieces along the selvedge as indicated in the diagram below. For more information regarding fabric selvedge, see this post
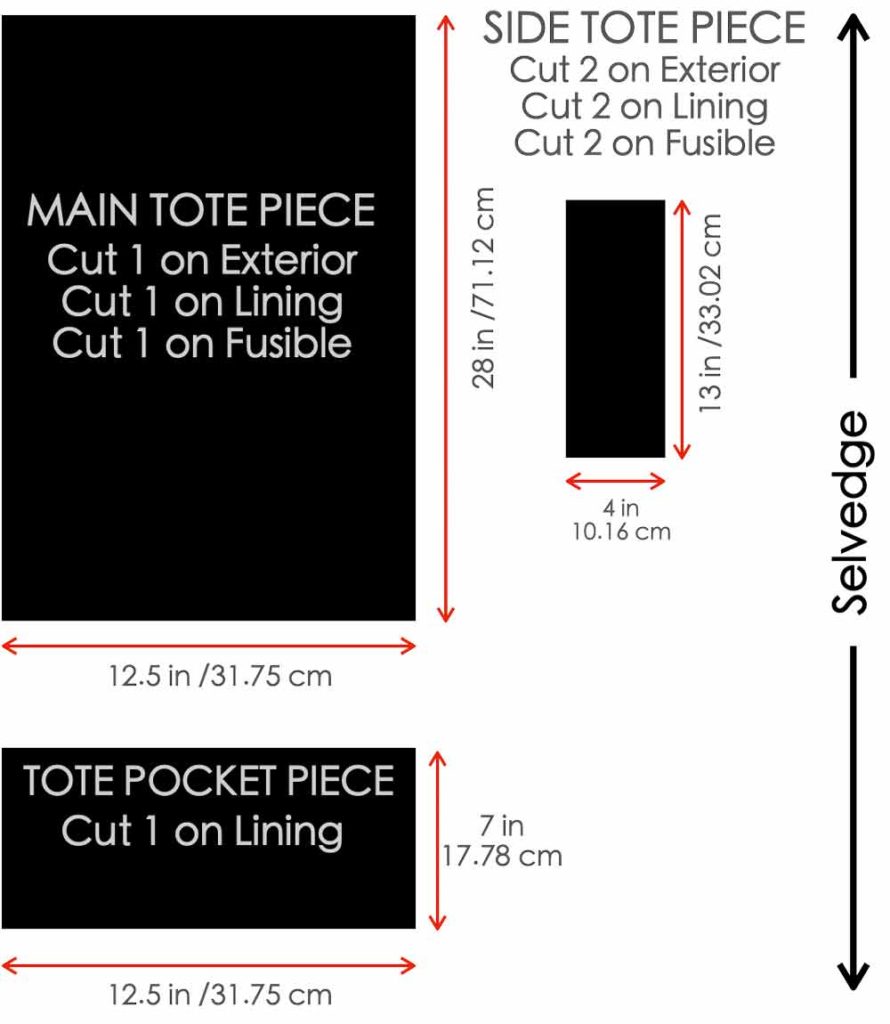
- MAIN TOTE PIECE
- 12.5 in x 28 in (31.75 cm x 71.12 cm)
- SIDE TOTE PIECE
- 4 in x 13 in (10.16 cm x 33.02 cm)
- TOTE POCKET PIECE (optional)
- 12.5 in x 7 in (31.75 cm x 17.78 cm)
How to Make A Simple Tote bag: Step-by-Step Instructions
Sewing Pocket Piece
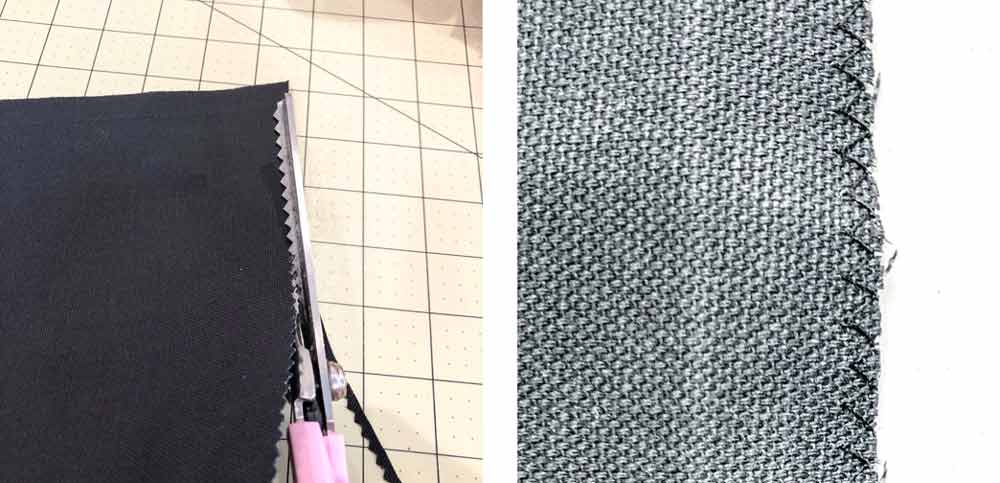
Finish the top and bottom seam (the longer side) of POCKET PIECE. You can use either one of the following methods:
- Pinking (LEFT Photo) – This is the one I used for my pockets
- Zigzag Stitch (RIGHT photo) – I used width 4 and length 2
- Serging
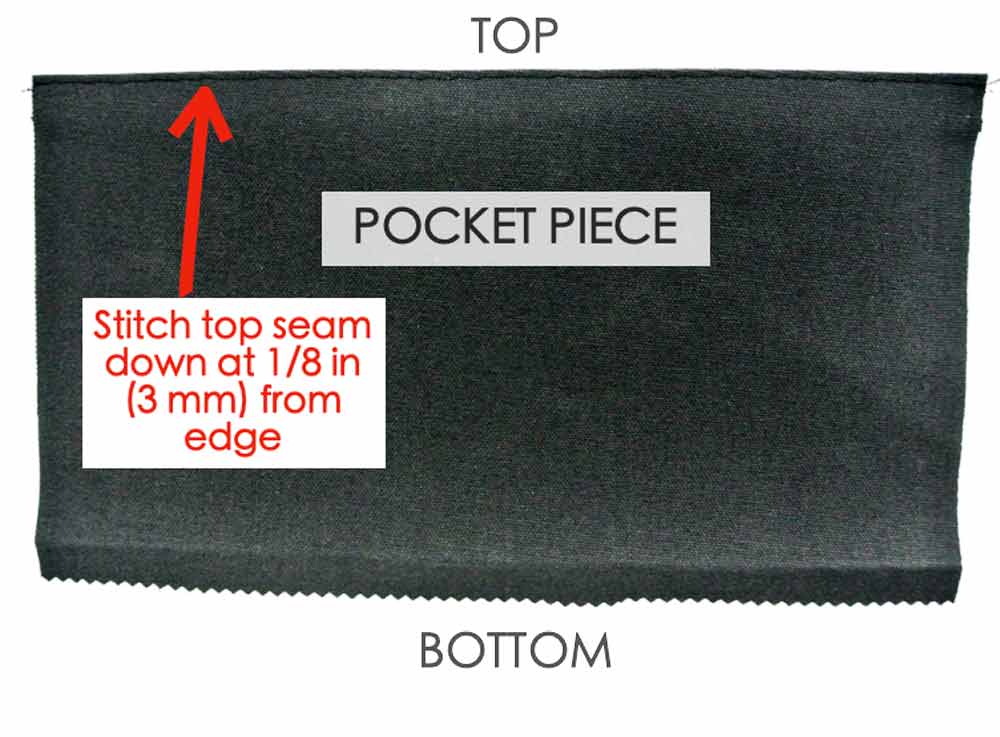
Fold top and bottom seam in 1/2” (1.27cm) and press. Stitch top seam down at 1/8”(3 mm) from edge
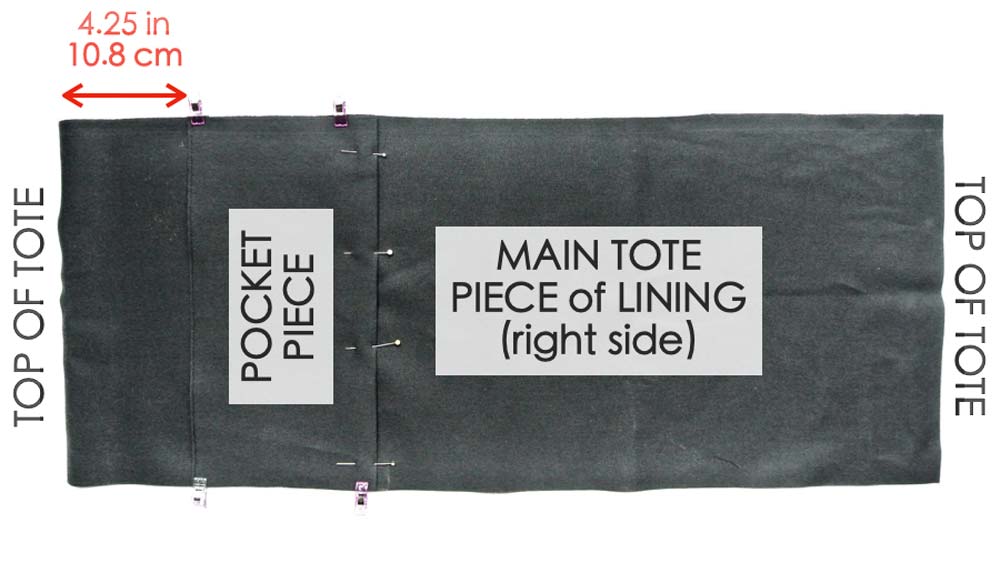
Place POCKET PIECE on right side of LINING PIECE about 4.25 in (10.8 cm) down from top of tote. Pin POCKET PIECE in place at the sides and bottom. Make sure to fold in seam allowance at bottom of POCKET PIECE.
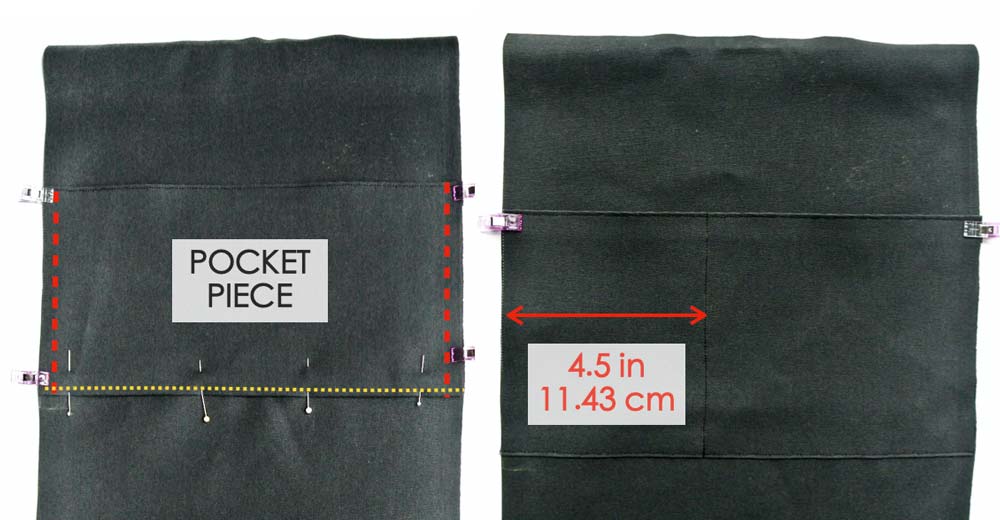
LEFT: Baste sides of POCKET PIECE (red dotted lines) and stitch bottom of POCKET PIECE down.
RIGHT: Sew dividing line on POCKET PIECE if you want to create smaller pocket sleeves. For mine I sewed a line 4.5” (11.43 cm) from the edge to create two pocket sleeves.
Sewing Side Tote Panel to Main Tote Piece
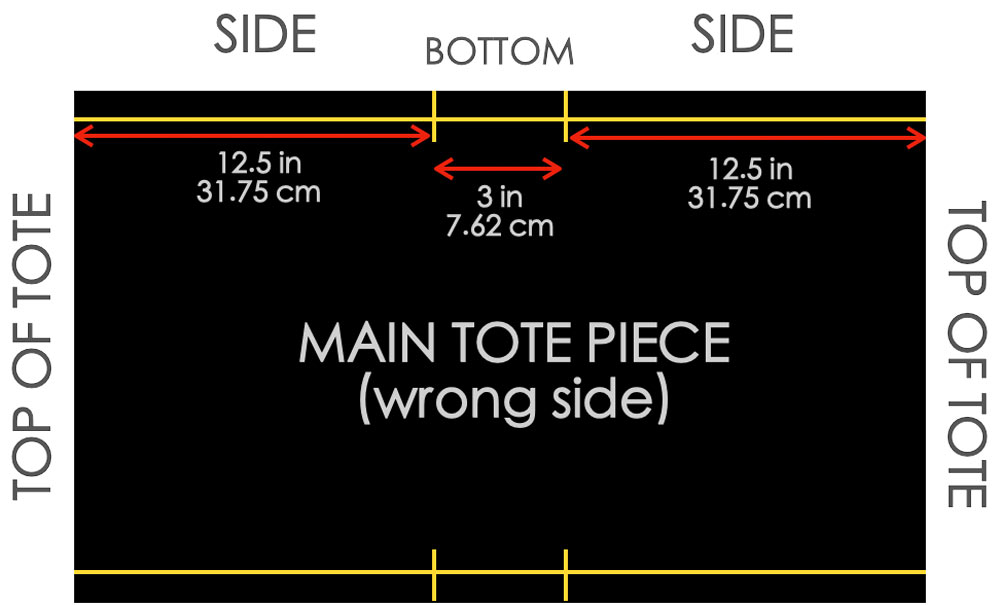

Using chalk, mark sew line on wrong side of SIDES and BOTTOM of MAIN TOTE PIECE (solid yellow line). The sew line will be 0.5 in/1.27cm in from the edge of the fabric. Again, mark sew line on wrong side of bottom of SIDE TOTE PIECE (solid yellow line). The sew line will be 0.5 in/1.27cm in from the edge of the fabric.
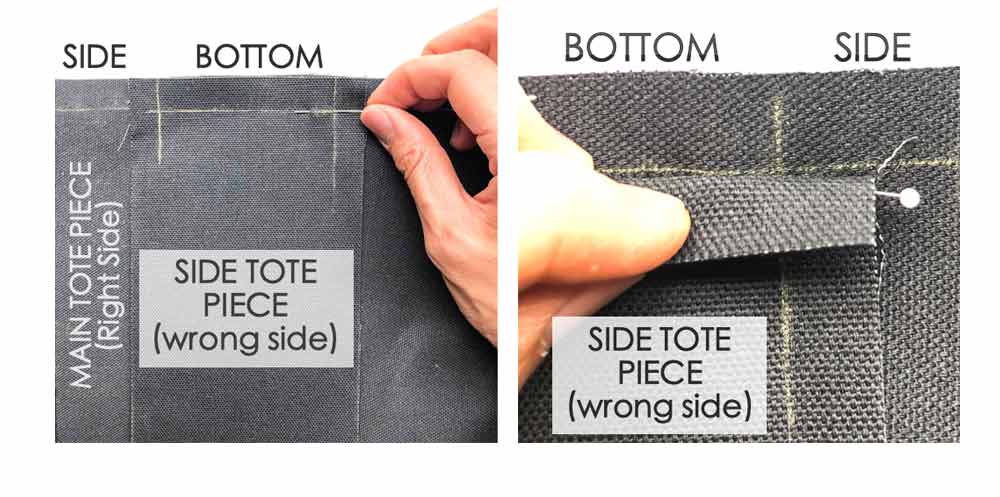
With Right Sides together, pin bottom of SIDE TOTE PIECE to bottom of MAIN TOTE PIECE. Make sure to match at the corners as shown.
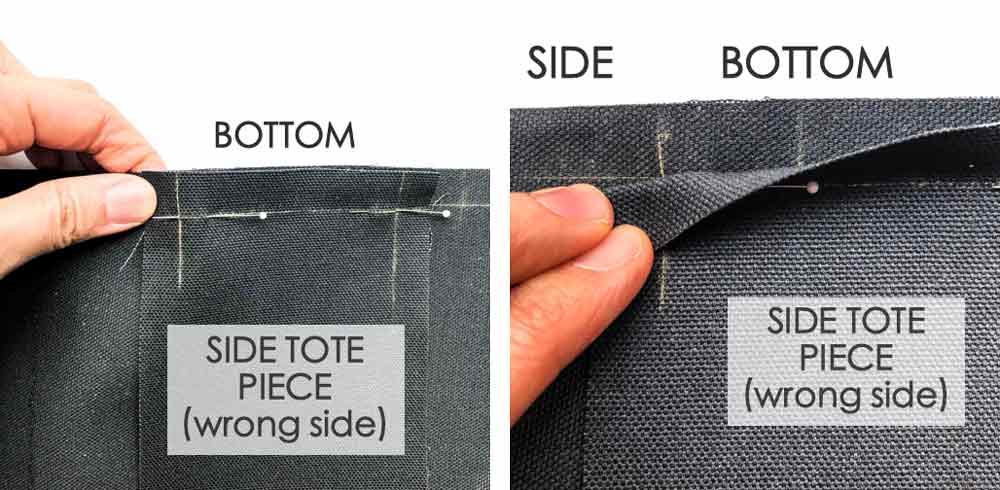
Repeat and match and pin other corner of SIDE TOTE PIECE to bottom of MAIN TOTE PIECE
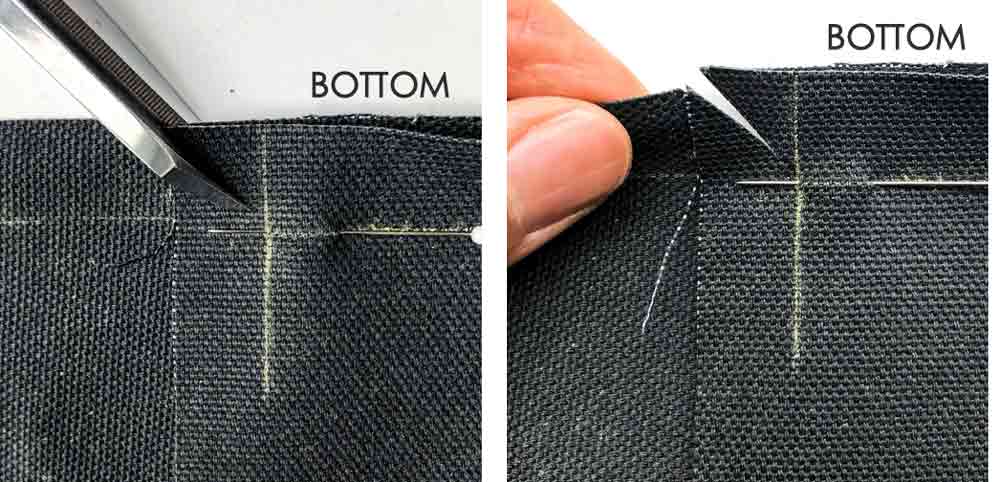
Make a diagonal slit just short of the corner you just pinned at. IMPORTANT: Make sure you don’t clip into the corner. Stop 1/4-1/8 inch (about 35mm – 60mm) short of the corner.
Repeat the clipping for other corner
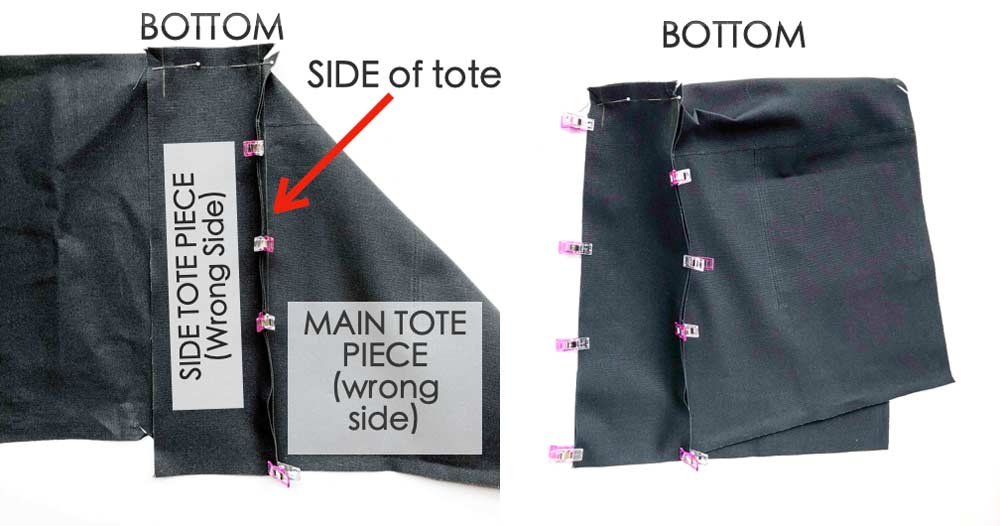
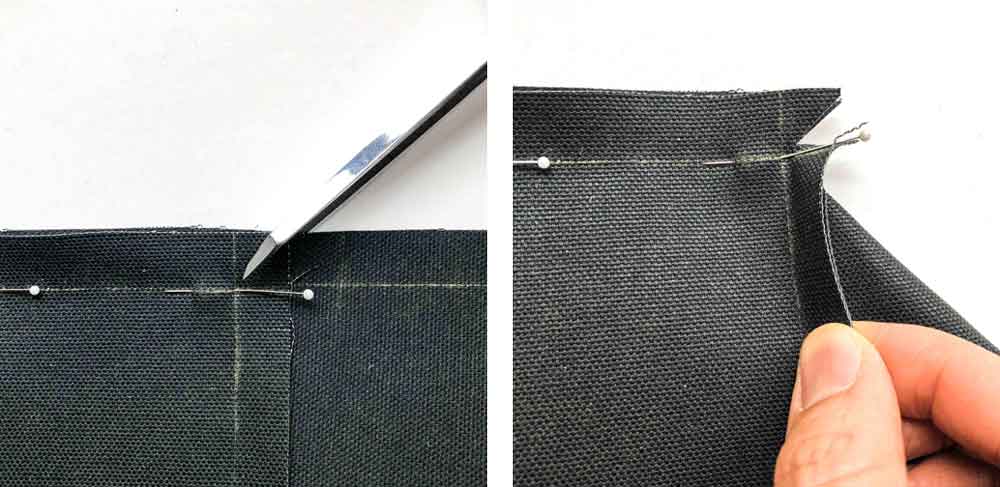
Match the sides of SIDE TOTE PIECE with MAIN TOTE PIECE. Use sewing clips or pins to hold in place. Repeat on other side.
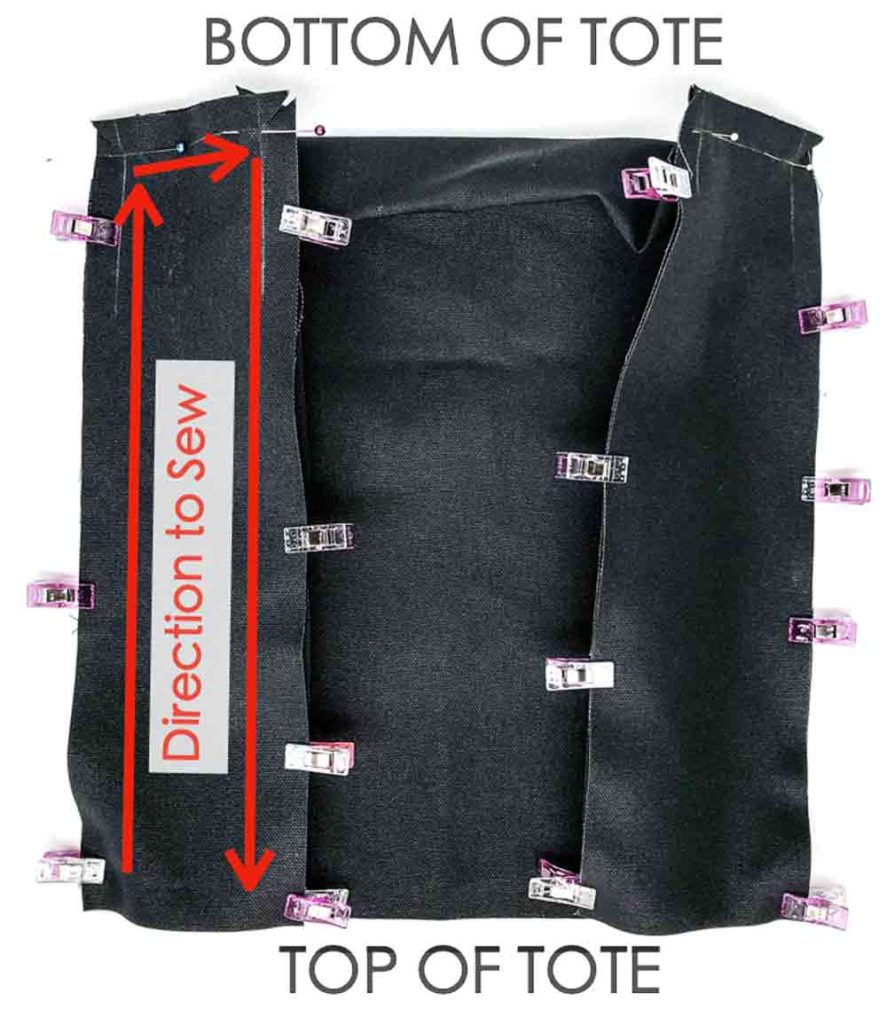
Sew both sides of SIDE TOTE PIECE to MAIN TOTE PIECE at 1/2”(1.27cm) seam allowance. Start sewing from top of tote to bottom of tote, and then back up to top of tote again (red arrows). Make sure to pivot at the corners (see “HOW TO PIVOT”in next steps)
How to Pivot (for Sewing Corners)
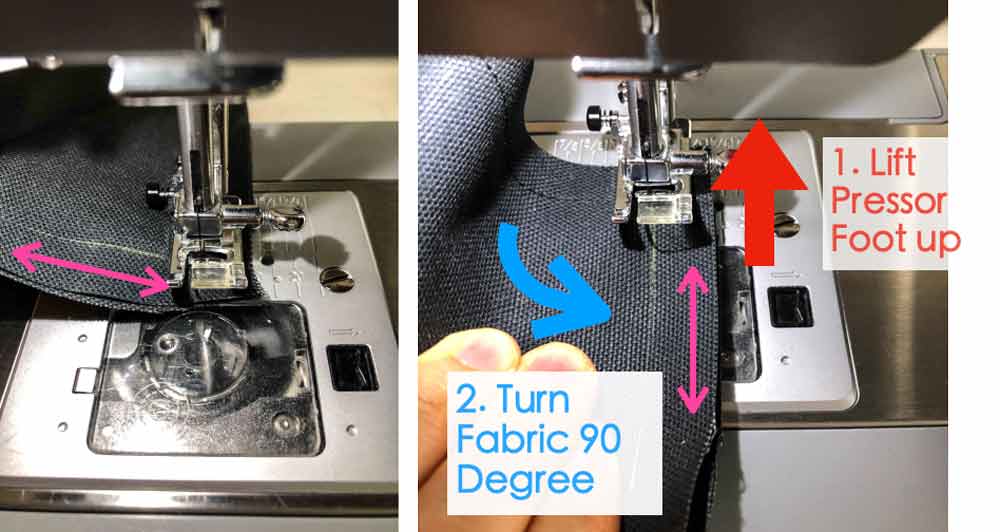
LEFT: To sew corners, sew to the end of the corner.
RIGHT: Lift pressor foot up (fat red arrow), then turn the entire fabric 90 degrees. Pink arrow shows direction of fabric.
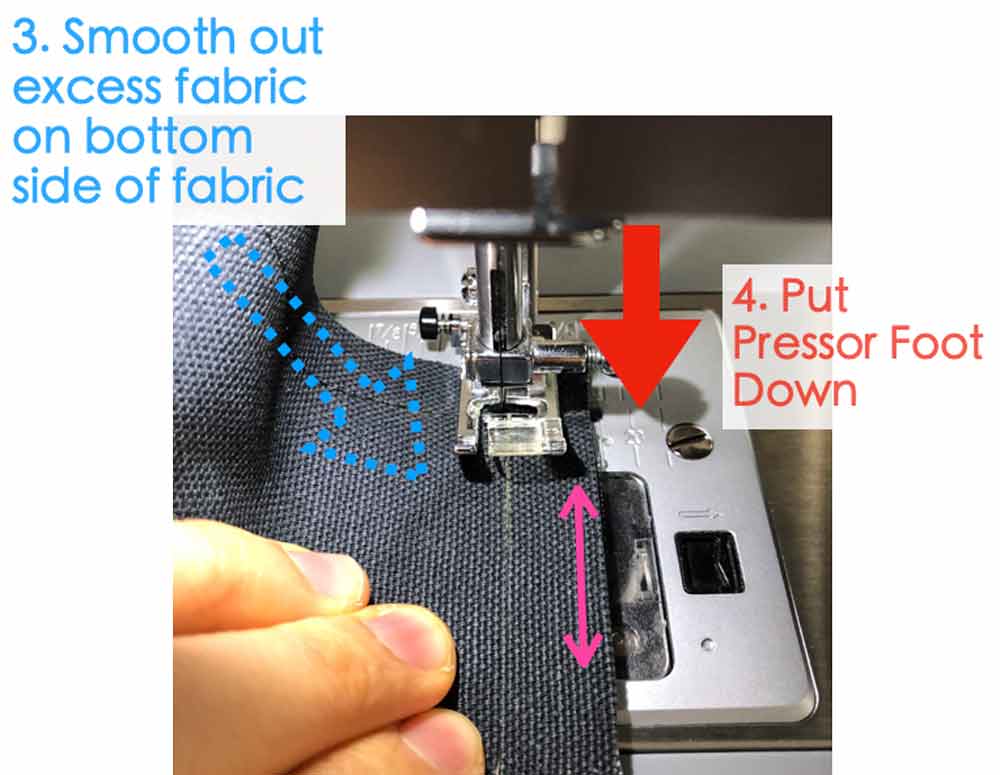
Use your hands to smooth out the excess fabric at the bottom side of fabric (the side facing throat plate). Then, lower pressor foot (fat red arrow) and continue sewing.
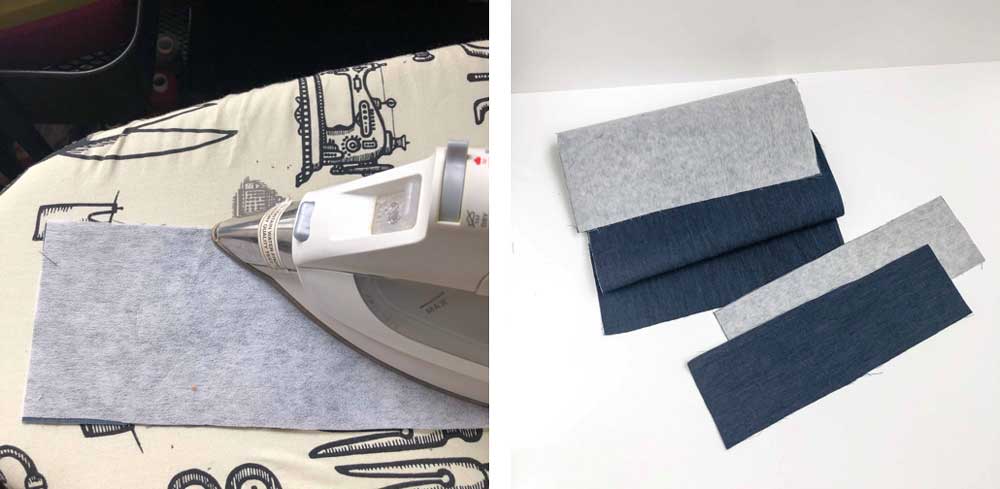
Simple Tote Bag: Pressing Top Edge of Tote
LEFT: View of tote lining finished.
RIGHT: Using chalk, mark 0.5”(1.27 cm) and 1.5”(3.81 cm) from top edge of tote.

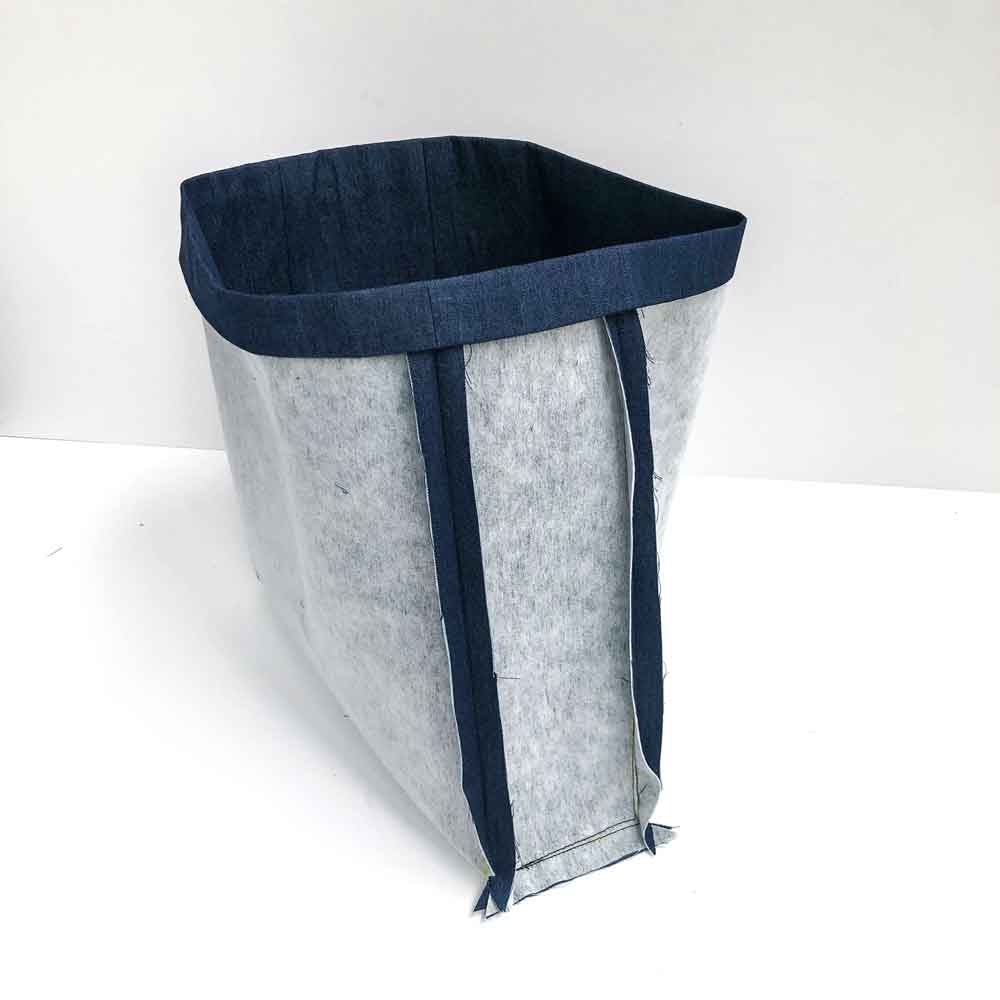
LEFT: Press open the side seams
RIGHT: Press down at 0.5”(1.27 cm) mark
LEFT: Press down at 1.5”(3.81 cm) mark
RIGHT: View of tote lining after you finish pressing top seams.
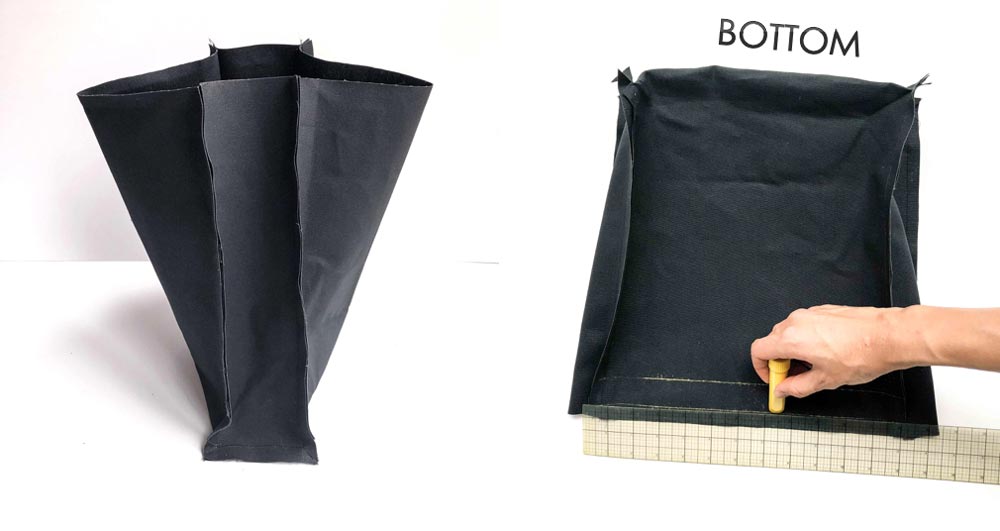
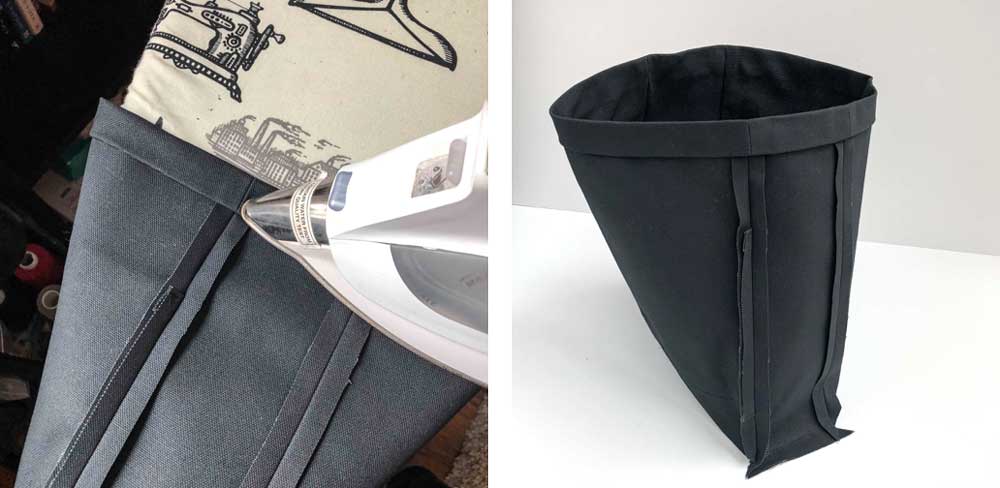
Apply fusible interfacing to exterior fabric. Repeat same steps of SEWING SIDE OF TOTE TO MAIN TOTE for exterior fabric.
Finished view of exterior tote
Simple Tote Bag – Sewing it All Together
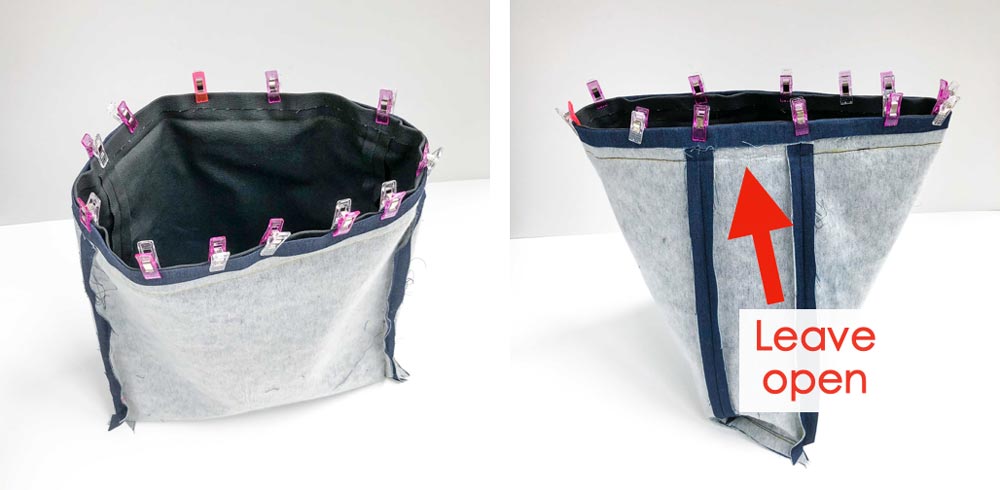
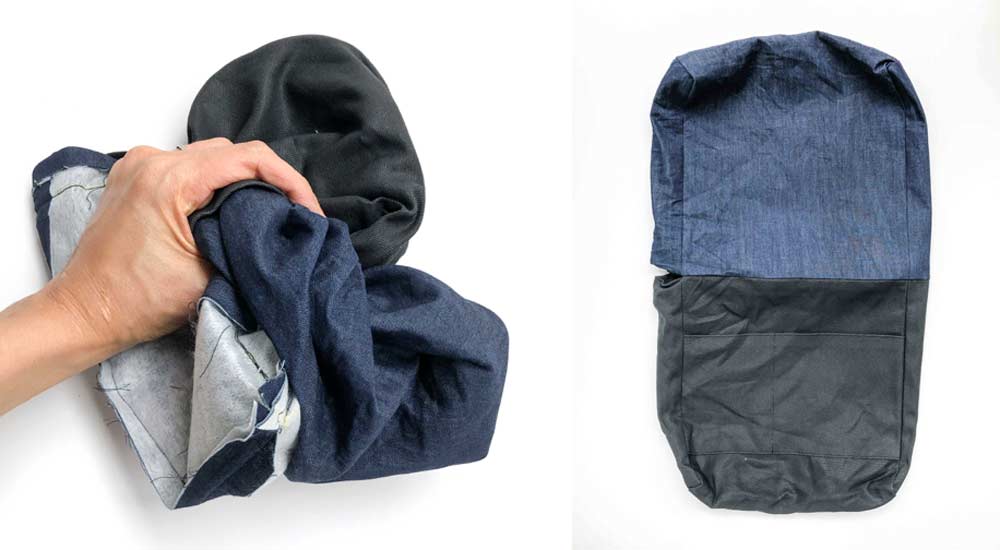
LEFT: Match EXTERIOR to LINING and hold together with pins or binding clips.
RIGHT: Sew around the entire tote at the 1.5 cm (3.81 cm) seam line, leaving an opening on one of the SIDE TOTE PIECE. Make sure to back stitch at both side of the opening.
LEFT: Turn tote to right side through the opening. Note: This opening is a little small (but doable) to turn the bag to the right side. Just be patient and slowly push the fabric out.
RIGHT: View of tote turned to the right side with opening on the side
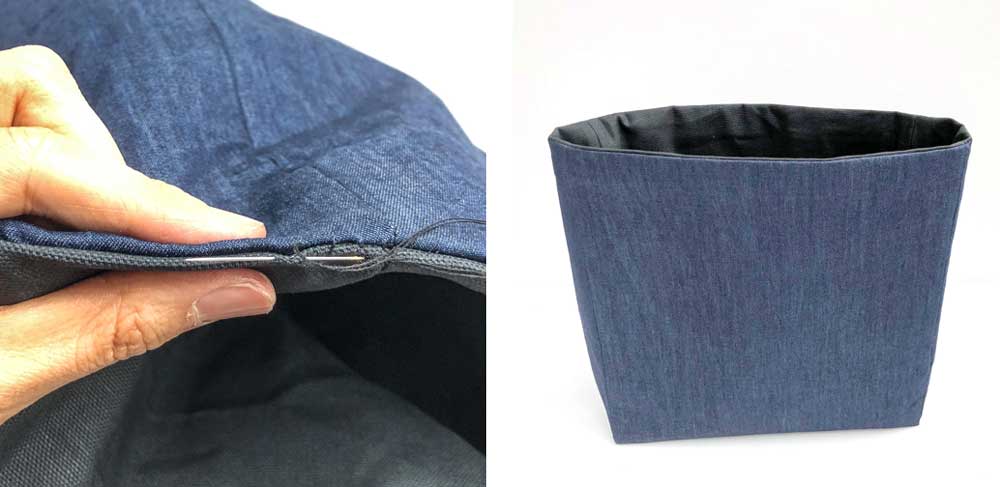
LEFT: Close opening using invisible ladder stitch
RIGHT: Turn lining in and give your bag a good press!
Simple Tote Bag – How to Sew Straps
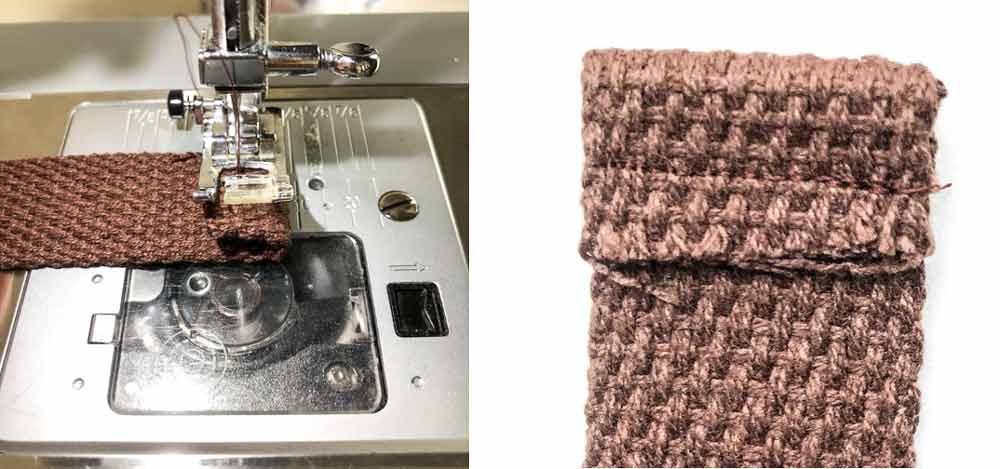
LEFT: Fold raw ends of webbing in 0.5 – 0.75 inches (1.27 cm – 1.9 cm) and stitch down with matching thread approximately 1/8 inch (3mm) from raw edge.
RIGHT: View of webbing with raw edges sewn down.
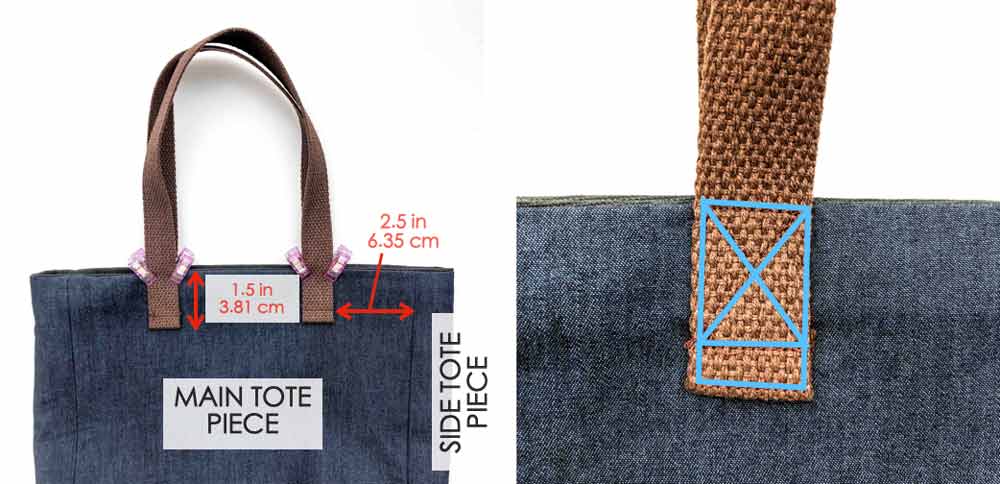
LEFT: Place webbing on top of tote, 2.5 inch (6.35 cm) from seam line (of MAIN TOTE PIECE and SIDE TOTE PIECE) and 1.5 inch (3.81 cm) down.
RIGHT: Stitch down webbing to tote by making two rectangular boxes. The one on top has an ‘X’ in the middle (solid blue line). Repeat sewing down other 3 sides of the handle.
Finished! Wasn’t that easy? You did it! Take a moment to congratulate yourself (especially it’s it’s your first time sewing a tote bag!) Be thankful for the ability and resources to sew and learn something new (that always excites me!). I hope you found this tutorial helpful. Happy Sewing!
How to Make a Simple Tote Bag
This simple tote bag is fully lined with a flat bottom and side pockets to make it the perfect little bag on-the-go. It is also beginner friendly and only requires sewing straight lines!
Materials
- EXTERIOR FABRIC - 1 YARD
- LINING - 1 YARD
- FUSIBLE INTERFACING (optional)
- 1" WIDE COTTON WEBBING - 44 inches (112 cm) Length (See note 1)
Tools
- SEWING MACHINE
- SERGER (optional)
- FABRIC SCISSORS
- SEWING PINS or SEWING CLIPS
- FABRIC CHALK
- CLEAR RULER
- MATCHING THREAD
- HAND SEWING NEEDLES
- IRON - for pressing
- PINKING SHEARS (optional)
Instructions
- Cut out all pattern pieces on fabric (see note 2)
SEWING POCKET PIECE
- Finish the top and bottom seam (the longer side) of POCKET PIECE. You can use either one of the following methods: pinking, serging, or zigzag stitch
- Fold top and bottom seam in 1/2” (1.27cm) and press. Stitch top seam down at 1/8”(3 mm) from edge.
- Place POCKET PIECE on right side of LINING PIECE about 4.25 in (10.8 cm) down from top of tote.
- Pin POCKET PIECE in place at the sides and bottom. Make sure to fold in seam allowance at bottom of POCKET PIECE.
- Baste sides of POCKET PIECE (red dotted lines) and stitch bottom of POCKET PIECE down.
- Sew dividing line on POCKET PIECE if you want to create smaller pocket sleeves. For mine I sewed a line 4.5” (11.43 cm) from the edge to create two pocket sleeves.
SEWING SIDE TOTE PANEL TO MAIN TOTE PIECE
- Using chalk, mark sew line on wrong side of SIDES and BOTTOM of MAIN TOTE PIECE (see note 3)
- With Right Sides together, pin bottom of SIDE TOTE PIECE to bottom of MAIN TOTE PIECE. Make sure to match at the corners as shown.
- Repeat and match and pin other corner of SIDE TOTE PIECE to bottom of MAIN TOTE PIECE.
- Make a diagonal slit just short of the corner you just pinned at (see note 4)
- Repeat clipping for other corner.
- Match the sides of SIDE TOTE PIECE with MAIN TOTE PIECE. Use sewing clips or pins to hold in place.
- Repeat on other side.
- Sew both sides of SIDE TOTE PIECE to MAIN TOTE PIECE at 1/2”(1.27cm) seam allowance (see note 5)
PRESSING TOP EDGE OF TOTE:
- Using chalk, mark 0.5”(1.27 cm) and 1.5”(3.81 cm) from top edge of tote.
- Press open the side seams.
- Press down at 0.5”(1.27 cm) mark.
- Press down at 1.5”(3.81 cm) mark.
- Apply fusible interfacing to exterior fabric. Repeat same steps for exterior fabric.
SEWING IT ALL TOGETHER
- Match EXTERIOR to LINING and hold together with pins or binding clips.
- Sew around the entire tote at the 1.5 cm (3.81 cm) seam line, leaving an opening on one of the SIDE TOTE PIECE.
- Make sure to back stitch at both side of the opening.
- Turn tote to right side through the opening.
- Close opening using invisible ladder stitch
- Turn lining in and give your bag a good press.
HOW TO SEW STRAPS
- Fold raw ends of webbing in 0.5 - 0.75 inches (1.27 cm - 1.9 cm) and stitch down with matching thread approximately 1/8 inch (3mm) from raw edge.
- Place webbing on top of tote, 2.5 inch (6.35 cm) from seam line (of MAIN TOTE PIECE and SIDE TOTE PIECE) and 1.5 inch (3.81 cm) down.
- Stitch down webbing to tote by making two rectangular boxes. The one on top has an ‘X’ in the middle (solid blue line). Repeat sewing down other 3 sides of the handle.
- Finished!
Notes
- You can also make your own straps using the tote fabric. Check out this post in the section HOW TO MAKE REVERSIBLE TOTE STRAPS.
- Pattern Piece Measurements:
・MAIN TOTE PIECE : 12.5 in x 28 in (31.75 cm x 71.12 cm)
・SIDE TOTE PIECE: 4 in x 13 in (10.16 cm x 33.02 cm)
・TOTE POCKET PIECE (optional): 12.5 in x 7 in (31.75 cm x 17.78 cm) - The sew line will be 0.5 in/1.27cm in from the edge of the fabric.
- Make sure you don’t clip into the corner. Stop 1/4-1/8 inch (about 35mm - 60mm) short of the corner.
- Start sewing from top of tote to bottom of tote, and then back up to top of tote again. Make sure to pivot at the corners
.


Sounds like exactly the tote I’ve been wanting to make! Thank you so much! I can’t wait to get started on mine!
Hi Georgann,
You are so welcome! Cheers to a new tote bag! Would also LOVE to see a photo when you are done, you can email it [email protected] if you’d like to share 🙂