
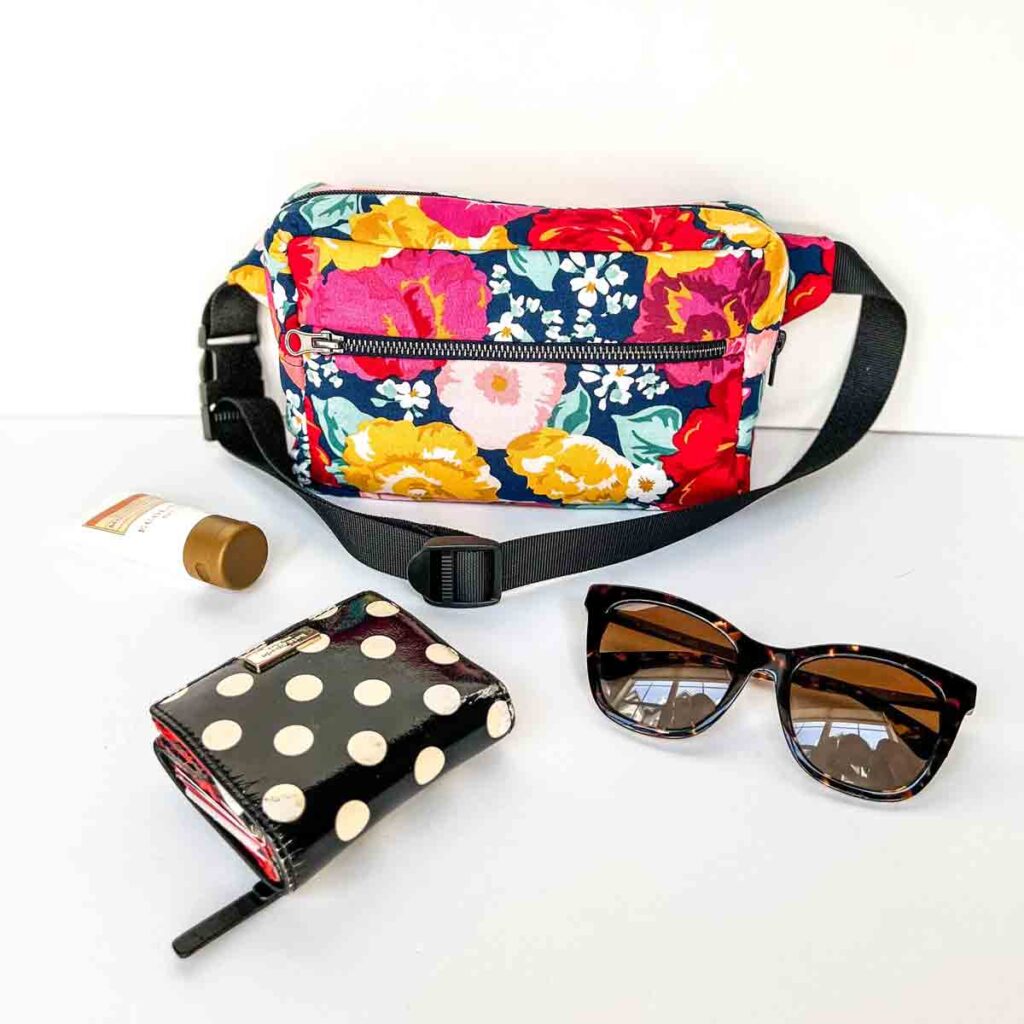
How to Make a Simple Fanny Pack (Free Sewing Pattern)
This post may contain affiliate links. Please read my disclosure policy for details. As an Amazon Associate, I earn from qualifying purchases.
This simple fanny pack pattern is square and consists of a front and a top zipper. The perfect handsfree bag that is so stylish for carrying all your essentials!
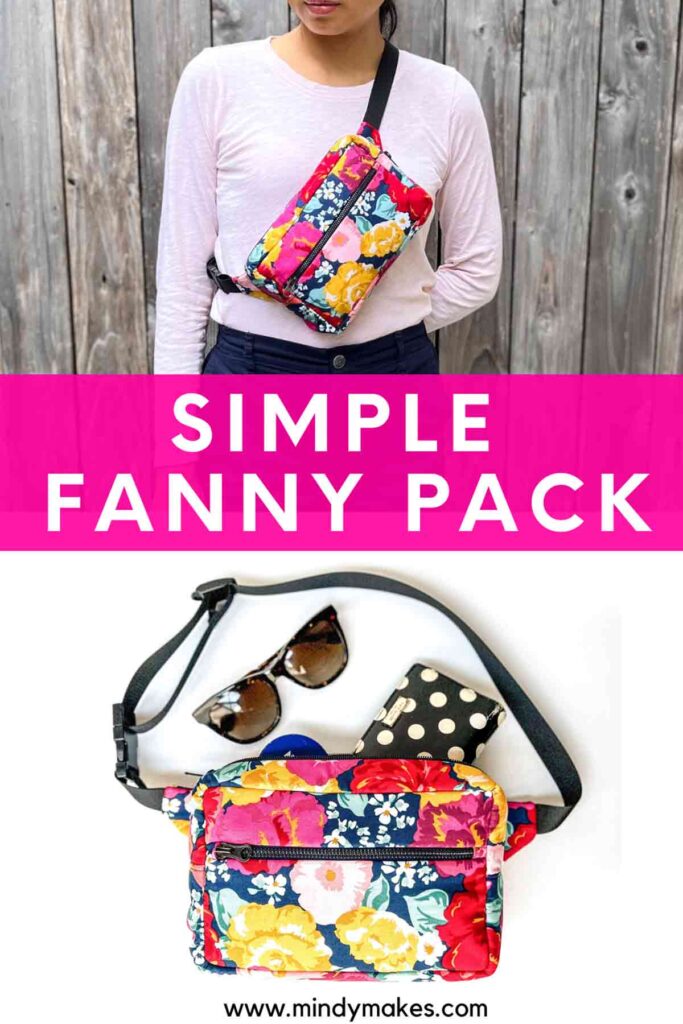
Remember those dreadful fanny packs your parents wore everywhere in the 80s? Well, fashion always repeats itself and now the fanny pack style is back in full force!


However these days stylish fanny pack fashion dictates that one wear it over the shoulders (both in front and on the back are considered okay). But never mind what fashion gurus says, you do you and wear it however you like!
How do you make a crossbody fanny pack?
Today I will be showing you how to make your own version of a very simple fanny pack (also called bum bag, hip bag, or belt bag). The bag has two side flaps for increased comfort and comes with an adjustable belt that closes with a buckle. This way, you can easily convert it from a hip bag (or bum bag) to a crossbody bag that goes over your shoulders.
What are the Dimensions of this Hip Bag?
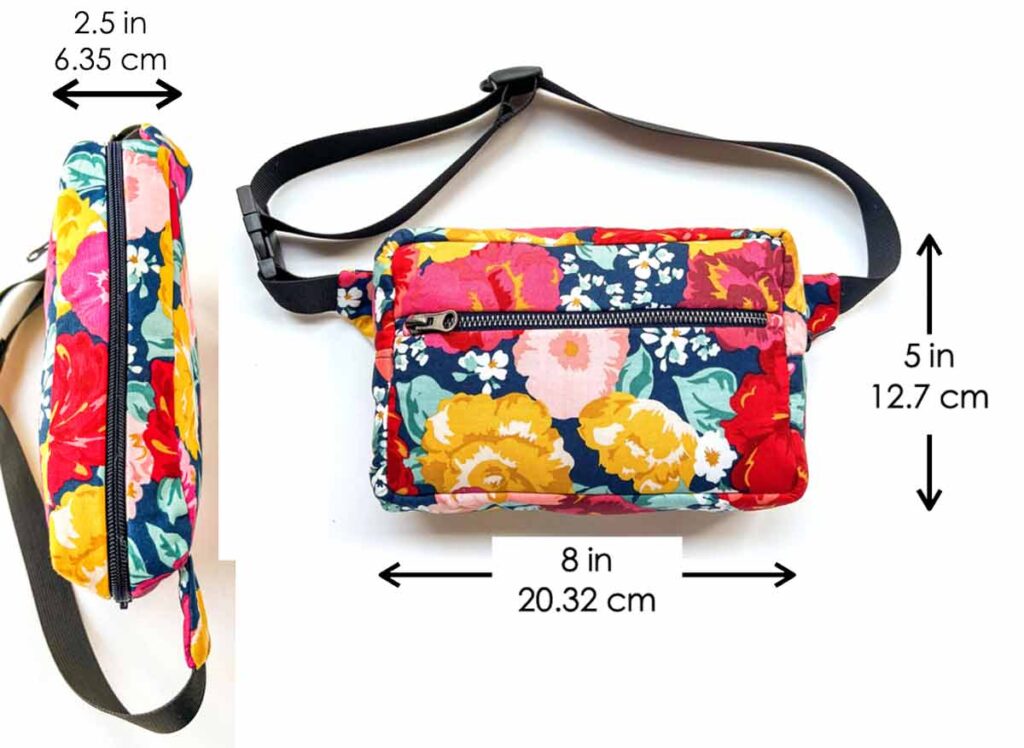
This simple fanny pack you are about to make measures approximately 5” x 8” (12.7cm x 20.3cm). The side width (thickness) of the bag is approximately 2.5” (6.35 cm).
This is a perfect size for carrying all your essentials such as keys, wallets, phone, and more without being bulky.
How Much Fabric Do I need for a Fanny Pack?
For this fanny pack pattern that I will show you how to make, you will need 1/2 yard (0.45m) of exterior fabric and 1/2 yard (0.45m) of lining fabric.
If you choose to use a thin cotton fabric for the exterior (like I did), I recommend adding 1/2 yard (0.45m) of fusible fleece or fusible interfacing for support. This is optional if you are using a thick fabric such as vinyl or canvas.
How do you make a fanny pack at home?
This basic yet stylish bag is very easy to make at home. All you will need is a home sewing machine and the following items:
MATERIALS:
- EXTERIOR FABRIC – 1/2 yard (0.46 meters)
- LINING FABRIC – 1/2 yard (0.46 meters)
- FUSIBLE INTERFACING (optional) – 1/2 yard (0.46 meters). I used Pellon 987F Fusible Fleece. May not need if using medium to heavy-weight canvas or duck cloth for the exterior.
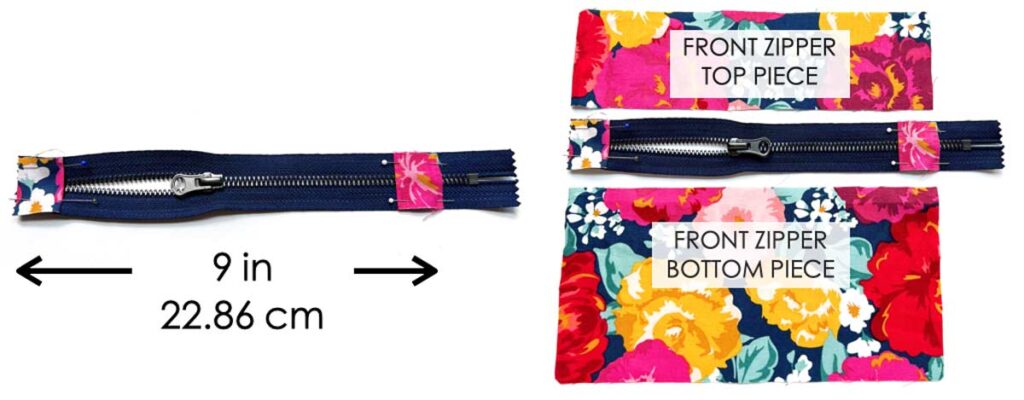
- 9″ ZIPPER – for front pocket
- 12″ HEAVY DUTY ZIPPER – for top pocket. I recommend using a double zip for ease of use (speaking from personal experience!). However, one zip is fine as well.
- 1″ WIDE WEBBING – 1 Yard (91.44 cm)
- 1″ PARACHUTE BUCKLES (x1) – I got mine at Hobby Lobby. Also available on Amazon.
- 1″ STRAP ADJUSTERS (x1) – I got mine at Hobby Lobby. Also available on Amazon.
TOOLS:
- HOME SEWING MACHINE
- FABRIC SCISSORS – these Ginghers are my favorite.
- CLEAR RULER – I have the DRITZ See-Through Sewing Ruler
- SEWING PINS & SEWING CLIPS
- MATCHING THREAD
FANNY PACK SEWING PATTERN
To get started, you will need to first download and print the FREE FANNY PACK SEWING PATTERN.
The pattern is available in the FREE MINDYMAKES LIBRARY. In order to access the library, all you will need to do is Subscribe Now to receive the password.
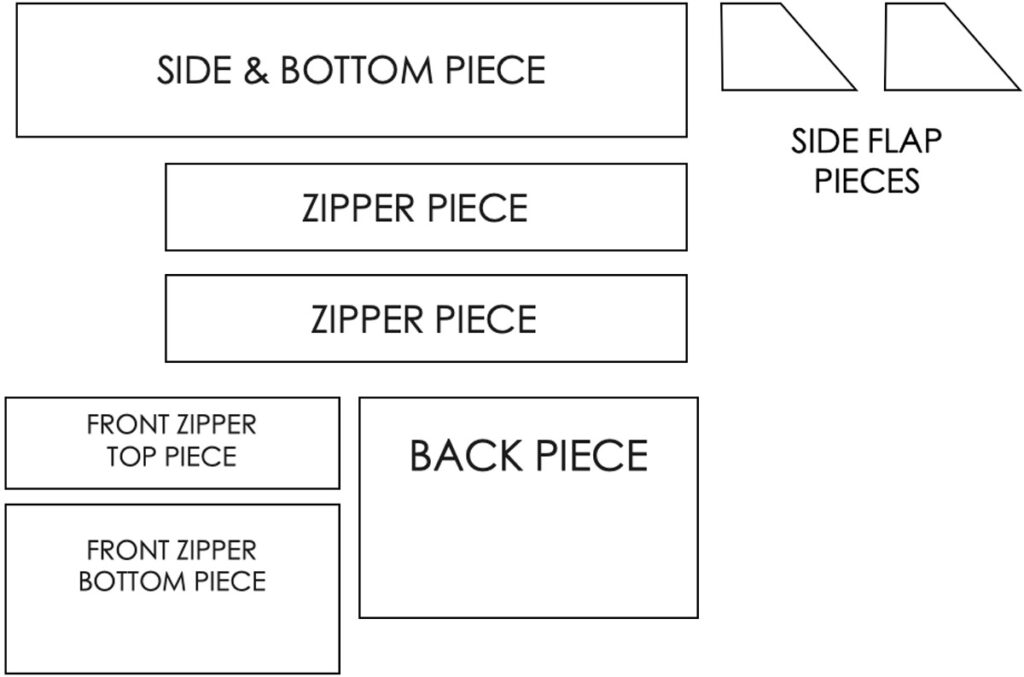
Next, cut out the pattern pieces on fabric. Note that you will need to draw out the patterns [SIDE & BOTTOM PIECE] and [ZIPPER PIECE] on fabric. Exact measurements are listed in the PDF Sewing Pattern.
EXTERIOR FABRIC

- Side & Bottom Piece (x1)
- Zipper Piece (x2)
- Front Zipper Top (x1)
- Front Zipper Bottom (x1)
- Back Piece (x1)
- Zipper Ends Cover (x2)
- Side Flap Piece (x4)
LINING

- Side & Bottom Piece (x1)
- Zipper Piece (x2)
- Front Zipper Top Piece (x1)
- Front Zipper Bottom Piece (x1)
- Front Zipper Pocket Back Piece (x1)
- Front Piece (x1)
- Back Piece (x1)
NOTE: FRONT PIECE and BACK PIECE are the exact same pattern. Just cut out 2 pieces of the lining using the [BACK PIECE] pattern.
FUSIBLE INTERFACING*
*Optional if using thick fabric such as vinyl or canvas. However, highly recommended if you are using thin fabrics for added support.
- Side & Bottom Piece (x1)
- Zipper Piece (x2)
- Front Zipper Top (x1)
- Front Zipper Bottom (x1)
- Front Zipper Pocket Back (x1)
- Back Piece (x1)
- Side Flap Piece (x2)
How do you make a fanny pack pattern?
The following tutorial with step-by-step instructions will show you exactly how to make your own version of a stylish fanny pack.
The bag is fully lined and consists of two compartments (a top zipper and a front zipper).
Additionally, you can always add more zipper pockets to the bag to create more compartments if you like. Inside the lining and on the back of the bag are all great options. Designers choice!

Want to make a fanny pack with a front zipper flap and a back zipper pocket? This pattern is available in my Etsy Shop and includes printer-friendly PDF tutorial (no ads!) and ready-to-print pattern pieces in PDF format.
Need a little refresher for some Basic Sewing Skills? Check out the following articles:
- How to Thread a Sewing Machine
- How to Thread and Wind The Bobbin
- 10 Tips to Easily Thread a Sewing Needle
- 19 Essential Hand Sewing Stitches Everyone Needs to Know
Ready to get started? Let’s go!
STEP-BY-STEP SEWING TUTORIAL
First, before you start, make sure to apply the interfacing (if using) to the appropriate fabric pieces.
SEWING FRONT ZIPPER POCKET
Fold each of the zipper end covers in half and pin them on both ends of zipper. Make sure the folded edge face the zipper pull. Baste zipper covers down to zipper. For more information about basting, check out How to Sew a Basting Stitch

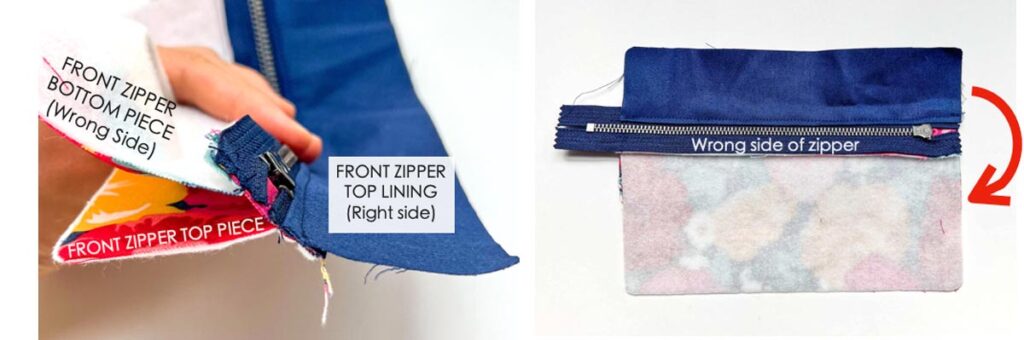
Pin and stitch [FRONT ZIPPER TOP PIECE] to zipper, right sides together, at 1/2”(12.7mm) seam allowance
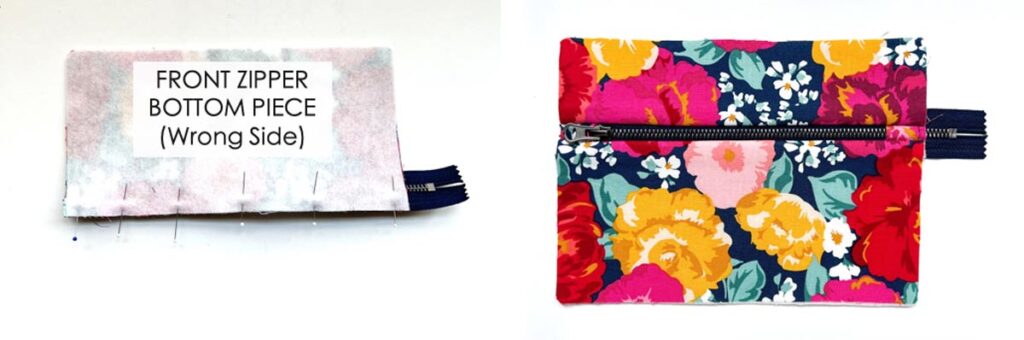
Next, pin and stitch [FRONT ZIPPER BOTTOM PIECE] to zipper, right sides together, at 1/2”(12.7mm) seam allowance. The front of your bag with zipper pocket will look like the right photo.
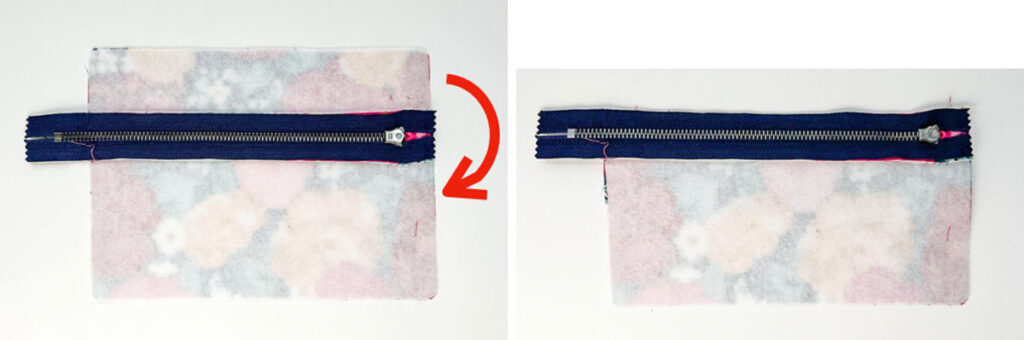
Flip front of bag to wrong side. Fold [FRONT ZIPPER TOP PIECE] down (red arrow).
LEFT: Pin and sew [FRONT TOP ZIPPER LINING PIECE] to zipper, right sides together (yellow dotted line).
RIGHT: Top stitch seam allowance to lining.
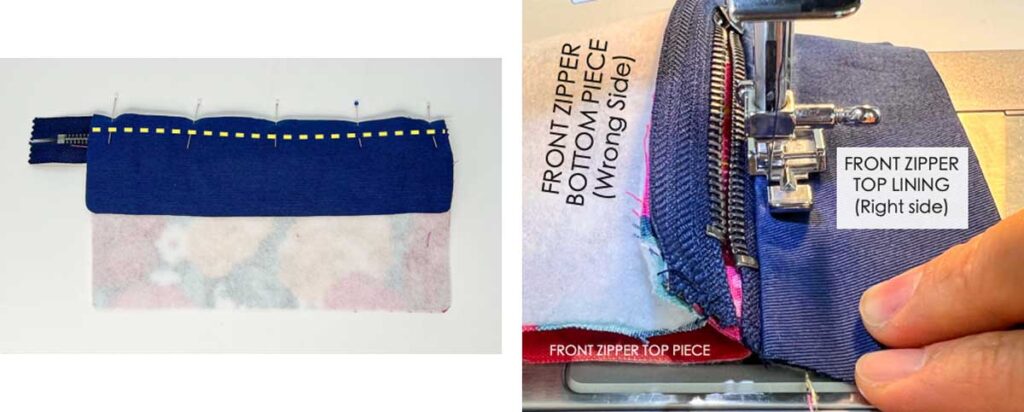
Note that [FRONT ZIPPER TOP PIECE] is pushed to the left side so you are only sewing the lining and the seam allowance.
LEFT: Another view showing seam allowance top stitched to the lining. See how only the lining is sewn down to the seam allowance. [FRONT ZIPPER TOP PIECE] is not part of the top stitching.
RIGHT:Fold down (red arrow) the top portion of the zipper pocket (lining + exterior) so that right side of zipper is facing up.
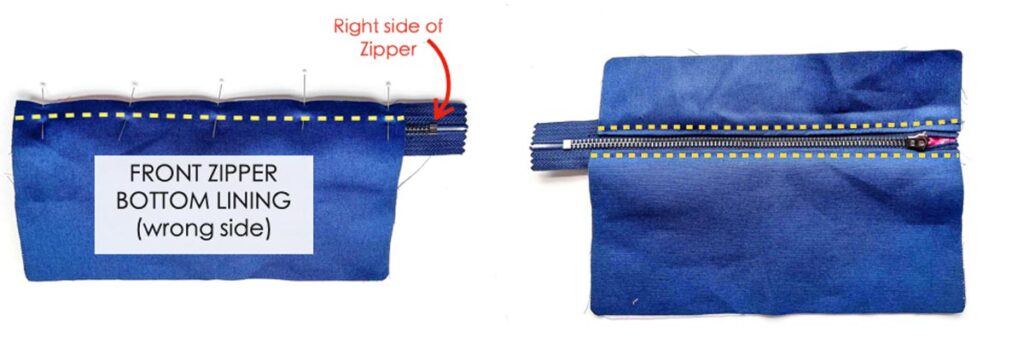
LEFT: Pin and sew [FRONT BOTTOM ZIPPER LINING PIECE] to zipper, right sides together (yellow dotted line).
RIGHT: Top stitch seam allowance to lining (yellow dotted line), as you did previously.
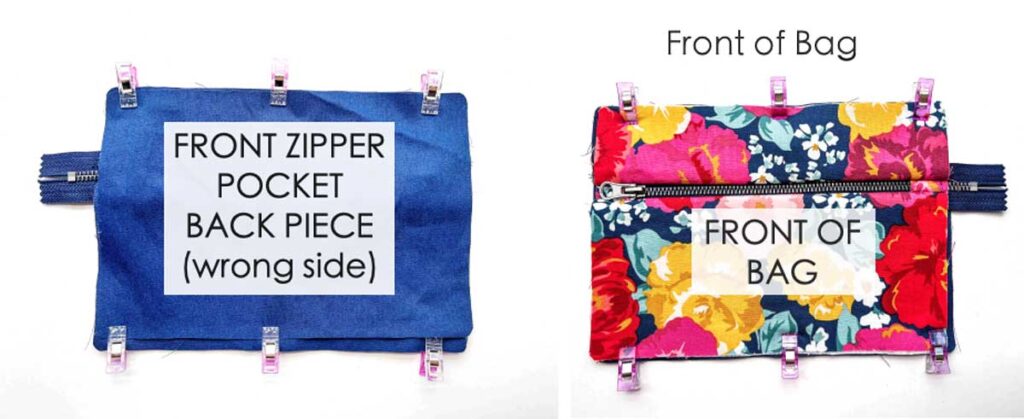
Pin/clip [FRONT ZIPPER POCKET BACK PIECE] to front of bag. In the next steps we will refer to the front of bag as [FRONT OF BAG]

Most of the time, your [FRONT OF BAG] will be larger than [FRONT ZIPPER POCKET BACK PIECE]. This is normal!
In my example, the area shaded in orange is the part of [FRONT OF BAG] that extends beyond [FRONT ZIPPER POCKET BACK PIECE]. Note that f your [FRONT OF BAG] and [FRONT ZIPPER POCKET PIECE] are exactly the same size, no trimming necessary!
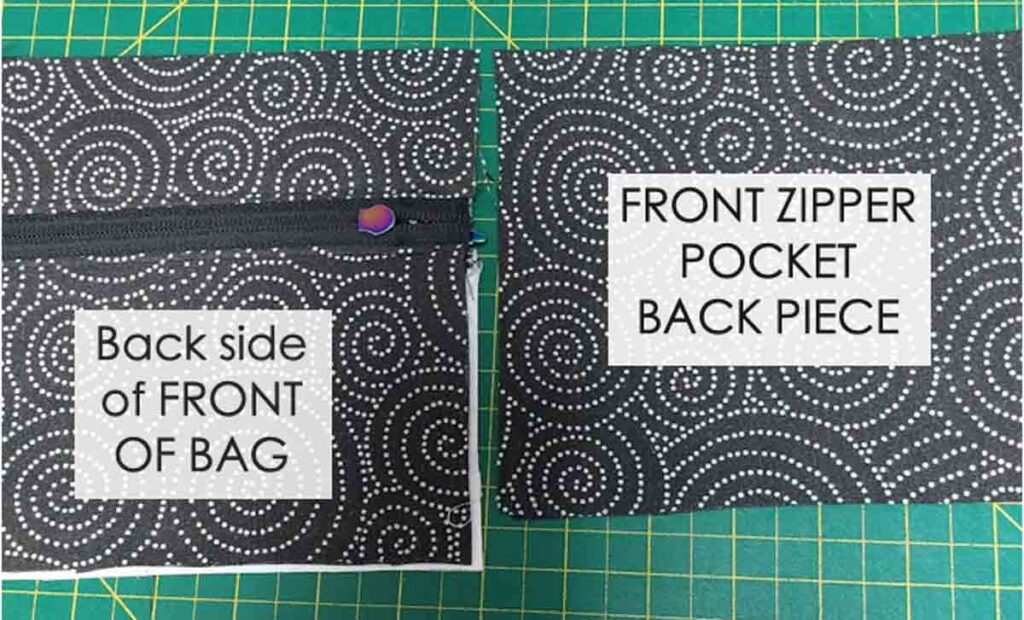
Here is a photo from one of our lovely readers. Note how her [FRONT ZIPPER POCKET BACK PIECE] is about 0.75”shorter than [FRONT OF BAG]. In this case, you can either trim off the excess from the bottom of [FRONT OF BAG] or you can trim off equal amounts (3/8 in) from the top and bottom. Use your best judgement! At the end of the day, as long as both pieces of fabric are the same size, you’ll be fine.
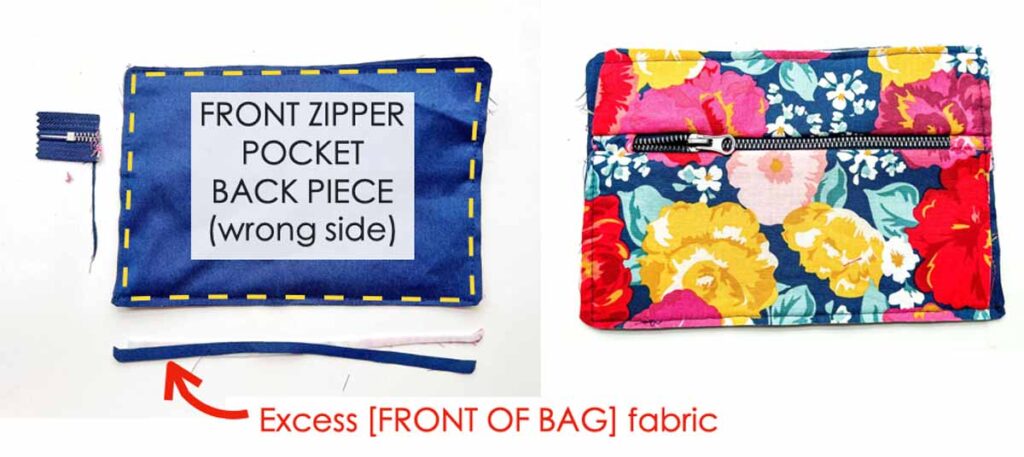
LEFT: Baste [FRONT OF BAG] to [FRONT ZIPPER POCKET BACK PIECE] (yellow dotted line). Trim excess zipper and any excess [FRONT OF BAG] fabric.
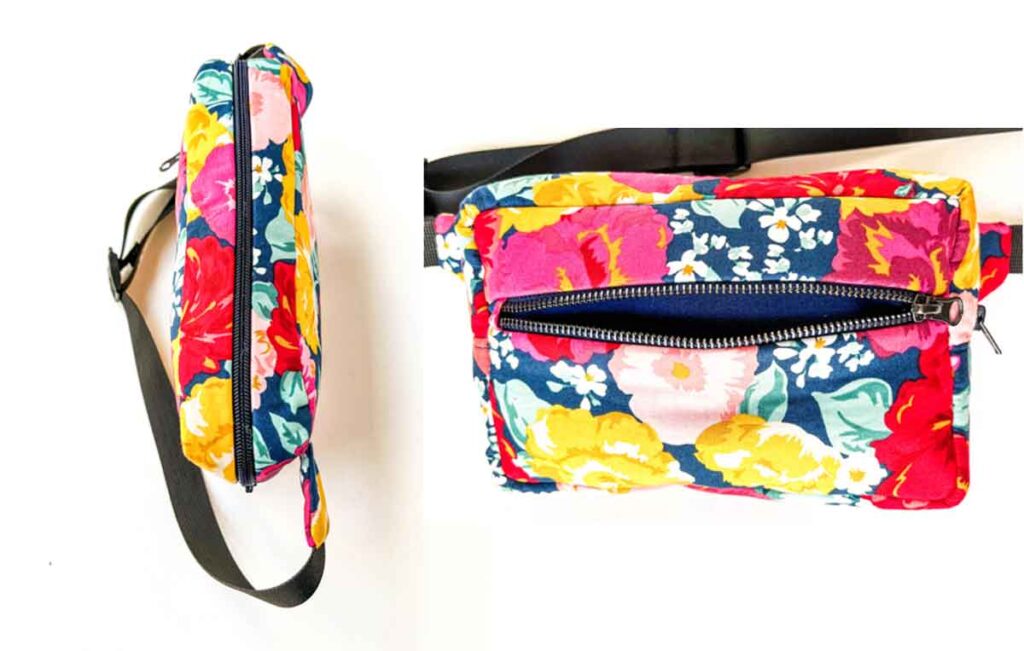
RIGHT: Your front bag zipper pocket is now done!

Top view of front bag zipper pocket.
HOW TO SEW TOP ZIPPER

Get ready the [ZIPPER PIECE] x 2, [ZIPPER END COVERS] x 2, and one 12” zipper

LEFT: Fold [ZIPPER END COVER] in half length-wise.
RIGHT: With the zipper fully zipped, place folded edge right against zipper pull and pin in place.

Fold second piece of [ZIPPER END COVER] in half and place it on other end of zipper, a distance of 12.25”(31.1 cm) away, as pictured. Make sure the folded edge of [ZIPPER END COVER] faces towards the middle of the zipper.

Put [ZIPPER PIECE] over, right side facing right side of zipper. Hold in place with pins or clips. Make sure side edge of [ZIPPER PIECE] matches exactly with ends of [ZIPPER END COVER].
NOTE: Move the [ZIPPER END COVER] along the zipper if it’s not matching exactly with edge of [ZIPPER PIECE].

Use a zipper foot and stitch [ZIPPER PIECE] to zipper.

Top stitch [ZIPPER PIECE] using matching thread. Press.

Put other [ZIPPER PIECE] over bottom of zipper, right sides together. Pin/clip in place.

Sew [ZIPPER PIECE] to zipper and top stitch with matching thread.

Place [SIDE & BOTTOM PIECE] over zipper and note if there is any excess fabric on the zipper (red arrows) that is wider than [SIDE & BOTTOM PIECE].

Trim excess with rotary cutters or scissors.

Pin or clip left and right side of [SIDE & BOTTOM PIECE] to zipper.

LEFT: Another view of [SIDE & BOTTOM PIECE] clipped to zipper
RIGHT: Stitch sides together at 1/2”(12.7mm) seam allowance

Trim excess zipper off.

Point seam allowance towards [SIDE & BOTTOM PIECE]. Top stitch with matching thread. Press. Repeat on other side.

Finished! We will refer to this piece as [ZIPPER/SIDE/BOTTOM PIECE].
SEWING BAG LINING

Use an iron and press in 1/2”(12.7mm) seam allowance on [ZIPPER PIECE] as shown in photo.
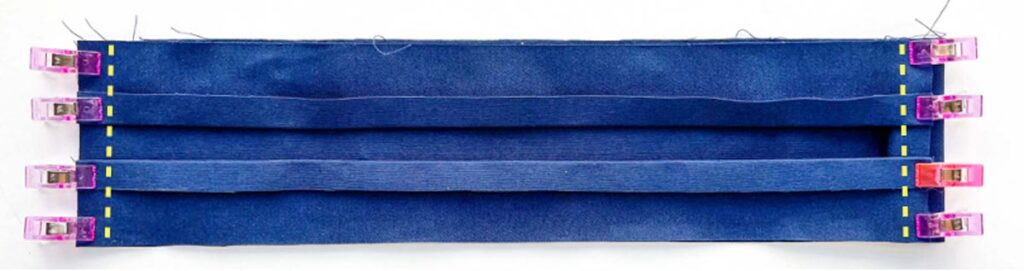
Clip and sew [ZIPPER PIECE] to [SIDE & BOTTOM PIECE], right sides together (yellow dotted line)
Using a matching colored thread, stitch down seam allowance towards [SIDE & BOTTOM PIECE] at 1/8”(3mm). Repeat on other side.
HOW TO SEW BAG STRAP & BUCKLE
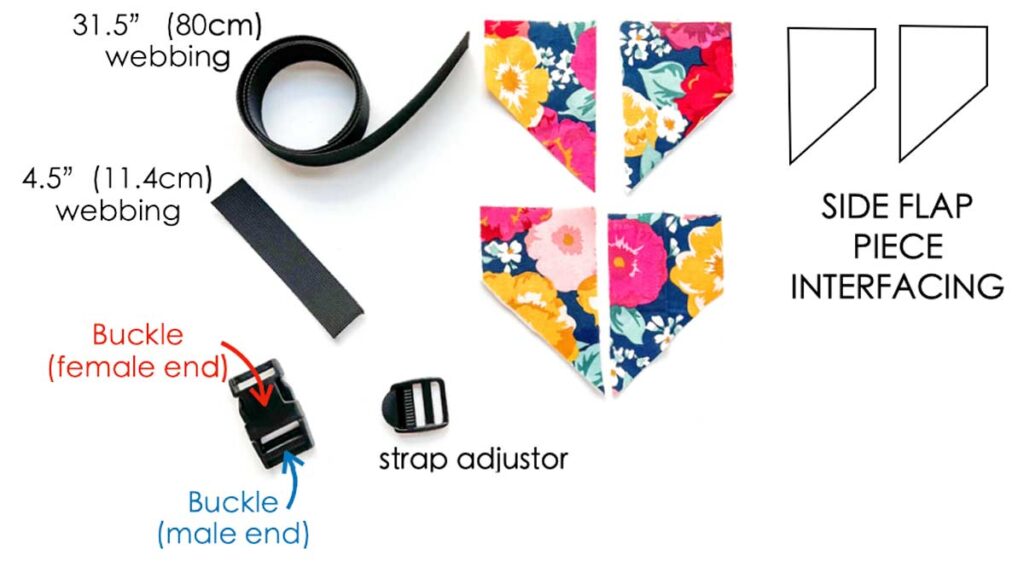
Cut your 1” wide webbing into two pieces, one measuring 4.5”(11.4cm) long, and the other piece 31.5” (80cm). Iron on interfacing to [FLAP PIECE]. I used fusible fleece in this case.

Thread the 4.5”(11.4cm) long piece through the female end of the buckle. Meet the ends of the webbing, clip and basted in place (yellow dotted line).
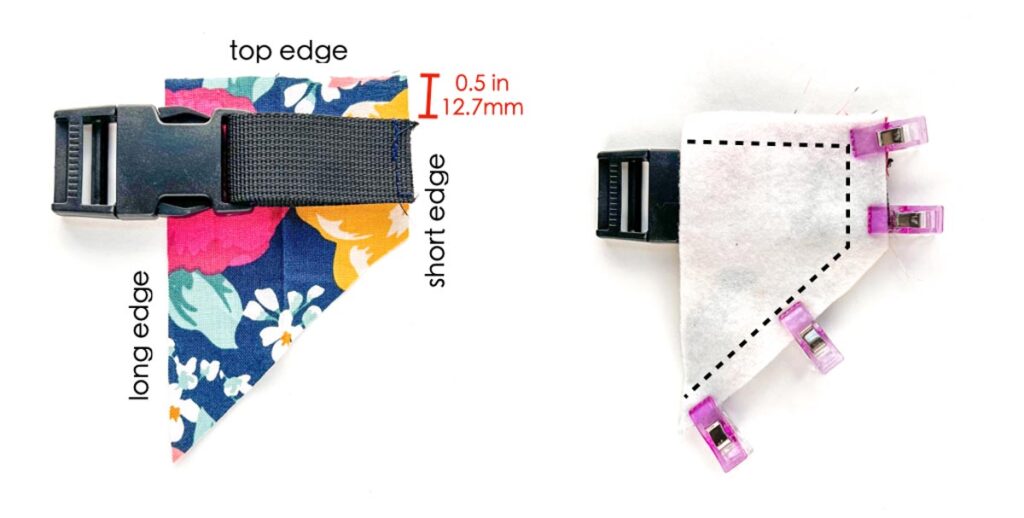
LEFT: With right side of [FLAP PIECE] facing up, place buckle with webbing over short edge, 1/2” (12.7mm) from the top edge.
RIGHT: Place second [FLAP PIECE] over, right sides. together. Clip in place and sew (black dotted line)
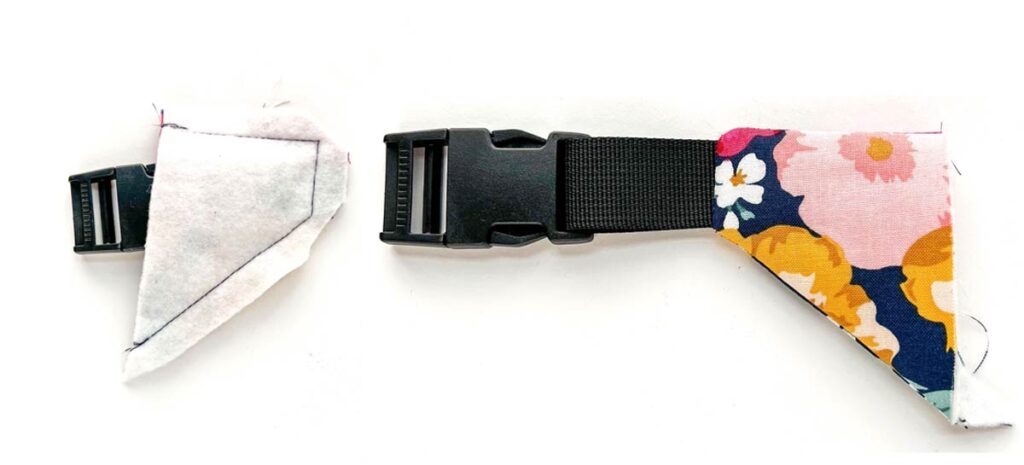
LEFT: Clip corners at a diagonal
RIGHT: Turn flap piece with buckle to right side.

Repeat making other side of [FLAP PIECE] with the long (31.5 in) piece webbing. Photo shows other flap piece complete with corners clipped at a diagonal.

LEFT: Turn flap piece with webbing to right side and cut off the excess triangle at the bottom. At this point you may also choose to top stitch around the edge of the flap pieces for reinforcement (black dotted lines). Sorry, I completely forgot to do this in my demo!
RIGHT: Clip flap pieces to [BACK PIECE], 0.75”(19mm) from top edge. Baste in place (black dotted line)
NOTE: When basting the flaps, make sure to do it within the seam allowance. This means that your baste line will be a distance of less than 1/2”(12.7mm) from edge of fabric. This way, when you sew the [BACK PIECE] to the rest of the bag later, your basting stitch will be hidden in the seam allowance.
SEWING BAG TOGETHER

Prior to sewing the bag pieces together, you will need to mark the midpoint of all the pieces. First, fold each of the pieces in half and make a small diagonal cut on the fold. You will end up with a little notch that looks like the photo (right)

Black arrows show all the places where midpoint needs to be marked. You will do this for the exterior fabric as well as lining.
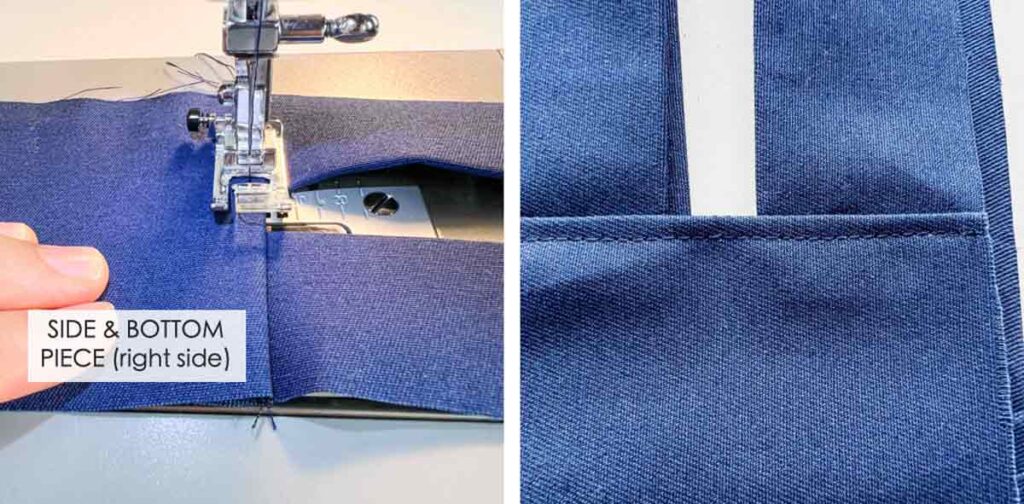
Pin [FRONT PIECE] and [BACK PIECE] to the [ZIPPER/SIDE/BOTTOM PIECE], right sides together. Match at the midpoints.
The following photo tutorial show how to sew the bag together at the corners. Note the photos use a black colored lining fabric (instead of the blue lining), but the process is exactly the same!

LEFT: At the corners, make a few shallow cuts on [ZIPPER/SIDE/BOTTOM PIECE]. This allows the fabric to “spread”so it’s easier to pin it to the corner of [FRONT PIECE].
RIGHT: Your pinned corner will look something like the photo

To sew the corner, go slowly and walk the foot if necessary. Make sure to smooth out any fabric on the left so the fabric doesn’t bunch up on itself (this creates unsightly pleats!). Red arrow shows the direction of the stitches on the fabric
NOTE: You will use your left hand to turn the fabric in counterclockwise direction as you sew around the corner.

LEFT: Finished stitch around bag corner. You might see some puckers, but this is ok as you can easily iron it out. What you shouldn’t see are pleats (where the fabric is stitched over itself).
RIGHT: Clip curves on [FRONT PIECE]. Repeat this for all the corners.
Sew [BACK PIECE] to [ZIPPER/SIDE/BOTTOM PIECE] in the same way you just did.
Trim seam allowance down to 1/4”(6mm) all around.

When you you turn the bag to the right side, see how nicely the corners appear!
Sew exterior bag together like you did for lining.
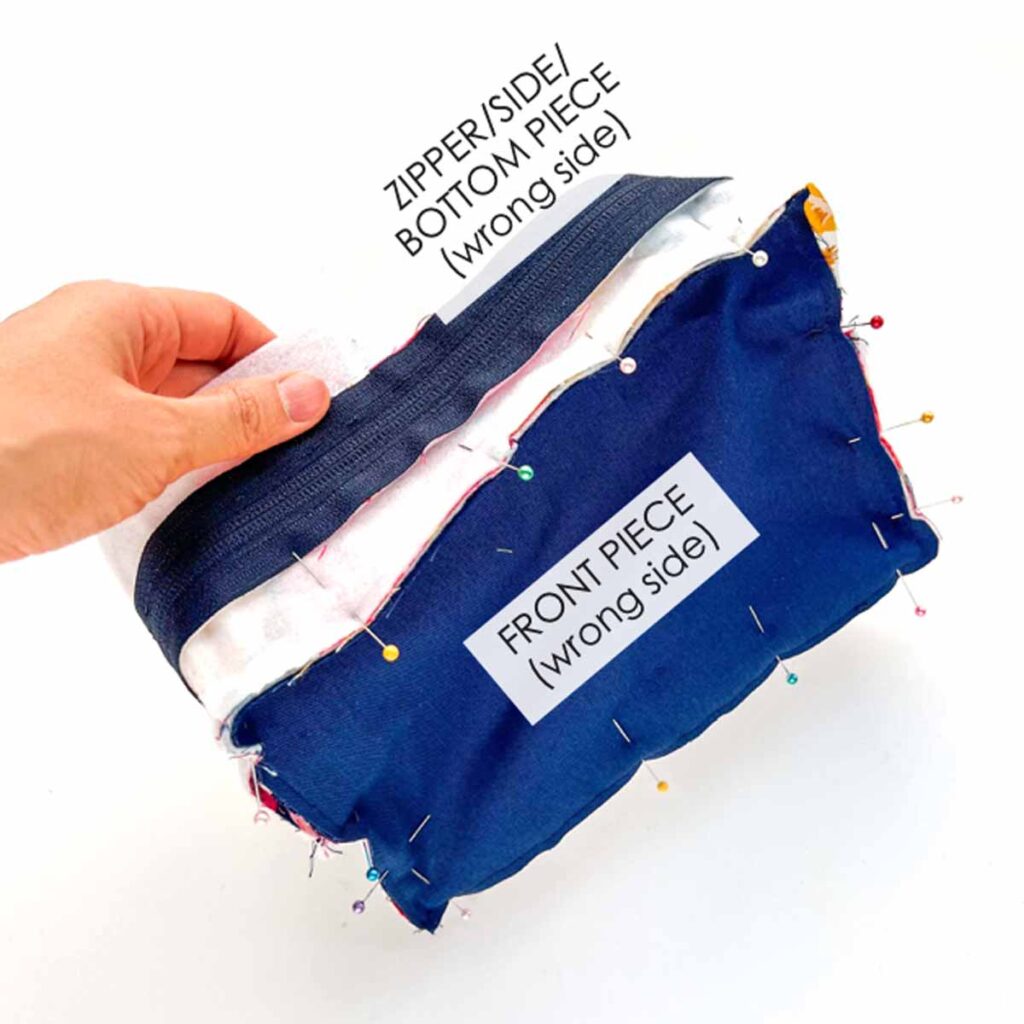
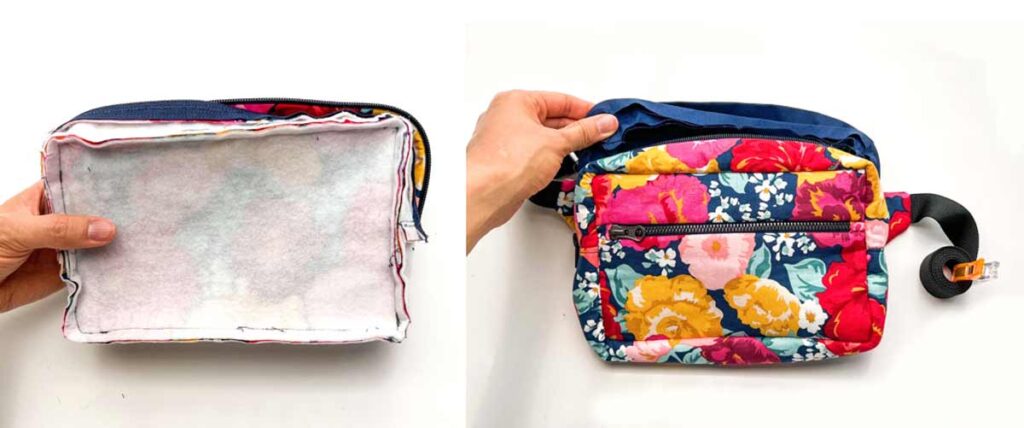
RIGHT: Turn bag exterior to right side and place bag lining (wrong side up) in.

Pin lining onto the wrong side of exterior bag and stitch in place using invisible ladder stitch.
FANNY PACK ADJUSTABLE BELT

LEFT: Slide free end of webbing up through the flat end of the strap adjuster, then down through the curved end (red arrow). This creates a loop (first loop) over strap adjuster.
RIGHT: Now slide free end of webbing though the first opening on male side of buckle, then back through the second opening. (blue arrow)
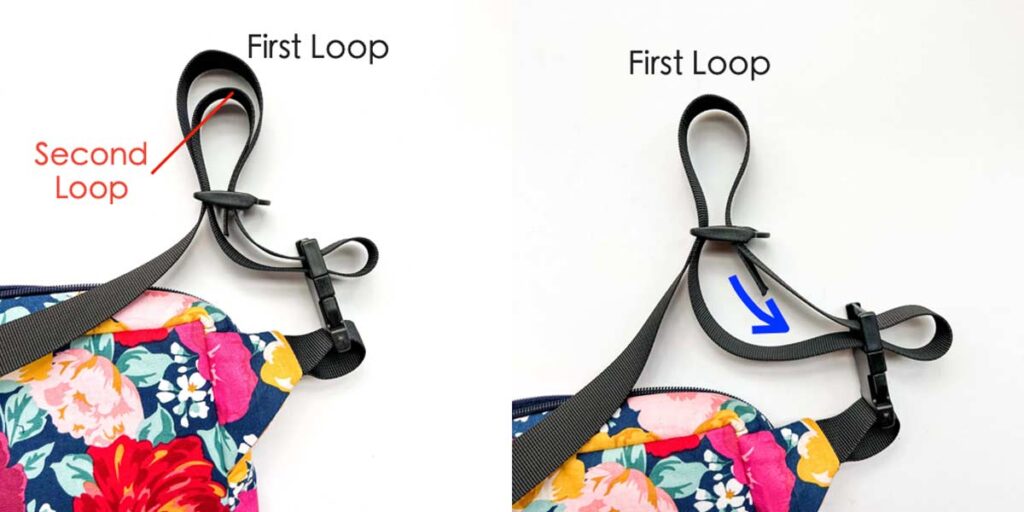
LEFT: Next, slide webbing up and down through the strap adjuster like you previously did. This creates a second loop beneath the first loop you had just made.
RIGHT: Pull webbing through (blue arrow) so the second loop is gone.
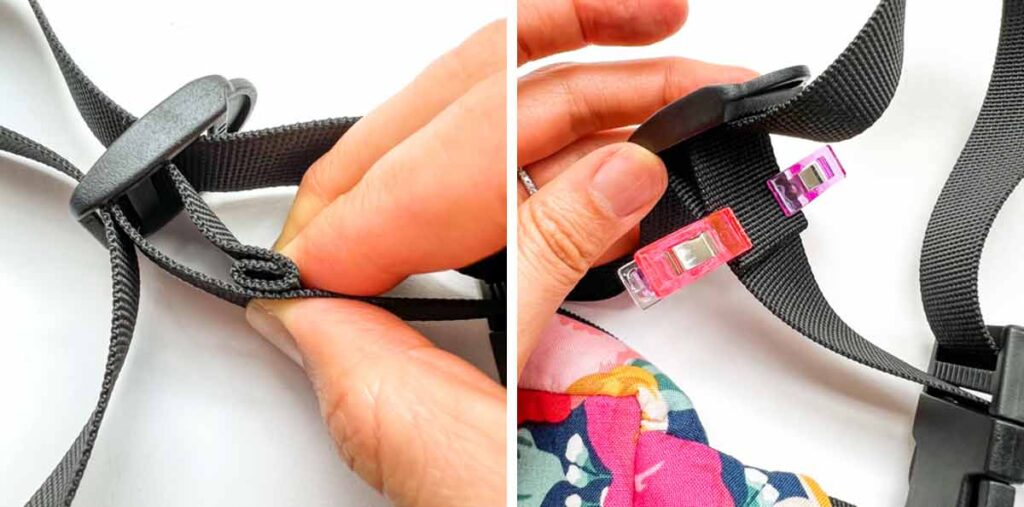
LEFT: Fold the end of webbing over on itself 1/4”(6mm), and then again over itself 1/4” (6mm).
RIGHT: Hold in place using clips.

Stitch down the folded webbing to the rest of the webbing. You will make two stitches, one at 1/8”(3mm) from the folded edge, and the other one 1/4”(6mm) from edge (yellow dotted lines).
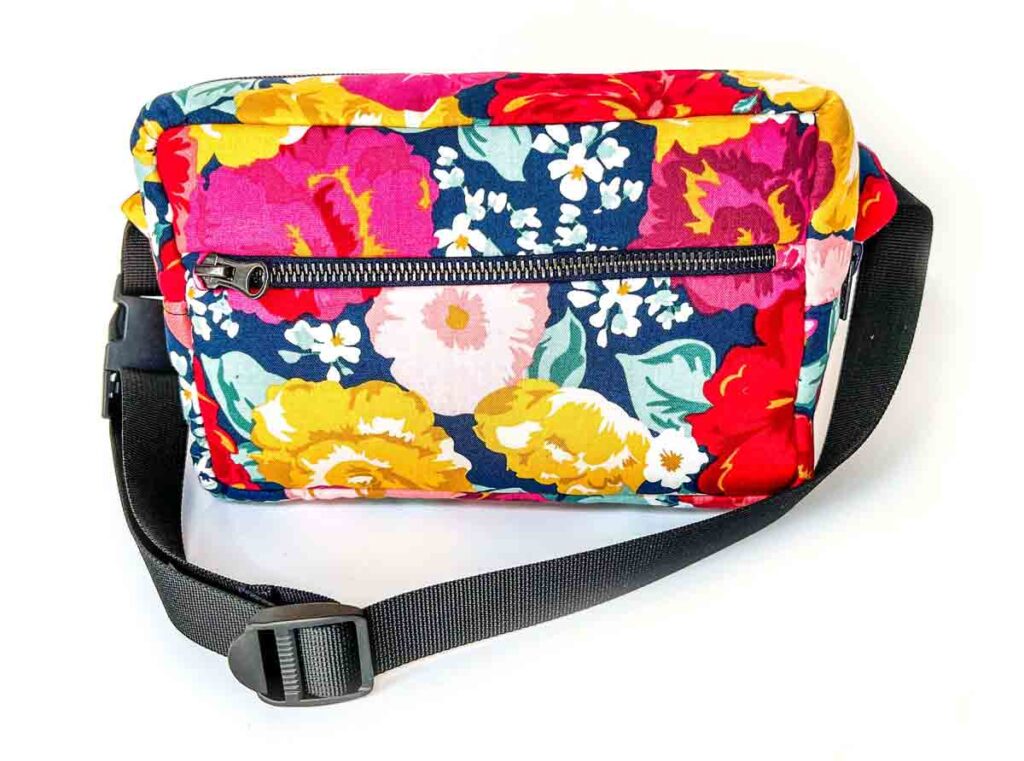
Your DIY Fanny Pack is now finished!
Great for holding all your essentials for running errands, family outings, beach days, and more!
How to Sew a Fanny Pack

The perfect hands-free bag that is so stylish for carrying all your essentials!
Materials
- EXTERIOR FABRIC - 1/2 Yard (0.46 meters)
- LINING FABRIC – 1/2 yard (0.46 meters)
- FUSIBLE FLEECE (optional) – 1/2 yard (0.46 meters)
- 9" ZIPPER - for front pocket
- 12" HEAVY DUTY ZIPPER - for top pocket (see note 1).
- 1″ WIDE WEBBING – 1 Yard (91.44 cm)
- 1″ PARACHUTE BUCKLES (x1)
- 1″ STRAP ADJUSTERS (x1)
Tools
- HOME SEWING MACHINE
- FABRIC SCISSORS
- CLEAR RULER
- SEWING PINS & CLIPS
- MATCHING THREAD
Instructions
Before You Start....
- Print and cut out paper patterns
- Cut out the pattern pieces on fabric (see note 2).
- Apply Fusible interfacing to exterior fabric (if using)
SEWING FRONT ZIPPER
- Fold each of the zipper end covers in half and pin them on both ends of zipper. Make sure the folded edge face the zipper pull. Baste zipper covers down to zipper.
- Pin and stitch [FRONT ZIPPER TOP PIECE] to zipper, right sides together, at 1/2”(12.7mm) seam allowance
- Next, pin and stitch [FRONT ZIPPER BOTTOM PIECE] to zipper, right sides together, at 1/2”(12.7mm) seam allowance.
- Flip front of bag to wrong side. Fold [FRONT ZIPPER TOP PIECE] behind.
- Pin and sew [FRONT TOP ZIPPER LINING PIECE] to zipper, right sides together. Top stitch seam allowance to lining.
- Fold down the top portion of the zipper pocket (lining + exterior) so that right side of zipper is facing up.
- Pin and sew [FRONT BOTTOM ZIPPER LINING PIECE] to zipper, right sides together.
- Top stitch seam allowance to lining.
- Pin/clip [FRONT ZIPPER POCKET BACK PIECE] to front of bag.
- Baste all around. Trim excess zipper and if necessary, any excess pocket back fabric.
HOW TO SEW BAG ZIPPER
- Get ready the two [ZIPPER PIECE] and zipper. Sew the two [ZIPPER PIECE] to zipper, right sides together, matching at the beginning end of zipper. Press.
- Place [SIDE & BOTTOM PIECE] over zipper piece and trim excess.
- Pin/clip one end of [SIDE & BOTTOM PIECE] to zipper piece, right sides together.
- Pin/clip other end of [SIDE & BOTTOM PIECE] to zipper piece and sew (blue dotted line)
- Using a matching colored thread, stitch down seam allowance towards [SIDE & BOTTOM PIECE] at 1/8”(3mm) on both sides of zipper.
SEWING BAG LINING
- Use an iron and press in 1/2”(12.7mm) seam allowance on [ZIPPER PIECE].
- Clip and sew [ZIPPER PIECE] to [SIDE & BOTTOM PIECE], right sides together.
- Using a matching colored thread, stitch down seam allowance towards [SIDE & BOTTOM PIECE] at 1/8”(3mm). Repeat on other side.
HOW TO SEW BAG STRAP & BUCKLE
- Cut your 1” wide webbing into two pieces, one measuring 4.5”(11.4cm) long, and the other piece 31.5” (80cm). Iron on interfacing to [FLAP PIECE], if using.
- Thread the 4.5”(11.4cm) long piece through the female end of the buckle. Meet the ends of the webbing, clip and basted in place.
- With right side of [FLAP PIECE] facing up, place buckle with webbing over short edge, 1/2” (12.7mm) from the top edge.
- Place second [FLAP PIECE] over, right sides. together. Clip in place and sew.
- Clip corners at a diagonal and turn flap piece with buckle to right side.
- Repeat making other side of [FLAP PIECE] with the long (31.5 in) piece webbing.
- Turn flap piece with webbing to right side and cut off the excess triangle at the bottom.
- Top stitch around the edge of the flap pieces for reinforcement
- Clip flap pieces to [BACK PIECE], 0.75”(19mm) from top edge. Baste in place.
SEWING BAG TOGETHER
- Mark the midpoint of all the [ZIPPER/SIDE/BOTTOM PIECE] and [FRONT] and [BACK] pieces by folding each of the pieces in half and make a small diagonal cut on the fold. You will end up with a little triangular notch.
- Mark midpoint for lining pieces as well
- Pin [FRONT PIECE] and [BACK PIECE] to the [ZIPPER/SIDE/BOTTOM PIECE] of exterior piece, right sides together. Match at the midpoints.
- Sew [FRONT PIECE] to [ZIPPER/SIDE/BOTTOM PIECE] (see note 3).
- To sew the corner, go slowly and walk the foot if necessary. Make sure to smooth out any fabric on the left so the fabric doesn’t bunch up on itself (this creates unsightly pleats!) - See note 4.
- Clip curves on [FRONT PIECE]. Repeat this for all the corners.
- Sew [BACK PIECE] to [ZIPPER/SIDE/BOTTOM PIECE] in the same way you just did. Trim seam allowance down to 1/4”(6mm) all around.
- Repeat sewing lining together.
- Turn Exterior Bag to right side, then put the Bag Lining inside the exterior, wrong sides facing each other.
- Pin lining onto the wrong side of exterior bag and stitch in place using invisible ladder stitch.
FANNY PACK ADJUSTABLE BELT
- Slide free end of webbing up through the flat end of the strap adjuster, then down through the curved end. This creates a loop (first loop) over strap adjuster.
- Now slide free end of webbing though the first opening on male side of buckle, then back through the second opening.
- Next, slide webbing up and down through the strap adjuster like you previously did. This creates a second loop beneath the first loop you had just made.
- Pull webbing through so the second loop is gone.
- Fold the end of webbing over on itself 1/4”(6mm), and then again over itself 1/4” (6mm).
- Hold in place using clips
- Stitch down the folded webbing to the rest of the webbing. You will make two stitches, one at 1/8”(3mm) from the folded edge, and the other one 1/4”(6mm) from edge
- DIY Fanny Pack is now finished!
Notes
Note 1: I recommend using a double zip for ease of use (speaking from personal experience!). However, one zip is fine as well.
Note 2: You will need to draw out the patterns [SIDE & BOTTOM PIECE] and [ZIPPER PIECE] on fabric. Exact measurements are listed in the PDF Sewing Pattern.
Note 3: At the corners, make a few shallow cuts on [ZIPPER/SIDE/BOTTOM PIECE]. This allows the fabric to “spread”so it’s easier to pin it to the corner of [FRONT PIECE].
Note 4: After sewing, you might see some puckers, but this is ok as you can easily iron it out. What you shouldn’t see are pleats (where the fabric is stitched over itself).

The AD-FREE, PRINTER-FRIENDLY PDF version of this sewing tutorial with all the step-by-step photos is available IN OUR ETSY SHOP. Simply print and use! BONUS: Receive the pattern and tutorial for making a front zipper flap as well as a back zipper pocket to give more style to your fanny pack. Print a copy today to keep next to your sewing machine for easy reference.
More Sewing Projects You will LOVE!

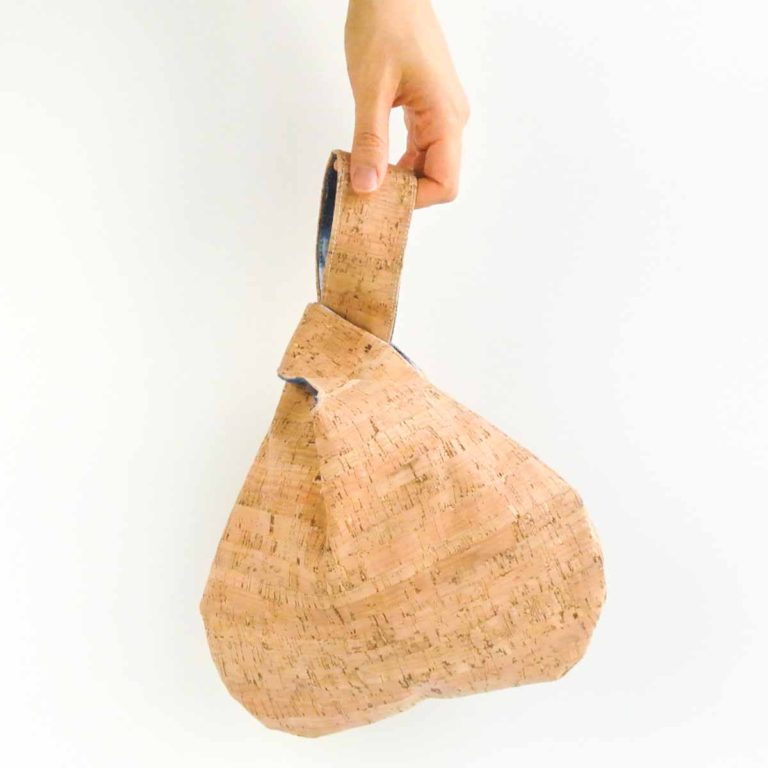
The Japanese knot bag is a fully lined, stylish bag that everyone needs.

Keep your jewelry safe and organized with this handy 8 pocket jewelry bag.

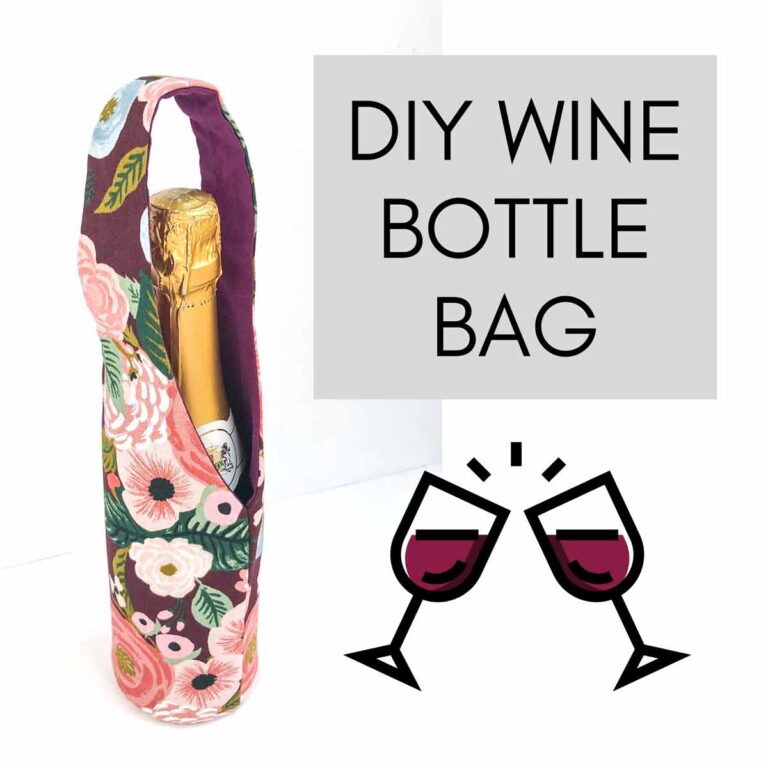
A MUST HAVE for bringing your favorite bottle of wine or champagne to the next social gathering.


I subscribed love your pattern for the Fanny pack and trying to find how to print the pattern ! I’m not having any luck . Can you help me? Thank you in advance 😊
Sherry
Hi Sherry,
Thank you so much! Were you able to get into our resource library? In the library, just click on the link right under the photo of the fanny pack and it will open the PDF file of the pattern. Hope that helps!
The resource library requires a password. I don’t see how to make an account to view it!
Thanks!
Hi Jessica,
Check out this step-by-step tutorial how to download: https://mindymakes.com/how-to-download-pdf-files-from-the-mindymakes-library/
Hope that helps!
I just finished making this for my older sister for Christmas (she’s on a fanny pack kick after discovering how much lighter they are than purses, haha), and it turned out so incredibly well!! I am definitely a beginning sewist, but your instructions were so clear and had so many helpful pictures, I was able to follow the pattern super easily. Thank you so much for sharing this pattern and tutorial (for free, no less!)–this project definitely boosted my confidence in my sewing skills, and I’m absolutely delighted with how well it worked. And my sister’s going to love it! So, thank you!!!
Hi Kay,
You are so welcome! I’m so happy to hear that you found the tutorial helpful! Thanks again 🙂
Hi , Is there a video tutorial for your crossbody Fanny pack? I downloaded your pattern and instructions. I’m a beginner and I found your pattern to be easy to cut out. I am a visual person and I’m hoping you have a video to watch. Thank you for your kindness.
Warmly,
Linda
Hi Linda,
Unfortunately I do not have a video tutorial for the fanny pack. Sorry about that. However, feel free to reach out at [email protected] if you have encounter any questions as you sew. Thanks!
This is such a great pattern! Your instructions are well written and easy to follow! I modified it slightly and made quilted pieces for mine and instead of making the strap I bought a cute coordinating strap. Now my girls are wanting me to make bags for them too. So thank you for sharing your talent with us! I cant wait to try another pattern.
Hi Erin,
I’m so glad you enjoyed the tutorial. And making quilted pieces for the bag sounds like it would make a beautiful bag, what a great idea! You are so very welcome!
Hello there,
Is the pattern free for this project? Many thanks!
Hannah
Hi Hannah,
Yes, the pattern is available to download in the Free MindyMakes Resource Library
Hello Mindy,
Thank you so so much for sharing this wonderful pattern.
Could I ask if the measurement of 31.5″ is correct for the shoulder strap?
I am currently at that step right now and when I cut the webbing, it seems too short to be a crossbody strap? But I have not finished the project yet so perhaps my judgment is incorrect?
Many thanks!
Can this be made without the strap adjusters? Are they just so that the extra webbing doesn’t hang down?
Hi Mataya,
Yes these can be made without strap adjusters. The adjusters are so you can change the length of the belt, depending on how you want to wear the fanny pack (across the body, around the hip etc). Hope that helps!
I made this pattern for the first time two years ago (it was actually my first sewing project with a zipper), and today I just finished making my fourth! Your instructions are super clear and easy-to-follow, and the finished product is so incredibly polished-looking and useful. Just wanted to let you know how much I’ve enjoyed this pattern–it really is fantastic! Thank you so much for sharing it!
What an awesome sewing tutorial! Your fanny pack turned out so cute, and I’ve featured your project on Crafts on Display – hope you enjoy it! https://craftsondisplay.com/sewing/stylish-diy-fanny-pack-149372/