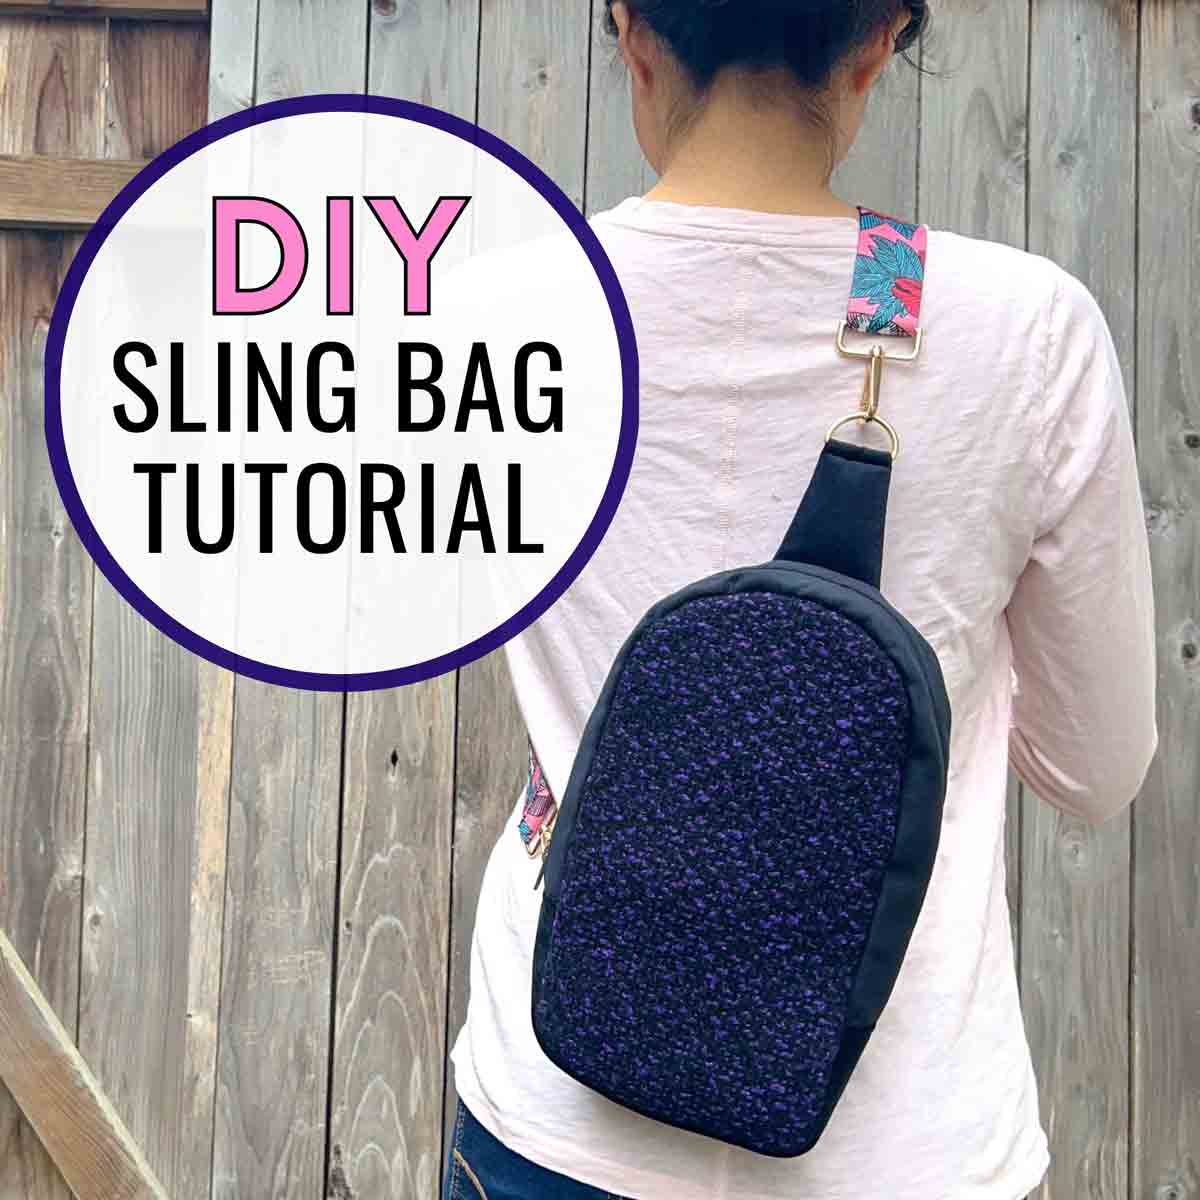
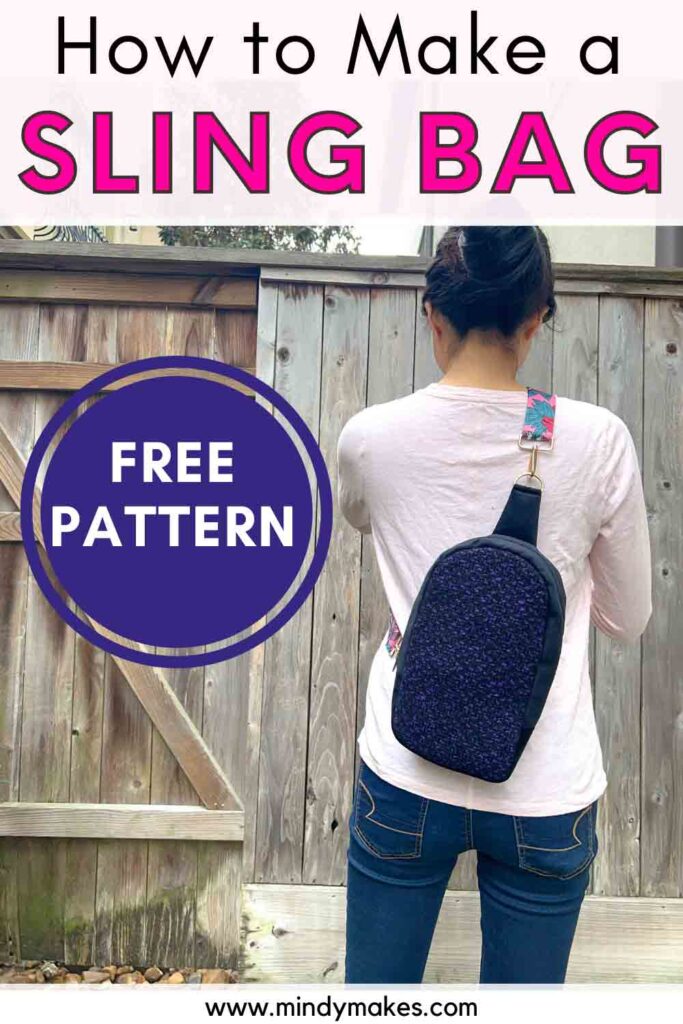
How to Make a Sling Bag (Free Sewing Pattern)
This post may contain affiliate links. Please read my disclosure policy for details. As an Amazon Associate, I earn from qualifying purchases.
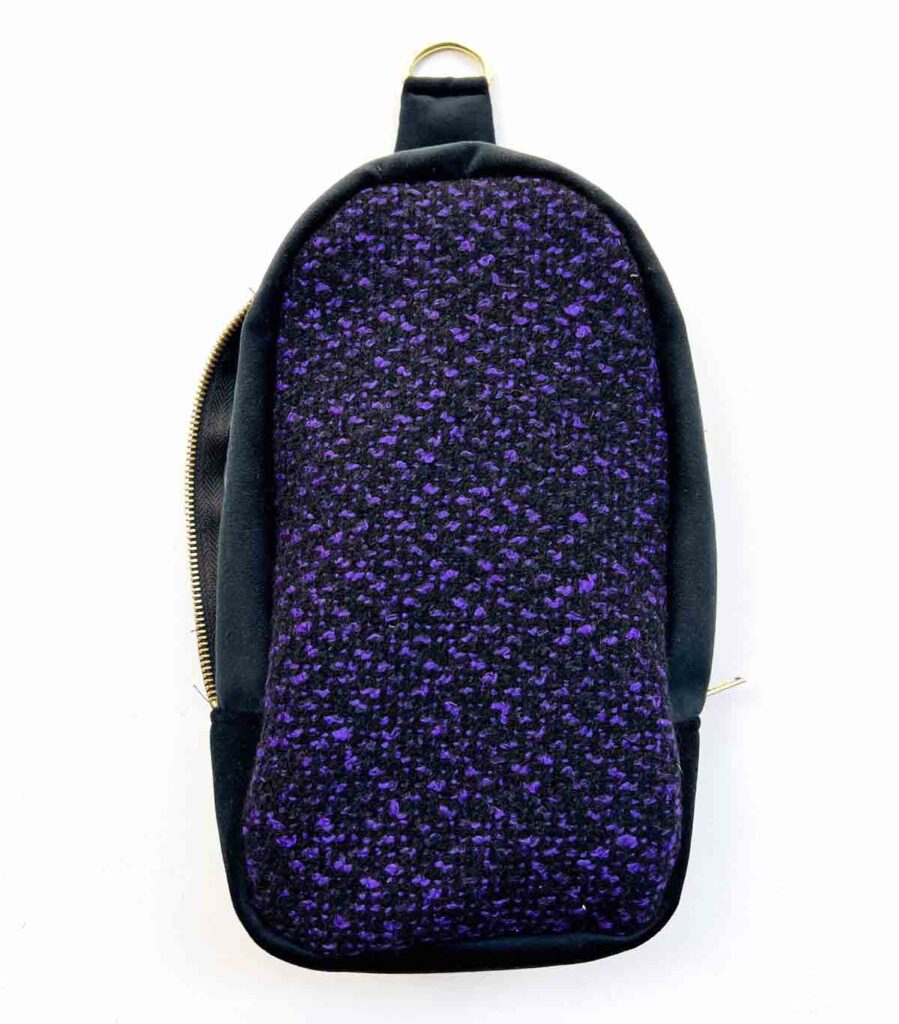
A hybrid between a back pack and a crossbody, this simple sling bag pattern only has one strap and is the perfect take anywhere bag. Great for hikes, day trips, travel, and more!
My favorite thing about a sling bag is that it resembles a backpack, yet you can quickly and easily put it on (and take it off) because it only has one strap. This make is SO much easier when you just one to grab one or two things.
Another thing I love about this simple yet sleek sling bag is that you can wear it across your body or behind your back. In a hurry? No problem. Just sling it over your shoulder and you are ready to go!

Finally, in addition to being able to carry all the essentials, you can fit a water bottle, a light jacket, or a small umbrella inside. This is perfect for running errands and outdoor excursions where things might take longer than expected or the weather changes suddenly.
What are the dimensions of this Sling BaCKPACK?
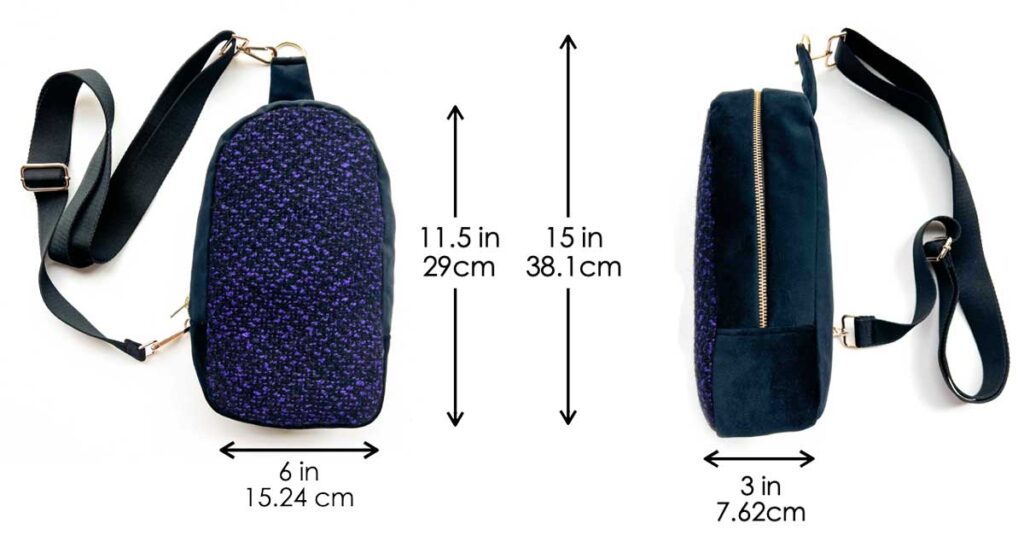
- Sling bag measures 6” (15.24cm) across and 11.5” (29cm) in height.
- Including top strap piece and D-ring, Sling bag measures approximately 15”(38.1cm)
- Sling bag measures 3”(7.62cm) wide
How Much Fabric Do I need for a SLING BACKPACK?
First, to make this sling bag pattern, you will need about 1/2 yard (0.46m) of exterior fabric and 1/2 yard (0.46m) of lining.
Next, If you decide to use a second exterior fabric for the front of bag (like I did in this tutorial), you will need an extra piece of fabric that measures 8″ x 13″ (20.3cm x 33cm)
Finally, keep in mind that If you choose a thin cotton fabric for the exterior, I do recommend adding 1/2 yard (0.46m) of fusible fleece or fusible interfacing for support. This is optional if you are using a thick fabric such as vinyl or canvas.
materials:
- EXTERIOR FABRIC – 1/2 yard (0.46 meters) – I am using Home Decor Velvet from Joanns, in the color black
- LINING FABRIC – 1/2 yard (0.46 meters)
- FUSIBLE INTERFACING (optional) – 1/2 yard (0.46 meters). I used Pellon 931TD Fusible Midweight Interfacing. May not need if using medium to heavy-weight canvas or duck cloth for the exterior.
- 22″ HEAVY DUTY ZIPPER – for top pocket.
- 6” ZIPPER – for zipper pocket on lining.
- 1.5”D- RING – Get them from HOBBY LOBBY or AMAZON
- 1/2”D-RING – Available at HOBBY LOBBY or AMAZON
- SHOULDER STRAP – You can either make your own (see note below) or grab one online (FUN PRINT or SOLID COLOR)
- BASTING ADHESIVE – Optional
NOTE: See “How to Make a Duffel Bag” under section “How to Sew Shoulder Strap” to learn how to make your own.
tools:
- HOME SEWING MACHINE
- FABRIC SCISSORS – these Ginghers are my favorite.
- CLEAR RULER – I have the DRITZ See-Through Sewing Ruler
- MARKING CHALK – These Clover Chaco Liners are my favorite
- MECHANICAL PENCIL
- SEWING PINS & SEWING CLIPS
- MATCHING THREAD
- LOOP TURNER
Free Sling Bag Pattern to Download
In order to get started, you will need to first download and print the FREE SLING BAG SEWING PATTERN.
The pattern is available in the FREE MINDYMAKES LIBRARY. In order to access the library, all you will need to do is Subscribe Now to receive the password.
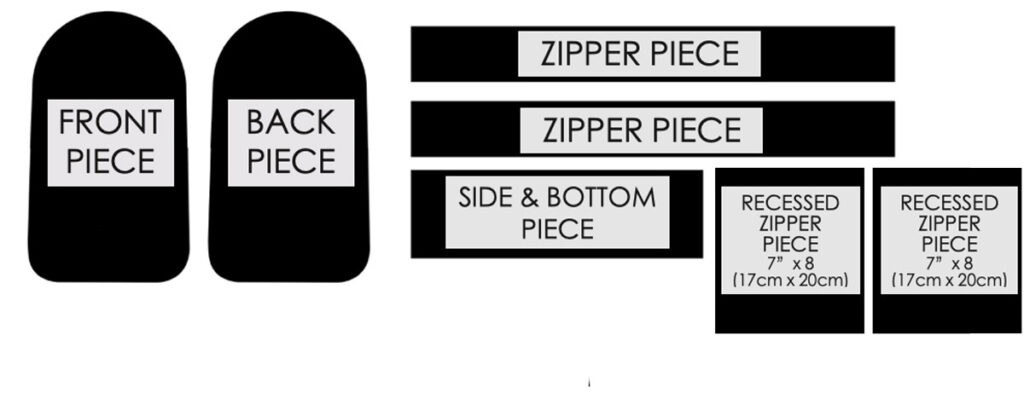
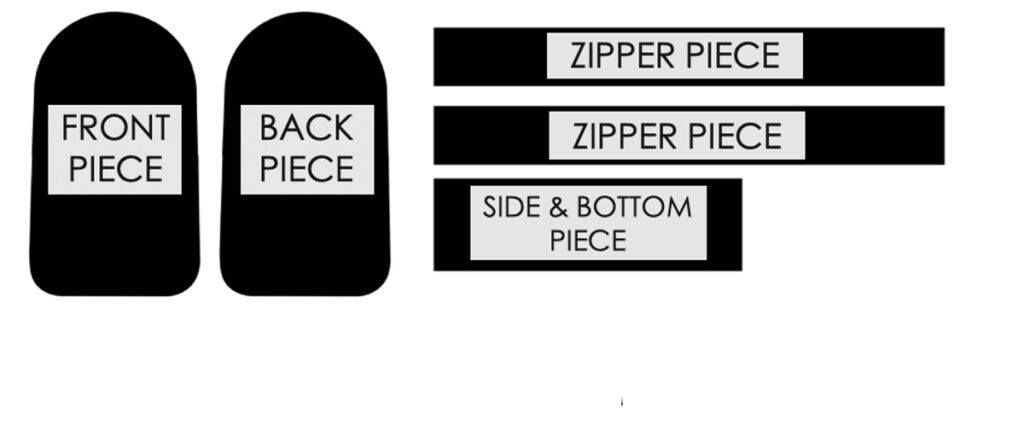
Next, cut out the pattern pieces on fabric. Note that you will need to draw out the patterns [SIDE & BOTTOM PIECE] and [ZIPPER PIECE] on fabric. Exact measurements are listed below:
sling bag pattern:
EXTERIOR FABRIC

- FRONT PIECE (x1)
- BACK PIECE (x1)
- SIDE & BOTTOM PIECE (x1)- Cut 1 piece that measures 13.25” x 4” (33.65cm x 10.16cm)
- ZIPPER PIECE (x2) – Cut 2 pieces that each measure 22”x 2.5” (55.88cm x 6.35cm)
- TOP STRAP PIECE FRONT (x1)
- TOP STRAP PIECE BACK (x1)
- SIDE HOOK PIECE (x1) – Cut 1 piece that measure 2”x 2” (5.08cm x 5.08cm)
LINING FABRIC
- FRONT PIECE (x1)
- BACK PIECE (x1)
- SIDE & BOTTOM PIECE (x1)- Cut 1 piece that measures 13.25” x 4” (33.65cm x 10.16cm)
- ZIPPER PIECE (x2) – Cut 2 pieces that each measure 22”x 2.5” (55.88cm x 6.35cm)
- RECESSED ZIPPER PIECE (x2) – Cut 2 pieces each measuring 7”x 8”(17cm x 20cm)
INTERFACING
- FRONT PIECE (x1)
- BACK PIECE (x1)
- SIDE & BOTTOM PIECE (x1)- Cut 1 piece that measures 13.25” x 4” (33.65cm x 10.16cm)
- ZIPPER PIECE (x2) – Cut 2 pieces that each measure 22”x 2.5” (55.88cm x 6.35cm)
How to MAKE a Sling Bag
Before You Start…
- First, print out sling bag pattern pieces and assemble [FRONT PIECE] and [BACK PIECE] according to arrows and instructions on pattern.
- Next, cut out all sling bag pattern pieces on exterior fabric, lining, and interfacing.
- Third, Iron press interfacing to exterior fabric using appropriate heat settings with steam
- Finally, mark side notches on [FRONT PIECE] and [BACK PIECE] as marked on paper pattern
SLing Bag Pattern: Step-By-Step SEWING Tutorial
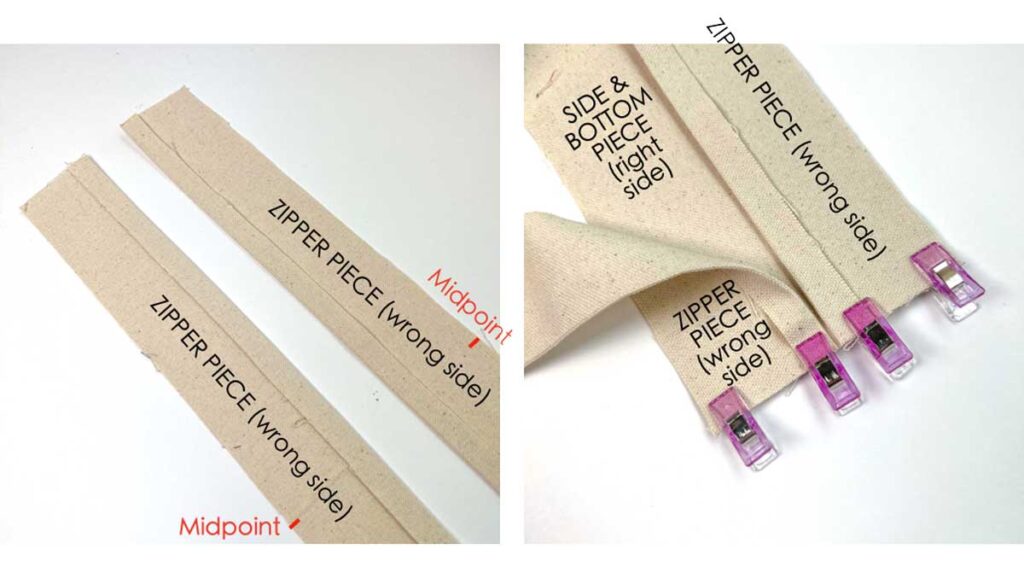
Sewing Bag Zipper Piece
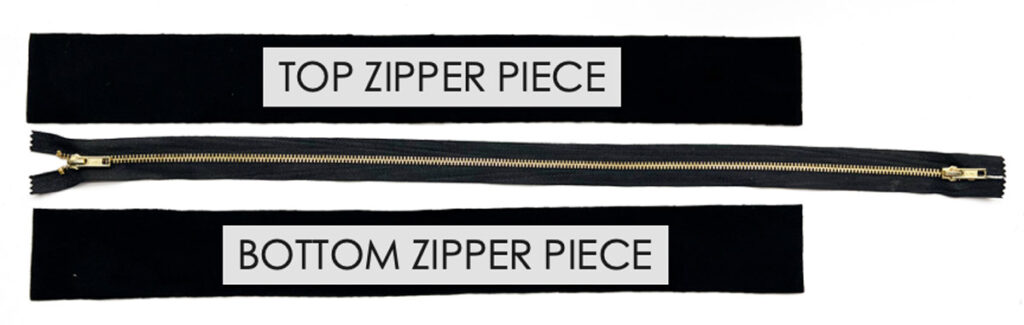
First, place [ZIPPER PIECE] x2 and zipper with right sides facing up. Note that I’m using a 28” zipper that’s why it’s so much longer than the [ZIPPER PIECE]. Also note that I’m calling the [ZIPPER PIECE] above the zipper in this photo as [TOP ZIPPER PIECE] and the one below the zipper as [BOTTOM ZIPPER PIECE] for clarity purposes.
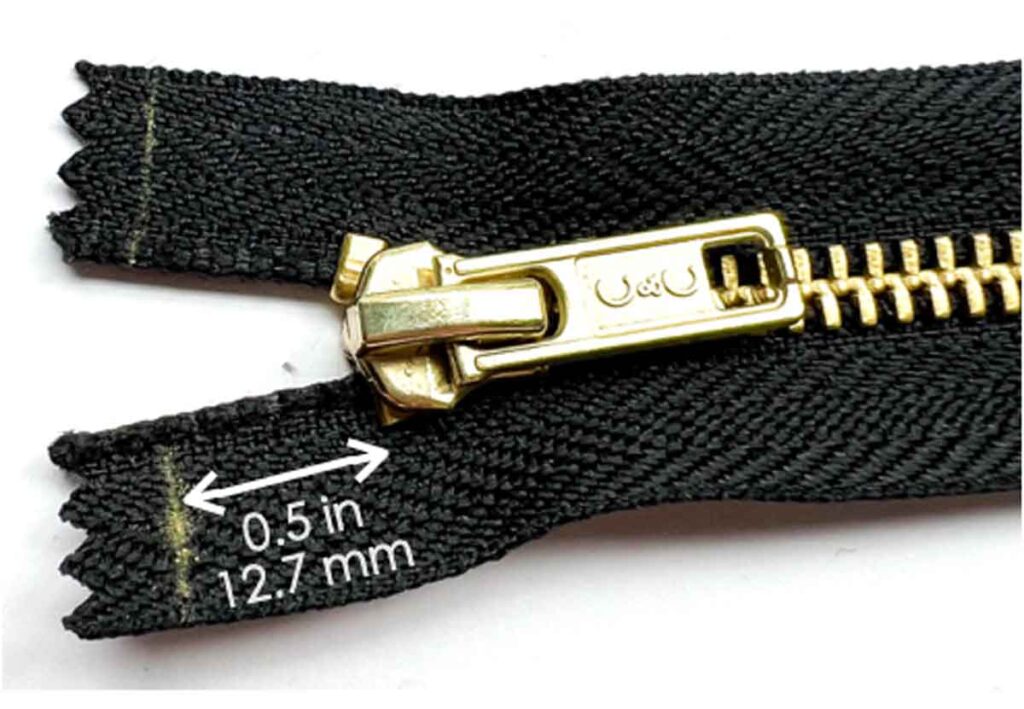
Next, mark a distance of 0.5” (12.7mm) away from beginning of zipper (yellow chalk line).
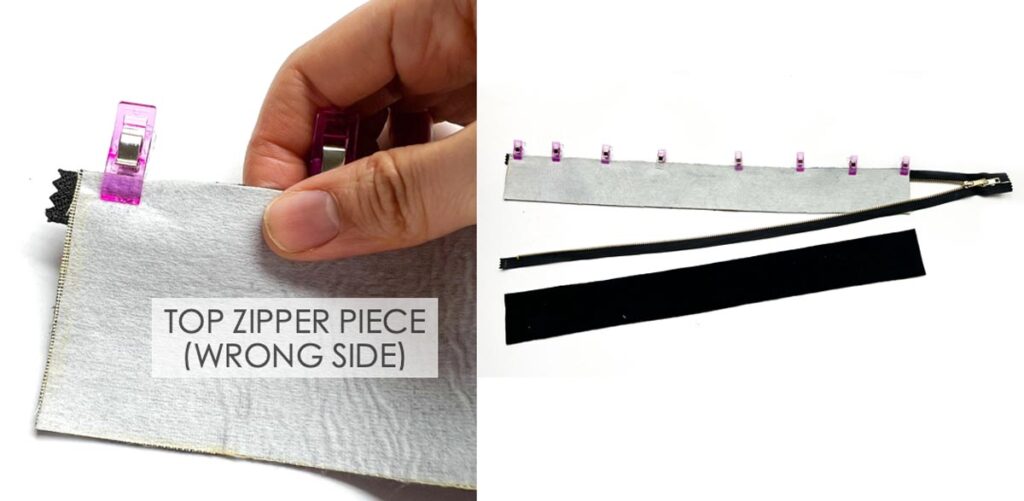
Third, put [TOP ZIPPER PIECE] and zipper right sides together, matching edge of [TOP ZIPPER PIECE] to yellow chalk line you just marked on zipper. Pin/Clip in place
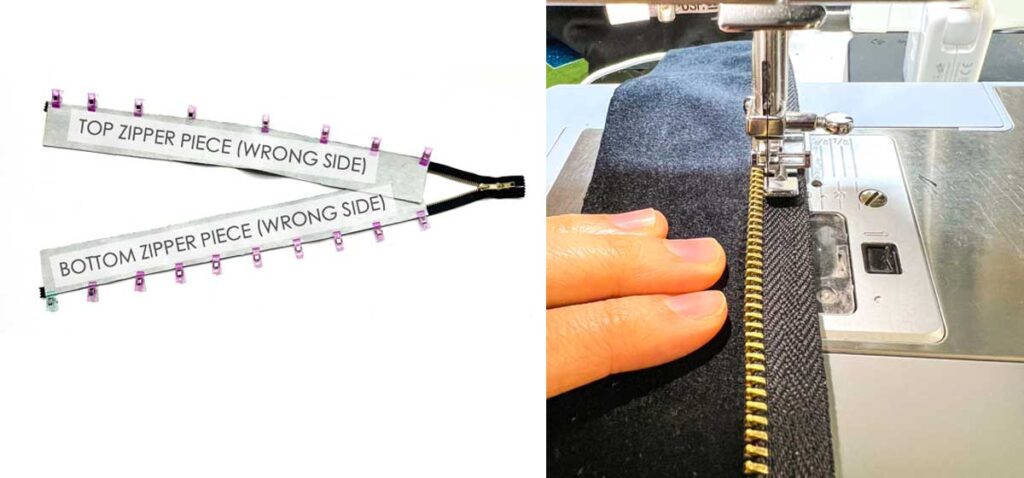
LEFT: Fourth, put [BOTTOM ZIPPER PIECE] and zipper right sides together, matching edge of [BOTTOM ZIPPER PIECE] to yellow chalk line. Pin/Clip in place.
RIGHT: Finally, use a zipper foot and stitch zipper to both zipper pieces.
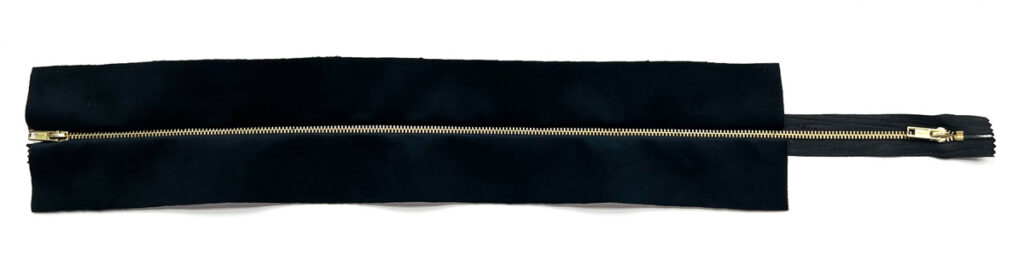
View of bag top zipper after it’s sewn in.
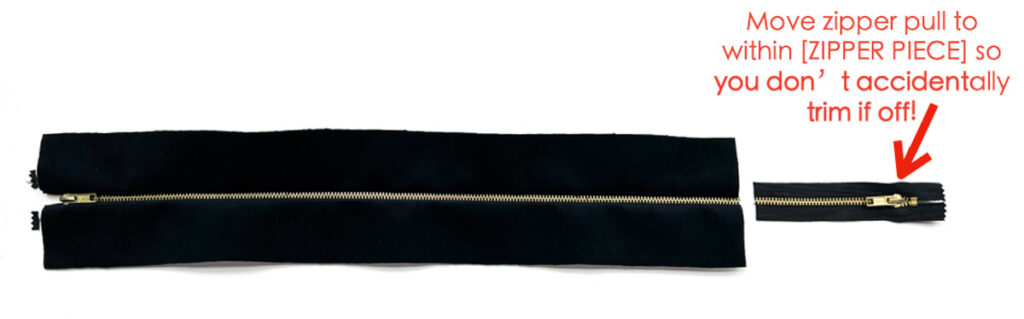
Trim off excess zipper that extends beyond [ZIPPER PIECE]
NOTE: Aaaah! I forgot to move the right zipper pull so it’s within the [ZIPPER PIECE] before cutting off the excess zipper. As a result I now only have one zipper pull for the bag. If you use a two way zipper like I did, don’t accidentally cut off the second pull like i did!!

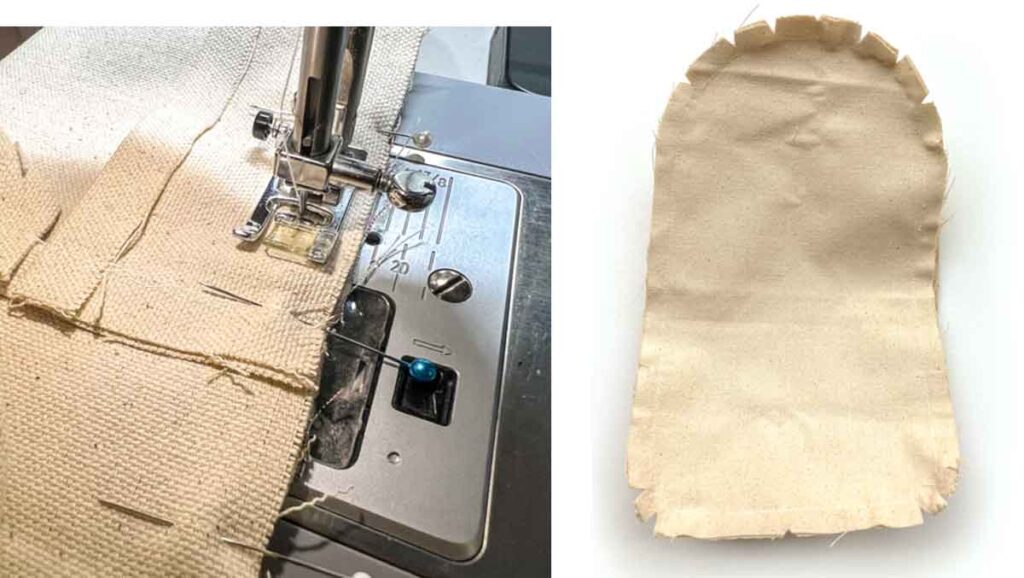
Now pin/Clip [SIDE & BOTTOM PIECE] to [ZIPPER PIECE], right sides together.
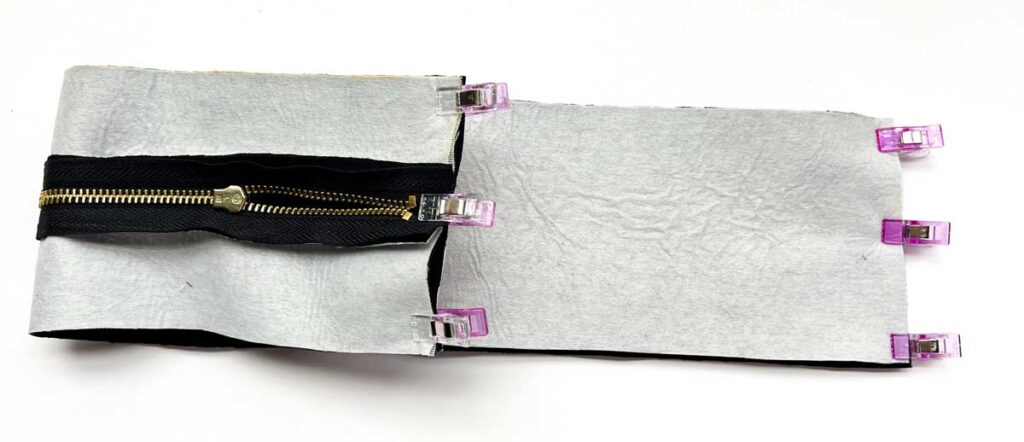
Next, repeat on other side.
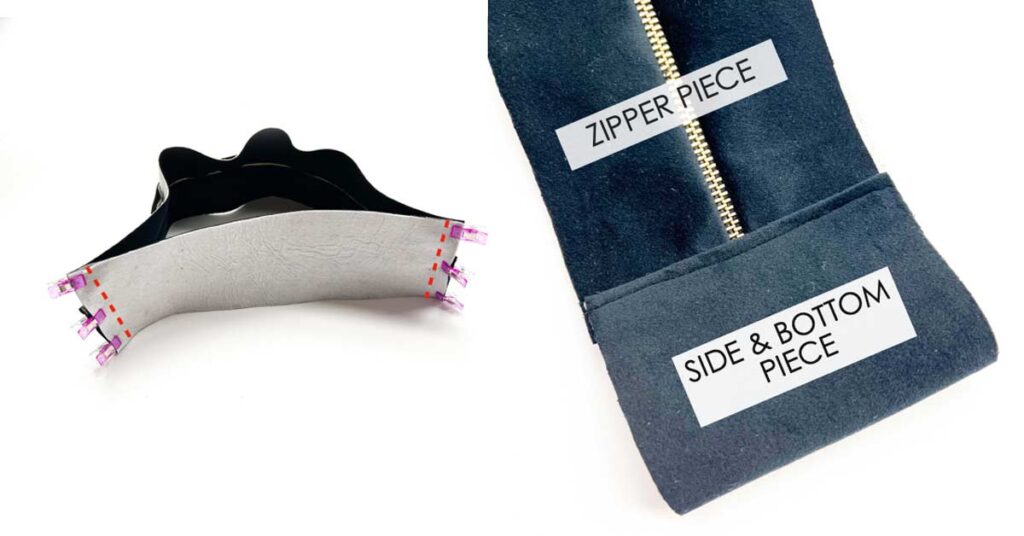
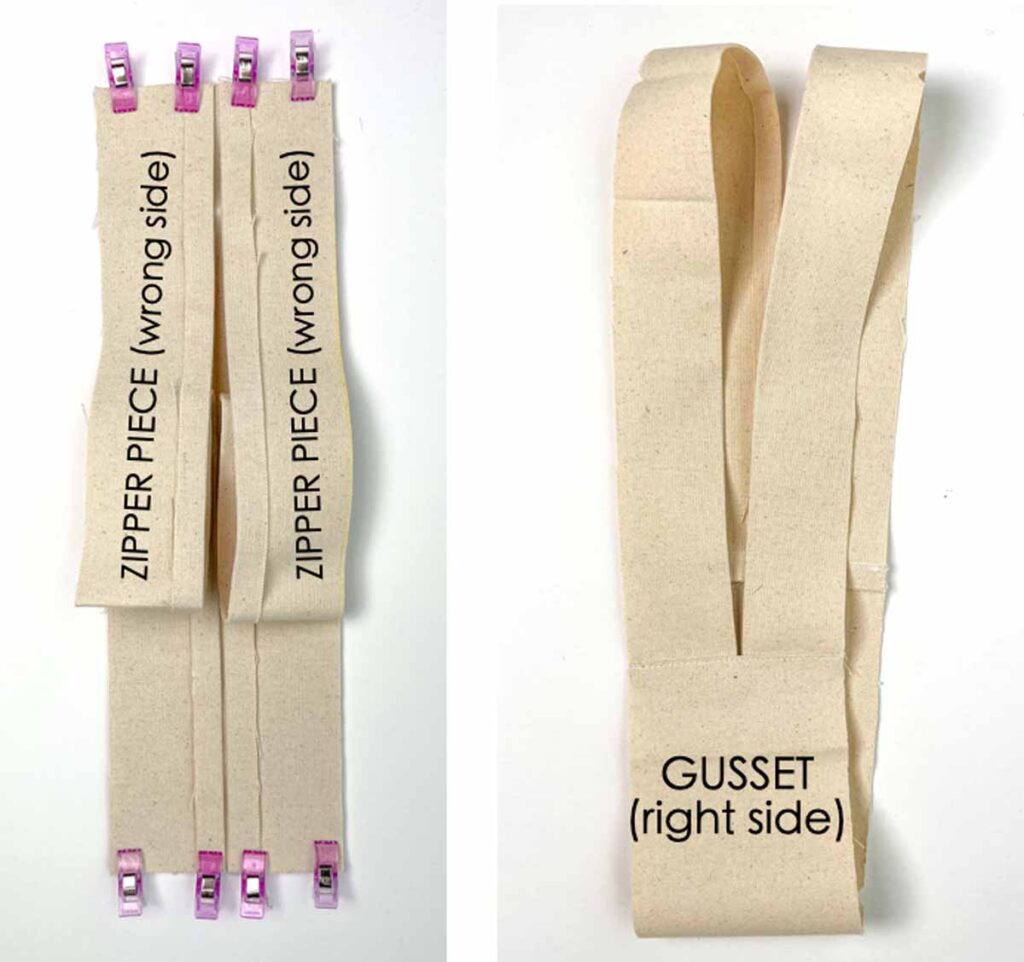
LEFT: Another view of [ZIPPER PIECE] pinned to [SIDE & BOTTOM PIECE]. Stitch together at 1/2”(1.27cm) seam allowance (red dotted line).
RIGHT: Press seam down towards [SIDE & BOTTOM PIECE] and top stitch at 1/8” (3mm) from edge.
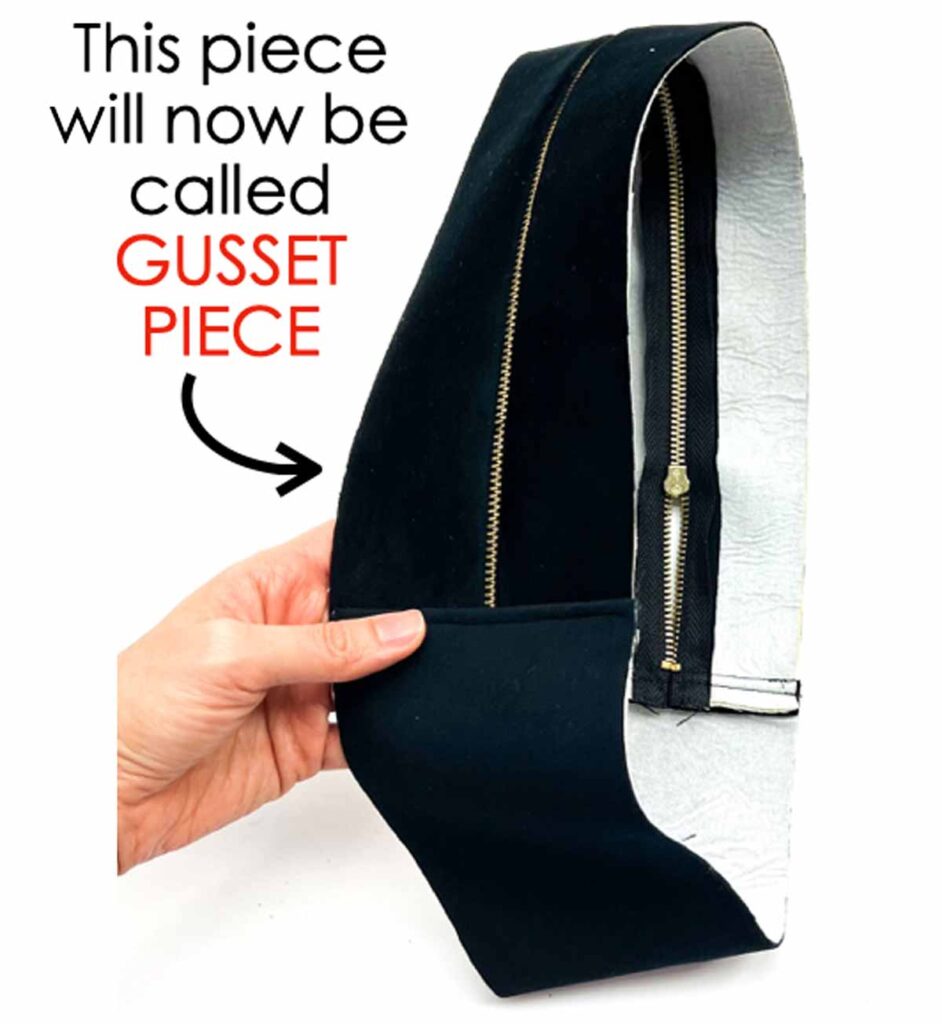
View of [ZIPPER PIECE] sewn to [SIDE & BOTTOM PIECE]. We will now call this entire piece that will go around the sling bag as [GUSSET PIECE].
Sewing Gusset to Front Piece

First, fold [GUSSET PIECE] in half along the length, matching at seam of [ZIPPER PIECE] and [SIDE & BOTTOM PIECE]
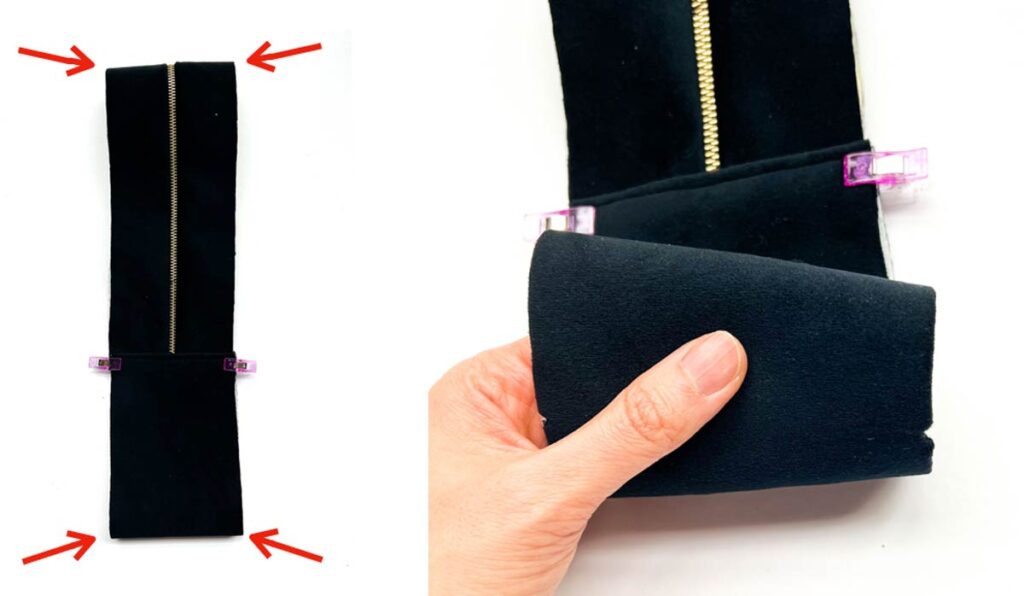
LEFT: Next, clip/Pin the seam in place. Third, mark midpoints on top and bottom of [GUSSET PIECE] by cutting small notches (red arrows).
RIGHT: View of midpoint notches on bottom of [GUSSET]
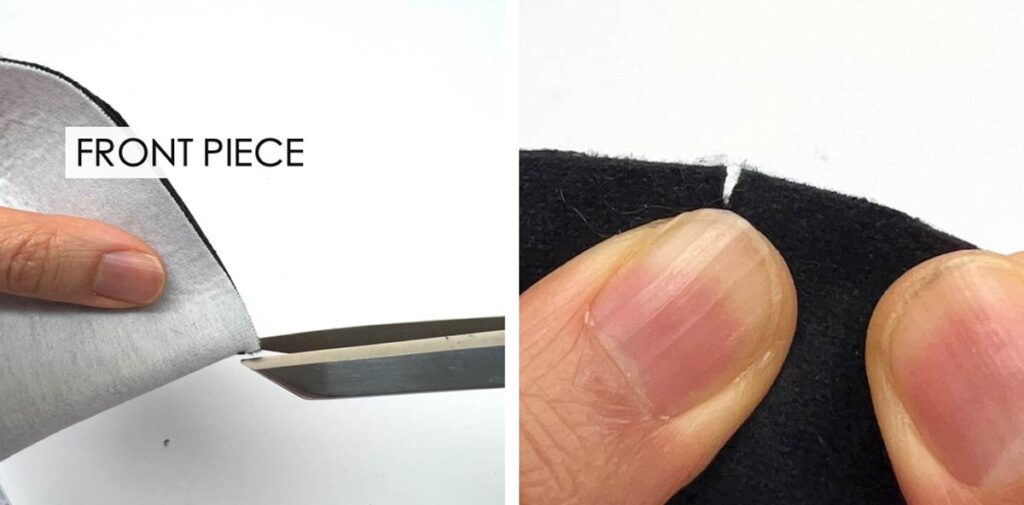
LEFT: Now, fold [FRONT PIECE] in half and mark midpoints on top and bottom by cutting a small notch. Next, repeat for [BACK PIECE] and mark midpoints.
RIGHT: View of midpoint notches on [BACK PIECE].

Photo shows where midpoints need to be marked (red marks). Don’t forget to mark side notches (blue marks) if you haven’t already.
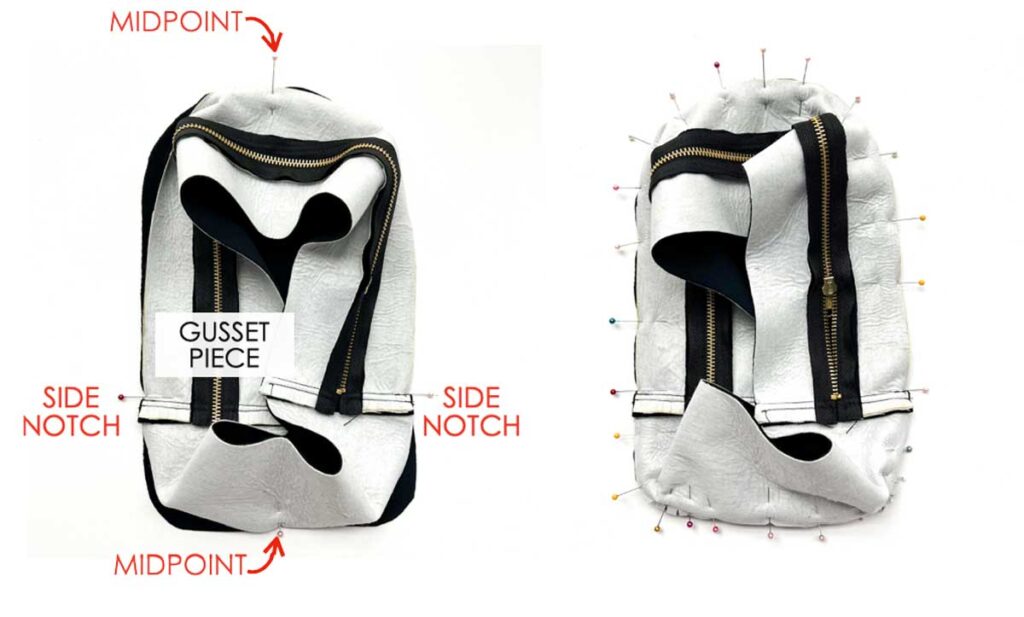
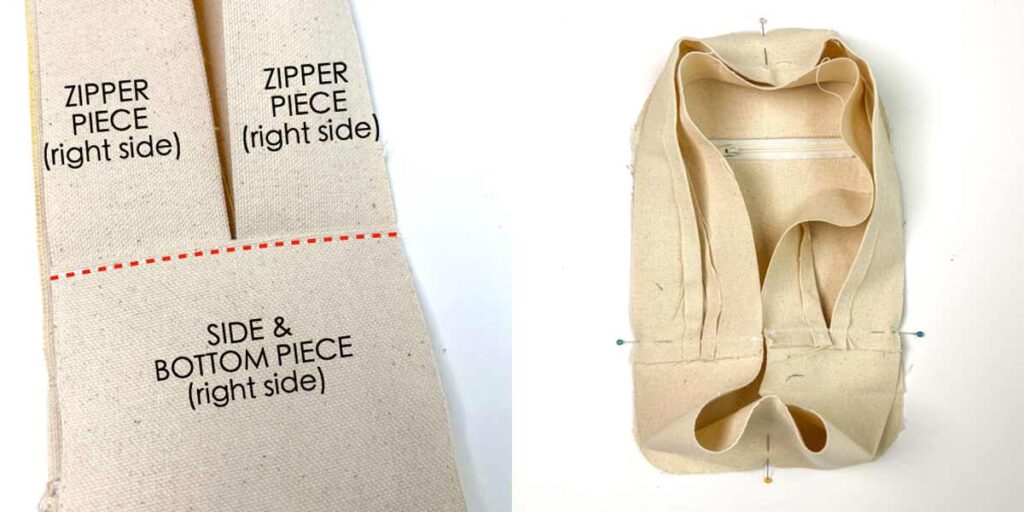
LEFT: First, pin [GUSSET] to [FRONT PIECE], right sides together, matching at top and bottom midpoint, and side notches. Next, match side notch on [FRONT PIECE] with seam of [GUSSET]. You will have 4 pins at this point.
RIGHT: Pin the rest of [GUSSET] to [FRONT PIECE] – See “HOW TO SEW A STRAIGHT FABRIC TO A CURVE” for details and tips of how to pin bottom curves to the [GUSSET].
How to Sew a Straight Piece of Fabric to a Curve
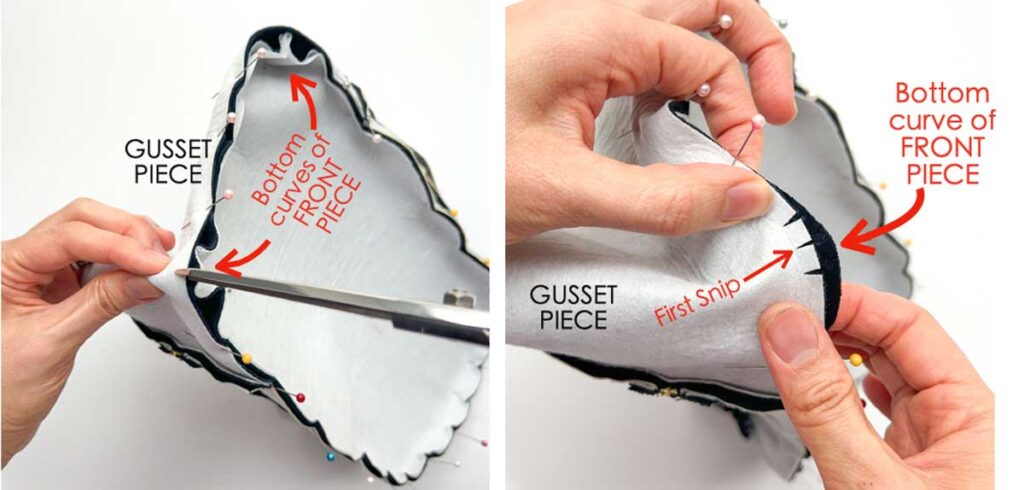
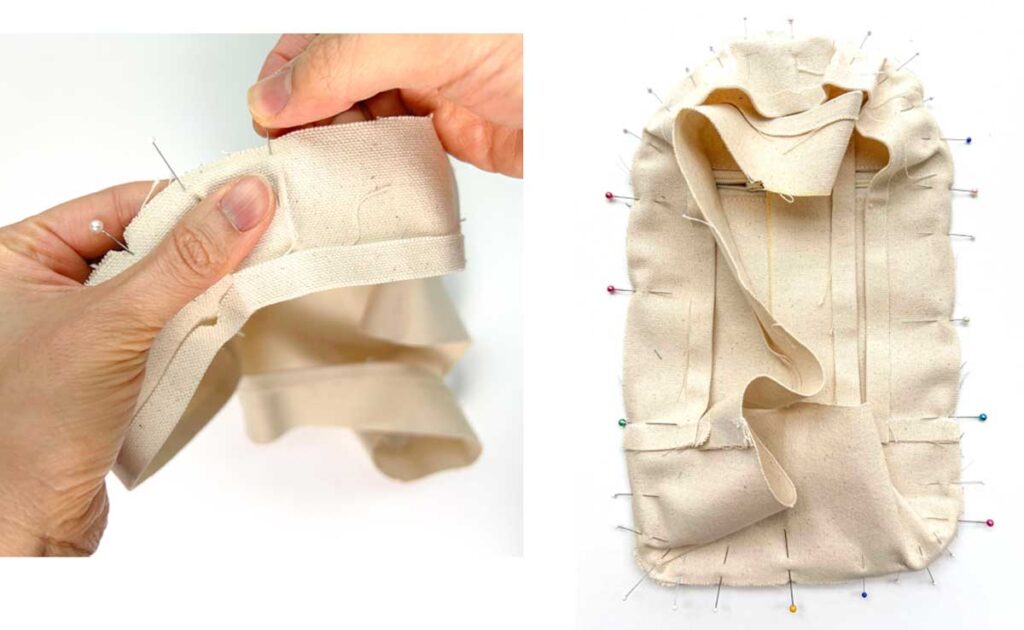
LEFT: Make a snip about 0.25”(6mm) deep on [GUSSET PIECE] where it goes around bottom curve of [FRONT PIECE]
RIGHT: Make two more snips, one on each side of the first snip, about 0.25”(6mm) away.

Pin [GUSSET] to bottom curve of [FRONT PIECE]. You should notice that after you make the 3 snips, the [GUSSET PIECE] will spread much easily and nicely around the curve.

Stitch [FRONT PIECE] to [GUSSET] at 1/2”(12mm) seam allowance. I find it’s easier to maneuver the curves if [GUSSET PIECE] is facing up as you sew.

View of [GUSSET] sewn to [FRONT PIECE]. Clip curves and trim seam allowance to 1/4”(6mm).
NOTE: This tutorial shows you how to sew [GUSSET], a straight piece of fabric, to the [FRONT PIECE], a piece with curves. The method is exactly the same when you sew [GUSSET] to [BACK PIECE] later on, and also for sewing the bag lining together.
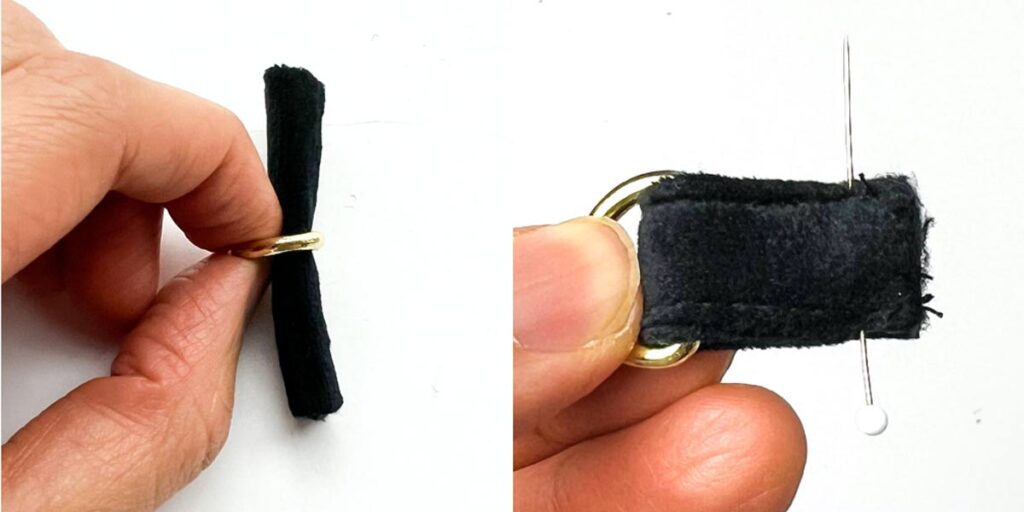
Making Shoulder Strap Clips
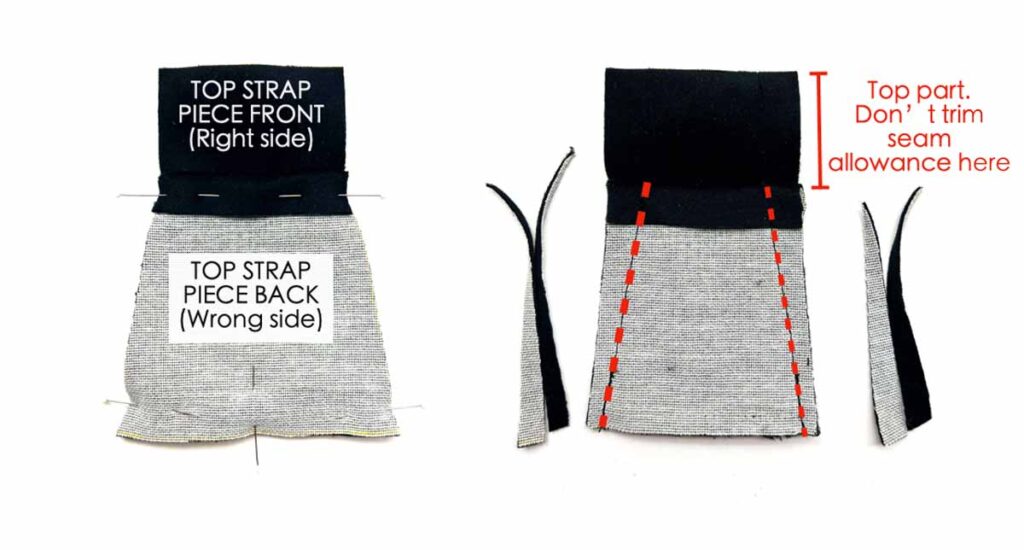
LEFT: First, fold top 1/2” (12mm) of [TOP STRAP PIECE – BACK] down towards the wrong side of fabric. Next, pin to [TOP STRAP PIECE – FRONT], right sides together.
RIGHT: Third, sew together at 1/2” (12mm) seam allowance (red dotted line), leaving top and bottom open. Back stitch at both ends.
Finally, trim seam allowance of where you sewed. Make sure not to trim down seam allowance of the top part where you didn’t sew.

LEFT: Then, turn [TOP STRAP PIECE] to right side.
RIGHT: Finally, give TOP STRAP PIECE a good press. Press 1/2” seam allowance of [TOP STRAP PIECE-FRONT] towards each other.
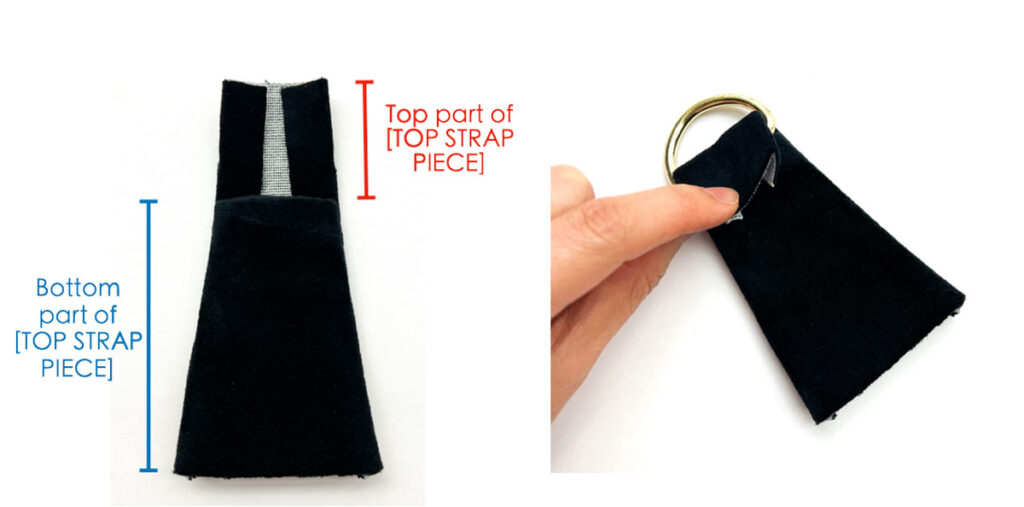
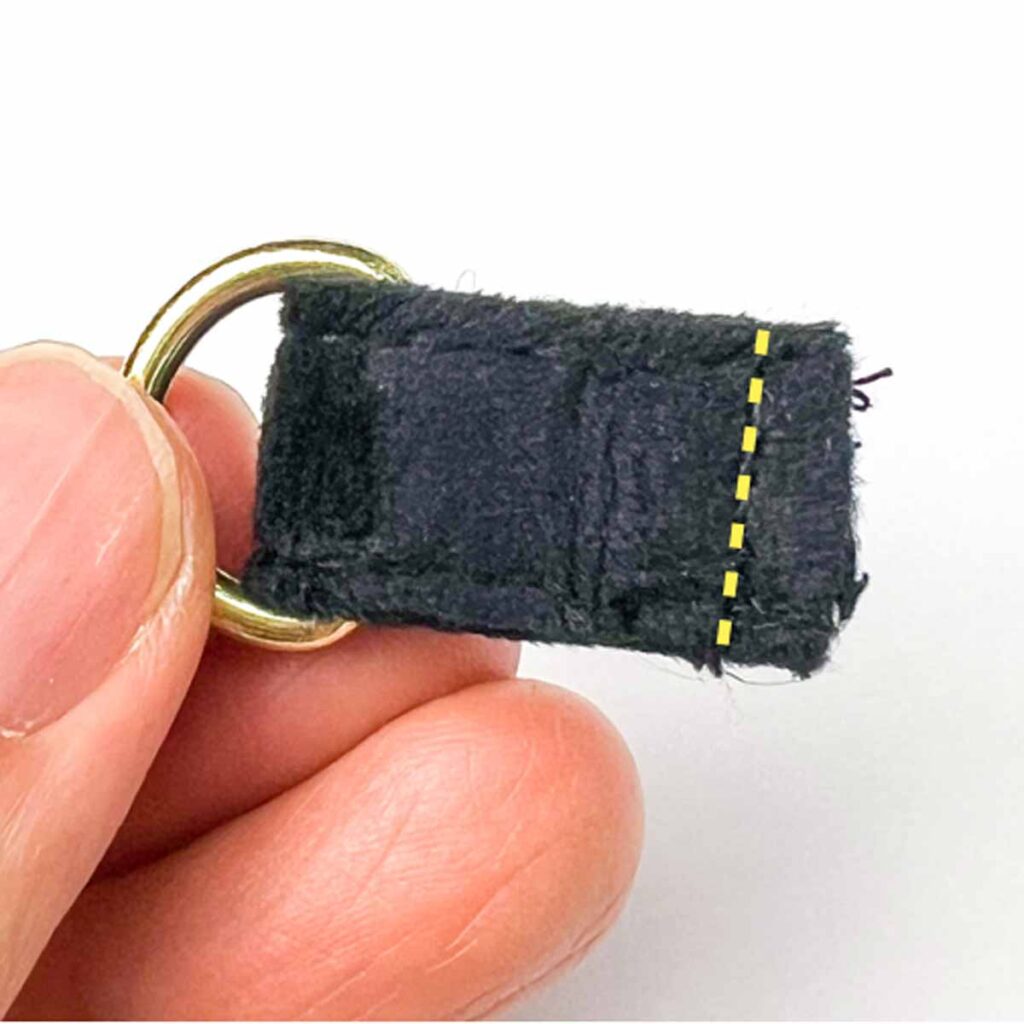
LEFT: View of [TOP STRAP PIECE] after sewn and pressed.
RIGHT: Next, loop a 1.5” D ring through the top part.
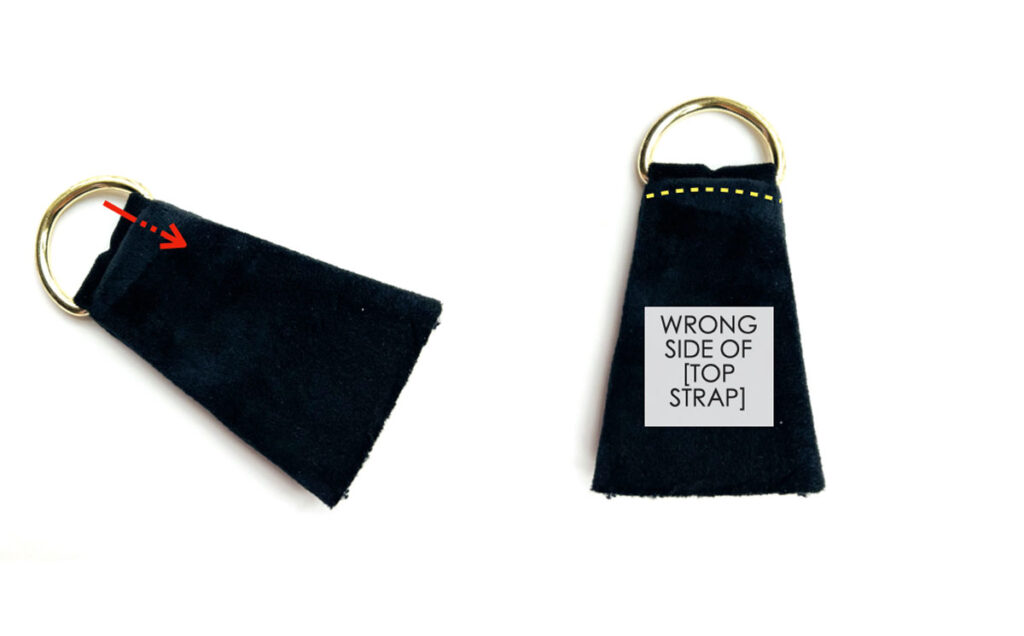
Finally, tuck the top part into the bottom part of [TOP STRAP PIECE] and sew at 1/8”(3mm) from edge (yellow dotted line).
NOTE: This side of [TOP STRAP PIECE] where you tucked in the top part and sewed will be considered the “wrong side” when we sew it to the rest of the bag later on (see “Sewing Back Piece to Rest of Sling Bag“).
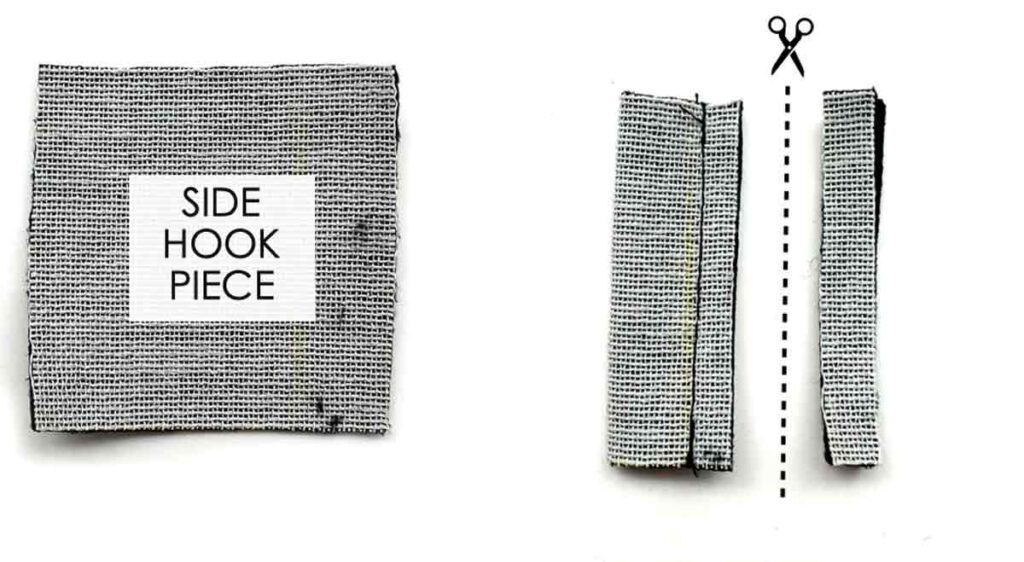
Now we will be sewing [SIDE HOOK PIECE]. First, fold [SIDE HOOK PIECE] in half, right sides together. Next, stitch at 1/2” (12.7mm) seam allowance. Finally, trim seam allowance down to 1/4” (6mm)
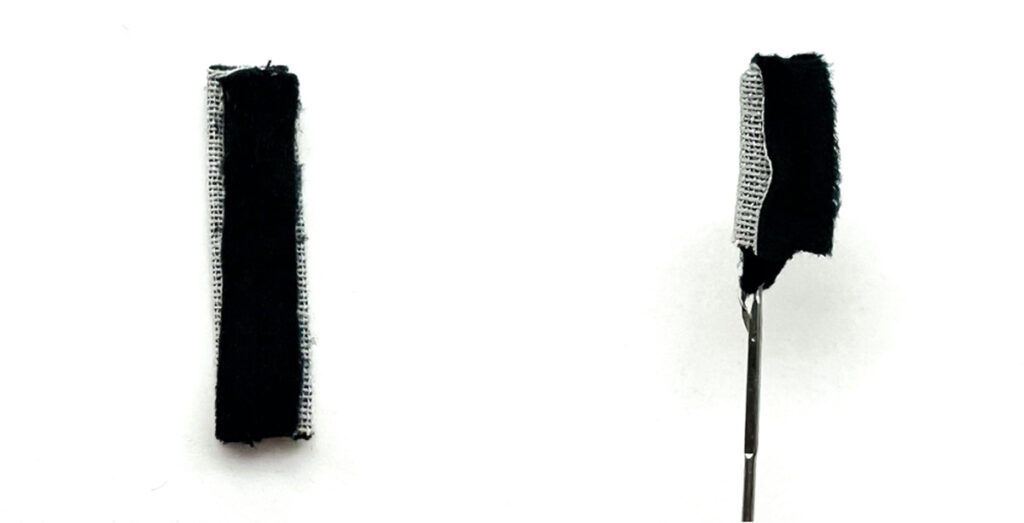
LEFT: Now, press seam allowances open
RIGHT: Then, turn [SIDE HOOK PIECE] to right side with loop turner.
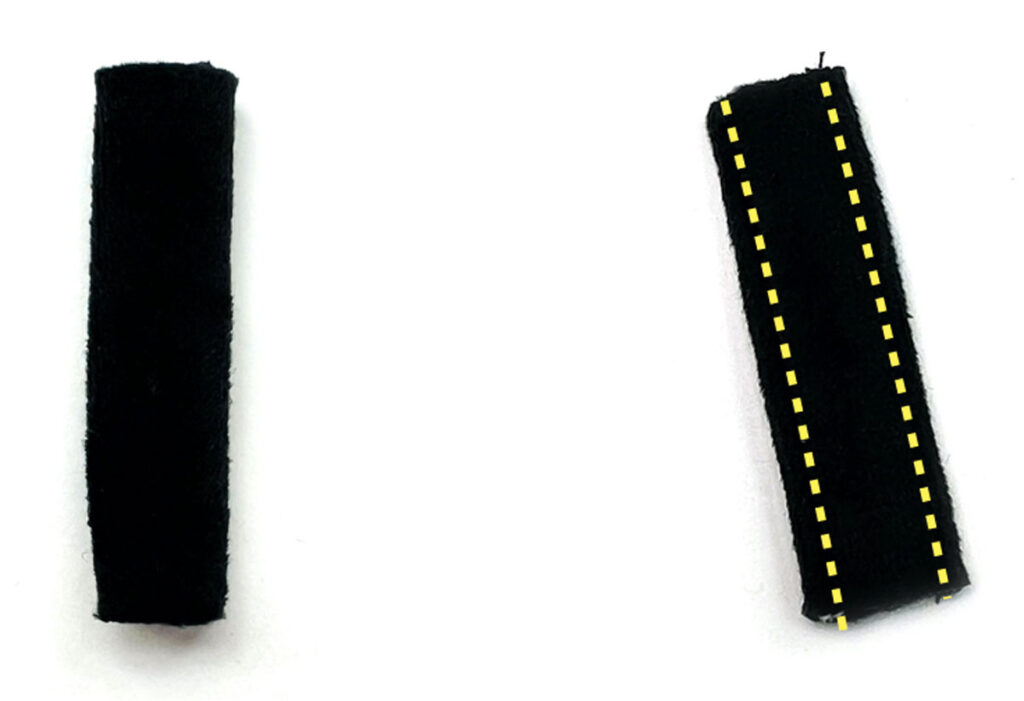
LEFT: Next, press [SIDE HOOK PIECE] flat.
RIGHT: Then, stitch both sides down at ⅛”(3mm) from edge (yellow dotted lines).
Next, thread [SIDE HOOK PIECE] through 0.5” D-ring, fold in half, and pin ends together.
Finally, machine baste ends together (yellow dotted line). For more information about how to machine baste, check out “How to Sew a Basting Stitch“.
Sewing Back Piece to Rest of Sling Bag
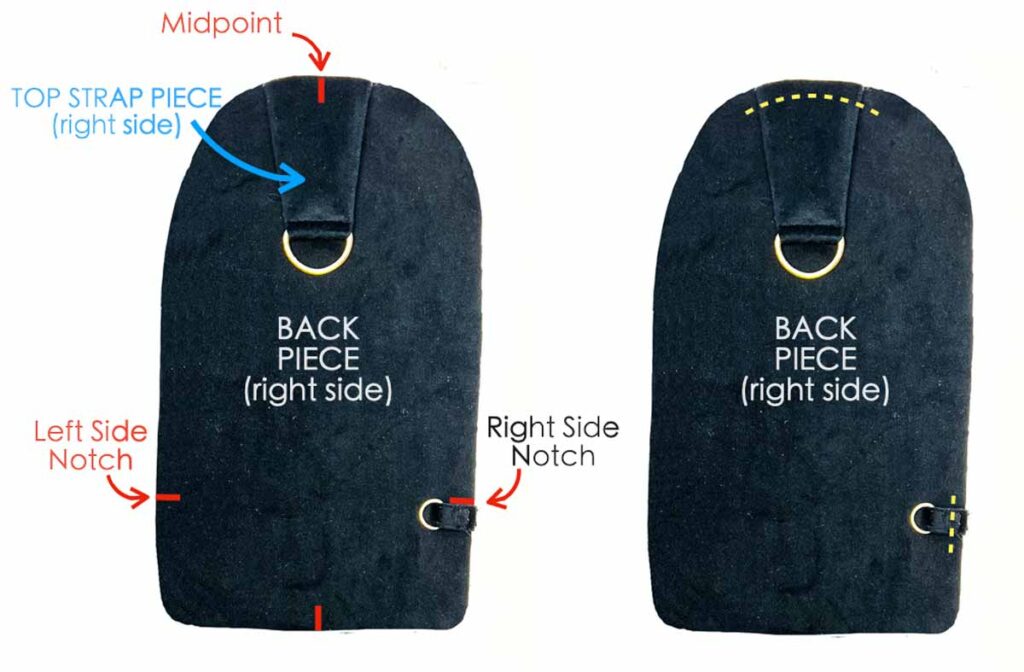
LEFT: First, mark midpoint of [TOP STRAP PIECE] and match it to top midpoint of [BACK PIECE]. Make sure the wrong side of [TOP STRAP PIECE] faces the right side of [BACK PIECE]. Remember the wrong side of [TOP STRAP PIECE] is the side where you tucked in the top flap that goes over the D-ring and then stitched together (see Sewing Shoulder Strap Clips). Next, match [SIDE HOOK PIECE] directly below the side notch on the right of [BACK PIECE].
RIGHT: Baste [TOP STRAP PIECE] and [SIDE HOOK PIECE] to [BACK PIECE] (yellow dotted lines).
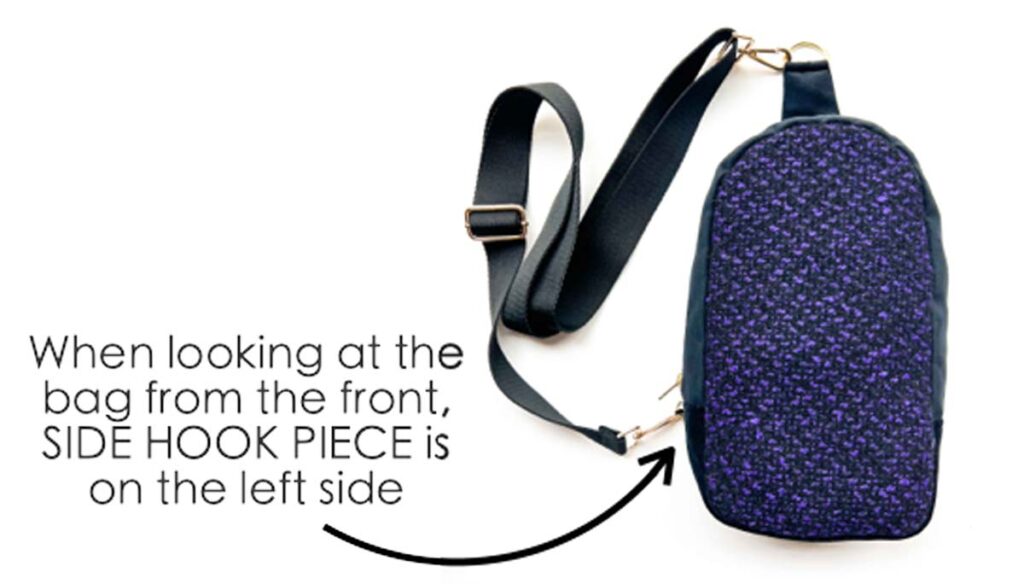
NOTE: You can also choose to place [SIDE HOOK PIECE] on left side notch of [BACK PIECE] if you like. Just remember that whichever side you place the [SIDE HOOK PIECE] on, it will end up on the opposite side when you are finished with the bag and looking at the bag from the front.
So for example, in this tutorial we basted the [SIDE HOOK PIECE] on the right side notch. When the bag is done, and you are looking at the bag from the front, the [SIDE HOOK PIECE] will be to the left of the bag.
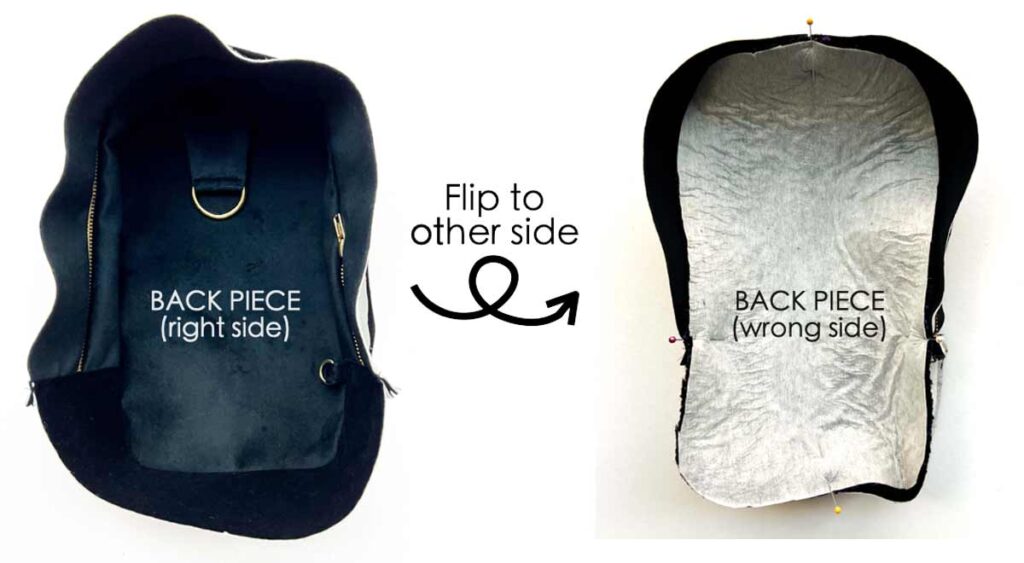
LEFT: Pin [GUSSET] to [BACK PIECE] at top and bottom midpoints and two side notch. Match seam (where [ZIPPER PIECE] is sewn to [SIDE & BOTTOM PIECE]) to the side notch.
NOTE: At this point, your [FRONT PIECE] is already sewn to [GUSSET] so you won’t be able to see [BACK PIECE] like in the left photo. I took this photo specifically so you can see what [BACK PIECE] pinned to [GUSSET], right sides up, looks like.
RIGHT: Flip to other side of wrong side of [BACK PIECE] faces up.
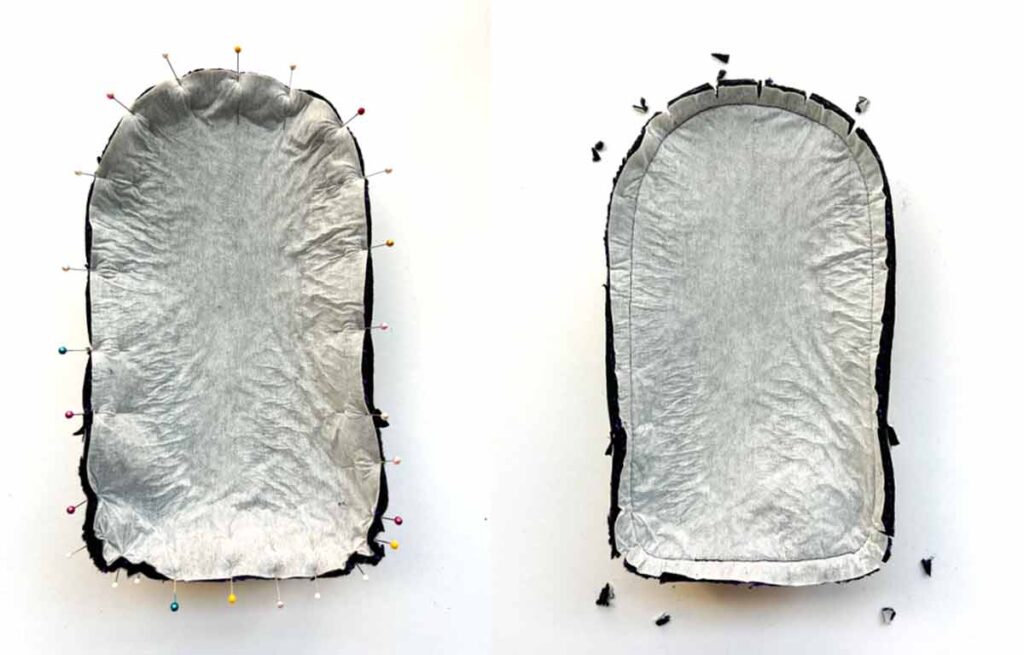
LEFT: Pin entire [BACK PIECE] to [GUSSET]. Follow instructions for “How to Sew a Straight Piece of Fabric Around a Curve”.
RIGHT: Clip curves

LEFT: Trim Seam allowance to 1/4” (6mm).
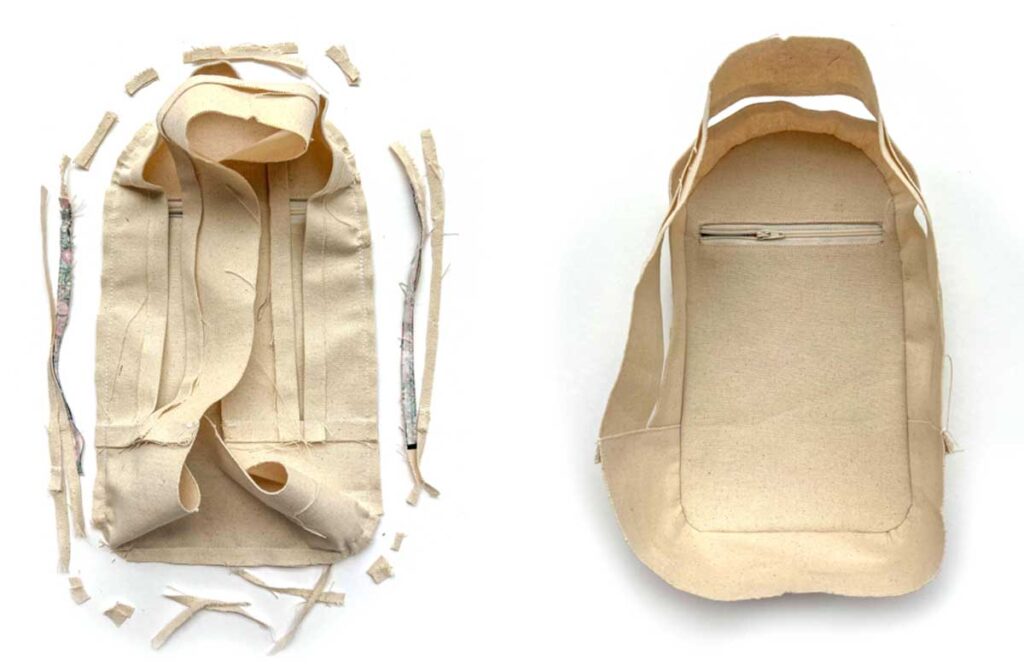
RIGHT: Finished bag exterior.
Turn exterior bag to right side.
How to Sew Recessed Zipper on Lining
Gather necessary supplies:
- BACK LINING PIECE
- 6” REGULAR ZIPPER
- RECESSED ZIPPER PIECE (x2) – Each Piece measures 7” x 8”(17cm x 20cm)

On right side of [BACK LINING PIECE], draw a rectangle that measures 5 ⅛“ x 0.5” (13cm x 1.27cm), a distance of 2.5” (6.35cm) from the top, and 1” (2.54cm) from both sides. Draw a “>———————< ” shape inside the rectangle as shown in photo.
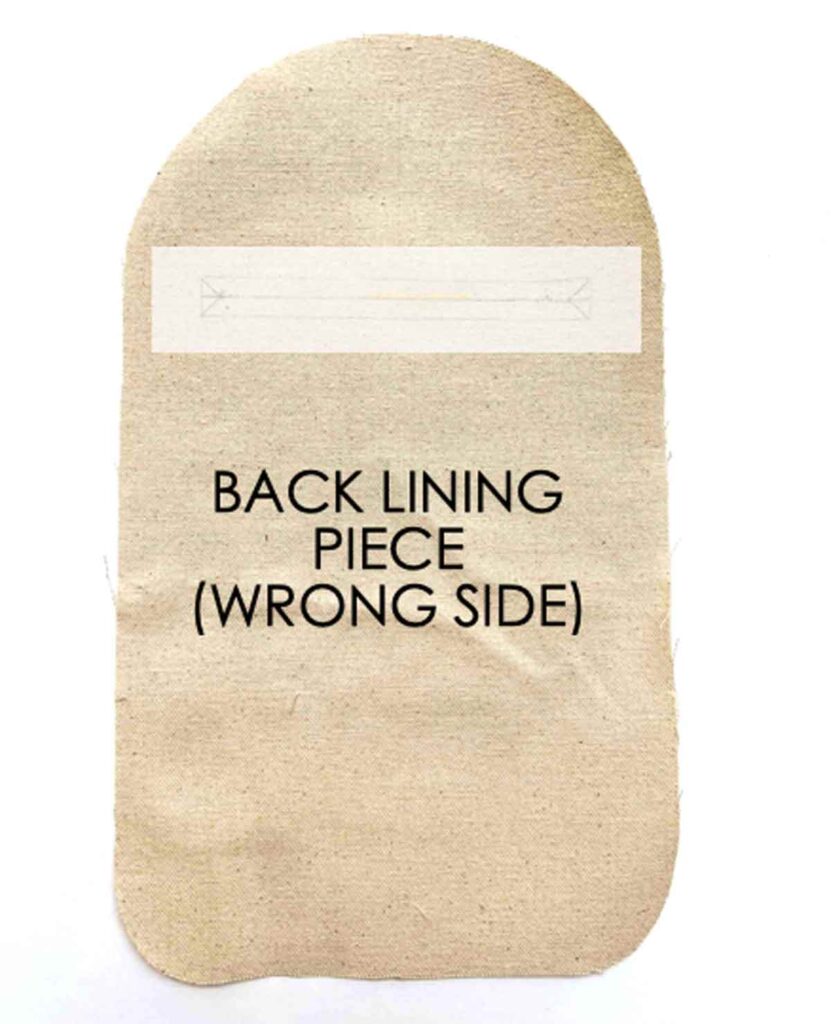
LEFT: Cut a piece of fusible interfacing that measures approximately 6”x 1.5” (15.24cm x 3.81cm). Fuse it onto the wrong side of [BACK LINING PIECE] so that it will covers the rectangle you just drew on the right side.

Cut “>——————————<“ inside rectangle.
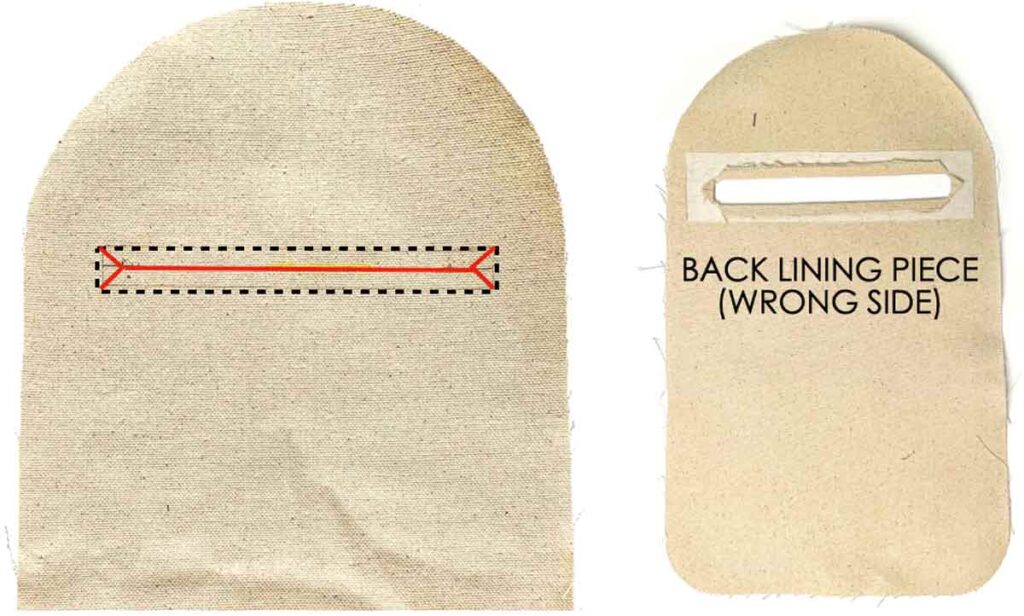
LEFT: Solid red line indicates where you cut. Fold back (to wrong side of BACK LINING PIECE) where you cut, along border of rectangle (black dotted line)
RIGHT: Next, from wrong side of [BACK LINING PIECE], press down the folds. You now have a rectangular opening
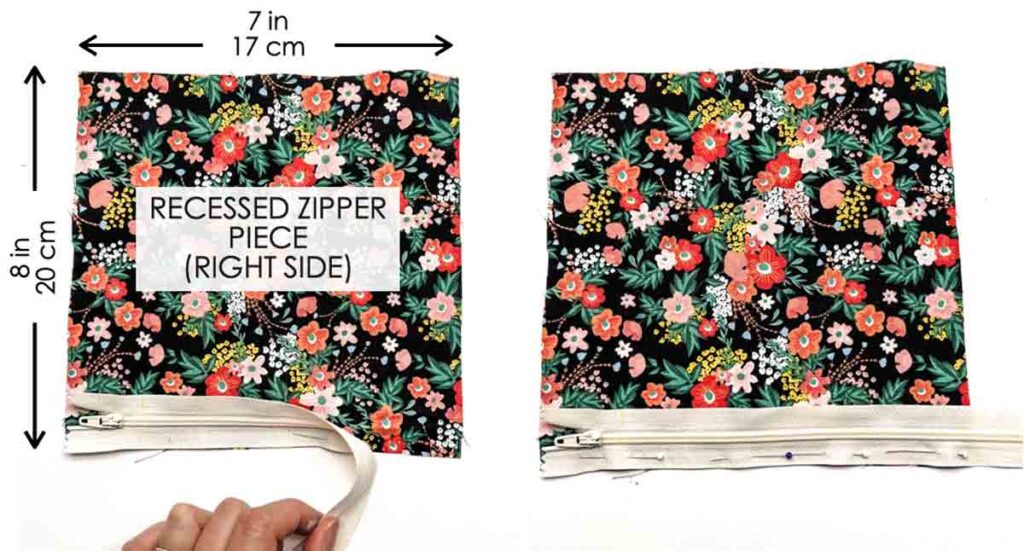
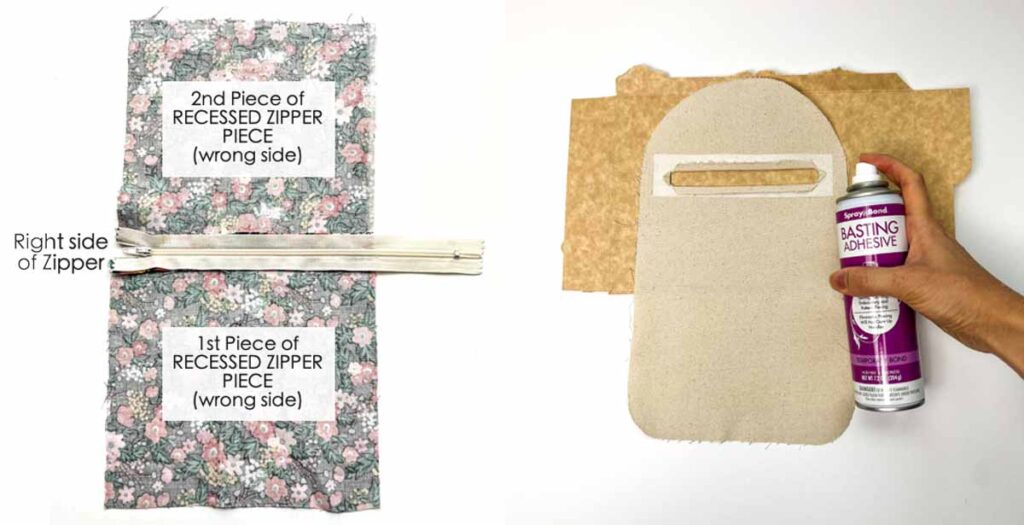
LEFT: Place wrong side of zipper over right side of [RECESSED ZIPPER PIECE], lining up at the bottom and left edge.
RIGHT: Next, pin zipper in place. I’ve oriented the pins parallel to the zipper as you will remove them as you sew later on. You can also pin perpendicular to the zipper if that is what you are used to.
NOTE: The right side of zipper and the right side of [RECESSED ZIPPER PIECE] will both be facing up. This is correct.
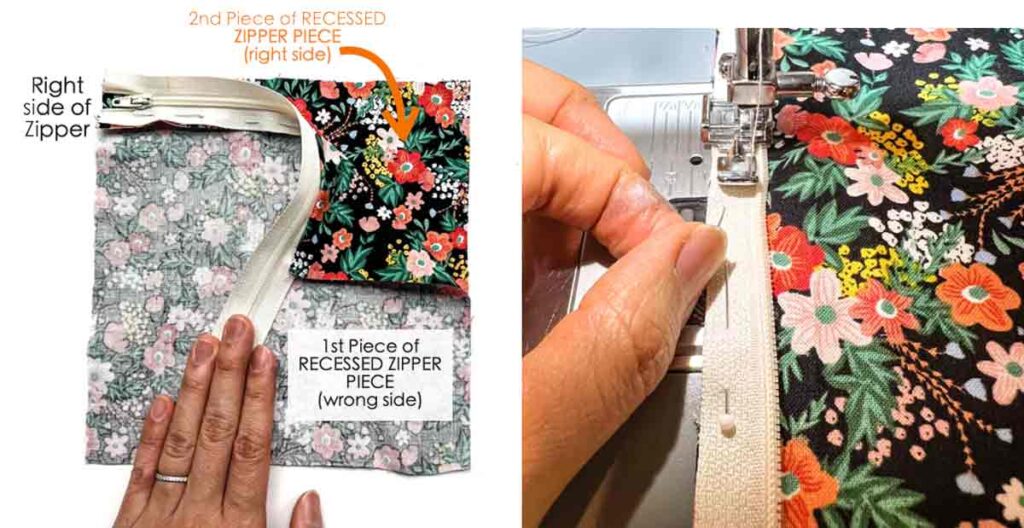
LEFT: Pull 1st piece of [RECESSED ZIPPER PIECE] down (the piece you just pinned to zipper). Place wrong side of zipper over right side of 2nd [RECESSED ZIPPER PIECE], matching at top and left edge. Pin in place.
RIGHT: Sew together with zipper foot, removing pins as you go.
LEFT: When you are done sewing, open both pieces of [RECESSED ZIPPER PIECE] so that the wrong side faces up. The right side of zipper will be facing up.
RIGHT: Apply basting adhesive to wrong side of [BACK LINING PIECE], just around the rectangular opening. Make sure to put a piece of paper/cardboard behind the opening so you don’t get your work surface sticky!
NOTE: If you don’t have basting adhesive, that’s ok too! Just use pins instead.
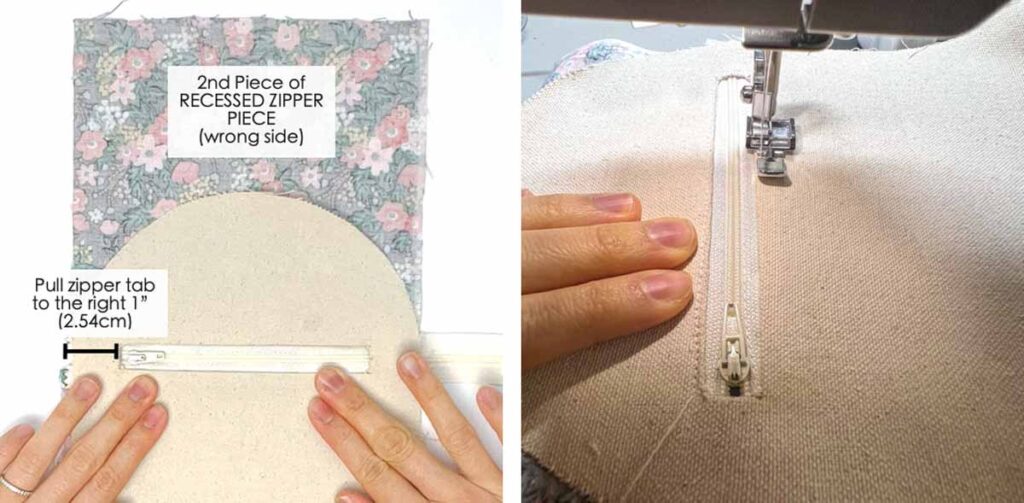
LEFT: Pull zipper tab open (to the right) so it’s about 1” (2.54 cm) from left edge. Place wrong side of [BACK LINING PIECE] over zipper, matching [BACK LINING PIECE] with [RECESSED ZIPPER PIECE] on the left and right edges. Gently pat around the rectangular opening to stick it to the zipper.
RIGHT: Sew [BACK LINING PIECE] to zipper around rectangular opening with zipper foot.
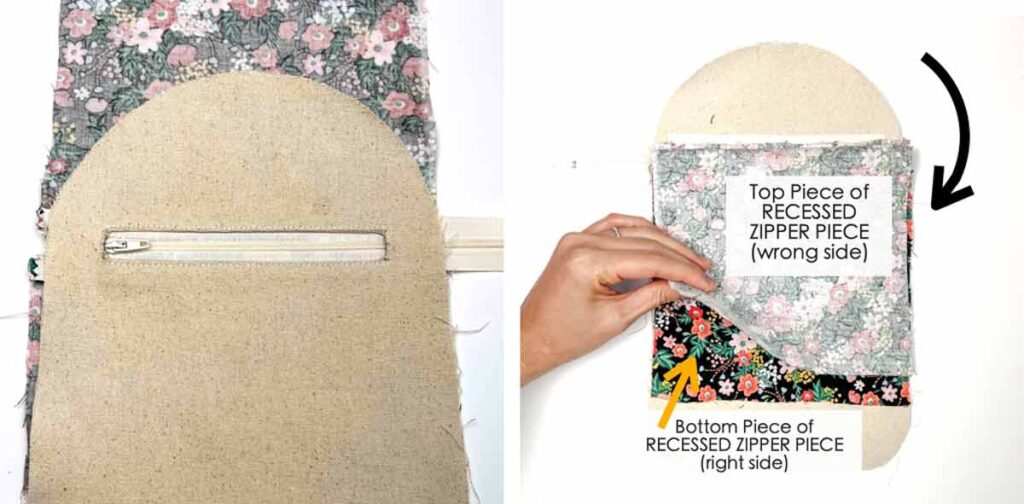
LEFT: View of [BACK LINING PIECE] stitched to zipper.
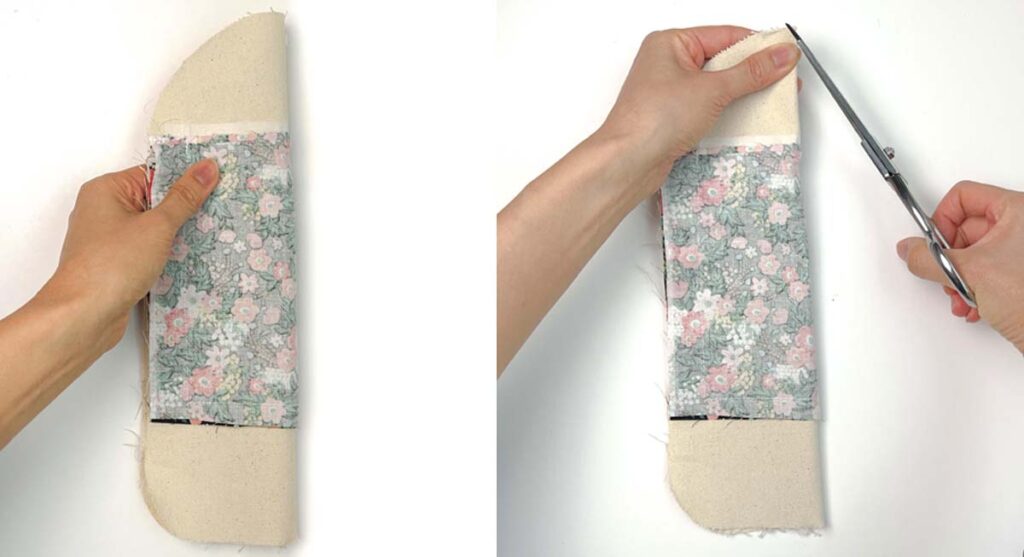
RIGHT: Flip top piece of [RECESSED ZIPPER PIECE] down and match it with the bottom [RECESSED ZIPPER PIECE]. You will notice that the bottom piece is longer than the top piece.
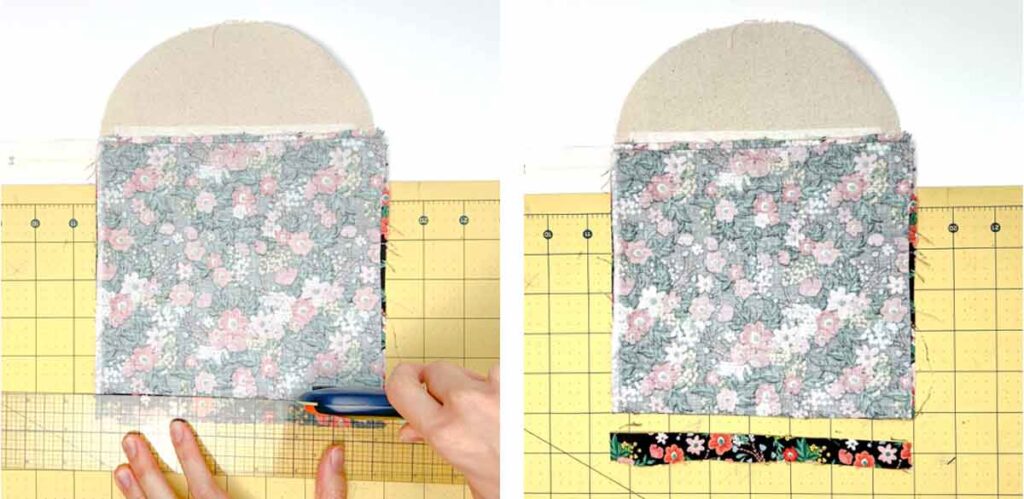
Use rotary cutters (or fabric scissors) to cut off the excess bottom piece. My was bottom piece was about 3/4” (1.9cm) longer
NOTE: Make sure you don’t accidentally cut [BACK LINING PIECE]!

LEFT: Cut off excess [RECESSED ZIPPER PIECE] and zipper that extends beyond [BACK LINING PIECE].
RIGHT: Clip [BACK LINING PIECE] back to expose the [RECESSED ZIPPER PIECE]. You will sew zipper and both [RECESSED ZIPPER PIECE] together along black dotted lines.
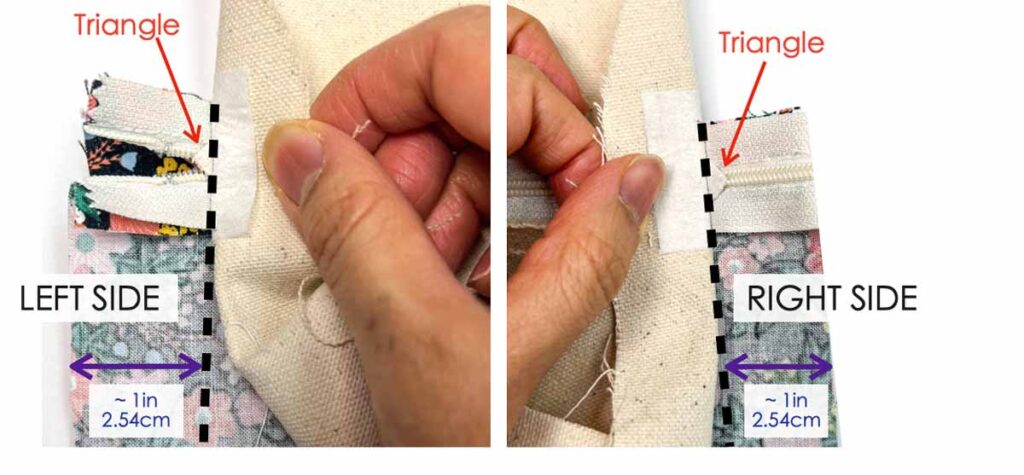
Make sure you sew down the two triangles (from when you cut the rectangular opening) onto zipper and both [RECESSED ZIPPER PIECE]. Black dotted line indicates where you will sew.
NOTE: The seam allowance of where you sew depends on where the triangles are on the left and right side. It is approximately 1” (2.54cm) from edge of [RECESSED ZIPPER PIECE]
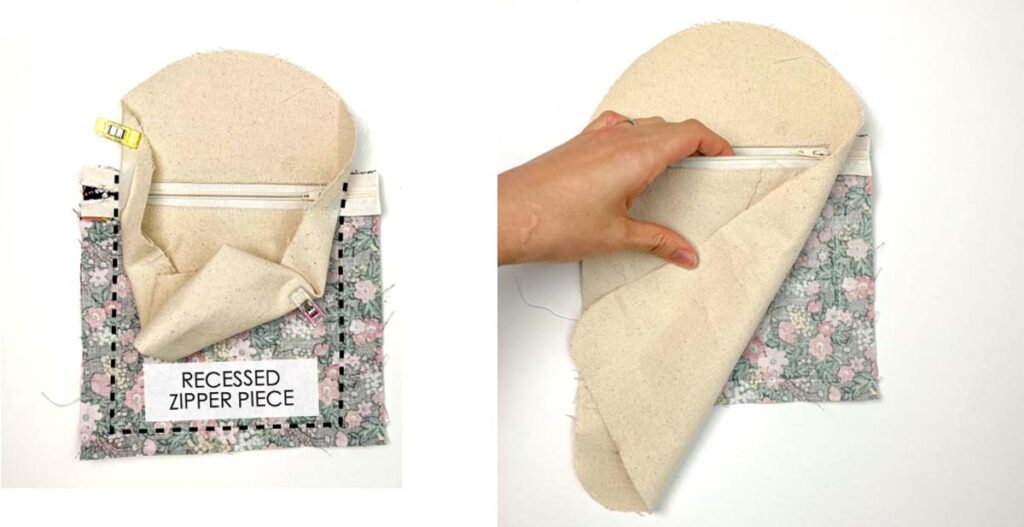
[RECESSED ZIPPER PIECES] sewn together. From the [BACK LINING PIECE], you now have a recessed zipper pocket! Hooray!
How to Sew Lining Together
Fold [BACK LINING PIECE] in half and snip the top and bottom midline to mark midpoints.
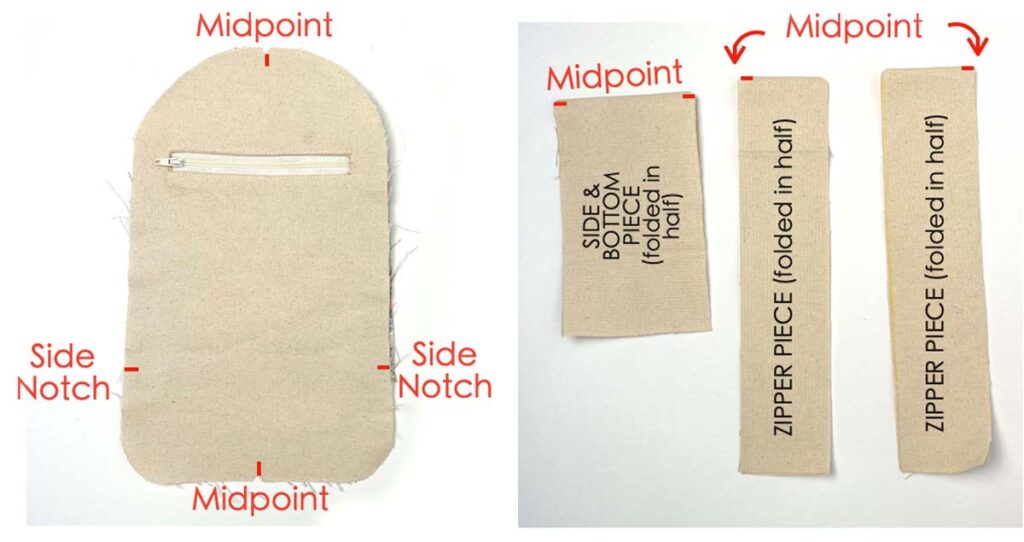
LEFT: Marked midpoints on [BACK LINING PIECE]. Don’t forget to also mark side notches (from paper pattern)
RIGHT: Mark midpoints on [SIDE & BOTTOM PIECE] and [ZIPPER PIECE] by folding them in half along the length and snipping at the midpoint (red markings)
NOTE: You only need to mark one side of midpoint on each [ZIPPER PIECE]
LEFT: On the side of [ZIPPER PIECE] that does not have midpoint marked, fold in 1/2” (1.27cm) so the fold faces wrong side of fabric. Press down with iron.
RIGHT: Clip/pin edge of both [ZIPPER PIECE] to [SIDE & BOTTOM PIECE], right sides together. Make sure the side with folded edge faces each other as shown in photo.
LEFT: Clip/pin other edge of [ZIPPER PIECE] to [SIDE & BOTTOM PIECE], right sides together and stitch together at 1/2” (1.27cm) seam allowance.
RIGHT: View of [ZIPPER PIECE] sewn to [SIDE & BOTTOM PIECE]. We will now refer to this piece as the [GUSSET]
LEFT: Press seam down towards [SIDE & BOTTOM PIECE] and top stitch at 1/8” (3mm) from edge (red dotted line).
RIGHT: Pin [GUSSET] to [BACK LINING PIECE], right sides together, matching at top and bottom midpoint, and side notches. Match side notch on [BACK PIECE] with seam of [GUSSET]. You will have 4 pins at this point.
Pin the rest of [GUSSET] to [BACK PIECE] – See “HOW TO SEW A STRAIGHT FABRIC TO A CURVE” for details of how to pin bottom curves to the GUSSET.
LEFT: Stitch [BACK PIECE] to [GUSSET] at 1/2” (12mm) seam allowance. I find it’s easier to maneuver the curves if [GUSSET PIECE] is facing up as you sew.
RIGHT: Clip curves.
LEFT: Trim seam allowance to 1/4” (6mm).
RIGHT: View of [GUSSET] sewn to [BACK PIECE].

LEFT: Pin [FRONT LINING PIECE] to [GUSSET] and sew at 1/2” (1.27cm) seam allowance (black dotted line). Leave an opening about 3-4”wide at the bottom. Make sure to back stitch at both ends of the opening.
NOTE: We will turn the entire bag to the right side later on through this opening.
RIGHT: Clip curves and trim seam allowance.

View of lining sewn together, wrong side facing out.
Sewing Sling Bag Altogether
NOTE: I ended up sewing another bag lining using black fabric as I like that it matched the bag exterior better. That’s why the bag lining you will see in the tutorial below is black.
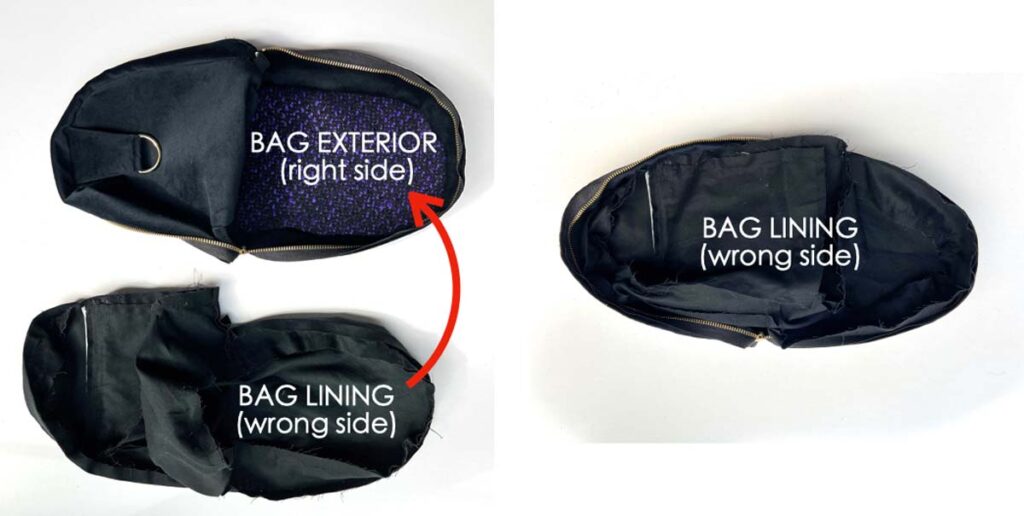
LEFT: Open [BAG EXTERIOR] with right side facing up. Open [BAG LINING] with wrong side facing up as shown in photo
RIGHT: Place [BAG LINING] into [BAG EXTERIOR], right sides together.
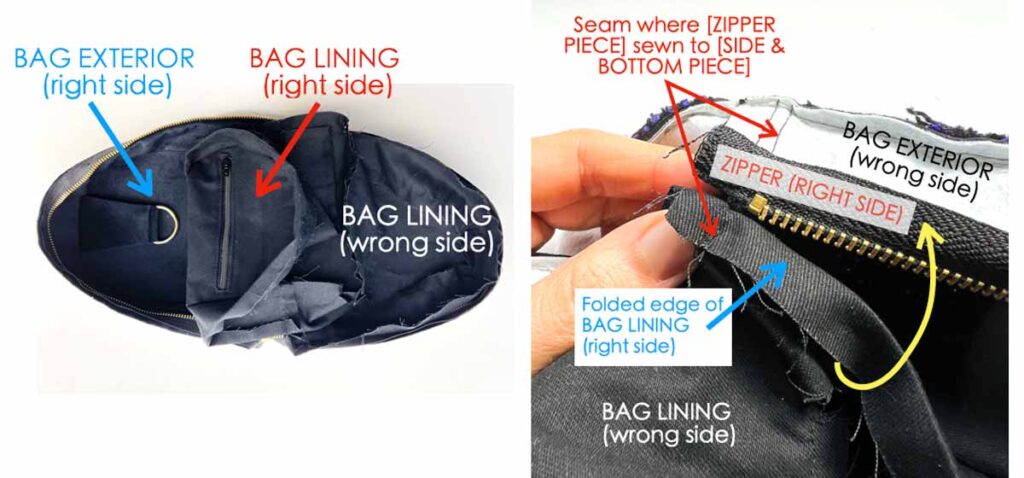
LEFT: Another view of [BAG LINING] placed inside [BAG EXTERIOR], with [BAG LINING] partially pulled back to reveal the top shoulder strap clip on right side of [BAG EXTERIOR] and the zipper on right side of [BAG LINING].
How to Pin Bag Lining to Bag Exterior
In these next few steps, you are going to pin folded edge of [BAG LINING] to the zipper on [BAG EXTERIOR]
RIGHT: First, match the bag lining and the bag exterior at the seam where [ZIPPER PIECE] is sewn to [SIDE & BOTTOM PIECE]. Secondly, turn folded edge of [BAG LINING] up to meet zipper so that both their right sides meet (yellow arrow).
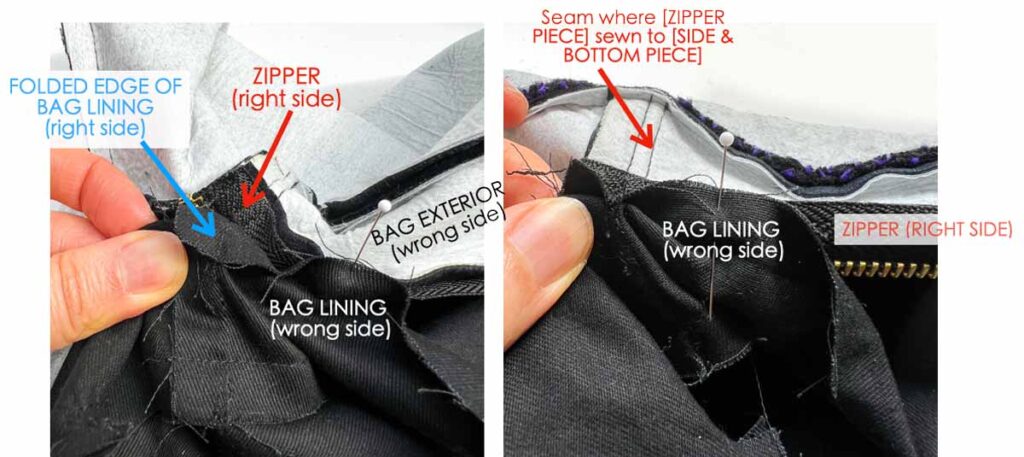
LEFT: Next, pin [BAG LINING] to zipper, right sides together.
RIGHT: Another view of [BAG LINING] pinned to zipper, right sides together.
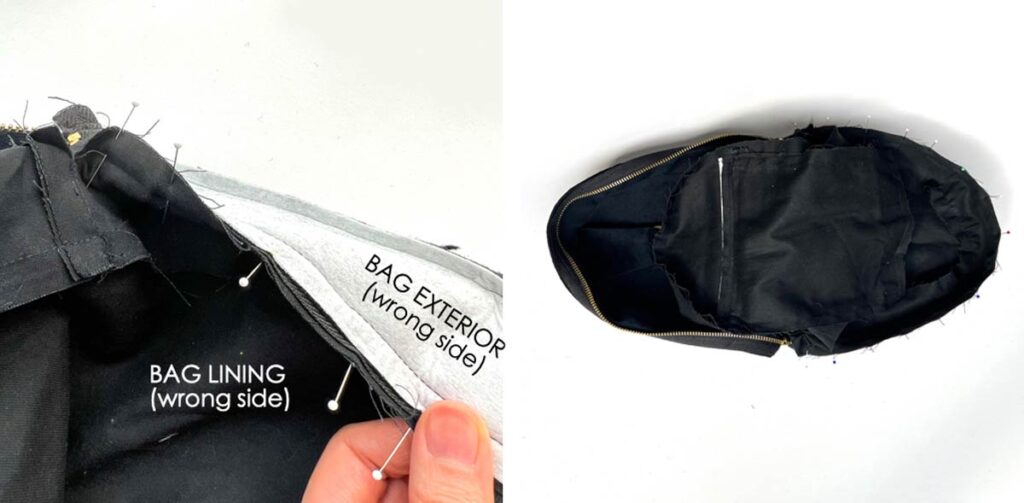
LEFT: Then, continue pinning [BAG LINING] to [BAG EXTERIOR], right sides together, going from one end of zipper to the other end.
RIGHT: View of [BAG LINING] pinned to [BAG EXTERIOR].
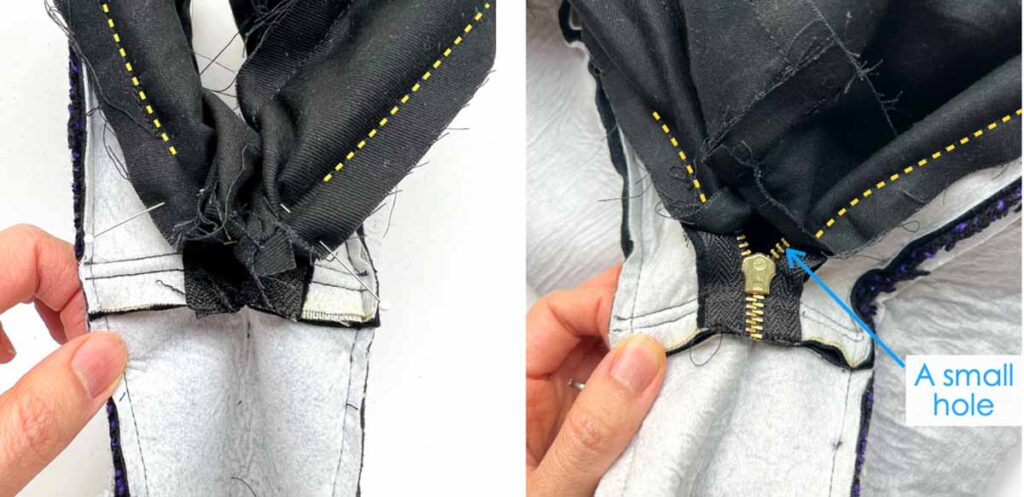
LEFT: Finally, repeat pinning other side of [BACK LINING] to [BAG EXTERIOR]
RIGHT: View of [BAG LINING] completely pinned to [BAG EXTERIOR], right sides together.
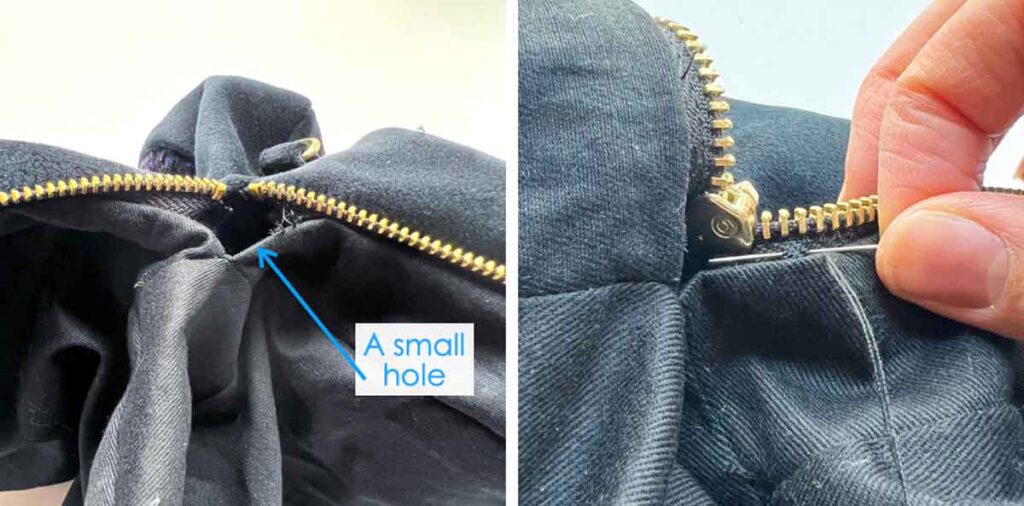
At this point, you will notice that you cannot completely pin the bag lining all the way down to the zipper. There will be a small hole. This is completely normal. Just pin as far as you can go. We will hand close this hole later on.
You have successfully pinned the bag lining to the exterior bag. You will now proceed to sew them together.
How to Sew Bag Lining to Bag Exterior
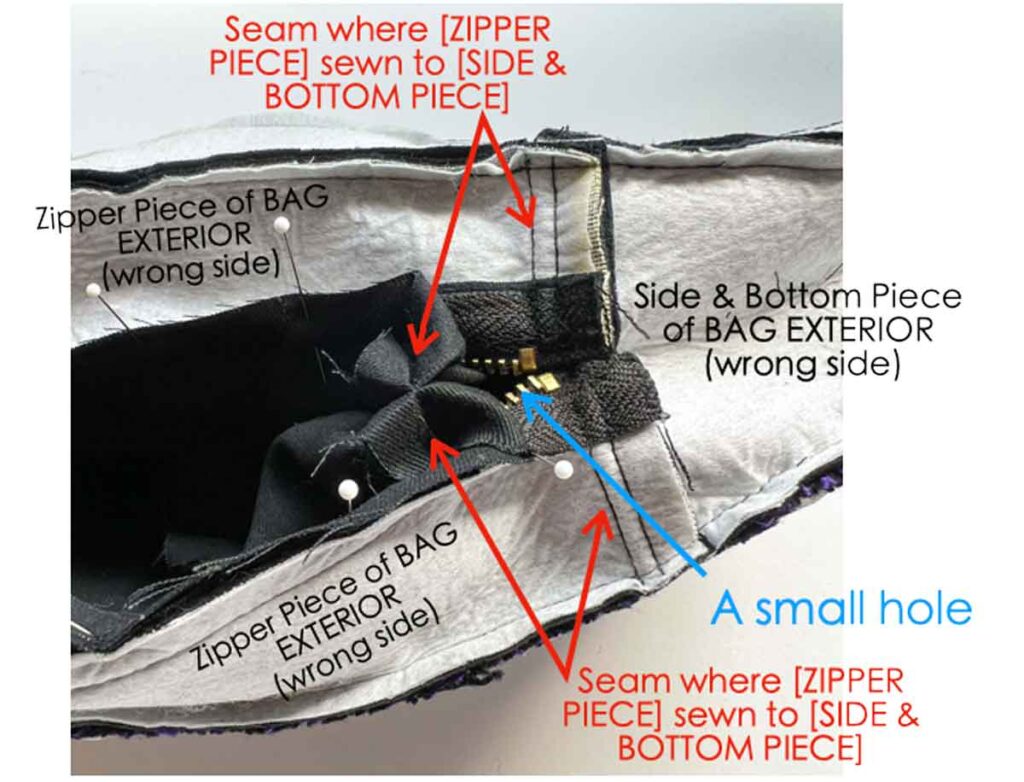
LEFT: First, sew [BAG LINING] to [BAG EXTERIOR], right sides together at 1/2” (1.27cm) seam allowance. Notice how you won’t be able to sew the [BAG LINING] all the way down to zipper (yellow dotted line). That’s ok, just sew as far as you can go.
RIGHT: You will see a small hole once you pull up the [BAG LINING]. This is completely ok!
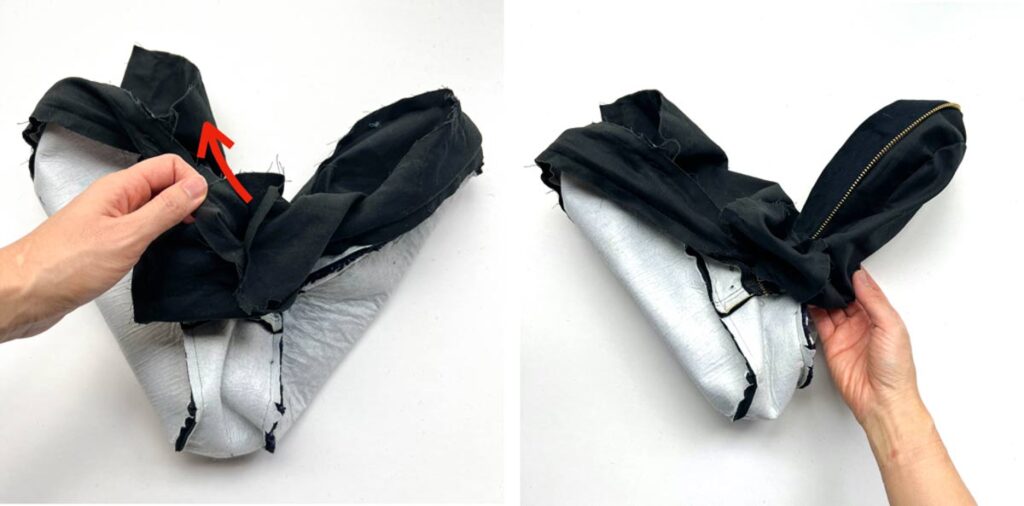
Next, turn bag to right side through opening on bottom of [BAG LINING].
Bag turned to right side.
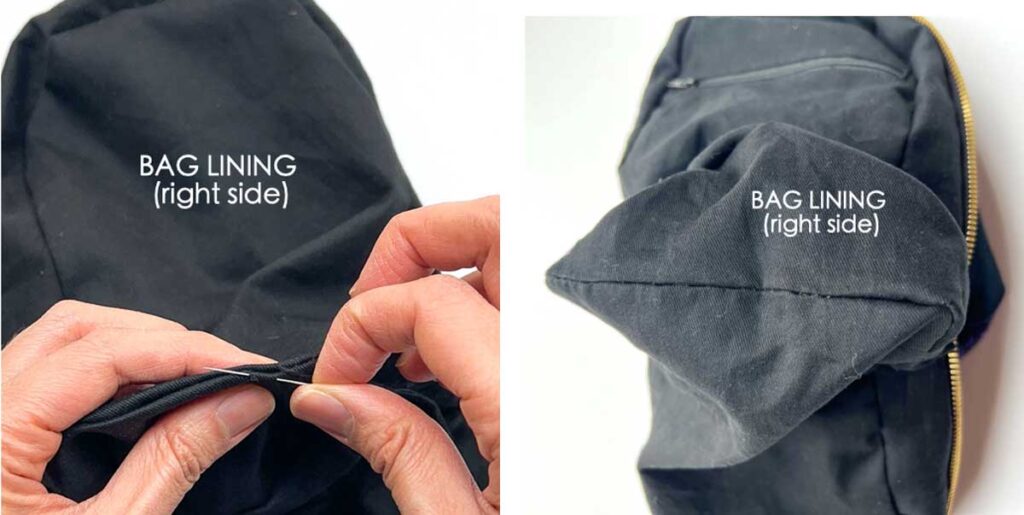
Then, use invisible ladder stitch to sew close the opening on bottom of [BAG LINING]
Finally, use invisible ladder stitch to close the small hole on both sides of bag at either end of zipper.
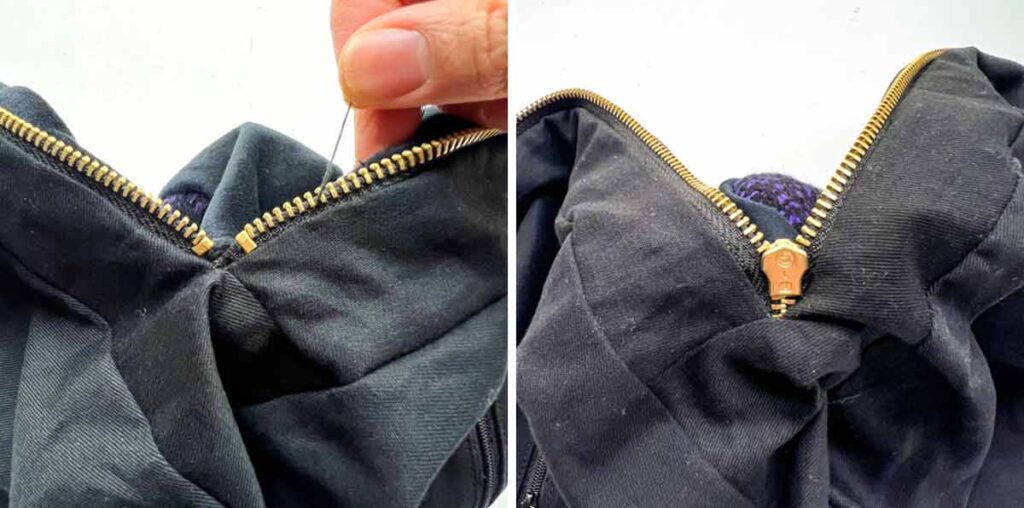
LEFT: Continue closing the small hole.
RIGHT: Hole closed! Repeat on other side of bag.
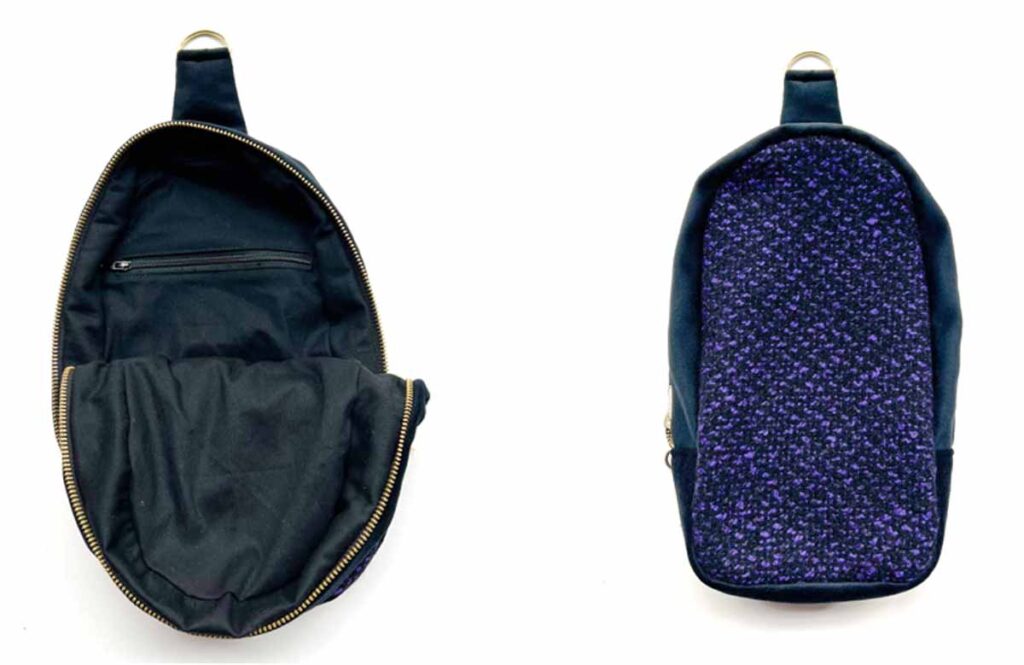
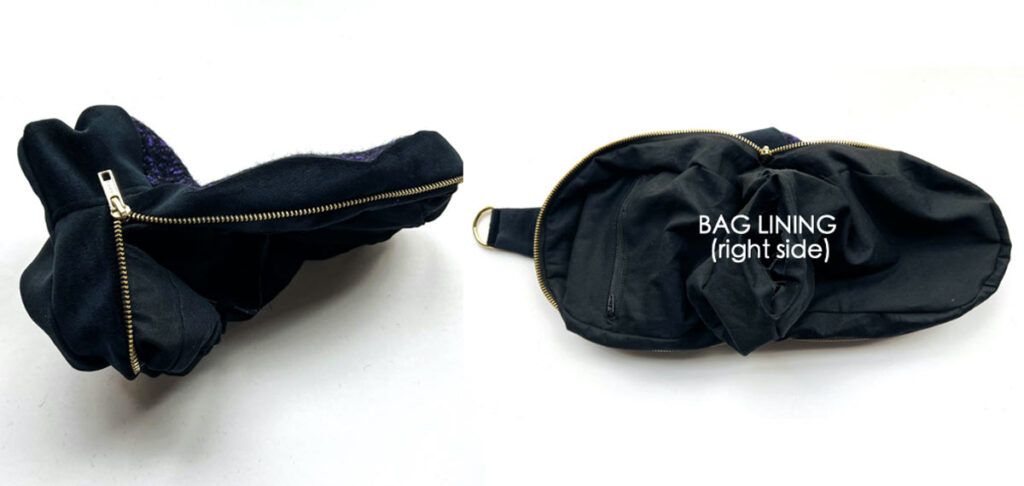
LEFT: Bag finished (interior view)
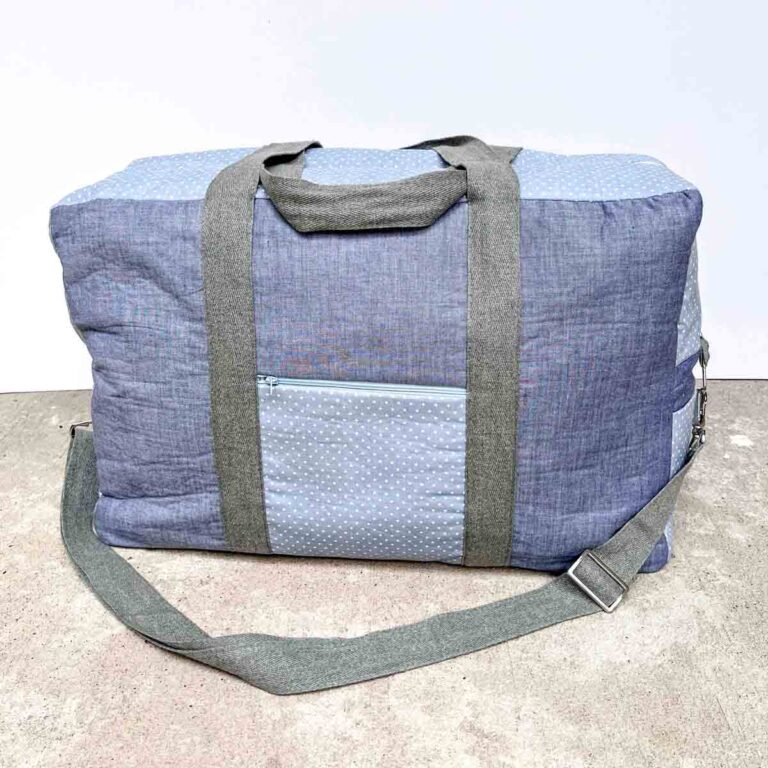
RIGHT: Bag exterior view.
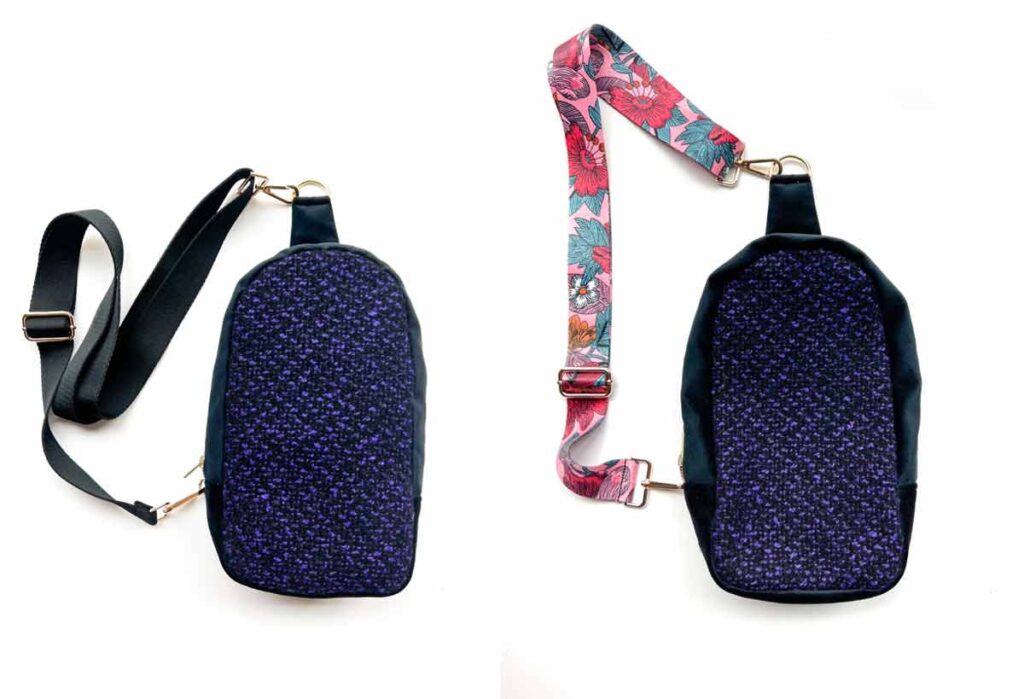
Now clip on the belt strap and you are done! I’m using a premade belt strap which makes it so much easier! You can purchase solid colors (left photo) for a more classy look or fun prints (right photo) for more pop! FYI I am using the 1.4″ (3.5cm) wide size.
However, if there is a very specific webbing you want to use to match your bag, you can make your own! See tutorial HERE under “How to Sew Shoulder Strap” for details.
How to Make a Sling Bag (Free Pattern)

A hybrid between a back pack and a crossbody, this simple sling bag pattern only has one strap and is the perfect take anywhere bag.
Materials
- EXTERIOR FABRIC - 1/2 YARD or 0.46m (see note 1)
- LINING - 1/2 YARD (0.46m)
- MID WEIGHT FUSIBLE INTERFACING (optional, see note 2) - 1/2 YARD (0.46m)
- 22" HEAVY DUTY ZIPPER - for top pocket
- 6" ZIPPER - for zipper pocket on lining
- 1.5" D-RING
- 1/2" D-RING
- SHOULDER STRAP (see note 3)
Tools
- HOME SEWING MACHINE
- FABRIC SCISSORS
- CLEAR RULER
- MARKING CHALK
- MECHANICAL PENCIL
- SEWING PINS
- SEWING CLIPS
- MATCHING THREAD
- LOOP TURNER
Instructions
BEFORE YOU START
- Print out sling bag pattern pieces and assemble [FRONT PIECE] and [BACK PIECE] according to arrows and instructions on pattern.
- Next, cut out all sling bag pattern pieces on exterior fabric, lining, and interfacing.
- Third, Iron press interfacing to exterior fabric using appropriate heat settings with steam
- Finally, mark side notches on [FRONT PIECE] and [BACK PIECE] as marked on paper pattern.
SEWING BAG ZIPPER PIECE
- Place [ZIPPER PIECE] x2 and zipper with right sides facing up
- Mark a distance of 0.5” (12.7mm) away from beginning of zipper using marking chalk
- Put [TOP ZIPPER PIECE] and zipper right sides together, matching edge of [TOP ZIPPER PIECE] to chalk line you just marked on zipper in step 2.
- Pin/Clip in place.
- Put [BOTTOM ZIPPER PIECE] and zipper right sides together, matching edge of [BOTTOM ZIPPER PIECE] to chalk line.
- Pin/Clip in place.
- Use a zipper foot and stitch zipper to both zipper pieces.
- Trim off excess zipper that extends beyond [ZIPPER PIECE].
- Pin/Clip [SIDE & BOTTOM PIECE] to [ZIPPER PIECE], right sides together.
- Repeat on other side.
- Stitch together at 1/2”(1.27cm) seam allowance.
- Press seam down towards [SIDE & BOTTOM PIECE] and top stitch at 1/8” (3mm) from edge.
- We will now refer this new piece that will go around the sling bag as [GUSSET PIECE].
SEWING GUSSET TO FRONT PIECE
- Fold [GUSSET PIECE] in half along the length, matching at seam of [ZIPPER PIECE] and [SIDE & BOTTOM PIECE].
- Clip/Pin the seam in place.
- Mark midpoints on top and bottom of [GUSSET PIECE] by cutting small notches.
- Fold [FRONT PIECE] in half and mark midpoints on top and bottom by cutting a small notch.
- Next, repeat for [BACK PIECE] and mark midpoints.
- Pin [GUSSET] to [FRONT PIECE], right sides together, matching at top and bottom midpoint, and side notches.
- Next, match side notch on [FRONT PIECE] with seam of [GUSSET]. You will have 4 pins at this point.
- Pin the rest of [GUSSET] to [FRONT PIECE] - See next section HOW TO PIN A STRAIGHT FABRIC TO A CURVE for details and tips of how to pin bottom curves to the [GUSSET].
HOW TO SEW A STRAIGHT FABRIC TO A CURVE
- Make a snip about 0.25”(6mm) deep on [GUSSET PIECE] where it goes around bottom curve of [FRONT PIECE].
- Make two more snips, one on each side of the first snip, about 0.25”(6mm) away.
- Pin [GUSSET] to bottom curve of [FRONT PIECE] (see note 4).
- Stitch [FRONT PIECE] to [GUSSET] at 1/2”(12mm) seam allowance. I find it’s easier to maneuver the curves if [GUSSET PIECE] is facing up as you sew.
- Clip curves and trim seam allowance to 1/4”(6mm).
MAKING SHOULDER STRAP CLIPS
- Fold top 1/2” (12mm) of [TOP STRAP PIECE - BACK] down towards the wrong side of fabric.
- Pin to [TOP STRAP PIECE - FRONT], right sides together.
- Sew together at 1/2” (12mm) seam allowance, leaving top and bottom open. Make sure to back stitch at both ends.
- Trim seam allowance of where you sewed. Make sure not to trim down seam allowance of the top part where you didn’t sew.
- Turn [TOP STRAP PIECE] to right side.
- Give [TOP STRAP PIECE] a good press. Press 1/2” seam allowance of [TOP STRAP PIECE-FRONT] towards each other.
- Loop a 1.5” D ring through the top part of [TOP STRAP PIECE]
- Tuck the top part into the bottom part of [TOP STRAP PIECE] and sew at 1/8”(3mm) from edge (see note 5).
- To sew [SIDE HOOK PIECE], first fold [SIDE HOOK PIECE] in half, right sides together.
- Stitch at 1/2” (12.7mm) seam allowance.
- Trim seam allowance down to 1/4” (6mm).
- Press seam allowances open.
- Turn [SIDE HOOK PIECE] to right side using a loop turner.
- Press [SIDE HOOK PIECE] flat and stitch both sides down at ⅛”(3mm) from edge.
- Thread [SIDE HOOK PIECE] through 0.5” D-ring, fold in half, pin ends together and machine baste in place.
SEWING BACK PIECE TO REST OF SLING BAG
- Mark midpoint of [TOP STRAP PIECE] and match it to top midpoint of [BACK PIECE]. Make sure the wrong side of [TOP STRAP PIECE] faces the right side of [BACK PIECE].
- Match [SIDE HOOK PIECE] directly below the side notch on the right of [BACK PIECE].
- Baste [TOP STRAP PIECE] and [SIDE HOOK PIECE] to [BACK PIECE].
- Pin [GUSSET] to [BACK PIECE] at top and bottom midpoints and two side notch. Match seam (where [ZIPPER PIECE] is sewn to [SIDE & BOTTOM PIECE]) to the side notch.
- Flip to other side of wrong side of [BACK PIECE] faces up.
- Pin entire [BACK PIECE] to [GUSSET]. Follow instructions for “How to Sew a Straight Piece of Fabric Around a Curve”.
- Clip curves and trim seam allowance to 1/4" (6mm).
- Turn exterior bag to right side.
HOW TO SEW RECESSED ZIPPER ON LINING
- On right side of [BACK LINING PIECE], draw a rectangle that measures 5 ⅛“ x 0.5” (13cm x 1.27cm), a distance of 2.5” (6.35cm) from the top, and 1” (2.54cm) from both sides.
- Draw a “>———————
- Cut a piece of fusible interfacing that measures approximately 6”x 1.5” (15.24cm x 3.81cm).
- Fuse it onto the wrong side of [BACK LINING PIECE] so that it will covers the rectangle you just drew on the right side.
- Cut “>——————————
- Fold back (to wrong side of BACK LINING PIECE) where you cut, along border of rectangle.
- From wrong side of [BACK LINING PIECE], press down the fold. You now have a rectangular opening.
- Place wrong side of zipper over right side of [RECESSED ZIPPER PIECE], lining up at the bottom and left edge.
- Pin zipper in place, (see note 6)
- Pull 1st piece of [RECESSED ZIPPER PIECE] down (the piece you just pinned to zipper).
- Place wrong side of zipper over right side of 2nd [RECESSED ZIPPER PIECE], matching at top and left edge. Pin in place.
- Sew together with zipper foot.
- When you are done sewing, open both pieces of [RECESSED ZIPPER PIECE] so that the wrong side faces up. The right side of zipper will be facing up.
- Apply basting adhesive to wrong side of [BACK LINING PIECE], just around the rectangular opening. Make sure to put a piece of paper/cardboard behind the opening so you don’t get your work surface sticky! (see note 7).
- Pull zipper tab open (to the right) so it’s about 1” (2.54 cm) from left edge. Place wrong side of [BACK LINING PIECE] over zipper, matching [BACK LINING PIECE] with [RECESSED ZIPPER PIECE] on the left and right edges.
- Gently pat around the rectangular opening to stick it to the zipper.
- Sew [BACK LINING PIECE] to zipper around rectangular opening with zipper foot.
- Flip top piece of [RECESSED ZIPPER PIECE] down and match it with the bottom [RECESSED ZIPPER PIECE]. You will notice that the bottom piece is longer than the top piece.
- Use rotary cutters (or fabric scissors) to cut off the excess bottom piece. My was bottom piece was about 3/4” (1.9cm) longer.
- Cut off excess [RECESSED ZIPPER PIECE] and zipper that extends beyond [BACK LINING PIECE].
- Clip [BACK LINING PIECE] back to expose the [RECESSED ZIPPER PIECE]. You will sew zipper and both [RECESSED ZIPPER PIECE] together. Make sure you sew down the two triangles (from when you cut the rectangular opening) onto zipper and both [RECESSED ZIPPER PIECE] (see note 8).
- Recessed zipper is done!
SEWING LINING TOGETHER
- Fold [BACK LINING PIECE] in half and snip the top and bottom midline to mark midpoints.
- Marked midpoints on [BACK LINING PIECE]. Don’t forget to also mark side notches (from paper pattern)
- Mark midpoints on [SIDE & BOTTOM PIECE] and [ZIPPER PIECE] by folding them in half along the length and snipping at the midpoint (see note 9).
- On the side of [ZIPPER PIECE] that does not have midpoint marked, fold in 1/2” (1.27cm) so the fold faces wrong side of fabric. Press down with iron.
- Clip/pin edge of both [ZIPPER PIECE] to [SIDE & BOTTOM PIECE], right sides together. Make sure the side with folded edge faces each other.
- Clip/pin other edge of [ZIPPER PIECE] to [SIDE & BOTTOM PIECE], right sides together and stitch together at 1/2” (1.27cm) seam allowance.
- This piece where [ZIPPER PIECE] is sewn to [SIDE & BOTTOM PIECE] will now be referred to as the [GUSSET].
- Press seam down towards [SIDE & BOTTOM PIECE] and top stitch at 1/8” (3mm) from edge.
- Pin [GUSSET] to [BACK LINING PIECE], right sides together, matching at top and bottom midpoint, and side notches. Match side notch on [BACK PIECE] with seam of [GUSSET]. You will have 4 pins at this point.
- Pin the rest of [GUSSET] to [BACK PIECE] - See “HOW TO SEW A STRAIGHT FABRIC TO A CURVE” for details of how to pin bottom curves to the GUSSET.
- Stitch [BACK PIECE] to [GUSSET] at 1/2” (12mm) seam allowance. I find it’s easier to maneuver the curves if [GUSSET PIECE] is facing up as you sew.
- Clip curves and trim seam allowance to 1/4" (6mm).
- Pin [FRONT LINING PIECE] to [GUSSET] and sew at 1/2” (1.27cm) seam allowance. Leave an opening about 3-4”wide at the bottom. Make sure to back stitch at both ends of the opening. (see Note 10)
- Clip curves and trim seam allowance to 1/4" (6mm).
- Your bag lining is finished!
SEWING LINING TO EXTERIOR SLING BAG
- Open [BAG EXTERIOR] so right side faces up. Open [BAG LINING] so wrong side faces up.
- Place [BAG LINING] into [BAG EXTERIOR], right sides together.
- In these next steps (steps 4-9), you are going to pin folded edge of [BAG LINING] to the zipper.
- First, match the bag lining and bag exterior at the seam the where [ZIPPER PIECE] is sewn to [SIDE & BOTTOM PIECE].
- Next, turn folded edge of [BAG LINING] up to meet the zipper so that both their right sides are together.
- Then, pin [BAG LINING] to zipper, right sides together.
- Continue pinning [BAG LINING] to [BAG EXTERIOR], right sides together, going from one end of zipper to the other end.
- Repeat pinning other side of [BACK LINING] to [BAG EXTERIOR].
- At this point, you will notice that you cannot completely pin the bag lining all the way down to the zipper. There will be a small hole. This is completely normal. Just pin as far as you can go. You will hand close this hole later on.
- Sew [BAG LINING] to [BAG EXTERIOR], right sides together at 1/2” (1.27cm) seam allowance. You will notice that you can't sew the [BAG LINING] all the way down to zipper. That’s ok, just sew as far as you can go.
- Turn bag to right side through the opening on the bottom of bag lining.
- Use invisible ladder stitch to sew close the opening on bottom of bag lining.
- Again, use invisible ladder stitch to close the small hole on both sides of bag at either end of zipper.
- Once you finish closing these holes, your bag is done!
- Clip on your belt strap of choice and your sling bag is ready for you to wear it! Hip hip horray!
.
Notes
- If you decide to use a second exterior fabric for the front of bag (like I did in this tutorial), you will need an extra piece of fabric that measures 8" x 13" (20.3cm x 33cm).
- I recommend adding fusible interfacing for support if you choose to use a thin cotton fabric as the exterior fabric.
- You can either make your own or grab one online (FUN PRINT or SOLID COLOR). See “How to Make a Duffel Bag” under section “How to Sew Shoulder Strap” to learn how to make your own.
- You should notice that after you make the 3 snips, the [GUSSET PIECE] will spread much easily and nicely around the curve.
- This side of [TOP STRAP PIECE] where you tucked in the top part and sewed will be considered the “wrong side” when we sew it to the rest of the bag later on.
- The right side of zipper and the right side of [RECESSED ZIPPER PIECE] will both be facing up. This is correct.
- If you don't have basting adhesive, that's ok too. Just use pins instead to hold in place.
- The seam allowance of where you sew depends on where the triangles are on the left and right side. It is approximately 1” (2.54cm) from edge of [RECESSED ZIPPER PIECE].
- You only need to mark one side of midpoint on each [ZIPPER PIECE]
- We will turn the entire bag to the right side later on through this opening.
More Sewing Projects You will Love!
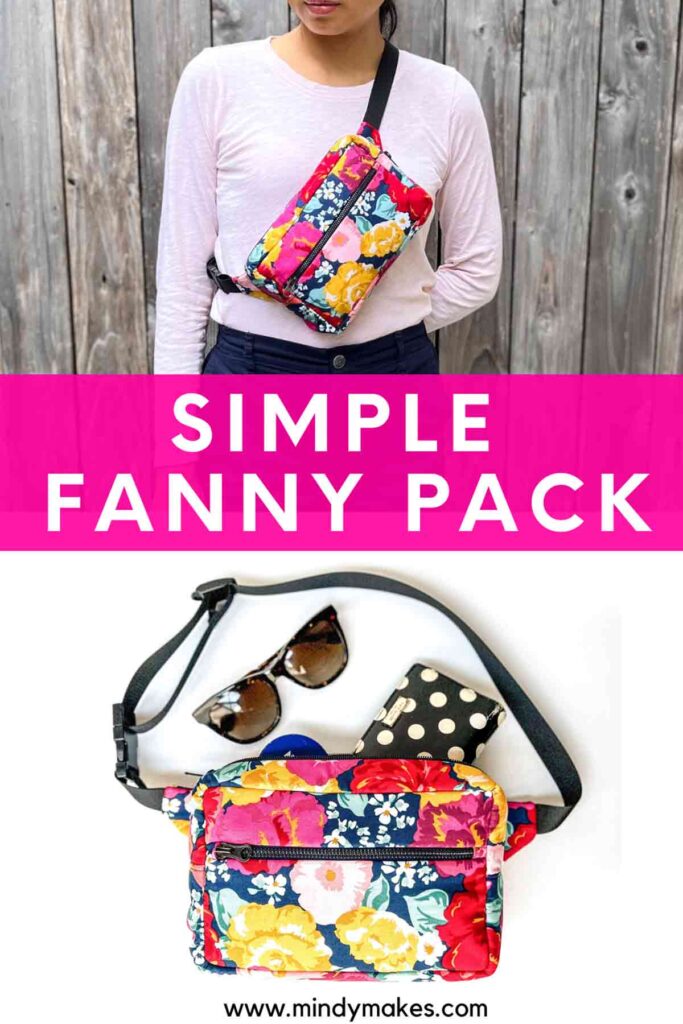
This fanny pack with two zippers is fully lined and can be worn across the body or around the hips.

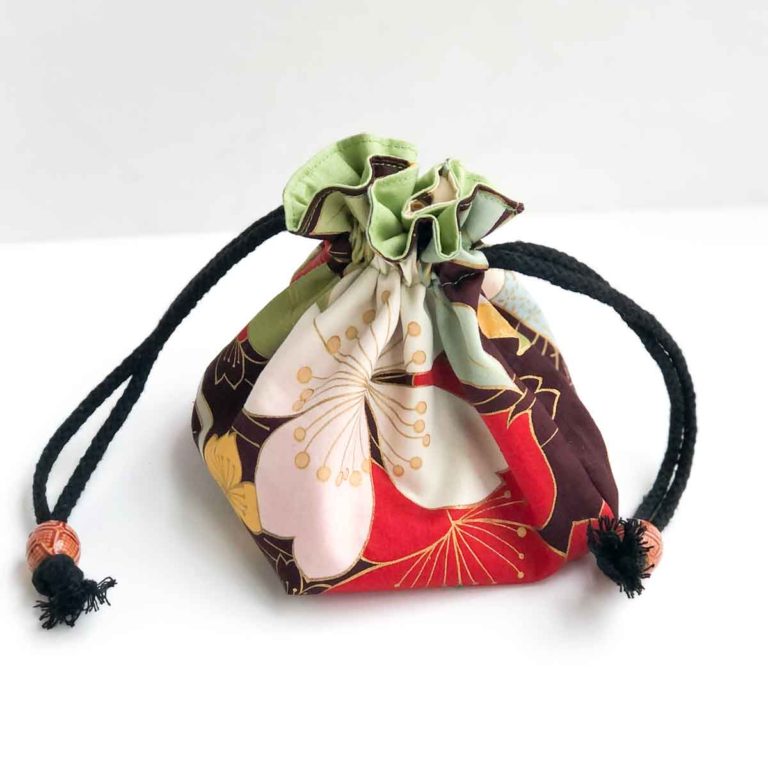
Keep your jewelry safe and organized with this handy 8 pocket jewelry bag.

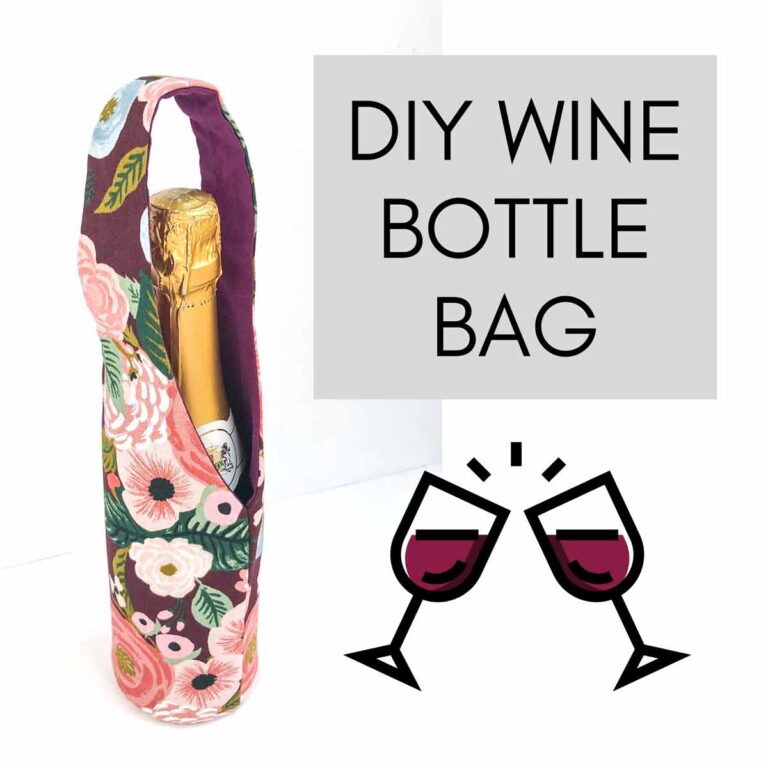
A MUST HAVE for bringing your favorite bottle of wine or champagne to the next social gathering.


There is no back piece on the paper pattern and no markings on the front piece for placements.
Hi Ann,
The pattern has been updated!
How do I find the pattern to print. Got instructions, no pattern.
Hi Elsie,
You will receive an email with the password to the Free MindyMakes Library once you subscribe to our mailing list. The sling bag pattern will be in the library under section “S”. Hope that helps!