
How to Make a Reusable Grocery Bag (Free Pattern)
Always wanted to know how to make a grocery bag out of fabric? Free grocery bag pattern with step-by-step tutorial will show you exactly how to make a fully lined grocery bag that also doubles as a shopping bag!
This post may contain affiliate links. Please read my disclosure policy for details. As an Amazon Associate, I earn from qualifying purchases.

I love reusable grocery bags! First all of, they are super environmentally friendly. Who really likes the extra clutter of plastic bags all over their home?
Secondly, they are so much sturdier than the thin plastic bags you get at stores. These thin bags tear at the slightest touch. I’ve had many an onions, apples, etc, roll out all over the floor because of torn bags!
Finally, I really love the look and feel of cloth reusable bags. These days, you can find reusable shopping bags at most stores. However, I always find myself gravitating towards the cloth ones. They just feel so much nicer and more more comfortable!
Simple Grocery Bag Pattern
Today, I will be showing you how to make a simple shopping bag with my free pattern. This grocery bag pattern makes a fully lined bag with a side gusset that resembles a plastic shopping bag.
The side gusset creates extra space so you can fit more items.
Additionally, I show you how to make a bag flap with snaps for easy closure of your grocery tote. This bag flap is completely optional, but adds a nice touch should you want to close up the bag.
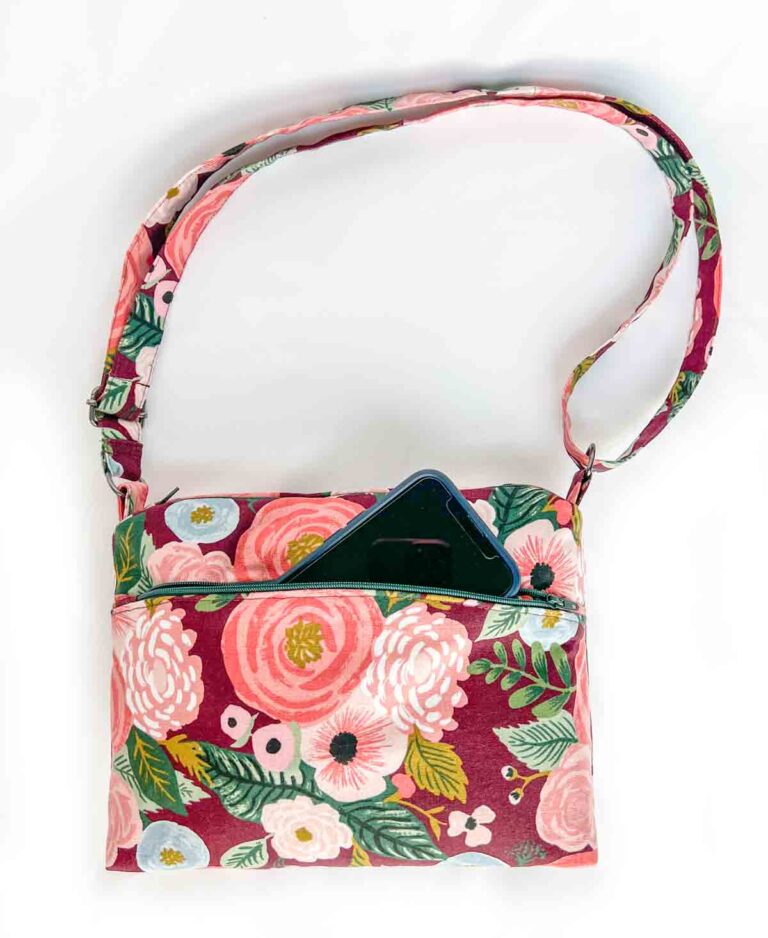
Finally, this grocery bag pattern comes with an attached stowaway pouch. Again, the pouch is completely optional. However, it allows you to fold the grocery bag into the this mini pouch when not in use.

This makes it super convenient to leave a grocery bag or two in your purse or in the car. Then, you’ll always have a shopping bag ready when you need to buy something!
What is the Best Material For Reusable Grocery Bags?
There are several materials suitable for making reusable grocery bags including cotton, burlap, and mesh.
Cotton
100% cotton fabrics are a great material for making reusable grocery bags. First of all, they are eco-friendly and come from natural plant fibers.
Secondly, cotton bags are soft to the touch, and they are very strong and durable. These qualities make them an excellent material to make grocery bags.
In addition, cotton fabrics comes in an array of beautiful prints, colors, and designs. This gives you the option of sewing a bag that displays your personal sense of style and aesthetics.
Finally, the best part making reusable bags with cotton is that they can be easily washed at home. This way, you don’t have to worry too much about spills and stains ruining your bag.
With good care, your cotton shopping bag can be reused over and over and last a very long time.
Burlap
Also known as jute or hessian, burlap is a woven fabric made from vegetable fibers (the jute plant). Burlap grocery bags are breathable and thus won’t accumulate condensation inside, a reason that often causes produce to spoil.
Additionally, burlap grocery bags are very durable and can withstand a lot of rough handling without breakage. They are also compostable and biodegradable, making them very eco-friendly.
You can find burlap in an array of bold, matte colors and some are even treated to be waterproof.
Burlap grocery bags can be reused over and over without any threat to the environment.
Mesh Fabrics
Mesh is another good fabric for making grocery bags as it is extremely breathable. Just like burlap, this quality prevents condensation from accumulating inside the bag, which can cause produce to spoil quickly.
Additionally, mesh bags allows ethylene gas to escape. This prevents your fruits from ripening too quickly (should you forget a few inside the bag).
Finally, mesh fabric is very light weight, making it an excellent choice for making stowaway grocery bags. You can easily leave them in your purse or handbag without adding extra weight.
How Much Fabric Do I need to Make a Shopping Bag?
To make a small reusable shopping bag with a stowaway pouch, you will need 3/4 Yard (0.68m) of exterior fabric and 1/2 Yard (0.45m) of lining fabric.
To make a medium sized reusable shopping bag, you will need 1⅓ Yard (1.22m) of exterior fabric and 1 Yard (0.91m) of lining fabric.
For a large reusable shopping bag, you will need 1⅔ Yard(1.52m) of exterior fabric and 1⅓ Yard (1.22m).
In this tutorial, I will show you exactly how to make a small reusable shopping bag. The directions are exactly the same for making a medium and large sized shopping bag.
What is a Good Size for a Grocery Bag
A good size for a grocery bag will depend on what you will be carrying, how much you will be carrying, and the weight and size of your items. Also, the material of the grocery bag will determine how much stuff (weight) you can carry.
Generally, the most common plastic grocery bags found in stores holds about 2 gallons or 8 liters of stuff.

Today, we will be making a small sized reusable grocery bag. This bag measures approximately 18″ (45.72cm) tall and 10″ (25.4cm) across. It is approximately 4″ (10cm) wide.
This small sized shopping bag is comparable to the size of plastic grocery bags you find at the store. The best part is that it is made of durable cotton fabric so you won’t have to worry about it tearing. Not to mention it is so much cuter than a plastic bag!

Overall, this reusable grocery bag can carry a 1 – 1.5 plastic grocery bags worth of stuff. It is also very suitable for last minute picking up a few items at the store.
A good rule of thumb is that if you can check out at from the express lane (usually 10 or less items), this is the bag to bring!
Grocery Bag Pattern
To get a copy of the FREE Small Grocery Bag PDF Pattern, subscribe to the MindyMakes Email List to receive the password for the Mindy Makes Free Resource Library. The Grocery Bag PDF Pattern is listed under section ‘G’ of the library as “Grocery Bag”.
Once you click “submit”, the password will show up on the next page. You will also receive a welcome email with the password in case you forget.
Please allow up to an hour for the welcome email to fly through cyberspace and travel into your inbox. If you still don’t receive the email, make sure to check your junk or spam folders and add my email to your safe list!
Need more help? Be sure to check out this step-by-step guide that shows you exactly how to get the password, enter the library, and download the PDF.
More (Sizes of) Grocery Bag Patterns
Want to make more sizes of Grocery Bags? The Medium and Large Sized Reusable Grocery Bag Patterns are available in My Shop.
The Medium Grocery Bag carries 2-3 plastic grocery bags worth of items. The Large Grocery Bag is perfect for your super large carrying needs —think laundry or blankets
In addition to your purchase, you will receive an ad-free, printer friendly PDF version of the Grocery Bag Tutorial. This way, you can easily print a copy and keep it next to you as sew!

Materials & Tools
Materials
- FABRIC – I recommend 100% Cotton for this project. However, see What is the Best Material for Reusable Grocery Bags for other suitable materials.
- 3/4 Yard (0.68m) Exterior Fabric
- 1/2 Yard (0.45m) Lining Fabric
- MATCHING THREAD
- GROCERY BAG PDF PATTERN (SIZE SMALL) – available in the Free MindyMakes Library
Tools
- HOME SEWING MACHINE – I LOVE my SINGER HEAVY DUTY SEWING MACHINE
- FABRIC SCISSORS – GINGHERS are my favorite. I’ve tried other brands such as Fiskars, but they just don’t compare.
- SEWING PINS and/or SEWING CLIPS
- CLEAR RULER
- FABRIC CHALK
- HAND SEWING NEEDLES
- IRON – for pressing
- SNAP PLIERS & PLASTIC SNAPS – optional, if you want to add a snap closure to the bag flap
How To Make Grocery Bags Step By Step
Reusable Grocery Bag Pattern Pieces

First cut out the following fabric pieces:
- BAG EXTERIOR (X2)
- BAG LINING (X2)
- BAG STRAP (X4)
- STOWAWAY POUCH FRONT
- STOWAWAY POUCH BACK
- BAG FLAP (X2)
Sewing Bag

Next, place [BAG EXTERIOR] piece right sides together.

Now sew side and bottom at 1/2”(1.27cm) seam allowance (black dotted line).
Folding and Pressing Sides in

Next, fold both sides in 2.5”(6.35cm) as pictured. Press the fold down and pin along bottom of the bag. Then sew folds down at 1/2”(1.27cm) seam allowance (blue line). Make sure to back stitch at both ends.

Then place [LINING] piece right sides together.

Next, sew sides and bottom at 1/2”(1.27cm) seam allowance (black dotted line). Make sure to leave an opening approximately 3”(7.62cm) wide at the bottom. This opening will be used to turn our bag to the right side later on.

Now (just like on the exterior fabric), fold both sides in 2.5”(6.35cm). Press the fold down and pin along bottom of bag. Then sew folds along the bottom folds (blue line) at 1/2”(1.27cm) seam allowance, leaving your opening open. Make sure to back stitch at both ends.
NOTE: Make sure not to sew across the entire bottom of lining as you don’t want to sew across the 3” opening.
Sewing Straps

First place [BAG STRAP] piece right sides together. Sew at 1/2” (1.27cm) seam allowance on both sides (black dotted line).

Next, repeat sewing other strap.
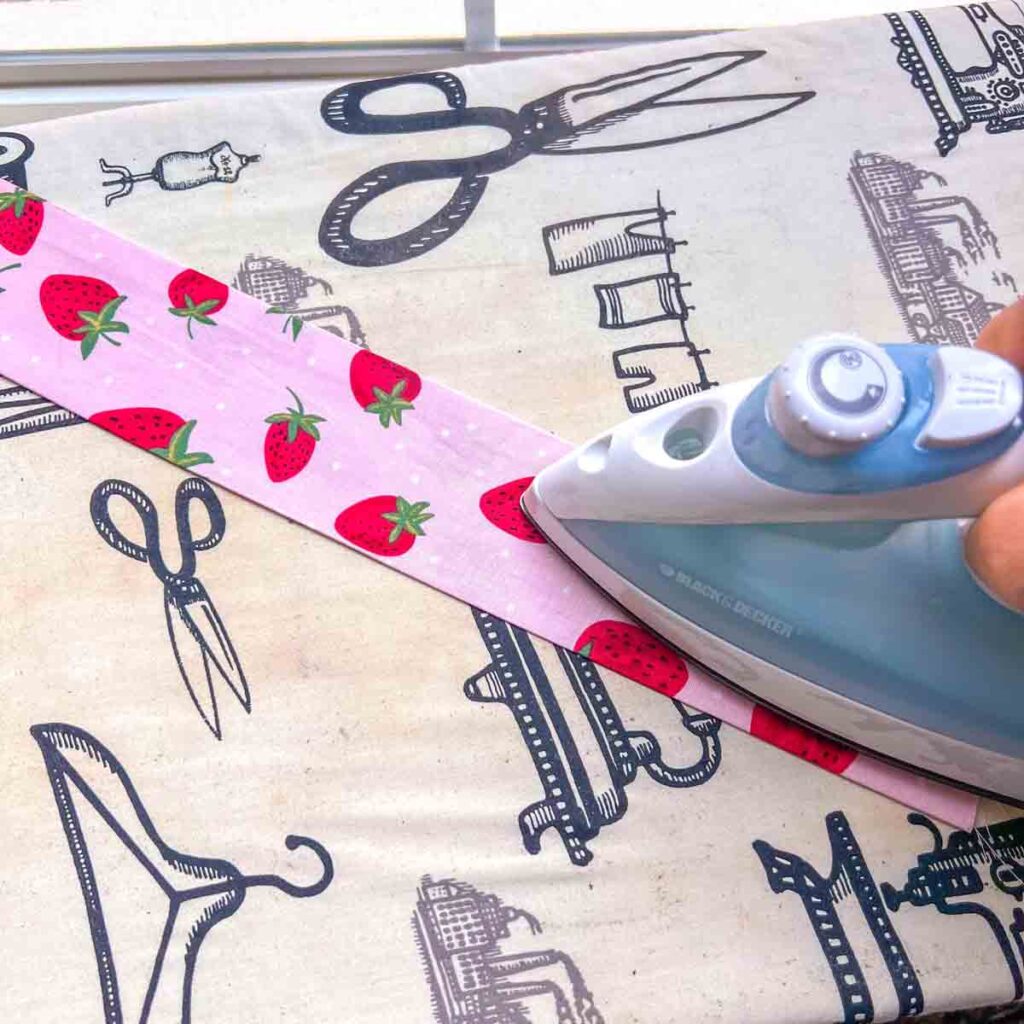
Now turn bag strap to right side and give it a good press.

Finally, top stitch the strap at 1/8” (3mm) from both edge (black dotted line).
How to Sew Bag Flap

First place [BAG FLAP] piece right sides together. Sew at 1/2” (1.27cm) seam allowance on sides and bottom (black dotted line).

Then clip corners.

Next, turn bag flap to right side, pushing out all corners.

Now give your bag flap a good press.

Finally top stitch at 1/8” (3mm) around sides and bottom. You bag flap is done!
Sewing Stowaway Pouch
In this next section we will sew stowaway pouch together using french seams.

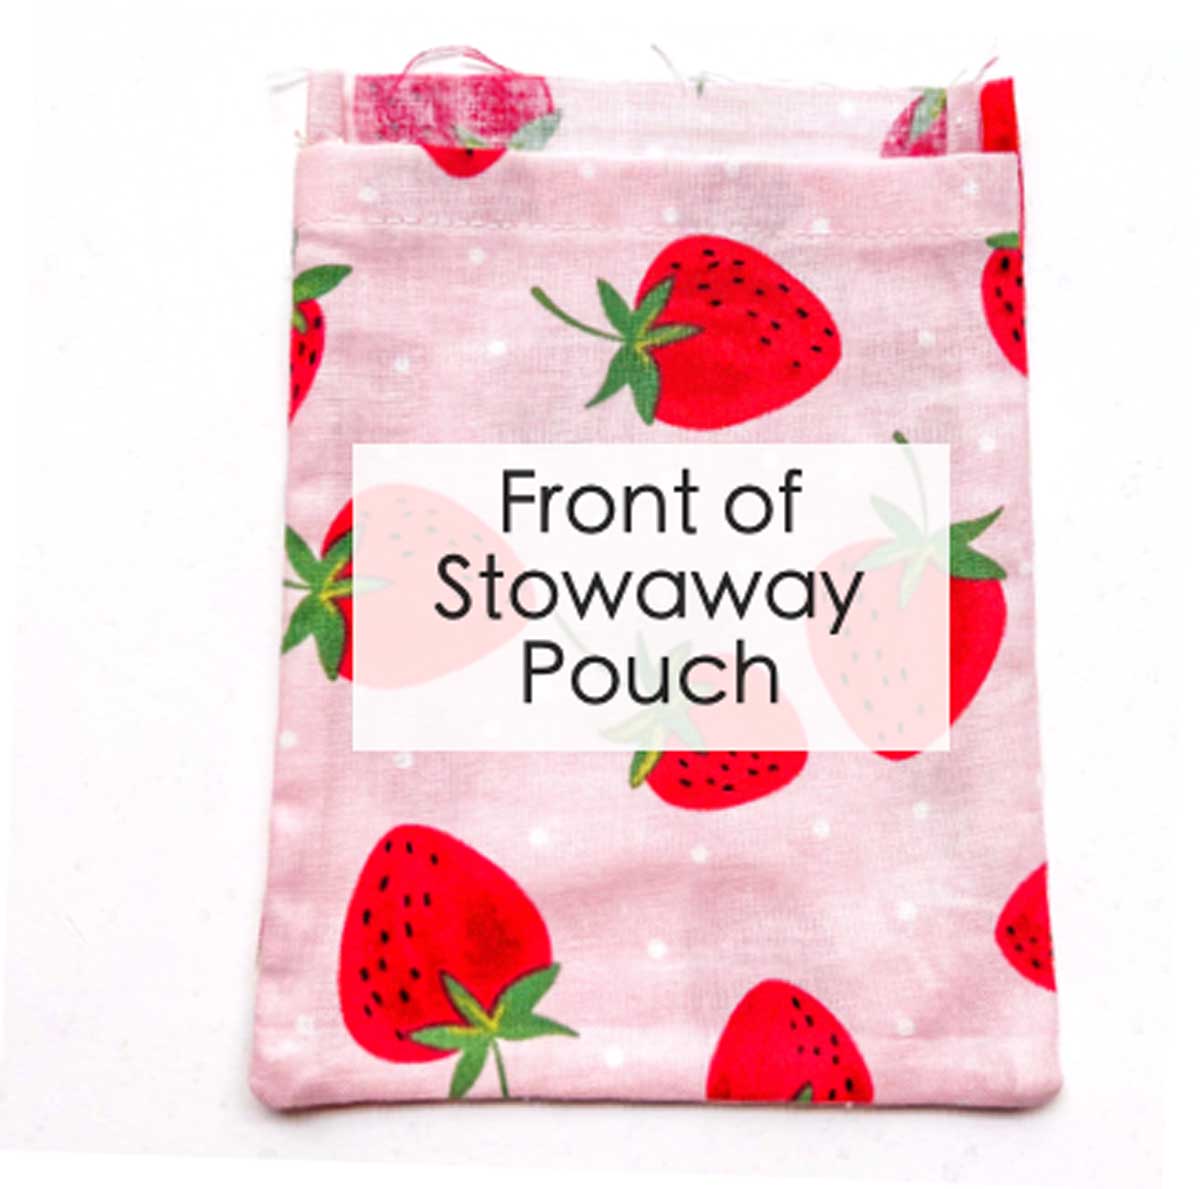
First place [STOWAWAY POUCH FRONT] with wrong side up. Then fold down 1/2” (1.27cm) at the top and press.

Next, fold down another 1/2” (1.27cm) and press.

Then stitch down hem at 1/8” (3mm) from edge (black dotted line).

Next place [STOWAWAY POUCH FRONT] and [STOWAWAY POUCH BACK] wrong sides together. Yes, wrong sides together.

Then sew pouch together at 1/4”(6mm) seam allowance on sides and bottom (black dotted line). Make sure back stitch at top of pouch to reinforce. Next, cut a diagonal at both bottom corners.

Now flip pouch inside out (so right sides of fabric face each other) and press.

Then sew side and bottom of pouch together at 1/4”(6mm) seam allowance (blue line). Make sure back stitch at the top a couple of times to reinforce.

Now flip pouch to right side and press.

Notice that because of the french seam, the [STOWAWAY POUCH BACK] piece folds upon itself at the sides. This is perfectly normal. When you stitch the pouch to the grocery bag later on, you won’t see this part anymore.
Marking Midpoint


Mark the midpoints of [BAG FLAP], [STOWAWAY POUCH], [BAG EXTERIOR] and [BAG LINING]. Do this by folding each piece in half and making a small snip on the fold.
Basting Bag Straps and Stowaway Pouch
First, we are going to baste [BAG FLAP] to [STOWAWAY POUCH].
First, place STOWAWAY POUCH so that the front side faces up.

Next, place BAG FLAP over, matching at the top. Baste together at the top (black dotted line).

Third, we will baste the edge of the BAG STRAPS along the crease lines (shown in blue). Remember, these crease lines were made when we folded and pressed the sides in earlier.

Next, pin edge of BAG STRAPS to crease line (shown in blue), right sides together.

Now repeat this on the other side of the bag.

Then match STOWAWAY POUCH to the bag at the midpoint, with BAG FLAP facing down (towards the right side of EXTERIOR BAG. Pin in place.
NOTE 1: The dotted line is there to indicate that the bag flap is behind the stowaway pouch, you just can’t see it in the photo
NOTE 2: The side of the bag that [bag flap + stowaway pouch] is pinned to becomes the back of the grocery bag.
NOTE 3: BACK of stowaway pouch is facing up, towards you.

Now we will baste bag straps and stowaway pouch to bag. However, before we do that, first make sure that the side seam allowance are all be pointing in the same direction as the folds on the bottom.

Next, baste bag straps and stowaway pouch to bag exterior (blue dotted line).
Sewing Bag All Together

Similarly on the lining, make sure side seam allowance points in same direction as the folds. You can put a pin to keep the seam allowance in place.

Now place bag lining into bag, right sides together.

Then, match the side seams together and pin in place. Make sure seam allowance of bag and lining face opposite directions. Black dotted line is to show you where the seam allowance on bag exterior is.

Another view of the side seams pinned together (at the yellow pin) with seam allowance facing opposite directions.

Next, match the midpoints and crease lines of lining and bag.

Then pin together and sew at 1/2” (1.27cm) seam allowance (black dotted line).

Now your bag will look something like this photo.

Note that the side folds on lining faces the back whereas side folds on bag exterior faces the front.

Next, turn bag to right side through opening on lining.

Bag turned to right side.

Now close opening on lining with invisible ladder stitch

Then place lining into bag.

Finally, top stitch lining to exterior bag along the top, 1/8” (3mm) from edge (black dotted line).
Applying Plastic Snaps
This section shows you how to apply plastic snap buttons. The approximate measurements of where to put the snaps are given. However, feel free to adjust the placement according to your preference.

First, insert snap cover through the bag flap from the front side so the prong pokes through to the back. For my small bag the snap cover is inserted approximately 0.75” (1.9cm) from top edge, along the midline.

Then, place snap stud over the exposed prong.

Next, use snap pliers to squeeze the snap cover and stud together.

See how the pointy end of snap cover will be squished flat

Next, insert the second snap cover into front of bag, from bag interior to bag exterior. The prong will be exposed on the exterior of bag. Again, for this small bag the snap cover is inserted approximately 0.75” (1.9cm) from top edge, along the midline.

Then, place socket over exposed prong

Finally, use snap pliers to squeeze the snap cover and socket together.

See how the pointy end of snap cover has been squished flat.

Tada! Your grocery bag is now done! Wasn’t that simple? Now you can make a bunch for yourself and for friends. These personal shopper bags make great gifts as they are so useful for toting around pretty much anything!

Grocery bag viewed from the top.
How to Fold Reusable Grocery Bag

To fold grocery bag into stowaway pouch:
- Turn bag so the back faces up. Flip bag flap and stowaway pouch up.
- Tuck bag flap into pouch.
- Fold right side of bag in so fold line is flushed with stowaway pouch. Smooth and flatten the bag as much as possible with your hand.
- Fold left side of bag in, flushed with stowaway pouch.

- Fold straps down
- Fold bag up
- (and 8) Tuck bag into pouch

9 & 10. Continue tucking bag into pouch until it’s all the way in.
Watch How to Make it
Grab the ad-free, printer friendly PDF Pattern and Tutorial of the Reusable Grocery Bag today! Print a copy and keep it next to your sewing machine for easy reference as you sew. Additionally, you will receive patterns for the medium and large sized grocery bags.
How to Make a Reusable Grocery Bag

This reusable grocery bag is fully lined for extra durability. Bag flap with snaps adds a convenient closure and stowaway pouch allows for easy storage.
Materials
- 3/4 YARD (0.68m) EXTERIOR FABRIC - 100% Cotton
- 1/2 YARD (0.45m) LINING - 100% Cotton
- MATCHING THREAD
- GROCERY BAG PDF PATTERN (SIZE SMALL)
Tools
- HOME SEWING MACHINE
- FABRIC SCISSORS
- SEWING PINS and/or
- SEWING CLIPS
- CLEAR RULER
- FABRIC CHALK
- HAND SEWING NEEDLES
- IRON - for pressing
- SNAP PLIERS & PLASTIC SNAPS - optional, if you want to add a snap closure to the bag flap
Instructions
- Cut out all fabric grocery bag pattern pieces
- BAG EXTERIOR (X2)
- BAG LINING (X2)
- BAG STRAP (X4)
- STOWAWAY POUCH FRONT
- STOWAWAY POUCH BACK
- BAG FLAP (X2)
SEWING BAG
- Place [BAG EXTERIOR] piece right sides together
- Sew side and bottom at 1/2”(1.27cm) seam allowance.
- Fold both sides in 2.5”(6.35cm).
- Press the fold with iron and pin along bottom of the bag.
- Sew folds down at 1/2”(1.27cm) seam allowance. Make sure to back stitch at both ends.
- Place [LINING] piece right sides together.
- Sew sides and bottom at 1/2”(1.27cm) seam allowance. Make sure to leave an opening approximately 3”(7.62cm) wide at the bottom. This opening will be used to turn our bag to the right side later on.
- Fold both sides in 2.5”(6.35cm), just like on exterior fabric (step 3).
- Press the fold with iron and pin along bottom of bag.
- Sew folds along the bottom folds at 1/2”(1.27cm) seam allowance, leaving the opening unstitched. Back stitch at both ends.
SEWING STRAPS
- Place [BAG STRAP] piece right sides together. Sew at 1/2” (1.27cm) seam allowance on both sides.
- Repeat sewing other strap
- Turn bag strap to right side and give it a good press.
- Top stitch the strap at 1/8” (3mm) from both edge.
HOW TO SEW BAG FLAP (optional)
- Place [BAG FLAP] piece right sides together.
- Sew at 1/2” (1.27cm) seam allowance on sides and bottom.
- Clip corners.
- Turn bag flap to right side, pushing out all corners.
- Give your bag flap a good press.
- Top stitch at 1/8” (3mm) around sides and bottom. You bag flap is done.
SEWING STOWAWAY POUCH (optional)
- PLACE [STOWAWAY POUCH FRONT] with wrong side up.
- Fold down 1/2” (1.27cm) at the top and press.
- Fold down another 1/2” (1.27cm) and press.
- Stitch down hem at 1/8” (3mm) from edge.
- Place [STOWAWAY POUCH FRONT] and [STOWAWAY POUCH BACK] wrong sides together.
- Sew pouch together at 1/4” (6mm) seam allowance on sides and bottom. Make sure back stitch at top of pouch to reinforce.
- Cut a diagonal at both bottom corners.
- Flip pouch inside out (so right sides of fabric face each other) and press.
- Sew sides and bottom of pouch together at 1/4” (6mm) seam allowance (blue line). Make sure back stitch at the top a couple of times to reinforce.
- Flip pouch to right side and press.
MARKING MIDPOINT
- Mark the midpoints of the following pieces by folding each piece in half and making a small snip on the fold at the top:
- BAG FLAP
- STOWAWAY POUCH
- BAG EXTERIOR - both pieces
- BAG LINING - both pieces
BASTING BAG STRAPS AND STOWAWAY POUCH
- Place STOWAWAY POUCH so that its back side faces up.
- Place BAG FLAP over, matching at the top. Baste together at the top.
- Place the edge of BAG STRAP along the crease lines on BAG EXTERIOR and pin, right sides together.
- Repeat with other BAG STRAP.
- Match STOWAWAY POUCH to EXTERIOR BAG at the midpoint, with BAG FLAP facing down. Pin in place.
- Make sure that side seams of EXTERIOR BAG are pointing in the same direction as the folds on the bottom.
- Baste bag straps and stowaway pouch to bag exterior.
SEWING BAG ALL TOGETHER
- Similarly on the lining, make sure side seam allowance points in same direction as the folds. You can put a pin to keep the seam allowance in place.
- Place bag lining into bag, right sides together.
- Match the side seams together and pin in place. Make sure the side seam allowance of bag and side seam allowance of lining face opposite directions.
- Match the midpoints and crease lines of LINING and EXTERIOR BAG.
- Pin together and sew at 1/2” (1.27cm) seam allowance.
- Turn bag to right side through opening on lining.
- Close the opening on lining with invisible ladder stitch.
- Place lining into bag.
- Top stitch LINING to EXTERIOR BAG along the top, 1/8” (3mm) from edge.
- Apply plastic snaps to front of bag and bag flap. Finished!


Your strawberry tote bag is simply gorgeous, what an awesome pattern! Today I’ve featured your project on Crafts on Display, I hope you enjoy it, and keep up the amazing work! https://craftsondisplay.com/sewing/reusable-grocery-bag-166391/