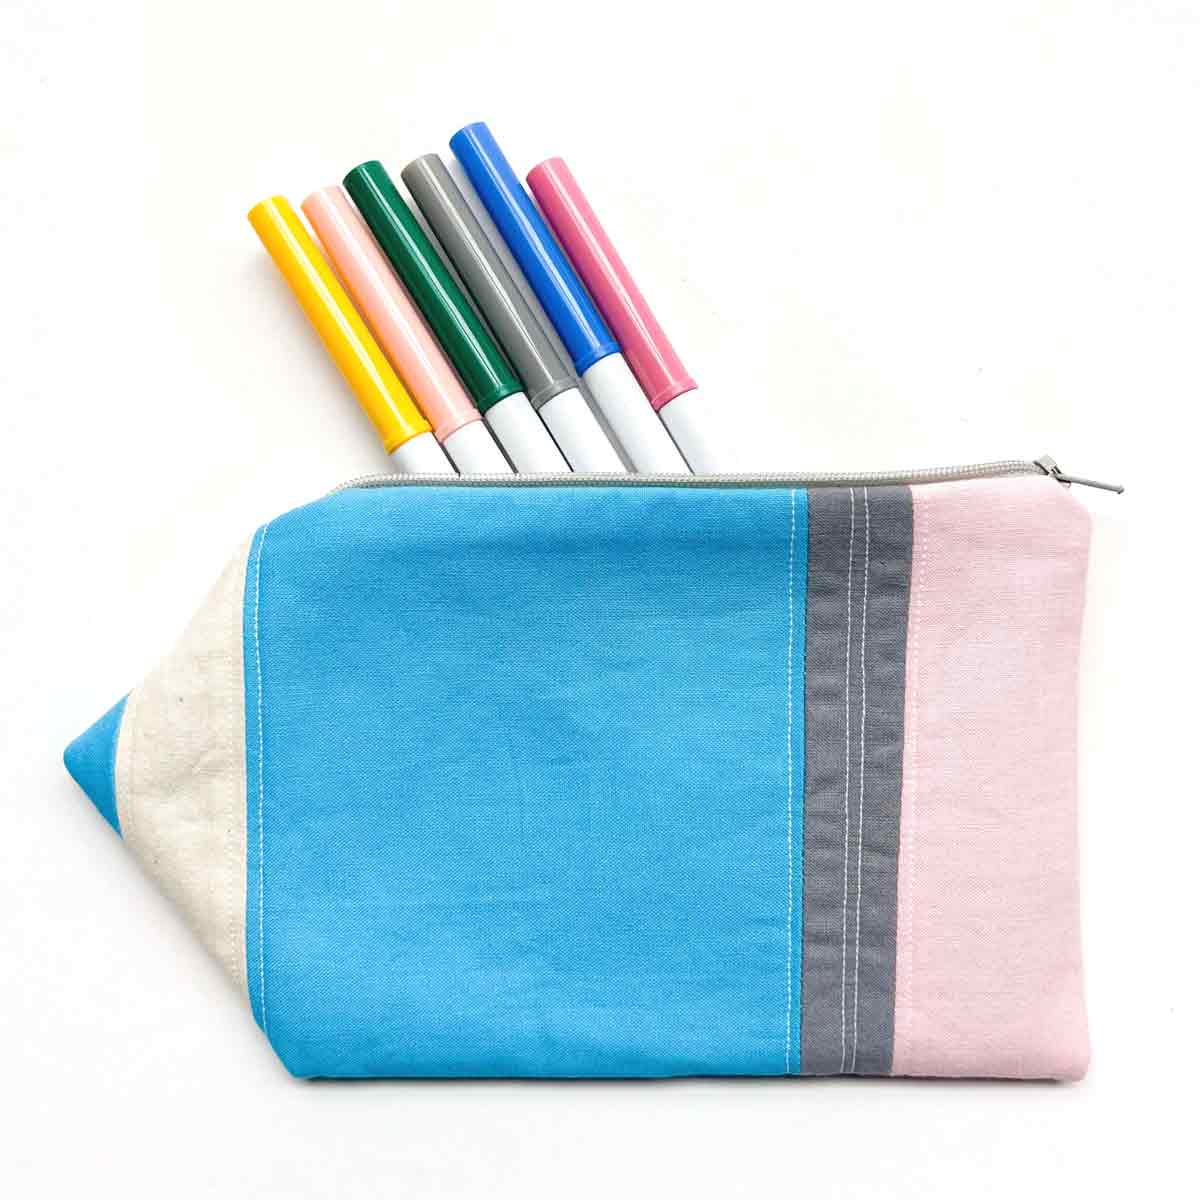
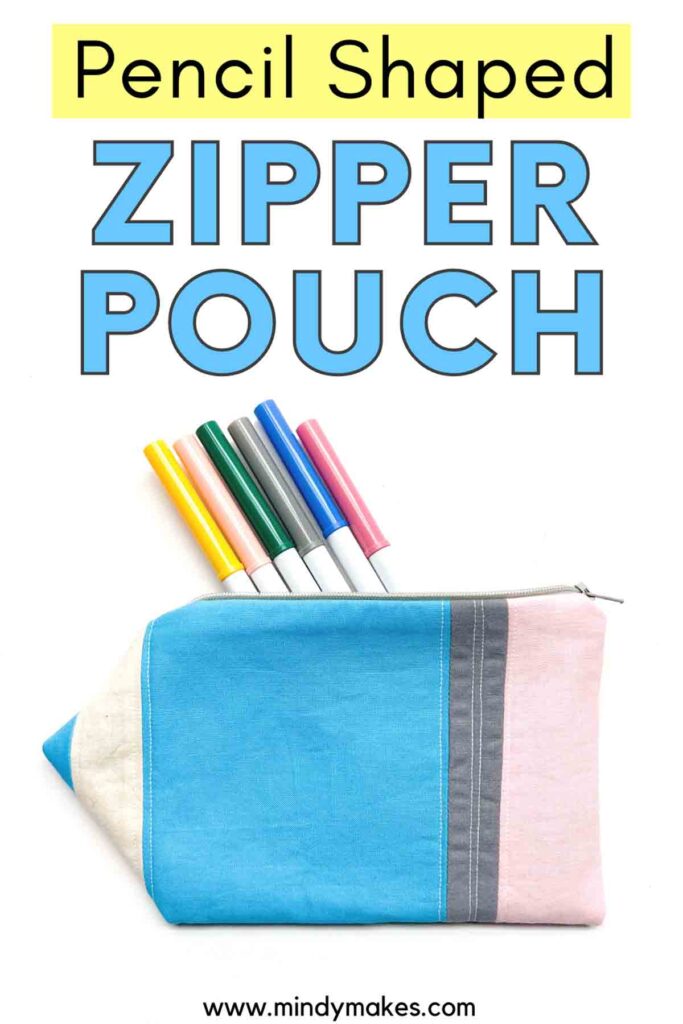
Free Pencil Case Sewing Pattern (That Looks Like a Pencil!)
A simple yet adorable pencil case sewing pattern made to look just like a pencil! School aged kids will love this zipper pouch. Also great as teacher appreciate gifts!
This post may contain affiliate links. Please read my disclosure policy for details. As an Amazon Associate, I earn from qualifying purchases.
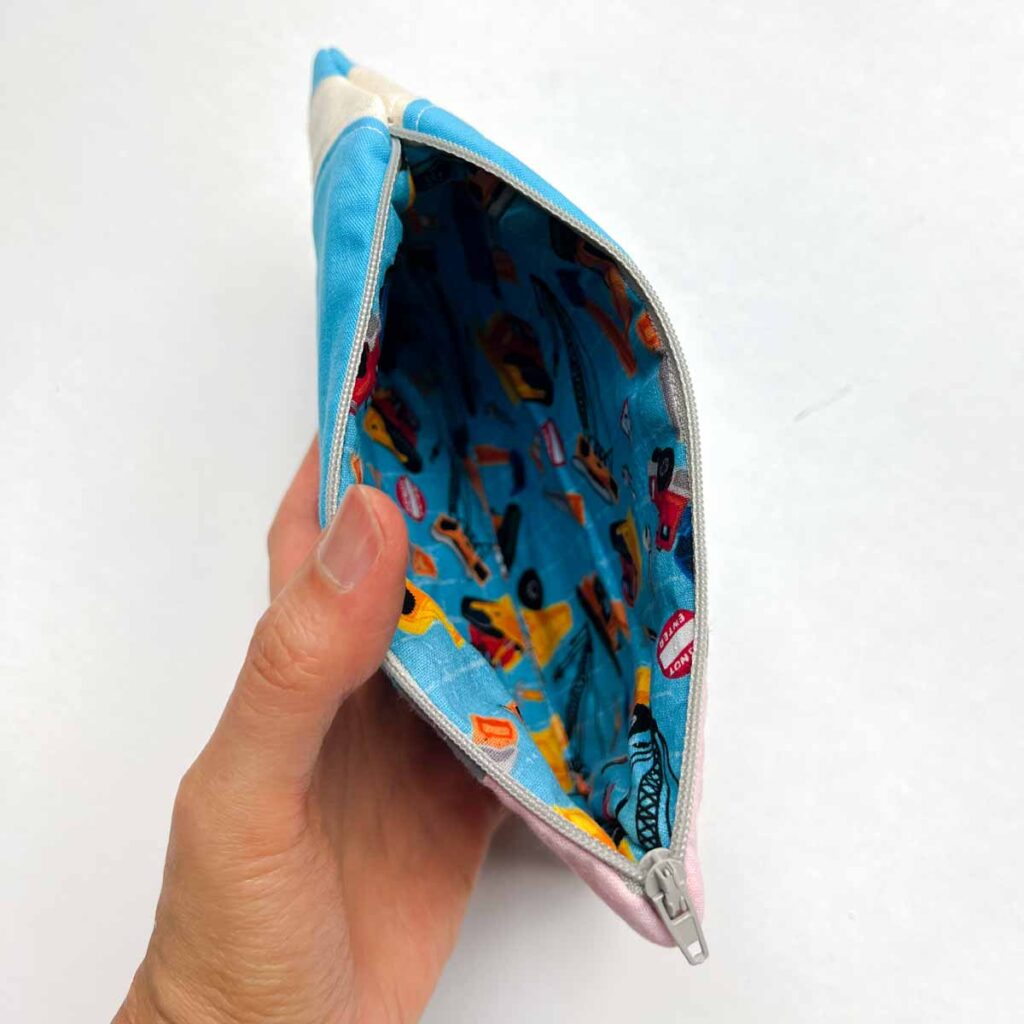
Which kid won’t love their very own pencil shaped zipper pouch to store their school supplies? Even adults will find this adorable pencil pouch hard to resist!
The exterior of this cute bag is made to look like a pencil via color blocking different colored fabrics. Choose yellow with a black tip to make a classic #2 pencil.
Otherwise, make the tip in the same color as the middle to resemble a colored pencil. The possibilities are endless!
What is the best fabric for a pencil case?
Most fabric is suitable to make pencil cases as long as it is medium to heavyweight. Light weight fabrics such as woven cottons can also be used by applying fusible fleece or interfacing on the wrong side to make the fabric more sturdy.
Fabric choices that are suitable for making pencil cases include cotton, canvas, denim, vinyl, velvet, and pleather. You can also use medium to heavyweight knit fabric to make a sturdy pencil pouch.
For this easy sewing project, I recommend using cotton as the fabric of choice. This is because cotton fabric comes in an array of different patterns and colors. And in order to make this pouch look like a pencil, you will need a few different colored fabrics.
Additionally, cotton is also the best fabric for those who consider themselves beginners. Cotton is a very easy fabric to work as it doesn’t stretch or slide around as you sew. You can also easily wash your pencil case if you ever you get it dirty (think pen or pencil stains)!
How Big is This Pencil Pouch?

This small pencil pouch measures 8.5″ (21.59 cm) from tip of pencil to eraser and 5″ (12.7cm) tall. Please note that these dimensions are approximate and your finished pencil case may vary slightly.
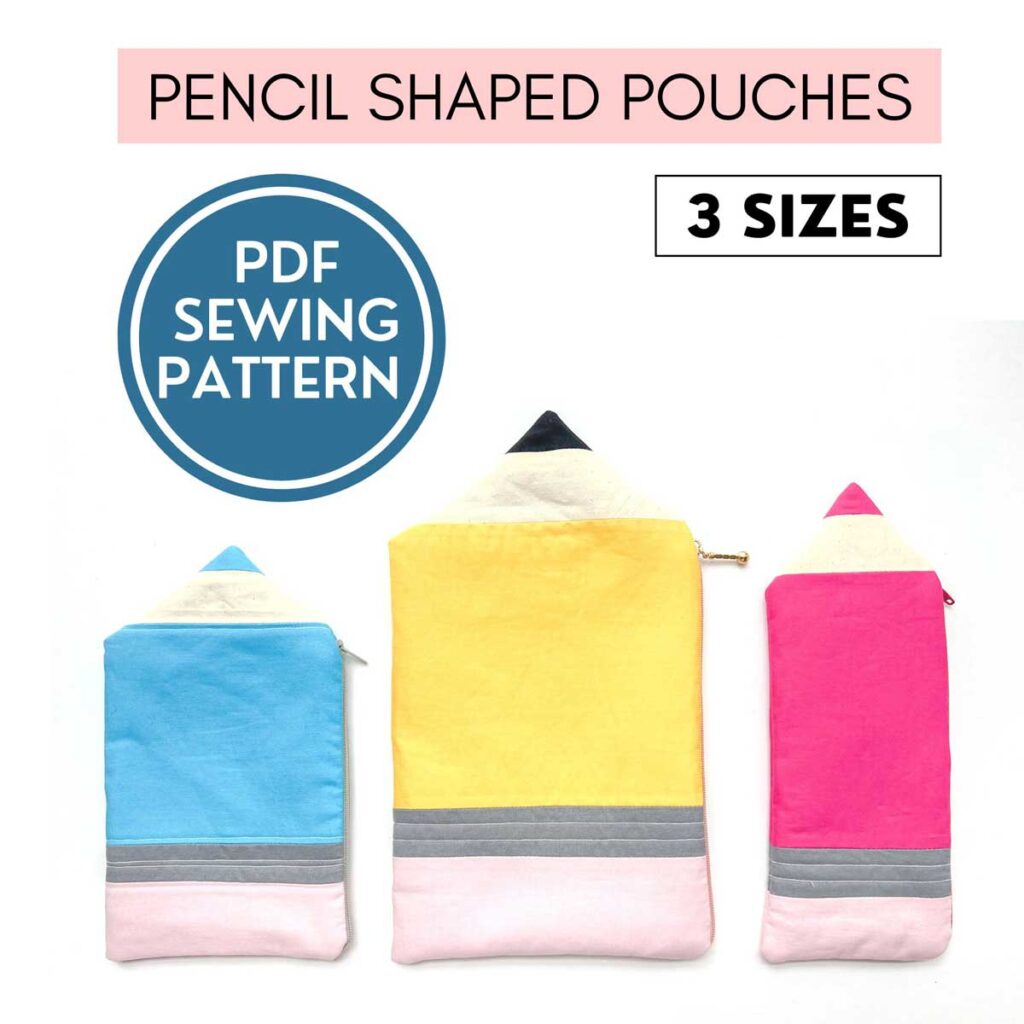
Want more sizes of this adorable pencil shaped pouch? Grab the AD-FREE, PRINTER-FRIENDLY PDF version of this sewing pattern from OUR ETSY SHOP today! Pattern comes in 3 sizes: Small (blue pouch), Large (yellow pouch), and Long (pink pouch) as well as step-by-step tutorial. Just print and use!
What Materials Are Used to Make a Pencil Pouch?
For this adorable pencil shaped zippered pouch, you will need the following supplies:
Materials
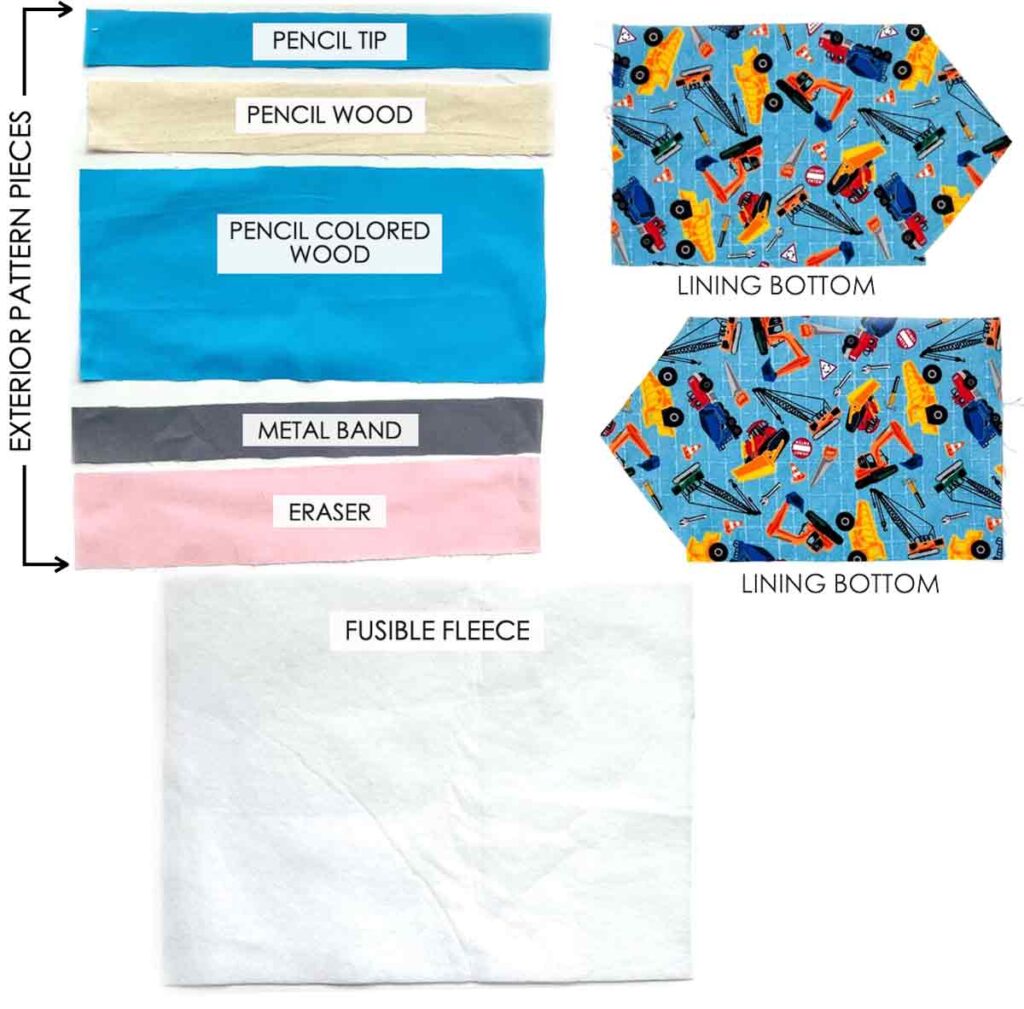
- EXTERIOR FABRIC – 1/4 yard (0.23 meters) of each of the following:
- PENCIL TIP – Black for #2 pencil, Other for colored pencils
- PENCIL WOOD – Cream
- PENCIL COLORED WOOD – Yellow for #2 pencil, other for colored pencils
- METAL BAND – Gray
- ERASER – Light pink
- LINING FABRIC – 1/4 yard (0.23 meters)
- FUSIBLE FLEECE – 1/2 yard (0.46 meters).
- 9” ZIPPER
Tools
- HOME SEWING MACHINE
- FABRIC SCISSORS
- CLEAR RULER – I have the DRITZ See-Through Sewing Ruler
- FABRIC CHALK
- IRON – for pressing
- SEWING PINS & SEWING CLIPS
- HAND SEWING NEEDLES
- MATCHING THREAD
Pencil Case Sewing Pattern
For this fun and easy sewing project, you will need to cut out the following pattern pieces:
- PENCIL TIP – 1 piece
- PENCIL WOOD – 1 piece
- PENCIL COLORED WOOD – 1 piece
- METAL BAND – 1 piece
- ERASER – 1 piece
- FUSIBLE FLEECE – Cut 1 Piece that measures 11”x 12” (28 cm x 31 cm) – See Note 2
- LINING – 2 pieces
NOTE 1: The fabric pieces listed in red (Pencil Tip to Eraser) will make up the exterior pattern pieces
NOTE 2: The fusible fleece piece is approximate and will be trimmed down later to match the exterior piece. Therefore, as long as your fusible fleece is larger than the stated measurements it will be fine.
Where Can I GRAB the Pencil Case Sewing Pattern?
To download this adorable Pencil Case Sewing Pattern (in size small), subscribe to the MindyMakes Email List to receive the password for the Mindy Makes Free Resource Library.
Once you click “submit”, the password will show up on the next page. You will also receive a welcome email with the password in case you forget.
Please allow up to an hour for the welcome email to fly through cyberspace and travel into your inbox. If you still don’t receive the email, make sure to check your junk or spam folders and add my email to your safe list!
Need more help? Be sure to check out this step-by-step guide that shows you exactly how to get the password, enter the library, and download the PDF.
How do you sew a pencil case?
This pencil shaped pencil case is fully lined and has a zipper closure. First, you will sew the fabric pieces of the exterior pencil pouch in the correct order so that it resembles a pencil.
Next, you will trim the fabric at the “pencil tip” into a triangle. Then, you will sew the zipper to the exterior fabric, and then also sew the two lining pieces to the zipper.
Then, you will sew the lining pieces to itself and the exterior piece to itself, right sides together. Make sure to also leave a small opening on the lining in order to turn the pencil pouch to the right side. Finally, turn the pouch to the right side, close off the opening on the lining and you are done!
How do you make a fabric pencil case with a zipper?
Before you get started
- Print pattern pieces out, and cut them out on appropriate colored fabric.
- All the EXTERIOR PATTERN PIECES are cut on fold, this includes [PENCIL TIP], [PENCIL WOOD], [PENCIL COLORED WOOD], [METAL BAND], and [ERASER].
- After you sew all the EXTERIOR PATTERN PIECES together, you will use that as a “pattern” for the fusible fleece.
- Please make sure to note that [LINING PIECE] has a top side (that gets sewn to zipper) and a bottom side. The two sides are NOT interchangeable.
Sewing Exterior Piece
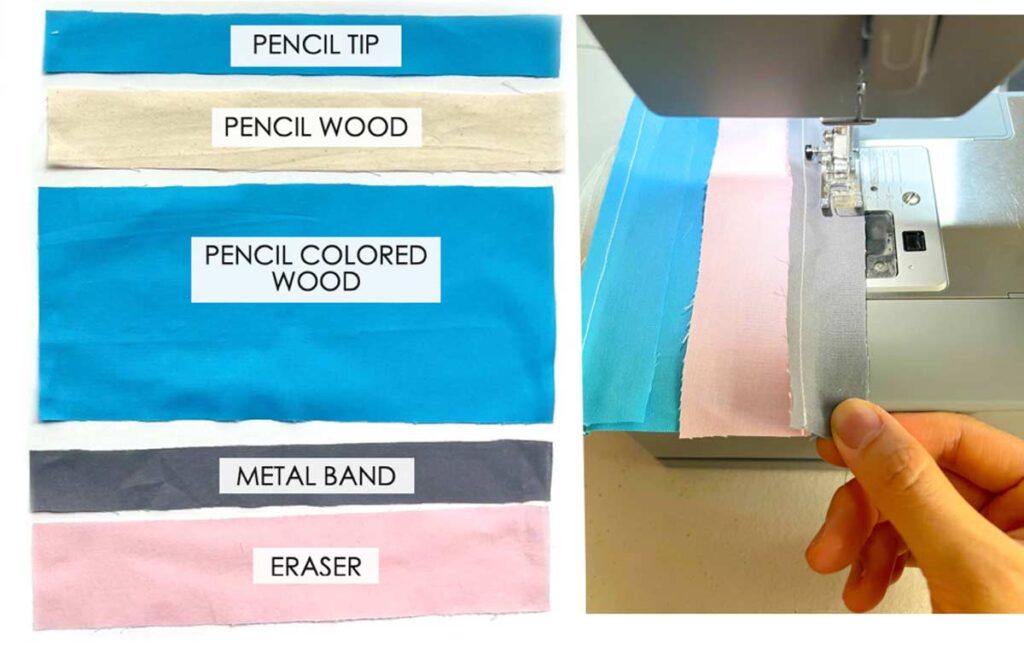
LEFT: Lay pencil case sewing pattern pieces in order from top to bottom (see photo):
- PENCIL TIP
- PENCIL WOOD
- PENCIL COLORED WOOD
- METAL BAND
- ERASER
RIGHT: Then, stitch all the pieces together at 1/4” (6.35mm) seam allowance.
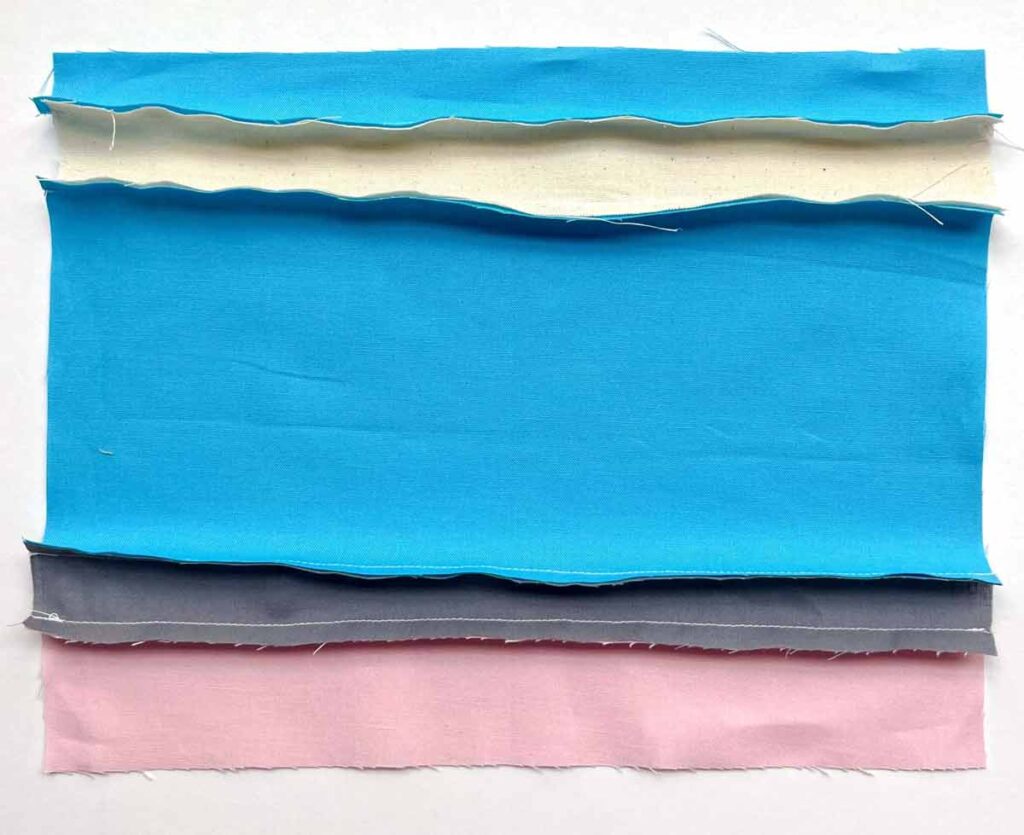
You will end up with an entire piece like the photo above.
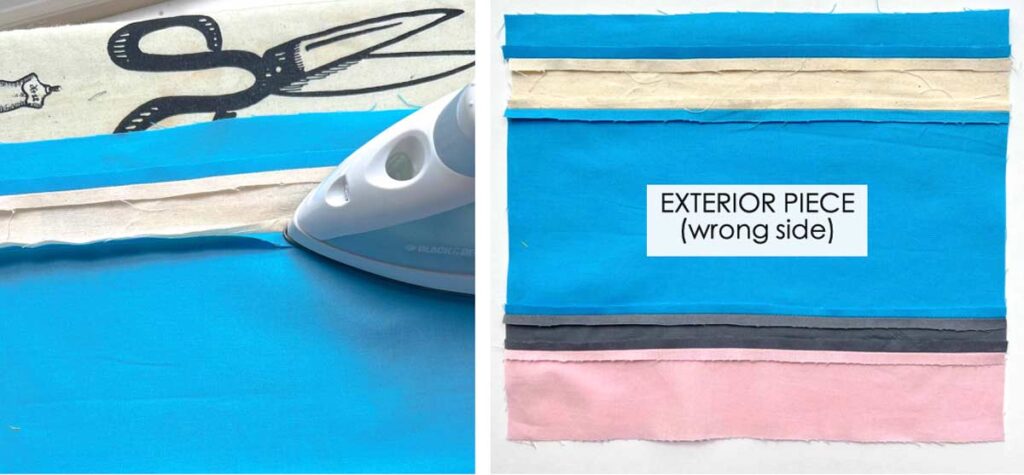
Press open all the seam allowances. This piece will now be referred to as [EXTERIOR PIECE]
How to Cut Exterior Piece
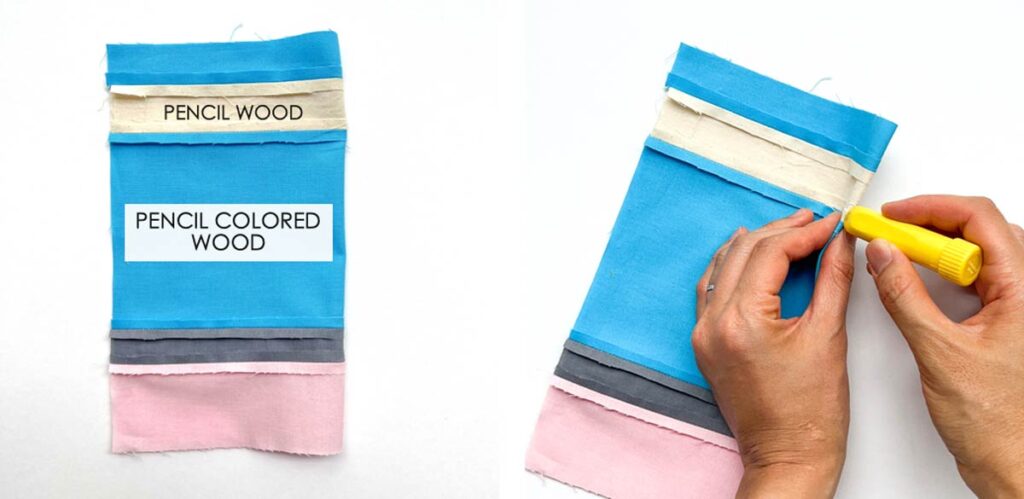
Next, we will mark the midpoint of where [PENCIL WOOD] and [PENCIL COLORED WOOD] pieces meet. Make sure you are marking on the wrong side of the fabric. First, fold [EXTERIOR PIECE] in half. Then, use fabric chalk to mark the midpoint at the junction where [PENCIL WOOD] is sewn to [PENCIL COLORED WOOD]
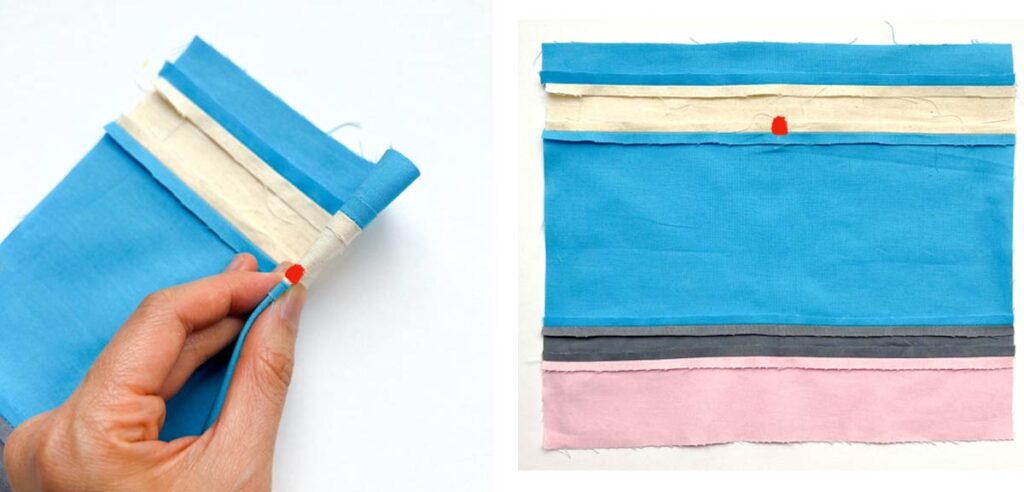
Red shows where the midpoint is marked.
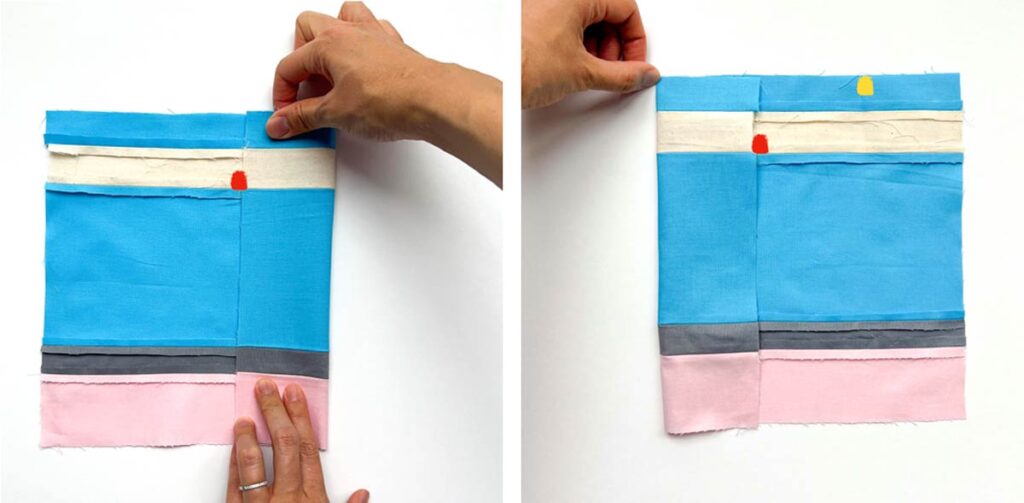
Next, we will mark the quarter-points of [EXTERIOR PIECE].
First, fold right side of [EXTERIOR PIECE] so that it meets the midpoint and make a crease at the top of the fold (yellow marking on right photo).
Repeat this on the left side and mark the fold by creasing top of fabric with your fingernails.
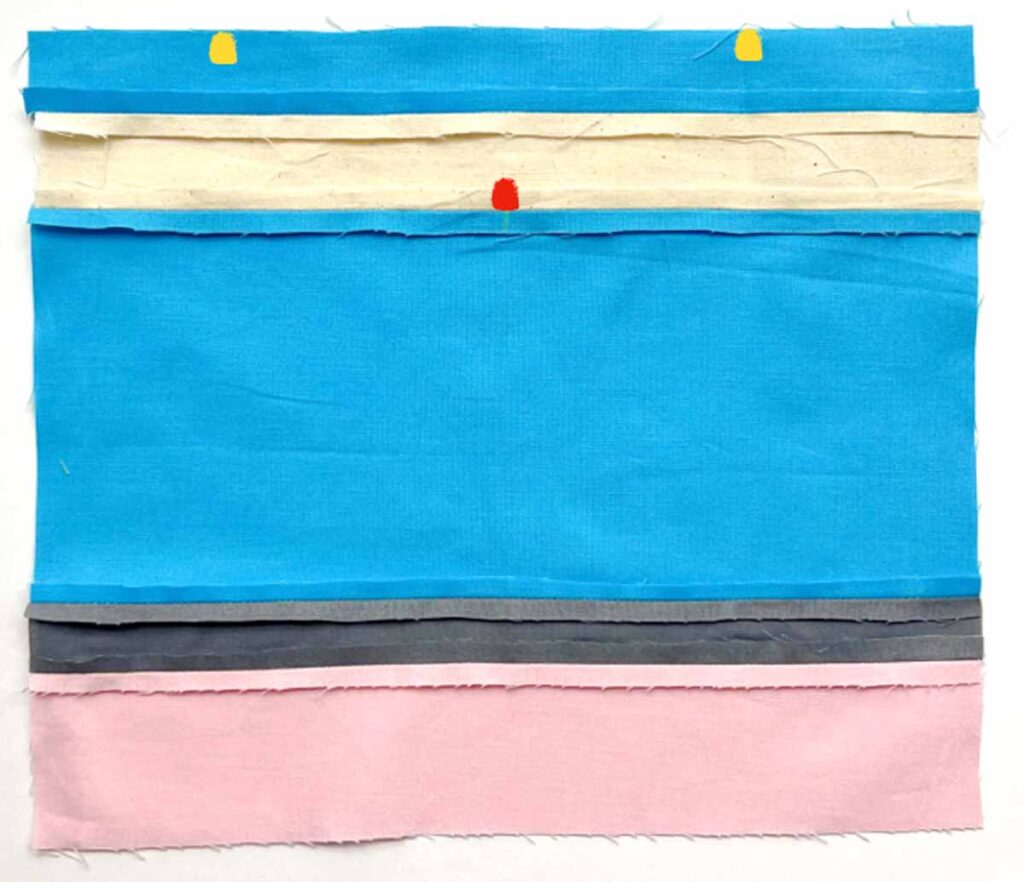
You will end up with 3 markings as shown in the photo. Two quarter-points (yellow) and one midpoint (red).
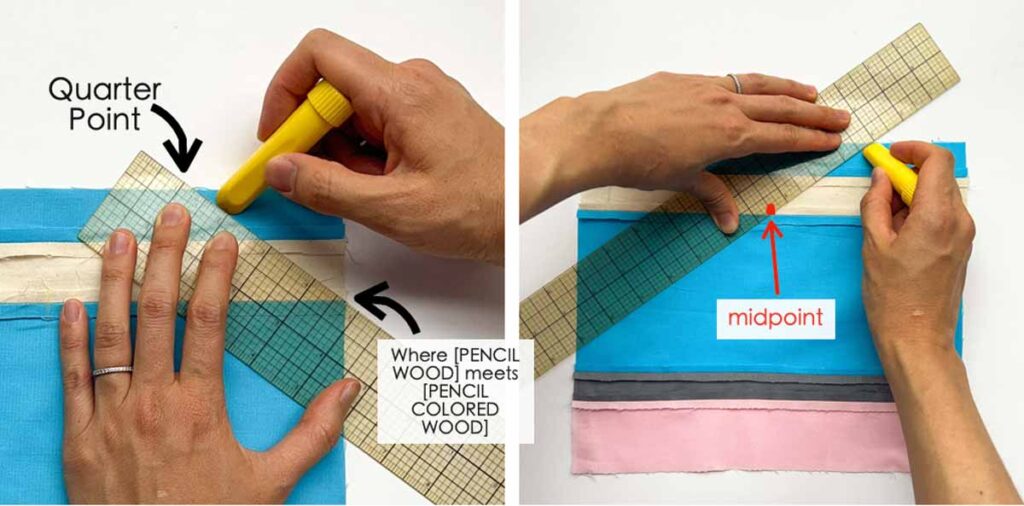
Using a ruler and fabric chalk, connect quarter point to the edge where [PENCIL WOOD] meets [PENCIL COLORED WOOD], as shown in photo.
Next, connect quarter point to mid point. Repeat on other side.
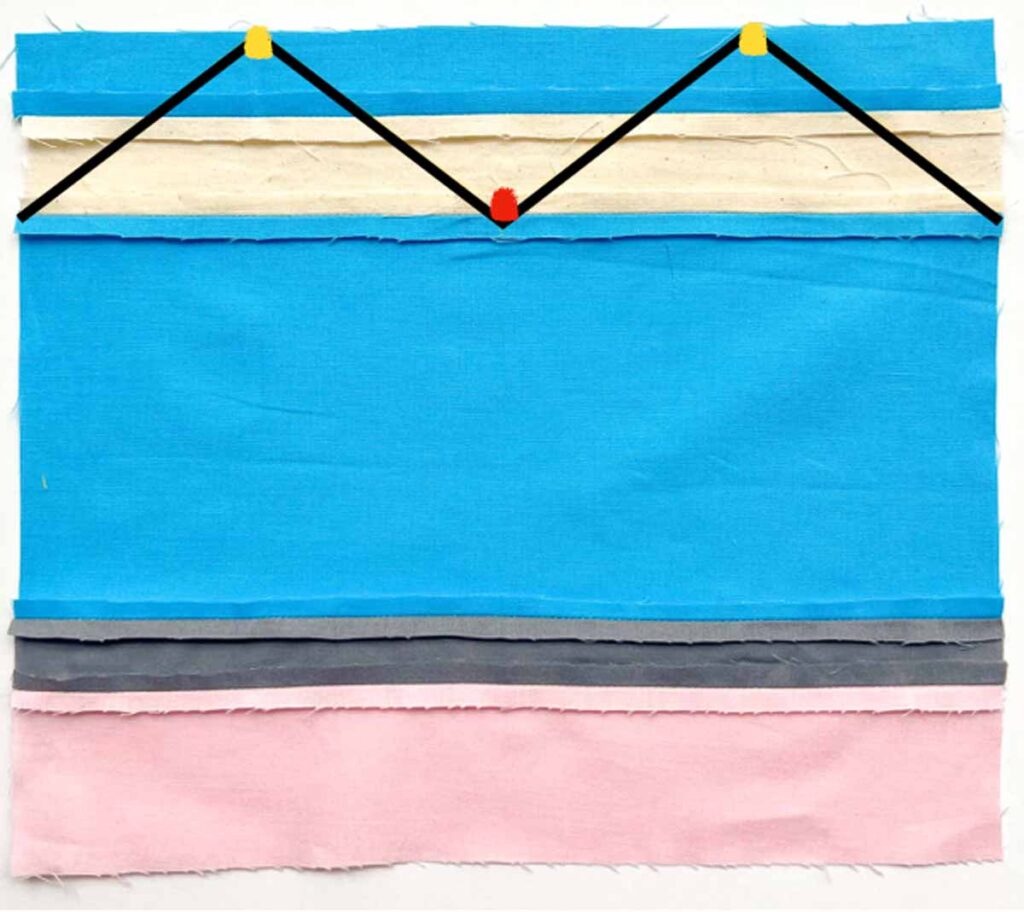
Your markings will look like this (black solid line). This marks the two pointy tips of the pencil pouch.

LEFT: Cut [EXTERIOR PIECE] along where you marked. Your exterior piece will now have two pointy tips.
RIGHT: Next, you will use your [EXTERIOR PIECE] as the pattern piece for your fusible interfacing. Pin wrong side of [EXTERIOR PIECE] (right side facing up) to the rough side (the side that has the glue) of fusible fleece.
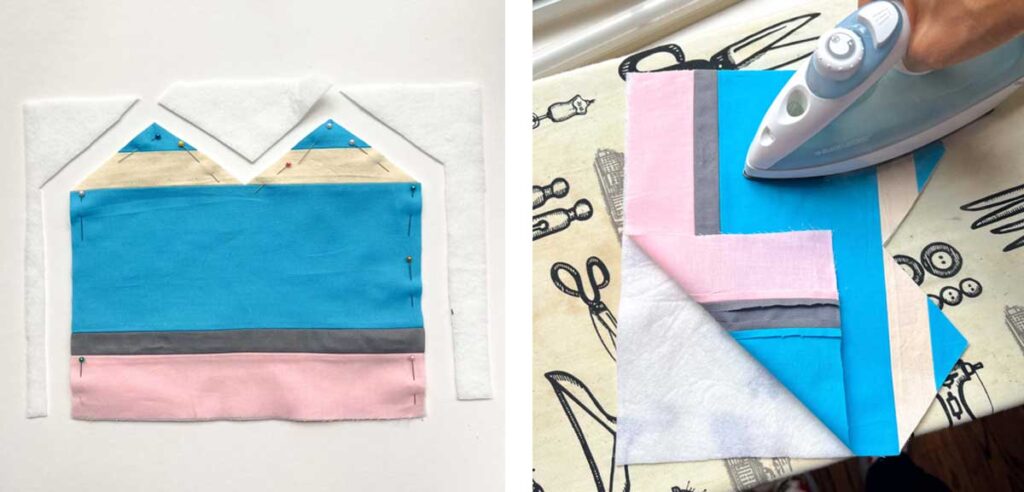
LEFT: Cut fusible fleece, following pattern of [EXTERIOR PIECE]
RIGHT: Fuse fleece to wrong side of [EXTERIOR PIECE] according to directions on your fusible fleece.
Top Stitching Exterior Piece
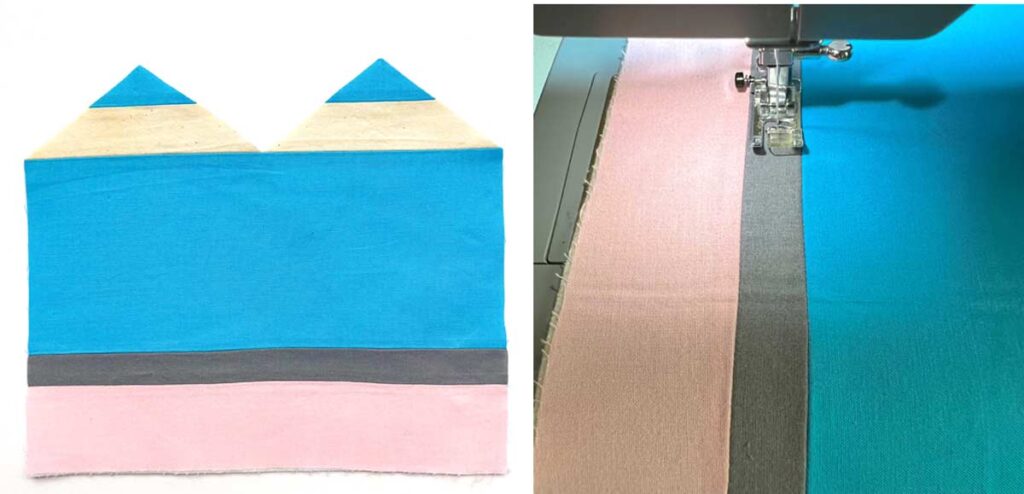
LEFT: View of [EXTERIOR PIECE] fused to fusible fleece.
RIGHT: Add some top stitching on your gray [METAL BAND] fabric to make it look more like the metal band around a pencil.
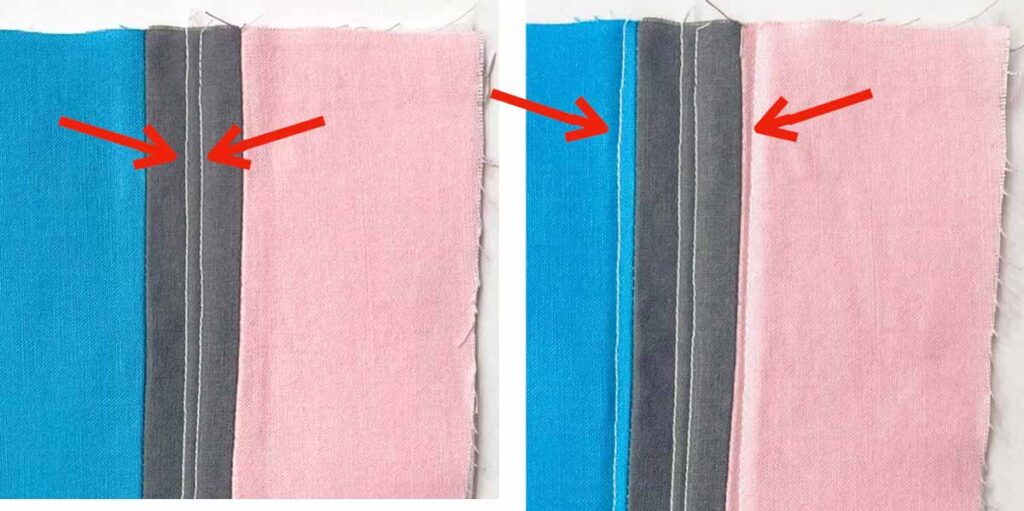
LEFT: I made two straight stitches about 3/8” (9.5mm) away from edges of gray [METAL BAND] fabric, with white thread. You can also use gray thread.
RIGHT: Add more top stitching if you like for decorative purposes. This step is completely optional!
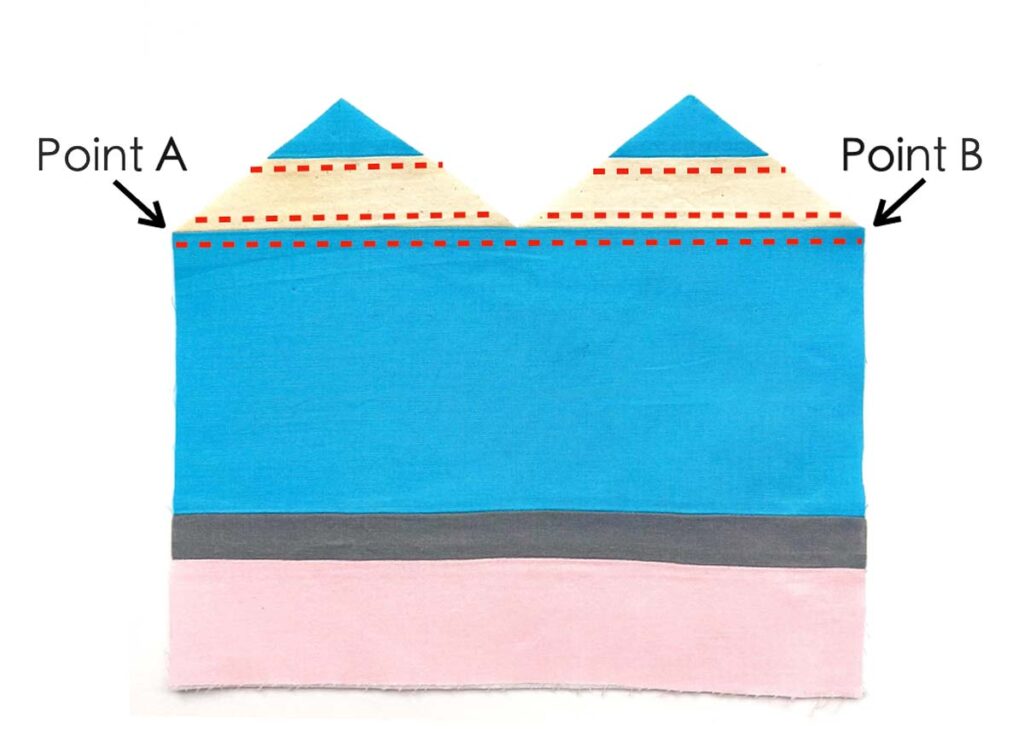
I also added top stitching to the pencil tip as well (red dotted lines). Also note that the two points on the side will be referred to as point A and point B. This will be where you match the zipper to in the next step.
How to Install Zipper
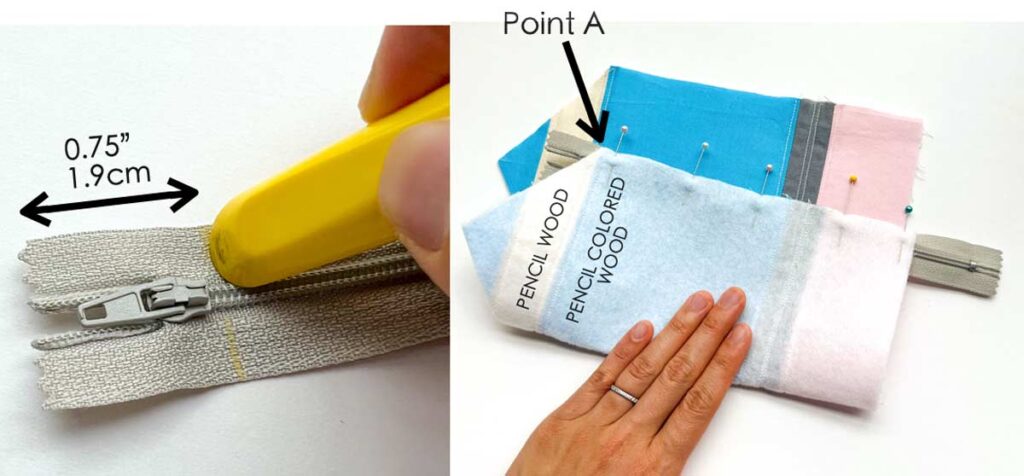
LEFT: Mark zipper a distance of 0.75” (1.9cm) from zipper start.
RIGHT: Pin zipper to [EXTERIOR PIECE], right sides together. Match the marking on zipper to Point A
LEFT: Sew zipper to [EXTERIOR PIECE] with zipper foot (red dotted line). Next, open the zipper all the way and match marking on other side of zipper to Point B.
RIGHT: Pin and sew zipper to [EXTERIOR PIECE], right sides together (blue dotted line).
View of [EXTERIOR PIECE] with zipper sewn in.
How to Sew Lining in
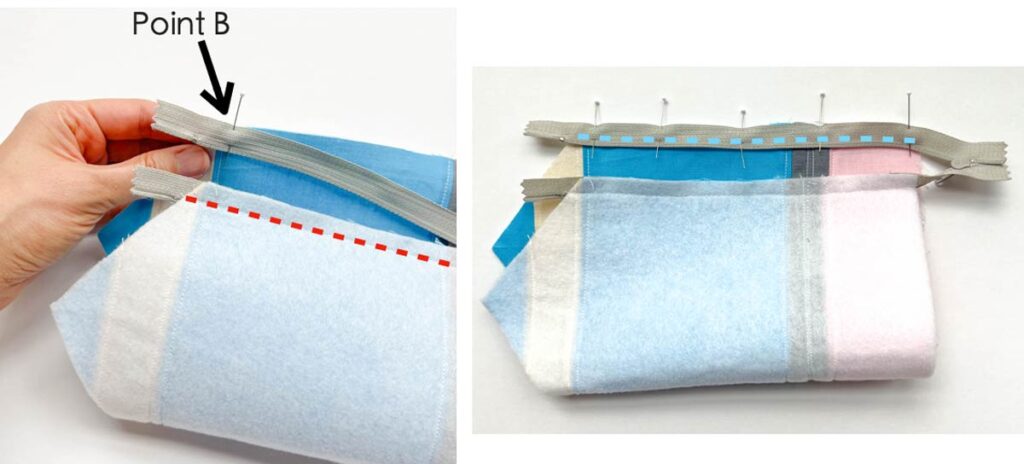
LEFT: Pin and sew [LINING] to [EXTERIOR PIECE], right sides together, matching at Point B. RIGHT: White dotted line shows where you sew.
NOTE: Make sure you are pinning the top of [LINING] to zipper, not the bottom.
LEFT: View of your pouch after one side of lining is sewn in.
RIGHT: Pull down the lining piece you just sewed so it faces [EXTERIOR PIECE], right sides together.
LEFT: Pin and sew second piece of [LINING] to [EXTERIOR PIECE], right sides together, matching at Point A.
RIGHT: View of lining sewn into zipper.
How to Sew Pencil Pouch Together
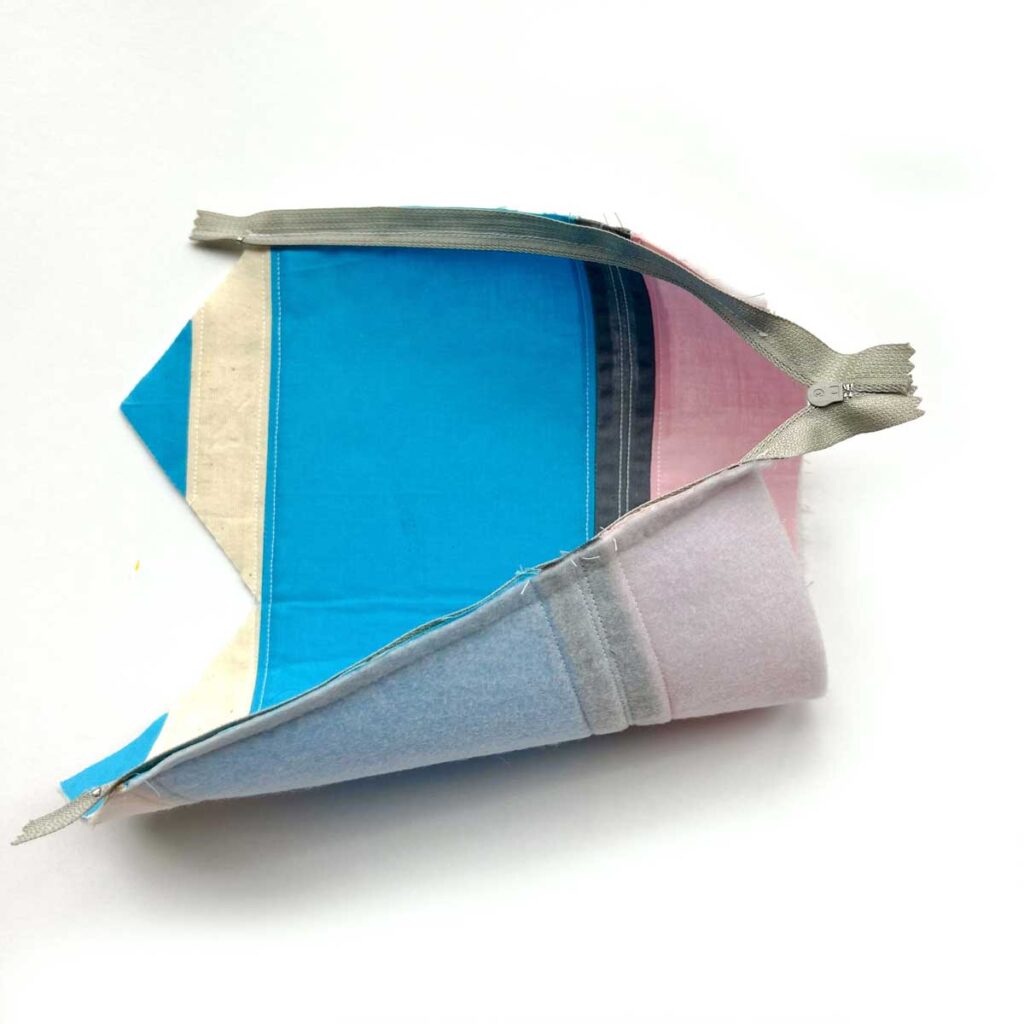
Now that you’ve sewn your exterior piece and lining to the zipper, it’s time to sew your entire pouch together!

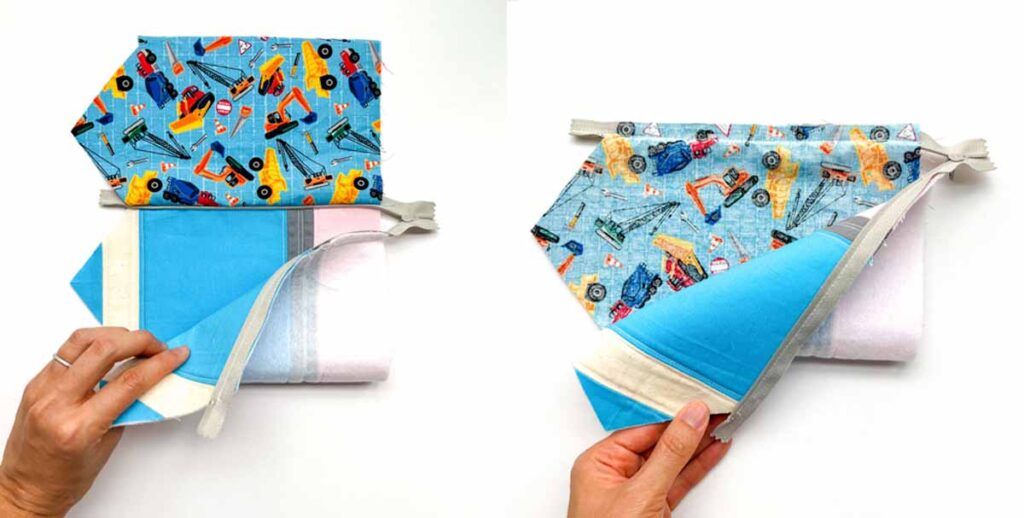
Match [LINING] pieces at the bottom and pull it away from [EXTERIOR PIECE].
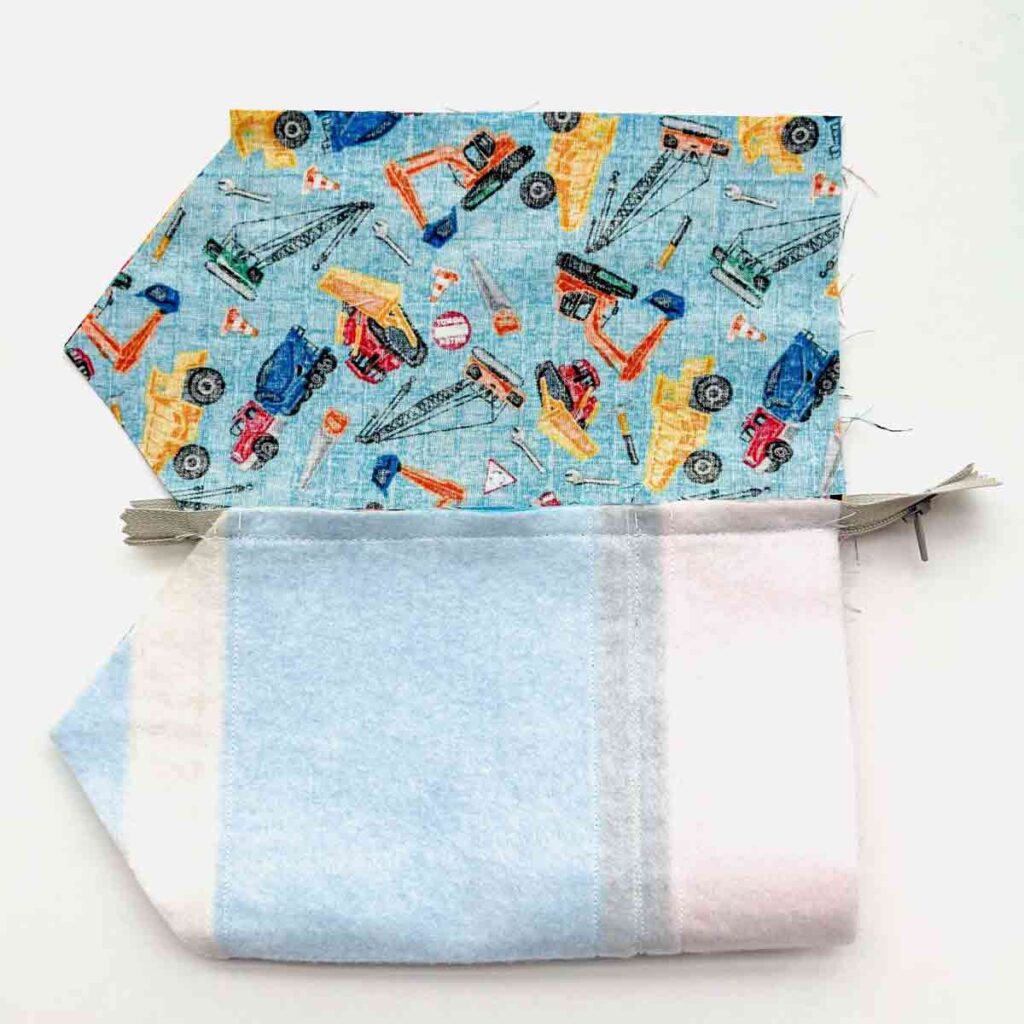
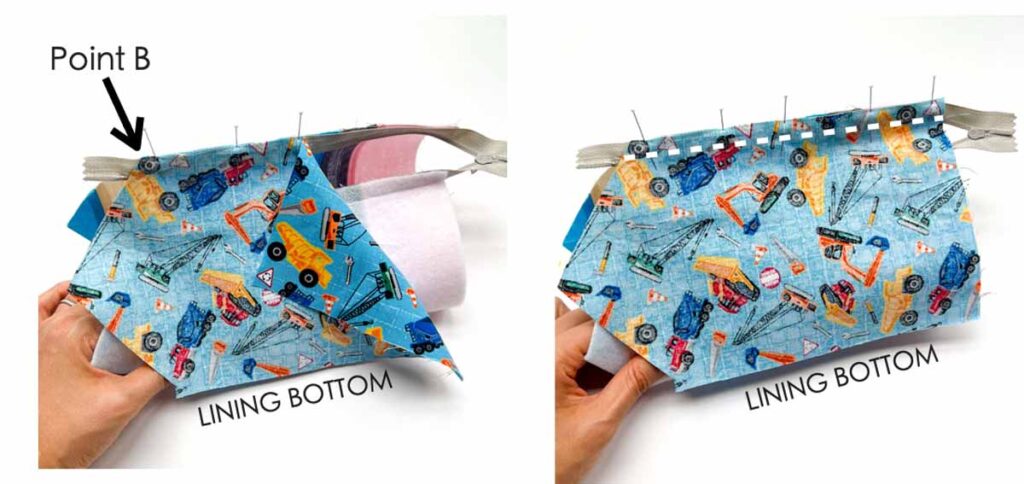
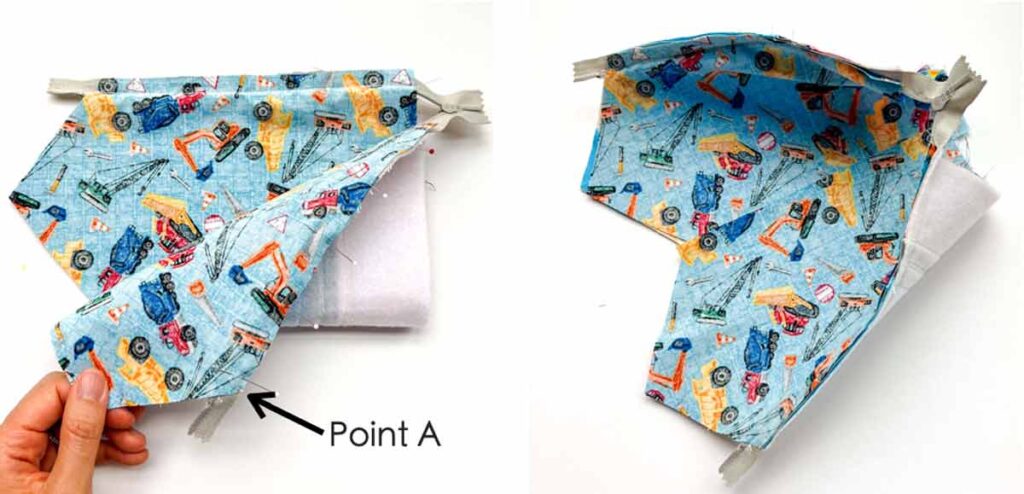
Match [LINING] pieces together and fold [EXTERIOR PIECE] in half. Make sure to match pencil tips to each other, and point A to point B.
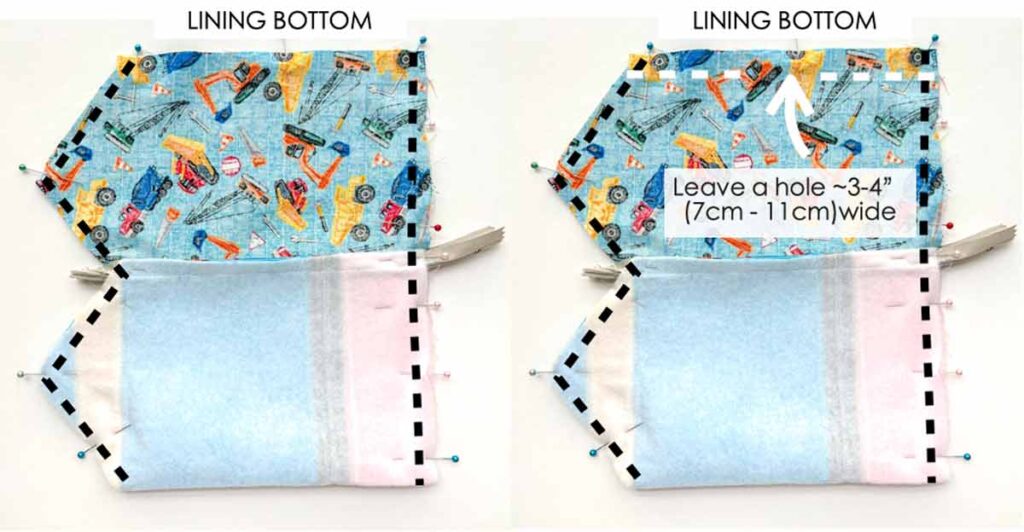
LEFT: Make sure to first pull zipper into the middle of the pouch. Then, pin and sew at 1/4” (6 mm) seam allowance on the sides (black dotted line).
RIGHT: Next, sew at 1/2” (12.7 mm) seam allowance on the bottom of the lining (white dotted line), leaving a hole about 3-4”(7.5cm – 10cm) wide
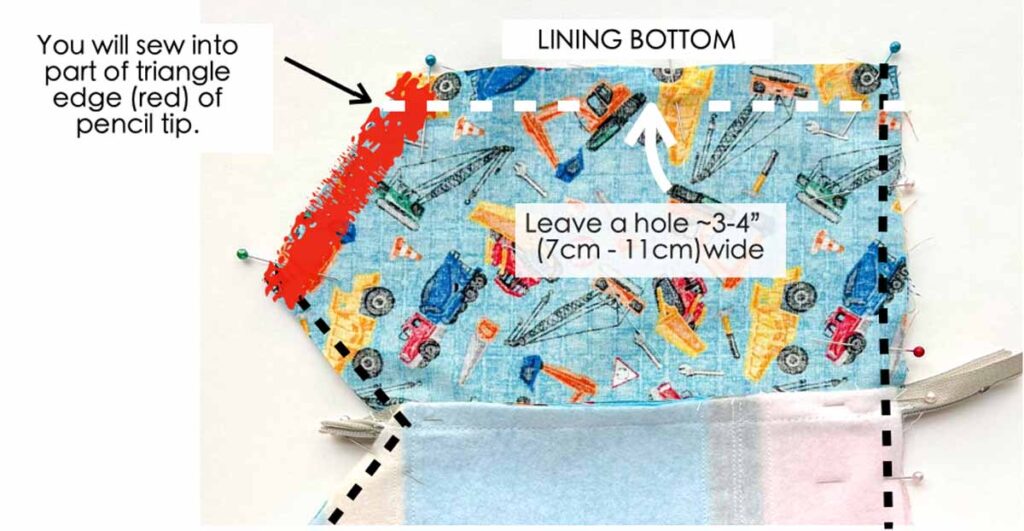
When you sew at 1/2” seam allowance stitch on the lining bottom, you will sew into part of the triangle of the pencil tip (marked in red). This is ok.
NOTE: I’ve found that by sewing at 1/2” (12.7mm) seam allowance on the lining bottom, the lining will fit much better inside the exterior pouch, versus bunching up at the bottom when sewn at 1/4” (6mm) seam allowance.
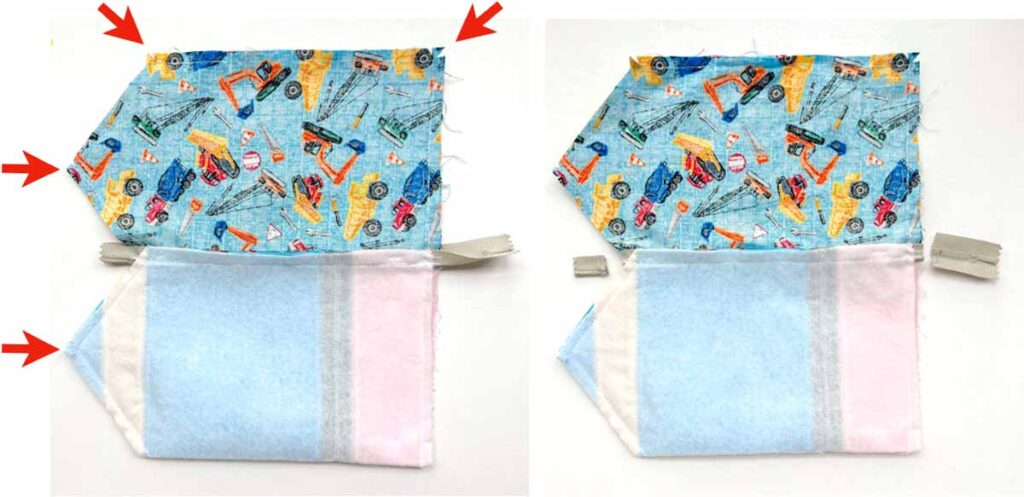
LEFT: Make notches at corners (red arrows)
RIGHT: Trim excess zipper
A FRIENDLY REMINDER: Make sure your zipper pull is in the middle of the pouch before trimming off excess zipper. If you accidentally sewed the pouch together with the zipper pull outside, just take out enough stitches to move the zipper pull back into the middle and close up the pouch again.
Finishing Your Pencil Case
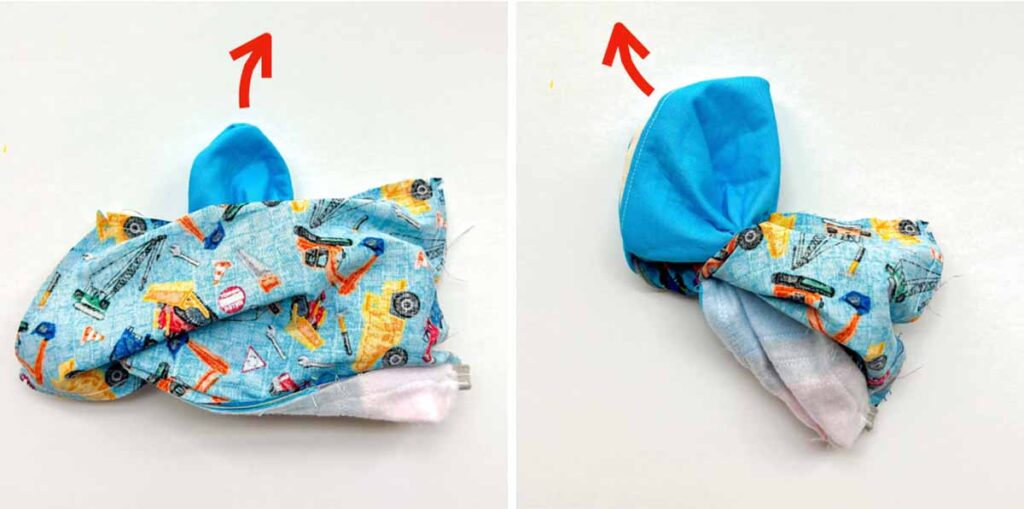
Turn pencil pouch to right side through opening on lining bottom.

LEFT: Use a pair of scissors to gently push out the corners and tips.
RIGHT: Pencil pouch turned to right side. Almost there!
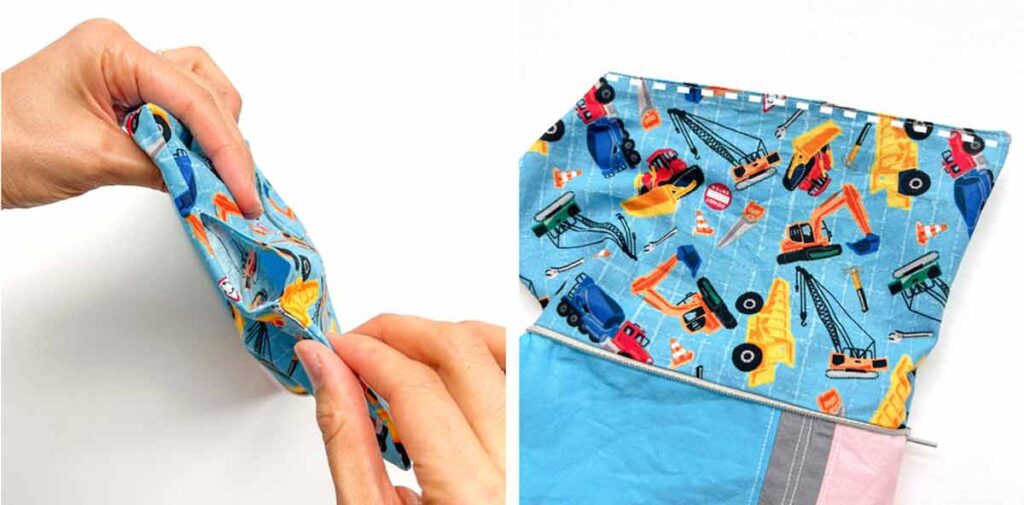
LEFT: Close the hole on lining bottom with invisible ladder stitch.
RIGHT: If you prefer not hand stitch, you can also close the hole with a machine. First, tuck the seam allowance of the hole into wrong side of lining. Then make a straight stitch across the entire lining bottom (white dotted line) 1/8” (3mm) from edge. Make sure to back stitch on both ends.
NOTE: You can also close the opening by making a straight stitch just across the hole, back stitching on both sides. However, I think it looks slightly neater if you stitch along the entire lining bottom versus only over the hole. However, it’s totally up to you!
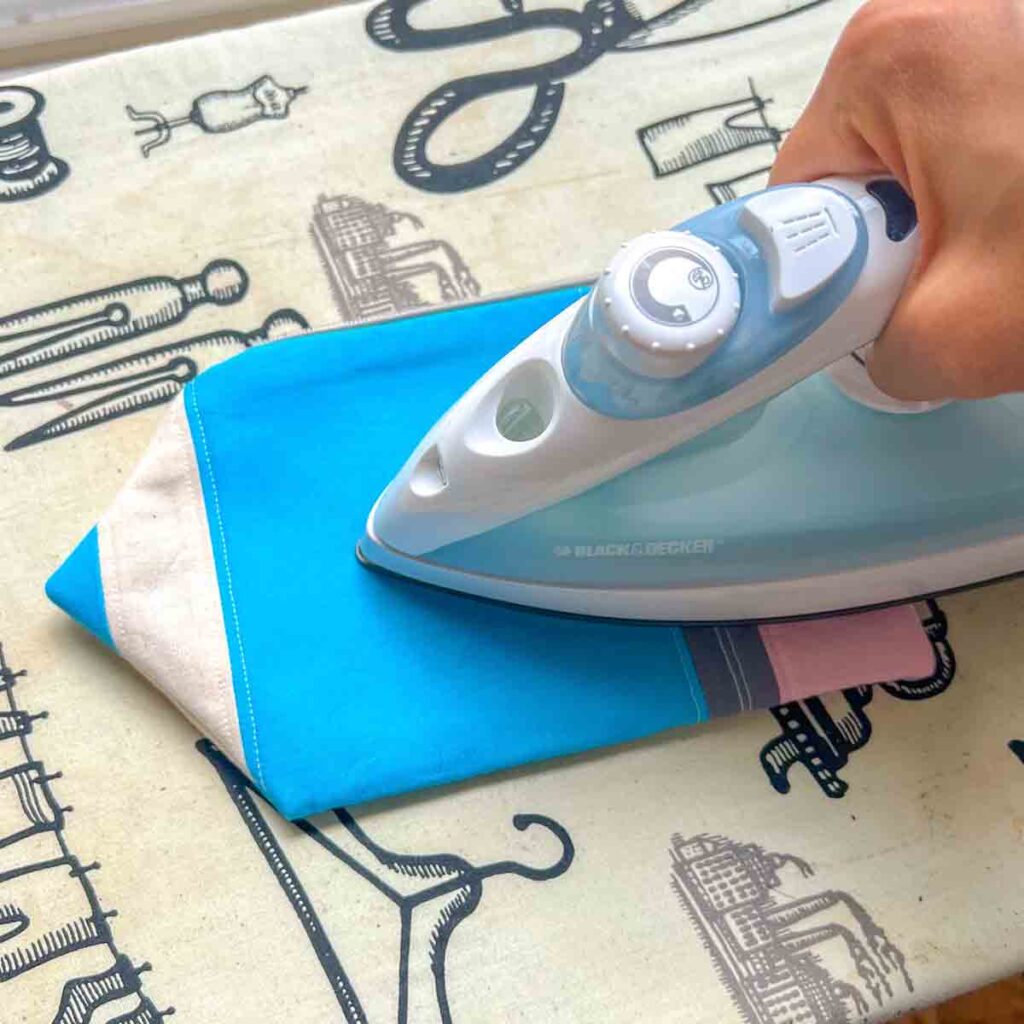
Tuck the lining back into the pencil pouch and give it a good press. Be careful not to melt your zipper if you use high heat!

Finished! Your pencil shaped pouch is all ready to go!
DIY Pencil Pouch (That Looks like a Pencil!)

A simple yet adorable pencil case sewing pattern made to look just like a pencil! School aged kids will love this zipper pouch.
Materials
- EXTERIOR FABRIC – 1/4 Yard (0.23 meters) of necessary colors (see Note 1)
- LINING FABRIC - 1/4 Yard (0.23 meters)
- FUSIBLE FLEECE - 1/2 Yard
- 9" Zipper
Tools
- HOME SEWING MACHINE
- FABRIC SCISSORS
- CLEAR RULER
- FABRIC CHALK
- SEWING PINS or
- SEWING CLIPS
- IRON - for pressing
- HAND SEWING NEEDLES
- MATCHING THREAD
Instructions
Before You Get Started
- Print pattern pieces out, and cut them out on appropriate colored fabric (see Note 2)
- After you sew all the EXTERIOR PATTERN PIECES together, you will use that as a “pattern” for the fusible fleece.
- Please make sure to note that [LINING PIECE] has a top side (that gets sewn to zipper) and a bottom side. The two sides are NOT interchangeable.
SEWING EXTERIOR PIECE
- Lay pencil case sewing pattern pieces in order from top to bottom:
PENCIL TIP
PENCIL WOOD
PENCIL COLORED WOOD
METAL BAND
ERASER - Stitch all the pieces together at 1/4” (6.35mm) seam allowance.
- Press open all the seam allowances. This piece will now be referred to as [EXTERIOR PIECE]
HOW TO CUT EXTERIOR PIECE
Next, we will mark the midpoint of where [PENCIL WOOD] and [PENCIL COLORED WOOD] pieces meet. Make sure you are marking on the wrong side of the fabric.
- First, fold [EXTERIOR PIECE] in half. Then, use fabric chalk to mark the midpoint at the junction where [PENCIL WOOD] is sewn to [PENCIL COLORED WOOD].
- Next, we will mark the quarter-points of [EXTERIOR PIECE]. Do this by folding right side of [EXTERIOR PIECE] so that it meets the midpoint and make a crease at the top of the fold.
- Repeat this on the left side and mark the fold by creasing top of fabric with your fingernails.
- You will end up with 3 markings: Two quarter-points and one midpoint.
- Using a ruler and fabric chalk, connect quarter point to the edge where [PENCIL WOOD] meets [PENCIL COLORED WOOD].
- Next, connect quarter point to mid point.
- Repeat on other side of [EXTERIOR PIECE].
- Cut [EXTERIOR PIECE] along where you marked. Your exterior piece will now have two pointy tips.
- Next, you will use your [EXTERIOR PIECE] as the pattern piece for your fusible interfacing.
- Pin wrong side of [EXTERIOR PIECE] (right side facing up) to the rough side (the side that has the glue) of fusible fleece.
- Cut fusible fleece, following pattern of [EXTERIOR PIECE].
- Fuse fleece to wrong side of [EXTERIOR PIECE] according to directions on your fusible fleece.
TOP STITCH EXTERIOR PIECE
- Add some top stitching on your gray [METAL BAND] fabric to make it look more like the metal band around a pencil. I made two straight stitches about 3/8” (9.5mm) away from edges of gray [METAL BAND] fabric, with white thread. You can also use gray thread
- Add more top stitching if you like for decorative purposes. This step is completely optional!
HOW TO INSTALL ZIPPER
- Mark zipper a distance of 0.75” (1.9cm) from zipper start.
- Pin zipper to [EXTERIOR PIECE], right sides together. Match the marking on zipper to Point A.
- Sew zipper to [EXTERIOR PIECE] with zipper foot.
- Next, open the zipper all the way and match marking on other side of zipper to Point B
- Pin and sew zipper to [EXTERIOR PIECE], right sides together.
HOW TO SEW LINING IN
- Pin and sew [LINING] to [EXTERIOR PIECE], right sides together, matching at Point B (See Note 3).
- Pin and sew second piece of [LINING] to [EXTERIOR PIECE] and zipper, right sides together, matching at Point A.
HOW TO SEW POUCH TOGETHER
- Match [LINING] pieces at the bottom and pull it away from [EXTERIOR PIECE].
- Match [LINING] pieces together and fold [EXTERIOR PIECE] in half. Make sure to match pencil tips to each other, and point A to point B.
- IMPORTANT!! Make sure to first pull zipper into the middle of the pouch!!
- Pin and sew at 1/4” (6 mm) seam allowance on the sides
- Sew at 1/2” (12.7 mm) seam allowance on the bottom of the lining (See Note 4), leaving a hole about 3-4”(7.5cm - 10cm) wide.
- Clip corners and trim excess zipper
FINISHING YOUR PENCIL CASE
- Turn pencil pouch to right side through opening on lining bottom.
- Use a pair of scissors to gently push out the corners and tips.
- Close the hole on lining bottom with invisible ladder stitch (See Note 5).
- Tuck the lining back into the pencil pouch and give it a good press. Be careful not to melt your zipper if you use high heat!
- Finished! Your pencil shaped pouch is ready to go!
Notes
Note 1: Colors needed to make exterior pouch:
- PENCIL TIP – Black for #2 pencil, Other for colored pencils
- PENCIL WOOD – Cream
- PENCIL COLORED WOOD – Yellow for #2 pencil, other for colored pencils
- METAL BAND – Gray
- ERASER – Light pink
Note 2: All the EXTERIOR PATTERN PIECES are cut on fold, this includes [PENCIL TIP], [PENCIL WOOD], [PENCIL COLORED WOOD], [METAL BAND], and [ERASER].
Note 3: Make sure you are pinning the top of [LINING] to zipper, not the bottom.
Note 4: I’ve found that by sewing at 1/2” (12.7mm) seam allowance on the lining bottom, the lining will fit much better inside the exterior pouch, versus bunching up at the bottom when sewn at 1/4” (6mm) seam allowance.
Note 5: If you prefer not hand stitch, you can also close the hole with a machine. First, tuck the seam allowance of the hole into wrong side of lining. Then make a straight stitch across the entire lining bottom (white dotted line) 1/8” (3mm) from edge. Make sure to back stitch on both ends.
You can also close the opening by making a straight stitch just across the hole, back stitching on both sides. However, I think it looks slightly neater if you stitch along the entire lining bottom versus only over the hole. However, it’s totally up to you!
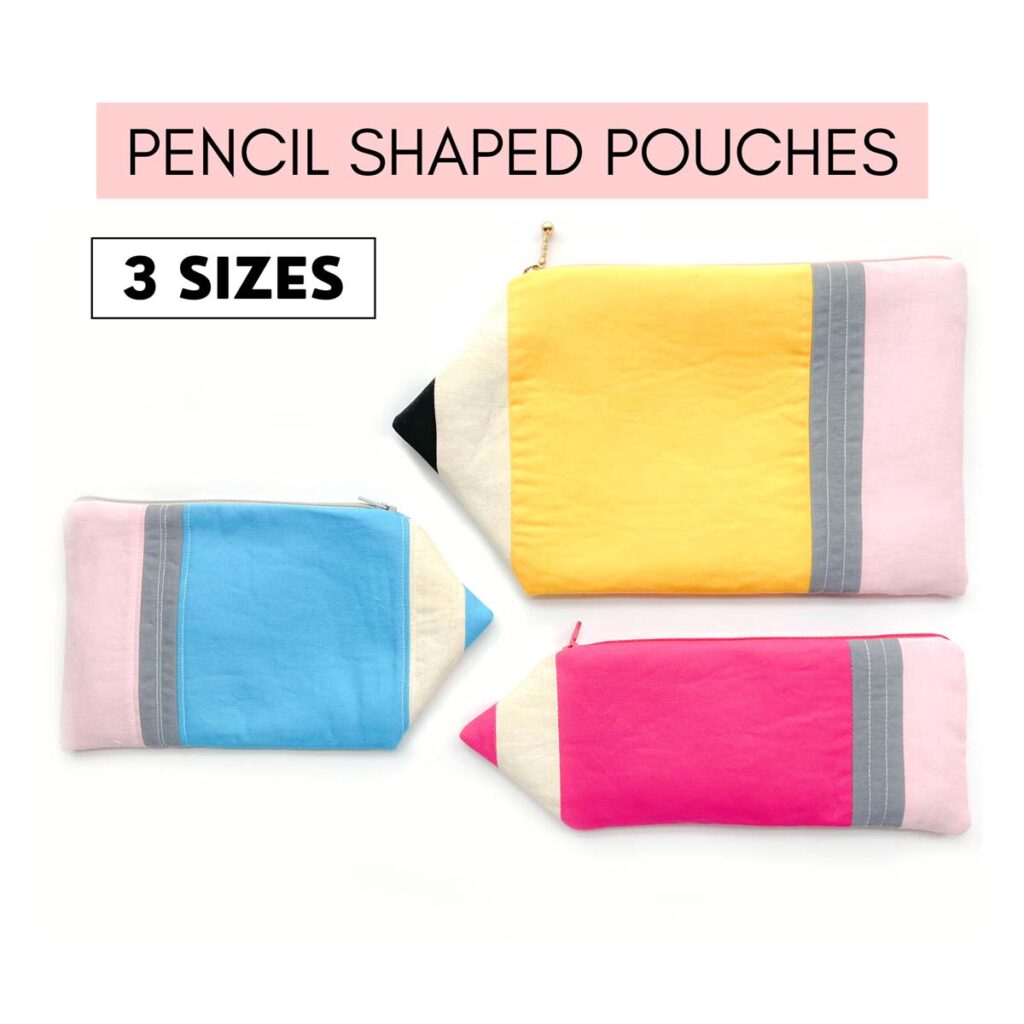
The AD-FREE, PRINTER-FRIENDLY PDF version of this sewing tutorial is available IN OUR ETSY SHOP. You will also instantly receive 3 pattern sizes: Size Small (blue pouch), Size Large (yellow) and Size Long (Pink). Simply print and use! Print a copy today to keep next to your sewing machine for easy reference.
More Easy Sewing Projects You will LOVE!

These simple drawstring bags are super easy to sew. A great sewing project for beginners.
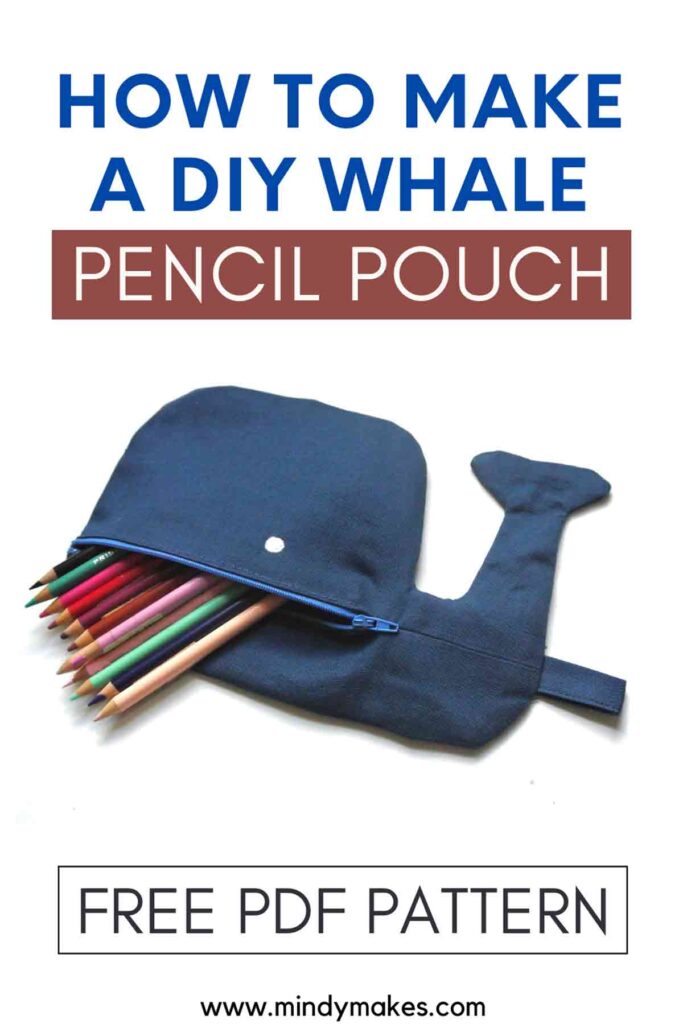
An fun whale shaped pouch to store all your school supplies.
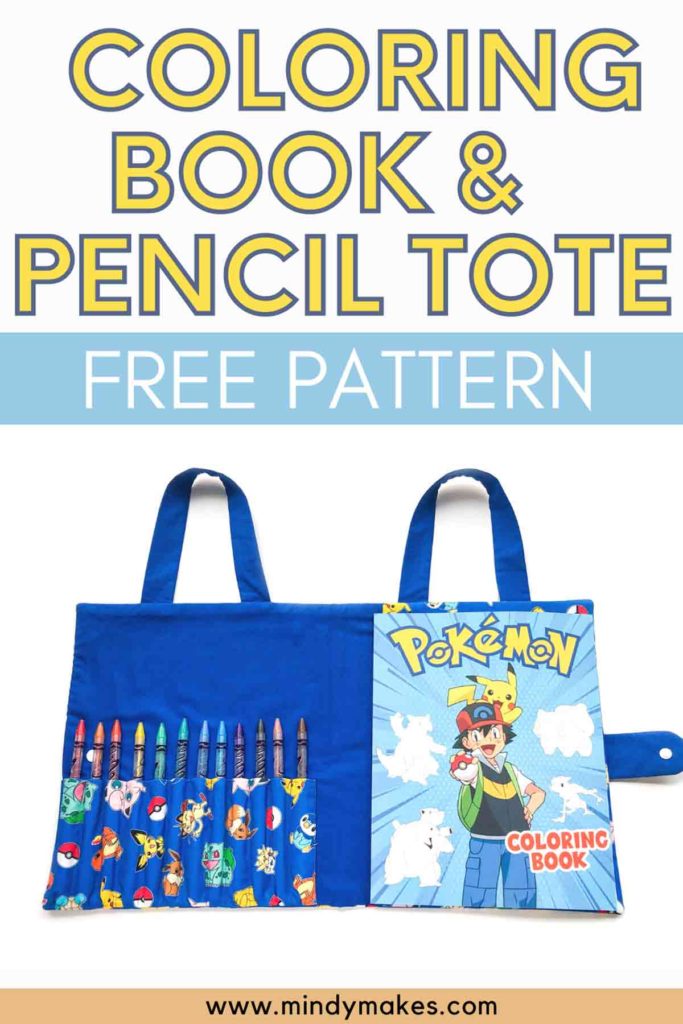
This coloring book and crayon tote is the perfect gift for all budding little artists.