How to Make a Sweatshirt Jacket (Easy Step-by-Step)
This post may contain affiliate links. Please read my disclosure policy for details. As an Amazon Associate, I earn from qualifying purchases.
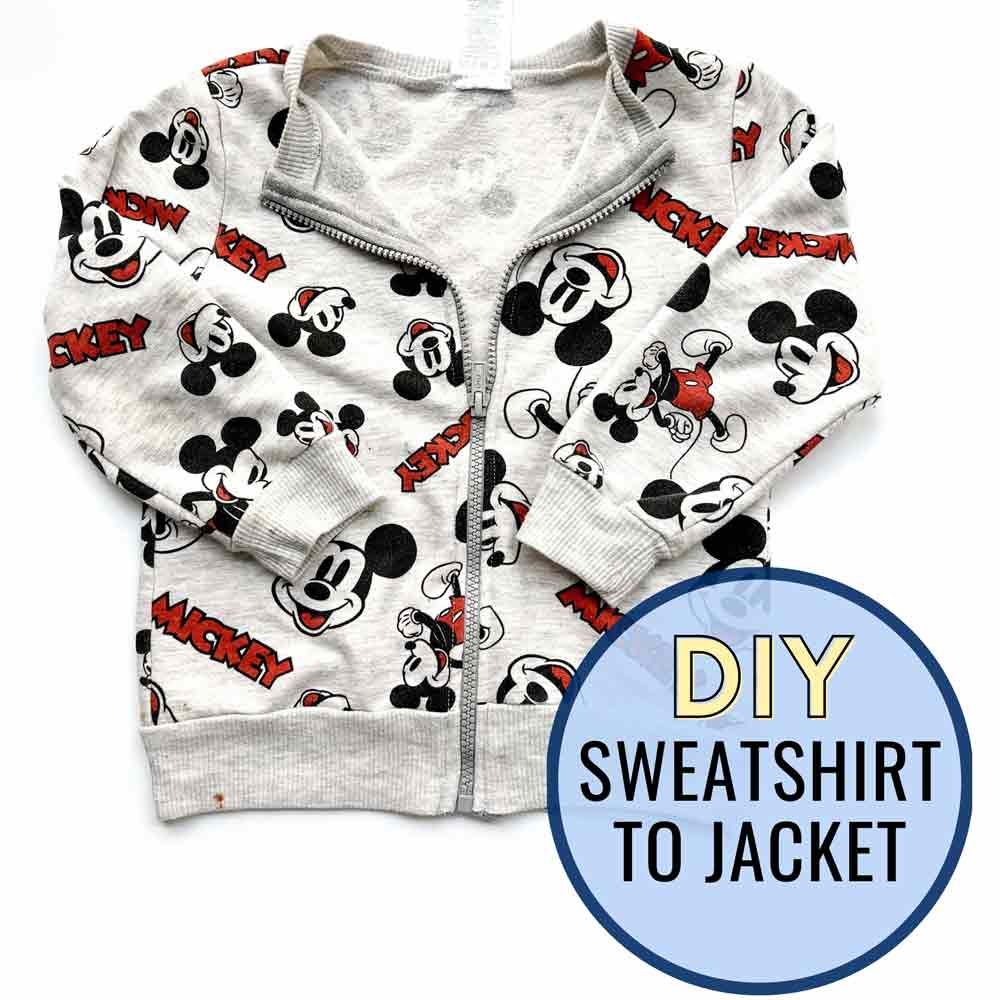
Learn how to effortlessly add a zipper to a sweatshirt so it becomes a zip-up jacket! Works for pullover hoodies as well!
A while back I spotted a cute little sweatshirt for my toddler while shopping at Ross. When I brought it home, I showed my son the sweatshirt and asked if he would wear it, to which he firmly responded with an affirmative “yes”.
Fast forward a few months…of course my toddler refuses to wear the sweatshirt *face palm*. In fact, it became such a battle every time to put it on him that we eventually gave up. The poor sweatshirt just sat in the drawer being unworn while my toddler grew bigger and bigger *sigh*.
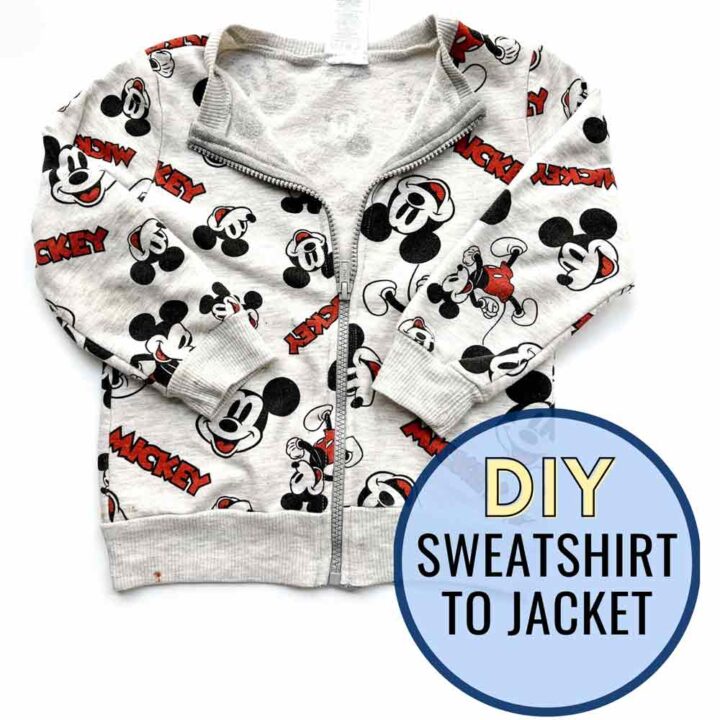
SWEATSHIRT JACKET DIY
Finally one day I realized that the reason my toddler wouldn’t wear the sweatshirt is because it’s not a “zip-it”, according to his 4 year old vocabulary.
I asked him if I turned it into a “zip-it” if he would wear it, and he nodded with a resounding yes. This time, I felt more confident about his answer. I quickly got to work and added a zipper and to my delight, my son gladly put it on! No complaining or resistance.
Now with cold weather in sight, he’s been asking for his zip-up sweater every day! I am definitely feeling like a proud mama!
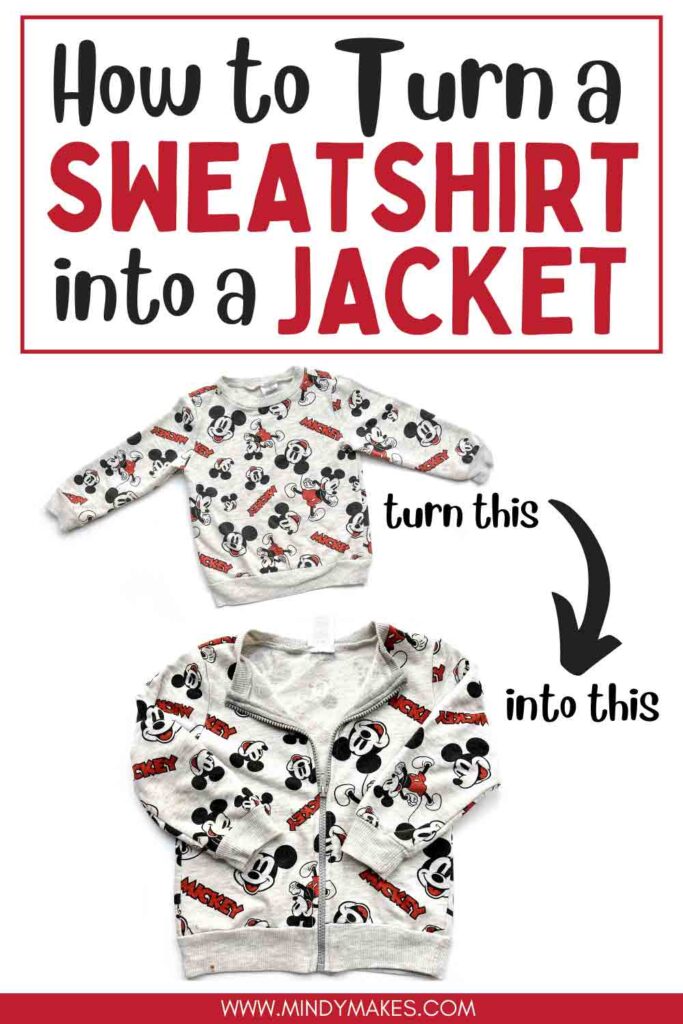
How to Turn A Sweatshirt into a Jacket
Today, I’ll be showing you how to turn a sweatshirt into a jacket with this easy step-by-step tutorial!
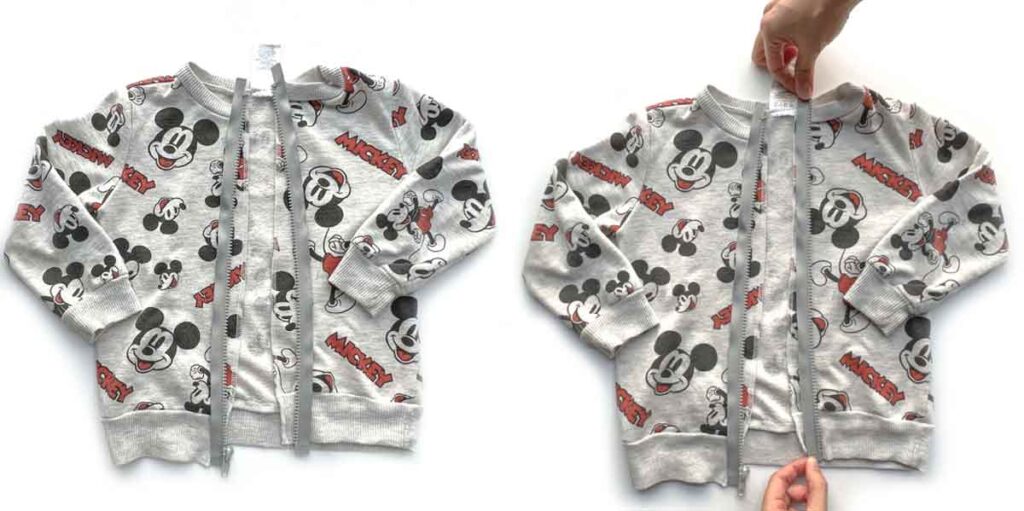
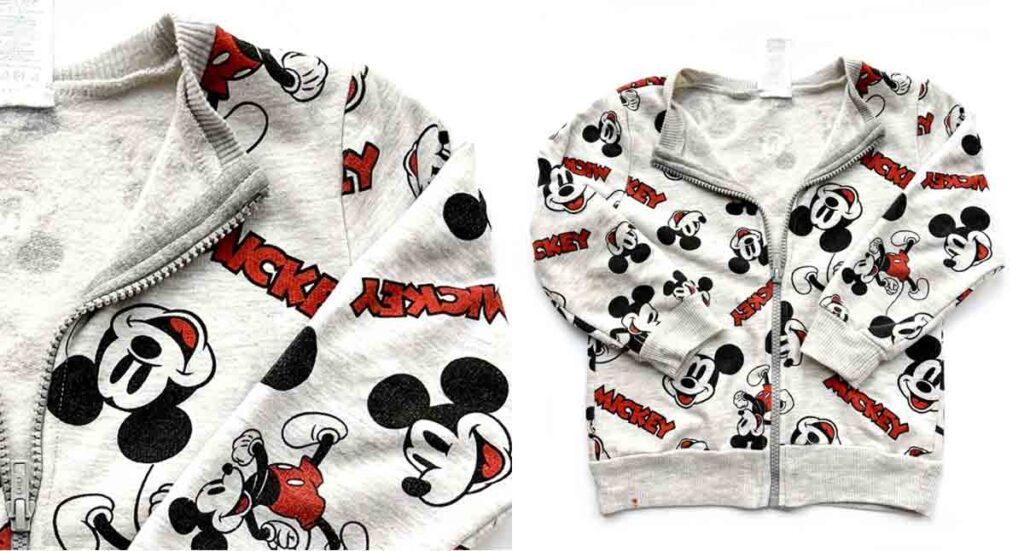
The process is extremely simple. First, you cut open the front of the sweatshirt along the mid-line. Next, add a separating zipper and you are done!
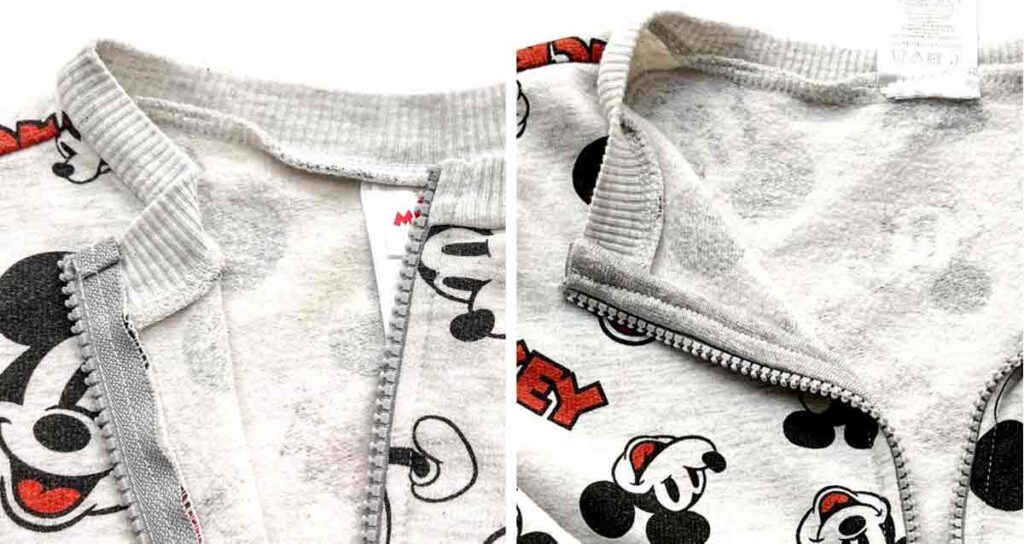
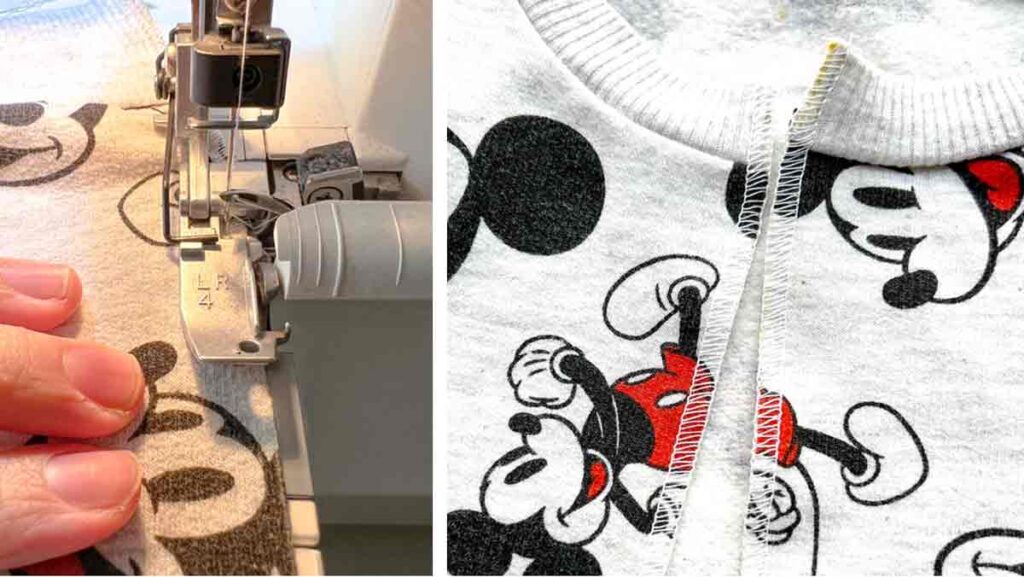
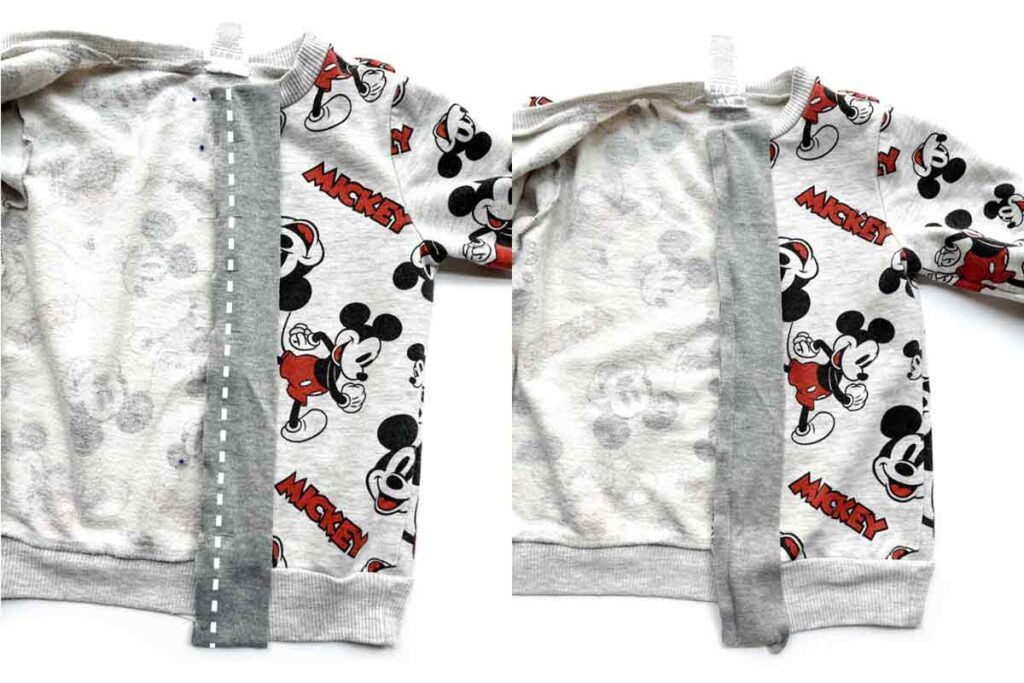
LEFT: Zipper without facing
RIGHT: Zipper with added facing
I also show you how to add a facing along the zipper just to make it look nicer (see photo above). This step is completely optional and totally up to you!
However, please keep in mind that in the process of adding a zipper to the sweatshirt, you will lose about 3/4″ – 1″ (1.9cm – 2.54cm) along the width of the sweatshirt. This accounts for the 1/2″ (1.27cm) seam allowance on each side of the zipper.
Thus, your jacket will feel slightly tighter than the original pullover sweatshirt. This usually isn’t a problem since sweatshirts are made of stretch knit fabric which has more give than woven fabrics. Nevertheless, if your pullover sweatshirt is very tight to begin with, I would not recommend turning it into a jacket.
Can you Turn a pullover hoodie into a zip up?
Absolutely! In the step-by-step tutorial below I show you how to turn a pullover sweater into a zip-up jacket. However, the process is exactly the same to refashion a pullover hoodie as well. You can also do this for thin knitted sweaters and t-shirts as well.
However, I don’t recommend doing it for thick wool sweaters as it will be difficult to sew. On top of that, the zipper will snag the wool fibers every time you zip and unzip, making it a pain to put on and take off. So stay away from those chunky sweaters when it comes to this DIY project!
Materials
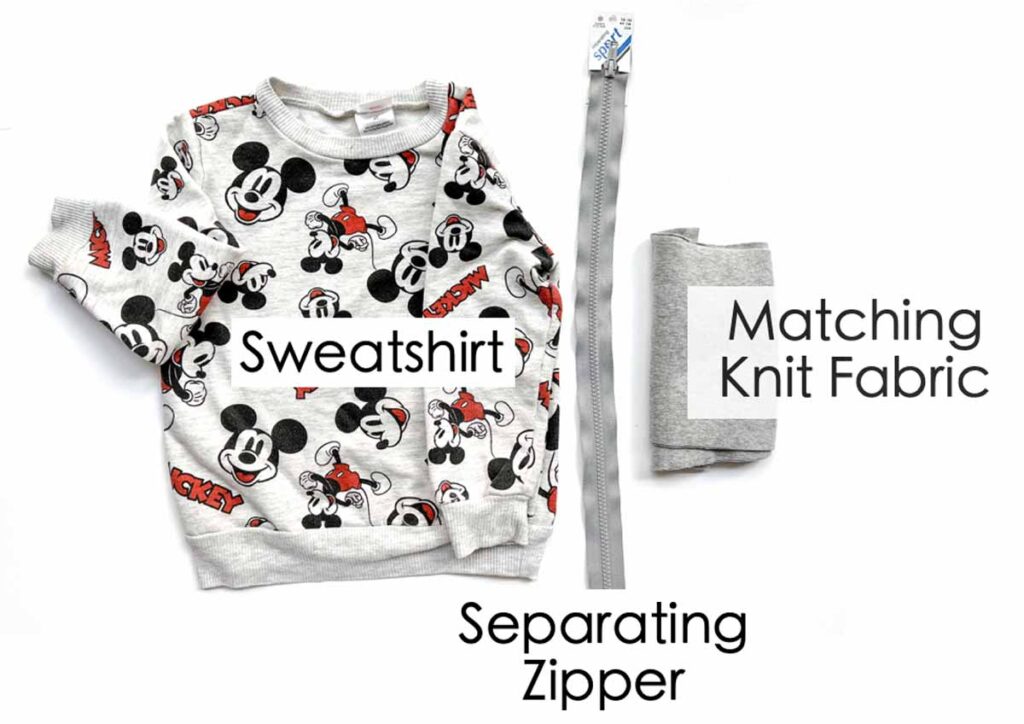
For this easy sweatshirt refashion, you will need the following:
- SWEATSHIRT or HOODIE
- SEPARATING ZIPPER – make sure it’s at least as long as the length of sweatshirt
- MATCHING KNIT FABRIC – optional. For facing. 1″ (2.54cm) more than the length of your sweater (see note 1)
NOTE 1: If your knit fabric is a 2-way stretch, the length of fabric you will need should be measured along the selvedge. If your knit is a 4-way stretch, it doesn’t matter what direction you cut the fabric (the length can be cut along the selvedge, perpendicular to the selvedge, or on the bias). Check out this post to learn more about 2-way stretch versus 4-way Stretch
Tools
- HOME SEWING MACHINE
- SERGER – optional
- FABRIC SCISSORS – these Ginghers are my favorite.
- TAPE MEASURE
- CLEAR RULER – I have the DRITZ See-Through Sewing Ruler
- SEWING PINS or SEWING CLIPS
- MATCHING THREAD
HOW TO TURN A SWEATSHIRT INTO A JACKET
Prepping Sweatshirt
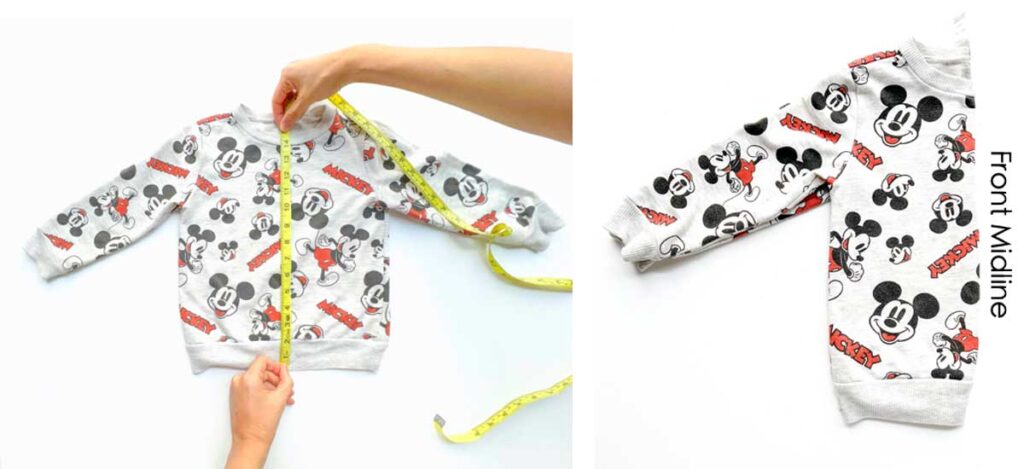
LEFT: First, measure length of sweater at front center from bottom to top of collar. For this tutorial, my 4T sized sweatshirt measured 14.5”
RIGHT: Next, fold sweatshirt in half along front center
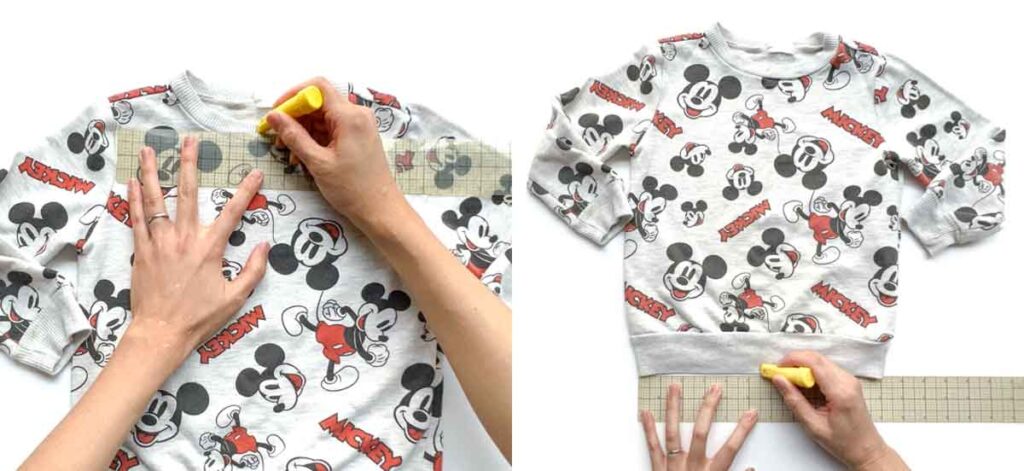
Then, using fabric chalk, mark front center of collar, and front center at bottom.
NOTE 2: Alternatively, you can also find the midpoint of the collar by measuring from armhole to armhole and marking the midpoint. Then, do the same by measuring the width of the sweatshirt bottom and marking the midpoint.
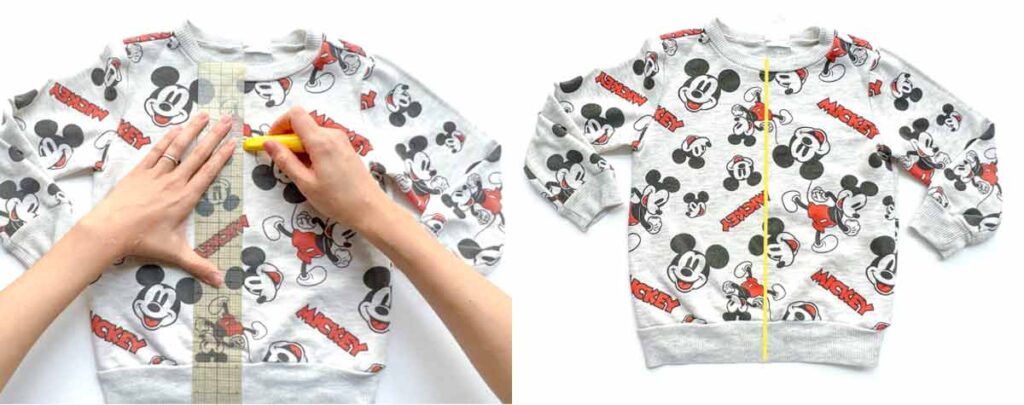
LEFT: With a clear ruler, draw a line connecting the top and bottom midpoints.
RIGHT: Marked line at center front (yellow line).
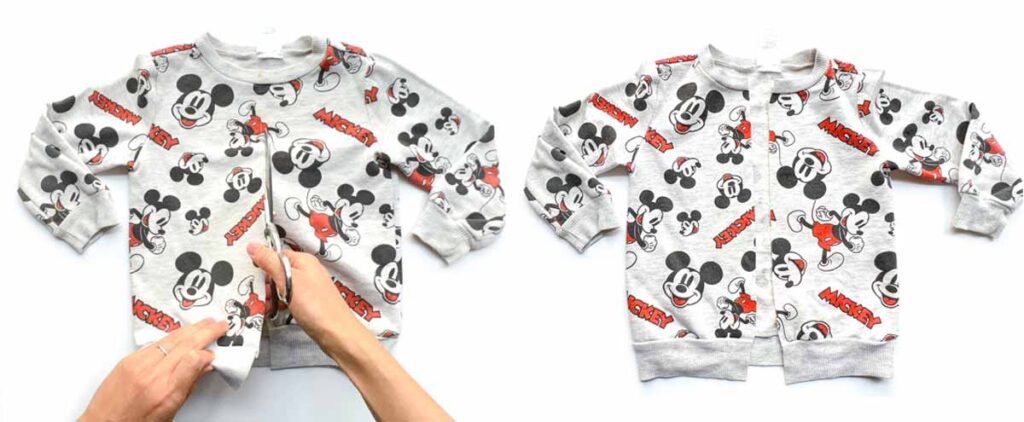
Cut center front of sweatshirt according to marked line.
Serge both raw edges of cut edges (see note 3).
NOTE 3: If you plan to add a facing to the jacket (see How to Sew Jacket Facing), you can skip the serging. You can also use the zig-zag stitch on a home sewing machine if you don’t own a serger.
How to Sew Zipper to Jacket
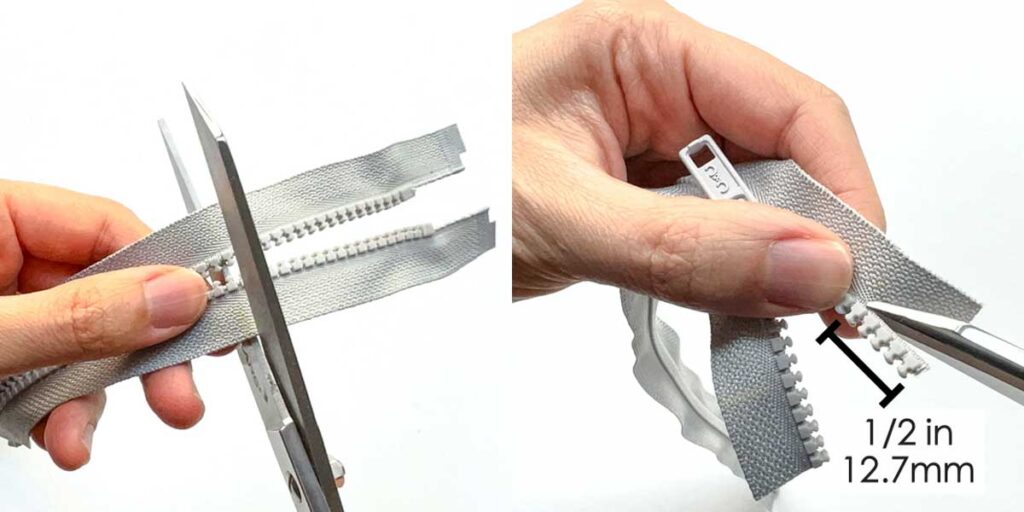
LEFT: First, if your zipper is longer than the jacket, we will need to trim it down to 1/2”(12.7mm) longer than jacket length (see note 4). For example, my jacket’s length at the midline measures 14.5” (36.83cm), so I trimmed my zipper to 15” (38 cm).
RIGHT: Second, cut zipper teeth from fabric, a distance of 0.5” (12.7mm) from where you trimmed.
NOTE 4: Make sure to trim zipper from the top, not from the bottom.
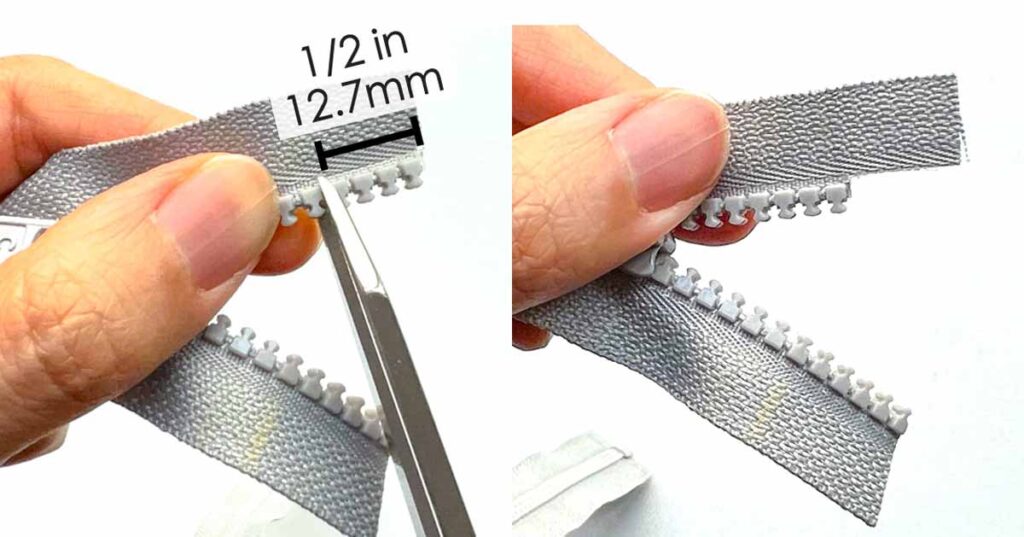
Next, cut top 0.5” (1.27cm) of zipper teeth completely off from zipper
Then, repeat trimming teeth on other side of zipper. Your zipper will now look something like the photo with the top teeth trimmed off.
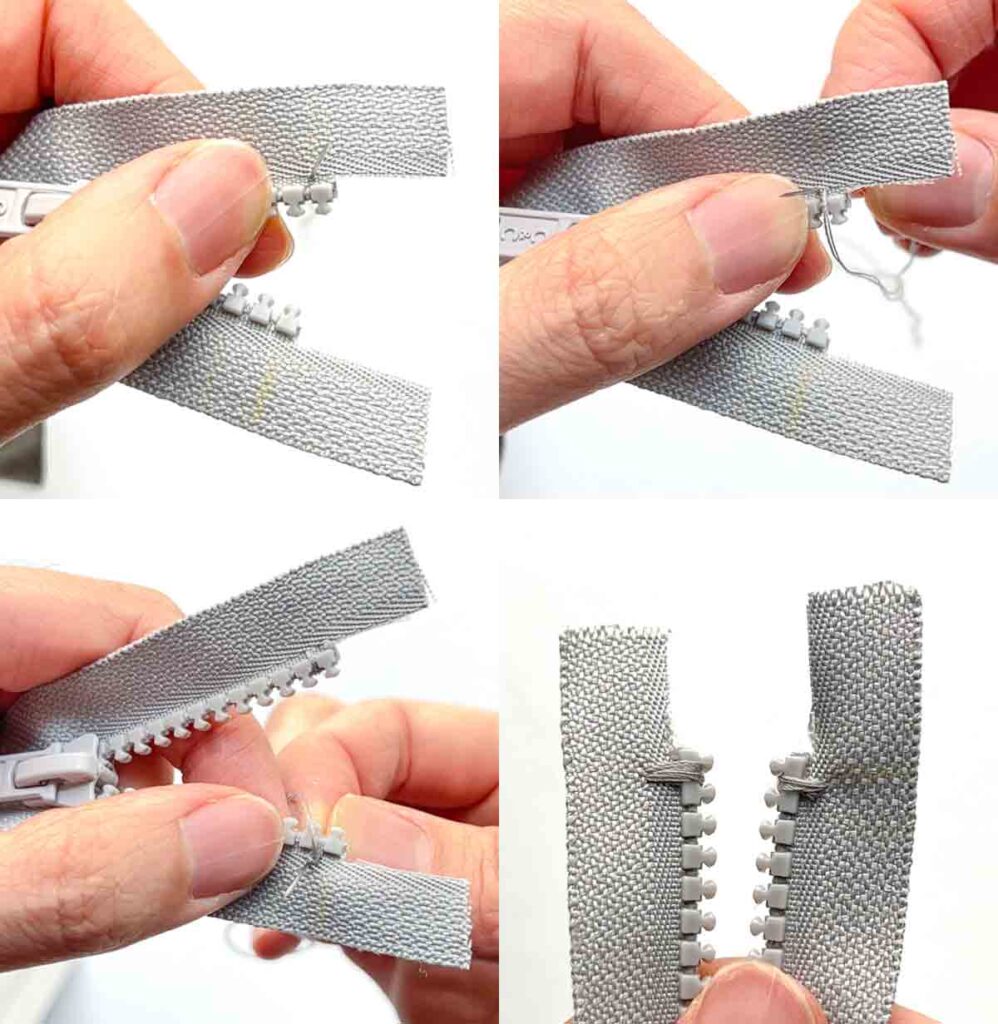
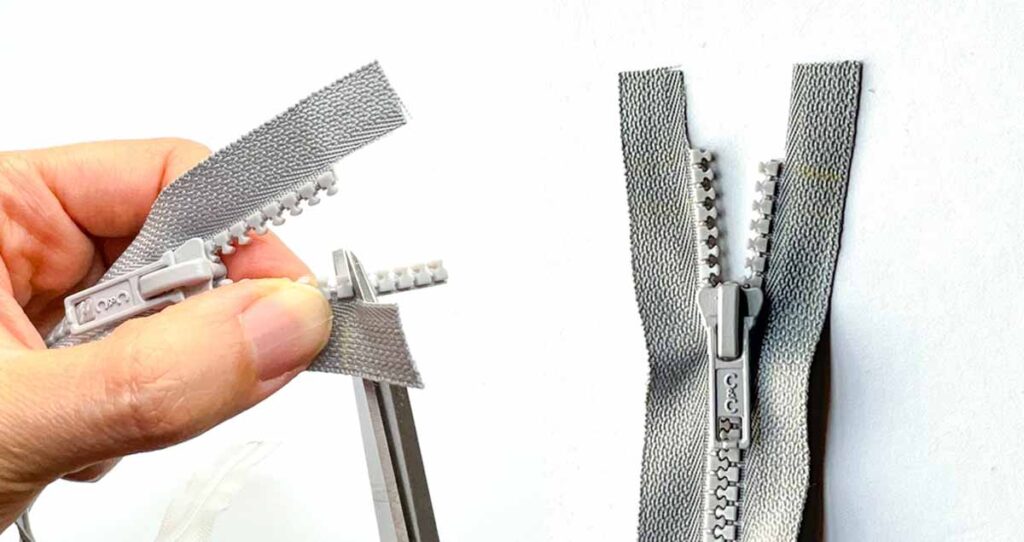
Take a needle with thread and make several loops around the zipper teeth to make stops for the zipper. This is to prevent the zipper head from sliding off the teeth when you pull it up (see note 5).
NOTE 5: In the photos I used a double threaded needle and made about 7-10 loops around the teeth to create a solid stop. You can also use 4-6 strands of embroidery floss, which would require less loops. Before cutting off your thread, test to make sure you have a solid stop by gently pulling the zipper to see if it will go through.
LEFT: Now completely separate your zipper
RIGHT: Flip the zipper so that its right side faces the right side of jacket. Note that the fabric edge of zipper will line up with serged edge of jacket.

Clip (or pin) zipper to jacket. Note that at the top of the jacket the fabric of the zipper will stick out. We will fold it down in the next steps. Repeat on other side of jacket.
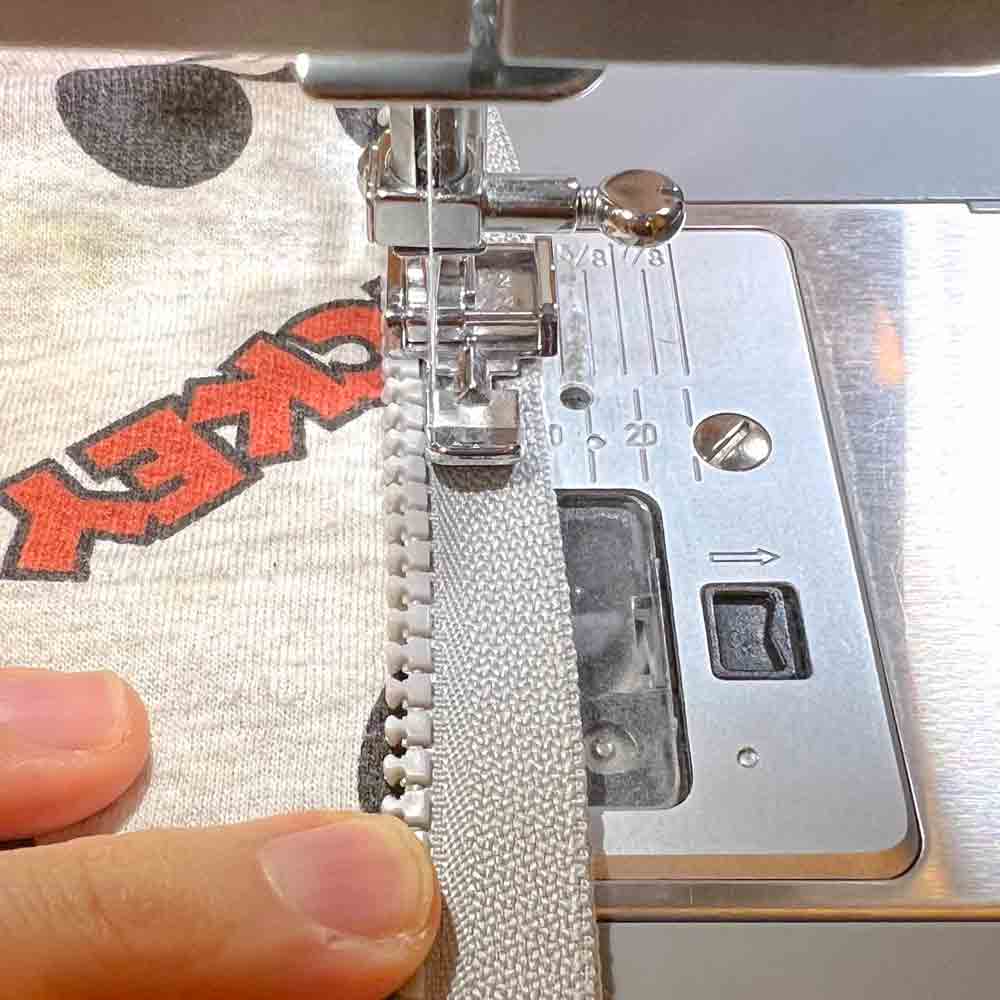
Sew zipper to jacket using zipper foot.
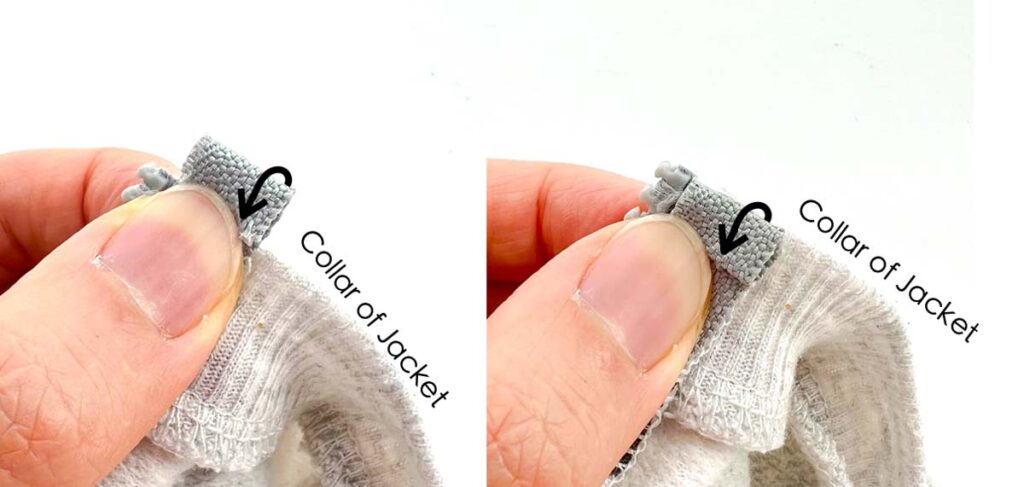
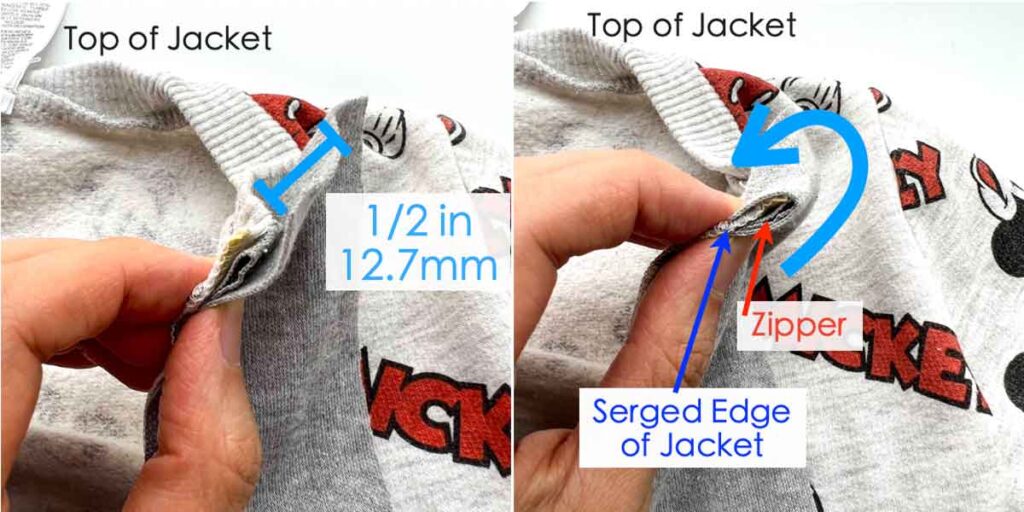
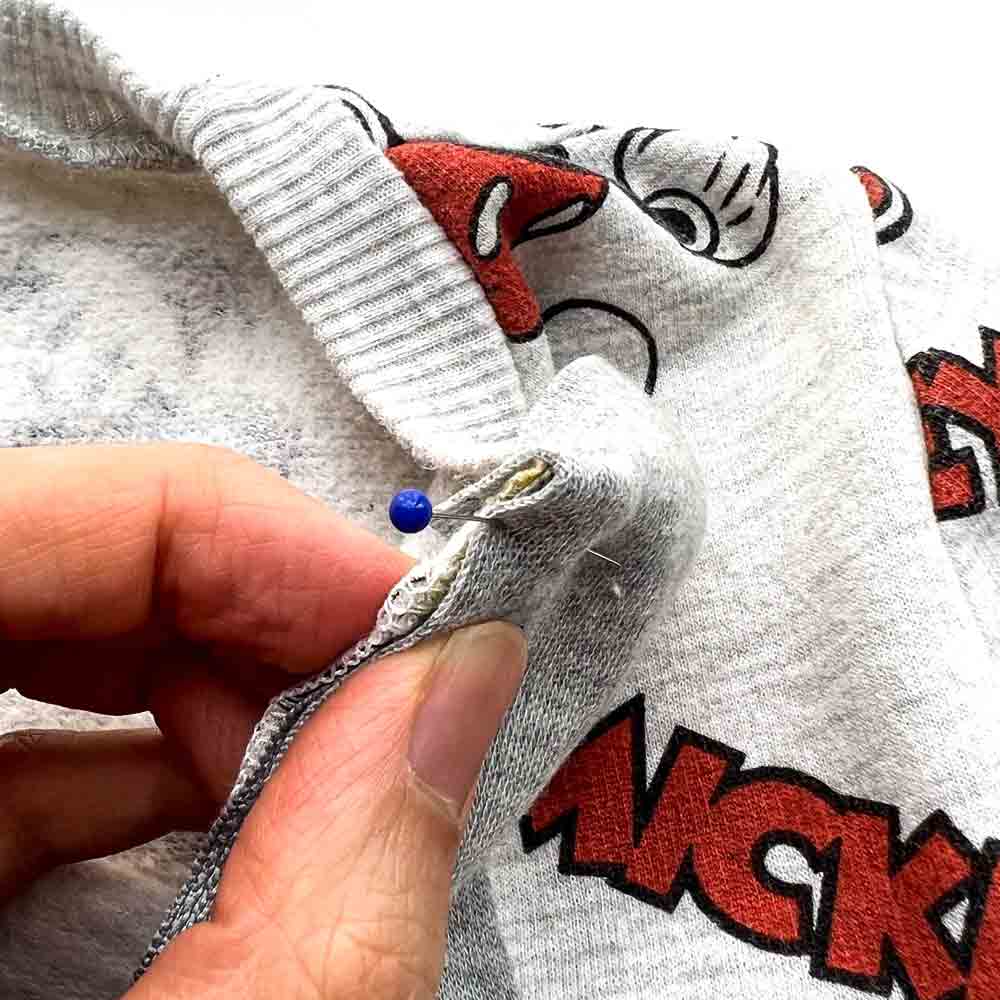
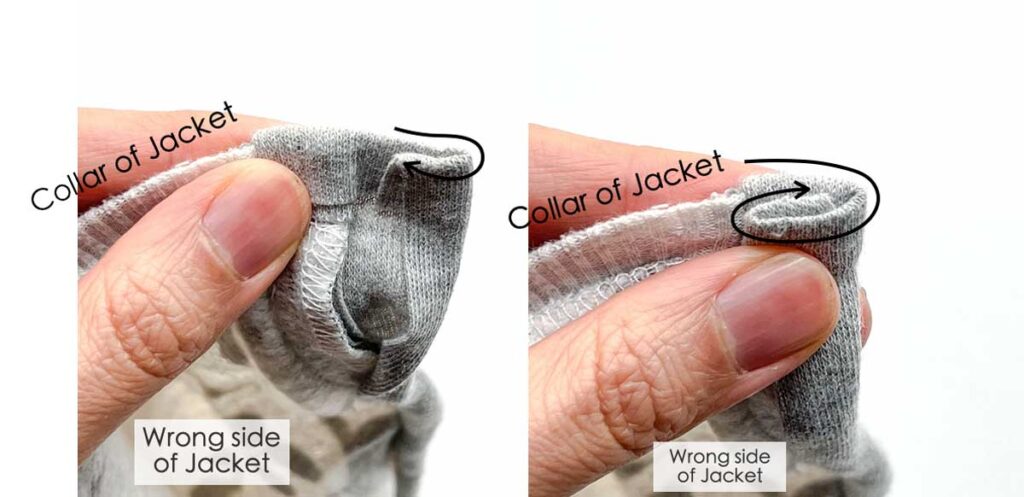
LEFT: Fold fabric of zipper (at the top of jacket) down 0.25 in (6.35mm)
RIGHT: Fold fabric down again another 0.25 in (6.35mm).
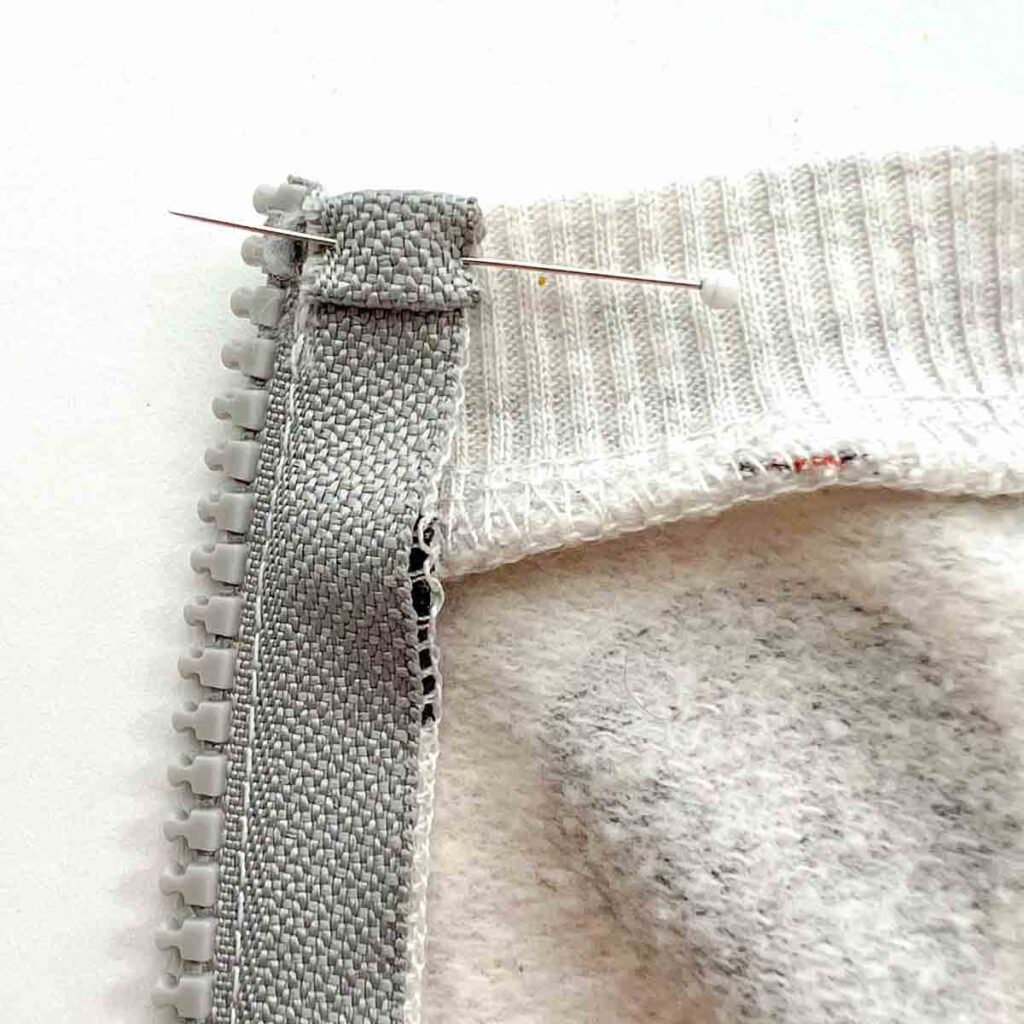
Hold in place with a pin. Repeat on other side of zipper.
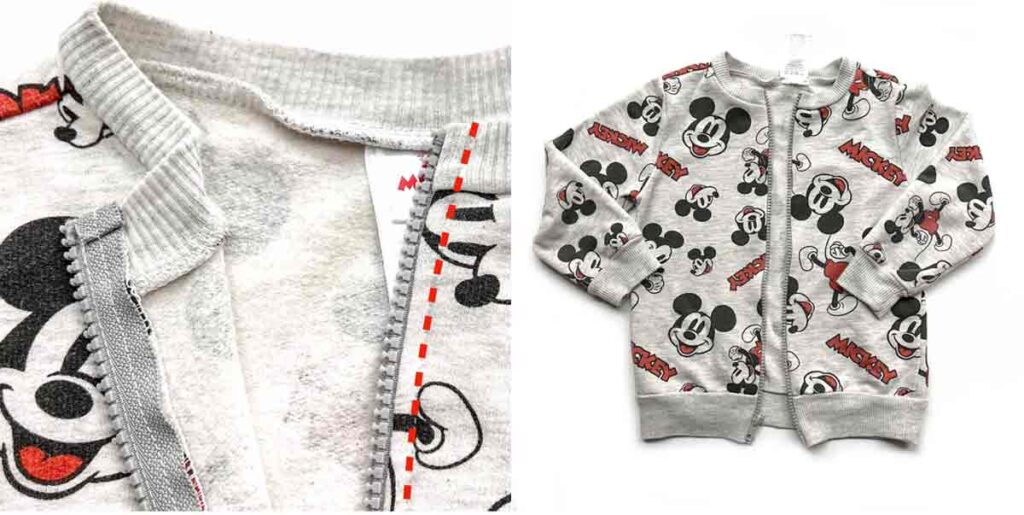
At this point, if you don’t want to add a zipper facing, simply stitch the zipper to the front of the jacket (red dotted line) at about 0.25”(6.35mm). Repeat for other side of jacket and you are done!
NOTE: If you want to add a facing to the jacket, don’t stitch down the zipper to the right side of the jacket yet. Jump to the next step How to Sew Jacket Facing.
How to Sew Jacket Facing
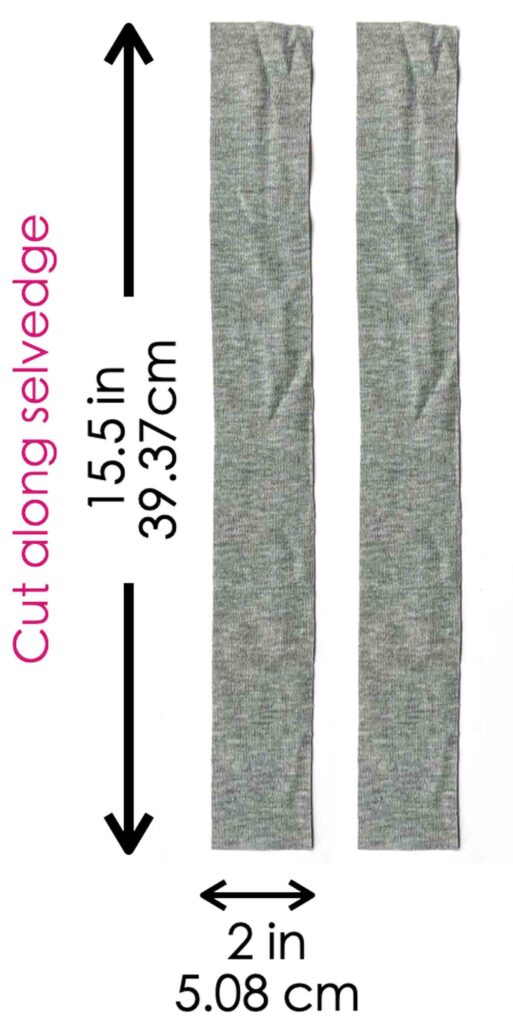
First, cut two fabric strips that measure [2 inch] x [length of jacket + 1 inch] or 5.08cm x [length of jacket + 2.54 cm]. So for example, the length of my jacket is 14.5”, so the length of my strip will be 15.5” (see note 6).
NOTE 6: Make sure to cut the longer side of fabric along the selvedge. This will help minimize distortion and stretching when you sew later on. To learn more about selvedge, check out this post.
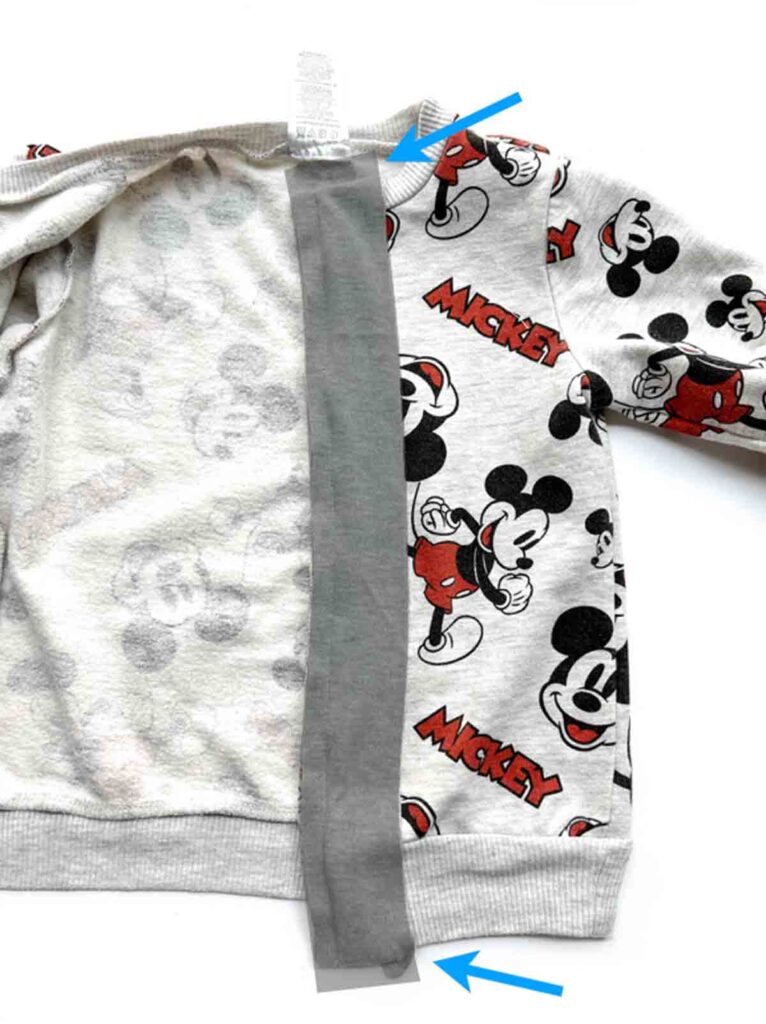
Second, place fabric strip on top of jacket so that it lines up with with serged edge of jacket, right sides together. Make sure the fabric strip extends 0.5”(12.7mm) beyond top of jacket and 0.5” (12.7mm) beyond bottom of jacket (blue arrows).
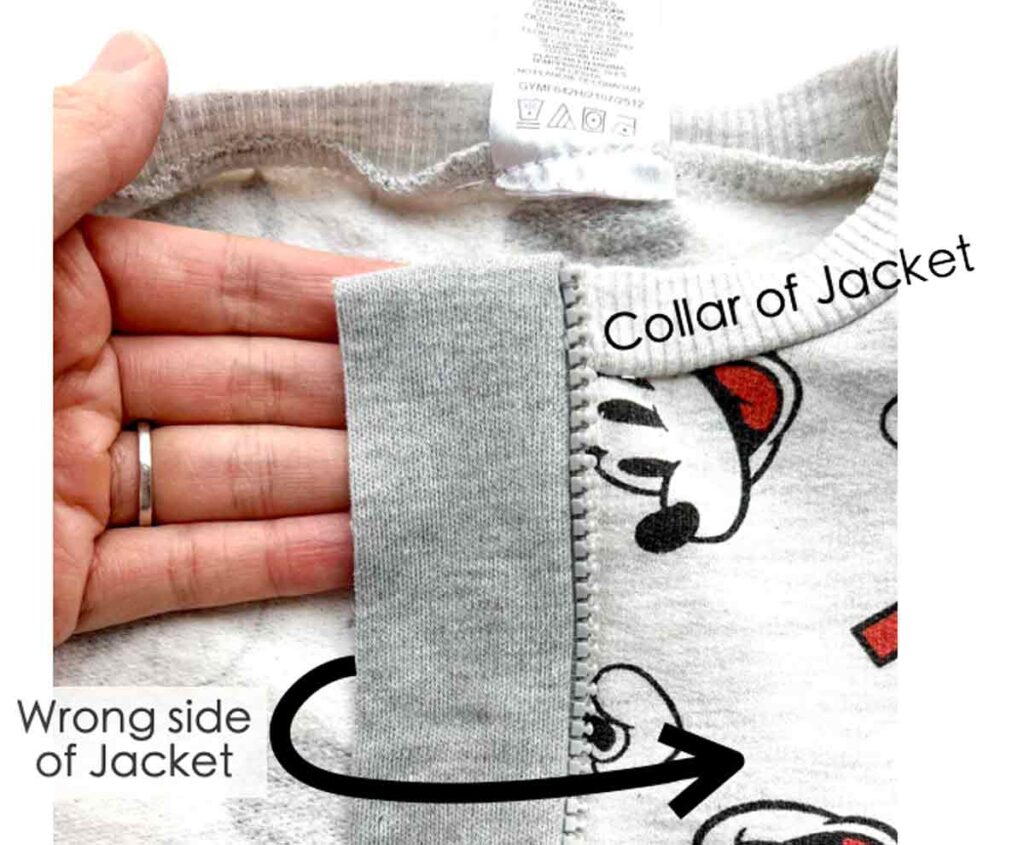
LEFT: Facing should extend 0.5”(12.7mm) beyond top of jacket.
RIGHT: Next, fold excess facing down over top of jack
Then, hold in place with a pin
LEFT: Facing also extends 0.5”(12.7mm) beyond bottom of jacket.
RIGHT: Again, first fold excess facing over bottom of jack and pin in place.
Then pin the rest of facing to jacket, right sides together. Next, sew facing to jacket using a zipper foot, 0.5”(12.7mm) from edge (white dotted line)
Your facing is now sewn to the jacket zipper. Turn zipper of jacket (along with the facing) to wrong side (black arrow)
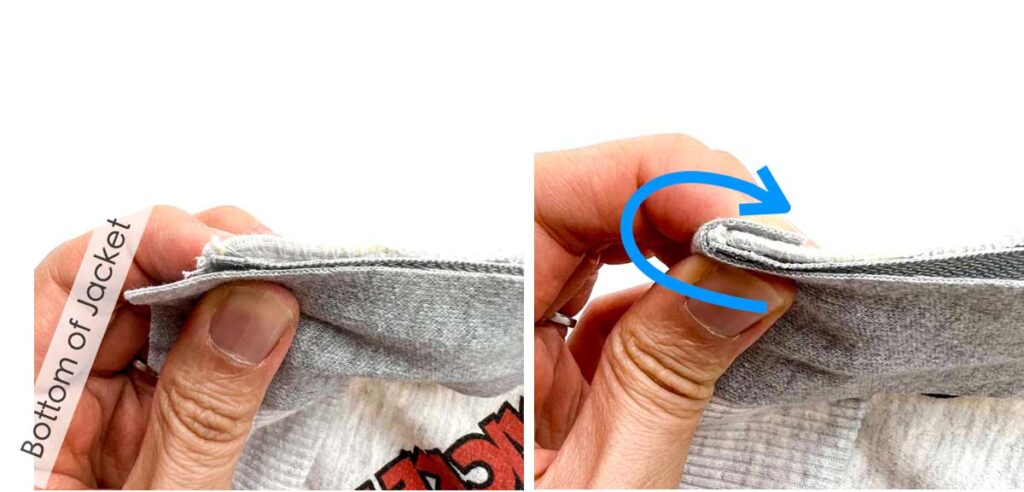
First, from the wrong side of facing, fold facing edge 0.5” (12.7mm) in. Next, fold in another 0.5” (12.7mm).
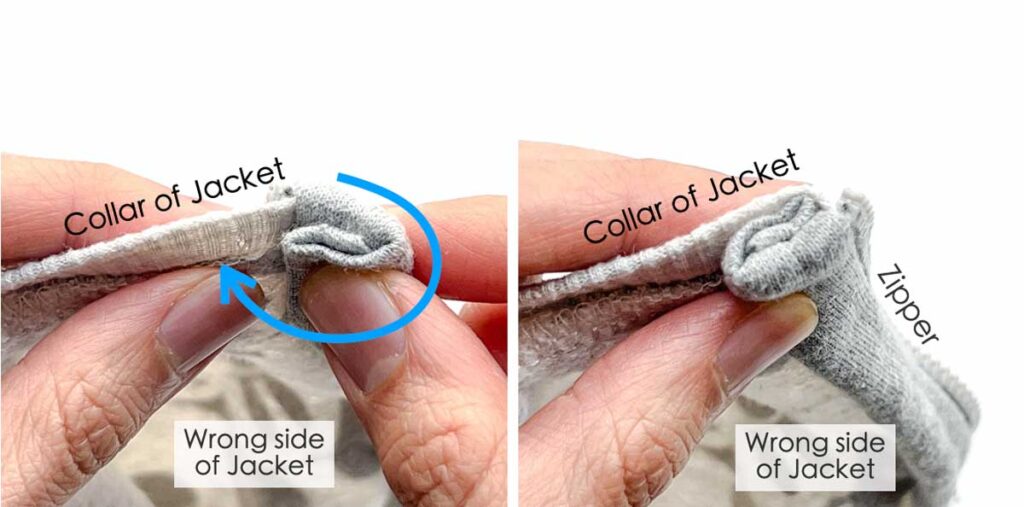
Then, turn the twice folded-in facing (blue arrow) so it faces wrong side the jacket.
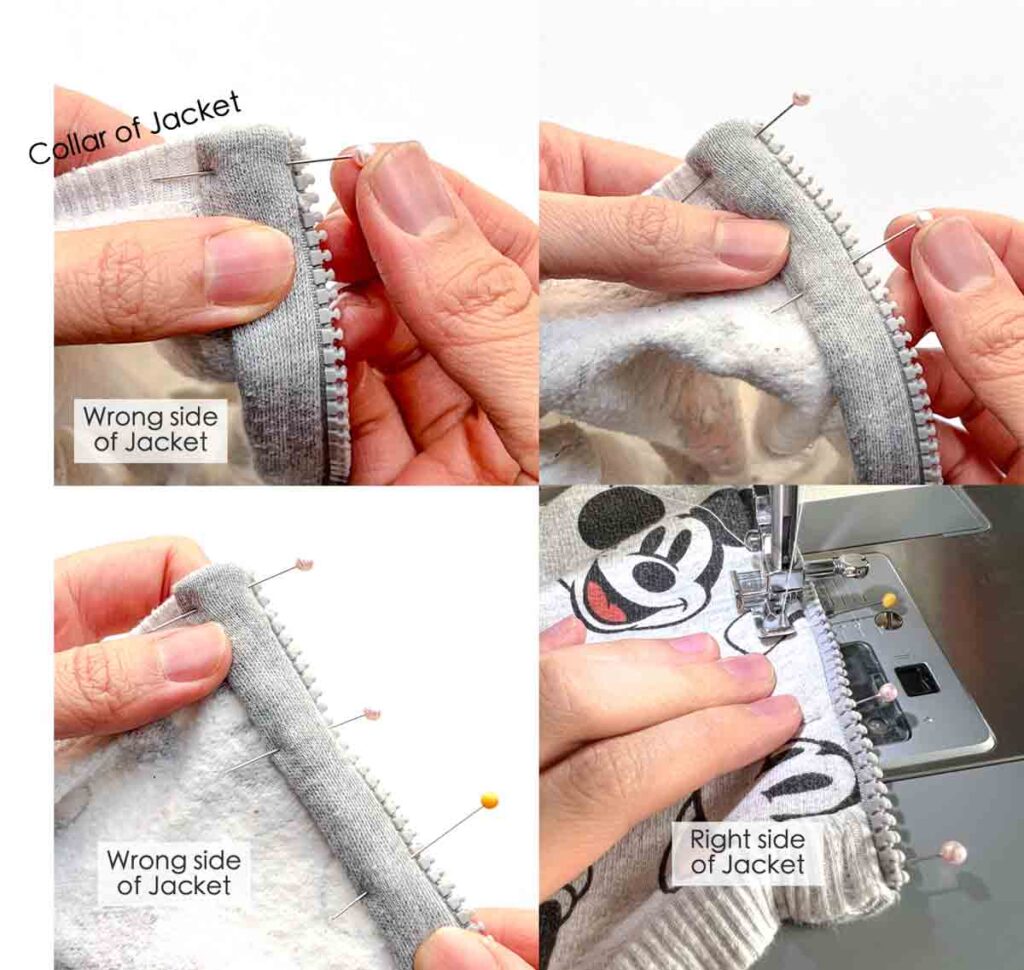
Pin facing to jacket front. Sew down to jacket with zipper foot, from the right side of the jacket (see note 7).
NOTE 7: It’s important to sew the facing from the right side of the jacket as this is the side you will see the most. Thus, your stitches will look nicer when you sew them from the right side.
Facing complete! Repeat on other side of jacket and you are finished! Wasn’t that simple? You can do this for hoodies, pullover sweaters, and more.
Additionally, you can always add some pockets to the jacket to make it extra fabulous. Such a fantastic way to give an old piece of clothing new life!
How to Make a Sweatshirt Jacket
Learn how to effortlessly add a zipper to a sweatshirt so it becomes a zip-up jacket. Works for pullover hoodies as well!
Materials
- PULLOVER SWEATSHIRT or HOODIE
- SEPARATING JACKET ZIPPER - make sure it's at least as long as the length of sweatshirt
- MATCHING KNIT FABRIC - optional, for creating facing. 1" (2.54cm) more than the length of your sweater (see note 1)
Tools
- HOME SEWING MACHINE
- SERGER - optional
- FABRIC SCISSORS
- MEASURING TAPE
- CLEAR RULER
- SEWING PINS or
- SEWING CLIPS
- MATCHING THREAD
Instructions
PREPPING SWEATSHIRT
- Measure length of sweater at front center from bottom to top of collar.
- Fold sweatshirt in half along front center.
- Using fabric chalk, mark front center of collar, and front center at bottom (see note 2).
- With a clear ruler, draw a line connecting the top and bottom midpoints.
- Cut center front of sweatshirt according to marked line.
- Serge both raw edges of cut edges (see note 3).
HOW TO SEW ZIPPER TO JACKET
- First, if your zipper is longer than the jacket, we will need to trim it down to 1/2”(12.7mm) longer than jacket length (see note 4).
- Cut zipper teeth from fabric, a distance of 0.5” (12.7mm) from where you trimmed.
- Cut top 0.5”of zipper teeth completely off from zipper.
- Repeat trimming teeth on other side of zipper.
- Take a needle with thread and make several loops around the zipper teeth to make stops for the zipper. This is to prevent the zipper head from sliding off the teeth when you pull it up (see note 5).
- Completely separate your zipper.
- Flip the zipper so that its right side faces the right side of jacket. Note that the fabric edge of zipper will line up with serged edge of jacket.
- Clip (or pin) zipper to jacket. Note that at the top of the jacket the fabric of the zipper will stick out. We will fold it down in the next steps. Repeat on other side of jacket.
- Sew zipper to jacket using zipper foot.
- Fold fabric of zipper (at the top of jacket) down 0.25 in (6.35mm).
- Fold fabric down again another 0.25 in (6.35mm) so it's flushed with the top of jacket.
- Hold in place with a pin. Repeat on other side of zipper.
- At this point, if you don’t want to add a zipper facing, simply stitch the zipper down to the front of the jacket at about 0.25”(6.35mm) from the edge of jacket. Repeat for other side and you are done!
If you want to add a facing to the jacket, don’t stitch down the zipper to the right side of the jacket yet. Jump to the next step How to Sew Jacket Facing.
HOW TO SEW JACKET FACING
- First, cut two fabric strips that measure [2 inch] x [length of jacket + 1 inch] or 5.08cm x [length of jacket + 2.54 cm] (see note 6).
- Place fabric strip on top of jacket so that it lines up with with serged edge of jacket, right sides together. Make sure the fabric strip extends 0.5” (12.7mm) beyond top of jacket and 0.5” (12.7mm) beyond bottom of jacket.
- Fold excess facing down over top of jacket and secure with a pin.
- Repeat by folding excess facing over bottom of jack and pin in place.
- Now pin the rest of facing to jacket, right sides together.
- Next, sew facing to jacket using a zipper foot, 0.5” (12.7mm) from edge.
- Flip jacket zipper and facing to wrong side of jacket.
- From the wrong side of facing, fold facing edge 0.5” (12.7mm) in. Next, fold in another 0.5” (12.7mm).
- Then turn the twice folded-in facing so it faces wrong side the jacket.
- Pin facing to jacket front. Sew down to jacket with zipper foot, from the right side of the jacket (see note 7).
- Repeat on other side of jacket and you are finished!
Notes
NOTE 1: If your knit fabric is a 2-way stretch, the length of fabric you will need should be measured along the selvedge. If your knit is a 4-way stretch, it doesn't matter what direction you cut the fabric (the length can be cut along the selvedge, perpendicular to the selvedge, or on the bias). Check out this post to learn more about 2-way stretch versus 4-way Stretch
NOTE 2: Alternatively, you can also find the midpoint of the collar by measuring from armhole to armhole and marking the midpoint. Then, do the same by measuring the width of the sweatshirt bottom and marking the midpoint.
NOTE 3: If you plan to add a facing to the jacket (see How to Sew Jacket Facing), you can skip the serging. You can also use the zig-zag stitch on a home sewing machine if you don't own a serger.
NOTE 4: Make sure to trim zipper from the top, not from the bottom.
NOTE 5: If using regular thread that's double threaded around needle, you make need to make 7-10 loops around to create a solid zipper stop. You can also use 4-6 strands of embroidery floss, which would require less loops. Before cutting off your thread, test to make sure you have a solid stop by gently pulling the zipper to see if it will go through.
NOTE 6: Make sure to cut the longer side of fabric along the selvedge. This will help minimize distortion and stretching when you sew later on. To learn more about selvedge, check out this post.
NOTE 7: It’s important to sew the facing from the right side of the jacket as this is the side you will see the most. Thus, your stitches will look nicer when you sew them from the right side.
More Sewing Tutorials You’ll Love!
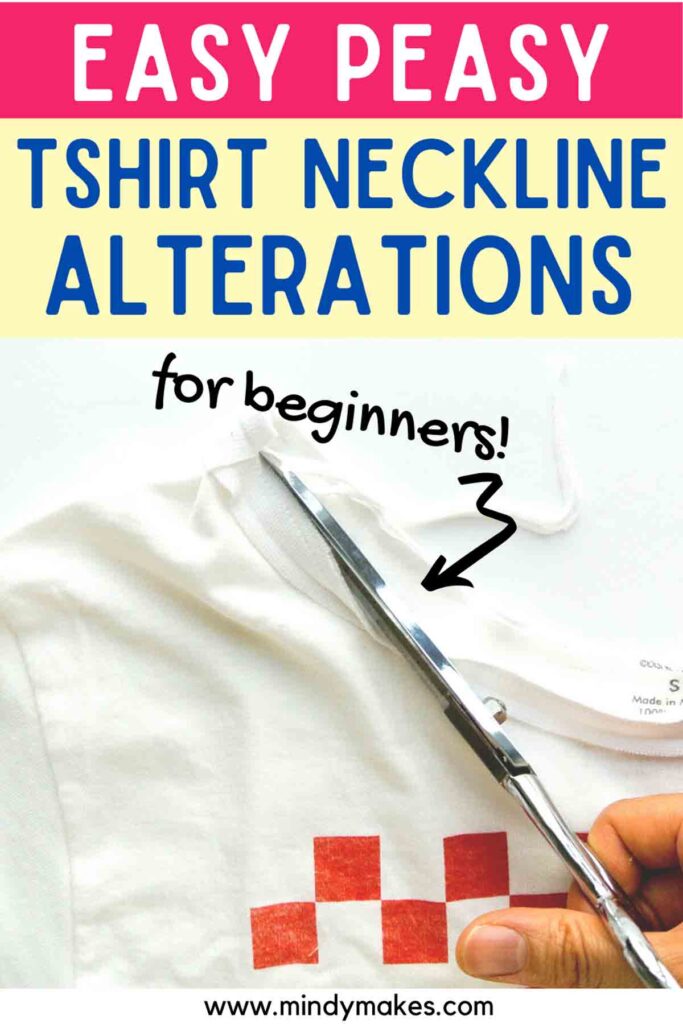
Transform a crew neck t-shirt into a more stylish and comfortable neckline.
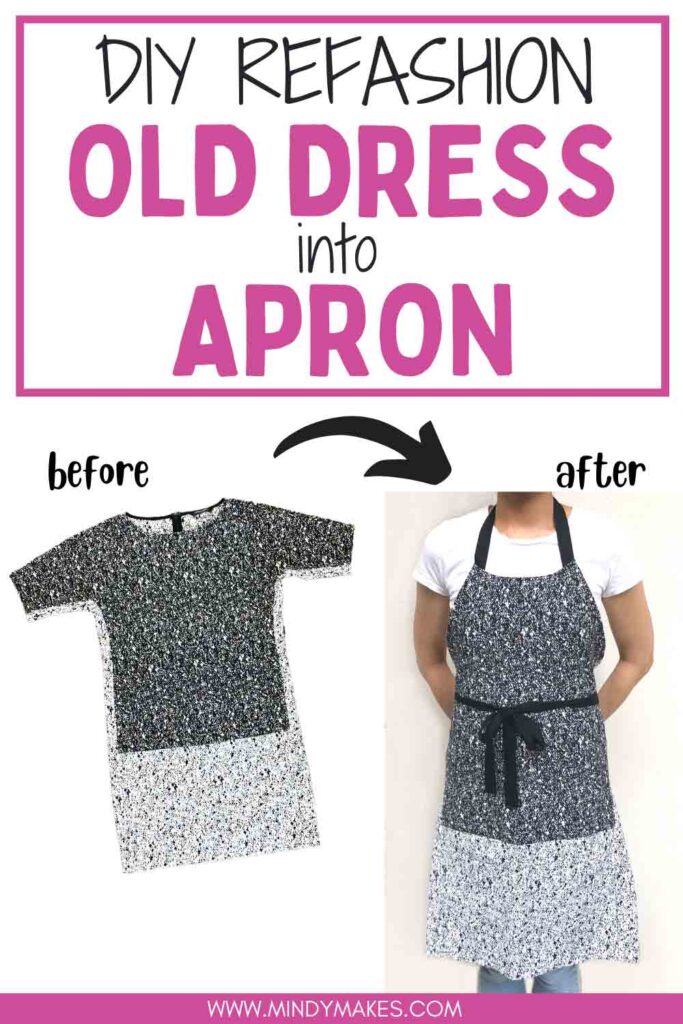
Give your old dress a second life by turning it into a new apron!
10+ Sewing Hacks to gracefully sew knit and stretchy fabric.


This was the best site I found for exactly what I was looking for! Your directions and photos were excellent. Thanks for posting!
You are so welcome!
Thank You so much, I just found your site and I’m amazed at all the things anyone can make. I have some sweatshirts from my kids and now I can make a zippered sweatshirt with your directions for my grandchildren from their fathers shirts. You have saved my tossing away sweatshirts forever. Darlene Brown.
Hi Darlene,
I’m so glad to hear that it was helpful! And it’s great to give the sweatshirts a new life!