How to Make a Drawstring Backpack (Free Pattern)
This simple drawstring backpack pattern is fully lined and comes with a zipper pocket. Perfect for sports, weekend activities, and more!
This post may contain affiliate links. Please read my disclosure policy for details. As an Amazon Associate, I earn from qualifying purchases.

Now that my kiddo has more activities, I feel he needs different bags for every activity to keep all his stuff separate. Otherwise, we may take some school stuff out of his one and only bag, and forget to put it back in on Monday when school starts again! Yikes!
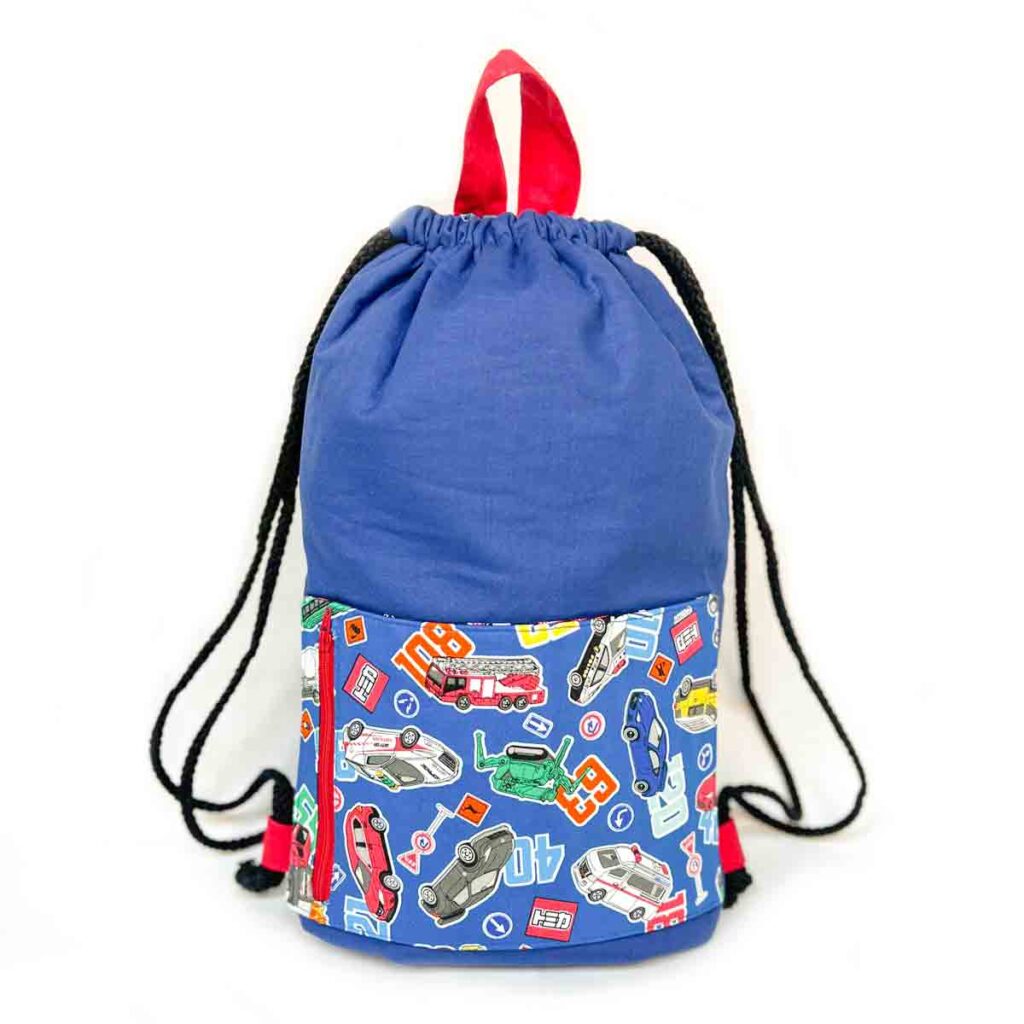
For this reason I decided to create him his very own drawstring backpack. Of course, since it’s customized for him, we must use some car fabric!
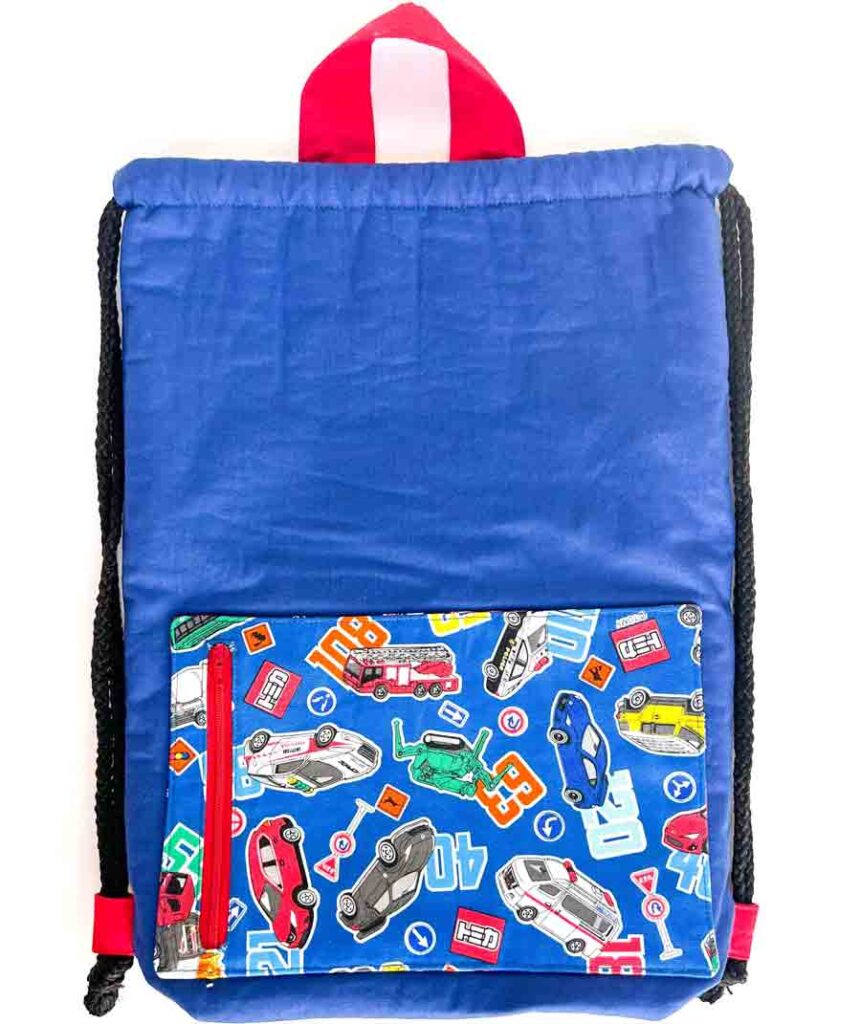
Since I had a piece of Japanese Toy Car fabric my son picked out when we visited grandparents in Taiwan earlier this year, I wanted to put it to good use. However, it was a small piece and not enough for a drawstring backpack. Therefore, I ended up using the car fabric to create zipper pocket at the front of the backpack.

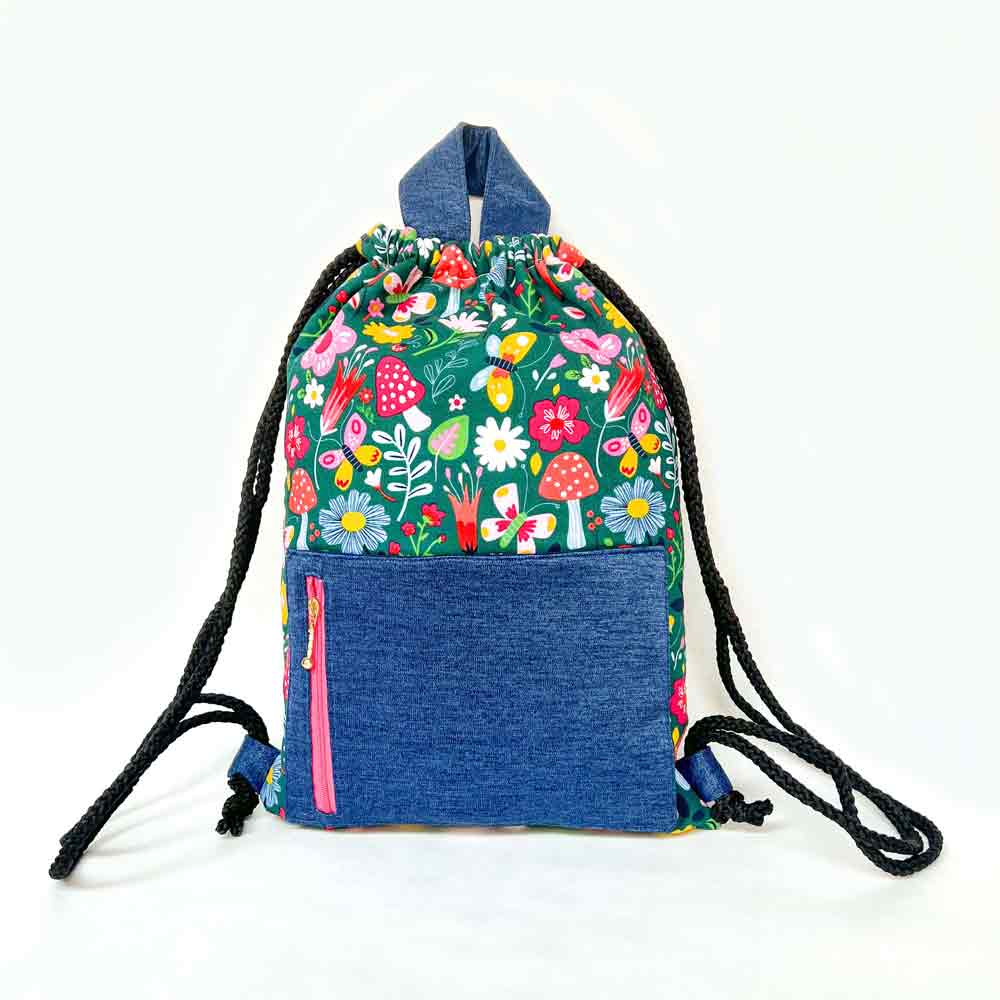
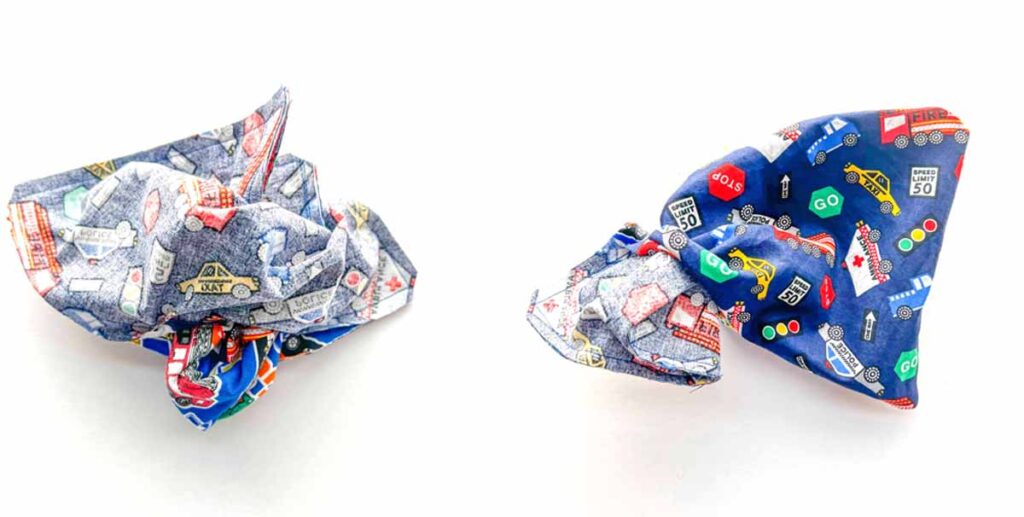
I also ended up making myself a more girly one (on the right) that is also larger in size. The pattern for the larger sized drawstring backpack along with an ad-free printer friendly PDF tutorial is available in Our Etsy Shop.
Drawstring Backpack Pattern with Zipper Pocket Free
This simple drawstring backpack is fully lined and comes with a front recessed zipper. Now a recessed zipper pocket is made by cutting a rectangle opening in the fabric piece and sewing a zipper pocket to it.

Don’t worry if you have never sewn a recessed zipper pocket before! My tutorial below will show you step-by-step how to make one. Once done, the zipper pocket is a fully lined pouch that has all the seams neatly hidden. Therefore, you can actually use it by itself to store toiletries, makeup, stationary, and more!
The recessed zipper pocket is then stitched onto the front of the drawstring backpack as an added feature. However, if you don’t want a front zipper pocket, just make the drawstring backpack by itself, which works just as well!
What is the Size of a Drawstring Backpack?
Please note that all measurements are approximate and not exact. The final dimension of your backpack may differ slightly from what is listed here.

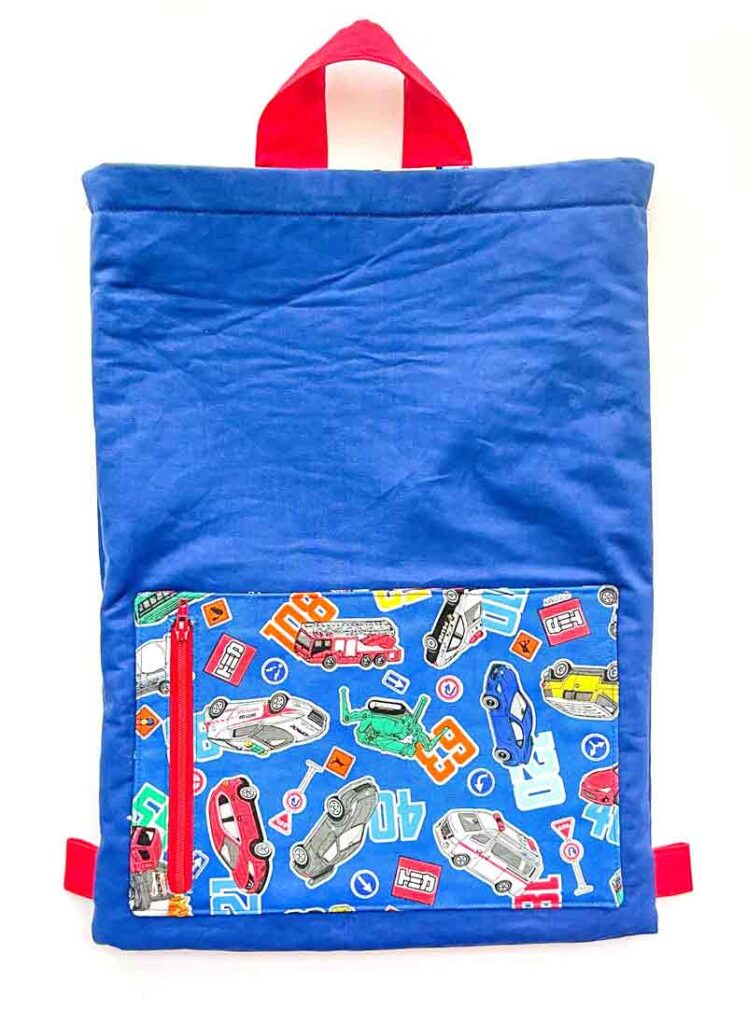
The drawstring backpack measures approximately 12″ (30.5 cm) wide and 16″ (40.6 cm) tall when finished. The zipper pocket is about 10″ (25.4cm) wide and 6.5″ (16.5 cm) tall. There is a top handle for you to easily hang it, and side loops for the drawstring.
Is this a beginner friendly sewing project?
If you consider yourself a beginner, I recommend just sewing the drawstring backpack without the front zipper pocket.
First, drawstring bags are very simple to sew and a great place to start for people who have never sewn a project from start to finish. Next, this drawstring backpack will also teach you how to sew a fully lined bag, which is another great feat!
The zipper pocket is probably the hardest thing to sew in this project. However, my step-by-step tutorial will show you exactly how to make this zipper pocket from start to finish. Once you get that down, everything else will be a breeze!
For other beginner friendly sewing projects, check out the following tutorials:
How Much Cord Do I need for a Drawstring Backpack?
I recommend using two pieces of cords each measuring about 55″ – 65″ (139.7 – 165.1cm) for a drawstring backpack. For a preschool – kindergarten child cut the shorter length (55″). For an elementary – middle school child cut 60″ or 152cm, and for an adult cut the longer length (65″).
However, for a perfect fit I recommend first cutting the cord 55″ – 65″ (depending on who you are sewing for). Then, thread the drawstring into the backpack and trying it on the person and adjusting the length as needed.
The good thing about this drawstring backpack is that even after finishing you can still easily adjust the cord down to the desired length. It is so versatile!
What Do I Need to Sew a Pull String Backpack?
Use 100% cotton fabric if you consider yourself a beginner. 100% cotton is very easy to work with and comes in all sorts of lovely colors and prints. I used 100% cotton in the tutorial.
Materials
- EXTERIOR FABRIC – 1/2 Yard (0.46M)
- LINING FABRIC – 3/4 (0.7M)
- ZIPPER POCKET FABRIC – 1/2 Yard (0.46M), see note 1
- FABRIC FOR STRAPS – 1/8 Yard (0.125M)
- FUSIBLE INTERFACING – 1/4 (0.23M) Yard. I used the Heat n Bond Medium Weight Iron on Interfacing
- FUSIBLE FLEECE – 3/4 Yard (0.7M) – I’m using Pellon 987F Fusible Fleece
- ZIPPER – 7” Zipper
- DRAWSTRING CORD – 2 Pieces each measuring 55”- 65”(140cm – 165cm long). I used the 6mm Bonnie Macrame Craft Cord in black, which is great because the ends can be sealed with heat and comes in so many colors!
- BASTING ADHESIVE
NOTE 1: 1/2 Yard (0.46M) is enough to cut out all 4 pieces needed to make the front zipper pocket. This includes:
1. [ZIPPER POCKET FRONT]
2. [ZIPPER POCKET BACK]
3. [ZIPPER POCKET LINING PIECE A]
4. [ZIPPER POCKET LINING PIECE B]
Tools
- HOME SEWING MACHINE
- FABRIC SCISSORS
- FABRIC CHALK
- IRON – for pressing
- SEWING PINS & SEWING CLIPS
- CLEAR RULER – For drawing out pattern on fabric.
- POINT TURNER (optional) – or can use chopsticks or That Purple Thang
- BODKIN – For threading drawstring cord
- LIGHTER – to seal ends of drawstring cord.
- HAND SEWING NEEDLES – for hand closing the opening of backpack
Drawstring Backpack Sewing Pattern Free
For this project, the sewing pattern measurements are listed below. Please draw dimensions on fabric and cut it out. All measurements already include 1/2″ (1.27cm) seam allowance.
Recessed Zipper Pocket
| ZIPPER POCKET FRONT | ZIPPER POCKET BACK | ZIPPER POCKET INTERFACING | ZIPPER POCKET LINING PIECE A | ZIPPER POCKET LINING PIECE B | |
| DIMENSION (WIDTH X HEIGHT) | 11″ X 7.5″ 27.9 cm x 19 cm | 11″ X 7.5″ 27.9 cm x 19 cm | 11″ X 7.5″ 27.9 cm x 19 cm | 13” x 7.5” 33cm x 19cm | 10” x 7.5” 25.4 cm x 19 cm |
Cut the following fabric pieces on Zipper Pocket Fabric:
- ZIPPER POCKET FRONT (X1)
- ZIPPER POCKET BACK (X1)
- ZIPPER POCKET INTERFACING (X1)
- ZIPPER POCKET LINING PIECE A (X1)
- ZIPPER POCKET LINING PIECE B (X1)
Drawstring Backpack
| EXTERIOR FRONT | EXTERIOR BACK | EXTERIOR FUSIBLE FLEECE | LINING FRONT | LINING BACK | |
| DIMENSION (WIDTH X HEIGHT) | 13” X 17” 33 cm x 43.18 cm | 13” X 17” 33 cm x 43.18 cm | 12”X 16” 30.5 cm x 40.64 cm | 13” X 17” 33 cm x 43.18 cm | 13” X 17” 33 cm x 43.18 cm |
Cut out the following fabric pieces on Exterior fabric, Lining fabric, and Fusible Fleece:
- EXTERIOR FRONT (X1)
- EXTERIOR BACK (X1)
- EXTERIOR FUSIBLE FLEECE (X2)
- LINING FRONT (X1)
- LINING BACK (X1)
Straps
| TOP HANDLE | TOP HANDLE INTERFACING | SIDE LOOPS | SIDE LOOPS INTERFACING | |
DIMENSION (WIDTH X HEIGHT) | 4” x 12” 10.16 cm x 30.5cm | 3”x 11” 7.62cm x 27.9cm | 3” x 6” 7.62cm x 15.24 cm | 2” x 5” 5cm x 12.7cm |
Cut out the following fabric pieces on Straps fabric and Fusible Interfacing:
- TOP BAG HANDLE (X1)
- SIDE LOOPS (X1)
- TOP BAG HANDLE INTERFACING (X1)
- SIDE LOOPS INTERFACING (X1)
How do you Make a Drawstring Backpack Bag
First, cut out all fabric and interfacing pieces according to the dimensions listed in Drawstring Backpack Sewing Pattern.
Recessed Zipper Pocket: Prepping Front Piece
NOTE: I purposely made the [ZIPPER POCKET – FRONT PIECE] really light in the photo below so you can clearly see where to draw the rectangular box.
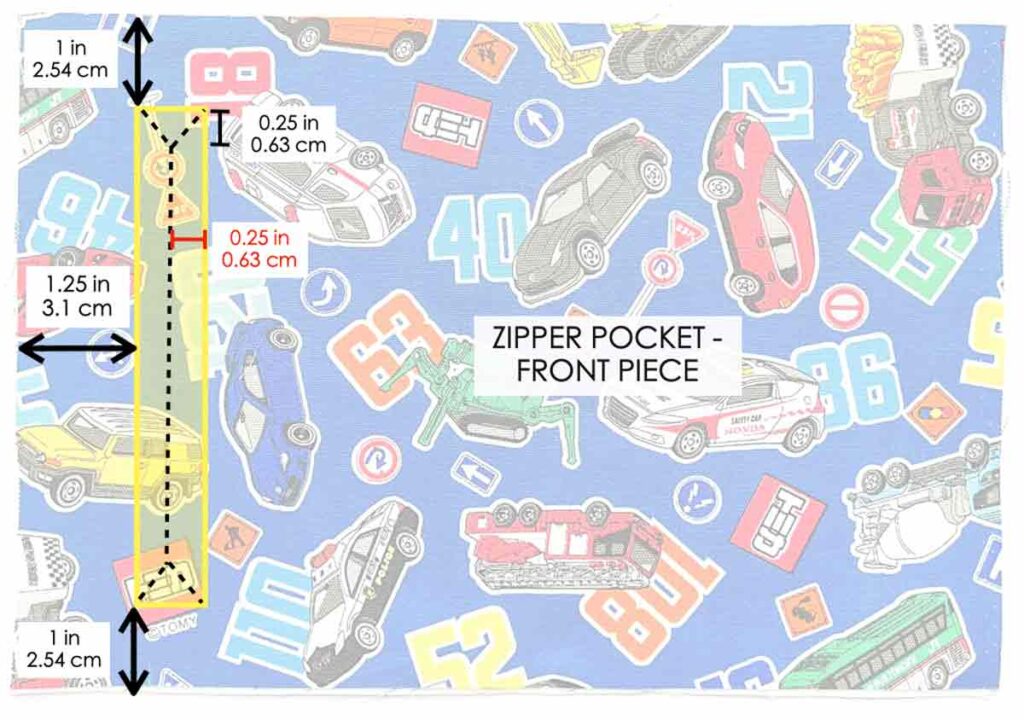
First, on the [ZIPPER POCKET – FRONT PIECE], draw a rectangular box (yellow box) as shown in photo:
• Left side of rectangle is 1.25”(3.1cm) away from left edge.
• Top and bottom of rectangle is 1”(2.54cm) away from top and bottom edge
Next, draw a “>———<” shape inside the rectangle (black dotted line) like the one in the photo.

Then, cut along the “>———<” lines, as shown in photo (steps 1-4).

Next, fold fabric along yellow rectangle line to form an opening on [ZIPPER POCKET – FRONT PIECE]. Then, press fold down with an iron.
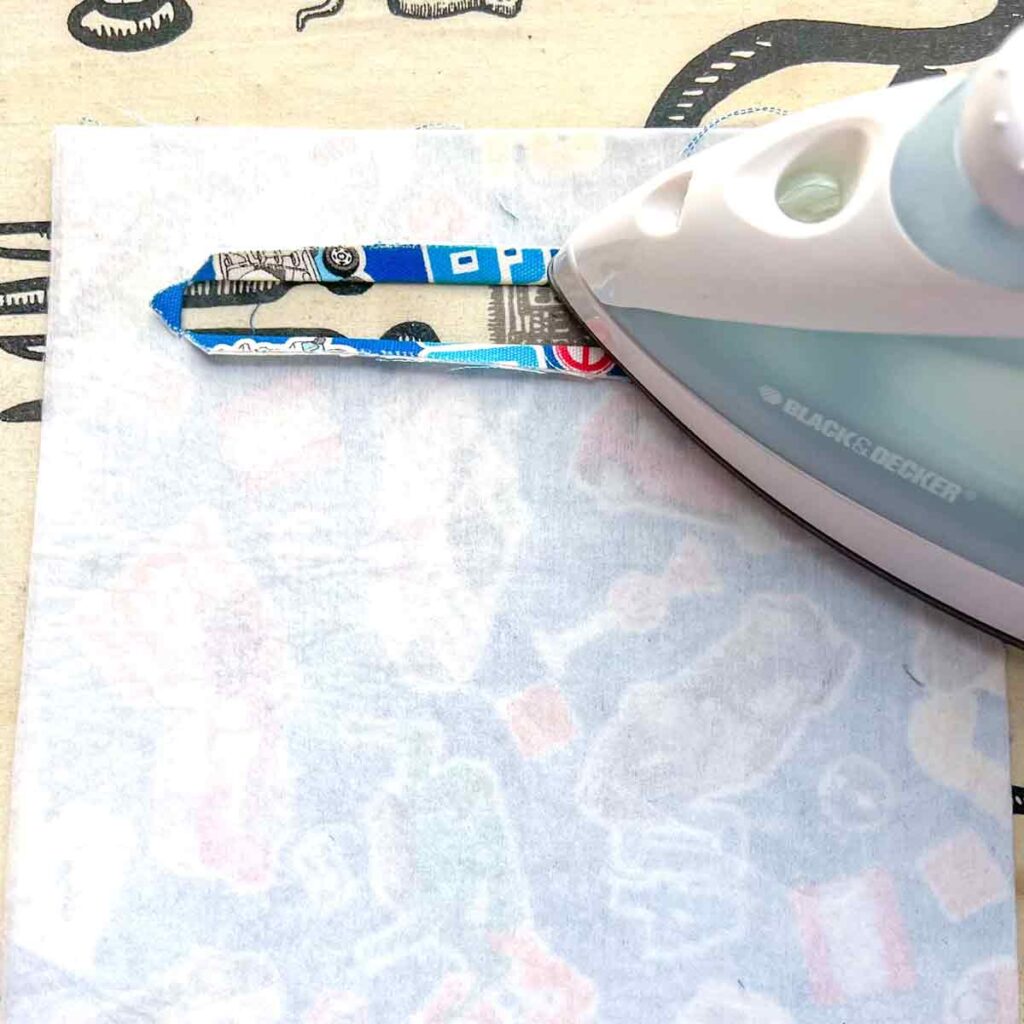
Now repeat pressing folds down on other side.
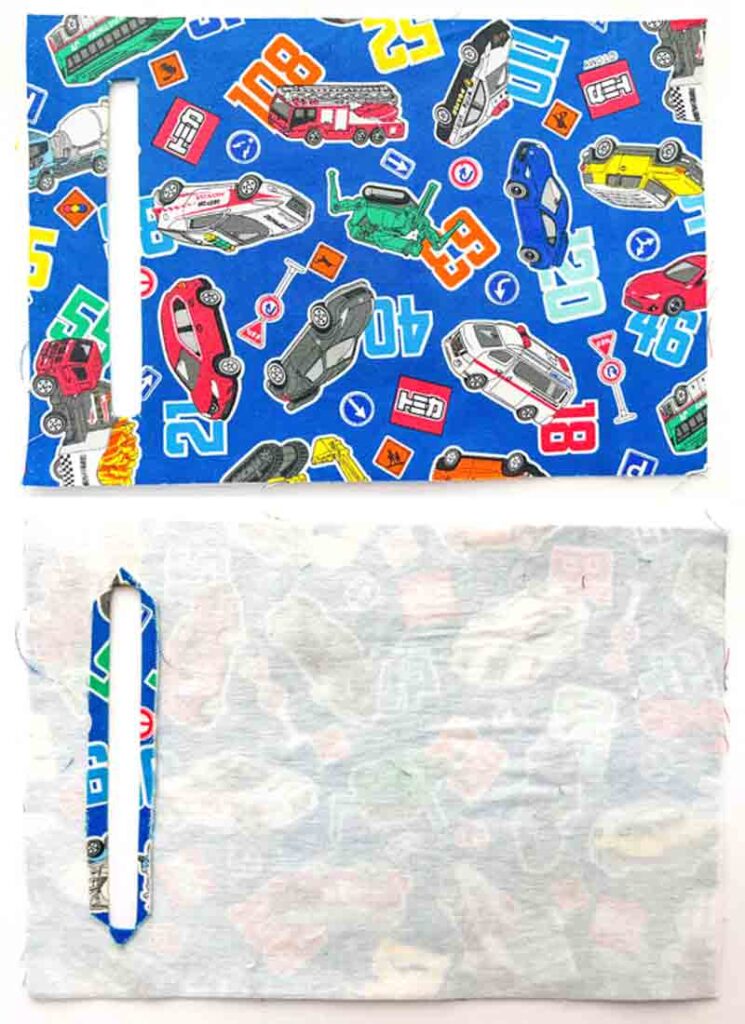
View of front and back of [ZIPPER POCKET – FRONT PIECE].
Recessed Zipper Pocket: Sewing Pocket Lining
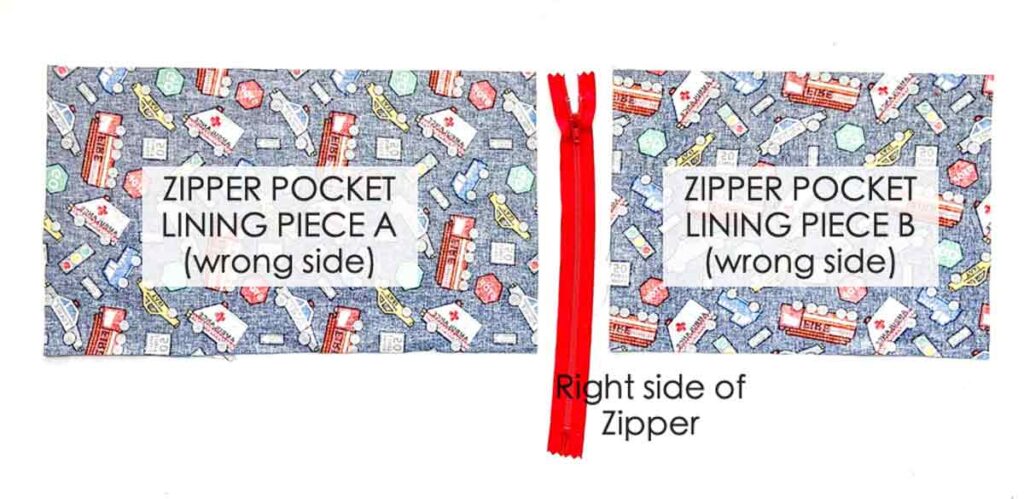
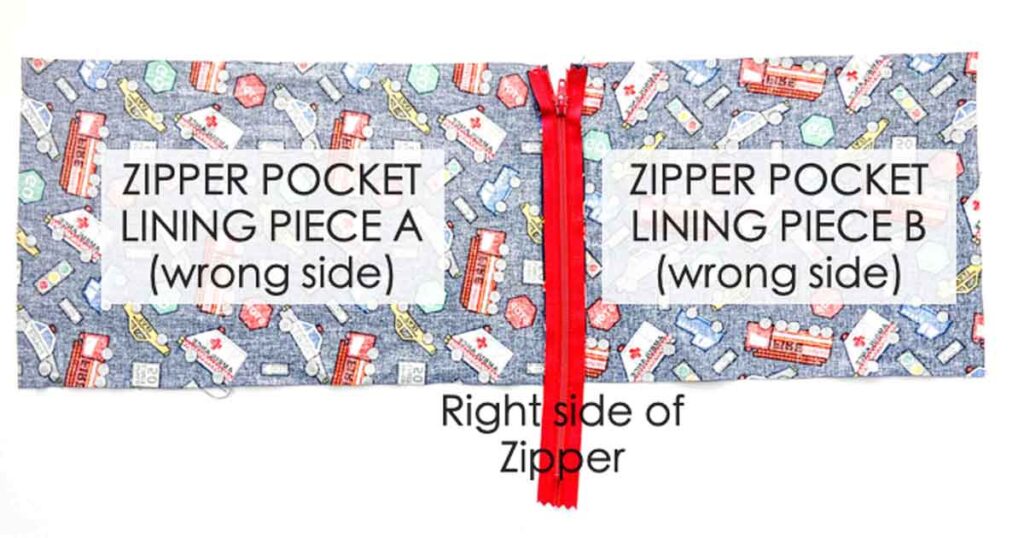
Now place zipper right side up. Then, to the left of zipper place [ZIPPER POCKET LINING – PIECE A] wrong side up. Next, to the right of zipper, place [ZIPPER POCKET LINING – PIECE B] wrong side up.
NOTE: [ZIPPER POCKET LINING PIECE A] is wider than [ZIPPER POCKET LINING PIECE B]. Piece A is placed on left side of the zipper, and piece B is placed to the right of zipper.
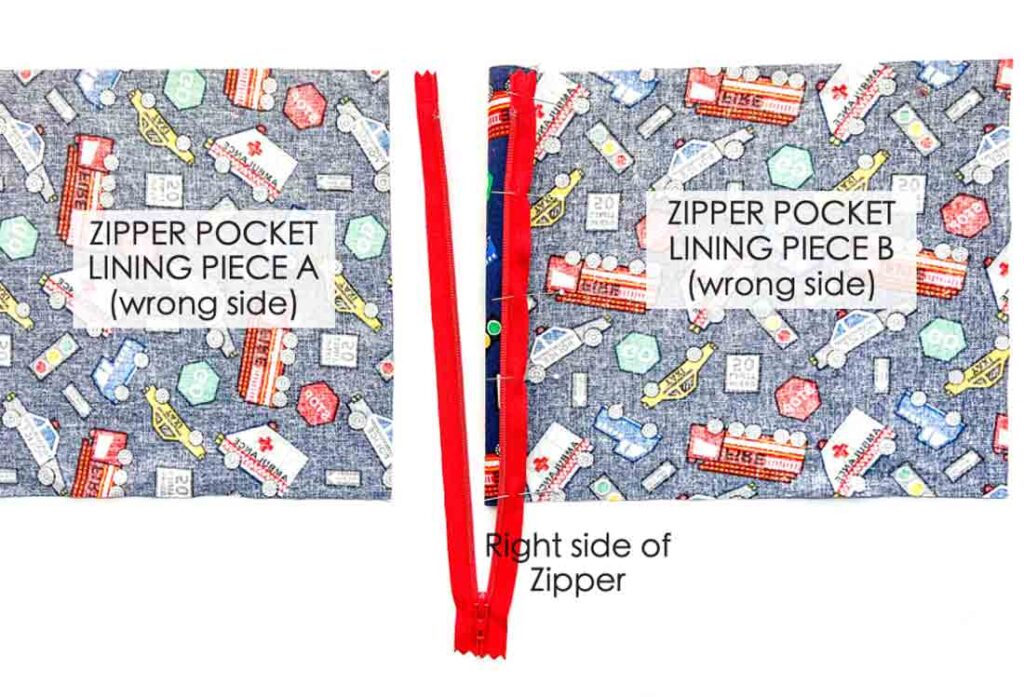
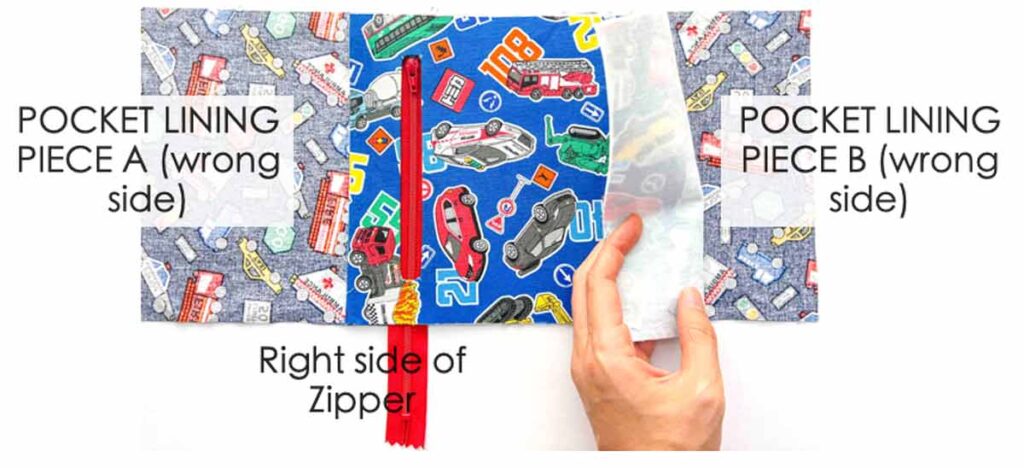
Now open the zipper. Then pin right side of [POCKET LINING – PIECE B] to wrong side of zipper.
NOTE: Make sure you are pinning RIGHT SIDE of fabric to WRONG SIDE of zipper.
Next, repeat by pinning right side of [POCKET LINING – PIECE A] to other side of zipper.

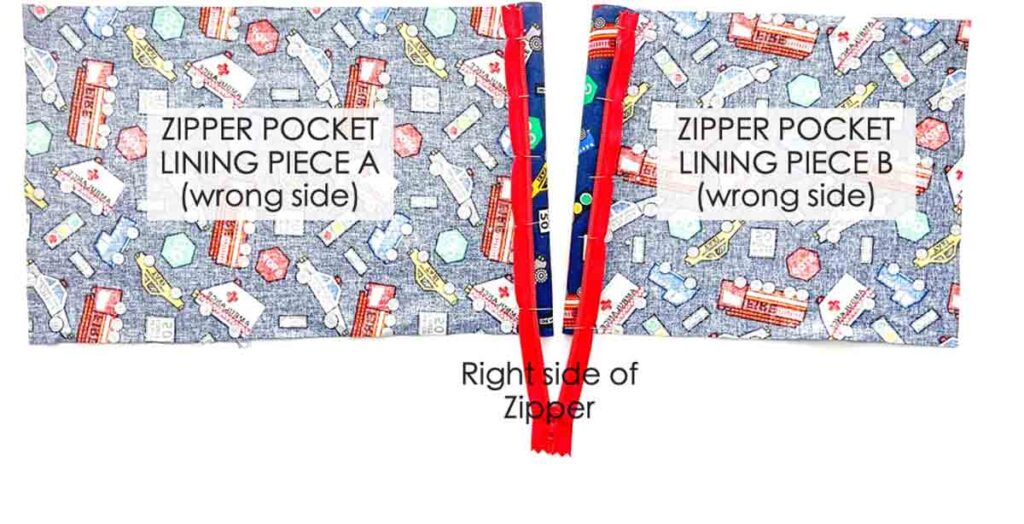
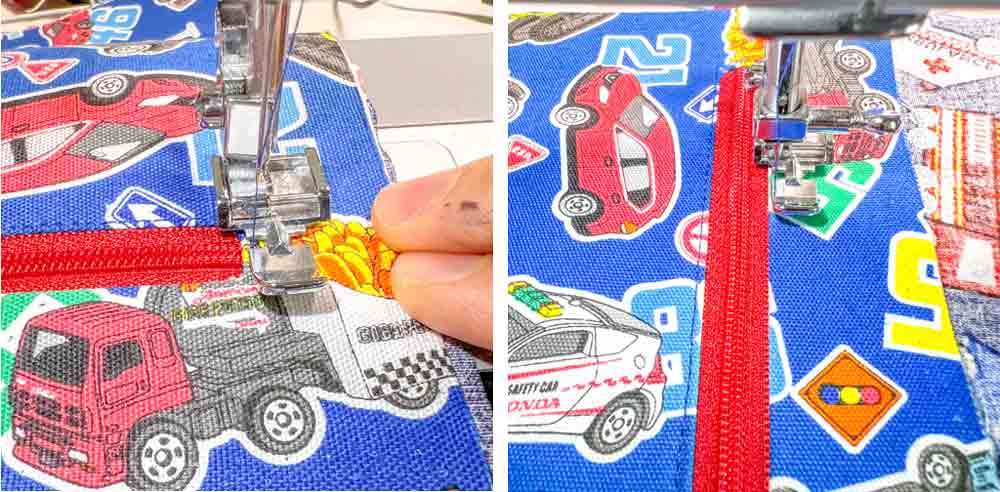
Then, use a zipper foot and sew zipper to POCKET LINING PIECE A and PIECE B, as pictured.

Now close zipper and press zipper and fabric.

Now, from the right side of fabric, you should see the bottom (wrong side) of zipper.
Next lay your zipper with fabric so the wrong side of fabric faces up.
Then, lay [ZIPPER POCKET – FRONT PIECE], right side up, on top of [POCKET LINING PIECE B].

Next, line up rectangle opening with your zipper (on the right side) and line up the sides of [ZIPPER POCKET – FRONT PIECE] with sides of [POCKET LINING PIECE B].
NOTE: These two steps help you determine where you need to place [ZIPPER POCKET -FRONT PIECE] over the zipper and [POCKET LINING PIECE B].

LEFT: Now apply basting adhesive to wrong side of rectangle opening. Spray the adhesive over a cardboard or scratch paper to protect your work surface. Make sure you apply just enough over the opening, don’t over apply or else your fabric will become very sticky.
RIGHT: Next baste [ZIPPER POCKET -FRONT PIECE] to zipper. Keep [POCKET LINING PIECE A] opened and away, like in the photo.
NOTE: The thing I love about the basting adhesive is that it allows you to peel off the fabric and realign it over the zipper if you need to fix the placement.
Next, use a matching thread and stitch zipper to the rectangular opening, 1/8”(3mm) from edge. Keep [POCKET LINING PIECE A] away as you don’t want to sew on it.

Now this is what your zipper pocket should look like. As stated previously, make sure you didn’t accidentally fold [POCKET LINING PIECE A] over and sew on it.

This is what other side of zipper pocket (right side of fabric) looks like.

Now take your zipper pocket and lay it out flat again.
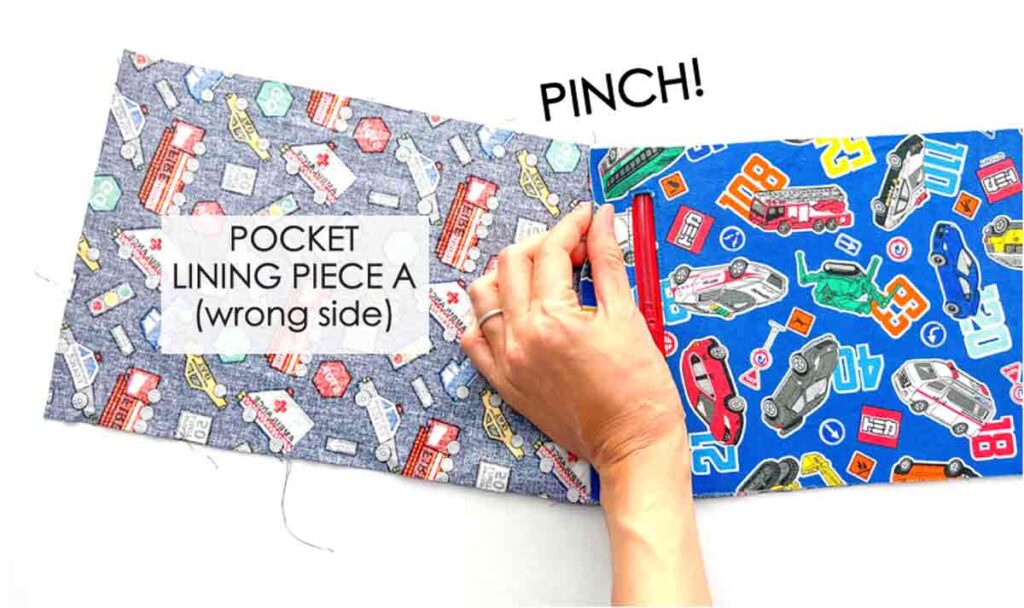
Then pinch and fold [POCKET LINING PIECE A] where it meets [ZIPPER POCKET-FRONT PIECE]
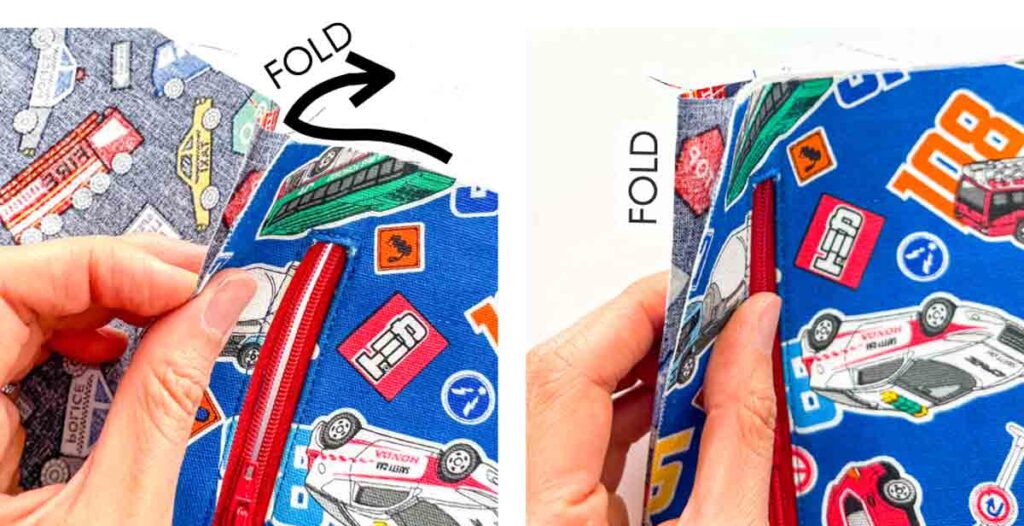
Next, keep folding [POCKET LINING PIECE A] so that it is now behind [ZIPPER POCKET – FRONT PIECE].
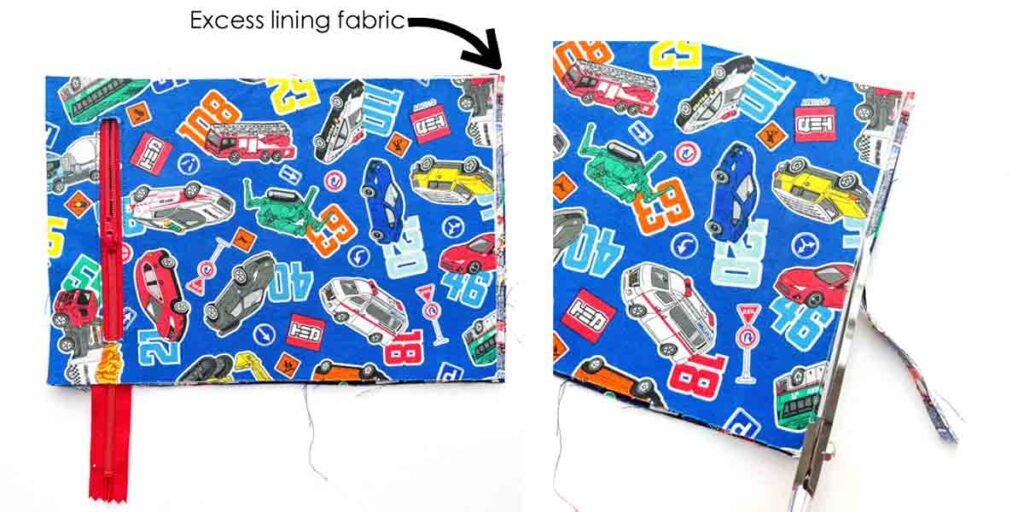
Now check if there is any excess lining fabric that extends beyond [ZIPPER POCKET – FRONT PIECE]. Trim as necessary.

Machine baste the entire zipper pocket together (pink dotted lines).
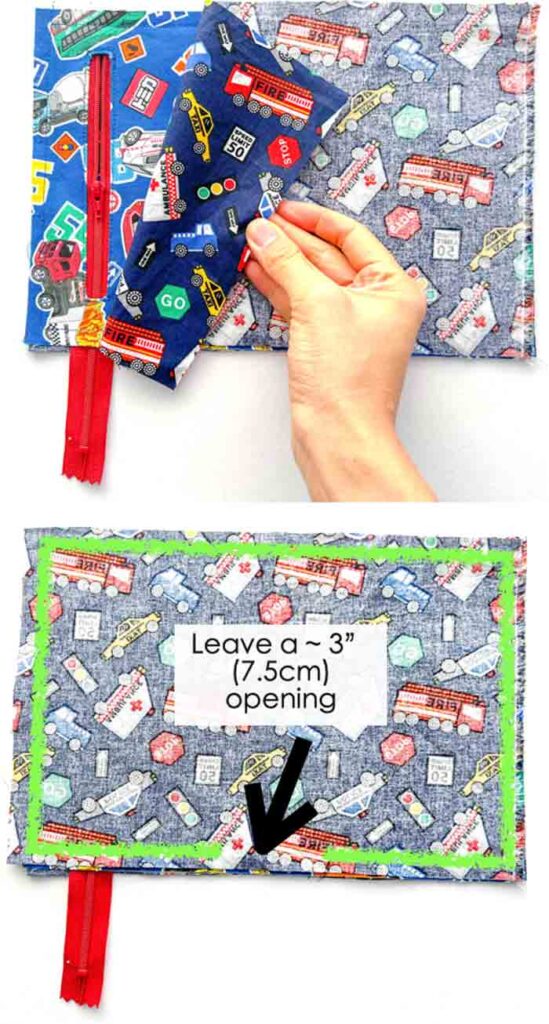
Then, place [ZIPPER POCKET – BACK PIECE] over, right sides together and sew together at 1/2” (1.27cm) seam allowance (green line), leaving an ~3” (7.5cm) opening at the bottom.

Finally, trim seam allowance, excess zipper, and cut a diagonal at all the corners.
Turn zipper pocket to right side through opening.

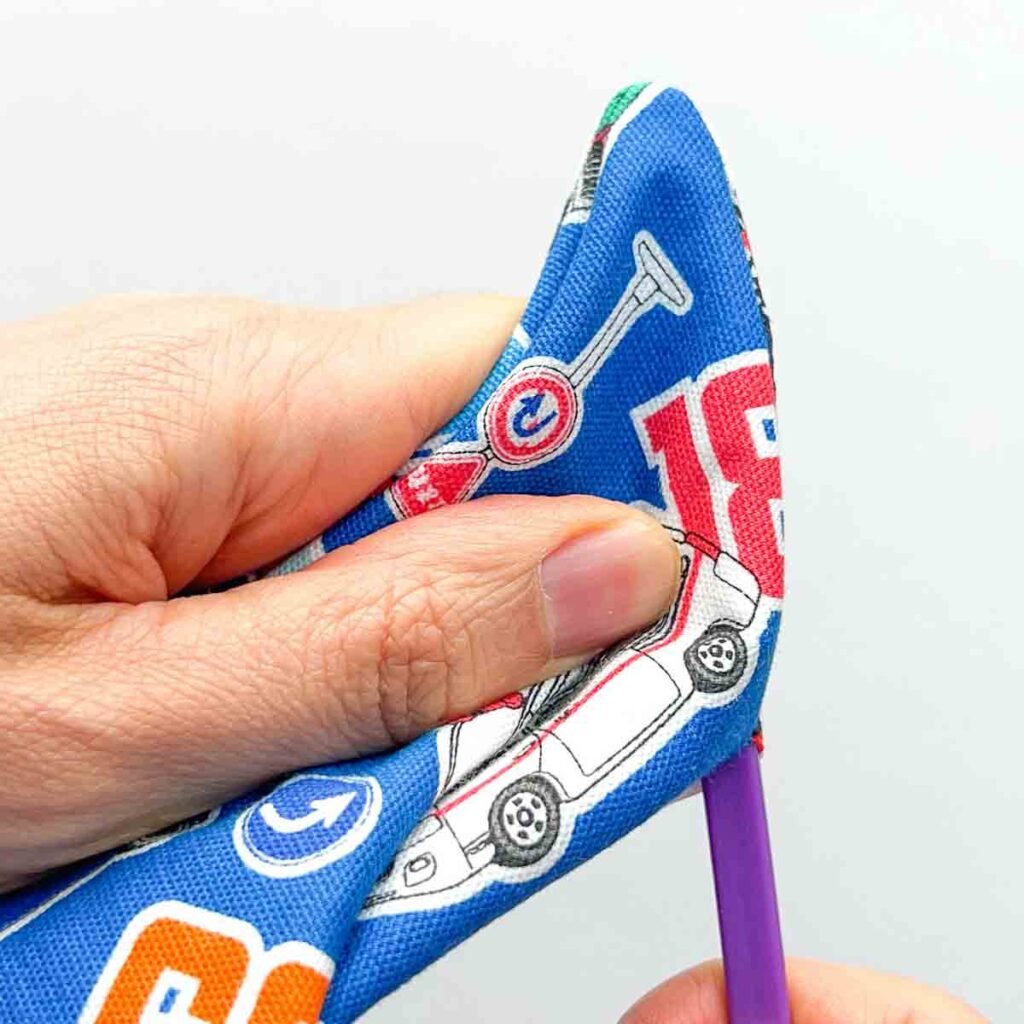
Poke out all the corners ( I’m using That Purple Thang)

Give your zipper pocket a good press. Make sure to press in the seam allowance at the opening. We will stitch it close when we sew the zipper pocket to the rest of the bag.
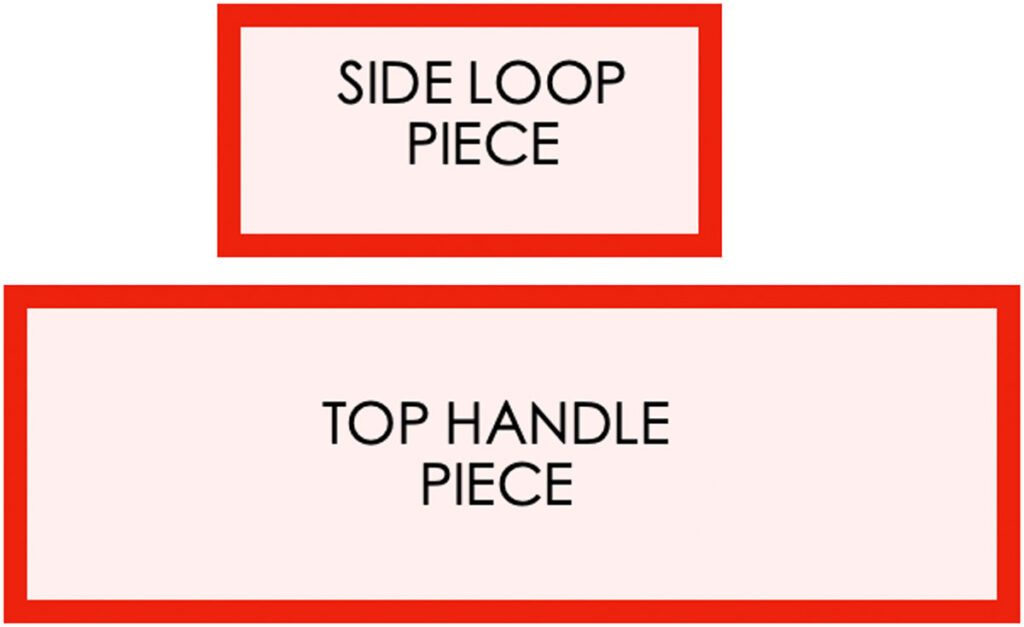
How to Make Top Handle and Side Loops
First, apply fusible interfacing to wrong side of handle and loop fabric

Next, press in 1/2” (1.27cm) seam allowance on top and bottom of side loop piece

Then fold in half and press.
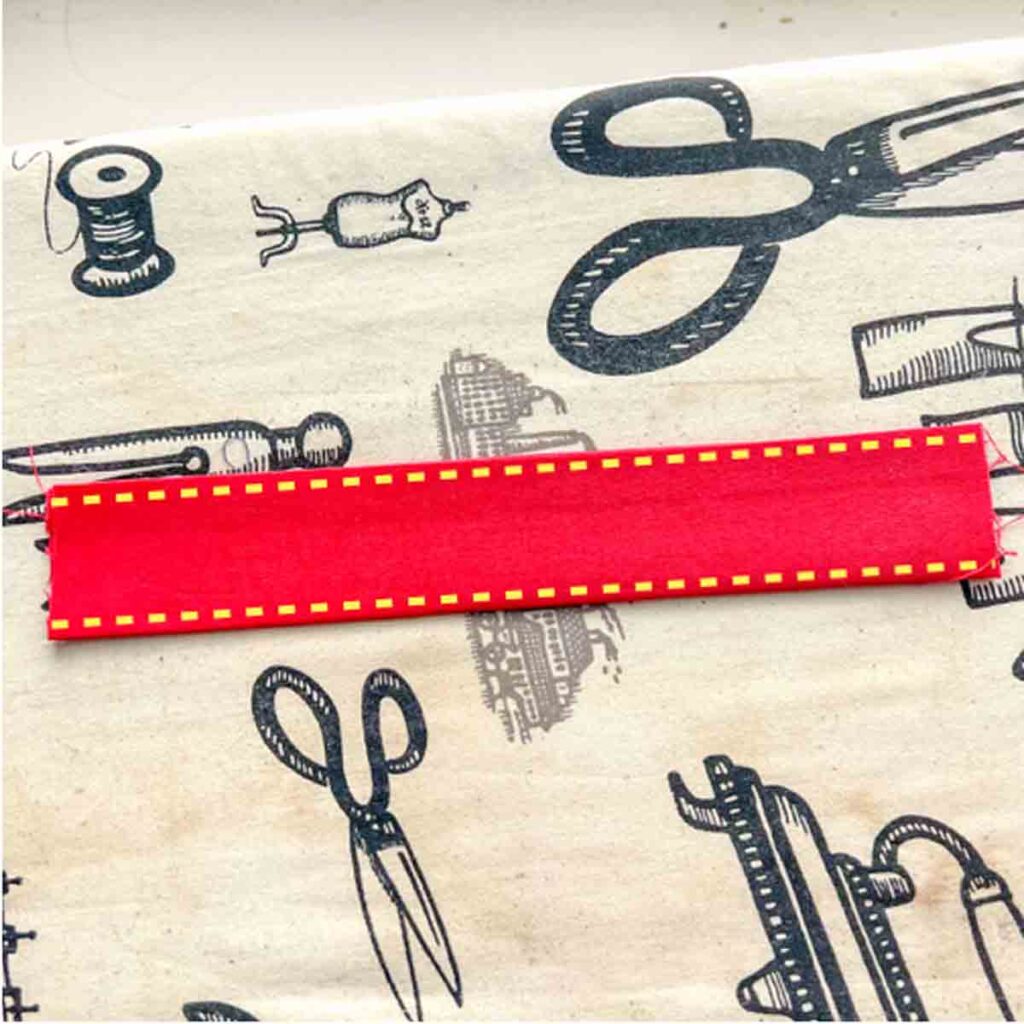
Now stitch both sides of side loop piece at 1/8” (3mm) from edge.
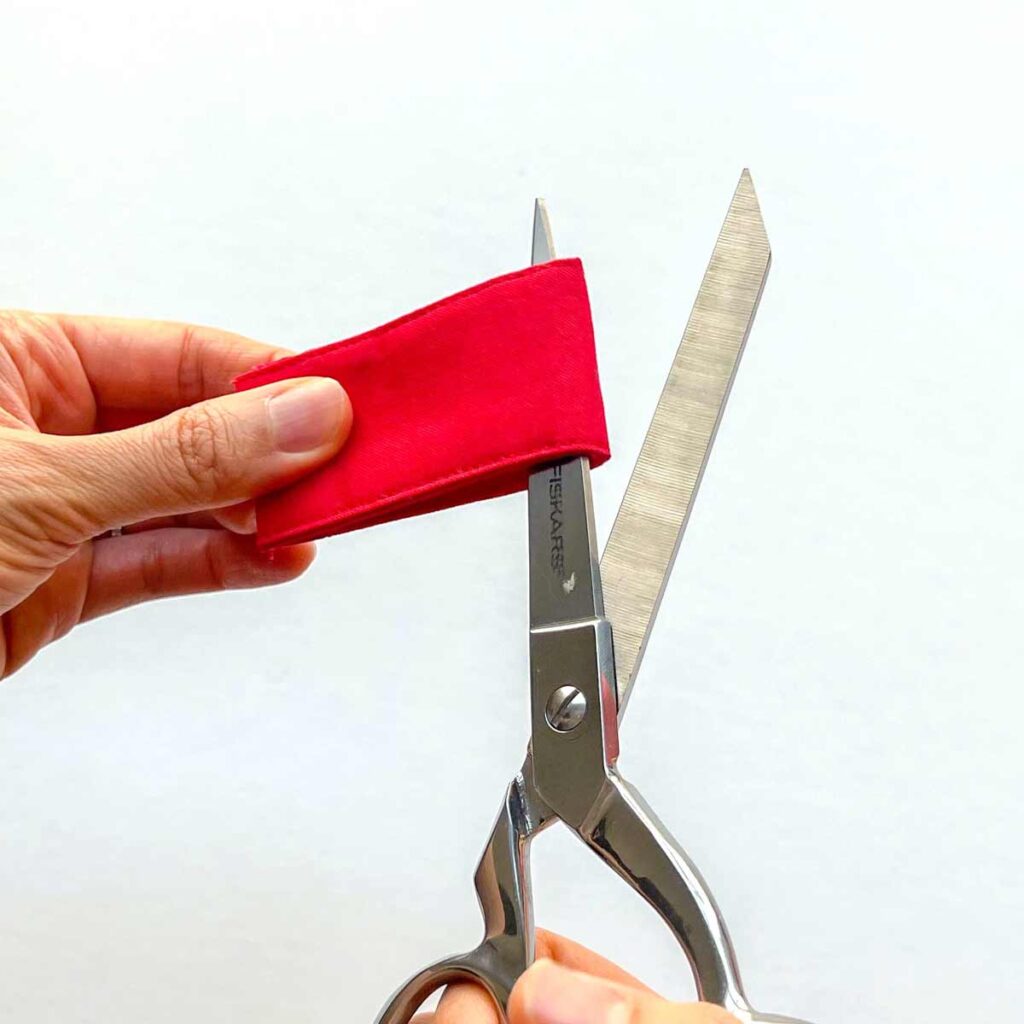
Finally, fold your side loop piece in half lengthwise, then cut.

You will now end up with two side loops that measure 1” wide by 3”long.

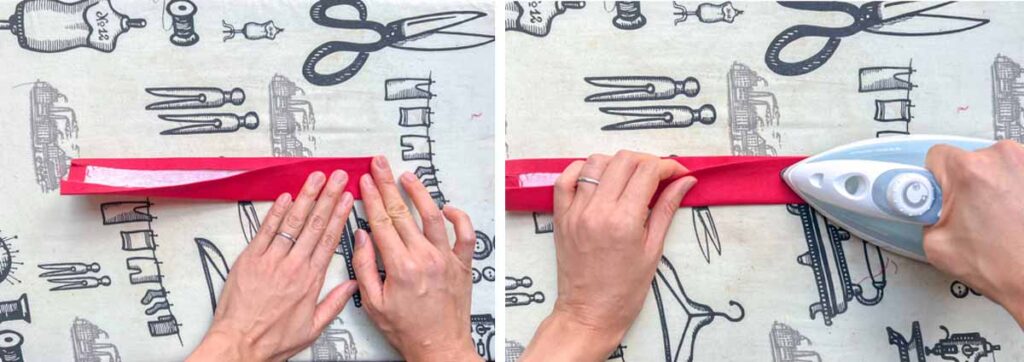
LEFT: For the [TOP HANDLE PIECE] first press in 1/2” (1.27cm) side seam allowances (see where the my fingers are pointing).
RIGHT: Next, press top seam allowance down.

LEFT: Now press bottom seam allowance up
RIGHT: Once all the seam allowances are pressed in, we will fold top handle piece in half
Fold handle piece in half and press.
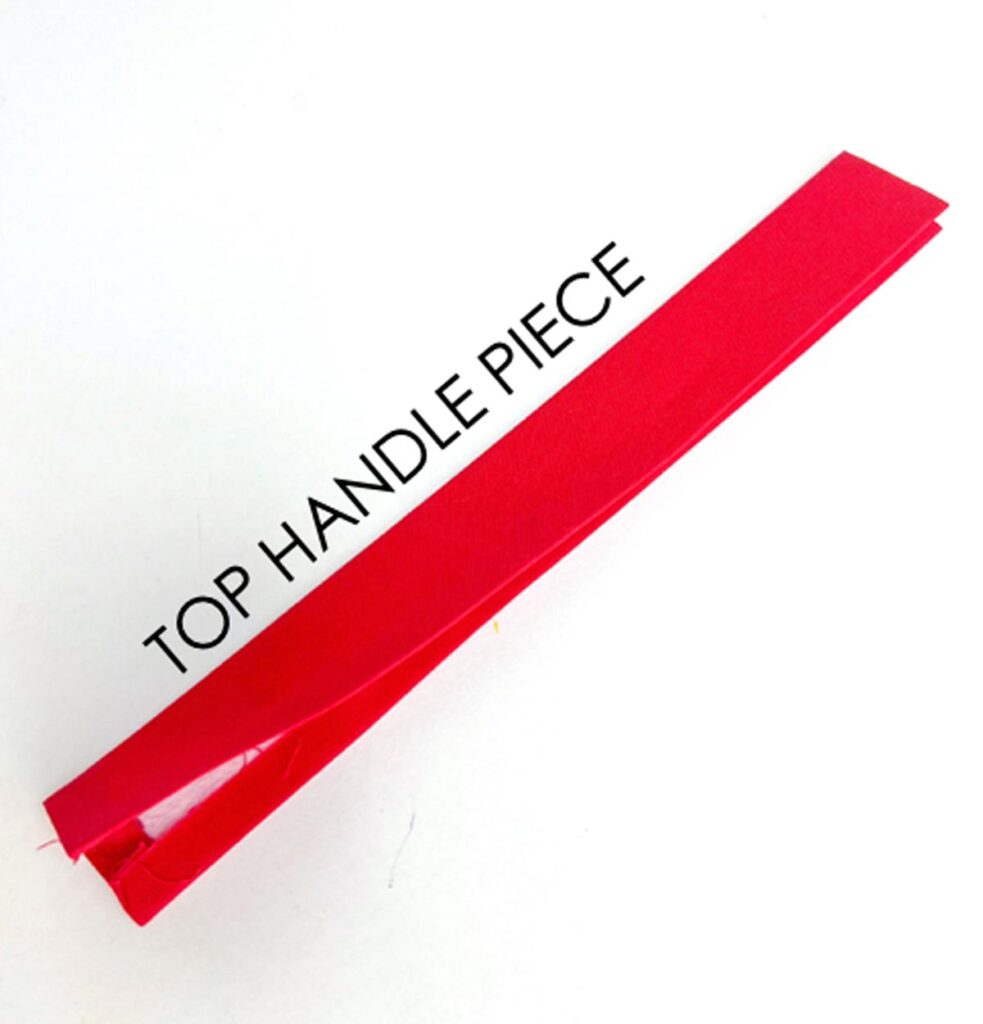
Your top handle piece will look like this.
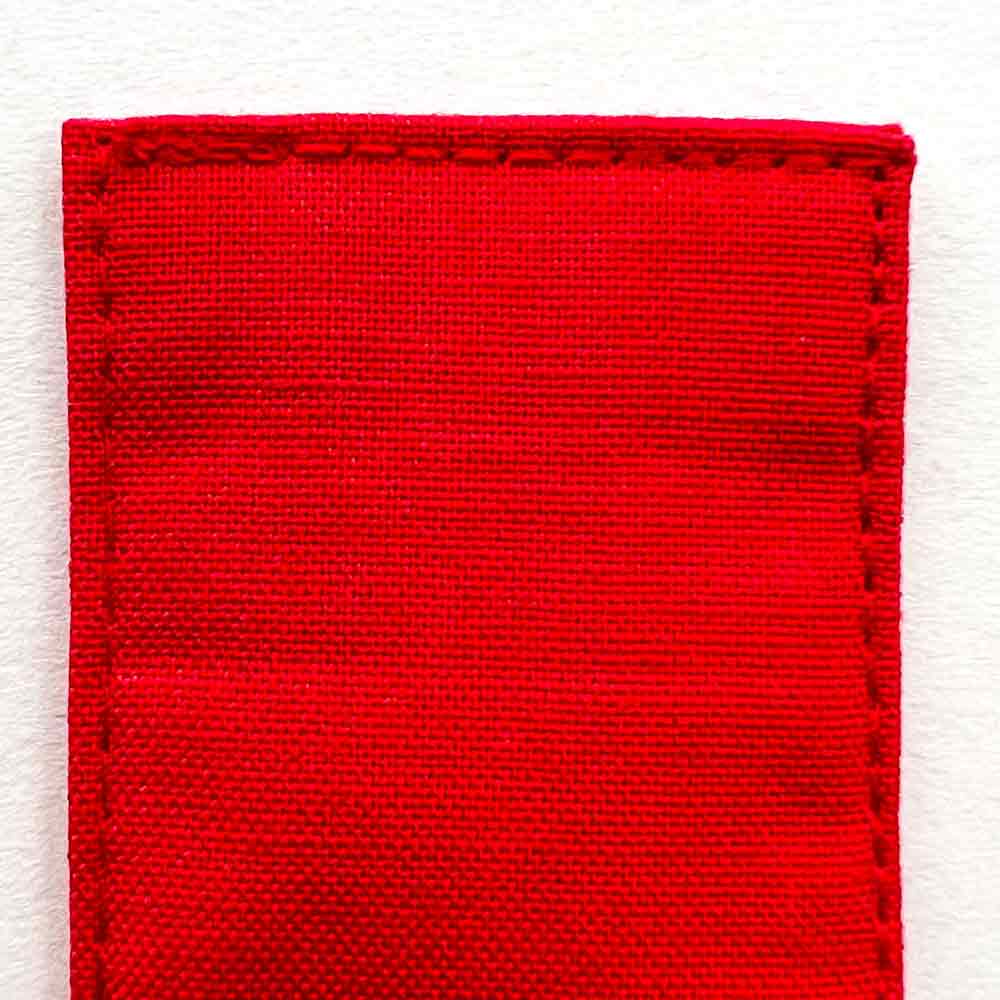
Stitch around entire handle piece, 1/8” (3mm) from the edges.
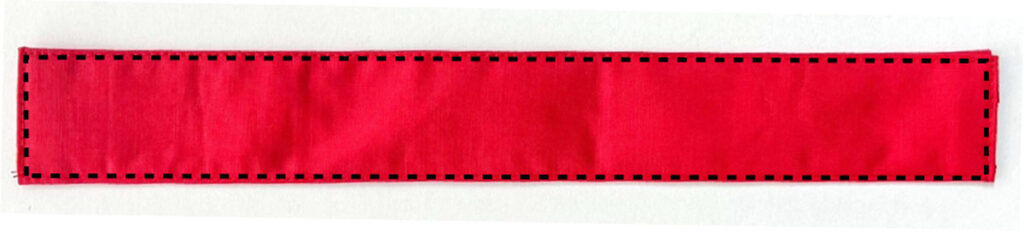
Finished Top handle piece. Black dotted line shows where you should stitch.
Sewing Zipper Pocket and Side Loops

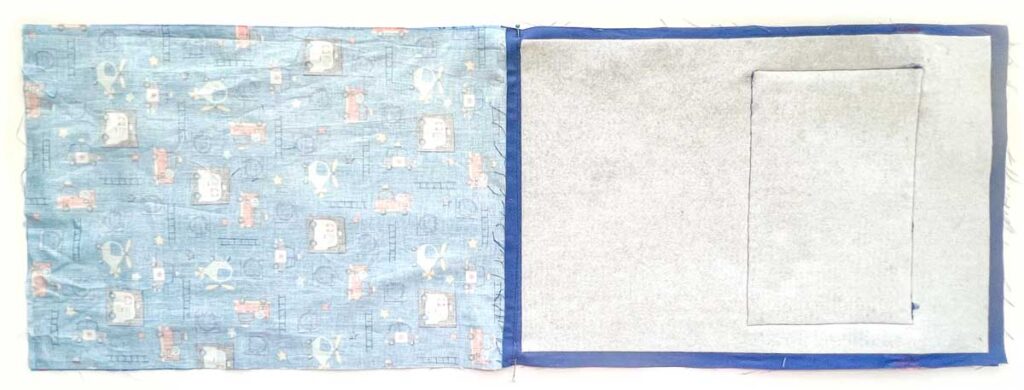
First apply fusible fleece to wrong side of [EXTERIOR FRONT] and [EXTERIOR BACK].
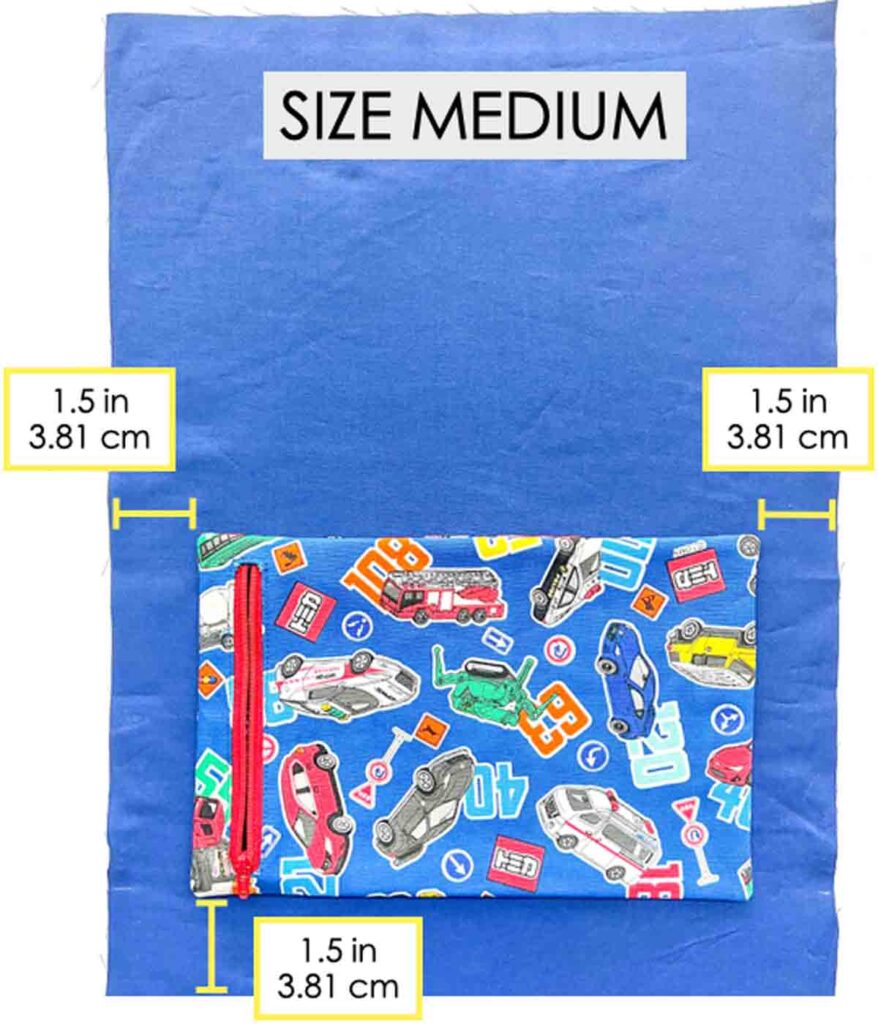
Then place zipper pocket over right side of [EXTERIOR FRONT], 1.5” (3.81cm) from the sides the bottom. Next, pin in place.

Then, make sure that seam allowance of bottom opening is tucked in.

Finally use matching thread and sew zipper pocket to [EXTERIOR FRONT], 1/8” (3mm) from edge of zipper pocket. Make sure you remove pins as you go so you don’t sew over them.


Next, fold side loops in half and place them 1.5” (3.81cm) from bottom of [EXTERIOR BAG], as pictured. Make sure the fold of side loops are pointing towards zipper pocket. Machine Baste in place.
Sewing Backpack Together
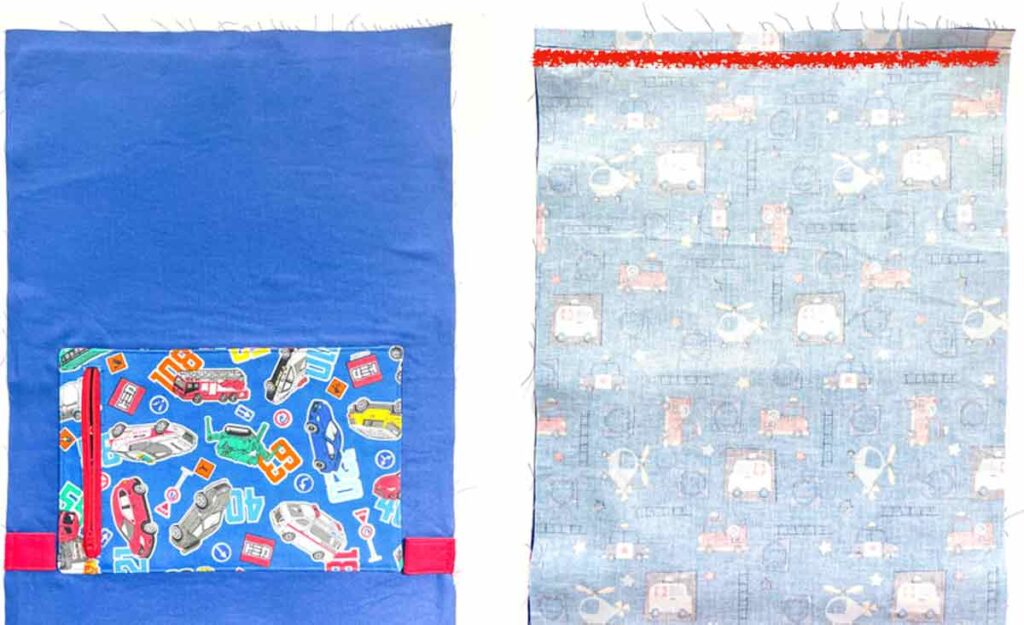
First place [LINING -FRONT PIECE] over [EXTERIOR FRONT], right sides together. Then, pin in place and stitch at 1/2″ (1.27cm) seam allowance.
Next, point seam allowances towards lining and top stitch on lining, 1/8” (3mm) from edge (yellow line).

View of the top stitch. Repeat for sewing [EXTERIOR BACK] and [LINING BACK] together.
Next, place front of bag with back of bag, right sides together.

Make sure to match lining to lining and exterior fabric to exterior fabric. Pin or clip in place.

Now on the lining side, sew together at 1/2” (1.27cm) seam allowance (green line), leaving a 3 – 4 in (7.6 – 10cm) at the bottom. Back stitch on both ends of stitch line.
Next, on the exterior bag, start and stop sewing 1” (2.54cm) from stitch line on the lining side. This 1” gap will become the opening for your drawstring channel. Back stitch a few times to reinforce.

Finally, turn drawstring backpack to right side through opening at the bottom of the lining.
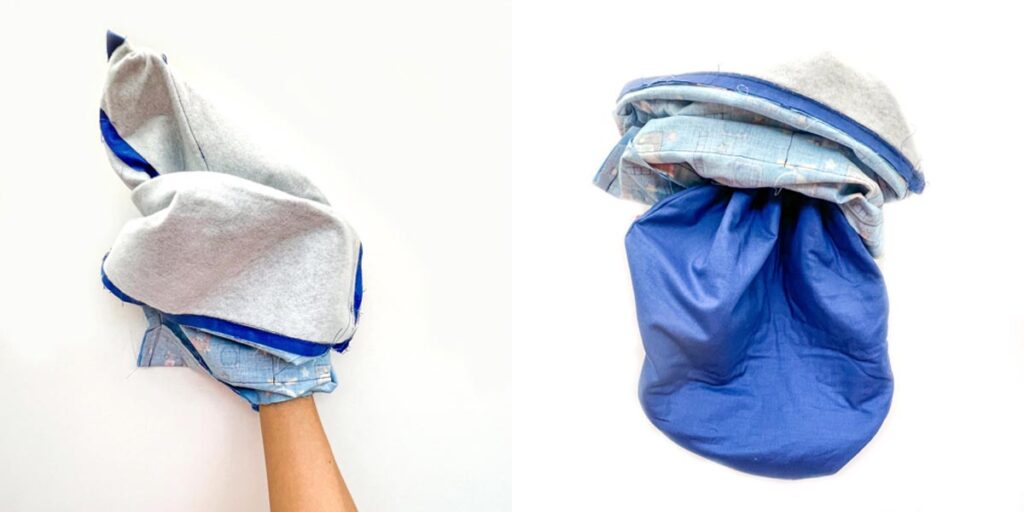
Turn, turn, turn.

View of drawstring backpack turned to the right side. Almost there!
Sewing Drawstring Channel
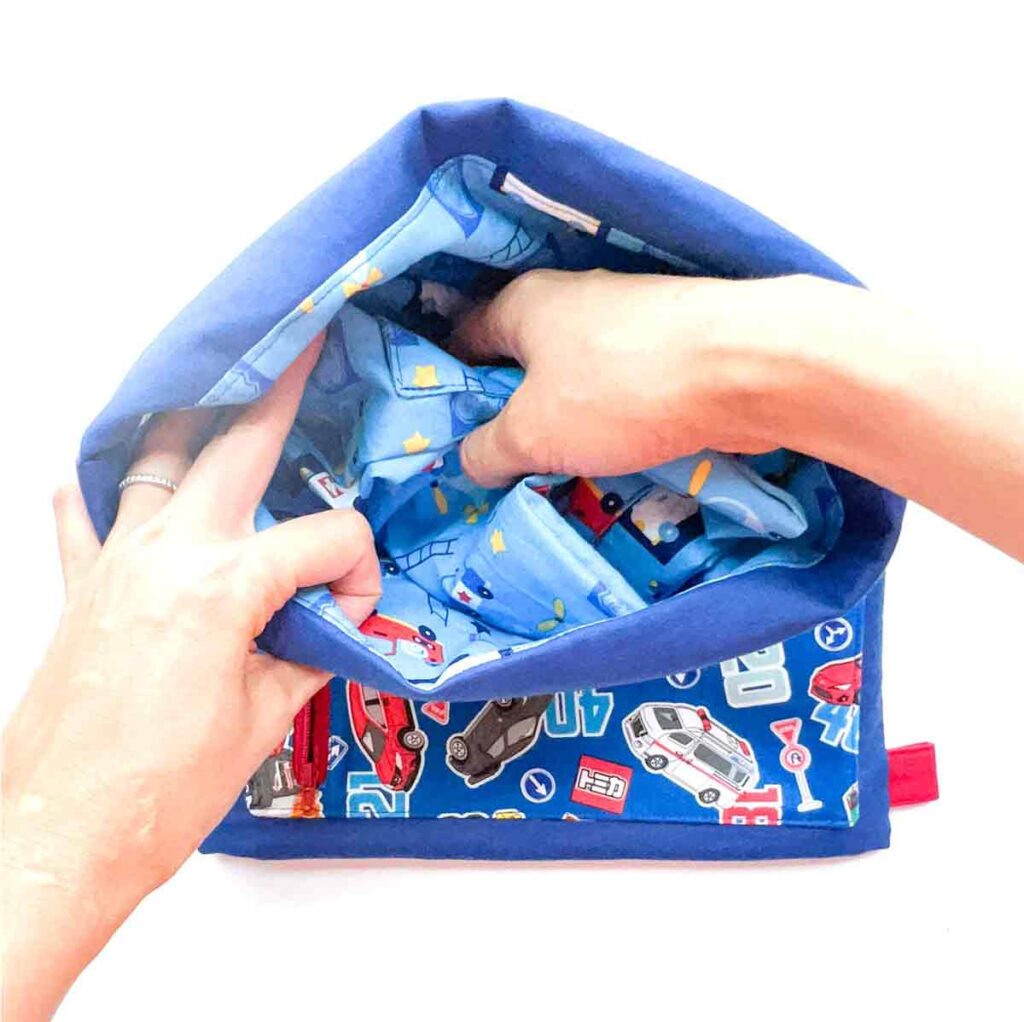
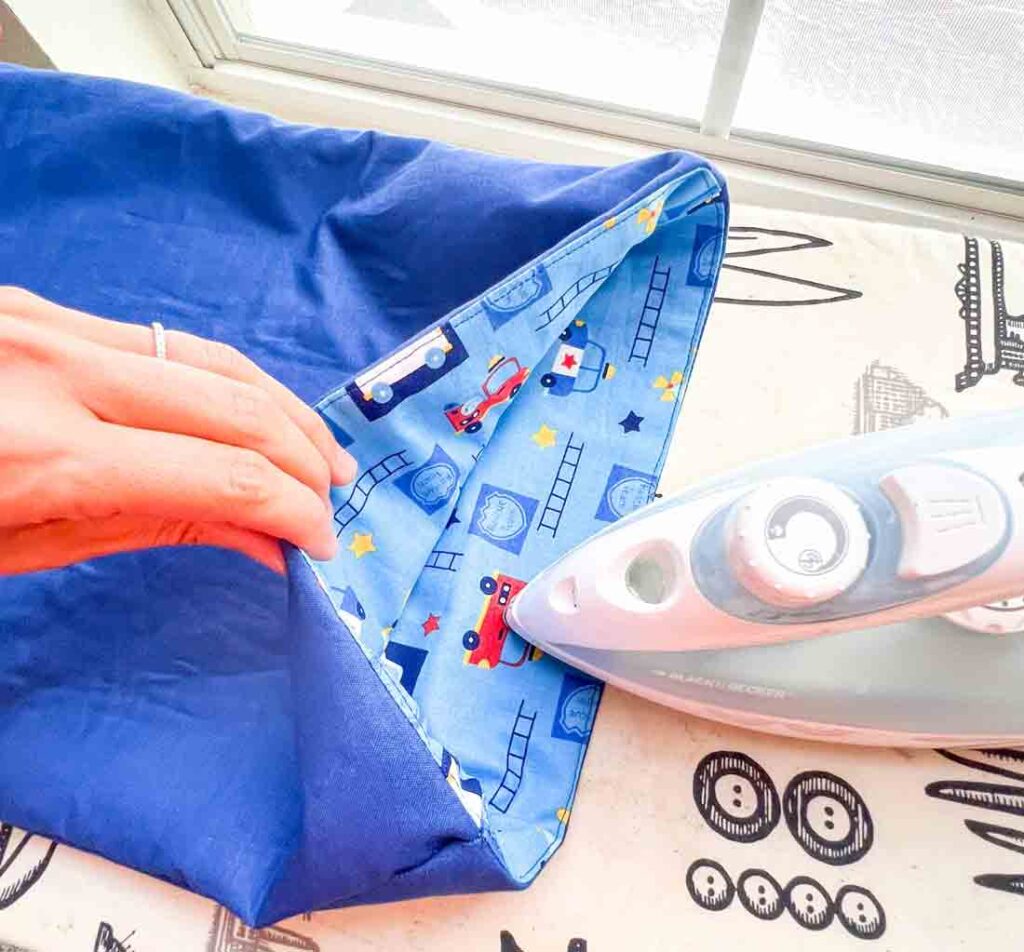
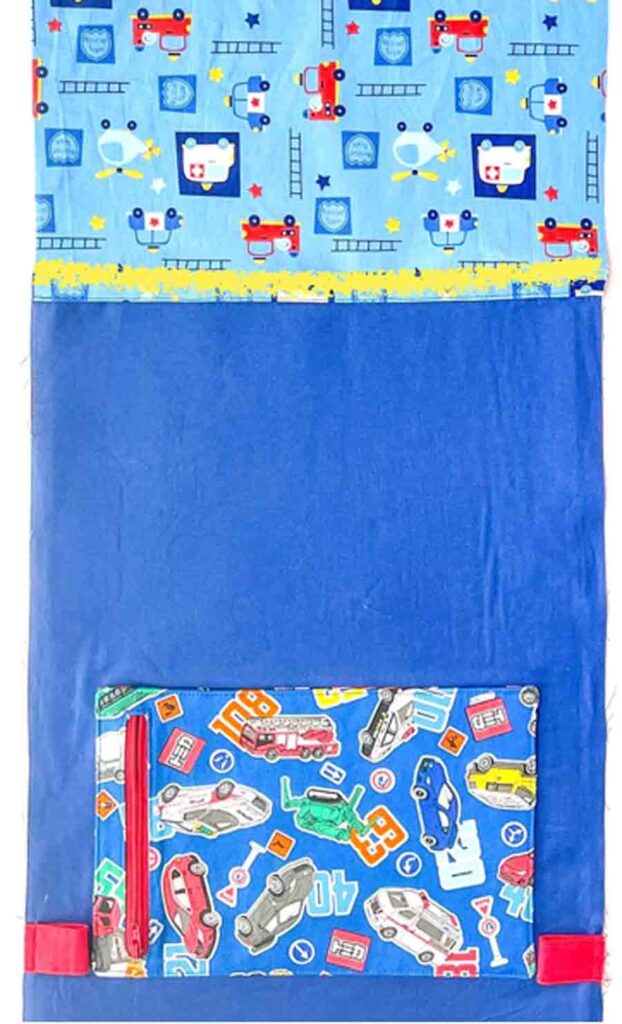
Place bag lining inside drawstring backpack and give it a good press at the top.


Sew a stitch around entire bag, 1” (2.54cm) from top edge. Back stitch on both sides of the drawstring channel openings.
Sewing Top Handle
The top handle is completely optional and up to you if you want to add this feature.
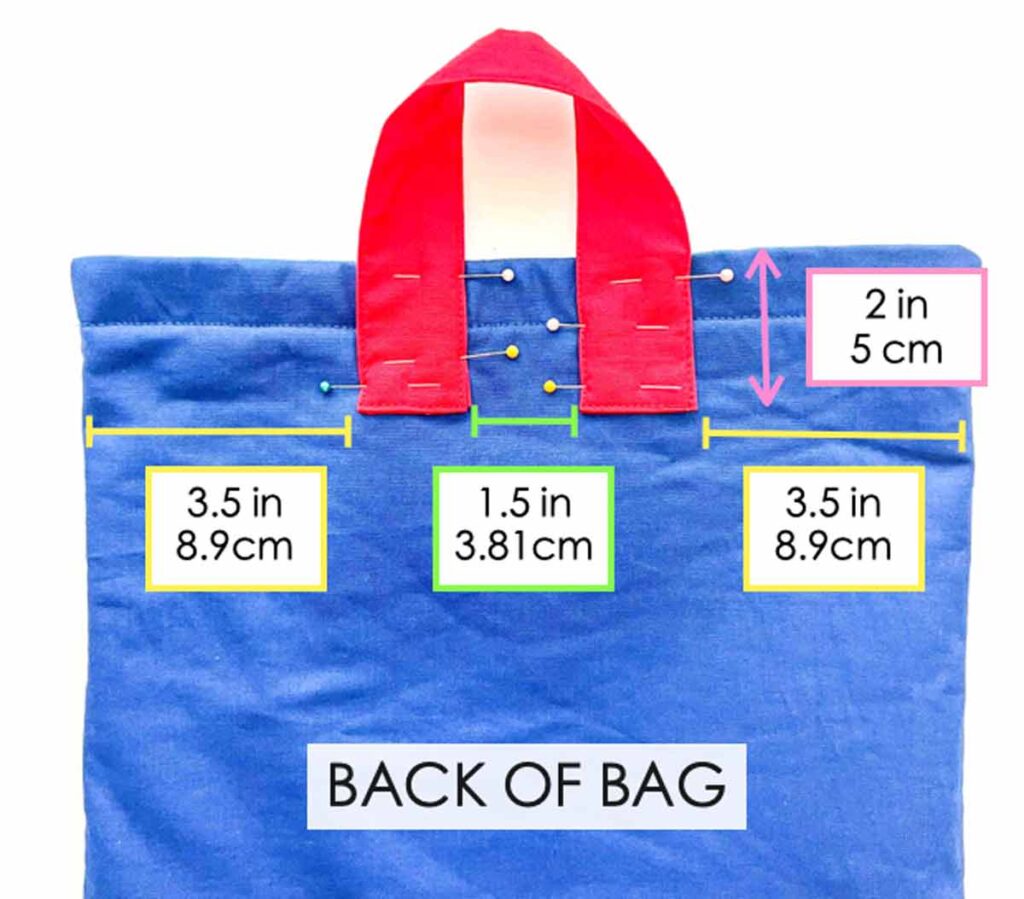
First, pin top handle to back of bag, 3.5” (8.9cm) from the sides and 2” (5cm) from the top. There should be a gap of about 1.5” (3.81cm) between the two ends of the handle.

Next, sew down handle to back of bag by sewing a rectangle with a “X”right below the drawstring channel. Then, sew a straight line across where the handle meets the top of bag (yellow dotted line)
Your drawstring backpack is finished! Whoo hoo! Now we just have to thread in the drawstrings.
How to Thread Drawstring Cord


First, thread drawstring by inserting bodkin into one side of bag, looping around the drawstring channel, and coming out the same side (see red arrows).

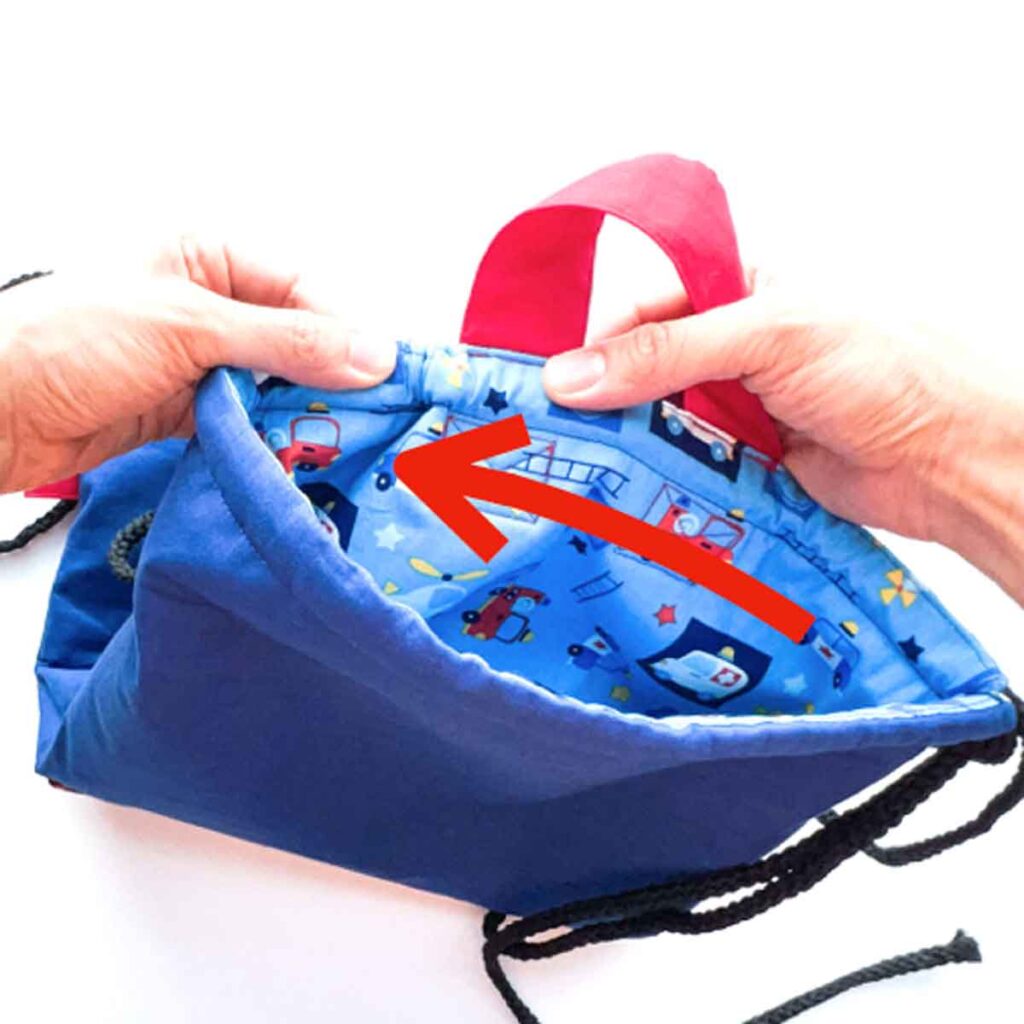
Second, repeat threading drawstring on other side in the same way.

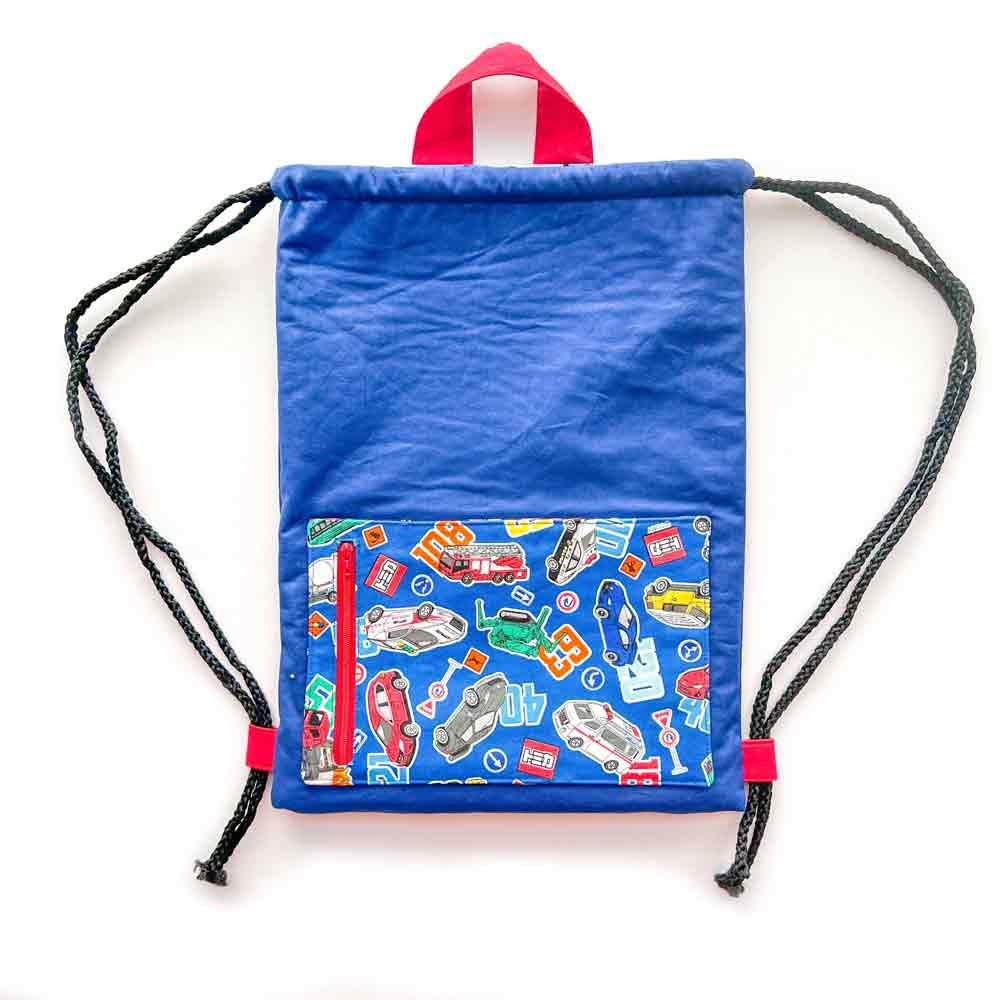
Tada! Your bag will look something like this when the drawstrings are both correctly threaded.

Now use the bodkin to thread the drawstring through the side loops.

Next, determine if you need to shorten the drawstring cords. Once you are happy with the length, tie a knot at the end and cut off the excess cord if necessary.
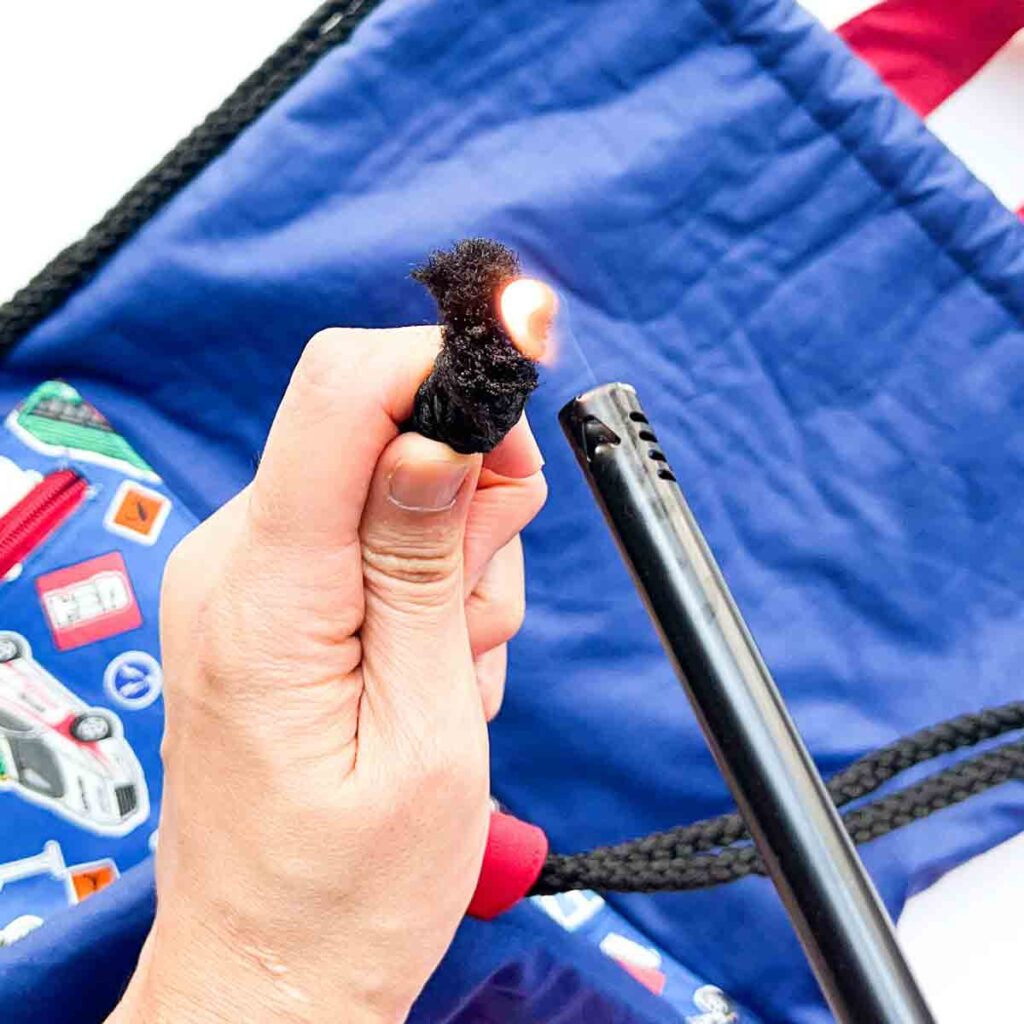
Next, use a lighter to burn the ends of the drawstring cord. This helps to “seal”the cord so it doesn’t continue to fray. Please note that this only works on cords that are labeled “Heat Fusible” such as the one I used. Also note that 100% cotton cord is NOT heat fusible.

Finally, close opening in lining using invisible ladder stitch.
You are done! Yay! Good job!!!
Drawstring Backpack Pattern with Zipper Pocket PDF
Want this tutorial in a PDF format that’s ready-to-print and ad-free? You can purchase the PDF sewing tutorial in our our Etsy Shop. This way, you can print a copy in a breeze to keep by your sewing machine for easy reference.

The PDF sewing pattern also includes measurements for making a medium sized backpack (the one shown in this free tutorial) and a large sized backpack. You will also receive a separate 14 page PDF tutorial showing you step-by-step how to make the backpack with a color blocked drawstring channel. Additionally, drawstring backpack pattern is boxed at the bottom so that you can store more items.
How to Make a Drawstring Backpack (With Zipper Pocket)

This simple drawstring backpack is fully lined and comes with a front zipper pocket. Perfect for sports, beaches, and other activities!
Materials
- EXTERIOR FABRIC - 1/2 YARD (0.46M)
- LINING FABRIC - 1/2 YARD (0.46M)
- ZIPPER POCKET FABRIC - 1/2 YARD (0.46M)
- FABRIC FOR SIDE LOOPS & TOP HANDLE - 1/8 YARD (0.125M)
- FUSIBLE INTERFACING - 1/4 YARD (0.23M)
- FUSIBLE FLEECE - 3/4 YARD (0.7M)
- 7" ZIPPER
- DRAWSTRING CORD - 2 PIECES EACH MEASURING 55" - 65" (140CM - 164CM)
- MATCHING THREAD
- BASTING ADHESIVE
Tools
- HOME SEWING MACHINE
- FABRIC SCISSORS
- SEWING PINS or
- SEWING CLIPS
- POINT TURNER
- BODKIN
- HAND SEWING NEEDLES
- LIGHTER - to seal ends of drawstring cord
- IRON - for pressing
Instructions
- First, on the [ZIPPER POCKET - FRONT PIECE], draw a rectangular box.
• Left side of rectangle is 1.25” (3.1cm) away from left edge.
• Top and bottom of rectangle is 1” (2.54cm) away from top and bottom edge - Next, draw a “>———
- Cut along the “>———
- Fold fabric along rectangular box to form an opening on [ZIPPER POCKET - FRONT PIECE]. Press rectangle box open and repeat pressing on wrong side of fabric.
- Place zipper right side up. To the left of zipper place [ZIPPER POCKET LINING - PIECE A] wrong side up.
- To the right, place [ZIPPER POCKET LINING - PIECE B] wrong side up, see note 1
- Open the zipper. Then pin right side of [POCKET LINING - PIECE B] to wrong side of zipper, see note 2
- Repeat by pinning right side of [POCKET LINING - PIECE A] to other side of zipper.
- Use a zipper foot and sew zipper to POCKET LINING PIECE A and PIECE B
- Now close zipper and press zipper and fabric.
- Lay your zipper with fabric so the wrong side of fabric faces up.
- Place [ZIPPER POCKET - FRONT PIECE] right side up, on top of [POCKET LINING PIECE B].
- Line up rectangle opening with your zipper, and line up the sides of [ZIPPER POCKET -FRONT PIECE] with sides of [POCKET LINING PIECE B], see note 3.
- Now apply basting adhesive to wrong side of rectangle opening. Spray the adhesive over a cardboard or scratch paper to protect your work surface. Make sure you apply just enough over the opening, don’t over apply or else your fabric will become very sticky.
- Baste [ZIPPER POCKET - FRONT PIECE] to zipper. Keep [POCKET LINING PIECE A] opened and away from [POCKET LINING PIECE B].
- Use a matching thread and stitch zipper to the rectangular opening, 1/8” (3mm) from edge. Keep [POCKET LINING PIECE A] away as you don’t want to sew on it just yet.
- Now take your zipper pocket and lay it out flat again (so that Lining Piece A and Lining Piece B are opened away from each other).
- Pinch and fold [POCKET LINING PIECE A] where it meets [ZIPPER POCKET-FRONT PIECE].
- Keep folding [POCKET LINING PIECE A] so that it is now behind [ZIPPER POCKET -FRONT PIECE].
- Now check if there is any excess lining fabric that extends beyond [ZIPPER POCKET - FRONT PIECE]. Trim as necessary.
- Machine baste the entire zipper pocket together
- Then, place [ZIPPER POCKET - BACK PIECE] over, right sides together and sew together at 1/2” (1.27cm) seam allowance, leaving an ~3” (7.5cm) opening at the bottom.
- Trim seam allowance, excess zipper, and cut a diagonal at all the corners.
- Turn zipper pocket to right side through opening.
- Poke out all the corners with point turner.
- Give your zipper pocket a good press. Make sure to press in the seam allowance at the opening you left. We will stitch it close when we sew the zipper pocket to the rest of the bag.
- Apply fusible interfacing to wrong side of handle and loop fabric.
- Next, press in 1/2” (1.27cm) seam allowance on top and bottom of [SIDE LOOP PIECE].
- Fold loop strap in half and press.
- Stitch both sides of side loop piece at 1/8” (3mm) from edge.
- Fold your side loop piece in half lengthwise, then cut. You will now end up with two side loops that measure 1” wide by 3”long.
- For the [TOP HANDLE PIECE] first press in 1/2” the side seam allowances.
- Press top seam allowance down and then press bottom seam allowance up.
- Once all the seam allowances are pressed in, fold top handle piece in half (along the width) and press.
- Stitch around entire handle piece, 1/8” (3mm) from the edges.
- Apply fusible fleece to wrong side of [EXTERIOR FRONT] and [EXTERIOR BACK].
- Place zipper pocket over right side of [EXTERIOR FRONT]. 1.5” (3.81cm) from the sides and bottom. Pin in place. Make sure that seam allowance of opening is tucked in.
- Use matching thread and sew zipper pocket to [EXTERIOR FRONT], 1/8” (3mm) from edge of zipper pocket. Make sure you remove pins as you go so you don’t sew over them
- Fold side loops in half and place them 1.5” (3.81cm) from bottom of [EXTERIOR BAG]. Make sure the fold of side loops are pointing towards zipper pocket. Machine baste in place.
- First place [LINING FRONT] over [EXTERIOR FRONT], right sides together. Pin in place and stitch at 1/2" (1.27cm) seam allowance
- Point seam allowances towards lining and top stitch on lining, 1/8” (3mm) from edge.
- Repeat for sewing [EXTERIOR BACK] and [LINING BACK] together.
- Place front of bag with back of bag, right sides together. Make sure to match lining to lining and exterior fabric to exterior fabric. Pin or clip in place.
- Sew LINING together at 1/2” (1.27cm) seam allowance leaving a 3 - 4 in (7.6 - 10cm) at the bottom. Back stitch on both ends of stitch line.
- On the exterior bag, start and stop sewing 1” (2.54cm) from the lining. This 1” gap creates the opening for drawstring channel. Back stitch a few times to reinforce.
- Finally, turn drawstring backpack to right side through opening at the bottom of the lining.
- Place bag lining inside drawstring backpack and give it a good press at the top.
- Sew a stitch around entire bag, 1” (2.54cm) from top edge. Back stitch on both sides of the drawstring channel openings.
- Pin top handle to back of bag, 3.5” (8.9cm) from the sides and 2” (5cm) from the top. There should be a gap of about 1.5” (3.81cm) between the two ends of the handle.
- Sew down handle to back of bag by sewing a rectangle with a “X”right below the drawstring channel. Then, sew a straight line across where the handle meets the top of bag (yellow dotted line)
- Thread drawstring by inserting bodkin into one side of bag, looping around the drawstring channel, and coming out the same side.
- Repeat threading drawstring on other side in the same way.
- Use the bodkin to thread the drawstring through the side loops.
- At this time, determine if you need to shorten the drawstring cords. Once you are happy with the length, tie a knot at the end and cut off the excess cord if necessary.
- Finally, use a lighter to burn the ends of the drawstring cord. This helps to “seal”the cord so it doesn’t continue to fray. Please note that this only works on cords that are labeled "Heat Fusible" such as the one I used. Also note that 100% cotton cord is NOT heat fusible.
- Close opening in lining using invisible ladder stitch.
First, cut out all fabric and interfacing pieces according to pattern dimensions listed.
MAKING RECESSED ZIPPER POCKET
HOW TO MAKE TOP HANDLE AND SIDE LOOPS
SEWING ZIPPER POCKET AND SIDE LOOPS TO BAG
SEWING BACKPACK TOGETHER
SEWING DRAWSTRING CHANNEL
SEWING TOP HANDLE
The top handle is completely optional and up to you if you want to add this feature.
HOW TO THREAD DRAWSTRING CORD
Notes
Note 1: [ZIPPER POCKET LINING PIECE A] is wider than [ZIPPER POCKET LINING PIECE B]. Piece A is placed on left side of the zipper, and piece B is placed to the right of zipper.
Note 2: Make sure you are pinning RIGHT SIDE of fabric to WRONG SIDE of zipper.
Note 3: These two steps help you determine where you need to place [ZIPPER POCKET -FRONT PIECE] over the zipper and [POCKET LINING PIECE B].
More Easy Sewing Projects You will Love!

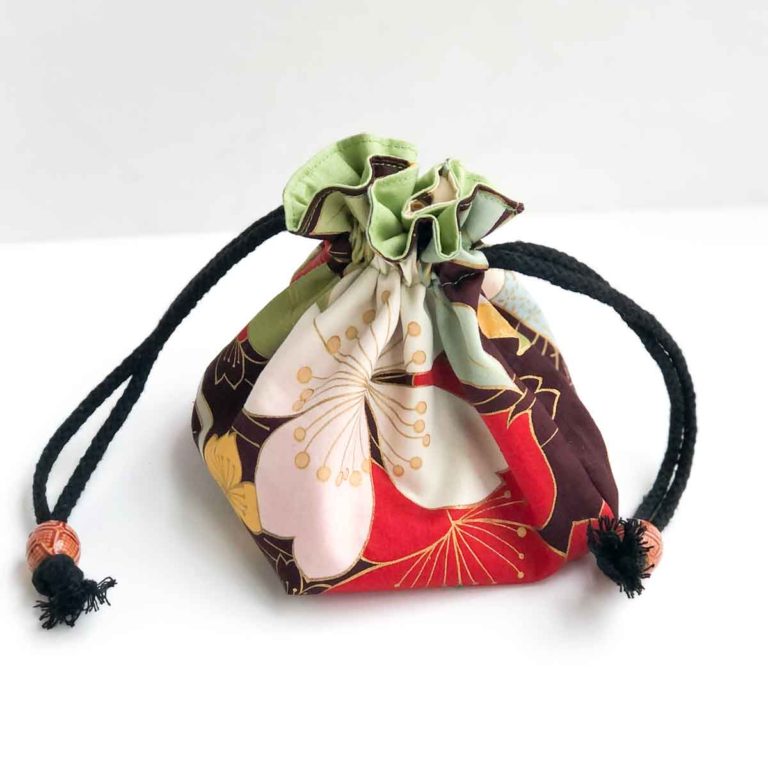
A simple drawstring pouch with 8 pockets to keep your jewelries organized on-the-go.

This easy to sew towel topper will keep all your towels off the floor!
Learn how to sew fabric baskets to keep your home organized and tidy.