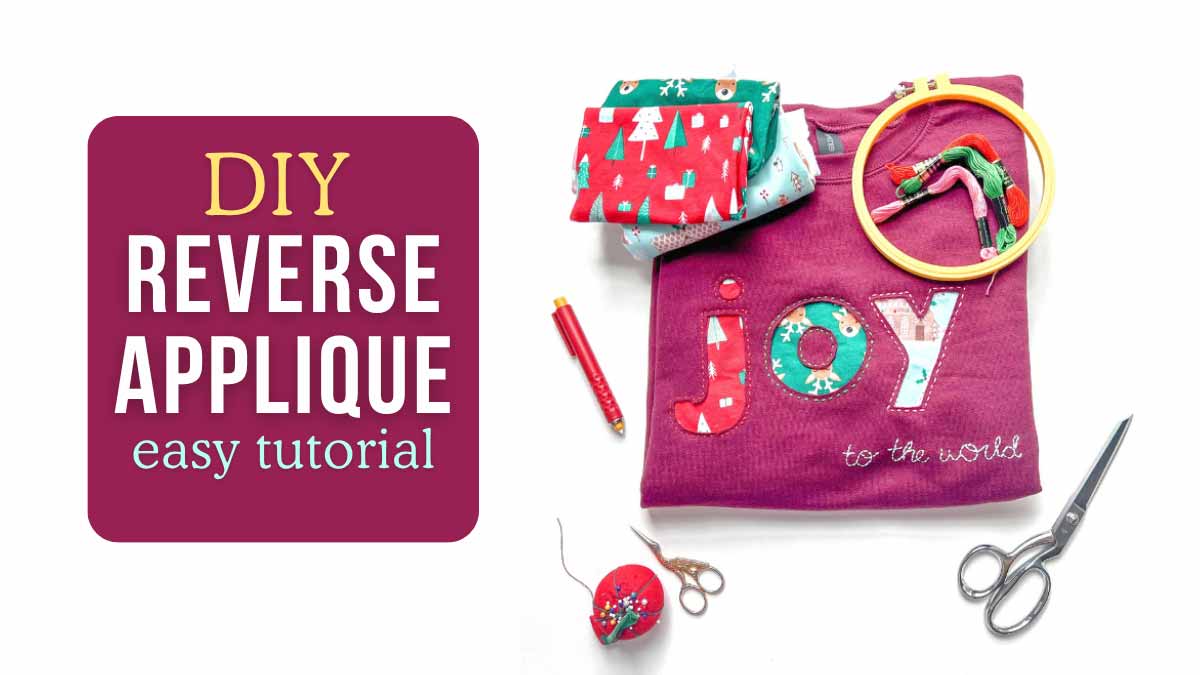
How to Reverse Applique for Beginners: Easy Step-by-Step Tutorial
Want to give a plain sweatshirt a fun, personalized makeover? Reverse appliqué is an easy sewing technique that can turn a basic sweatshirt into a one-of-a-kind piece.
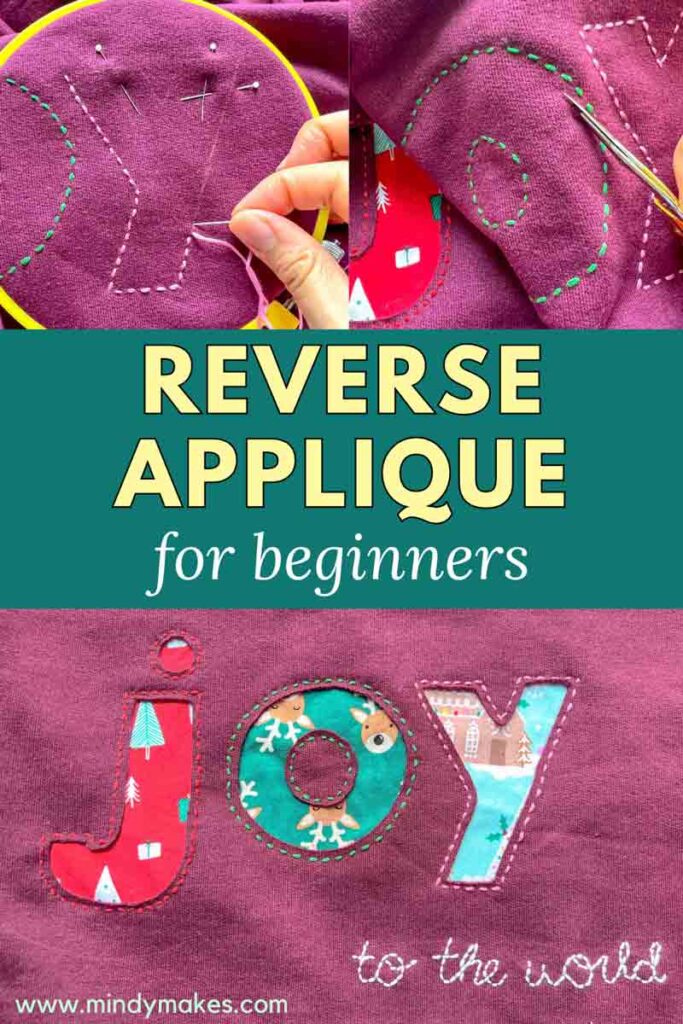
I love adding applique to my projects (especially letters) to give it a personalized look.
Awhile back I posted a post about How to Sew Letters Onto Fabric and that is still one of my favorite ways to add lettering to sewing projects. This is such a wonderful way to make personalized gifts for friends and family!
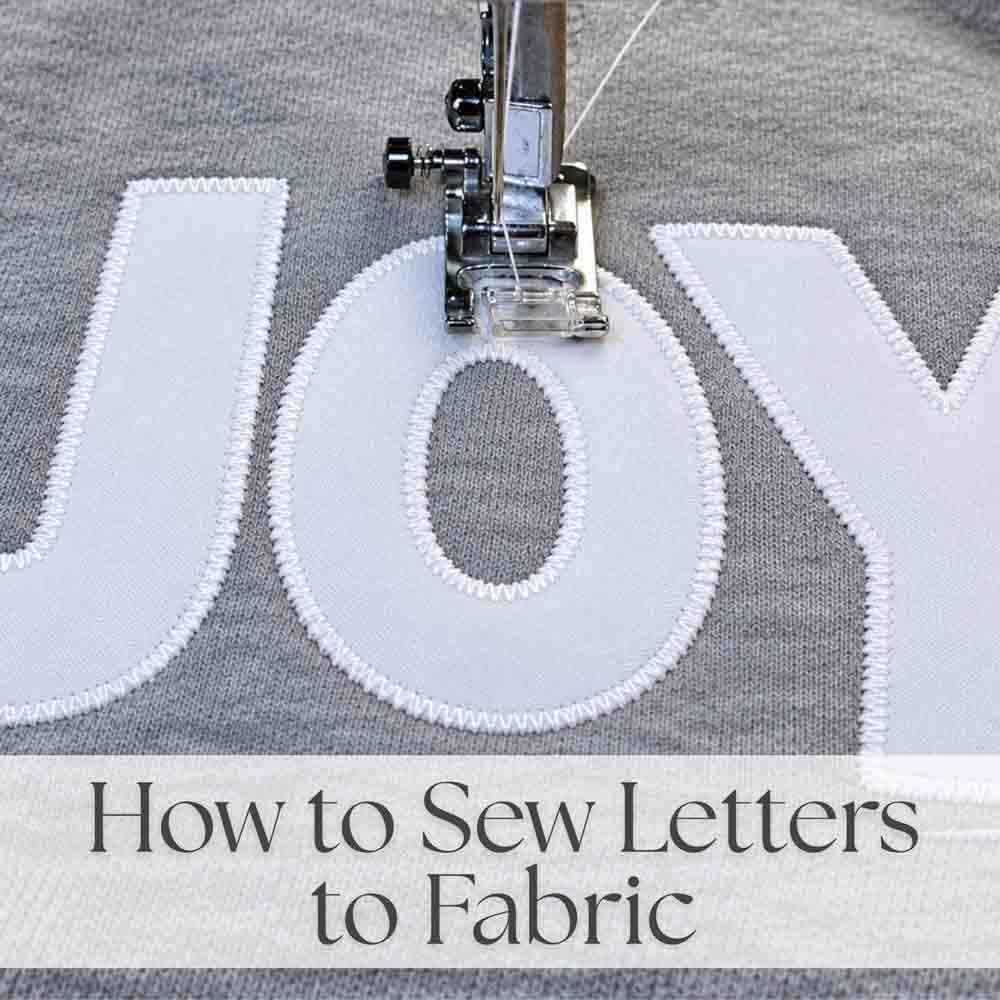
However, there are actually many other ways of adding applique to your sewing project! Today I’m going to show you another fun and simple way called reverse applique.
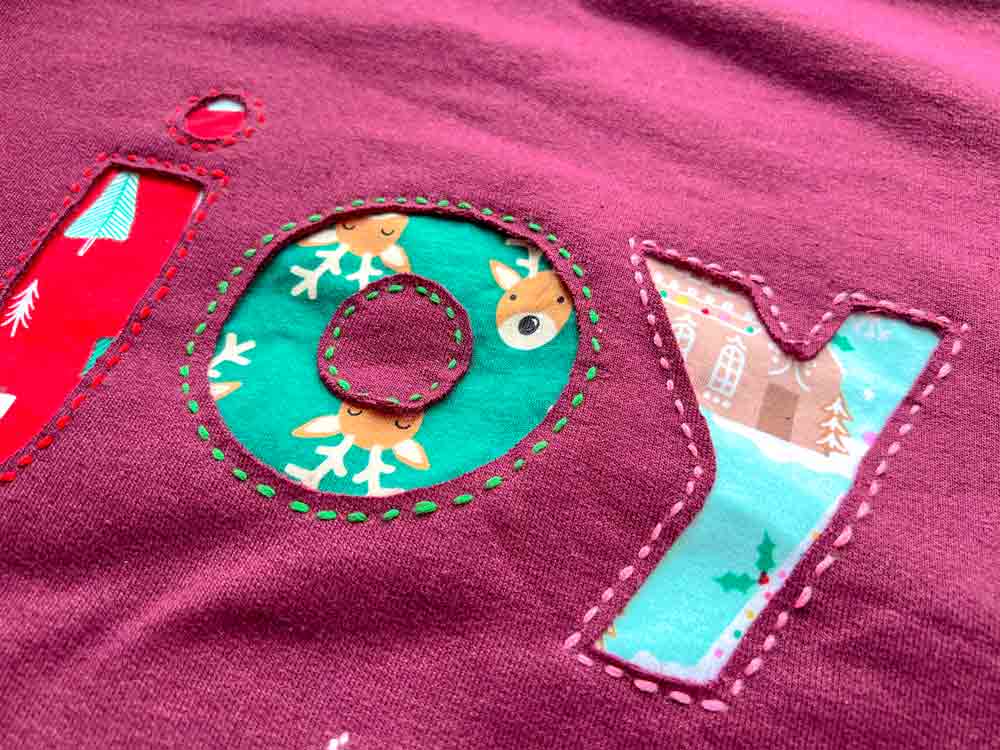
In reverse applique, as the name implies, instead of sewing fabric on top of your sweatshirt, you put a contrasting fabric behind an opening cut into the sweatshirt fabric, creating a colorful peek-through design.
It’s a great beginner sewing project and a fun way to customize sweatshirts for yourself, kids, holidays, or gifts!
What Is Reverse Appliqué?
Reverse appliqué is an appliqué technique where the decorative fabric is placed underneath the main fabric rather than on top. After sewing the decorative fabric behind, the main fabric is then cut out to create a colorful peek-through design.
How to Do Reverse Applique on a Sweatshirt?
The basic step-by-step is as follows:
- Place a contrasting fabric behind the sweatshirt.
- Transfer your design onto the sweatshirt.
- Stitch around the design.
- Carefully cut away the sweatshirt fabric inside the stitched area.
- The fabric underneath is revealed through the opening.
The result is a colorful design that peeks through the sweatshirt.
What Do You Need For Reverse Applique?
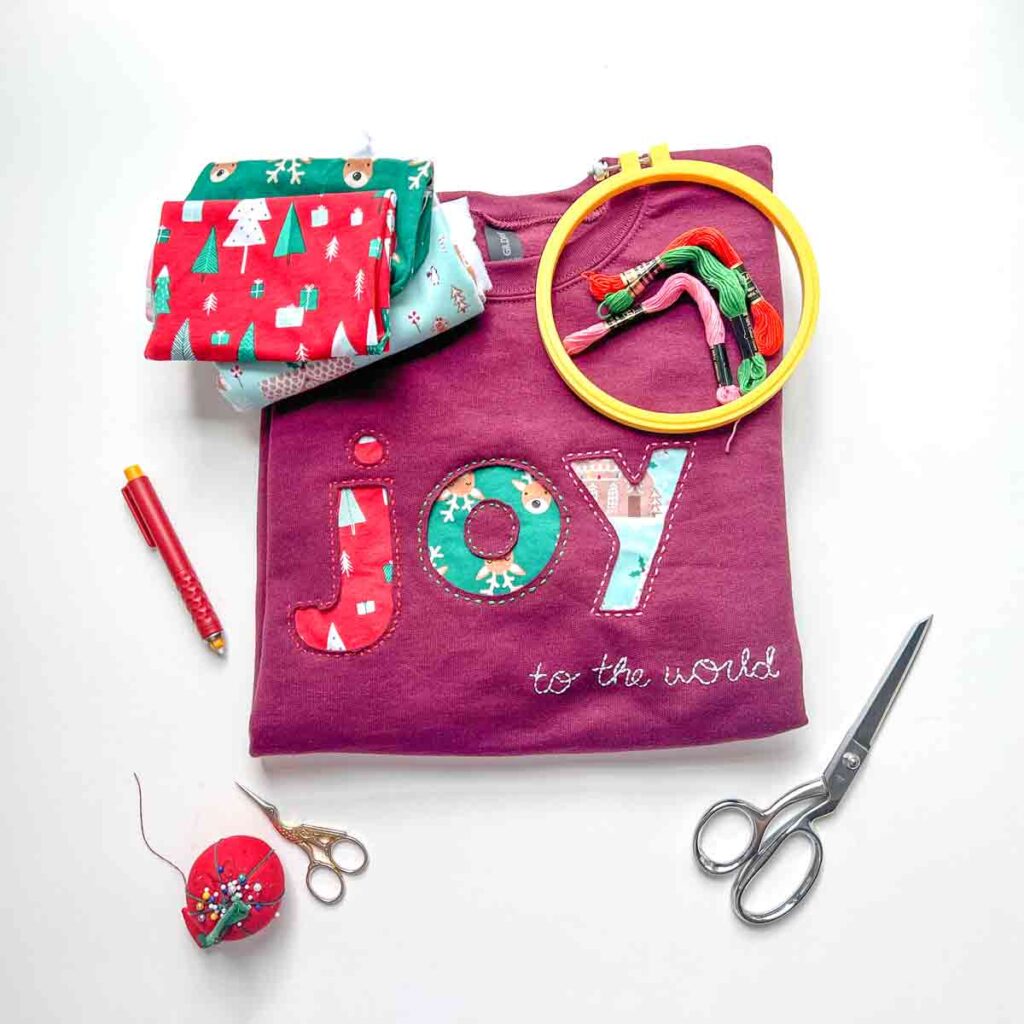
Reverse appliqué is a simple sewing technique that doesn’t require a lot of supplies. To get started, you’ll need the following:
- PLAIN SWEATSHIRT
- COTTON FABRIC
- EMBROIDERY FLOSS
- PAPER PATTERN
- FUSIBLE INTERFACING
- FABRIC SCISSORS or EMBROIDERY SCISSORS
- SEWING PINS
- CLEAR RULER
- FABRIC CHALK
- HAND SEWING NEEDLES
- EMBROIDERY HOOP – optional, but makes hand embroidering easier.
- IRON – for pressing. I love my Rowenta Iron with Retractable Cord for easy storage.
Choosing Your Fabrics
The easiest way to make your reverse appliqué stand out is to choose fabrics with plenty of contrast.
For example, try:
- Burgundy sweatshirt + white fabric
- Black sweatshirt + colorful floral fabric
- Gray sweatshirt + bright pink fabric
- Navy sweatshirt + red fabric
- White sweatshirt + colorful patterned fabric
Cotton quilting fabric works particularly well for the fabric underneath the sweatshirt because it is easy to cut and sew.
Step 1: Choose Your Design
Start by choosing the design you want to add to your sweatshirt.
Simple designs are easiest when you’re first learning reverse appliqué. Some ideas include:
- Names
- Initials
- Words
- Hearts
- Stars
- Flowers
- Pumpkins
- Christmas trees
- Snowflakes
- Animals
- Simple geometric shapes
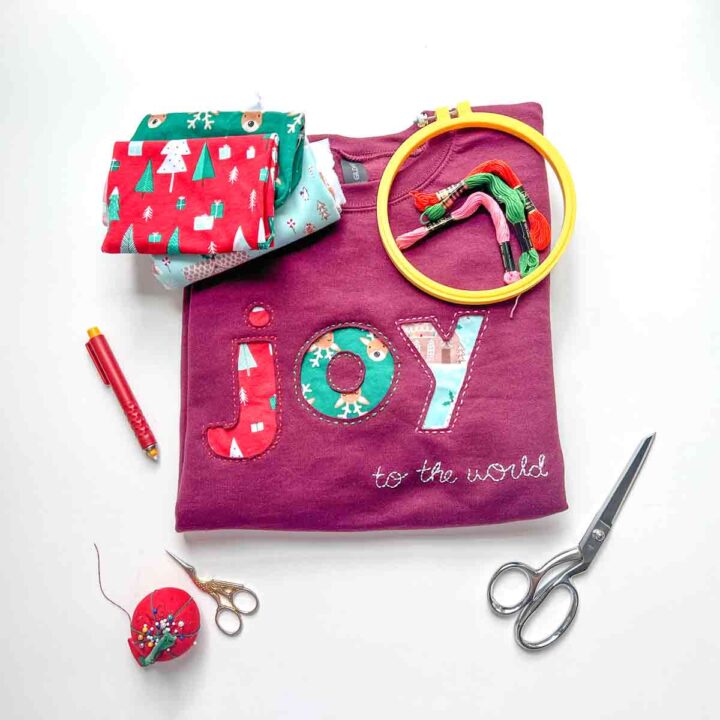
In this tutorial, I am going to show you how to reverse applique with a simple “joy” lettering design.
I chose to print the letters from the computer because I thought it was neater. However, you can freehand draw out the letters if you like.
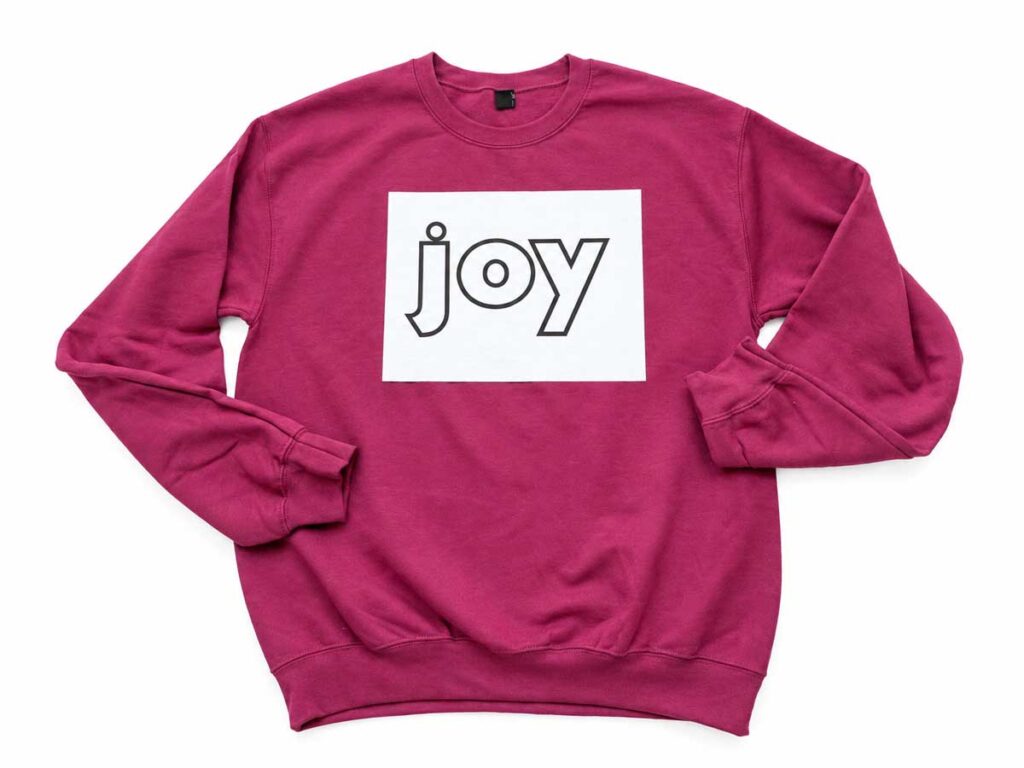
In this example I used Canva to create the letters. The letters are lower case Gill Sans Display font in size 400. (This is a medium sized Gildan Heavy Blend Sweatshirt in Maroon).
NOTE: When choosing letters, remember that the design will be cut out of the sweatshirt. Fonts with thick, simple letters are easier to work with than very thin or intricate fonts.
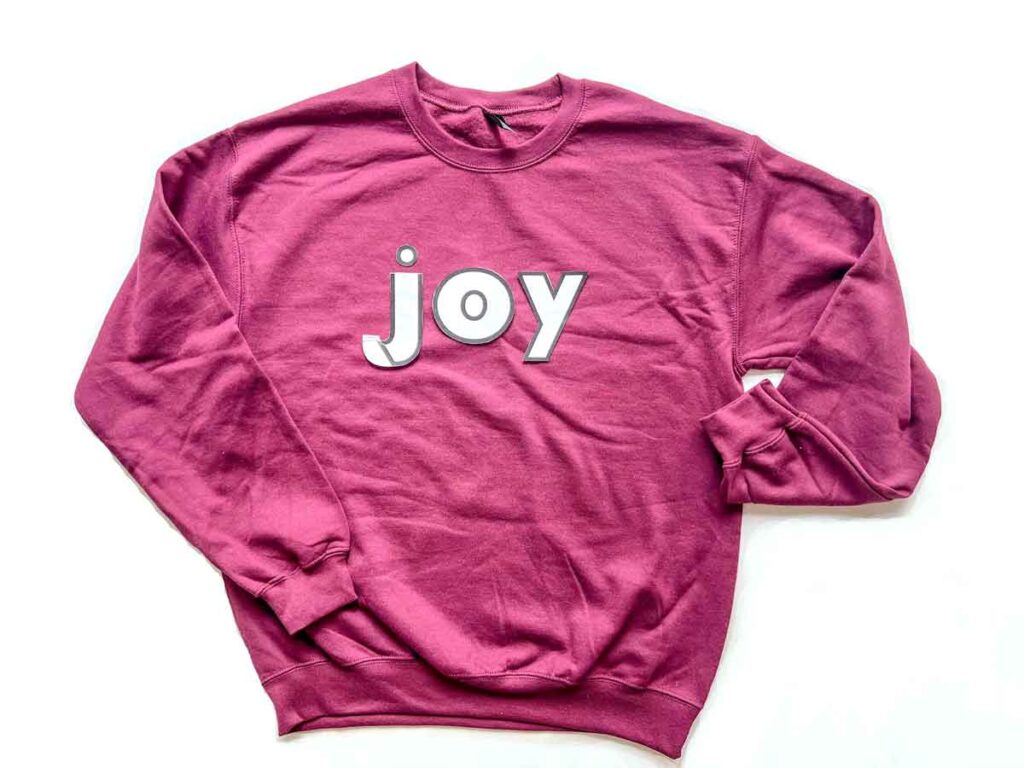
However, in the end I still modified the letter ‘j’ from the original font as I wanted a curve in my j. Next, cut out all the letters and place them on the sweatshirt exactly how you want them to appear.
Step 2: Preparing Your Design and Fabric
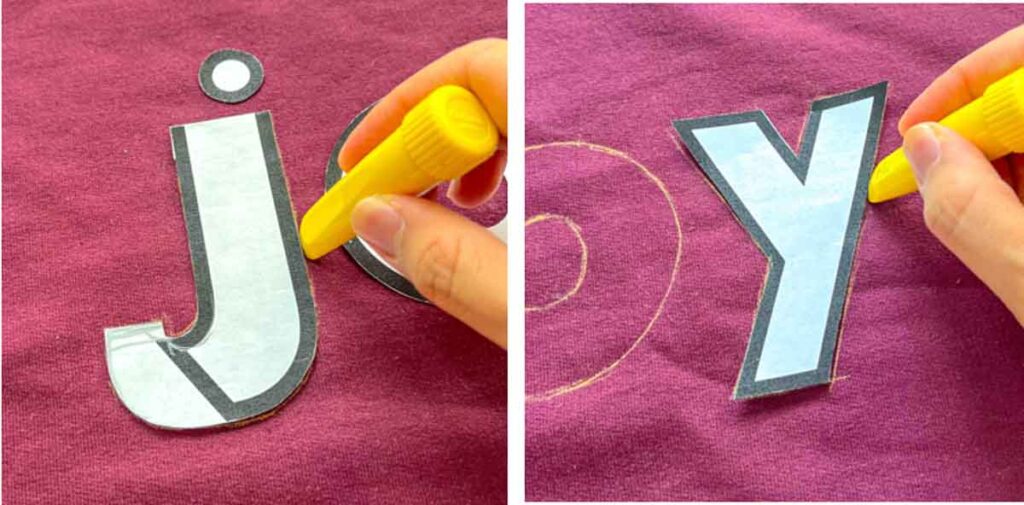
Once you are happy with the placement of the letters/design. Use fabric chalk to trace the outline onto the sweatshirt.
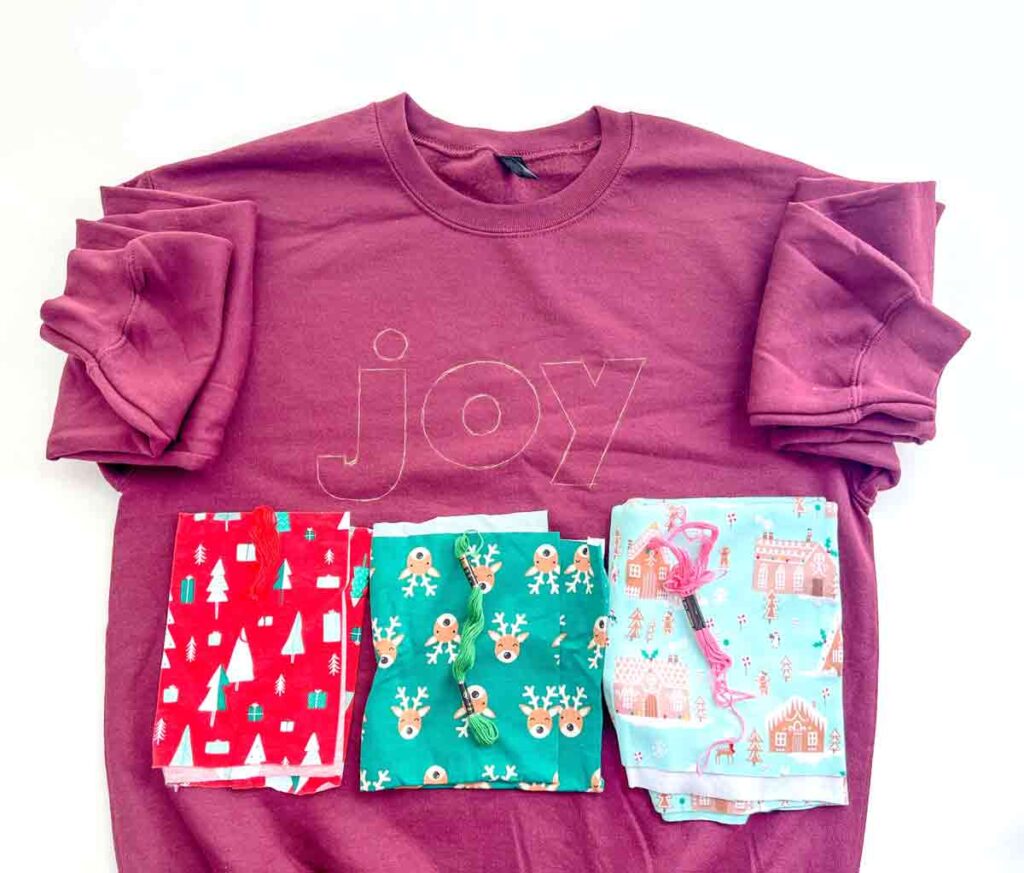
Next, choose the fabric and embroidery floss you want to use for each of the letters. In the photo it’s hard to see, but I chose red embroidery floss for the letter “j”, on the left.
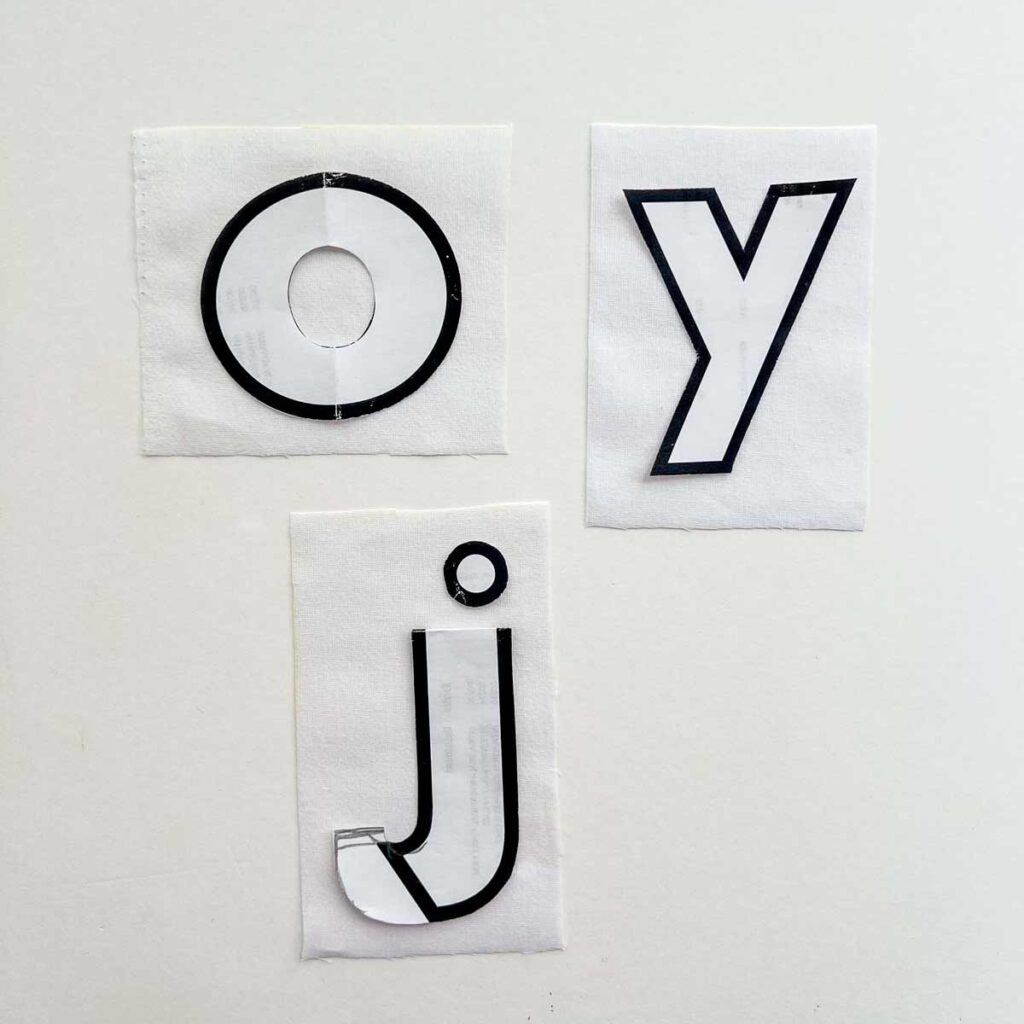
Then, cut out a piece of fusible interfacing that is at least 3/4 – 1 inch (1.9 – 2.54 cm) beyond the borders of each letter.
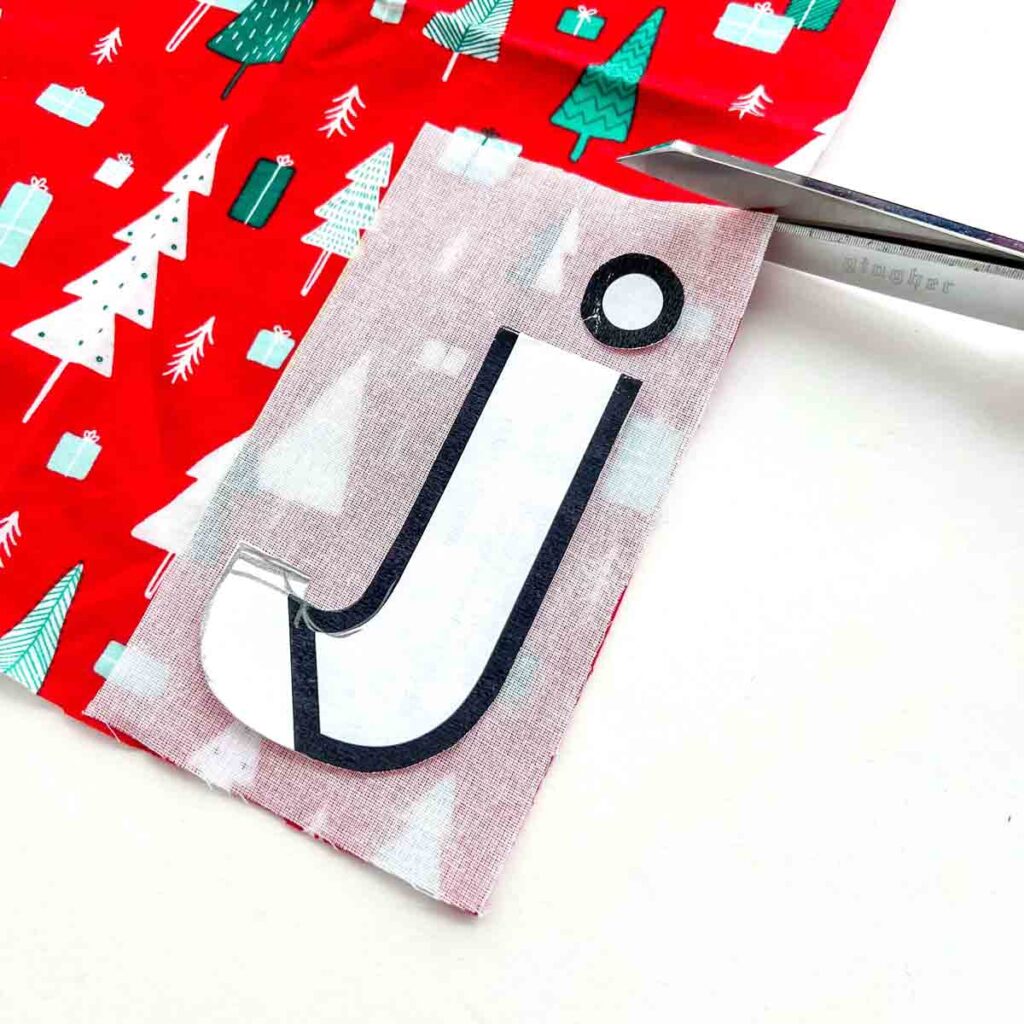
Next, cut out cotton fabric according to size of interfacing.
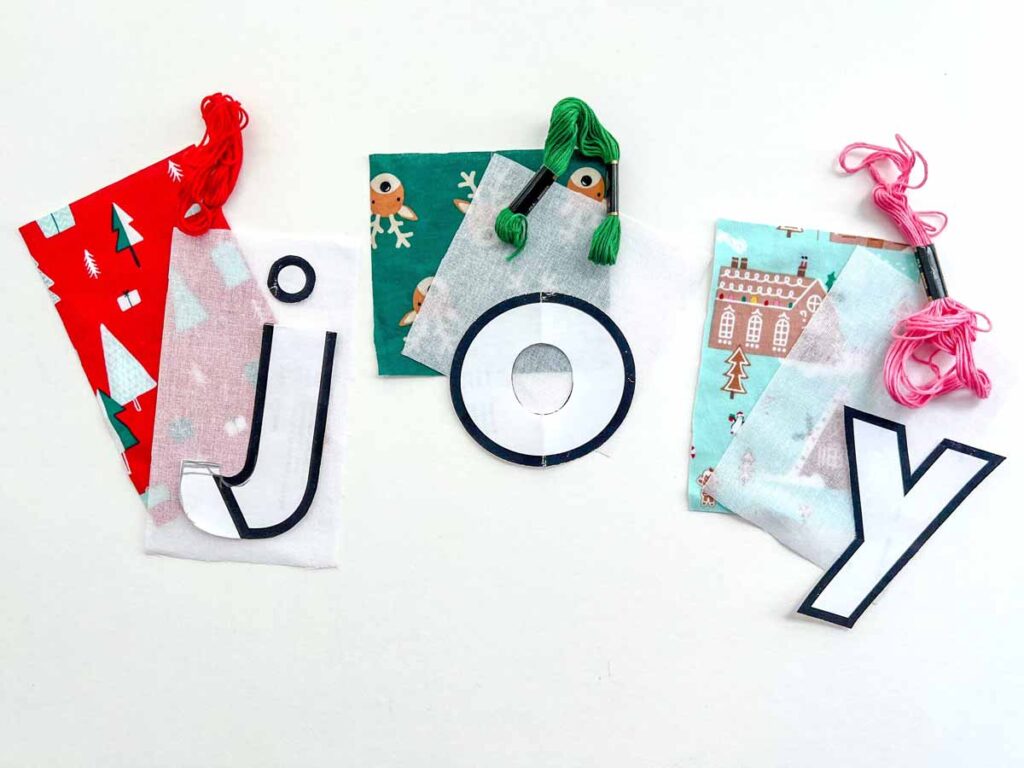
Now repeat cutting out fabric for all letters of your reverse applique.
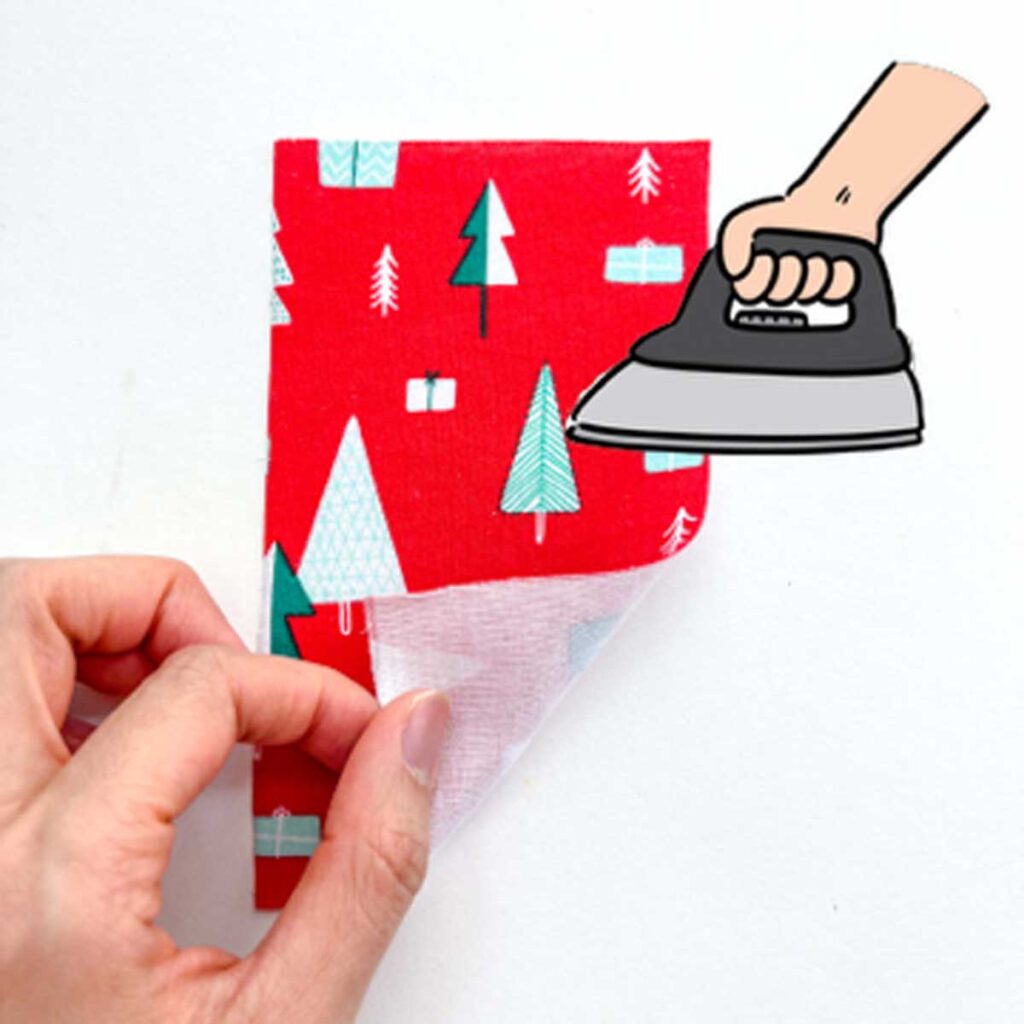
Next, iron fusible interfacing to wrong side of fabric.
Step 3: Position the Applique Fabric
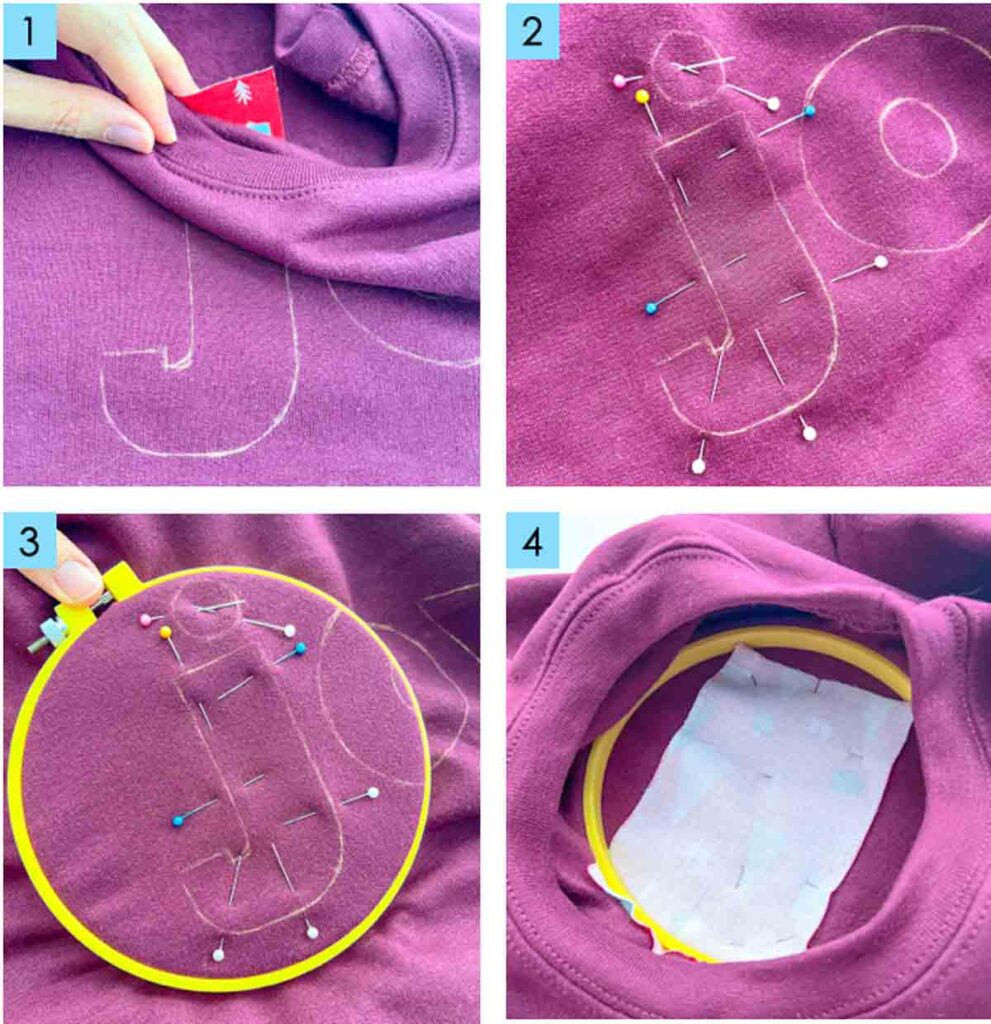
- Tuck the contrasting fabric behind the traced letter, right side up. Make sure the fabric extends past the letter on all sides.
- Pin fabric to front of sweatshirt.
- Place an appropriate sized embroidery hoop around where you will be sewing.
- Contrasting fabric viewed from wrong side of sweatshirt.
Step 4: Stitch Around the Design
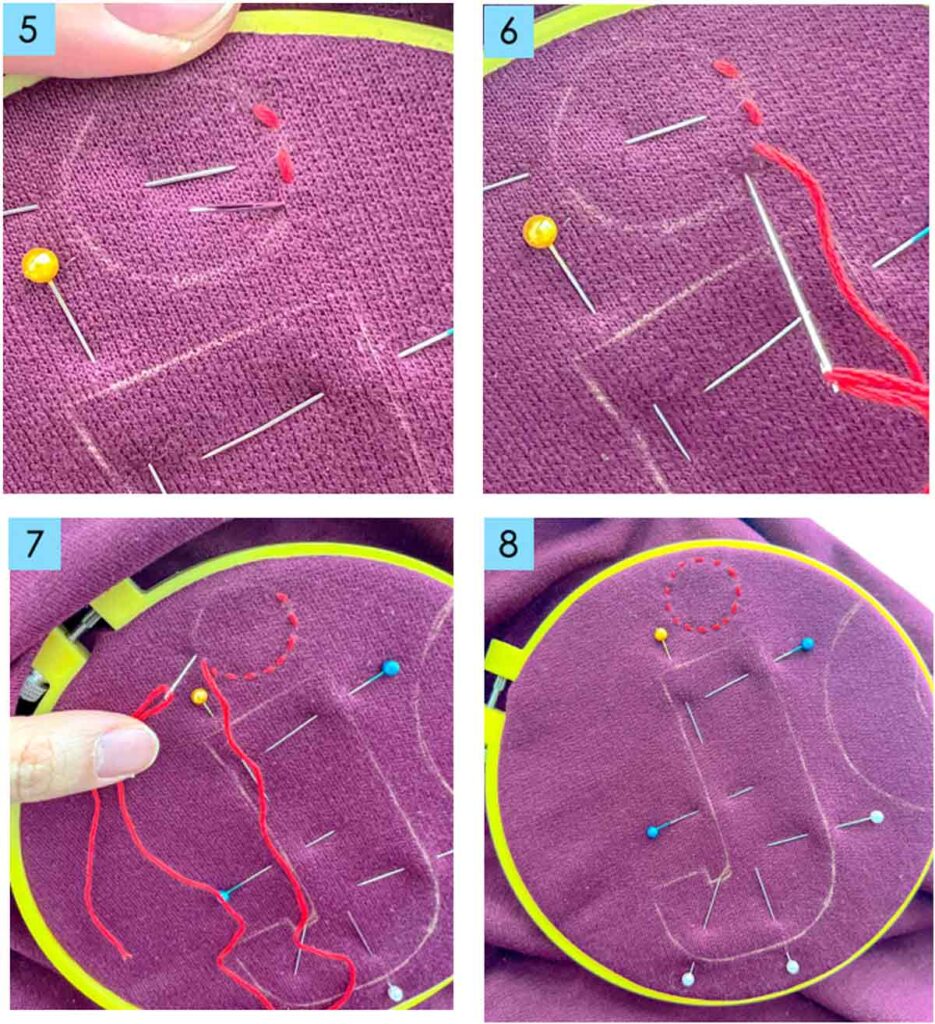
Next, start hand sewing contrasting fabric to sweatshirt, following outline of your letter. In this example I am using a straight stitch.
Check out “What stitch can I use for reverse applique?” in the FAQ section below for discussion of other stitches to use.
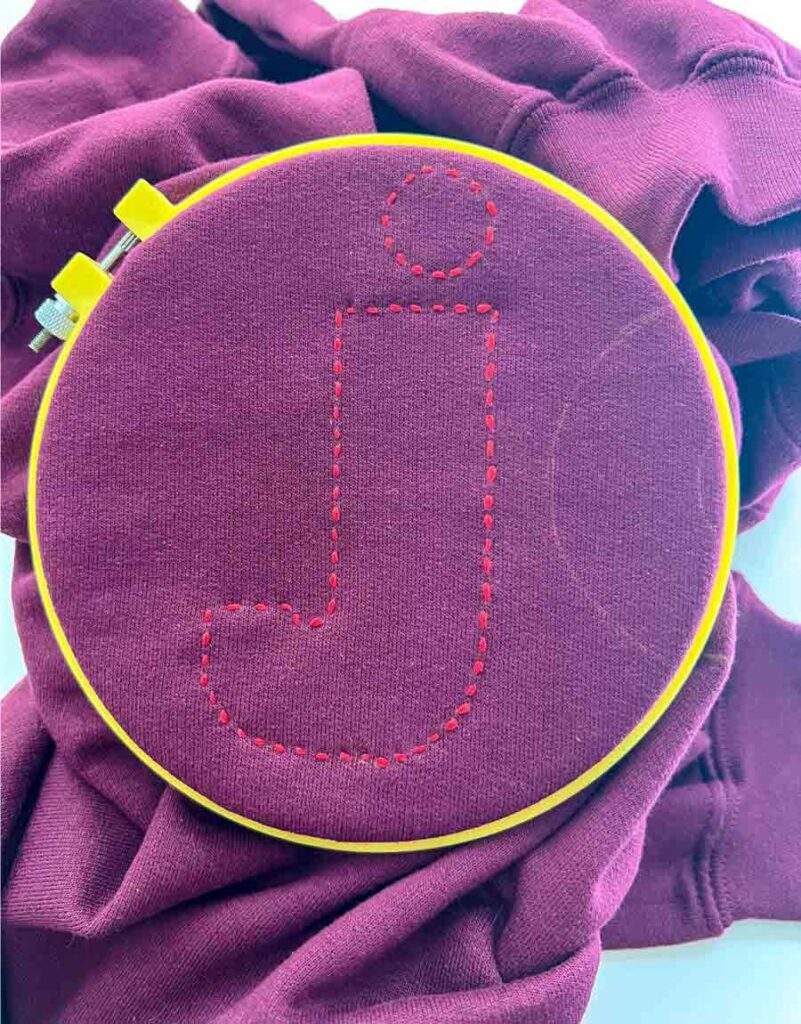
Continue until you have finished the entire letter.
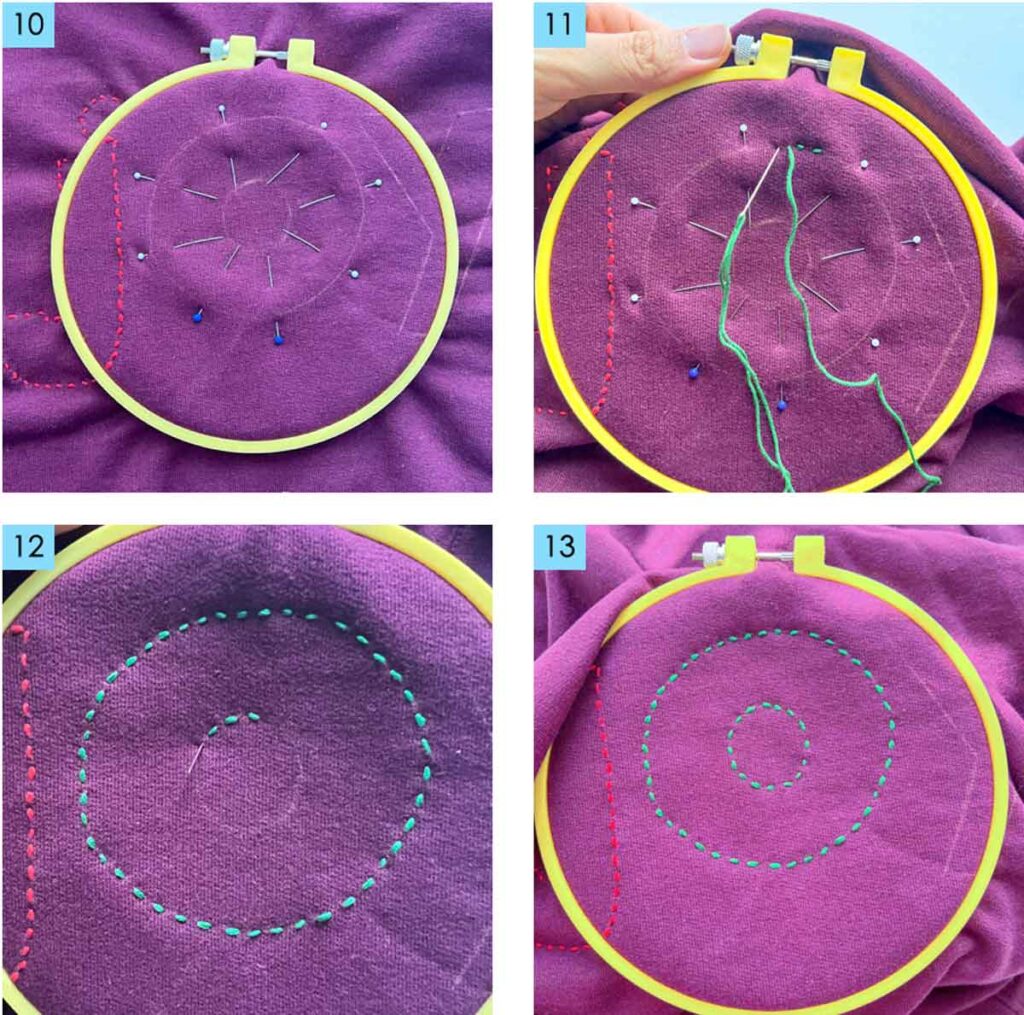
Now repeat the same process for the next letter.
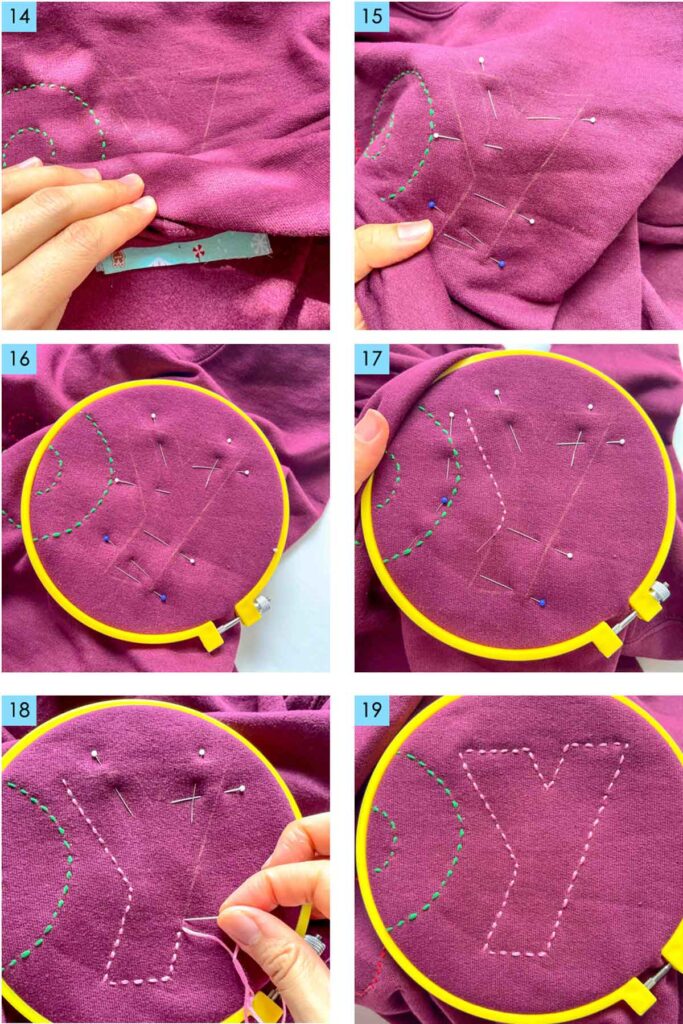
Finally, continue until you have stitched all the contrasting fabrics to the sweatshirt, following the design you traced on the front.
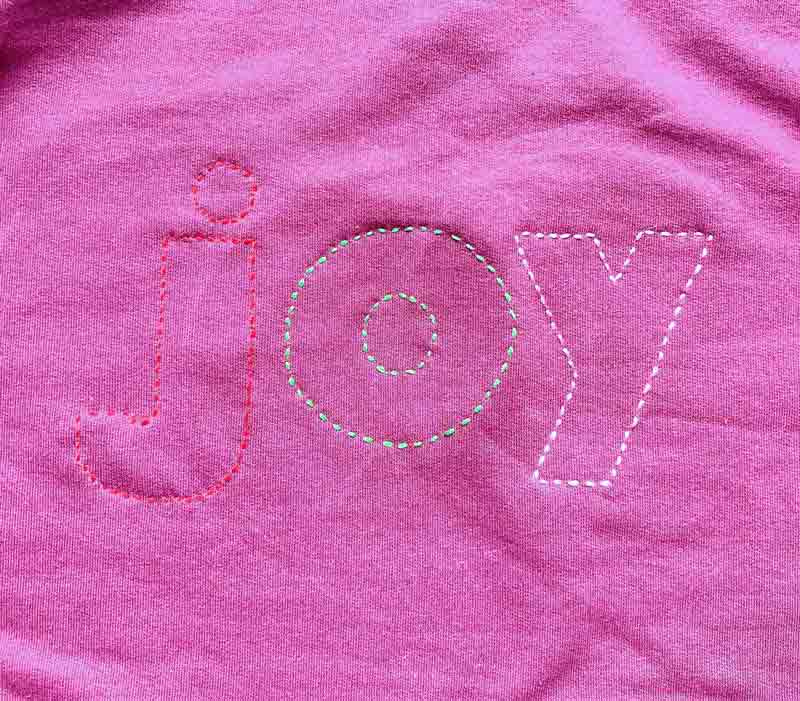
Here is what your sweatshirt looks after all the letters have been straight stitched to the contrasting fabric.
To create a different look, you could use a back stitch, cross stitch, whip stitch, or chain stitch.
Step 4 (Optional): Add Extra Text
For this project, I wanted to add the words “to the world” after the reverse appliqued “joy”. I decided to hand embroidery these words using a full back stitch.
If you are only doing reverse applique, jump to Step 5: Carefully Cut Away Sweatshirt Fabric.
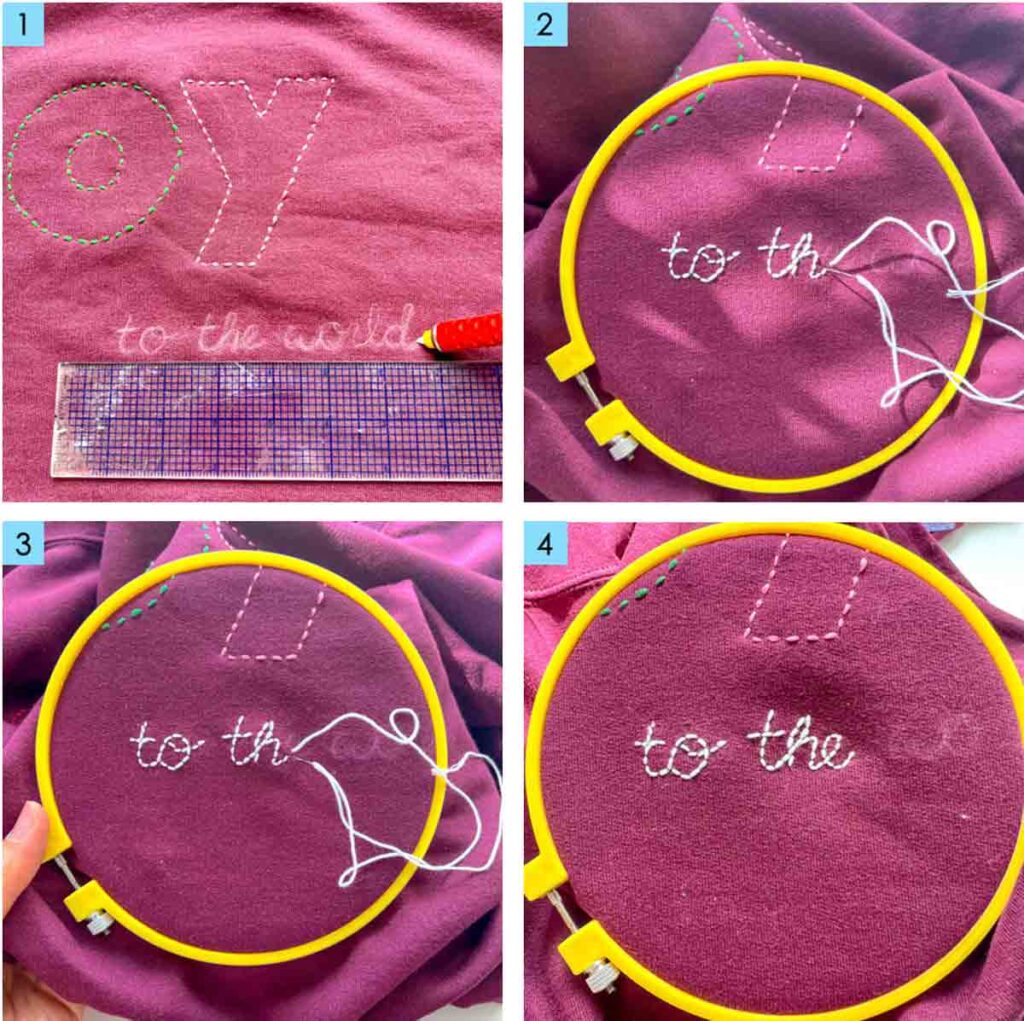
First, I wrote the words that I wanted to embroider. Then, I used a full back stitch to create the words on the sweatshirt. You could also reverse applique all of the text as well, really is up to you!
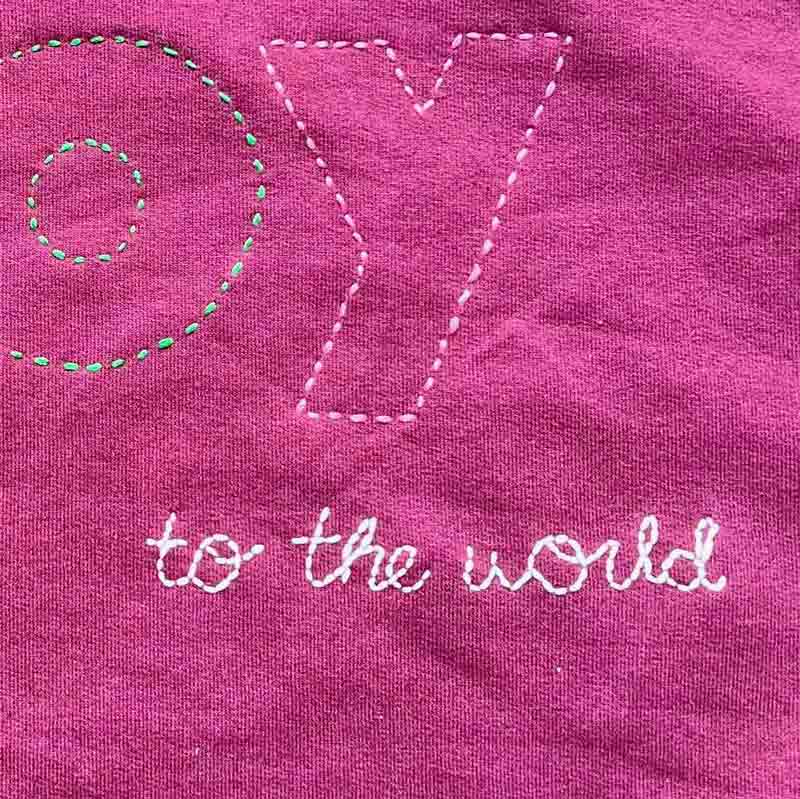
View of finished embroidered text.
Step 5: Carefully Cut away the Sweatshirt Fabric
After all that hard work of hand stitching, this is the BEST (and most fun) part of reverse applique!
For this step, we are going to use a small pair of sharp embroidery scissors or fabric scissors to carefully trim away the sweatshirt fabric inside the stitched design.
Take your time with this step and do it carefully! You don’t want to accidentally cut through those beautiful stitches you just made, or
You want to cut close to the stitching without accidentally cutting through your stitches or the fabric underneath.
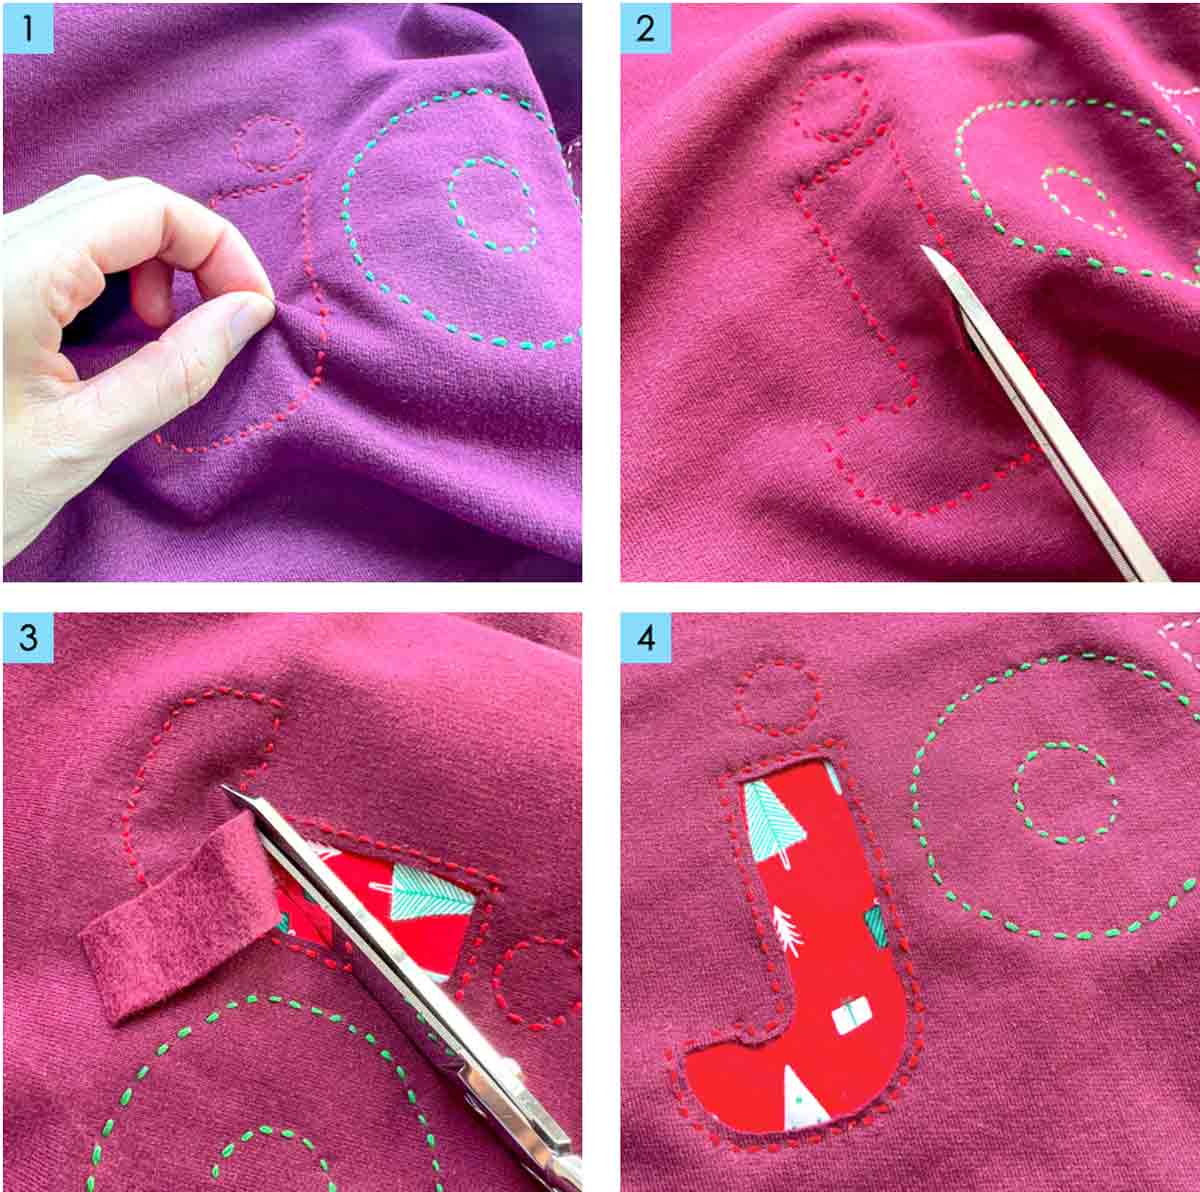
- First, pinch the sweatshirt fabric within the stitched design to make sure it is separated from the contrasting fabric beneath.
- Next, carefully take your scissors to make a cut into the sweatshirt.
- Slowly and carefully cut around the entire letter, 1/8″ (3mm) from the stitch line to reveal the fabric underneath. Try to cut the borders as even as possible for a neat look.
- Tada! Bottom part of the “j” letter has been successfully reverse appliqued!
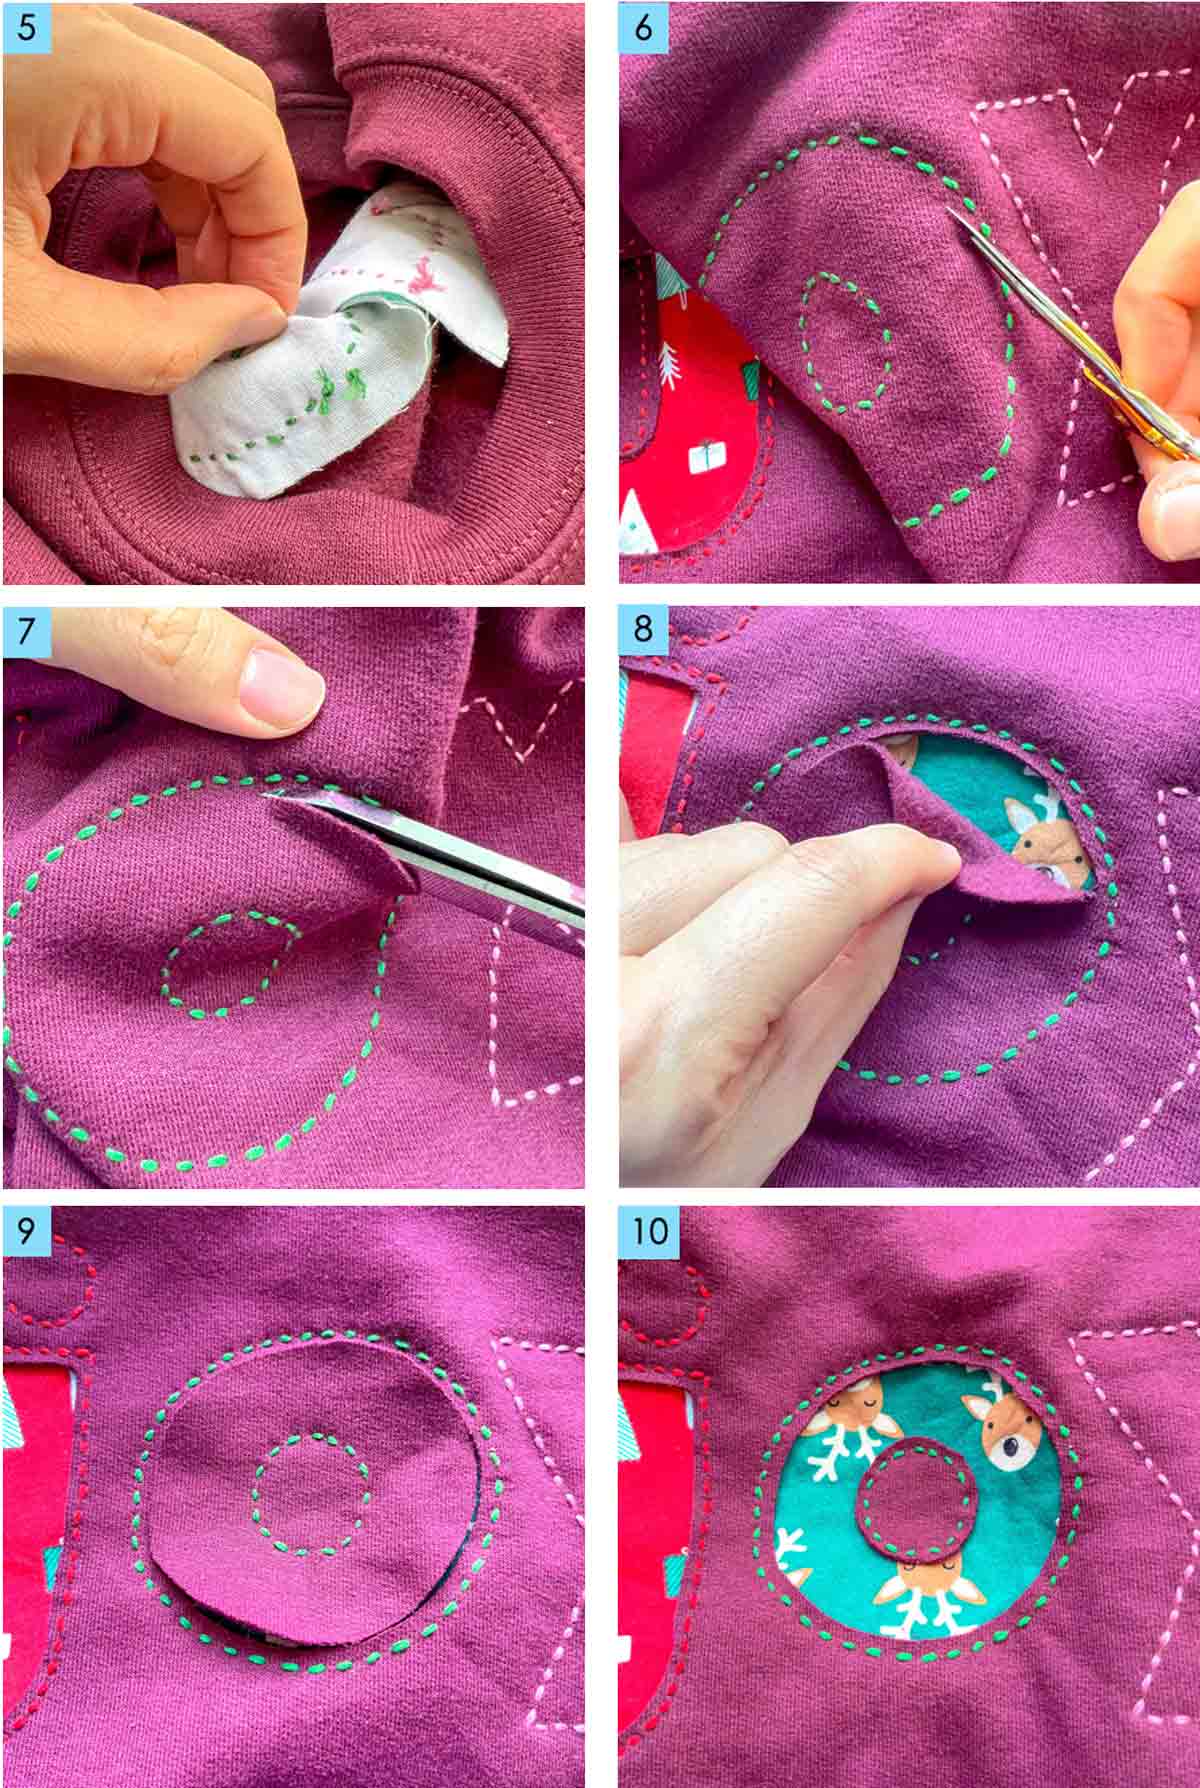
5. Alternatively, pinch the contrasting fabric (from wrong side of sweatshirt) to pull it away from the front of sweatshirt so you don’t accidentally snip it.
6. You can also use a sharp embroidery scissor to make the initial cut into the sweatshirt.
NOTE: It is a good idea to make tiny cuts a little at a time than trying to remove large portions all at once.
7-10. Continue cutting around the design, 1/8″ (3mm) away from the stitch line to reveal the contrasting fabric.
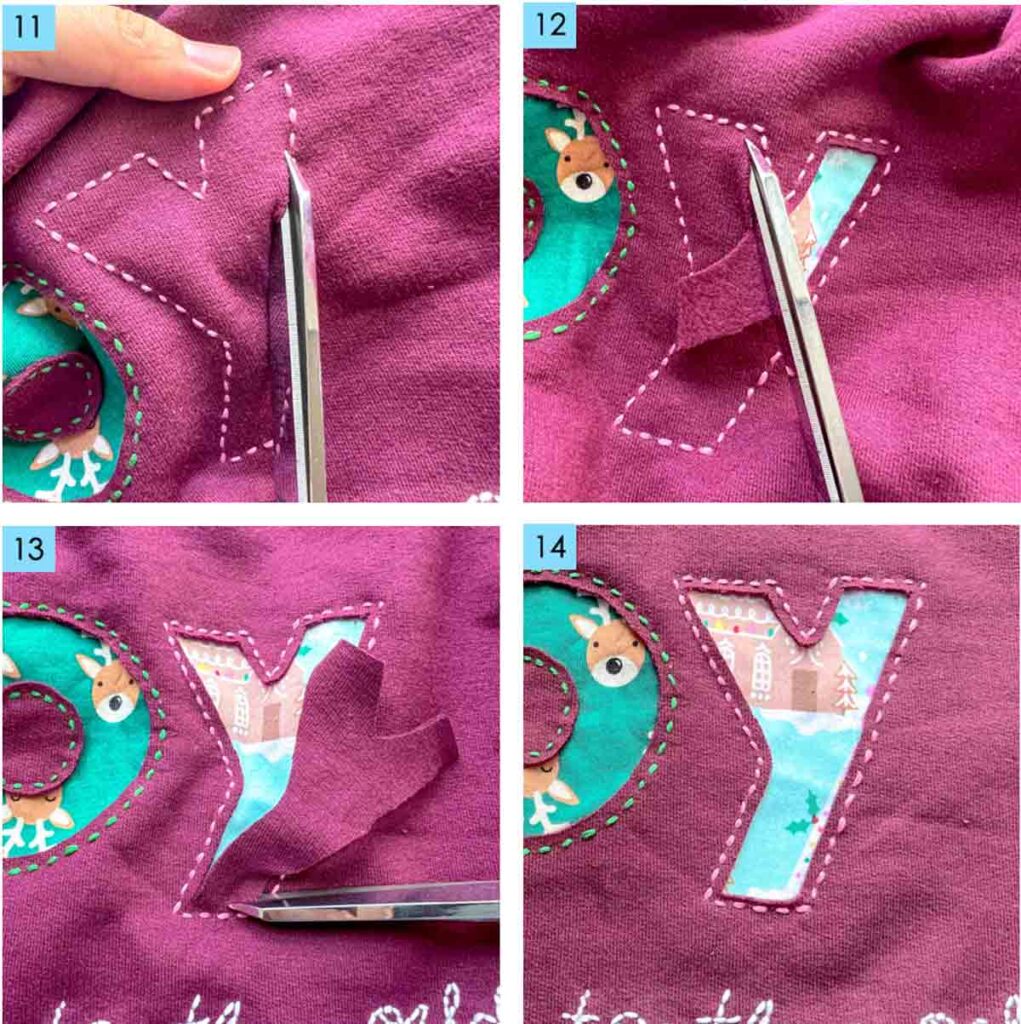
Repeat this process for all the letters.
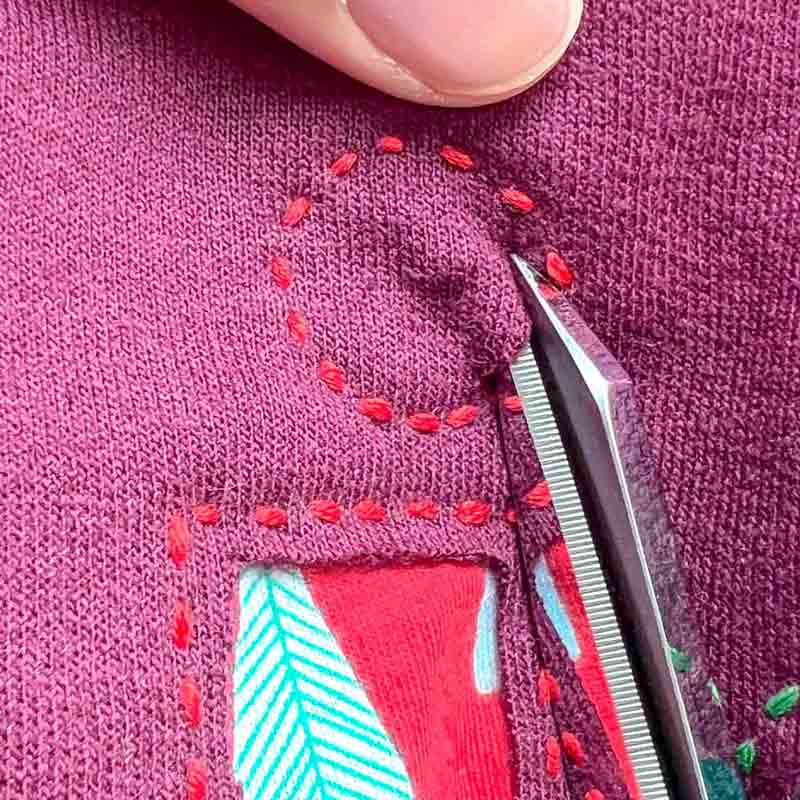
Don’t forget to cut out the dots too!
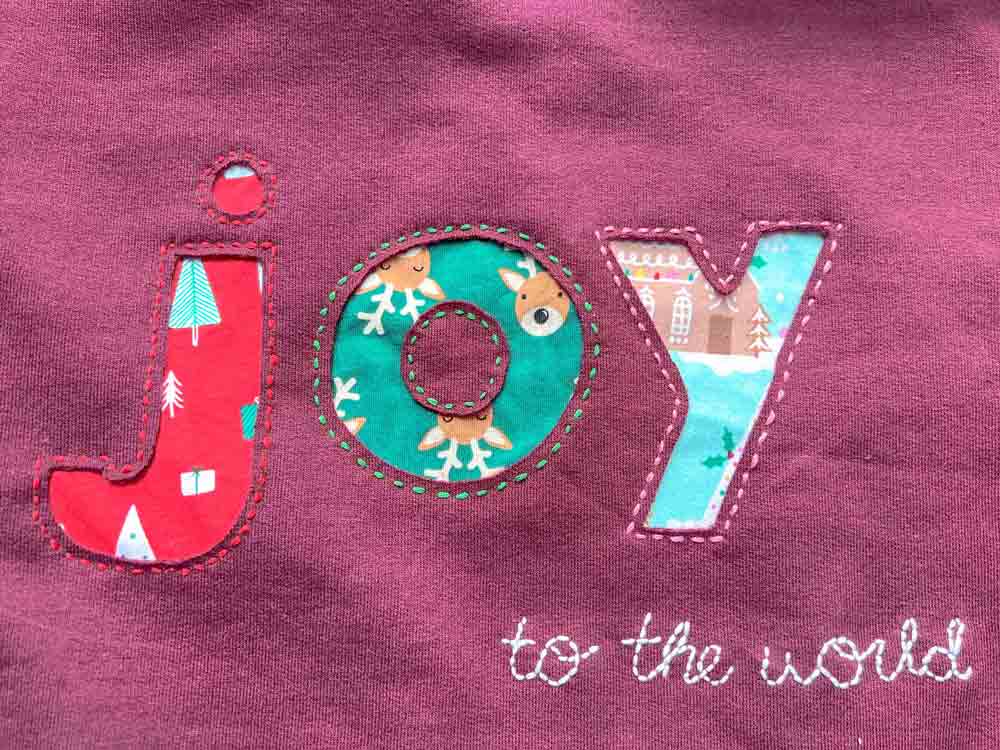
Whoo-hoo! Reverse applique sweatshirt is done!
Step 6: Trim the Back
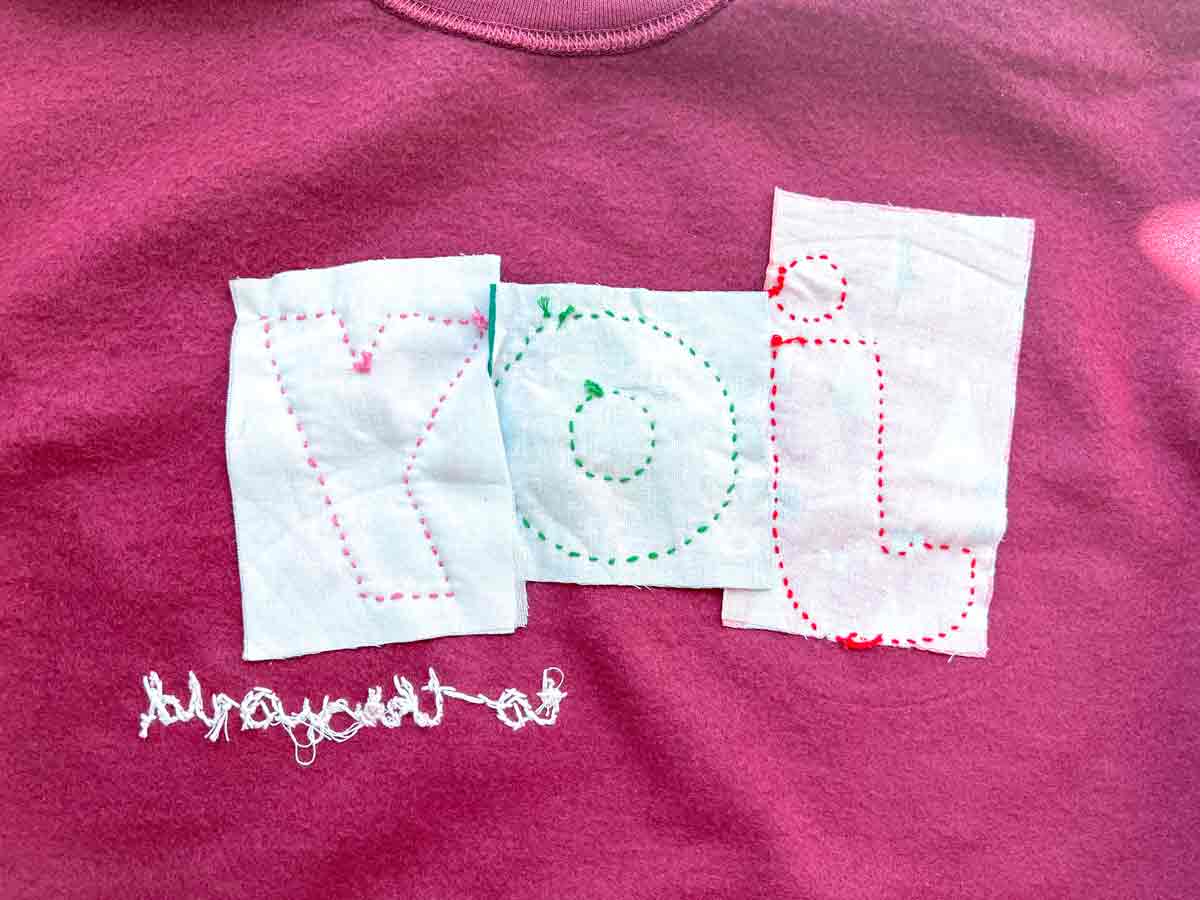
Now turn your sweatshirt to the wrong side to take a look. Oh my, look at the bottom of my ‘j’ and how little fabric there is. The fabric placement definitely could use improvement!
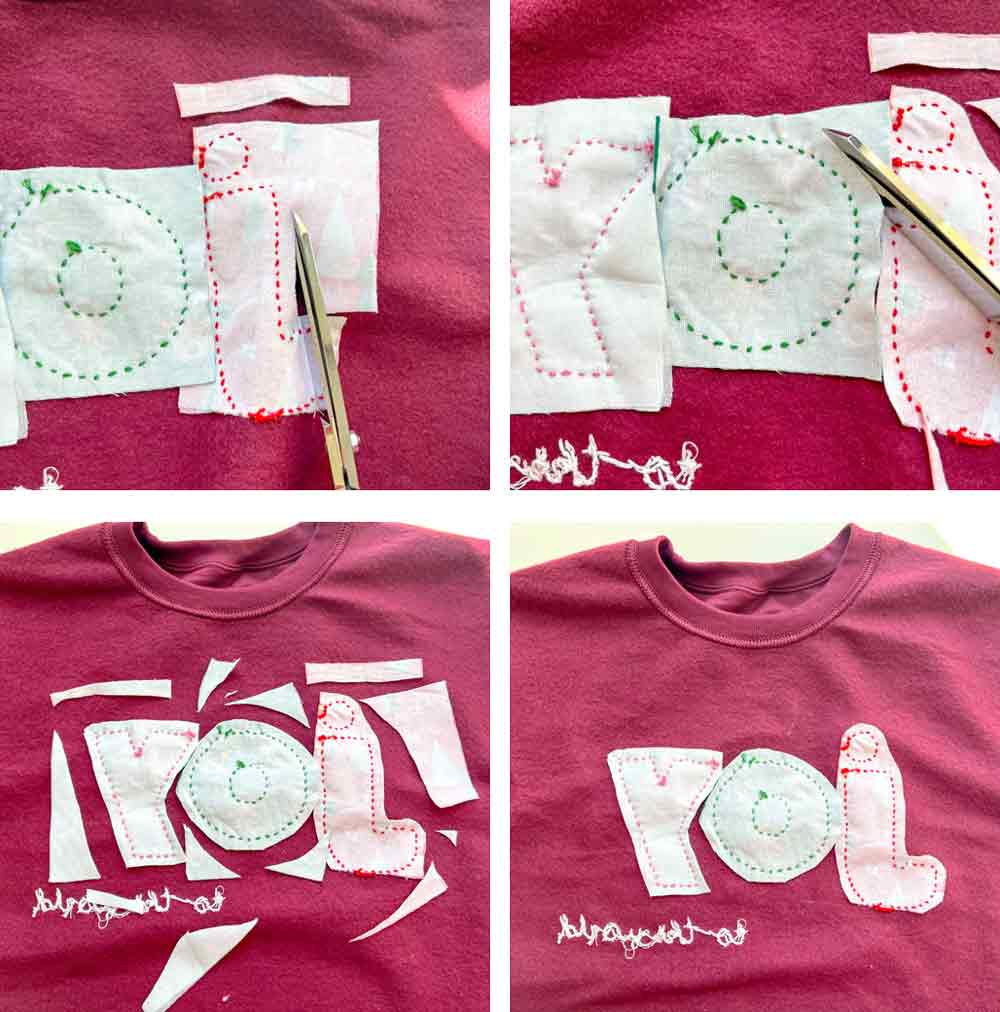
Trim the excess appliqué fabric if necessary, leaving enough fabric around the design to prevent the stitches from coming undone.
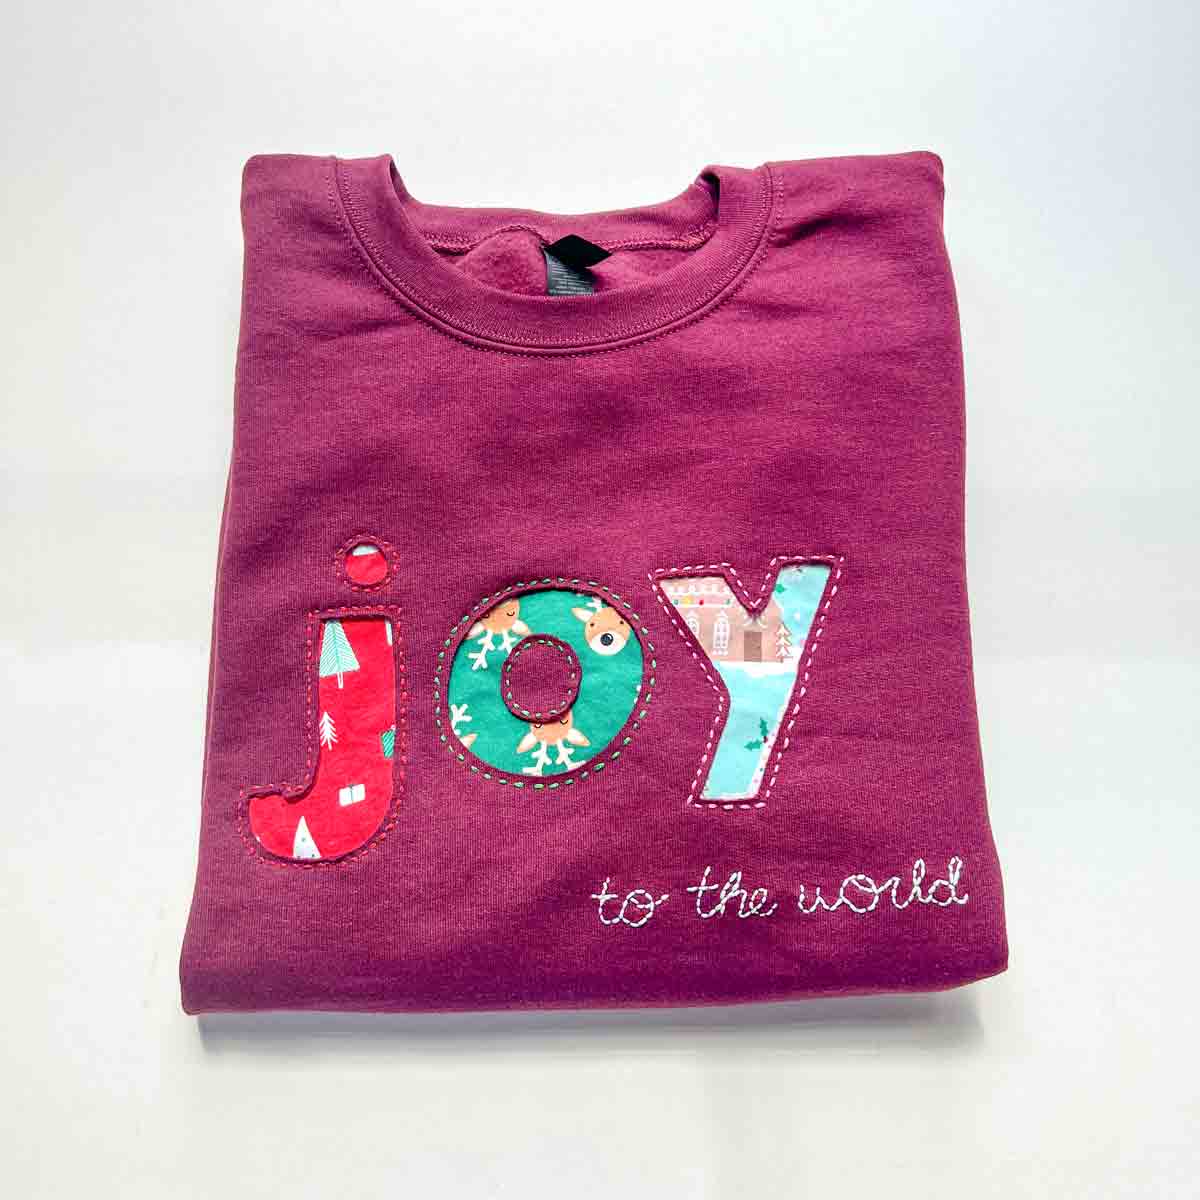
Finished! Doesn’t the reverse applique add so much fun and vibrancy to a plain old sweatshirt?
Reverse Appliqué Sweatshirt Tips
Choose a simple design.
If this is your first reverse appliqué project, avoid designs with lots of tiny details. Large letters and simple shapes are much easier to sew and cut.
Use contrasting fabrics.
The more contrast between the sweatshirt and the appliqué fabric, the more noticeable your design will be.
Use sharp scissors.
Small, sharp embroidery scissors give you much more control when cutting close to your stitching.
Practice first.
If you’re nervous about cutting into your favorite sweatshirt, practice the technique on a scrap piece of sweatshirt fabric first.
Reverse Appliqué Design Ideas
Once you’ve mastered the technique, there are so many different designs you can try!
Holiday Sweatshirts
Create personalized sweatshirts for:
- Christmas
- Halloween
- Valentine’s Day
- Easter
- Thanksgiving
- St. Patrick’s Day
Try designs such as JOY, pumpkins, hearts, snowflakes, Christmas trees, or ghosts.
Personalized Sweatshirts
Use reverse appliqué to create:
- Names
- Initials
- Monograms
- Birth years
- Favorite words
- Team names
Kids’ Sweatshirts
Kids’ clothing is especially fun to customize. Try colorful fabrics with:
- Rainbows
- Stars
- Dinosaurs
- Flowers
- Animals
- Hearts
- Their names
Frequently Asked Questions
What fabric should I use for reverse appliqué?
Cotton quilting fabric is a great choice for beginners. It is easy to sew, cut, and press and comes in thousands of colors and patterns.
Can I do reverse applique on a t-shirt?
Yes! T-shirts are also suitable for reverse applique because knit fabrics do not fray when cut.
In general, you want to choose a fabric that will not fray as the main fabric. This includes fleece, wool, knits, leather, and vinyl. You don’t want the main fabric to continue fraying once you cut it out as that will affect the longevity of your project.
Can I use a Sewing Machine instead of Hand Stitching?
Absolutely! The steps would be exactly the same as the tutorial, except you sew the contrasting fabric to the sweatshirt with a sewing machine instead of hand sewing.
Just note that the stitch lines from a sewing machine won’t look as thick or obvious as when you use embroidery floss.
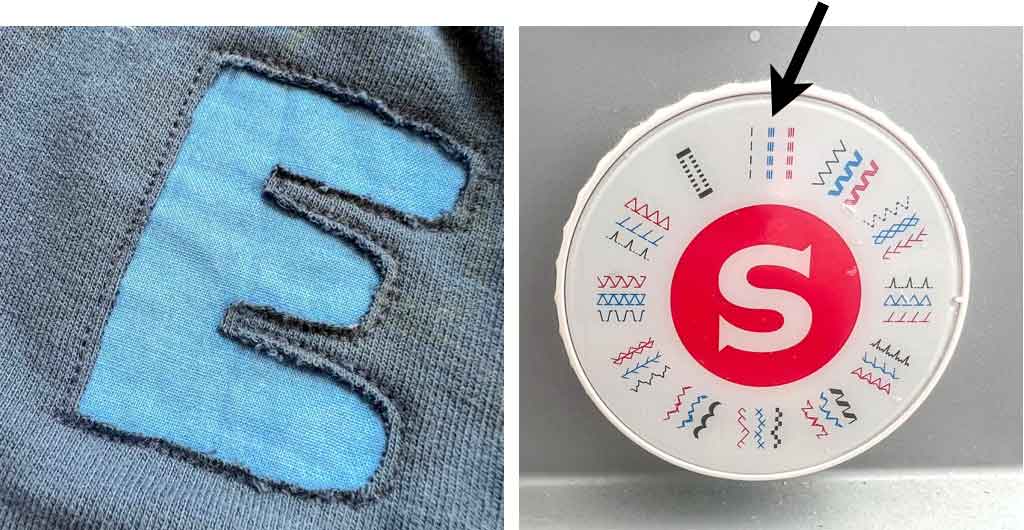
In this example, I machine stitched the contrasting fabric to the sweatpants (left), using the straight stretch stitch (right, black arrow).
The stitch itself is not as thick and noticeable as when done by hand. However, it gives your reverse applique a different look that is nice as well!
You can also use a zig-zag stitch, satin stitch, or other decorative stitches on your sewing machine to create different looks for your reverse applique!
What stitch should I use for reverse appliqué?
A straight stitch (running stitch) is the easiest option for beginners. You can also choose to use other decorative embroidery stitches such as back stitch, cross stitch, whip stitch, pick stitch, chain stitch, or more!
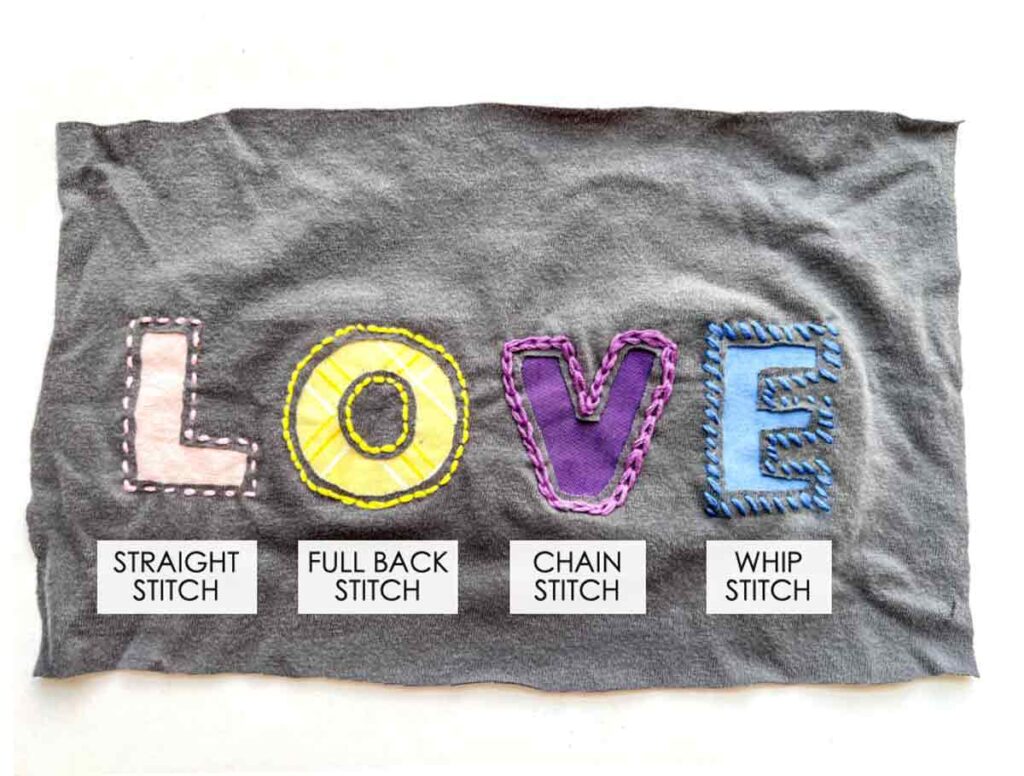
In this photo I made a sample reverse applique with different types of embroidery stitches to give you an idea for what you may want to do for your design. Do you have a favorite one out of these?
Can I wash a reverse appliqué sweatshirt?
Yes. Follow the washing instructions for the sweatshirt and appliqué fabric. Turning the sweatshirt inside out before washing can help protect the appliqué and stitching.
Final Thoughts
Reverse appliqué is a simple way to transform an ordinary sweatshirt into something completely custom. Once you understand the basic technique, you can experiment with different fabrics, fonts, colors, and designs to create sweatshirts for every season and occasion.
Whether you make a JOY sweatshirt for Christmas, a personalized name sweatshirt for a child, or a colorful everyday design, reverse appliqué is a fun sewing technique!
How to Reverse Applique
Learn how to do reverse appliqué on a sweatshirt with this easy step-by-step tutorial. Customize your sweatshirt with fabric, letters, and other fun designs!
Materials
- PLAIN SWEATSHIRT
- COTTON FABRIC
- EMBROIDERY FLOSS
- PAPER PATTERN
- FUSIBLE INTERFACING
Tools
Instructions
- Choose the design you want to applique on your sweatshirt.
- Cut out the design and decide where to place it on your sweatshirt.
- Using fabric chalk, trace the design onto the sweatshirt.
- Cut out a piece of contrasting fabric that is slightly larger than your design (see note 1).
- Cut out and apply fusible interfacing to wrong side of contrasting fabric.
- Place contrasting fabric on wrong side of sweatshirt, behind where design was traced on the front and pin in place.
- Put embroidery hoop around design (if using).
- Thread hand needle with embroidery floss and sew contrasting fabric to your sweatshirt, following design (see note 2).
- Once you finish sewing, carefully cut away the sweatshirt inside the design, about 1/8" (3mm) away from stitch line.
- Repeat for all other designs/lettering.
- Once you are done, turn sweatshirt to wrong side and trim excess contrasting fabric away (see note 3).
Notes
Note 1: Cut your contrasting fabric to be at the minimum 3/4" - 1" (1.9 cm - 2.54 cm) larger than your design all around.
Note 2: Straight stitch is a good place to start. Other stitches include back stitch, cross stitch, whip stitch, pick stitch, chain stitch, and more.
Note 3: When trimming contrasting fabric, leave about 0.25 - 0.5 inch (6mm-12mm) away from the stitch line to prevent stitches from coming undone.