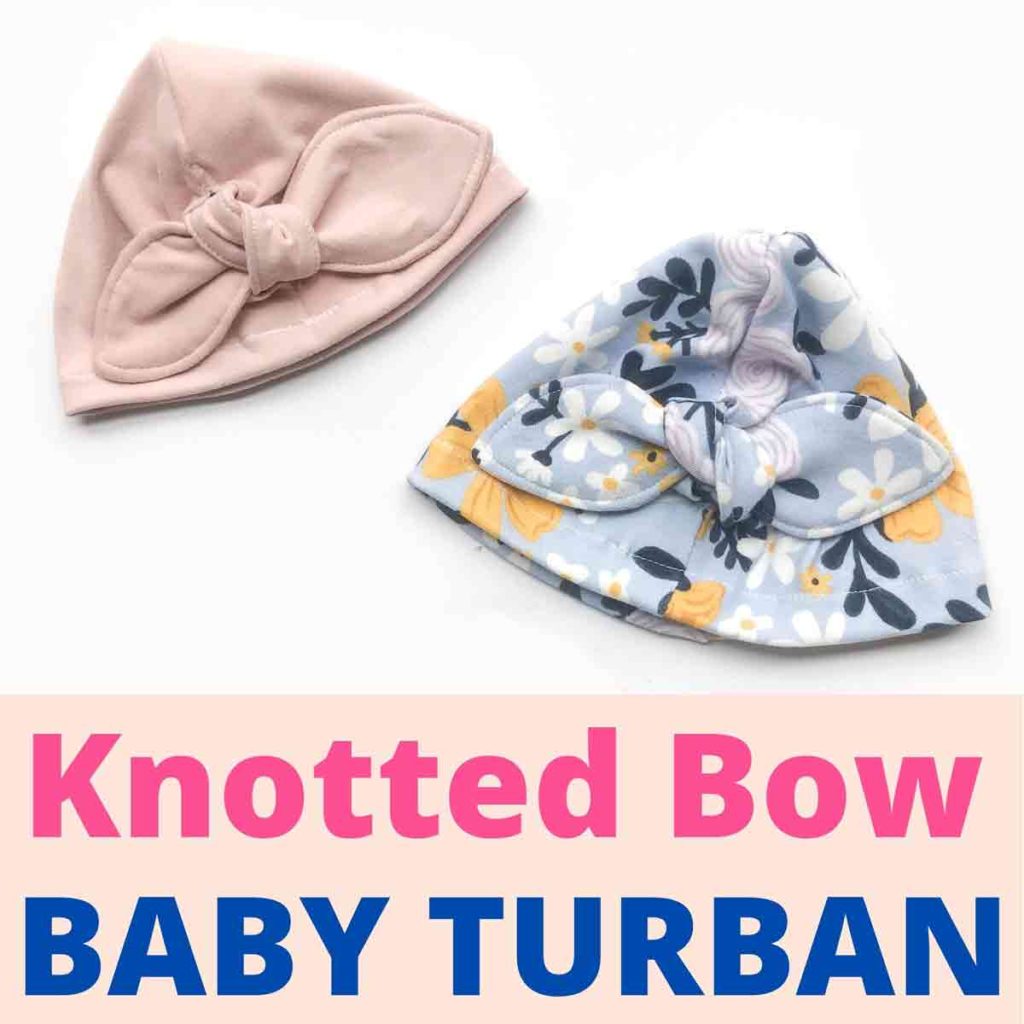
How to Make Simple DIY Headbands with Knotted Bow
This post may contain affiliate links. Please read my disclosure policy for details. As an Amazon Associate, I earn from qualifying purchases.
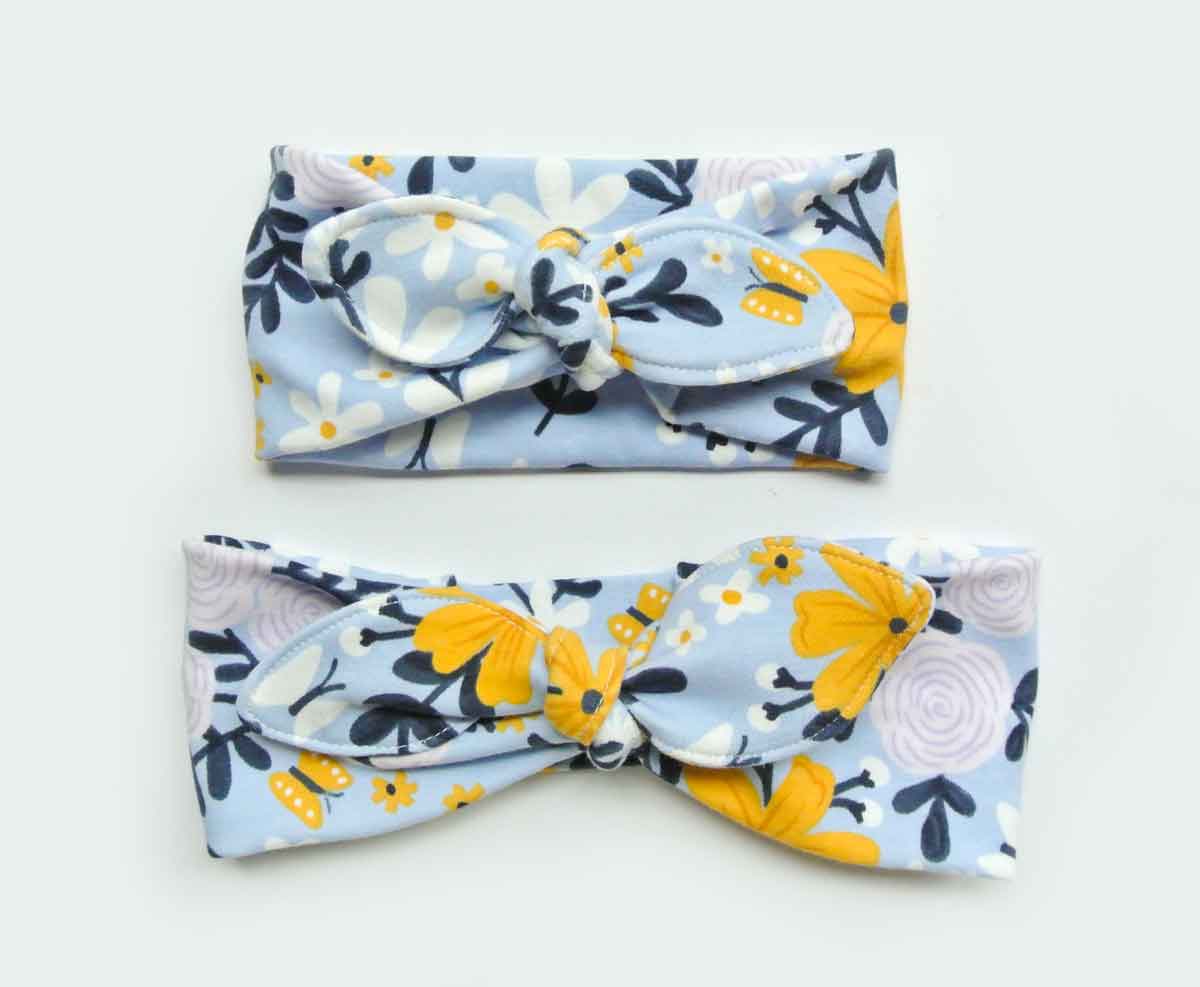
Learn how to make this Simple DIY headband using stretchy knit fabric (or upcycle an old T-shirt). Wear as is or dress it up with a bow. The best part? This easy project only takes 15 minutes to sew and makes great gifts!
I have a love/hate relationship with headbands. I love them because they keep my ears warm when I go for a jog. Unfortunately they also give me a headache whenever I wear them too long. Also, I can never seem to find one when I need it!
With the recent cold weather and outdoors running, I finally made time to sew up a bunch. That way I can easily find one when I need it, and I have extra ones while the rest are in the wash. The best part? No more headband induced headaches! Yay!
What are the Different Types of DIY Headband?
I test sewed several types of headbands and here is the summary:
100% Elastic
This headband can be made with knit fabric or woven (non-stretchy) fabric. There is a piece of elastic that goes inside the fabric.
Unfortunately, this was also the one that made my head hurt the most. If I tried to loosen the elastic, the headband didn’t stay on. I will say though, the tightness gave my hair a nice Bouffant that I couldn’t achieve with the other headbands!
100% Non-stretchy fabric with Partial Elastic
I liked the versatility of using non-knit fabrics as there are more pretty prints and options. Overall the headband stayed on well and it wasn’t too tight. However, this one was harder to put over your head. You could only stretch the bottom 1/4 of the headband (where the elastic was).
100% Knit Fabric (No Elastic)
This headband was comfortable but didn’t stay on so well. It’s good for regular use as you go about your day. However, if you engage in activity with a lot of head movement (sports), this headband tends to slide right off. You can counter this by using stretchy fabric with higher Spandex content.
100% Knit Fabric with Partial Elastic
This headband is made completely with knit fabric. A small section of the fabric has a piece of elastic sewn inside. This was my favorite as it was super comfortable and stayed on well even while being active. This is the one I will be showing you how to make in the tutorial.
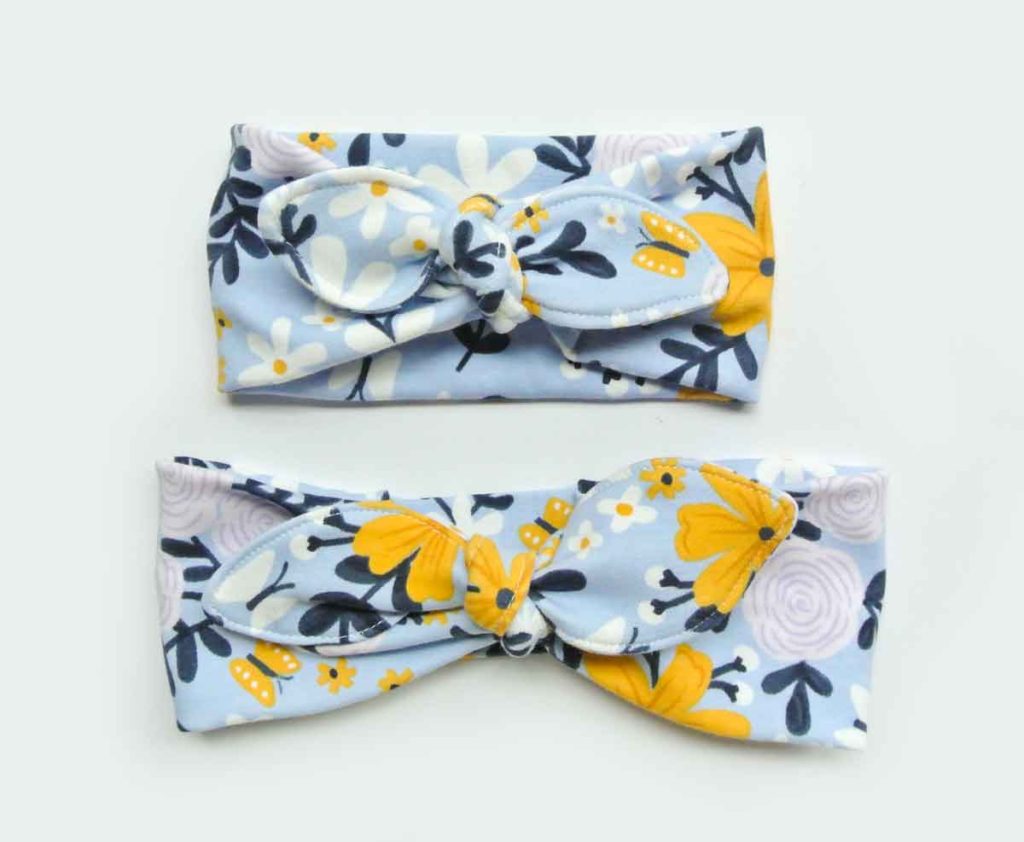
Just to make these headbands a bit more glam, I decided to add an optional bow tie. These headbands are also super cute as Mommy-and-Me headbands. I ended up making different sizes for my girlfriends who had daughters as gifts. If I ever have a daughter, you know what we’ll both be wearing 🙂
What Fabric Should I use to Make DIY Headbands?
For these simple DIY headbands you will need to use stretchy (knit) fabrics. However, keep in mind that different knit fabrics vary greatly in their ability to stretch and to recover. All this will affect how tight or loose your headband is.
I recommend using a fabric that contains Spandex. Spandex (brand name Lycra) is a synthetic fiber that is very elastic. We’ve all encountered Spandex (think competitive swimsuits, cycling shorts, and triathlon suits).
When you add spandex to a fabric, the fabric starts to become elastic (stretchy). Another advantage of Spandex is it’s ability to return to the original shape once stretched.
Both these traits (elasticity and good recovery) made Spandex a good material for headbands. You want the headband to stretch over your head so you can put it on (elasticity). But, you also want the fabric to recover so the headband will conform to the shape of your head.
A good guideline is that the amount of Spandex corresponds to how “tight” the fabric feels. Given that all other material percentages are the same, a fabric with a higher percentage of Spandex will recover better (and thus feel “tighter”) than one with a lower percentage.
This means that a knit fabric with 90% Cotton and 10% Spandex will feel “tighter” than one that’s 98% Cotton and 2% Spandex. Similarly, a knit fabric with 85% Viscose and 15% Spandex will feel tighter than one that’s 95% viscose and 5% spandex.
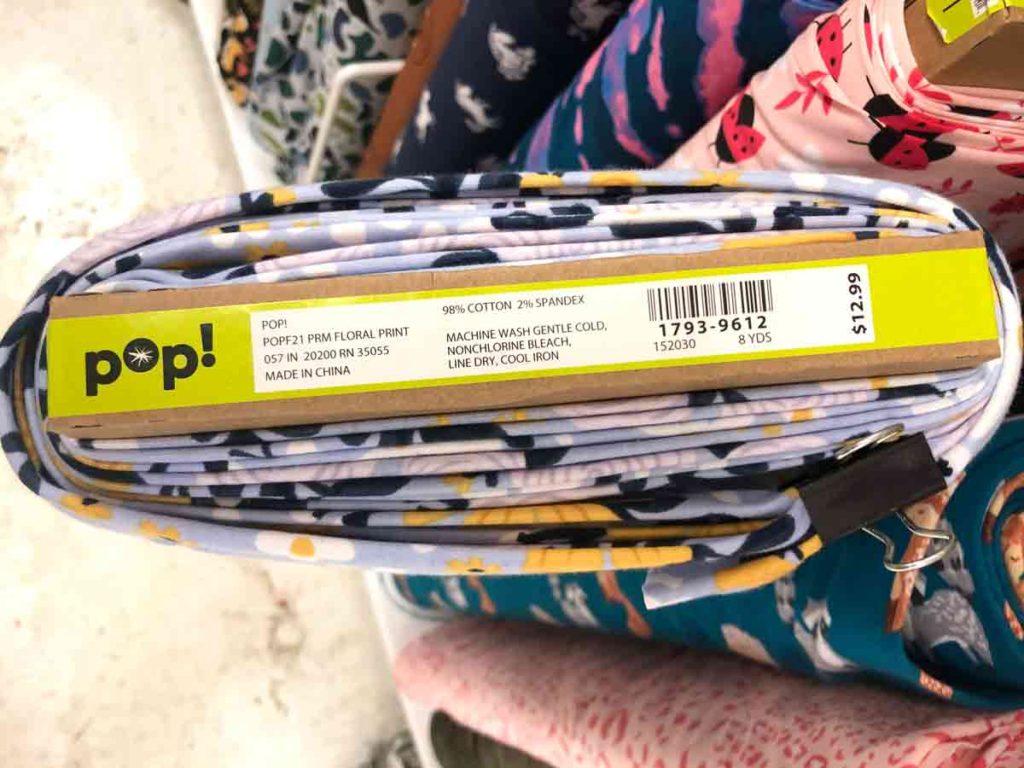
For this tutorial, I used knit fabric that is 98% Cotton and 2% Spandex. Since the Spandex content is so low, the headband was sized smaller for better fit.
How do I determine the Length of My Headband?
The easiest way to figure out what length to cut your headband fabric is to measure your head with the fabric you will be using.
- Take the knit fabric you will be using and wrap it around your head where you will wear the headband.
- Adjust how tight/loose you want the headband to be.
- Remove fabric from your head and measure this length
- Find this length on the headband sizing chart to determine what length to cut your fabric pieces.
I’ve also included a general sizing guide for kids if you are planning to sew this as a gift. Just remember that the beauty of knit fabrics is that it’s so forgiving! Even if you are slightly off in your measurements you will still be able to wear it.
Headband Sizing Chart
(Click Image to enlarge)

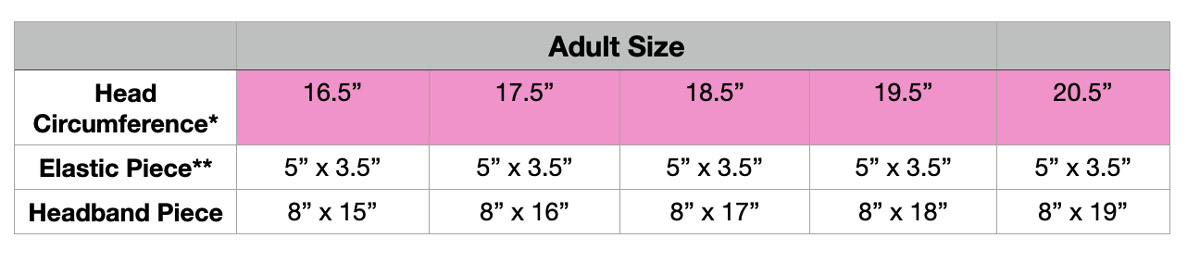
Headband Sizing Notes:
- Seam Allowance – Pattern Piece measurements already include 1/2″ seam allowance. No need to add!
- Head Circumference – Measure using knit fabric you will using to make headband. If you are making for an adult and are unsure of their size, just measure your own head and use that size.
- Elastic Piece – Measurements in chart are for a 2″ wide Elastic band
- 1.5″ wide Elastic Band: Use 4″ width (instead of 5″)
- 1″ wide Elastic Band: Use 3″ width (instead of 5″)
What do I Need to Make a DIY Bow Tie Headband?
MATERIALS:
- Pattern: Bow-Tie Headband Pattern (available in my free resource library) – get the password by subscribing.
- Knit Fabric – Ideally, find one that contains spandex (Lycra). Spandex helps the knit fabric to return to it’s original shape when stretched. This is important as you want the headband to retain it’s shape through multiple uses. I used this and this from Joann fabrics.
- Fusible Interfacing – Needed to stiffen the bow-tie which helps keep its shape while wearing. I used ultra lightweight
- 2″ Wide Elastic – You will need a piece that is 3 – 3.5″ long for each headband. You can go as small as 1” wide. However, I don’t recommend going any smaller as the elastic tends to twist and fold over so not as comfortable.
TOOLS:
- HOME SEWING MACHINE
- SERGER – optional
- FABRIC SCISSORS – these Ginghers are my favorite.
- ROTARY CUTTER– optional, but really helpful for cutting straight edges. Highly recommend if you are planning to sew in bulk.
- CLEAR RULER – I have the DRITZ See-Through Sewing Ruler
- SEWING PINS or SEWING CLIPS – ideally, use ball point pins as they won’t push out the threads of the knit fabric when you pin. However, regular pins are fine if that’s all you have.
- THREAD – regular good quality polyester or cotton thread. You don’t need elastic thread.
- HAND NEEDLES
- BALL POINT SEWING NEEDLE – helps prevent damaging or breaking knit fibers when you sew. I like Schmetz Brand.
- IRON – for fusible interfacing and pressing bow
How to Sew Knit Fabrics
New to sewing knits and stretchy fabric and don’t know where to start? Fear not! I have the perfect guide to Sewing Knits for Beginners, complete with 10 easy hacks to get you started!
How to Make Simple DIY Headband with Elastic
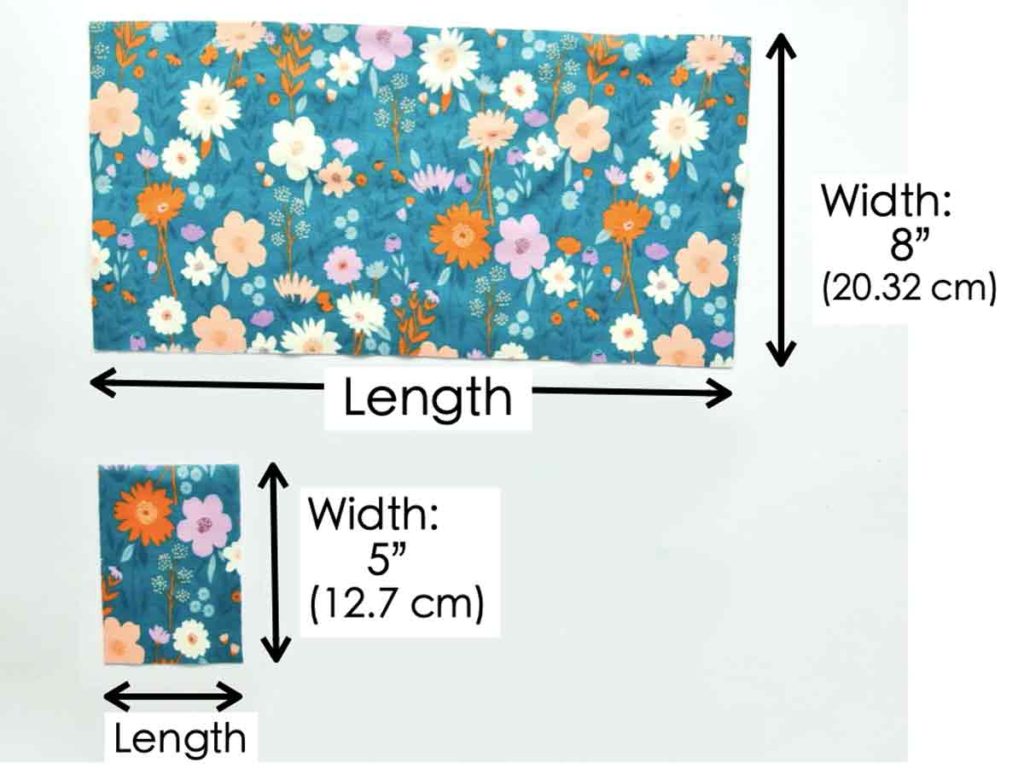
Cut 2 pieces of fabric according to headband size chart.
Width of Headband Piece = 8” (20.32cm)
Width of Elastic Piece = 5” (12.7cm)
Note: We will be folding the fabric in half along the width of the rectangle to sew.
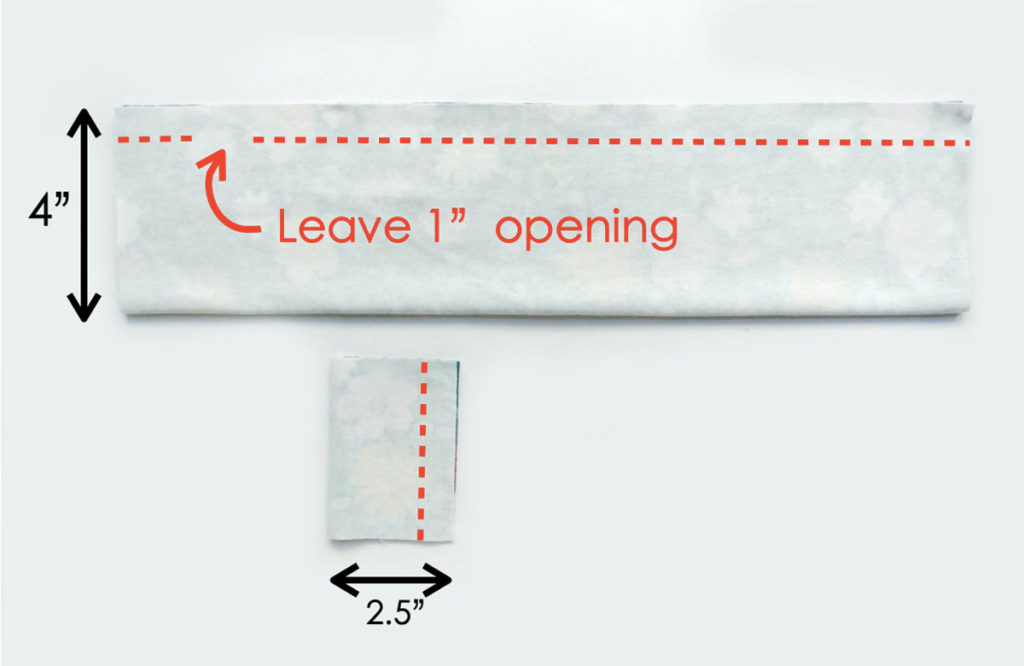
TOP: Fold Headband Piece in half along width (the side that measures 8″/20.32cm. Sew at 1/2″ (1.27cm) seam allowance (red dotted line), leaving a 1″ (2.54 cm) opening close to one of the sides.
BOTTOM: Fold Elastic Piece in half along width (side that measures 5”). Sew at 1/2” seam allowance (red dotted line)
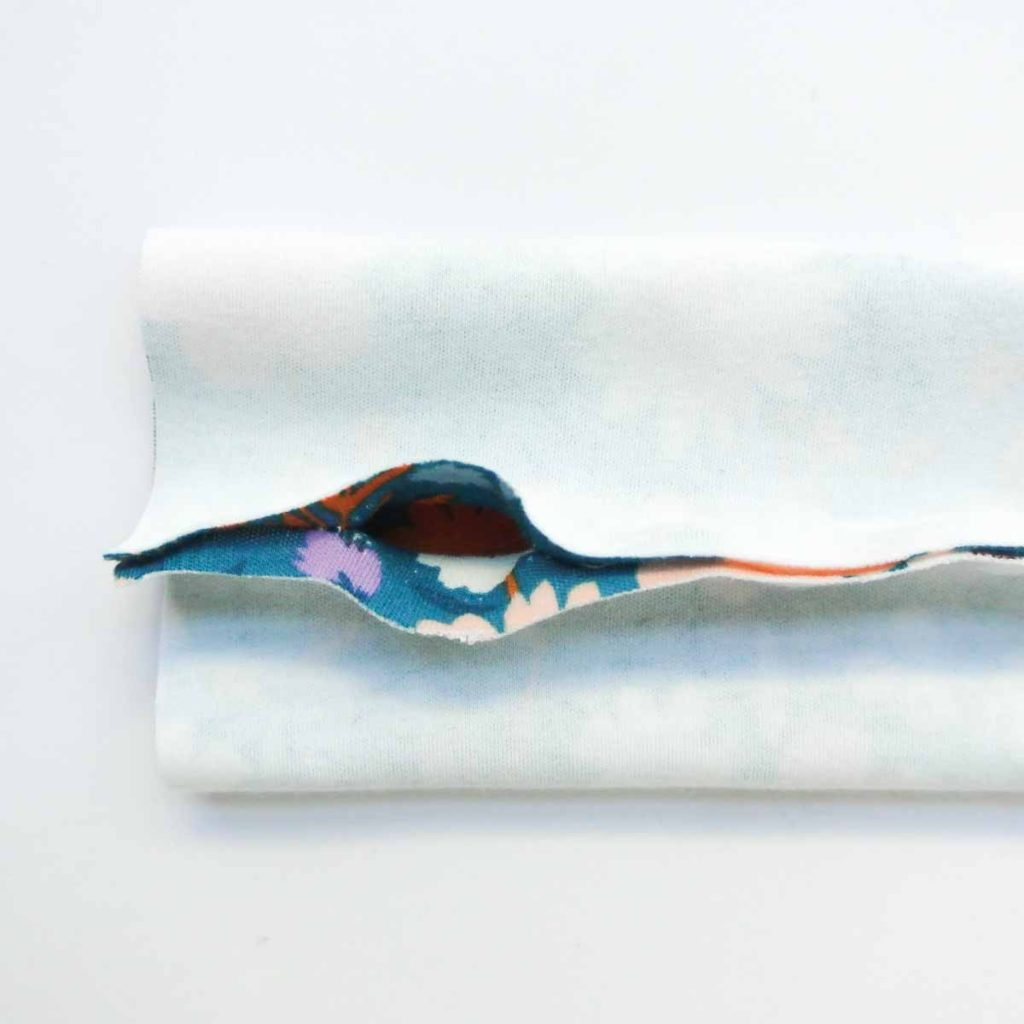
The Headband Piece will have an opening that looks like this. This opening will be where we will turn headband to the right side later on.


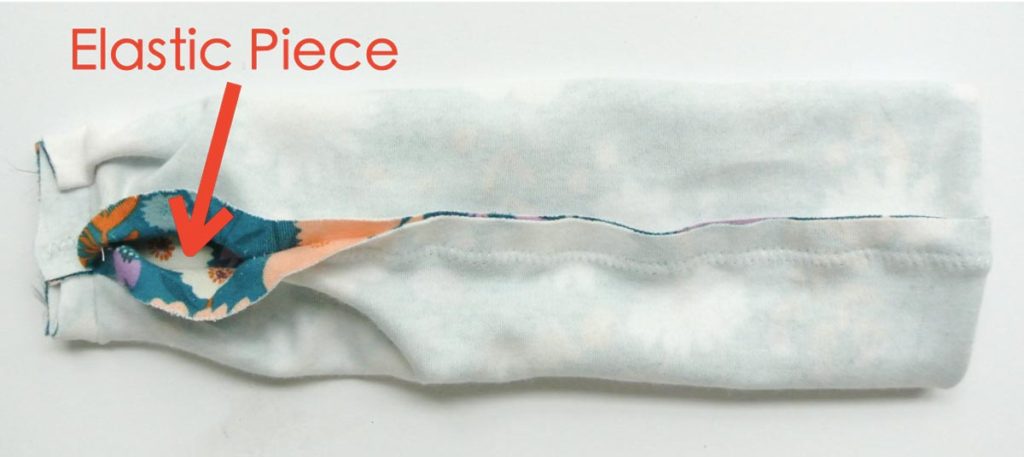
Now turn Elastic Piece to the right side and insert elastic band in

Place Elastic Piece into Headband Piece, right sides together
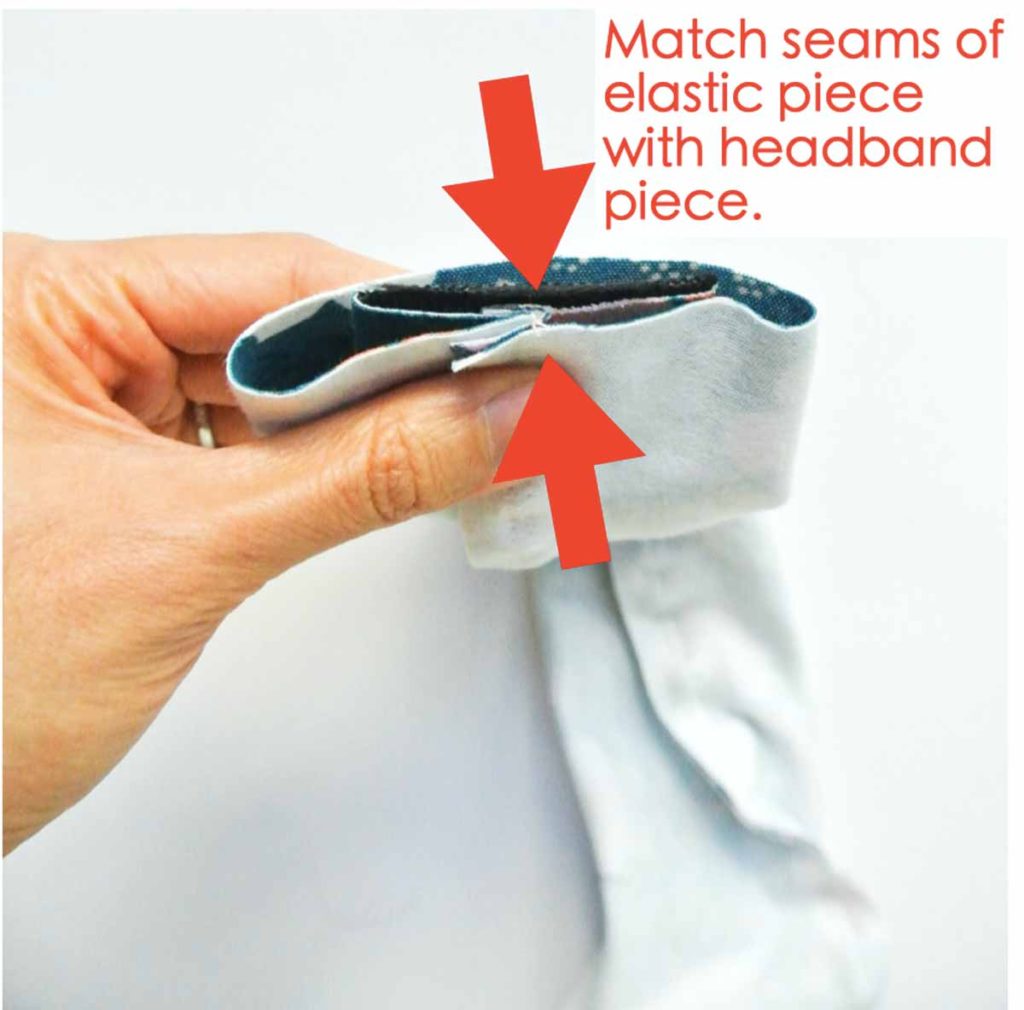
Match seam of Elastic Piece with Headband Piece


Fold sides of Headband Piece over Elastic Piece. Pin and sew at 1/2” seam allowance. Use a straight stitch when sewing this part.

Pull Elastic Piece through Headband Piece to match other edge of Headband Piece

Just like you did on the left side, fold sides of Headband Piece over Elastic Piece on the right side. Pin and sew at 1/2” seam allowance using a straight stitch.
TIP: This is a good place to check the headband fit before moving on. Use a basting stitch to sew Elastic Piece to other side of Headband Piece. This way you can quickly check the headband fit (no need to turn it to right side) and shorten Headband Piece if necessary. Remember to un-stitch the Elastic Piece, shorten the Headband Piece to the appropriate length before reattaching Elastic Piece back.


Now turn the entire headband to the right side through the opening.

Close the hole using Invisible Ladder Stitch.


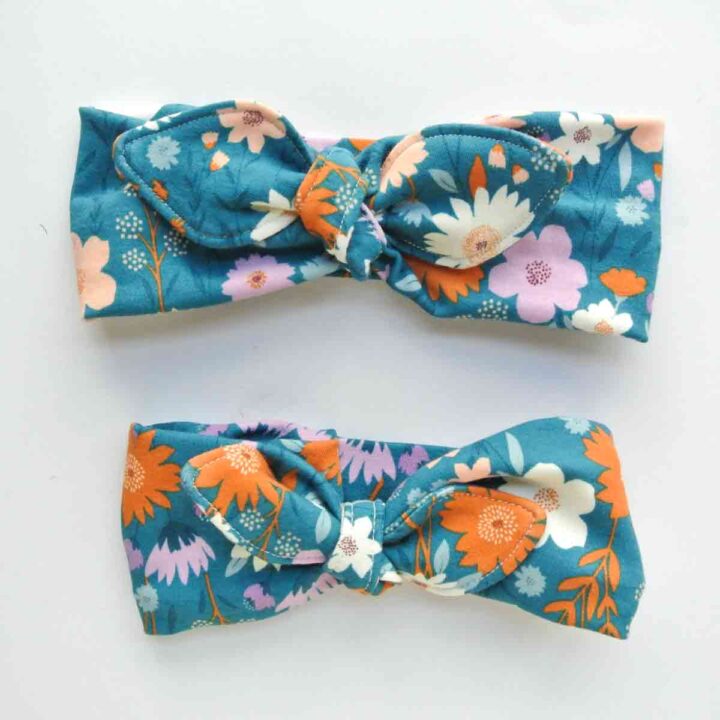
Finished headband, top view and side view. If you want to add a separate bow tie, continue with the tutorial. Otherwise you are done with the headband!
How to Make Bow Tie Knot
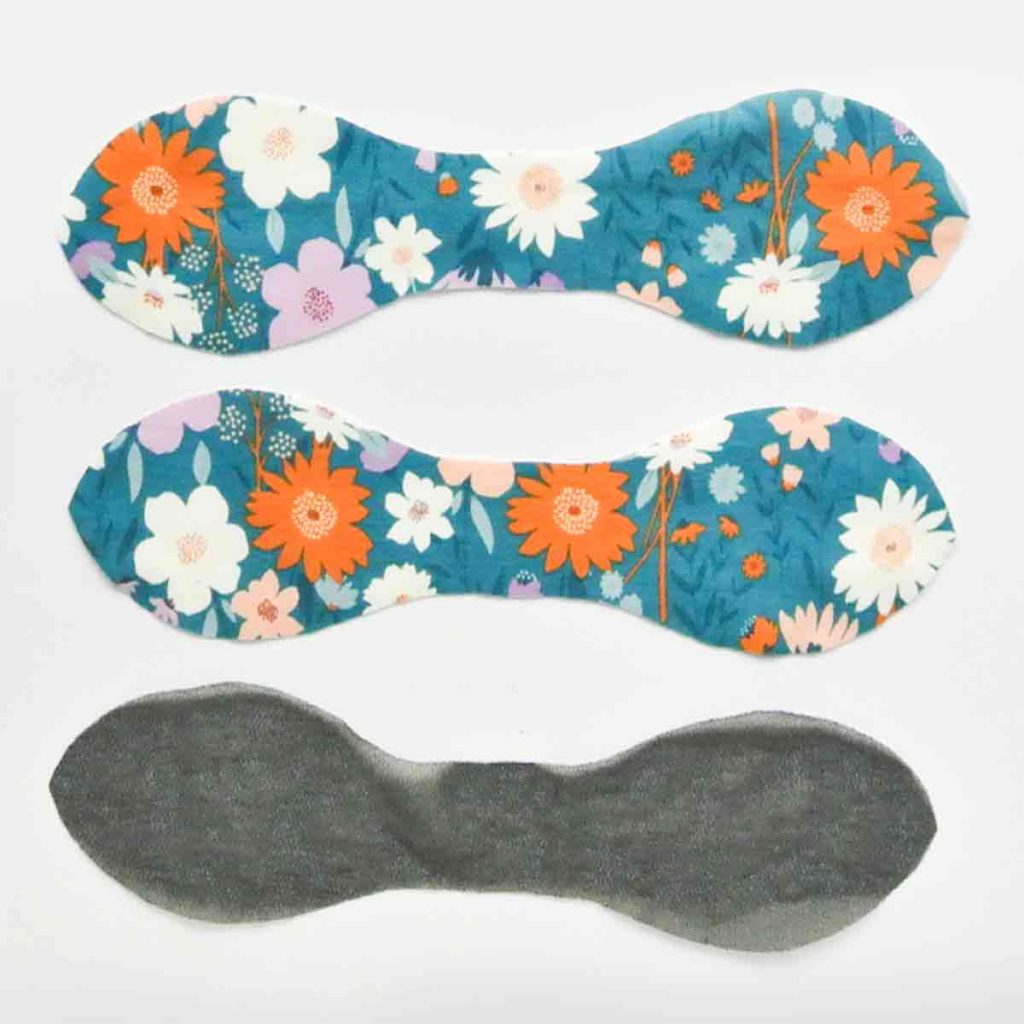
Cut out 2 bow tie pattern pieces on fabric and 1 piece on fusible interfacing

Iron on fusible interfacing to wrong side of one of the Bow Tie Piece.


Sew Bow Tie Piece, right side together at 1/2” (1.27cm) seam allowance (white dotted line) leaving an opening at the middle. Make sure to back stitch at either side of the opening. Clip curves.


Trim seam allowance down to about 1/4” (6 mm)

Using a pair of blunt scissors (or a chopstick, or pen with a closed cap), push the sides of the bow inward towards the opening. This helps make it easier to turn bow tie to the right side.

Turn bow tie to right side and use scissors to gently poke out the tips.


Close opening with hand needles using Invisible Ladder Stitch. If you don’t want to close the hole by hand, you can skip this step. The top stitching in the next step will also close the hole.

Give the bow tie a good press.
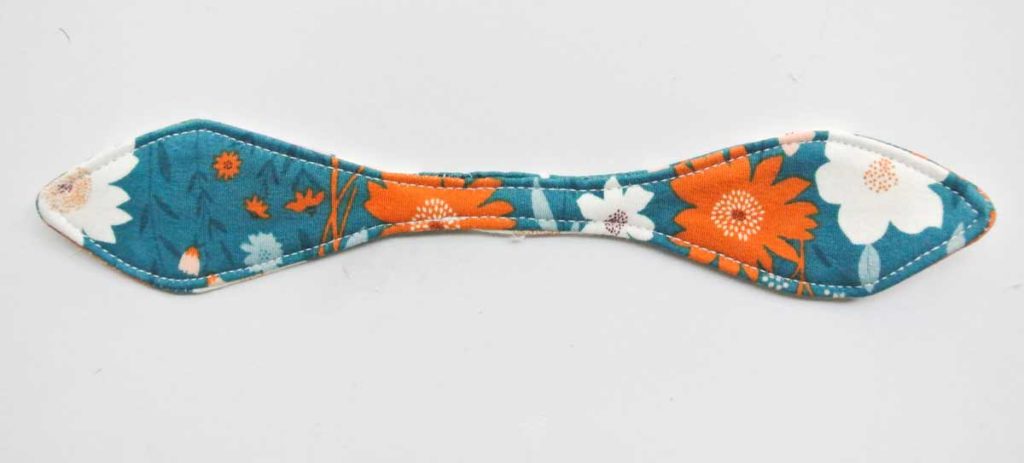
Top stitch at 1/8” (3mm) away from edge of bow tie. When top stitching, make sure the interfaced piece is on the bottom (facing feed dog). The interfacing decreases the stretch of your knit fabric.
By sewing with the interfaced piece on the bottom, the feed dog in the machine won’t stretch the fabric as you sew and cause warping.
Alternatively, you could also just top stitch all around the bow tie without closing the opening by hand. The top stitch will help close the hole as long as you do it close enough to the edge.
How to Tie Bow Tie
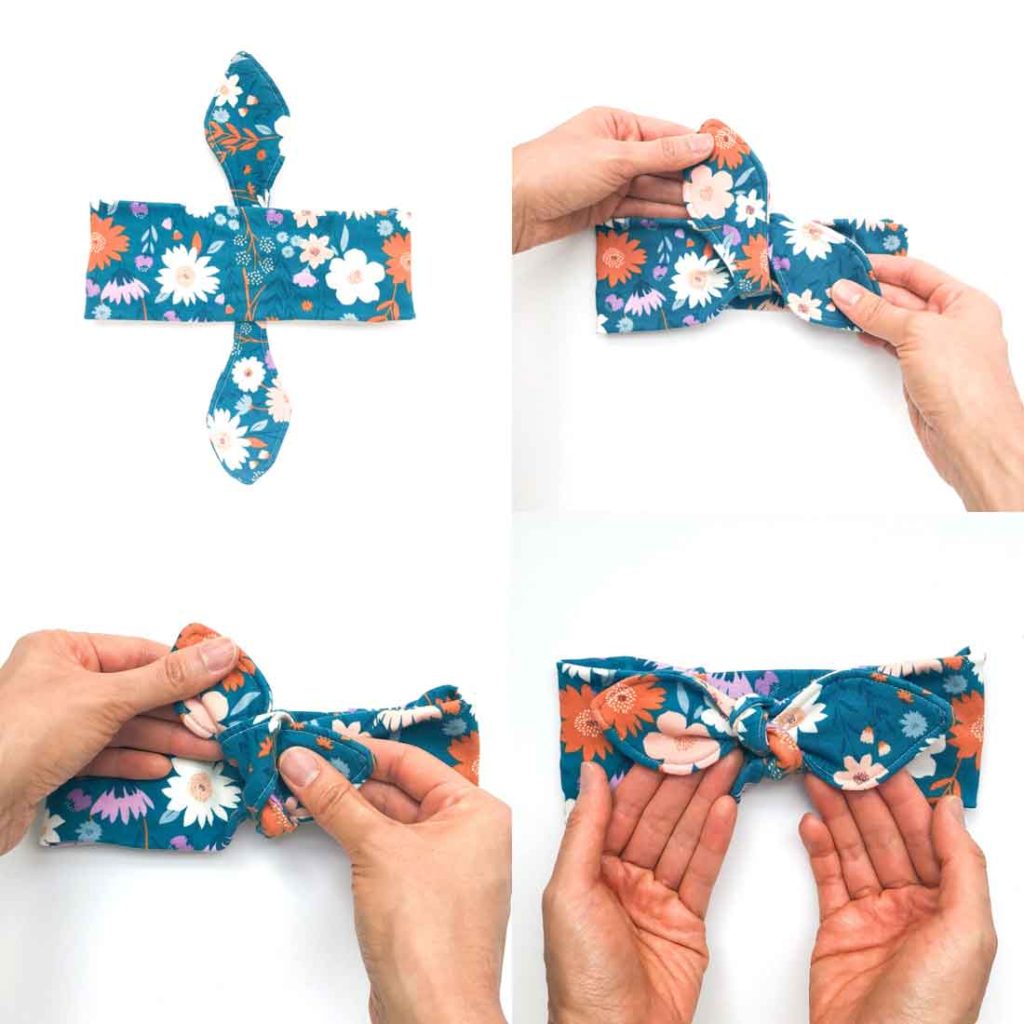
Tie the bow in a knot over the headband as shown in photo.

Finished! Wasn’t that simple? They are so easy and cute that you will want to make a bunch as gifts. Don’t forget to pin this image to save it for later. Happy Sewing 🙂
How to Make DIY Knit Headbands
Learn how to make this Simple DIY headband using stretchy knit fabric (or upcycle an old T-shirt). Wear as is or dress it up with a bow. This easy sewing project only takes 15 minutes to sew and is great for beginners.
Materials
- FREE BOW TIE HEADBAND PATTERN
- KNIT FABRIC
- FUSIBLE INTERFACING
- 2" WIDE ELASTIC - 3-3.5" long
Tools
- SEWING MACHINE
- SERGER (optional)
- FABRIC SCISSORS
- ROTARY CUTTER (optional) - but cuts knits very quickly and precisely, leaving clean, straight edges
- CLEAR RULER
- SEWING PINS or
- SEWING CLIPS
- MATCHING THREAD - polyester or cotton
- HAND SEWING NEEDLES
- IRON - for pressing
- BALL POINT SEWING NEEDLE
Instructions
- Cut 2 pieces of fabric according to headband size chart.
- Fold Headband Piece in half along width (the side that measures 8"/20.32cm.
- Sew at 1/2" (1.27cm) seam allowance, leaving a 1" (2.54 cm) opening close to one of the sides.
- Fold Elastic Piece in half along width (side that measures 5”) and sew at 1/2” seam allowance.
- Turn Elastic Piece to the right side and insert elastic band in.
- Place Elastic Piece into Headband Piece, right sides together.
- Match seam of Elastic Piece with Headband Piece.
- Fold sides of Headband Piece over Elastic Piece. Pin and sew at 1/2” seam allowance.
- Pull Elastic Piece through Headband Piece to match other edge of Headband Piece.
- Repeat on other side (see note 1).
- Turn the entire headband to the right side through the opening.
- Close the hole with Invisible Ladder Stitch.
- Finished headband!
HOW TO MAKE BOW TIE KNOT
- Cut out 2 bow tie pattern pieces on fabric and 1 piece on fusible interfacing.
- Iron fusible interfacing to wrong side of one of the Bow Tie Piece.
- Sew Bow Tie Piece, right side together at 1/2” (1.27cm) seam allowance leaving an opening at the middle. Make sure to back stitch at either side of the opening.
- Clip curves.
- Trim seam allowance down to about 1/4” (6 mm).
- Use a pair of blunt scissors (or a chopstick) and push the sides of the bow inward towards the opening. This helps make it easier to turn bow tie to the right side.
- Turn bow tie to right side and use scissors to gently poke out the tips.
- Close opening with hand needles using Invisible Ladder Stitch. If you don’t want to close the hole by hand, you can skip this step. The top stitching in the next step will also close the hole.
- Give the bow a good press.
- Top stitch at 1/8” (3mm) away from edge of bow tie ( see note 2).
- Tie bow over top of headband and you are done!
Notes
- This is a good place to check the headband fit before moving on. Use a basting stitch to sew Elastic Piece to other side of Headband Piece. This way you can quickly check the headband fit (no need to turn it to right side) and shorten Headband Piece if necessary. Remember to un-stitch the Elastic Piece, shorten the Headband Piece to the appropriate length before reattaching Elastic Piece back.
- When top stitching, make sure the interfaced piece is on the bottom (facing feed dog). The interfaced piece won't stretch compared to the non-interfaced piece which will make for a fuss-free sewing process.
Need pattern please
Hi Martha!
All of our patterns are available in the Free Resource Library. You will be emailed the password once you subscribe to our email list. You can do so at the following link: https://mindymakes.com/mindymakes-library/
Let me know if you run into any other problems. Thanks!
You didn’t explain how to attached the bow TO the headband. Is it just tied on? How do you get it to lay nicely across?
Hi Laura!
I’ve updated the post with photos of how attach the bow to the headband. You basically tie a knot and adjust how tight you want the knot over the headband. The knot part will pinch the middle of the headband to lay nicely across. Hope that helps! Let me know if you have any other questions!
um, there is no bow tie portion listed in your library.
Hi Laura,
The bow tie pattern is listed in the library under the letter “K” as “Knotted Bow Headband”. Let me know if you have trouble accessing it. Thanks!
I can’t find how long the elastic should be.
Hi Chelle!
Under the Headband Sizing Chart, there is a measurement for “Elastic Piece” depending on your head circumference, and that will tell you how much elastic you need. Thanks!
I’m absolutely loving your headband tutorial! In fact, I loved it so much that I featured it on Crafts on Display, a growing community of fellow crafting enthusiasts. You can check it out right here – https://craftsondisplay.com/sewing/simple-knotted-bow-headband-free-pattern-48542/ I hope you enjoy it, and please keep up the amazing work!
Hi Violeta,
Thank you so much! Wow there are so many fun crafts to make at craftsondisplay.com! I already see several I want to try. Thanks for sharing!