
How to Sew a Bunny Treat Bag (Free Pattern)
This easy drawstring bunny treat bag has two ears and a face to make it look the part. Perfect for holding little treats of sorts!
This post may contain affiliate links. Please read my disclosure policy for details. As an Amazon Associate, I earn from qualifying purchases.

Drawstring fabric bags are one of the easiest beginner sewing projects. It is quick and easy, and has wiggle room for maker error (meaning it’ll still turn out nicely) even if you are a beginner.
In today’s tutorial, I will be showing you how to sew a very easy drawstring bunny treat bag. This round drawstring pouch is fully lined and comes with two ears.
On top of that, you can add a bunny face at the end to take it over the top! This simple drawstring bag is perfect as an Easter treat bag or for bunny themed party favor bags.
Dimensions of Bunny Treat Bag
Please note that dimensions are approximate and your final project may differ slightly from the dimensions listed below.

The medium sized bunny bag measures 5″ (12.7cm) wide. It is about 6.5″ (16.51 cm) from bottom to tip of ears.
What Do I need To Make Bunny Treat Bag?
Materials
- BUNNY DRAWSTRING BAG PATTERN – available in the Free MindyMakes Resource Library. Scroll to the bottom of the post for more instructions.
- EXTERIOR FABRIC (100% cotton is recommended for beginners) – 1/4”Yard (0.23M) for large bag. Leftover fabric scraps are perfect for small and medium bag.
- LINING FABRIC (100% cotton is recommended for beginners) – 1/4”Yard (0.23M) for large bag. Leftover fabric scraps are perfect for small and medium bag.
- MEDIUM WEIGHT FUSIBLE INTERFACING
- COTTON CORD – for drawstring. In the photos I used a 5mm 100% cotton cord. However, feel free to use something thicker (no thicker than 10mm or 3/8”) if you prefer.
- HTV – for bunny face. Or use embroidery floss to create bunny’s face.
Tools
- SEWING MACHINE
- FABRIC SHEARS – I love my Ginghers Fabric Scissors! I’ve had it for over 10 years and it is still going strong!
- CLEAR RULER – I have the Dritz See Through Sewing Ruler 2 x 18 inch
- CHALK – I really like the Clover Chaco Chalk Liner for marking. It’s thin, marks well, and easy to use!
- POINT TURNER – optional, but very useful to push out the ears and bag.
- MATCHING THREAD
- BODKIN – for threading drawstring through bag.
- HAND SEWING NEEDLES
- SEWING PINS or SEWING CLIPS.
- POINT TURNER – optional, but very handy for all types of sewing projects!
- MATCHING THREAD
- IRON – I love my Rowenta Iron with a retractable cord for easy storage
Bunny Bag Pattern

Cut out the following Pieces:
- DRAWSTRING CHANNEL (X2)
- DRAWSTRING BAG LINING (X2)
- DRAWSTRING BAG EXTERIOR (X2)
- BUNNY EARS EXTERIOR (X2)
- BUNNY EARS LINING (X2)
- BUNNY EARS INTERFACING (X2)
DIY Easter Bunny Bag
Sewing Ears

First, Iron fusible interfacing to wrong side of BUNNY EARS EXTERIOR.

Second, place BUNNY EARS EXTERIOR and BUNNY EARS LINING right sides together.

Third, sew at 1/2” (1.27cm) seam allowance (red line).

Next, trim seam allowance down to 1/4” (6mm). Cut a diagonal at the tip and clip curves. Repeat on other ear.
NOTE: In the photo I cut notches at the curves for better visualization. However, making a snip with the tip of the scissor is sufficient.

Then turn ears to right side and poke out the tip with a point turner.

Finally give the ears a good press and top stitch 1/8”(3mm) along the edge.
How to Sew Drawstring Channel

First, along the sides, fold in 1/4”(6mm) and press, then fold in another 1/4”(6mm) and press.

Next, stitch down the folds, 1/8”(3mm) from inner edge (pink line). Repeat on other side.

Then do the same thing on other DRAWSTRING CHANNEL piece.

Next, fold DRAWSTRING CHANNEL in half along the length and clip in place. Repeat on other piece.

Now Machine baste DRAWSTRING CHANNEL (green line) down.
Sewing Drawstring Channel to Bag

First, with BAG LINING right side up, place DRAWSTRING CHANNEL over, lining it up along the top, 1/2” (1.27cm) in from both side of lining. Note fold of DRAWSTRING CHANNEL is facing down towards bottom of lining.

Second, place DRAWSTRING BAG EXTERIOR over, right sides together.

Third, hold together with clips (or pins) and sew together at the top with 1/2” (1.27cm) seam allowance (blue line).

Then trim seam allowance down to 1/4” (6mm).

Next, place BUNNY EARS (lining side down) over second DRAWSTRING CHANNEL, matching at the sides. Clip in place and baste (green line). Next, stitch the ears to the folded edge of DRAWSTRING CHANNEL, 1/8” (3mm) from edge (black line).

Next, place this entire piece over DRAWSTRING BAG LINING (right side up) in the same way you did earlier.
NOTE: Right side of BUNNY EARS lining face right side of DRAWSTRING BAG LINING.

Now place DRAWSTRING BAG EXTERIOR over, right sides together.

Next, hold together with clips (or pins) and sew together at the top with 1/2” (1.27cm) seam allowance (blue line).
Now trim seam allowance down to 1/4” (6mm).

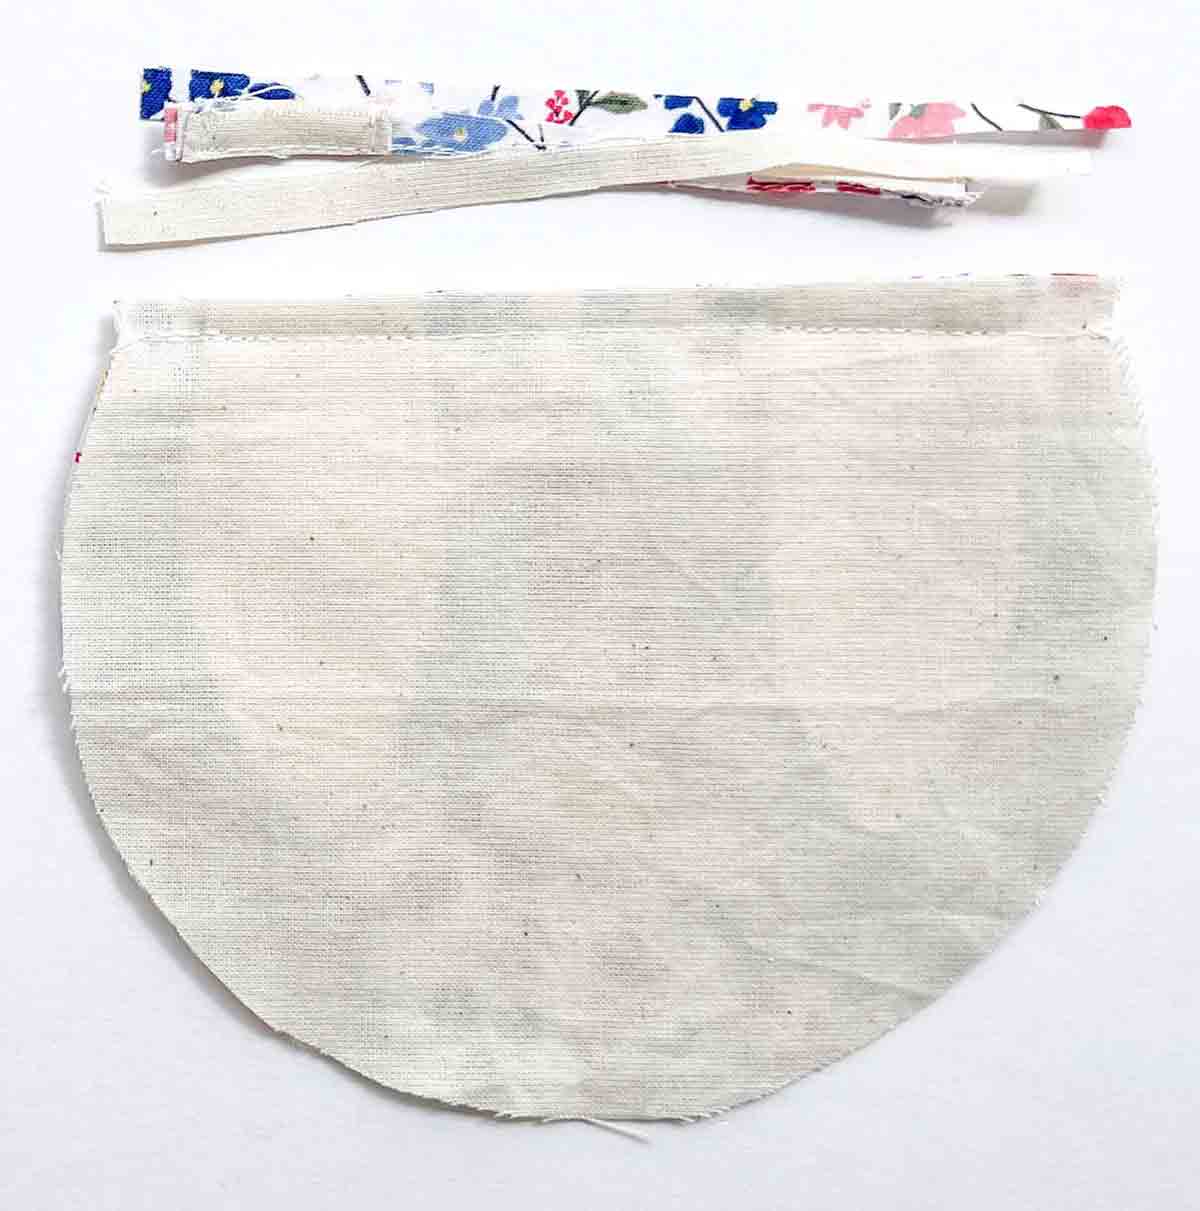
Now you will have 2 drawstring bag pieces that look like the photo. The piece with the ears sewn will be the BAG PIECE – BACK, and the piece without the ears will be BAG PIECE – FRONT.
Sewing Bunny Treat Bag Together

First place the 2 BAG PIECES right sides together, lining to lining, and exterior to exterior.

Second, clip/pin in place and sew at 1/2”(1.27cm) seam allowance, leaving an opening about 1.5 – 2” wide on the lining side (blue line). We will be turning the bag to the right side through this opening later.

Now trim seam allowance down to 1/4”(6mm), except at the opening, and clip curves.

Turn bag to right side through opening.

Next, use your point turner to push out the bag.

Now, hand close the hole on lining with invisible ladder stitch.

Almost done! Now it’s time to add some drawstrings!
How to Add Drawstring to Bunny Treat Bag

First, cut 2 pieces of cord approximately 16″ (40.64cm) long each. Next, use bodkin and thread cord in and out of one side of drawstring channel (black dotted line).

Now tie a knot at the end.

Next, repeat on other side.

Now tie a knot at the end. Your bunny bag is done!
Add Bunny Face to Treat Bag
The following tutorial is a visual guide showing you how to iron on the face of the bunny. First, you will need to cut out the bunny face on HTV using your cutting machine (Silhouette, Cricut, etc).
Also note that in this tutorial I cut the bunny face out in brown HTV and the nose in pink HTV. You can also cut the entire face out in the same color as well.
Alternatively, hand embroider the bunny face using embroidery floss, which will be equally as cute!

First, weed out negative space of bunny face HTV and place onto front of bag (sticky side down) where it looks good.

Next, adhere HTV to fabric with heat press or iron via instructions that came with your HTV. For mine, I use linen setting, no steam on my iron, and apply medium pressure over teflon paper (that came with my HTV) for 20-30s.

Peel off sticky clear backing. Next, stick bunny nose HTV on the fabric and adhere in the same way. Peel off sticky clear backing on nose and you are done!
FREE Sewing Pattern for Bunny Pouch
To get a copy of the FREE Bunny Drawstring Bag PDF Pattern, subscribe to the MindyMakes Email List to receive the password for the Mindy Makes Free Resource Library. The Bunny Drawstring Bag Pattern is listed under section ‘B’ of the library as “Bunny Drawstring Bag Pattern”.
Once you click “submit”, the password will show up on the next page. You will also receive a welcome email with the password in case you forget.
Please allow up to an hour for the welcome email to fly through cyberspace and travel into your inbox. If you still don’t receive the email, make sure to check your junk or spam folders and add my email to your safe list!
Need more help? Be sure to check out this step-by-step guide that shows you exactly how to get the password, enter the library, and download the PDF.
Bunny Treat Bag Printable PDF + More Sizes
The ad-free, printer friendly PDF version of the sewing tutorial is available in OUR ETSY SHOP. Additionally, it comes with Bunny Treat Bag Pattern in 3 sizes* (Small, Medium, and Large). Print a copy and keep it by your sewing table for easy reference!
*Only the Medium Sized Bunny Bag Pattern is available in the Free Resource Library.

How to Sew a Bunny Treat Bag
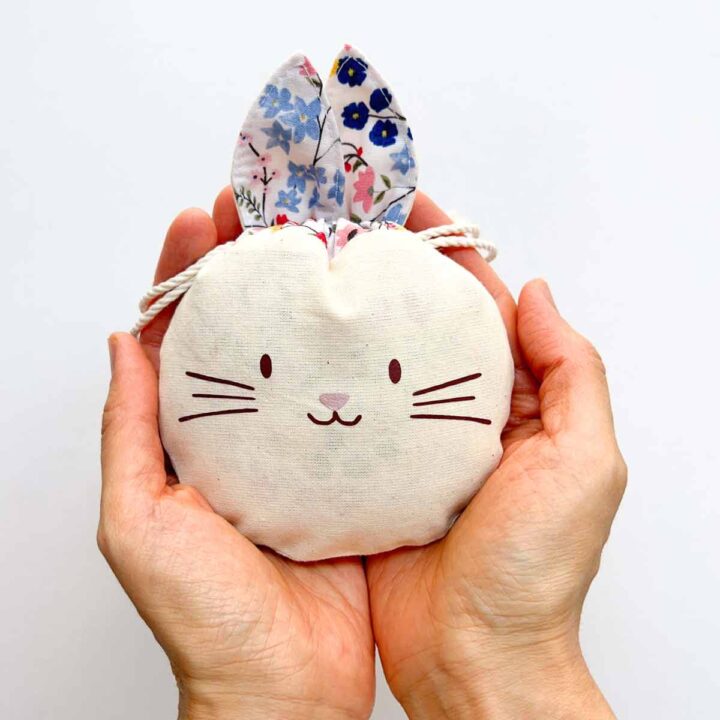
This simple bunny treat bag is very easy to make, not to mention super adorable. Perfect for treats of all sorts!
Materials
- DRAWSTRING BUNNY BAG PATTERN
- EXTERIOR FABRIC (recommend 100% cotton for beginners) - 1/4 Yard (0.23 M)
- LINING FABRIC (recommend 100% cotton for beginners) - 1/4 Yard (0.23 M)
- MEDIUM WEIGHT FUSIBLE INTERFACING
- COTTON CORD
- HTV (optional) - for bunny face
Tools
Instructions
- Iron fusible interfacing to wrong side of BUNNY EARS EXTERIOR.
- Place BUNNY EARS EXTERIOR and BUNNY EARS LINING right sides together.
- Sew at 1/2” (1.27cm) seam allowance.
- Trim seam allowance down to 1/4” (6mm). Cut a diagonal at the tip and clip curves. Repeat on other ear.
- Turn ears to right side and poke out the tip with a point turner.
- Give the ears a good press and top stitch 1/8” (3mm) along the edge.
- At the sides, fold in 1/4” (6mm) and press, then fold in another 1/4” (6mm) and press.
- Stitch down the folds, 1/8” (3mm) from inner edge (pink line). Repeat on other side.
- Do the same thing on other DRAWSTRING CHANNEL piece.
- Fold DRAWSTRING CHANNEL in half along the length and clip in place. Repeat on other piece.
- Machine baste DRAWSTRING CHANNEL at the bottom.
- With BAG LINING right side up, place DRAWSTRING CHANNEL over, lining it up along the top, 1/2” (1.27cm) in from both side of lining. Note that fold of DRAWSTRING CHANNEL is facing down towards bottom of lining.
- Place DRAWSTRING BAG EXTERIOR over, right sides together.
- Hold together with clips (or pins) and sew together at the top with 1/2” (1.27cm) seam allowance.
- Trim seam allowance down to 1/4” (6mm).
- Place BUNNY EARS (lining side down) over second DRAWSTRING CHANNEL, matching at the sides. Clip in place and baste.
- Stitch the ears to the folded edge of DRAWSTRING CHANNEL, 1/8” (3mm) from edge.
- Place this entire piece over DRAWSTRING BAG LINING (right side up) in the same way as the first step (see note 1).
- Place DRAWSTRING BAG EXTERIOR over, right sides together.
- Hold together with clips (or pins) and sew together at the top with 1/2” (1.27cm) seam allowance.
- Trim seam allowance down to 1/4” (6mm).
- You will now have 2 drawstring bag pieces that look like the photo. The piece with the ears sewn will be the BAG PIECE - BACK, and the piece without the ears will be BAG PIECE - FRONT.
- Place 2 BAG PIECES right sides together, lining to lining, and exterior to exterior.
- Clip/pin in place and sew at 1/2” (1.27cm) seam allowance, leaving an opening about 1.5 - 2” wide on the lining side. Don't forget to back stitch on both sides of opening.
- Trim seam allowance down to 1/4” (6mm), except at the opening, and clip curves.
- Turn bag to right side through opening.
- Use your point turner to push out the bag.
- Hand close the hole on lining with invisible ladder stitch.
- Cut 2 pieces of cord approximately 16" (40.64cm) long each.
- Use bodkin and thread cord in and out of one side of drawstring channel. Tie a knot at the end.
- Repeat on other side and tie a knot at the end.
- Your bunny bag is done!
- Weed out negative space of bunny face and apply it onto the front of bag, sticky side down.
- Adhere HTV to fabric with heat press or iron via instructions that came with your HTV (see Note 2).
- Peel off sticky clear backing
- Stick bunny nose HTV on the fabric and adhere in the same way. Peel off sticky clear backing on nose and you are done!
How to Sew Bunny Ears
How to Sew Drawstring Channel
Sewing Bunny Treat Bag Together
Sewing Bunny Treat Bag Together
How to String Drawstring Bag
How to Apply HTV Bunny Face
First, you will need to cut out the bunny face on HTV using your cutting machine (Silhouette, Cricut, etc).
Also note that in this tutorial I cut the bunny face out in brown HTV and the nose in pink HTV. You can also cut the entire face out in the same color as well.
Alternatively, hand embroider the bunny face using embroidery floss, which will be equally as cute!
Notes
Note 1: Right side of BUNNY EARS LINING face right side of DRAWSTRING BAG LINING.
Note 2: For my HTV, I use linen setting, no steam, medium pressure over teflon paper (came with my HTV) for 20-30s.
love your site
Thank you Leslie!