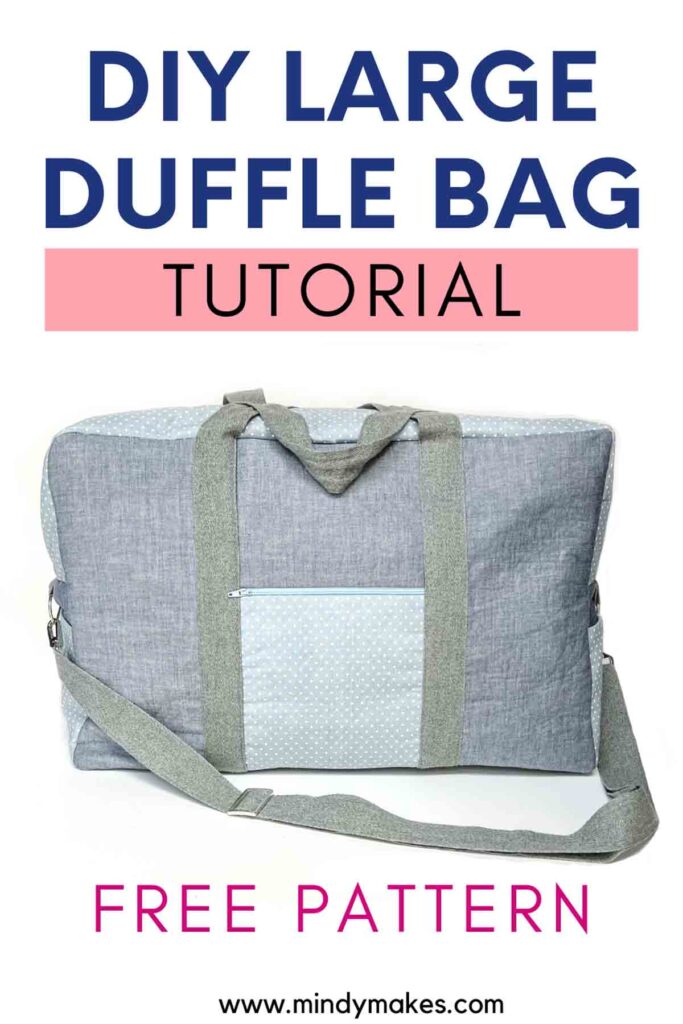
Large Duffle Bag Pattern (FREE) – The BEST Tutorial
Always wanted to know how to make a homemade duffle bag? This step-by-step tutorial with free pattern will show you exactly what to do. Get ready to rock your next adventure in style by making this simple duffle bag, perfect for holding everything!
If you’re anything like me, chances are you love large bags because you want to bring your entire wardrobe with you while traveling. Because well…you just never know when you will need that oversized sweater or that colorful scarf. Sound familiar?
Well today I have a treat for you, because this duffle bag pattern is everything you need to make a large carry-all bag to store your belongings.
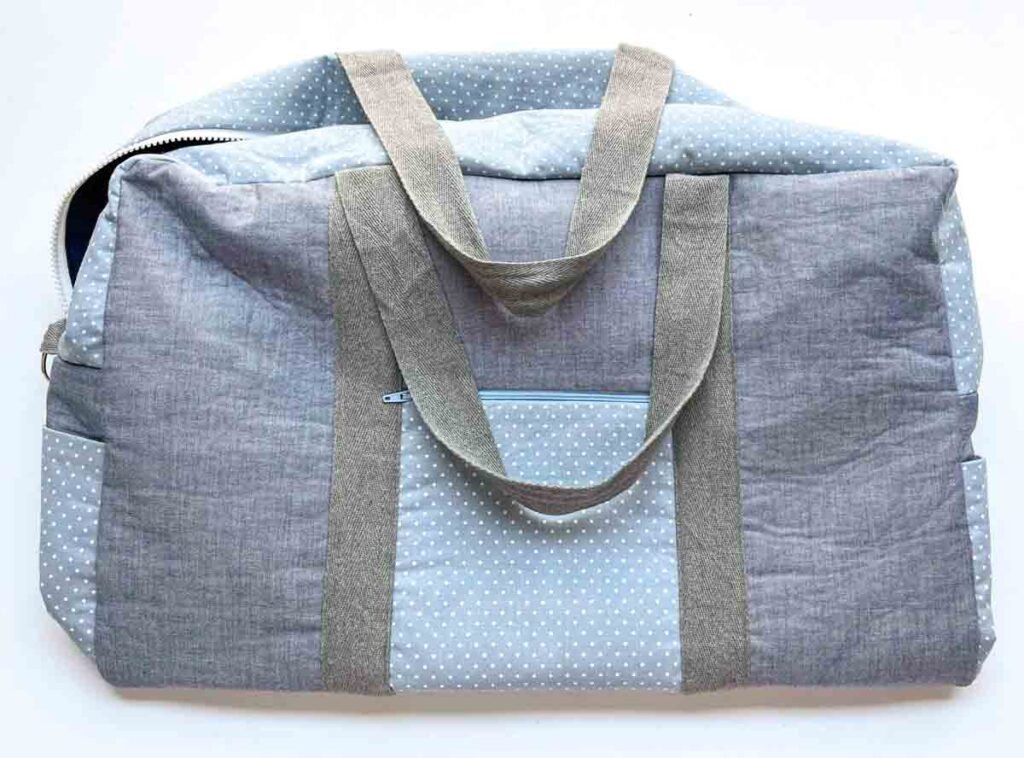
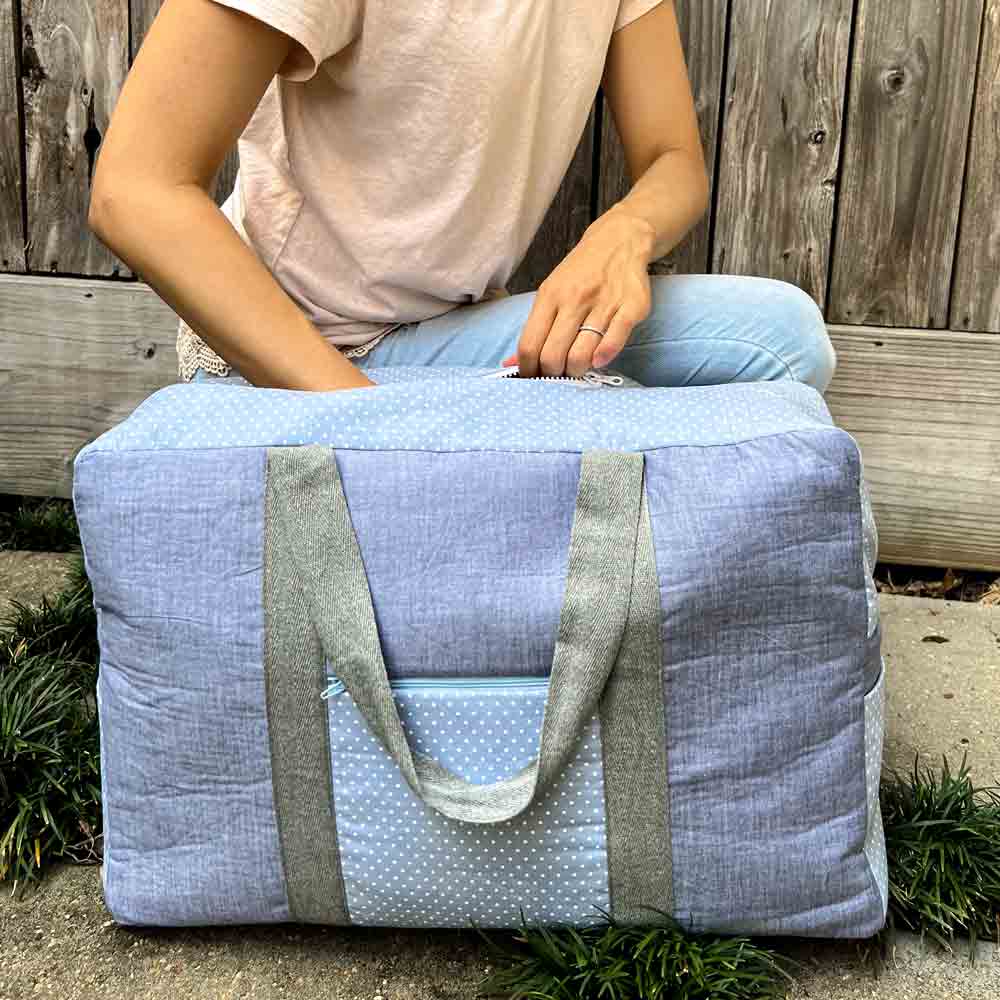
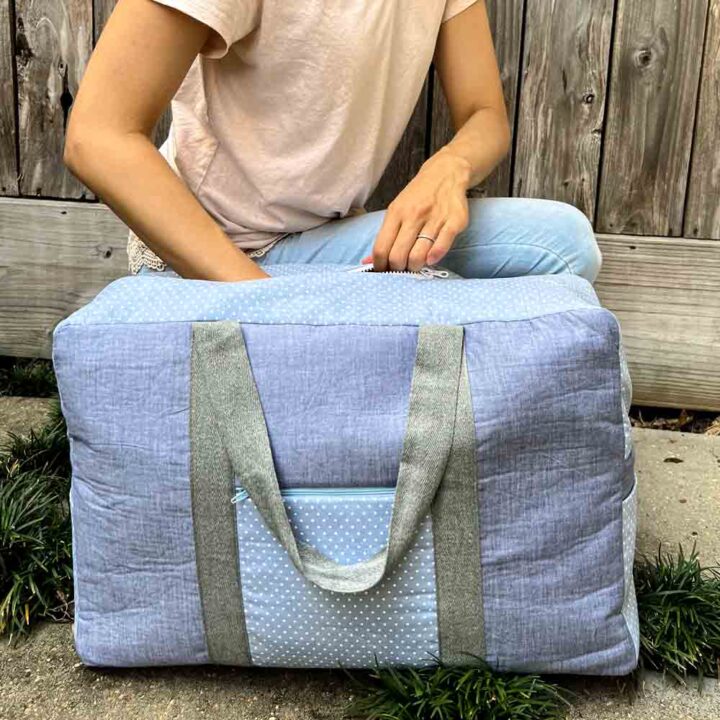
Handmade Duffle With free sewing pattern
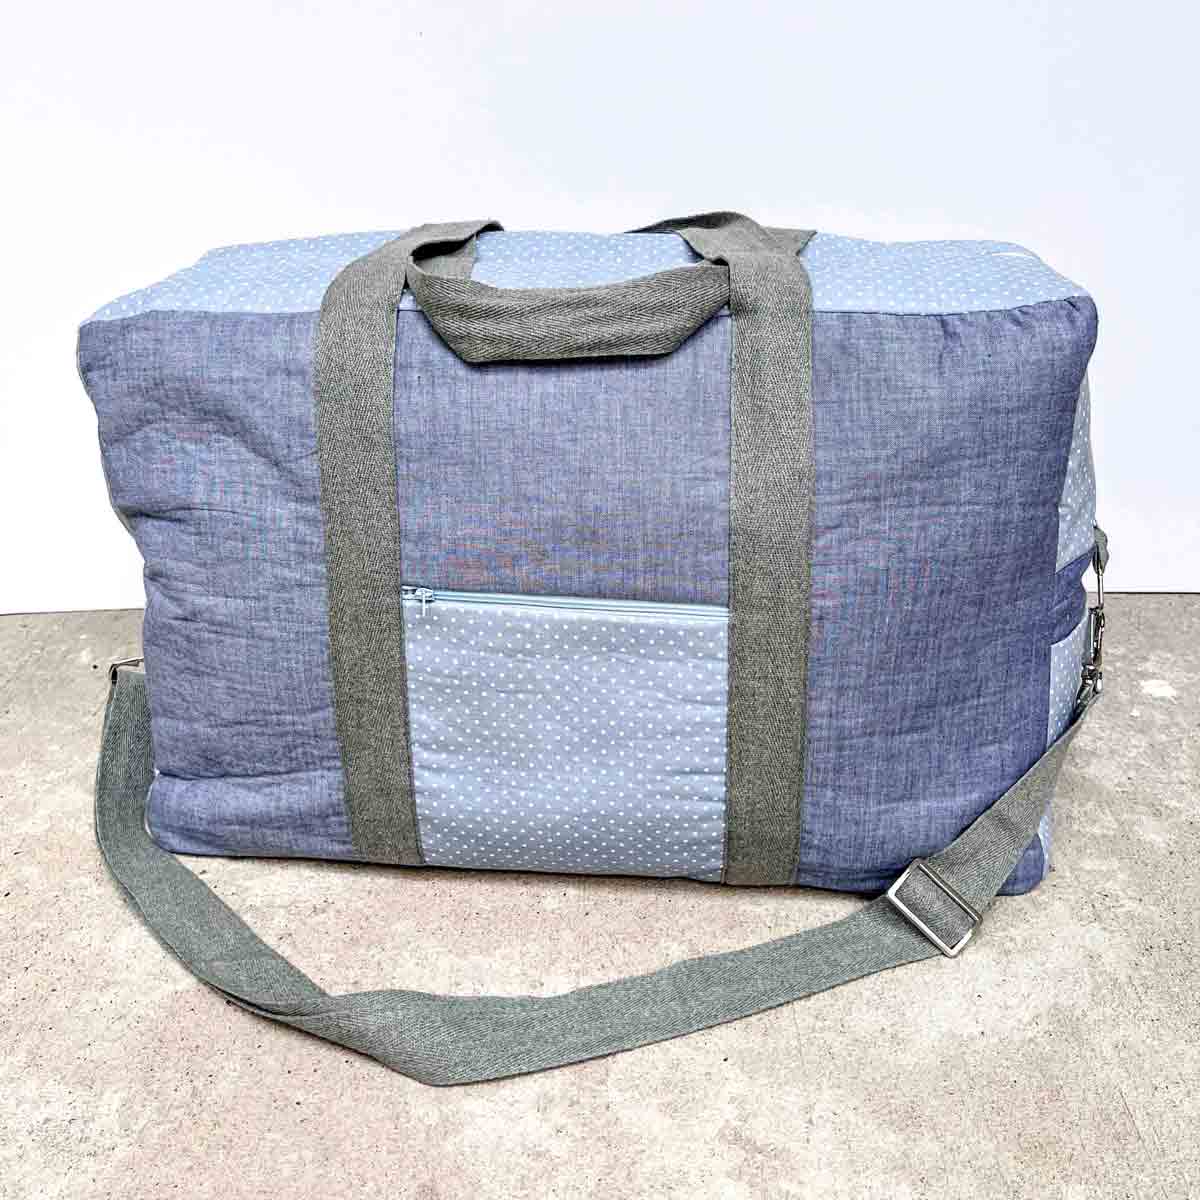
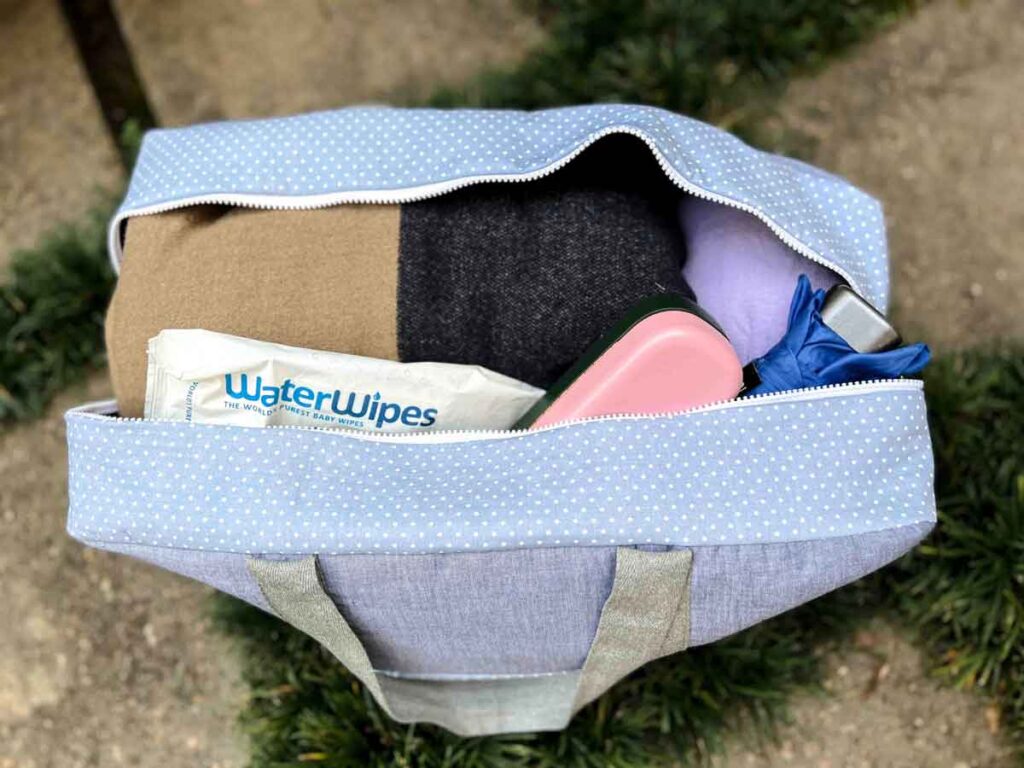
The large duffle bag consists of two zippered pockets on the front and back of the bag. Additionally, there are two side pockets so you can easily slide things in and out for easy access.
The bag has a dual zipper opening with wide access (it opens from side to side). I purposely designed it this way because I want my carry-all bags to have a large opening for ease-of-use.
On top of that, the bag comes with a shoulder strap so that you can wear it across your body. You can, of course, make it without the shoulder strap so the duffle is essentially a giant tote bag to carry around all your belongings.
Since this is a DIY project, you can make it however you want. This is the ABSOLUTE BEST part about sewing your own bags! You get to choose what features you want or don’t want.
How do You Make a Rectangular Duffle Bag?
Follow the step-by-step tutorial below and I will show you exactly how to make this stylish and useful bag. The duffel itself is not difficult to sew. However, it is not a quick sewing project as there are many parts to the bag, including 3 zippers. This sewing project is most suitable for those who have completed other simple sewing projects before.
If this is the first time you are attempting a sewing project, check out the following beginner-friendly sewing projects to help you get you started.
Last Minute Fabric Gift bag with a Gusset
If you are a complete beginner to sewing, these beginner-friendly sewing tutorials are just for you!
- How to Thread a Sewing Machine
- How to Thread and Wind The Bobbin
- 10 Tips to Easily Thread a Sewing Needle
- 19 Essential Hand Sewing Stitches Everyone Needs to Know
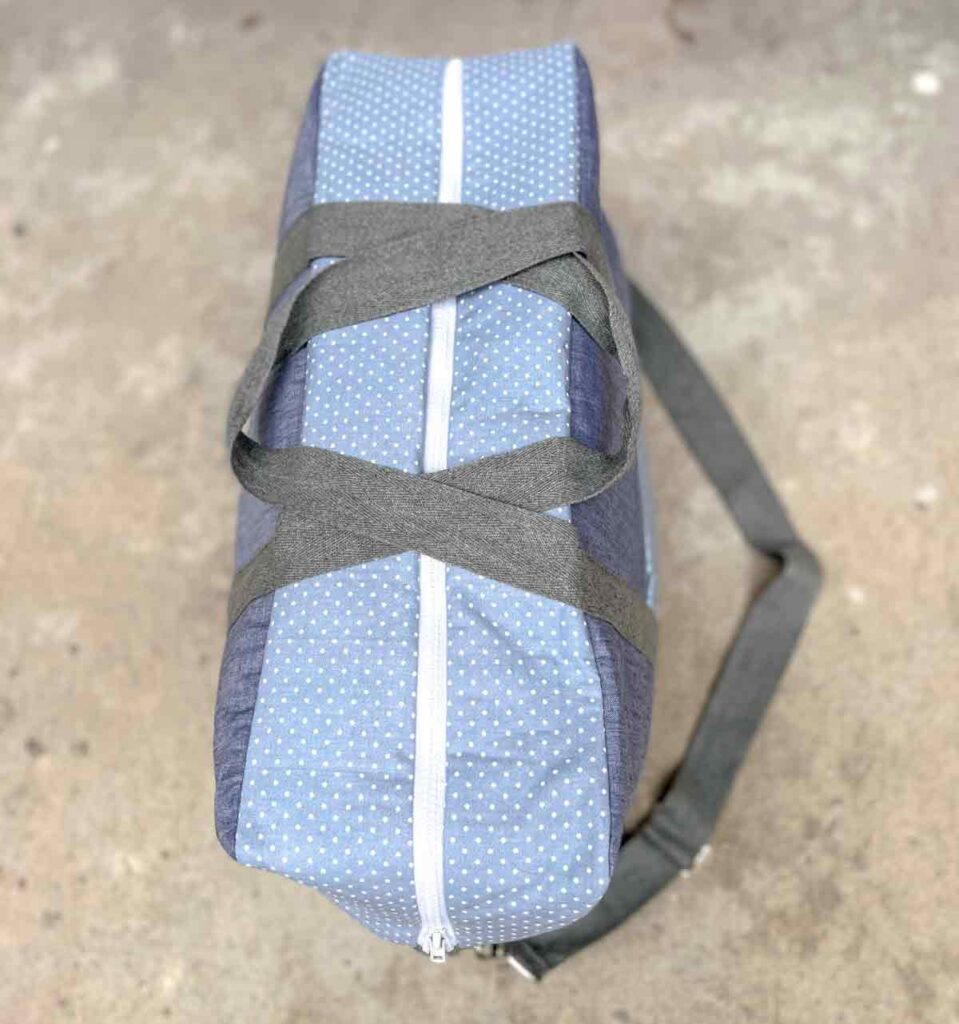
What are the Dimensions of Large Duffle Bag?
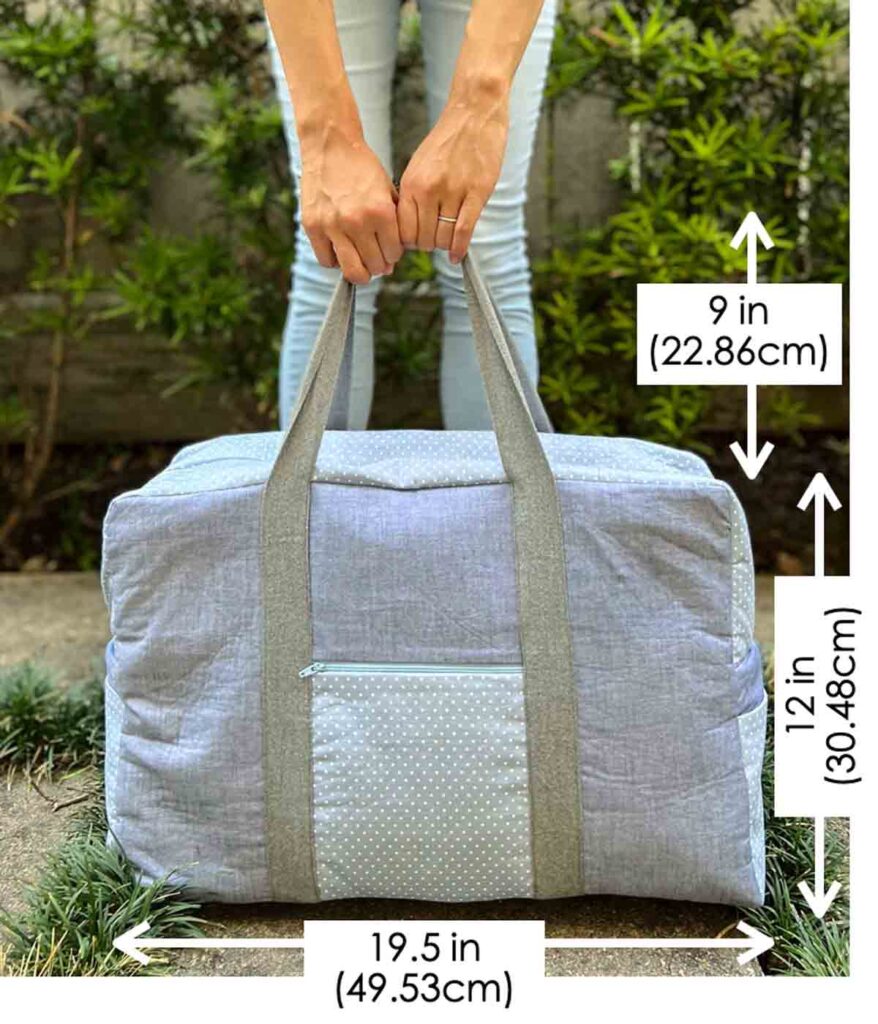
The front of the handmade duffle bag measures approximately 19.5″ (49.53cm) wide and 12″ (30.48cm) tall. The height of the handle strap is approximately 9″ (22.86cm).
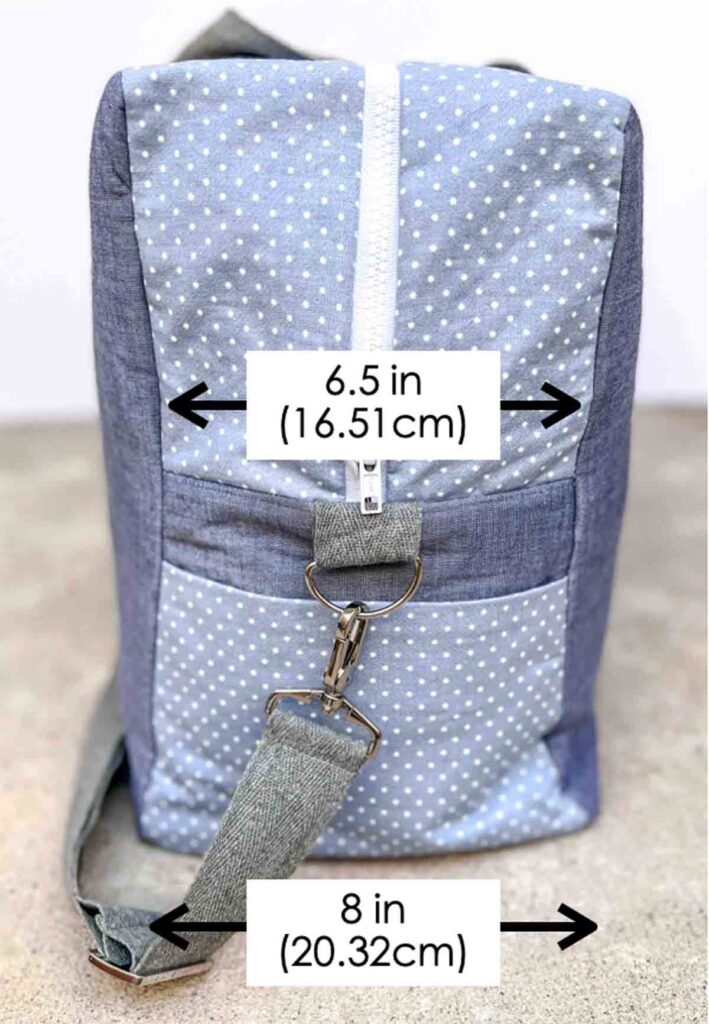
The side of the duffle bag measures approximately 8″ (20.32cm) at the bottom and 6.5″ (16.51cm) wide along the zipper.
How much Fabric Do I need to make a Duffle Bag
To make a large duffle bag, you will need 1 yard of exterior fabric and 1 yard of lining (0.9 meters each). You can also choose to make the bag using two types of exterior fabric. In that case, you will need 1/2 yard of each fabric. For a complete list of materials you will need for duffle bag, see MATERIALS below.
What Fabric is Used for Duffel Bags?
You can use any woven fabric you like. Fabrics in the following list are especially suitable for making duffel bags:
- Canvas – Canvas is sturdy, durable and heavy duty. This makes is very suitable as duffle bags usually go through repetitive wear and tear.
- Outdoor fabric – Similar to canvas, outdoor fabric is generally thick and heavy duty. They are also water resistant and some even waterproof, another bonus feature!
- Thick Cotton Fabric – Other thick cottons such as denim and twill are also good choices.
- Vinyl Fabric – Durable, stylish, and will look store-bought. However, recommend using a Heavy Duty Sewing Machine or industrial machine as the fabric pieces are thick and can be difficult to sew.
- Regular Weight Cotton reinforced with batting or interfacing – if you see a lightweight cotton print that you just have to have, reinforce it with fusible fleece or interfacing! Additionally, use canvas fabric as the lining for extra support. This is the option that I used. See STEP-BY-STEP TUTORIAL for how to make a sturdy large-sized duffle bag.
MATERIALS
- DUFFLE BAG SEWING PATTERN (Available in the Free MindyMakes Library).
- EXTERIOR FABRIC
- If using one type of fabric: 1 yard (44” wide)
- If using 2 types of fabric: 1 yard (44” wide) of each fabric
- LINING FABRIC: 1 Yard (44” wide) – ideally medium to heavy-weight woven cotton such as canvas, duck cloth, or heavy-duty twill. If wanting to use light weight fabric, you can always fuse interfacing to add stability
- FUSIBLE INTERFACING – 1 Yard
- FUSIBLE FLEECE – 1 Yard. I used Pellon 987F Fusible Fleece. May not need if using medium to heavy-weight canvas or duck cloth for the exterior.
- ONE SIDED FUSIBLE ULTRA FIRM STABILIZER (20”wide) – 2/3 of a yard (20”or 51cm). I used Pellon 71F Peltex
- 30” DUAL SEPARATING ZIPPER (x1) – I used Coats & Clark Sport Parka Dual Separating Zipper. You can also use a longer zipper and trim down
- 7″ MATCHING ZIPPER (x2)
- 1.5″ WIDE WEBBING in matching color: 4.5 Yards (4.2 meters) – cut into the following:
- TWO 47”(119.38cm) pieces – for bag handles
- ONE 60”(152.4cm) piece – for shoulder strap
- TWO 3″ (7.62cm) pieces – for side panel tabs
- 1.5” WIDE D RINGS (x2) – Also available on Amazon along with swivel hooks and slider
- 1.5” WIDE SWIVEL HOOKS (x2)
- 1.5” WIDE SLIDER (x1)
TOOLS
- SEWING MACHINE
- FABRIC SCISSORS – these Ginghers are my favorite.
- CLEAR RULER – I have the DRITZ See-Through Sewing Ruler
- FABRIC CHALK – These Chaco Liners by Clover are my absolute favorite
- SEWING PINS and SEWING CLIPS
- HAND SEWING NEEDLES
- MATCHING THREAD
DUFFLE BAG PATTERN
For the Large Duffle Bag Sewing Pattern, ALL pattern pieces are available in printable format except the [TOP ZIPPER PIECE] and [BOTTOM FUSIBLE PIECE] pattern. You will need to draw these patterns directly on the fabric. The dimensions of these two pattern pieces are listed below:
- TOP ZIPPER PIECE: 31.5″ x 4.25″ (79.4 cm x 10.8 cm)
- Cut 2 Pieces on Exterior Fabric
- Cut 2 Pieces on Lining Fabric
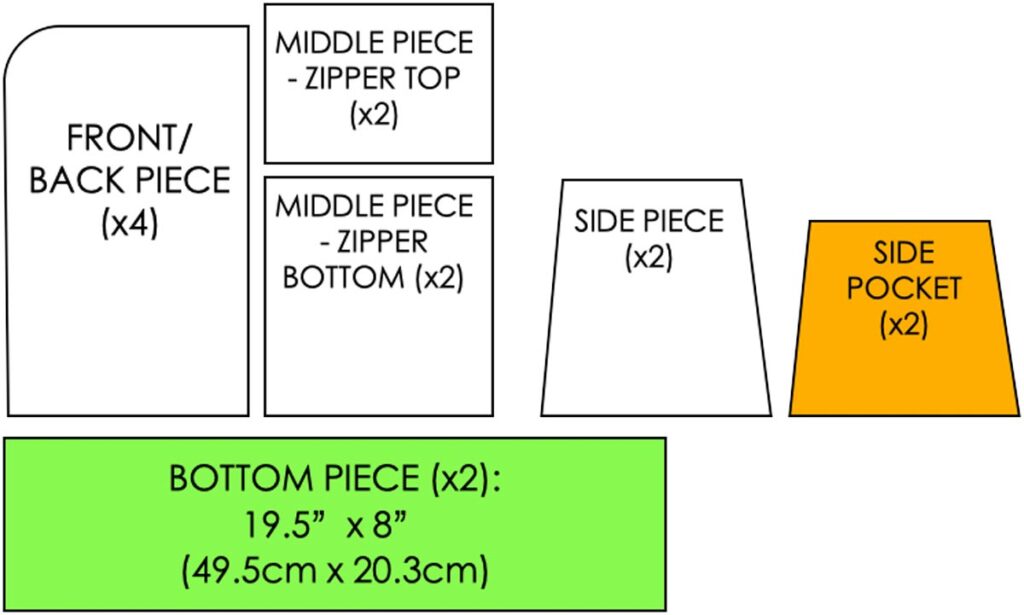
- BOTTOM FUSIBLE PIECE: 19.5″ x 8″ (49.5 cm x 20.3 cm)
Alternatively, you can also deduct 0.5″ (1.27mm) from entire border of [BOTTOM PIECE] pattern by folding the paper pattern in. This will give you the dimension of [BOTTOM FUSIBLE PIECE] if you prefer not to draw the pattern.
EXTERIOR FABRIC
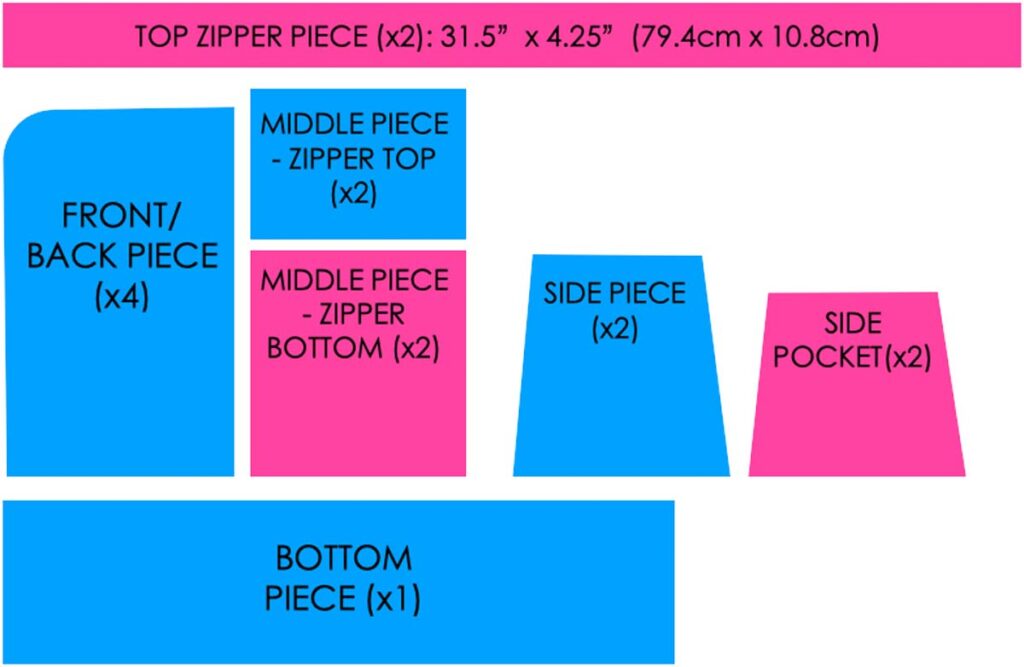
- FRONT/BACK PIECE (x4)
- MIDDLE PIECE – ZIPPER TOP (x2)*
- MIDDLE PIECE – ZIPPER BOTTOM (x2)*
- BOTTOM PIECE (x1)
- SIDE PIECE (x2)
- SIDE POCKET (x2)*
- TOP ZIPPER PIECE (x2) – draw measurements on fabric and cut out
NOTE: *If you want to self-line the pockets, cut out 4 pieces (instead of 2) for all the pieces marked with an asterisk (*). You won’t need to cut those pieces on the lining then.
LINING FABRIC

- FRONT/BACK PIECE (x2)
- MIDDLE PIECE – ZIPPER TOP (x2)*
- MIDDLE PIECE – ZIPPER BOTTOM (x2)*
- MIDDLE PIECE (x2) – Cut out of exterior fabric if you want self-line the pockets.
- BOTTOM PIECE (x1)
- SIDE PIECE (x2)
- SIDE POCKET (x2)*
- TOP ZIPPER PIECE (x2) – draw measurements on fabric and cut out
FUSIBLE INTERFACING
- FRONT/BACK PIECE (x4) – fusible fleece
- MIDDLE PIECE – ZIPPER TOP (x2) – fusible fleece
- MIDDLE PIECE – ZIPPER BOTTOM (x2) – fusible fleece
- SIDE PIECE (x2) – fusible fleece
- SIDE POCKET (x2) – fusible interfacing
- BOTTOM PIECE (x2) – Cut out 2 pieces measuring 19.5”x 8”(49.5 cm x 20.3 cm) each on Peltex Ultra Firm Stabilizer.
- TOP ZIPPER PIECE (x2) – Fusible fleece. Cut out following instruction in tutorial. There is no paper pattern.
LARGE DUFFLE BAG PATTERN is available in our Free MindyMakes Resource Library, listed under section “D” as Duffle Bag Pattern. Subscribe here to get the password.
How do you make a homemade duffle bag?
How To Sew A Zipper Pocket
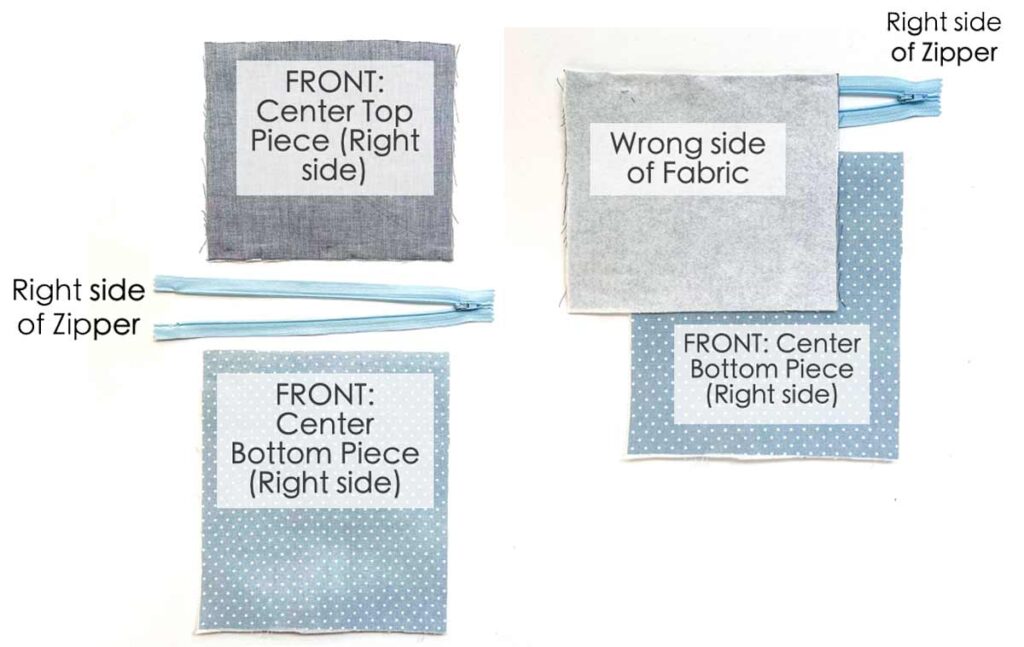
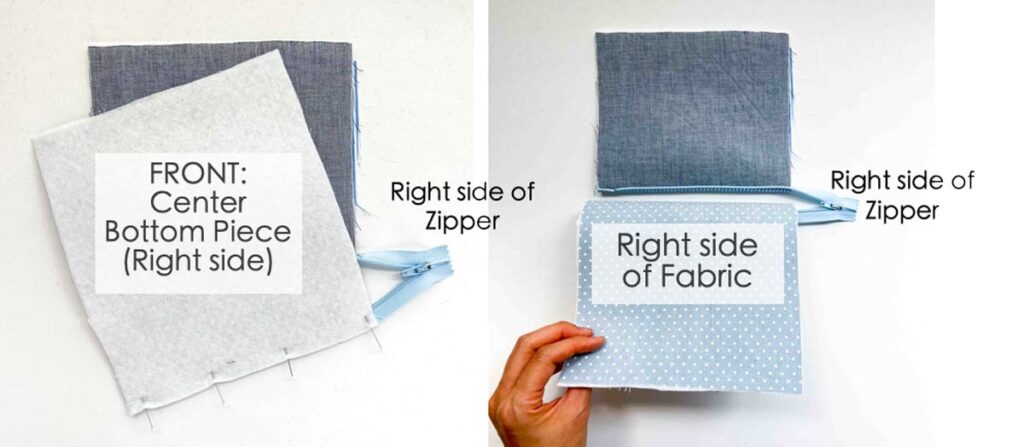
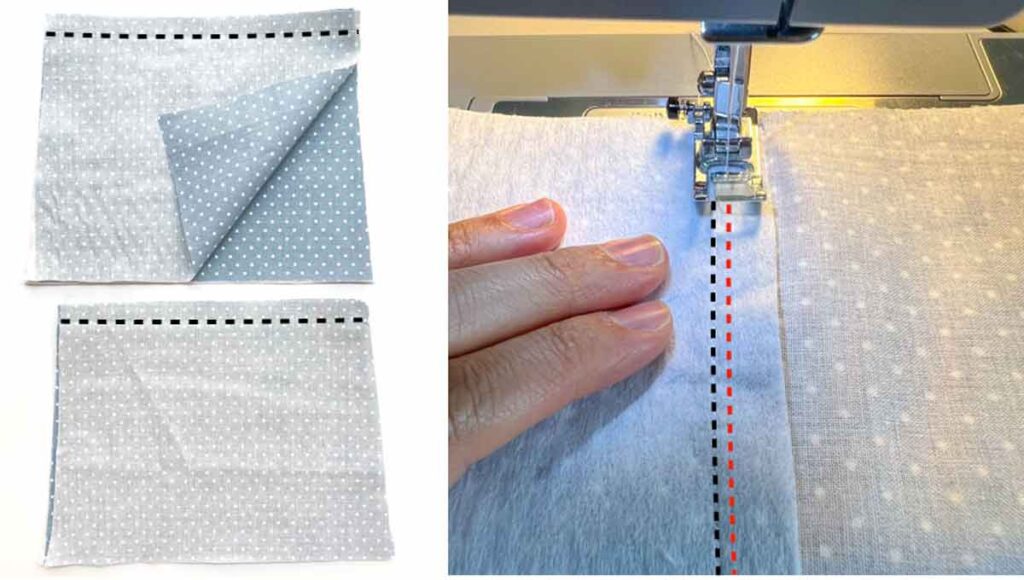
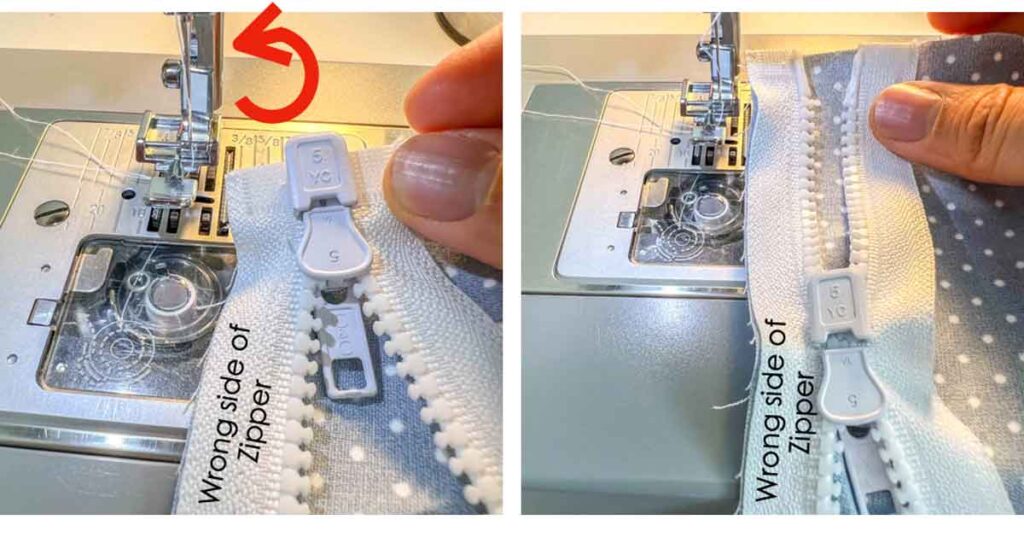
LEFT: Put zipper right side up. Place [FRONT: CENTER TOP PIECE] above zipper, right side up. Then put [FRONT: CENTER BOTTOM PIECE] below zipper, right side up.
RIGHT: Flip [FRONT: CENTER TOP PIECE] over from top to bottom so the wrong side faces up. Match fabric edge with end of zipper, right sides together.
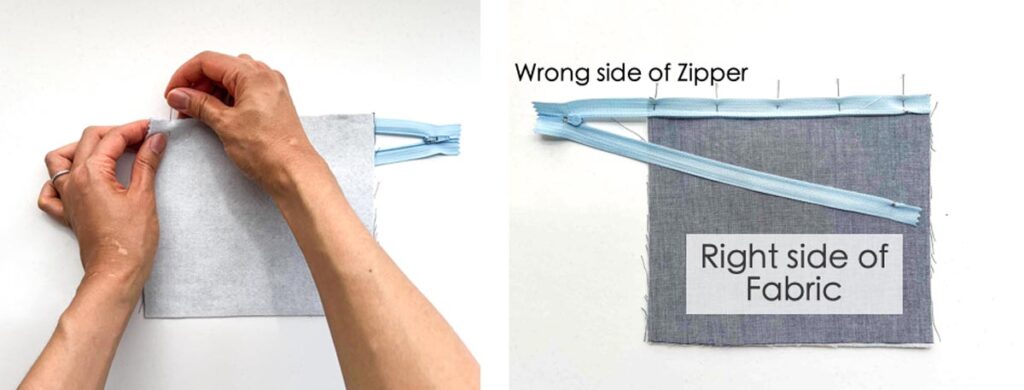
LEFT: Pin fabric to zipper.
RIGHT: Flip zipper and fabric (right to left) so that wrong side of zipper faces up.
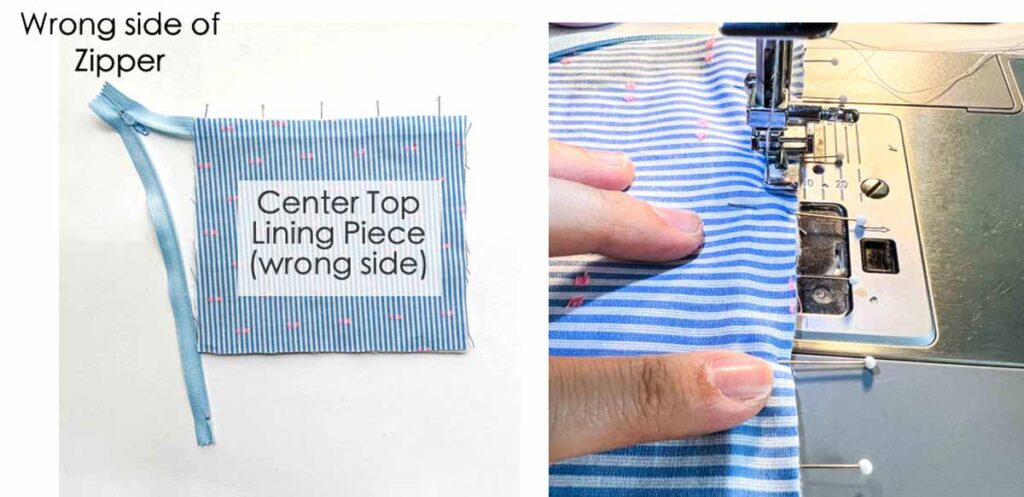
LEFT: Place [CENTER TOP LINING PIECE] over zipper and exterior fabric, wrong side up.
RIGHT: Using a zipper foot, sew fabric/zipper/lining together.
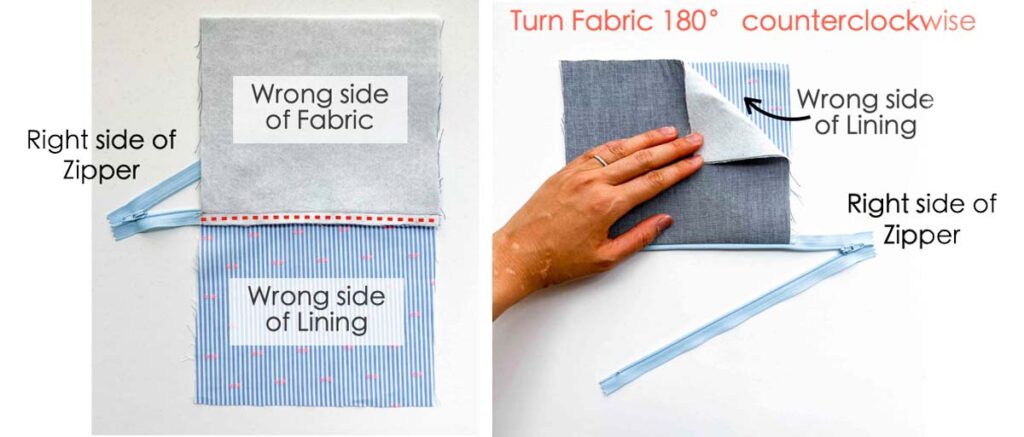
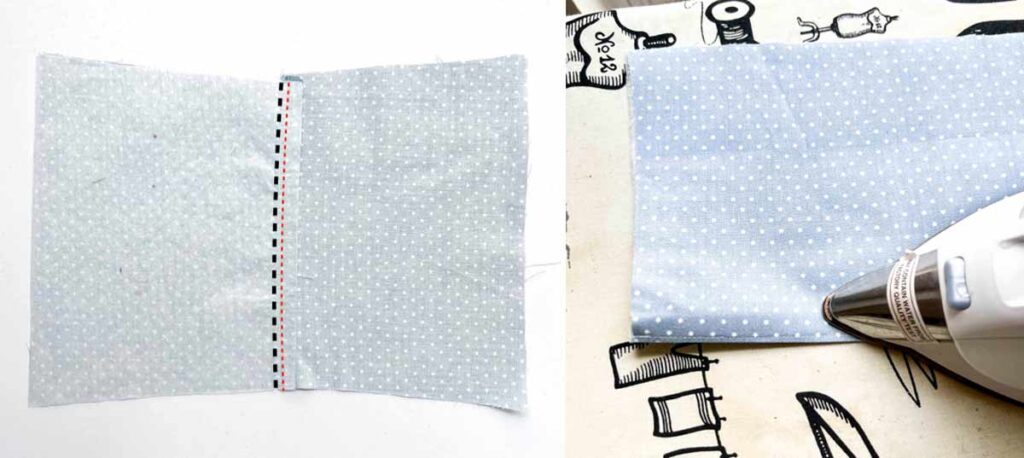
LEFT: Lean seam allowance down towards lining side and edge stitch (red dotted lines)
RIGHT: Next, turn fabric so that the right side of zipper is to your right (when looking down from above) and faces up.
LEFT: Pin [FRONT: CENTER BOTTOM PIECE] to zipper, right sides together, matching at the edge.
RIGHT: Flip [FRONT: CENTER BOTTOM PIECE] from top to bottom so the right side faces up
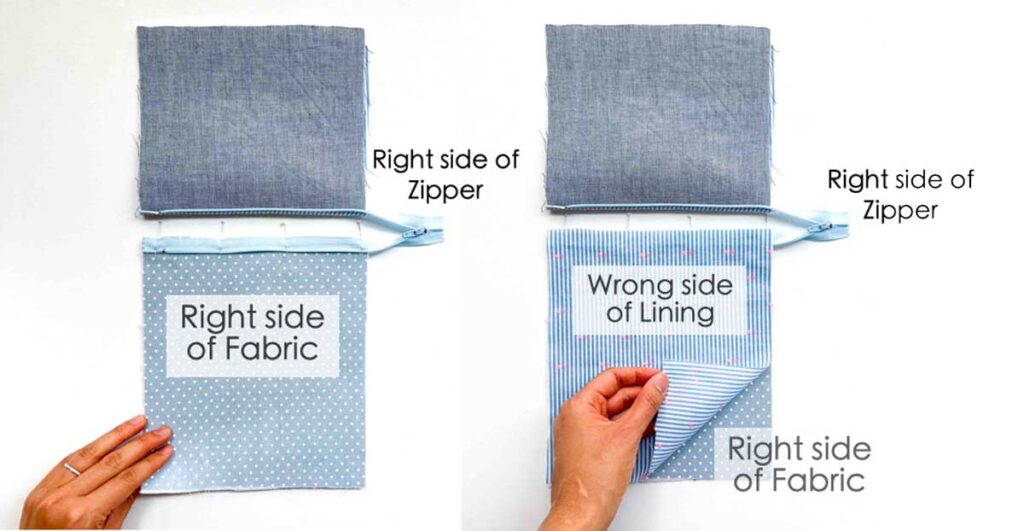
Place [CENTER BOTTOM LINING PIECE] over, with wrong side facing up. Stitch together.
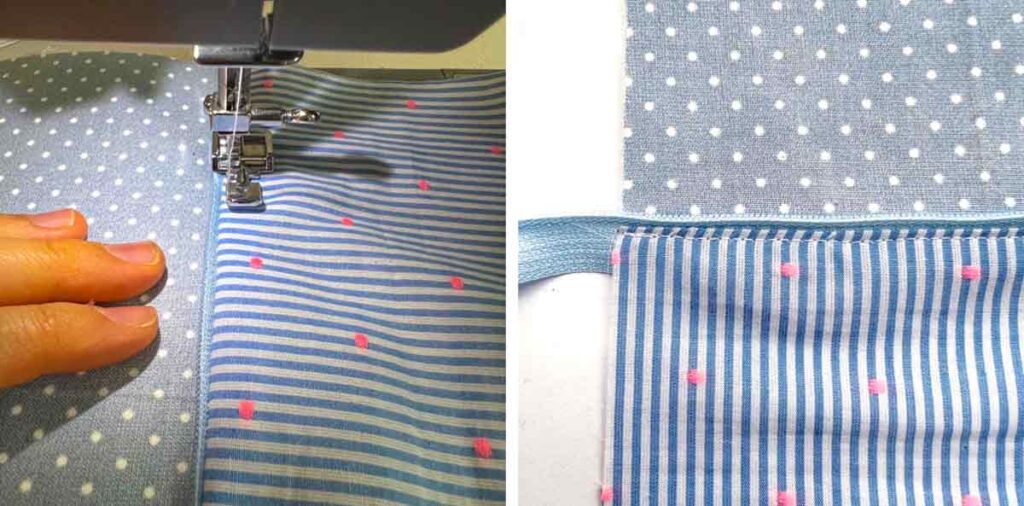
Lean seam allowance down towards lining and edge stitch down (see the white stitch line on RIGHT PHOTO)
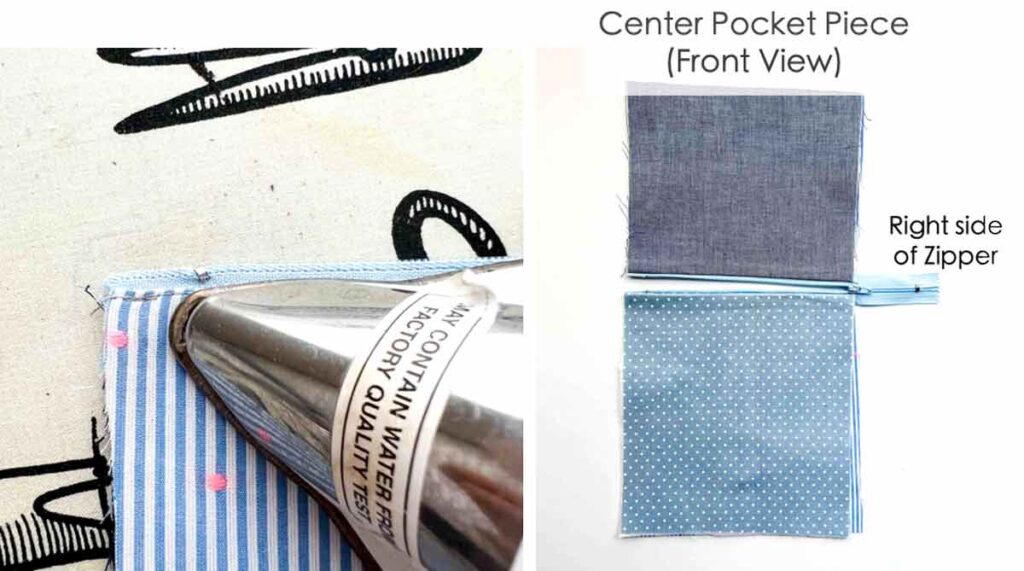
LEFT: Give it a good press.
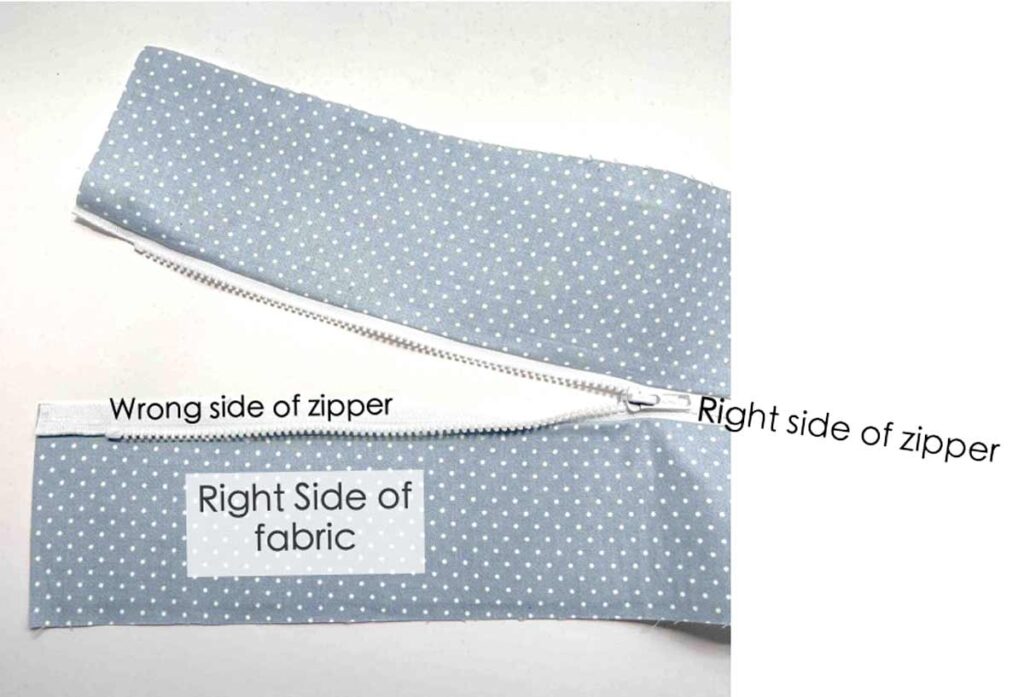
RIGHT: [CENTER POCKET PIECE], front view.
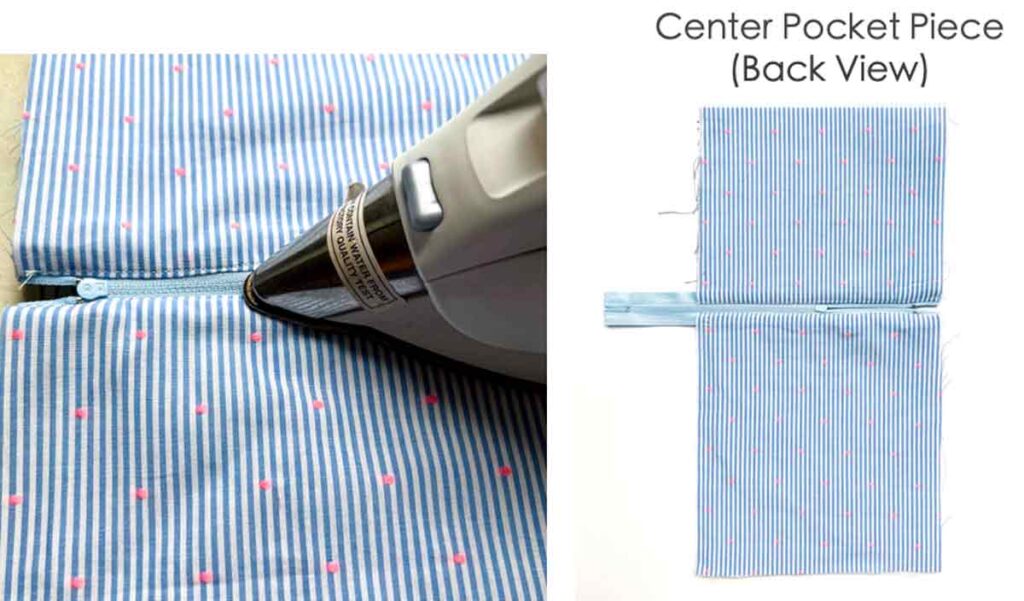
LEFT: Turn your zipper to the lining side and give it a good press.
RIGHT: [CENTER POCKET PIECE], back view. Note that the wrong side of zipper faces up.
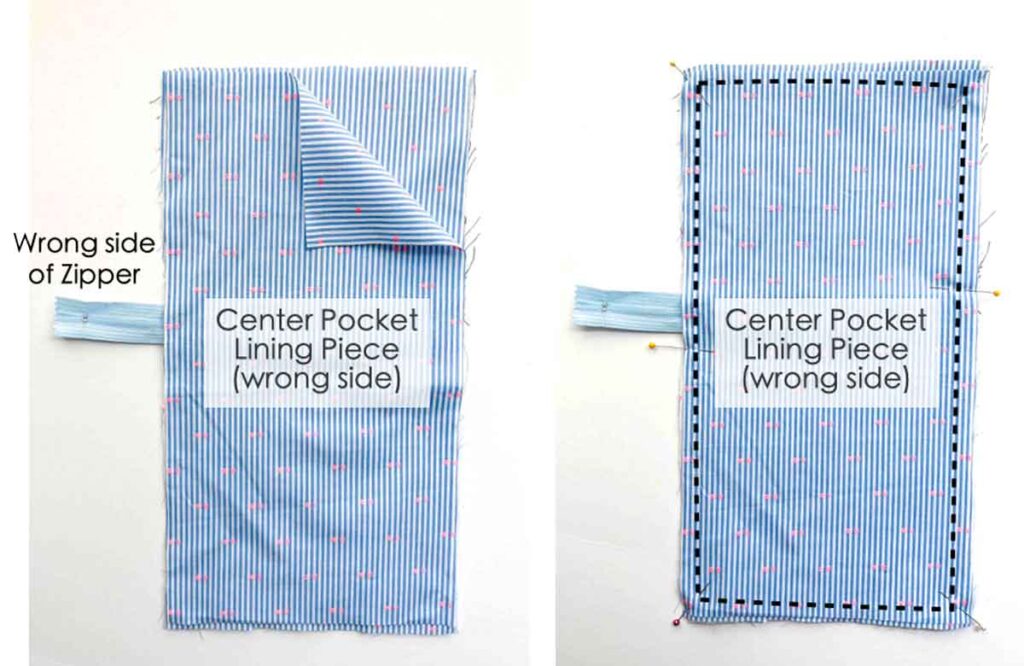
With wrong side of zipper facing up, place [CENTER POCKET LINING PIECE] over, right sides together. Baste the entire pocket together (black dotted lines).
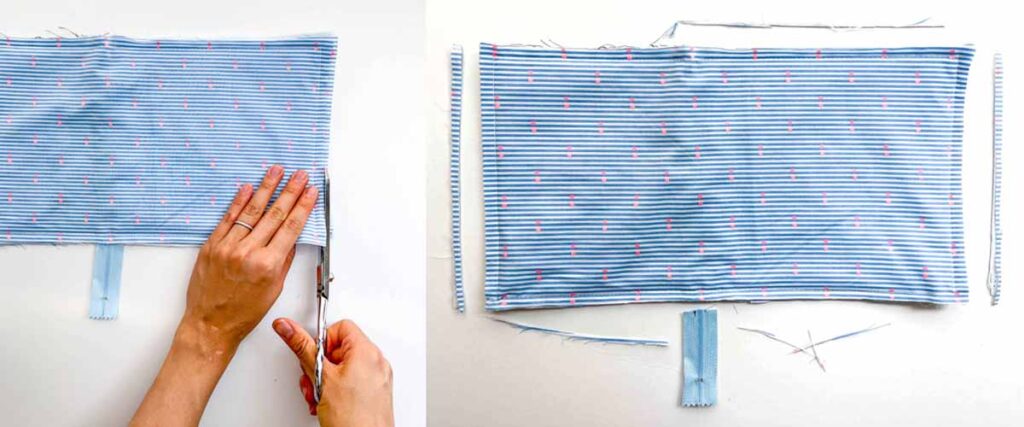
You may notice at this point that the [CENTER POCKET PIECE] is a little larger than the lining piece. Trim sides down so that it is the same size as the lining.
Your [CENTER POCKET PIECE] is now finished! Repeat for other side.
How to Sew Side Pockets
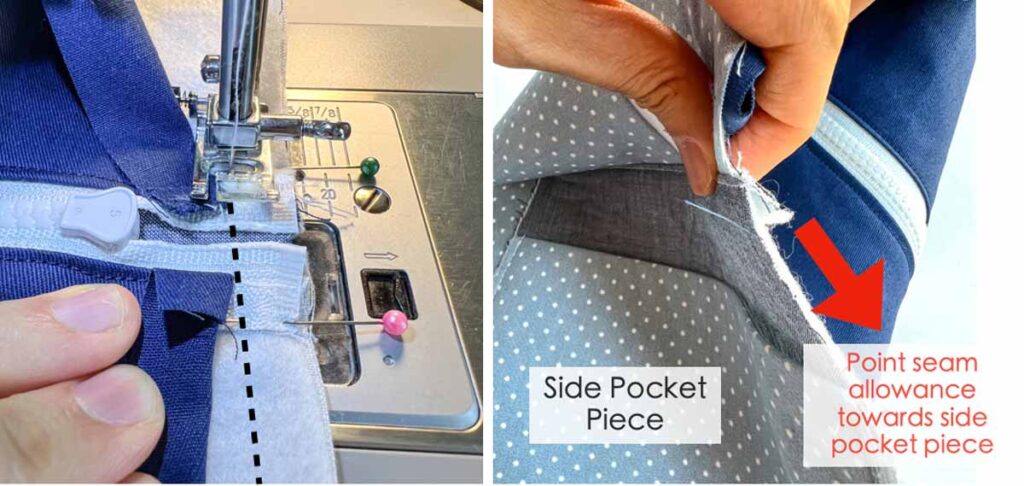
LEFT: Sew [SIDE POCKET PIECE] exterior and lining, right sides together (black dotted lines) In this example I self-lined the pockets (used same fabric on exterior and lining), but feel free to use the lining fabric.
RIGHT: Lean seam allowance down towards lining side and stitch down (red dotted lines) at 1/8”to sew line (black dotted lines)
Press seam allowance down towards lining. Then turn pocket so exterior fabric faces up and press at the sew line.
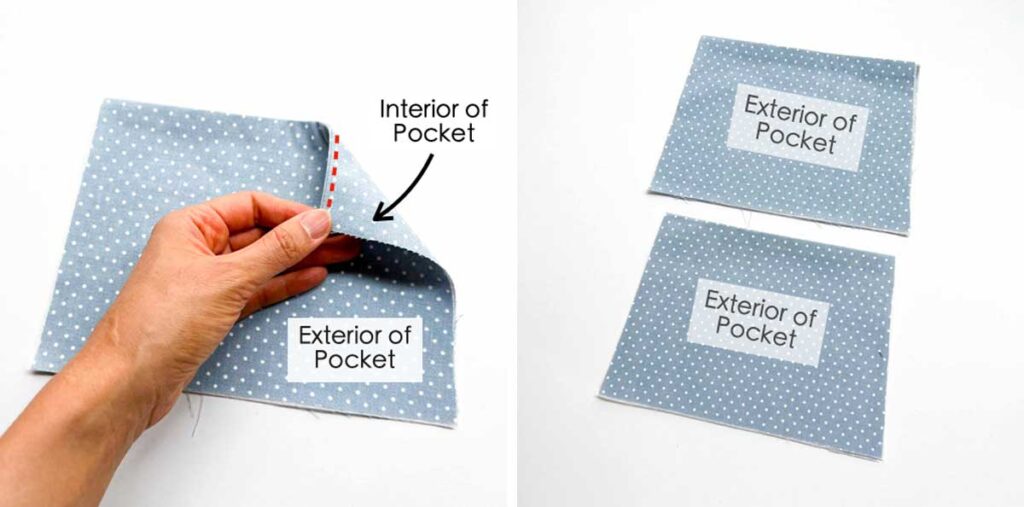
Your side pocket piece is now done. If you self-lined like I did, keep track that the interior of the pocket is the side with the seam allowance sewn down (red dotted lines). Repeat for other pocket.
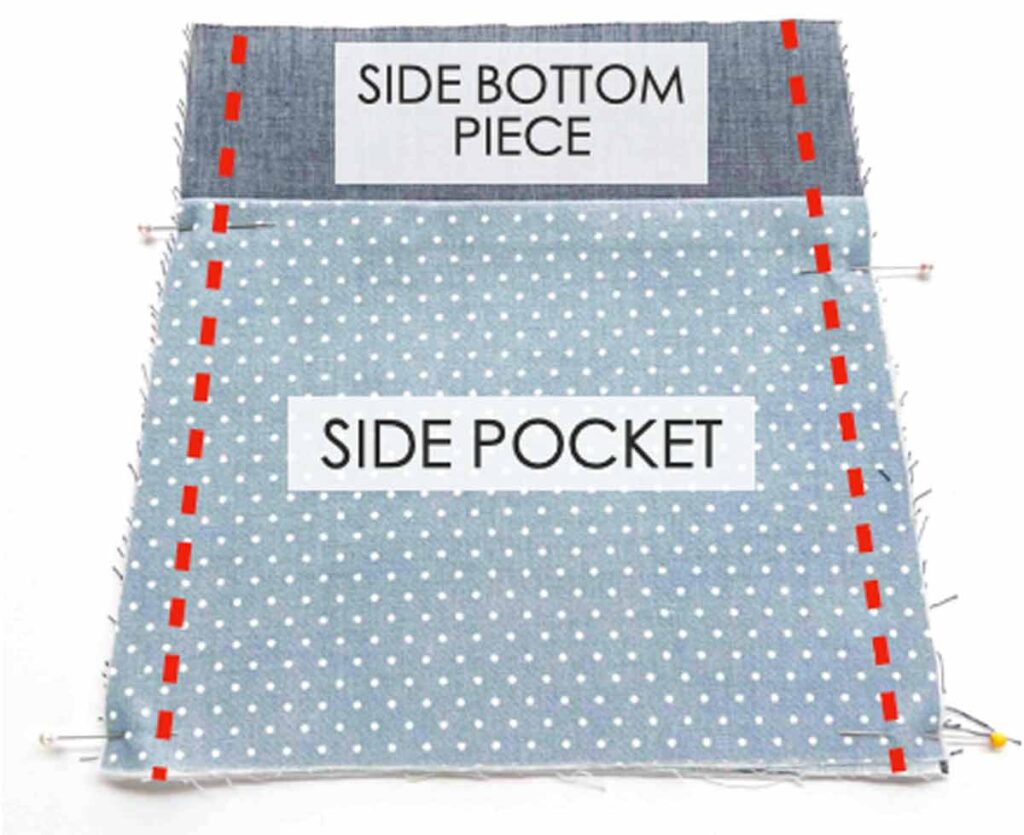
Baste Side Pocket to [SIDE BOTTOM PIECE] (red dotted lines). Repeat for other side.
Sewing Front Panels Together
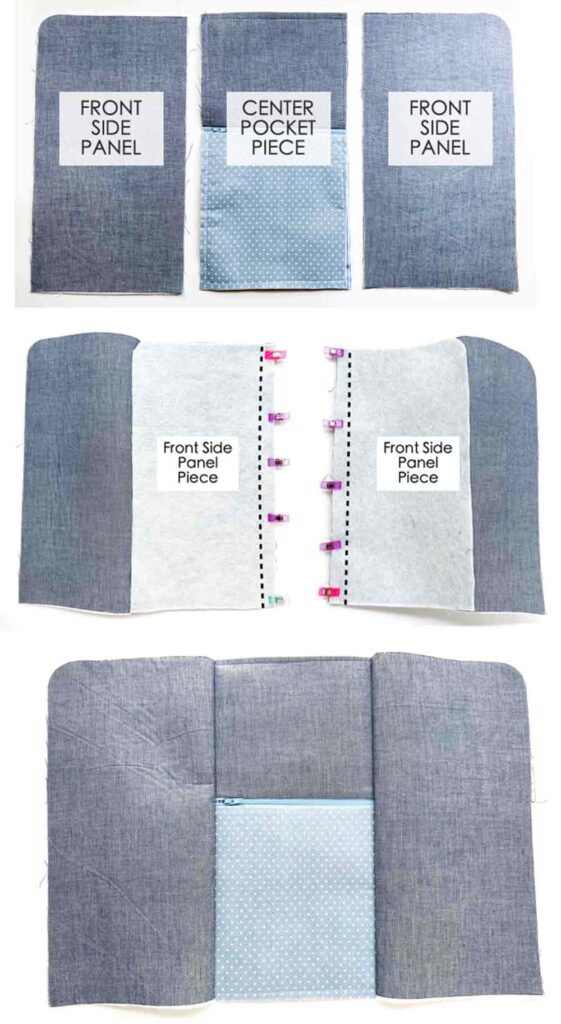
Sew [FRONT SIDE PANEL] pieces to [CENTER POCKET PIECE], right sides together (black dotted lines).
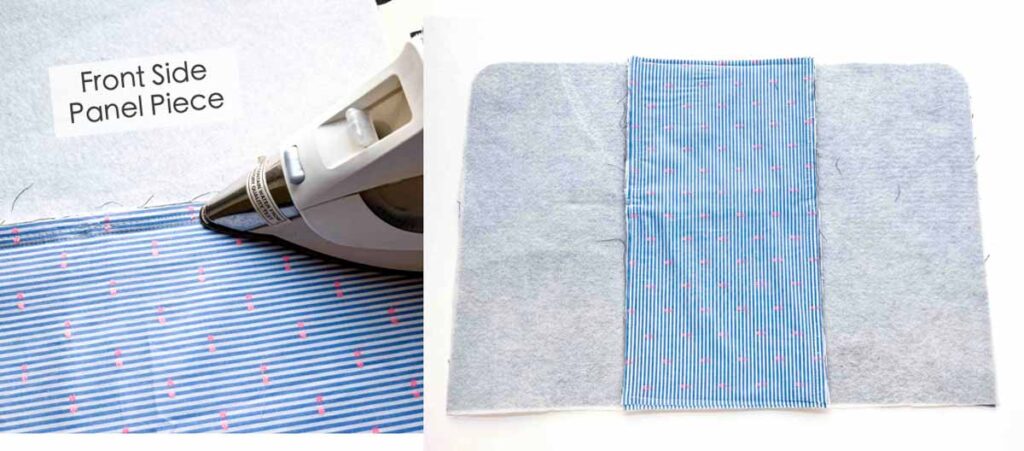
Press seam allowance down towards [FRONT SIDE PANEL] pieces as shown in photo. Repeat for other side.
How to Sew Zipper to Duffle Bag
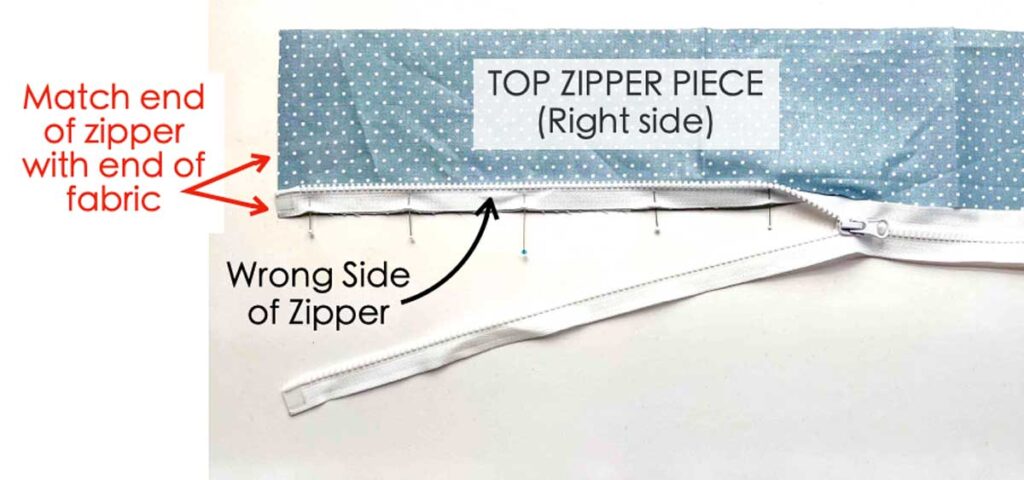
Pin [TOP ZIPPER PIECE] to zipper, right sides together, as pictured. Match end of zipper to edge of fabric (red arrows).
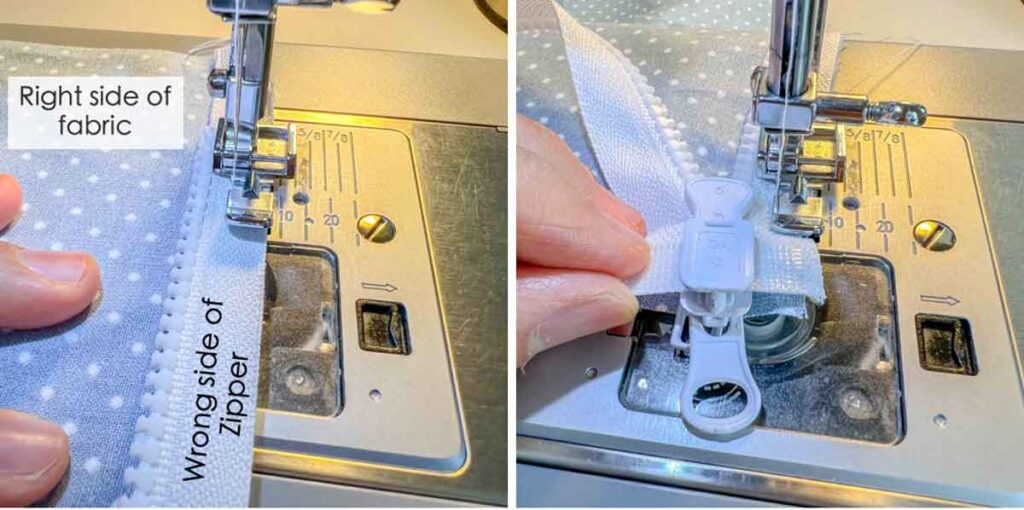
LEFT: First, use zipper foot to sew zipper to [TOP ZIPPER PIECE]
RIGHT: Second, when you get close to the end of the zipper, remove the fabric + zipper. No need to backstitch as you will stitch over where you stopped in the next step.
NOTE: Ideally, keep the needle in the zipper+fabric, lift the pressor foot, then open the zipper the other way (if using a double zip zipper) and finish stitching to the end of the zipper. However, in my case I wasn’t able to slide the zipper pull under my pressor foot because the pull was too thick (I’m using a parka zipper)
Flip the fabric counterclockwise 180°(red arrow) so the fabric is to your right. Switch zipper foot to the other side. Open the zipper.

Finish stitch zipper, making sure you stitch past where you stopped previously.
Pin other piece of [TOP ZIPPER PIECE] to other side of zipper, right sides together. Stitch together like you just did.
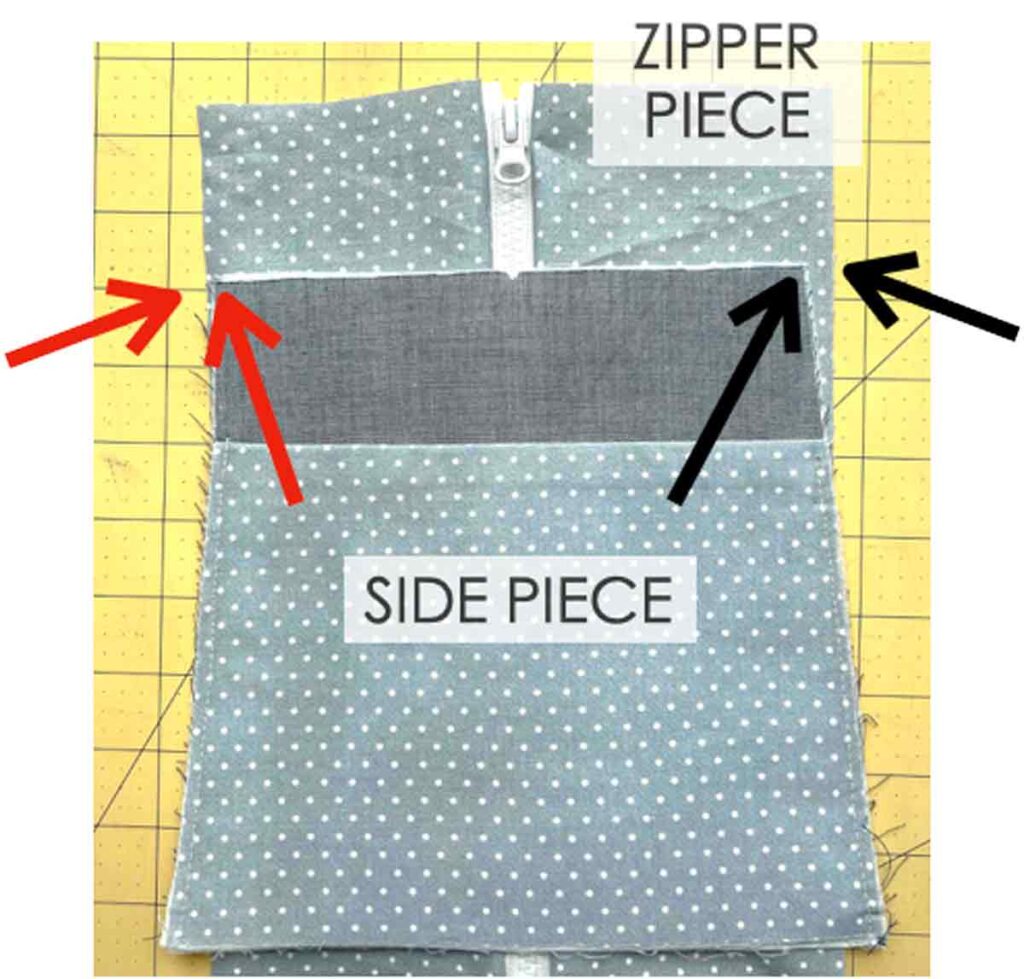
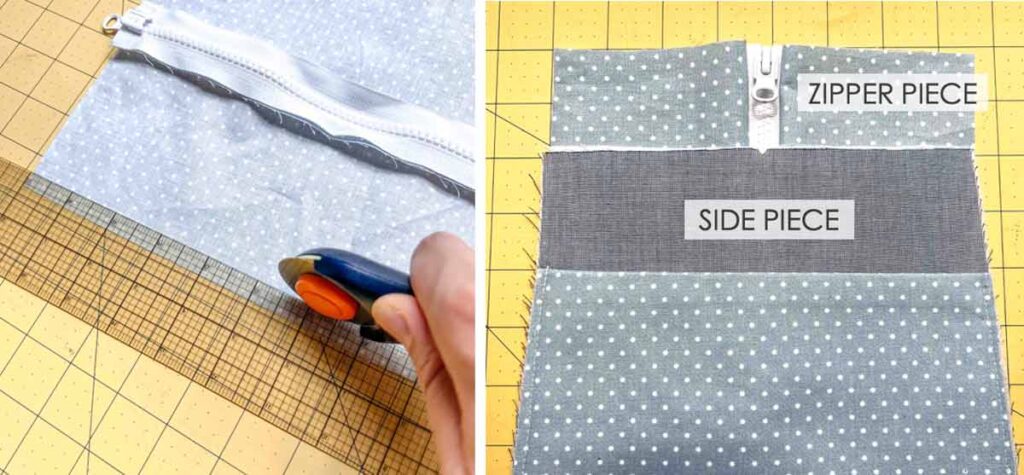
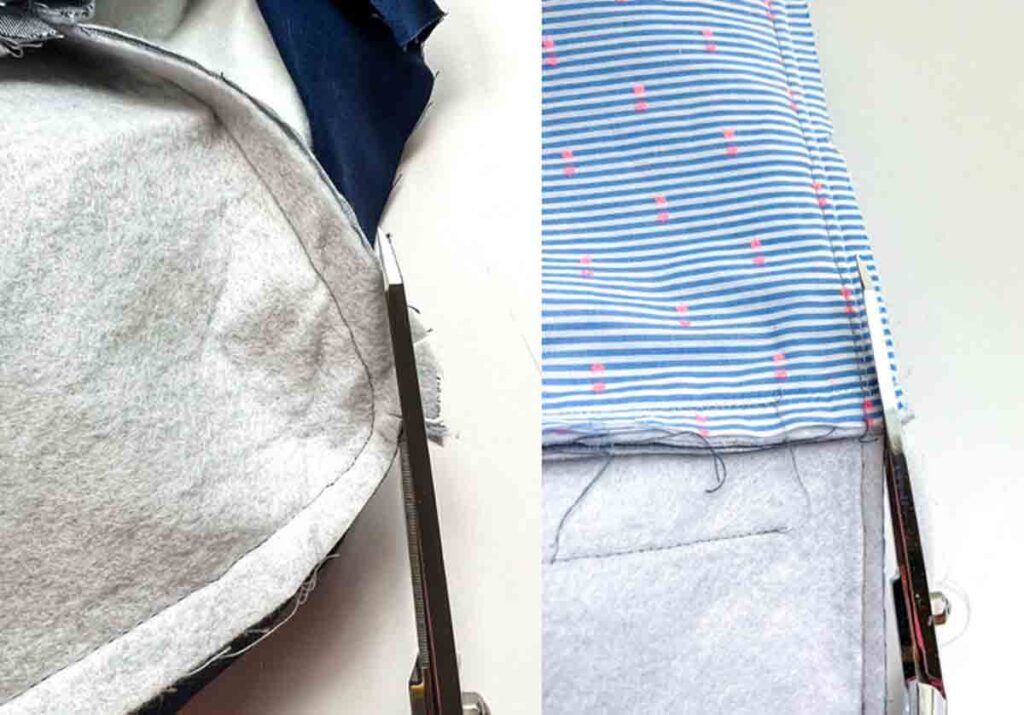
Place [SIDE PIECE] over [ZIPPER PIECE]. matching at the midline. Note that [ZIPPER PIECE] is (likely) going to be wider be than the top edge of [SIDE PIECE] (see where arrows are pointing). We are going to trim [ZIPPER PIECE] down to match the top width of [SIDE PIECE].
NOTE: If you find that your [SIDE PIECE] and [ZIPPER PIECE] match exactly, no need to trim!
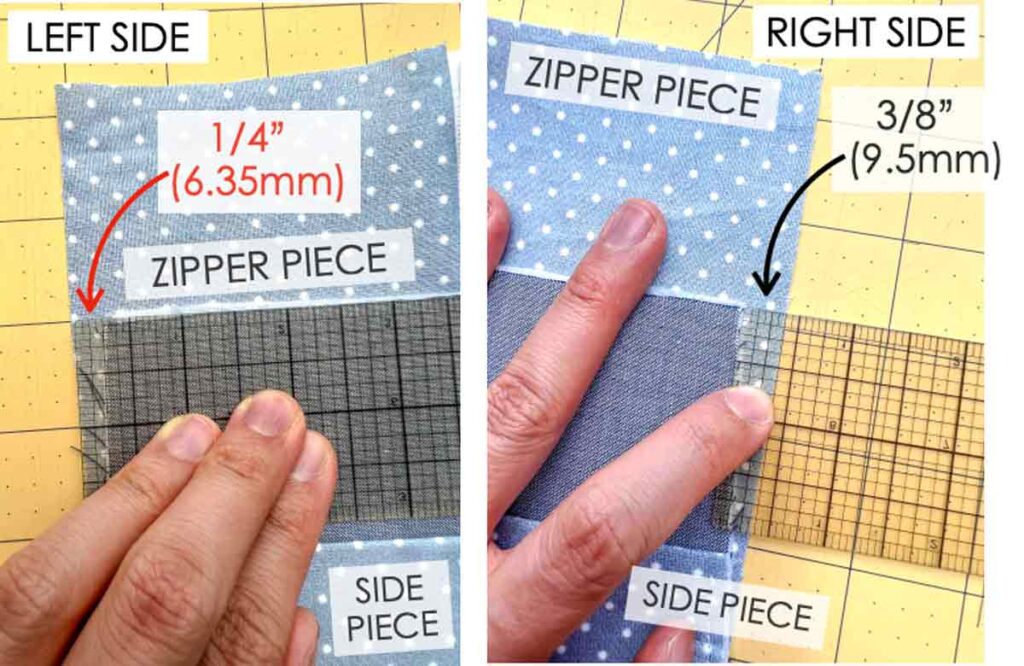
Measure the difference on each side of the [ZIPPER PIECE] versus [SIDE PIECE]. As you can see in the photo, the excess on the left and right sides is not the same.
Trim off the excess along entire strip of [TOP ZIPPER PIECE]. Now it matches the [SIDE PIECE] exactly!
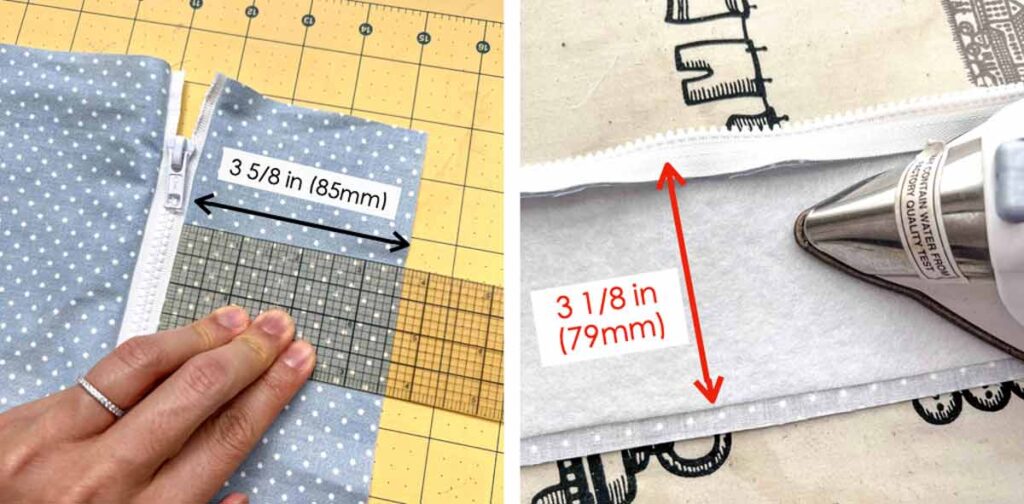
LEFT: Now measure the width of the fabric of [TOP ZIPPER PIECE] on one side of the zipper. Take that measurement (3 and 5/8 in or 85mm) and subtract seam allowance of 1/2 in (12.7mm). In my case I get a new width of 3 and 1/8 in (79mm). Cut two pieces of fusible fleece with the new width and the length of the [TOP ZIPPER PIECE]
RIGHT: Fuse fleece onto wrong side of [TOP ZIPPER PIECE]. Repeat for other side.
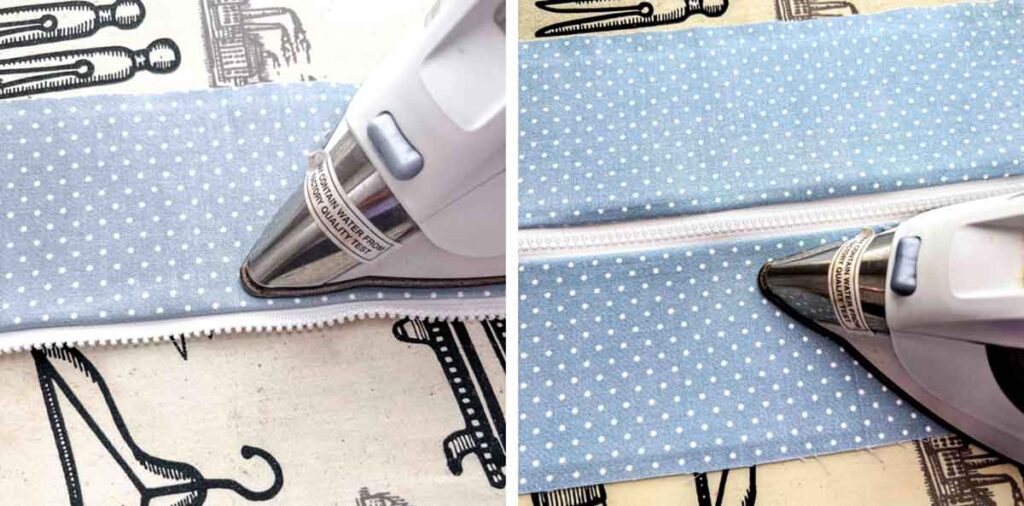
Turn [TOP ZIPPER PIECE] to right side and press again.
Sewing Lining to Zipper
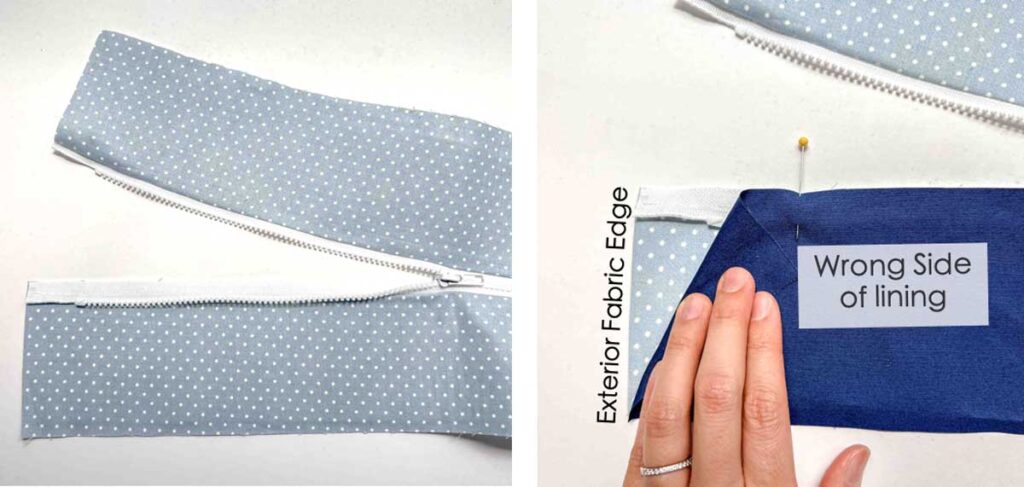
Open up your zipper with right side of exterior fabric facing up. Pin lining as pictured, right sides together, matching lining edge to exterior fabric edge.
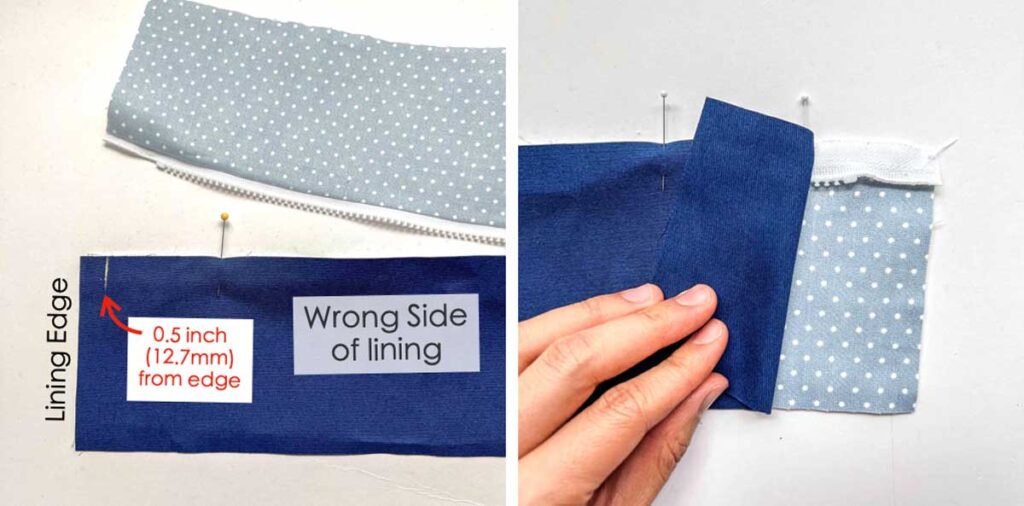
Use fabric chalk and mark about 0.5 in(12.7mm) from lining edge. Repeat for other end of [TOP ZIPPER PIECE]
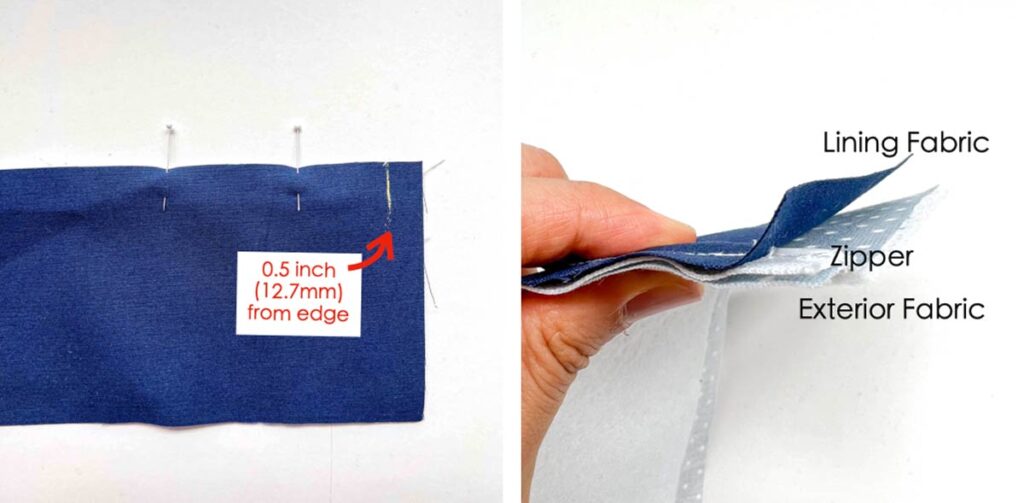
LEFT: Now sew lining to zipper + Exterior Fabric (right sides together), stopping 0.5” short of the edge of the lining. Back stitch at the 0.5” mark.
RIGHT: The ends of your [TOP ZIPPER PIECE] will look like the photo. See how the end of lining fabric is not sewn down to the zipper and exterior fabric.
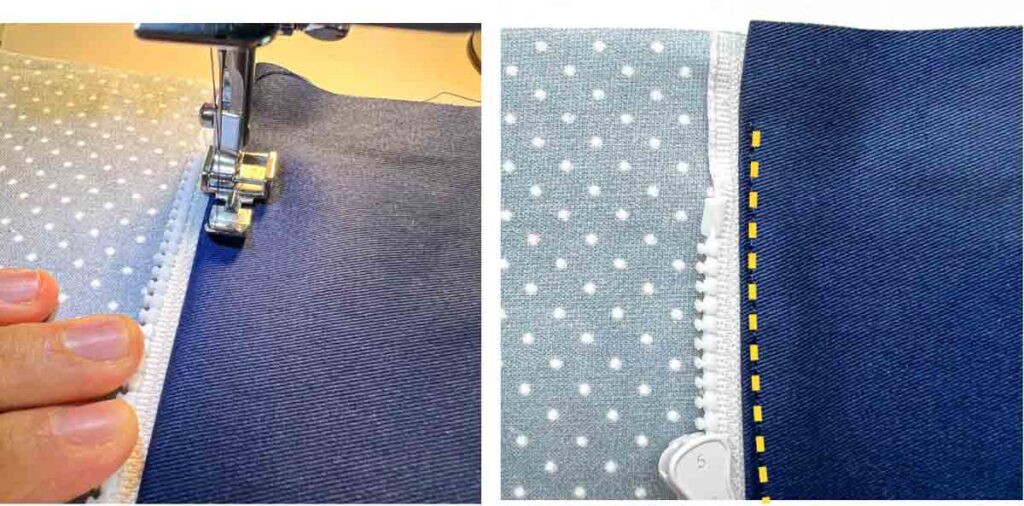
Lean seam allowance towards lining side and edge stitch down, starting about 1.25”(31.75mm) from edge (yellow dotted lines). Make sure to use thread that matches the lining.
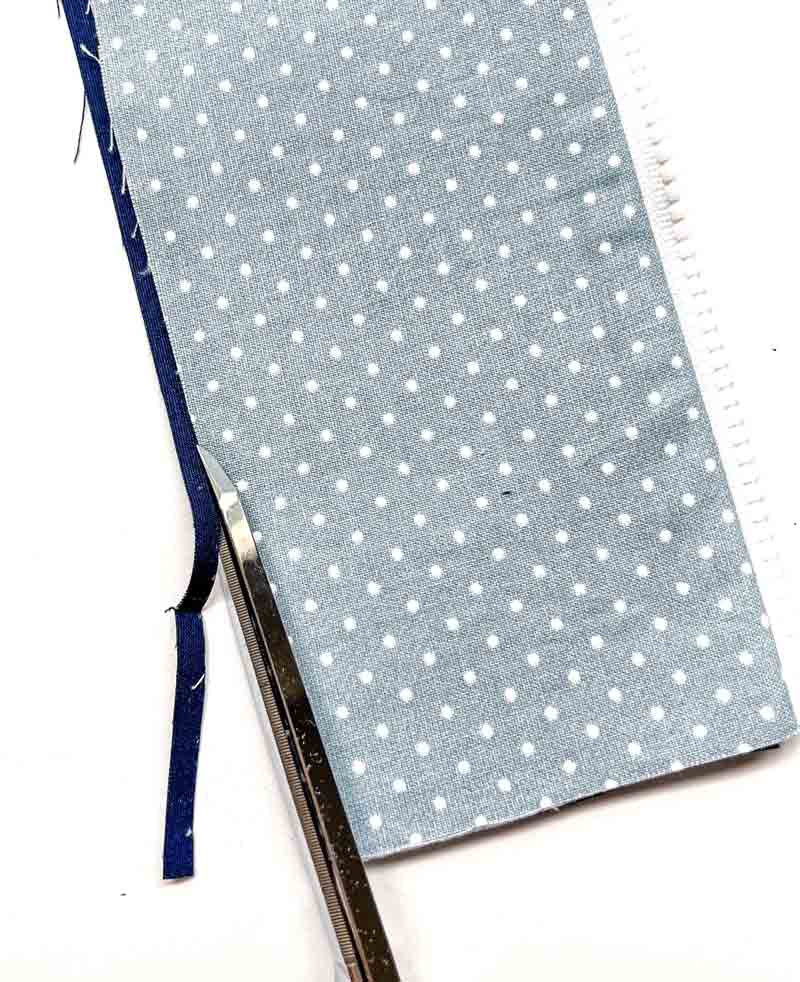
Give your [TOP ZIPPER PIECE ] with lining sewn in a good press. Trim any excess lining that extends past the exterior fabric.
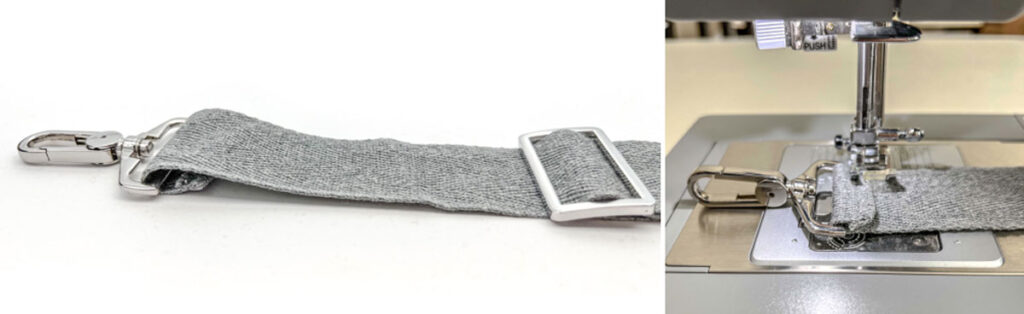
How to Sew D-Rings for Shoulder Strap
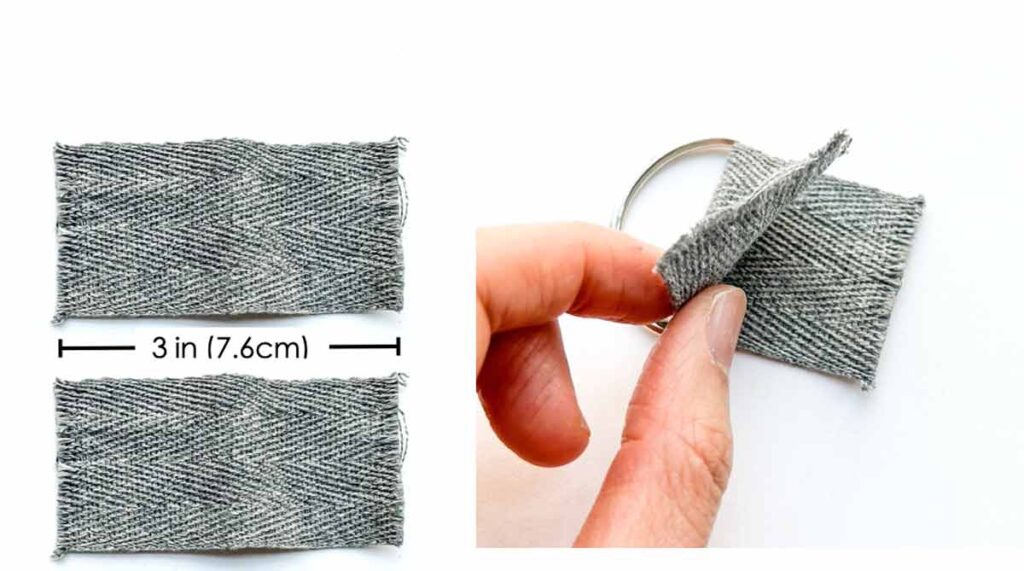
LEFT: Cut 2 pieces of 1.5” wide webbing three inches (7.6cm) in length each.
RIGHT: insert webbing into D ring.
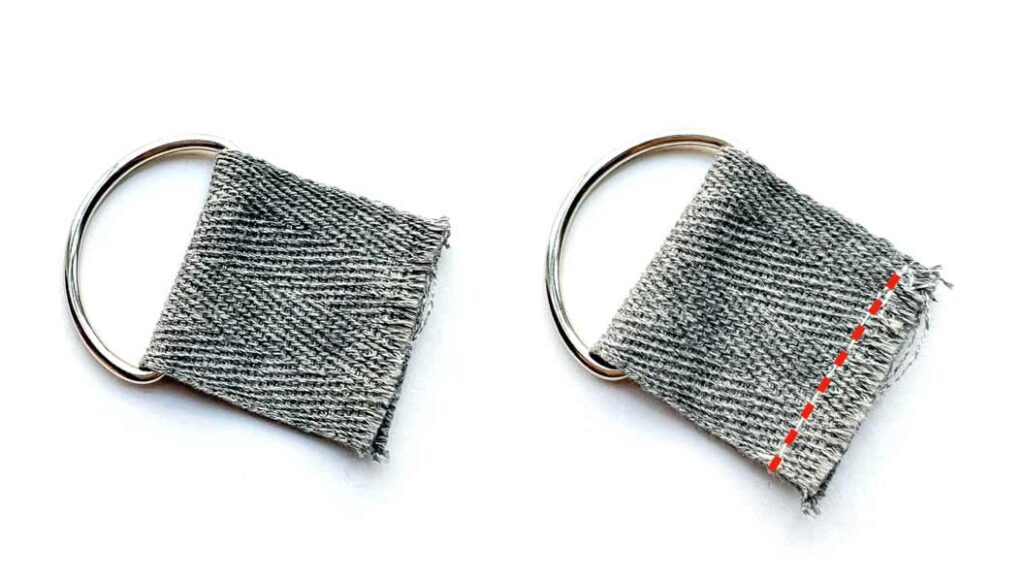
Fold webbing in half over D-ring and baste the ends together (red dotted line)
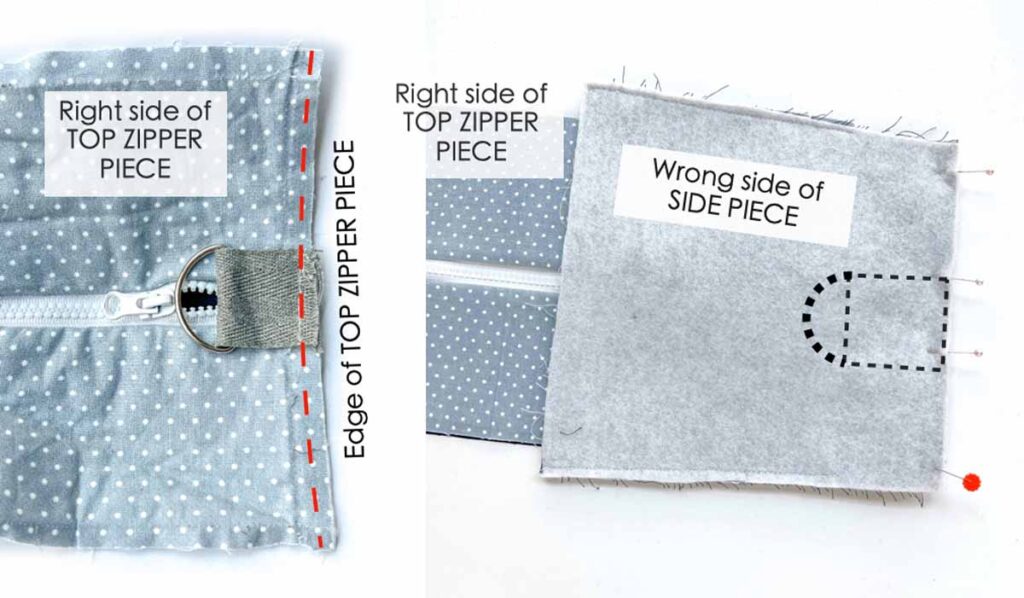
LEFT: With right side of [TOP ZIPPER PIECE] facing up, pull the zipper slightly away from the edge and place D-ring with webbing at the midpoint. Baste in place (red dotted line).
RIGHT: Place [SIDE PIECE] over [TOP ZIPPER PIECE], right sides together. Dotted line shows D-ring with webbing sandwiched in between. Pin together.
Sewing Side Pieces to Zipper Piece
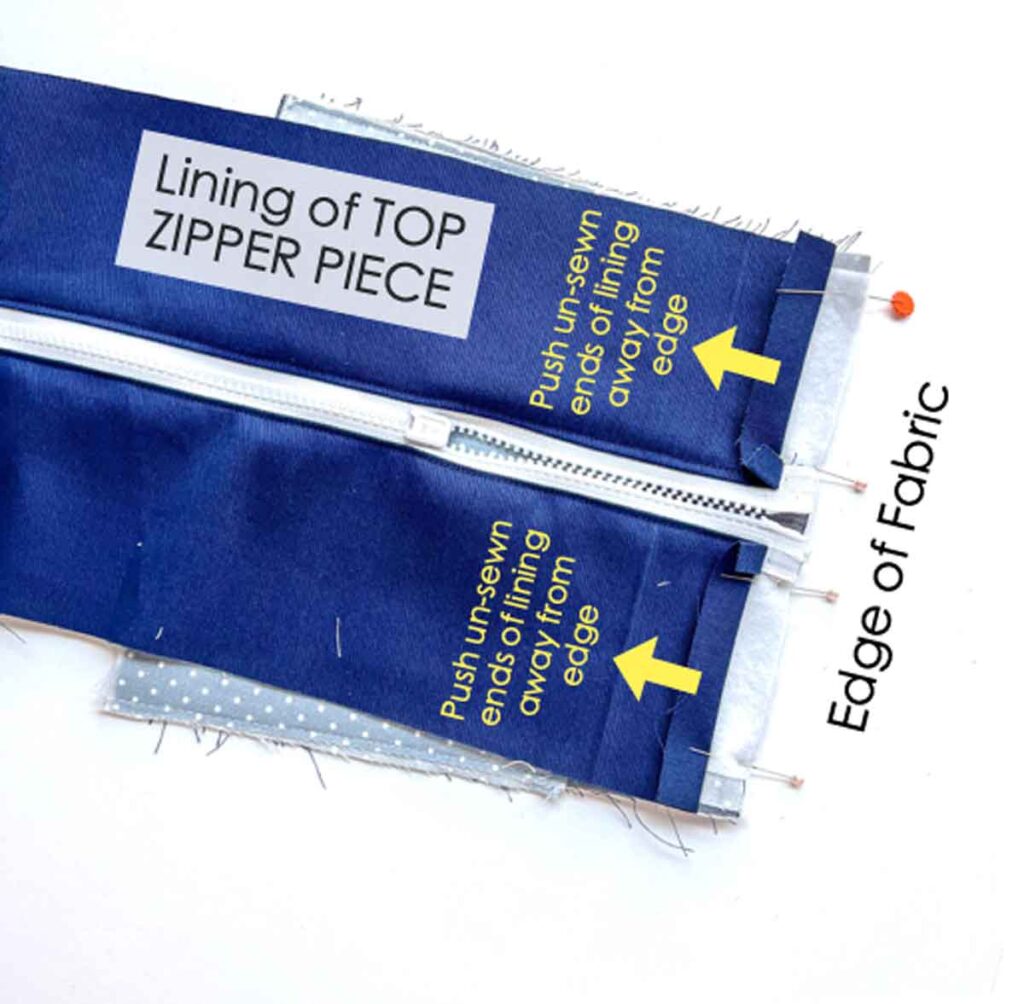
Turn your fabric around so zipper + lining is facing up. Push the un-sewn ends of the lining away from the edge fabric (yellow arrows) as you don’t want to stitch the lining just yet.
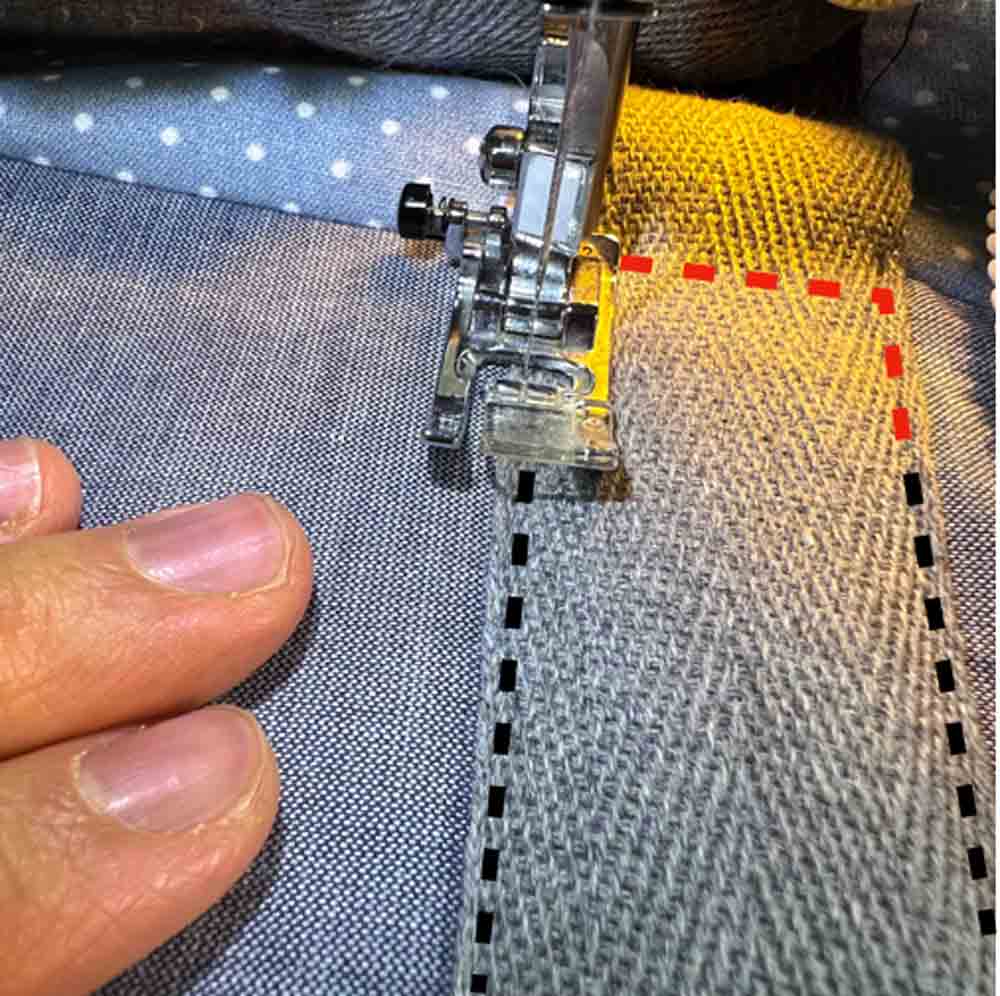
First, sew at 1/2” (12.7mm) seam allowance (black dotted line). Next, as you stitch, make sure you pull back the free ends of the lining so you don’t sew on it. Next, point seam allowance down towards [SIDE PIECE].
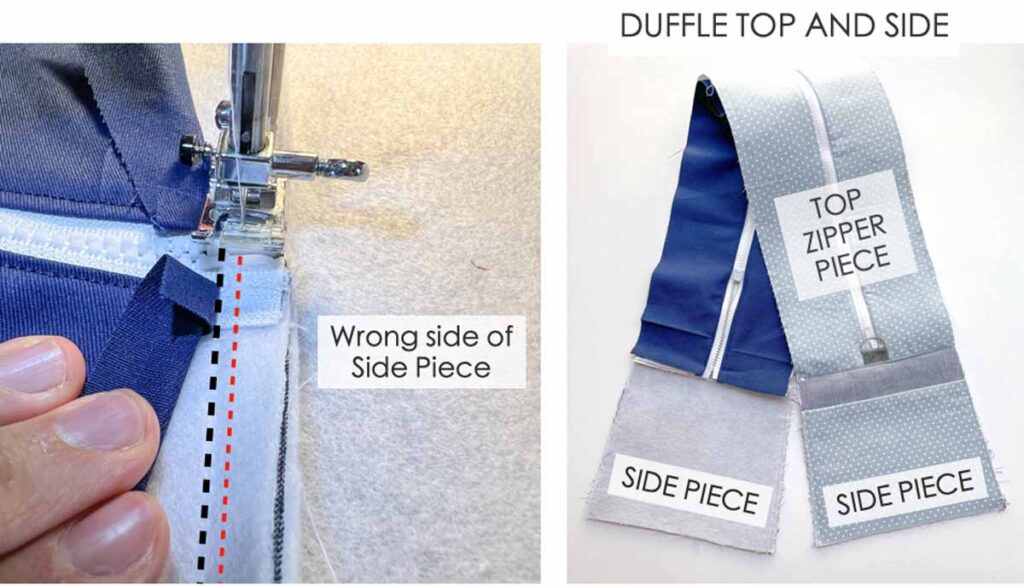
LEFT: Edge stitch (red dotted line) seam allowance down 1/8” (3mm) from where you had just sewn (black dotted line). Repeat on the other side.
RIGHT: You will end up with [TOP ZIPPER PIECE] sewn to the two [SIDE PIECE], as pictured. We will call this entire piece [DUFFLE TOP AND SIDE]
How to Sew Bag Handles
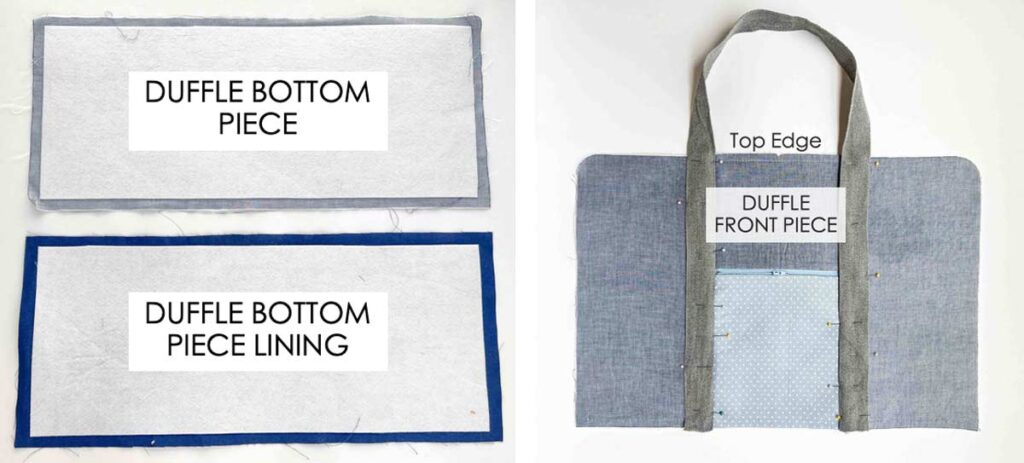
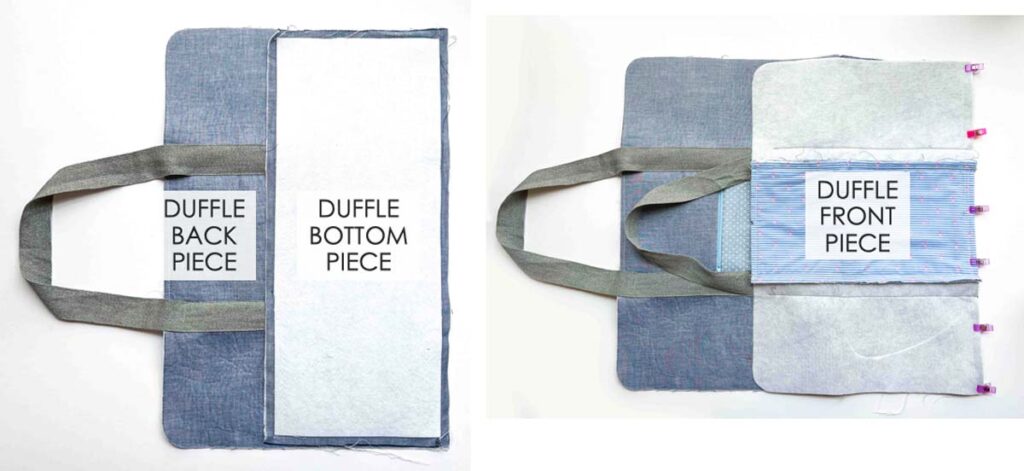
LEFT: Fuse Peltex to [DUFFLE BOTTOM] and [DUFFLE BOTTOM LINING].
RIGHT: Pin strap to [DUFFLE FRONT PIECE] and [DUFFLE BACK PIECE] as pictured.
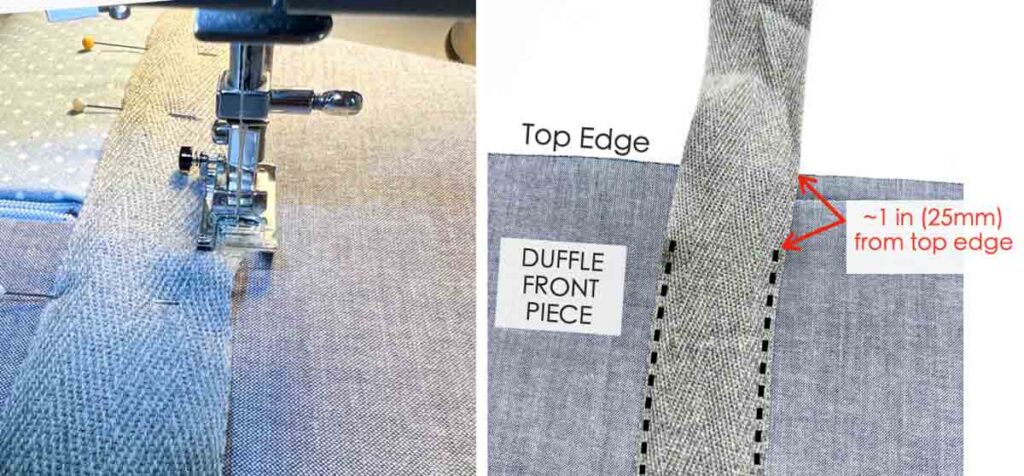
Stitch strap down to [DUFFLE FRONT PIECE] at 1/8” (3mm) from edge of strap. Stop sewing (black dotted lines) about 1”(25mm) from top edge of bag. You will finish sewing the straps in after you sew the [DUFFLE FRONT PIECE] to [TOP ZIPPER PIECE]. Repeat for [DUFFLE BACK PIECE]
Sewing Bag All Together
Sew [DUFFLE BOTTOM PIECE] to [DUFFLE BACK PIECE], right sides together. Repeat for [DUFFLE FRONT PIECE].
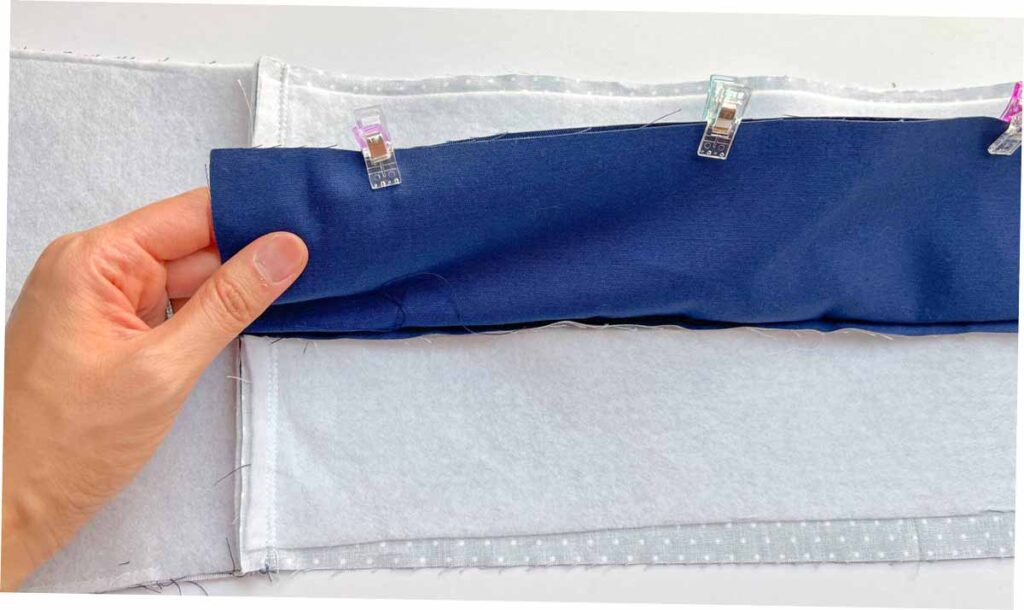
Next, use clips (or pins) to clip the Top Zipper Lining Pieces together so they don’t get in the way when you sew the exterior of the bag together.
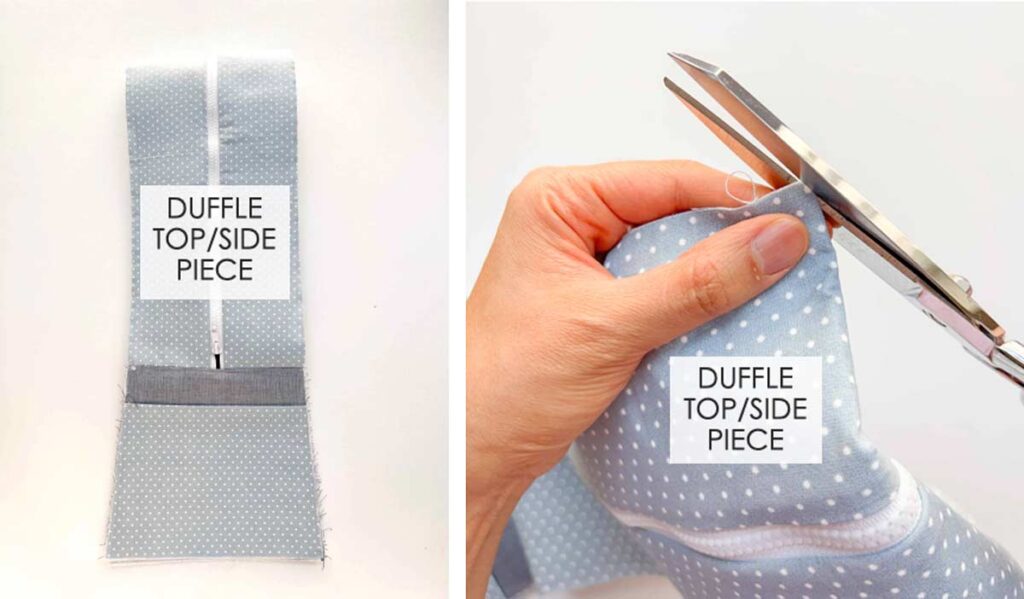
Fold [DUFFLE TOP/SIDE PIECE] in half and make small clips on both sides to mark the midline.

Repeat for [DUFFLE FRONT PIECE] and [DUFFLE BACK PIECE] to mark the midline.
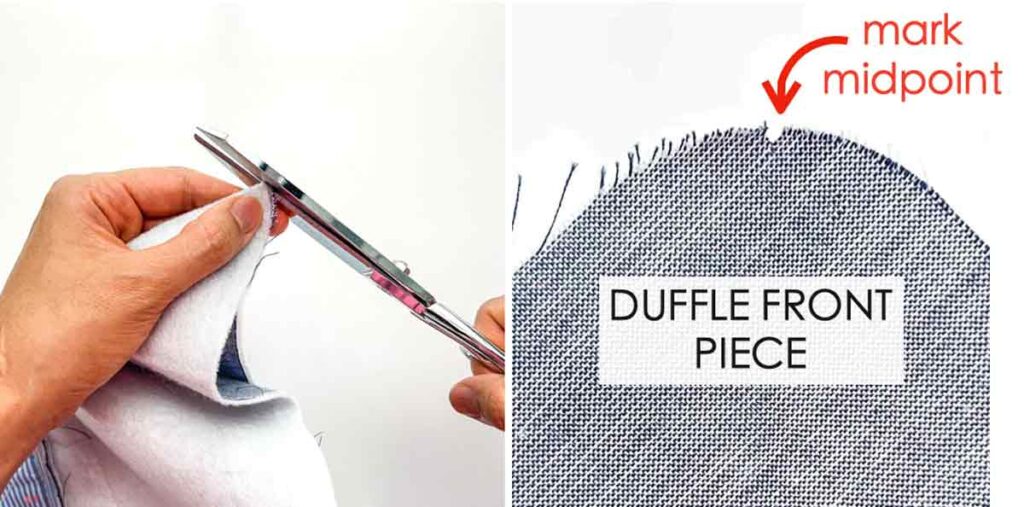
On [DUFFLE FRONT PIECE], mark the midpoint of the rounded corner by folding in half and making a small clip. Repeat on the other rounded corner. Do this on [DUFFLE BACK PIECE] as well.
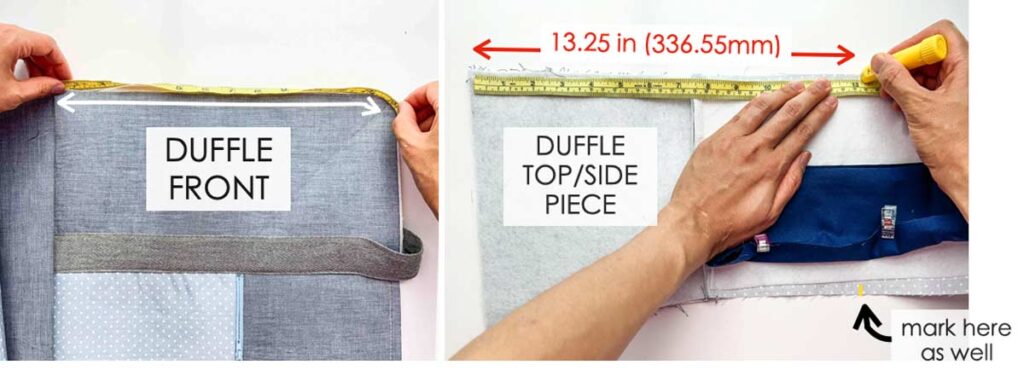
LEFT: First, measure the distance between the bottom of [DUFFLE FRONT PIECE] to midpoint of rounded corner you just marked. My bag measured about 12.75 in (323.85mm). Next, add 1/2”(12.7mm) seam allowance to that measurement (so mine is now 13.25” or 336.55mm).
RIGHT: Use chalk to mark the new measurement (that includes seam allowance) sides of [DUFFLE TOP/SIDE PIECE], as pictured. Repeat on other end.
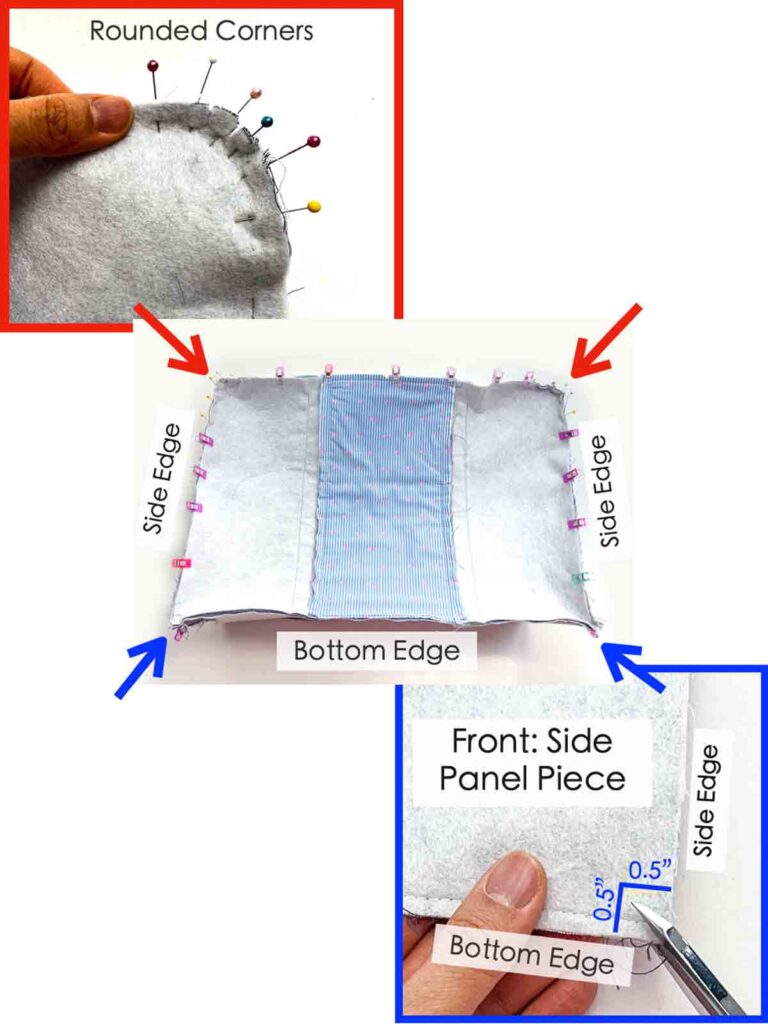
Pin/clip [DUFFLE FRONT PIECE] and [DUFFLE BACK PIECE] to [DUFFLE TOP/SIDE PIECE], right sides together. Make sure to match at all the markings you just made (midline, rounded corner).
I find it easier to use pins to stabilize rounded corners to [DUFFLE TOP/SIDE PIECE] and use clips for the rest.
On the bottom corners (blue arrows), I find it easier to sew if I first make a diagonal cut that is just shy of the 0.5” box.
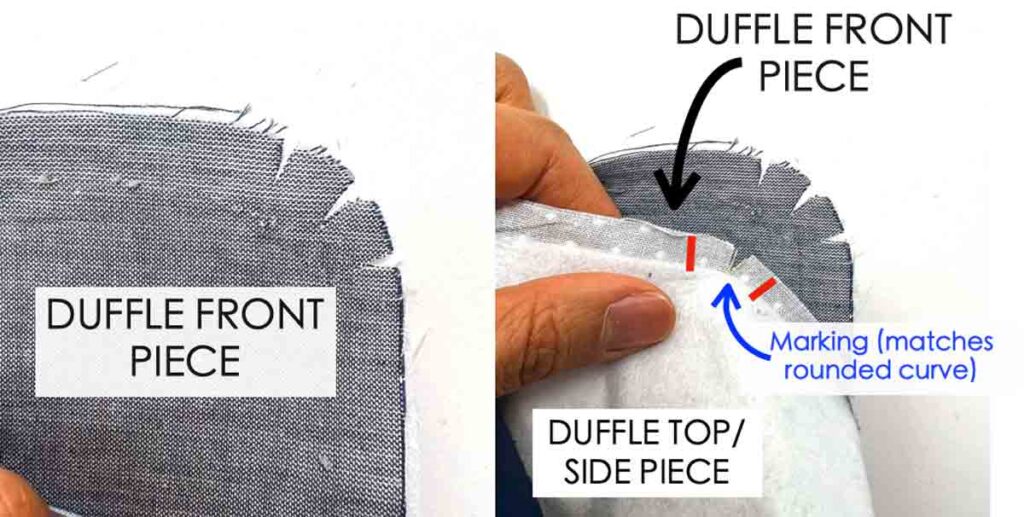
Another tip is I find it much easier to pin (and sew) if you first make a few notches around the rounded curve (LEFT PHOTO) as well as around your marking on [DUFFLE TOP/SIDE PIECE], red lines on RIGHT PHOTO. Just make sure the notches don’t extend past the 0.5” sew line.
Sew [DUFFLE FRONT PIECE] and [DUFFLE BACK PIECE] to [DUFFLE TOP/SIDE PIECE].
Trim seam allowance down to 1/4”(6.35mm)
Next, turn your bag to the right side and finish stitching the bag handles at the top (red dotted line), making sure to overlap with the black dotted lines (where you had previously sewn). Backstitch.
Sewing Duffle Bag Lining Together
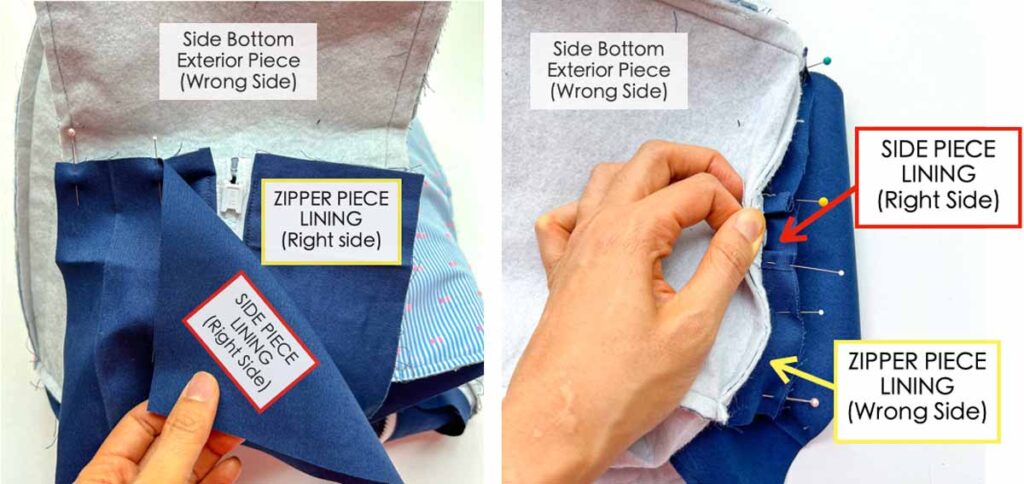
First, remove the clips/pins holding the [ZIPPER PIECE LINING]. Next, close the zipper on the side you will be working on. Finally, pin [SIDE PIECE LINING] to [ZIPPER PIECE LINING], right sides together.
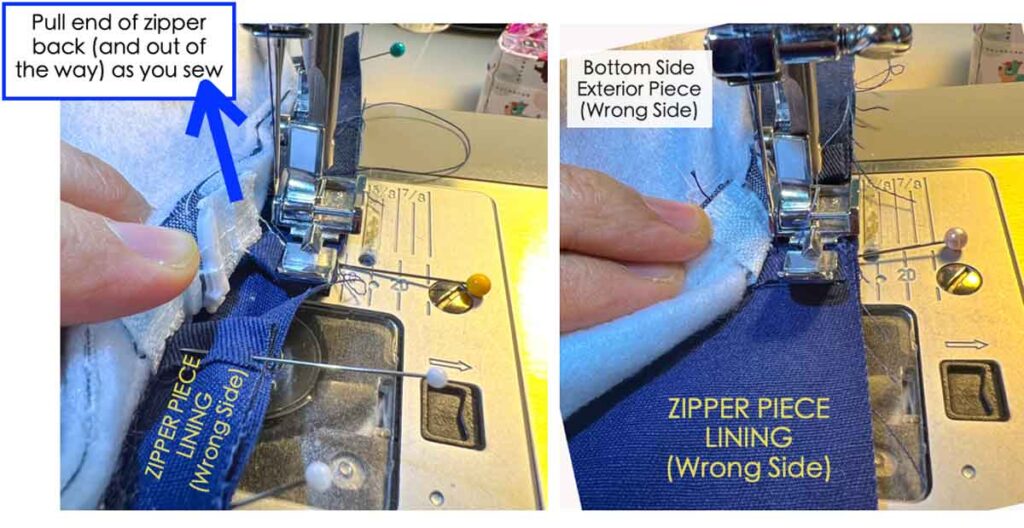
Sew [ZIPPER PIECE LINING] to [SIDE PIECE LINING] using a zipper foot. Pull the end of the zipper back and out of the way as you sew. Make sure you are sewing the lining only, NOT any of the exterior fabric.
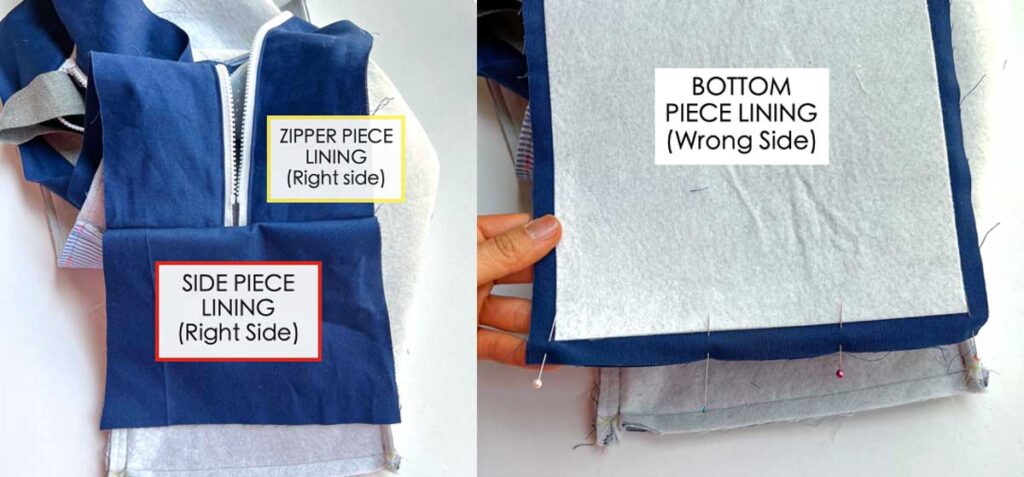
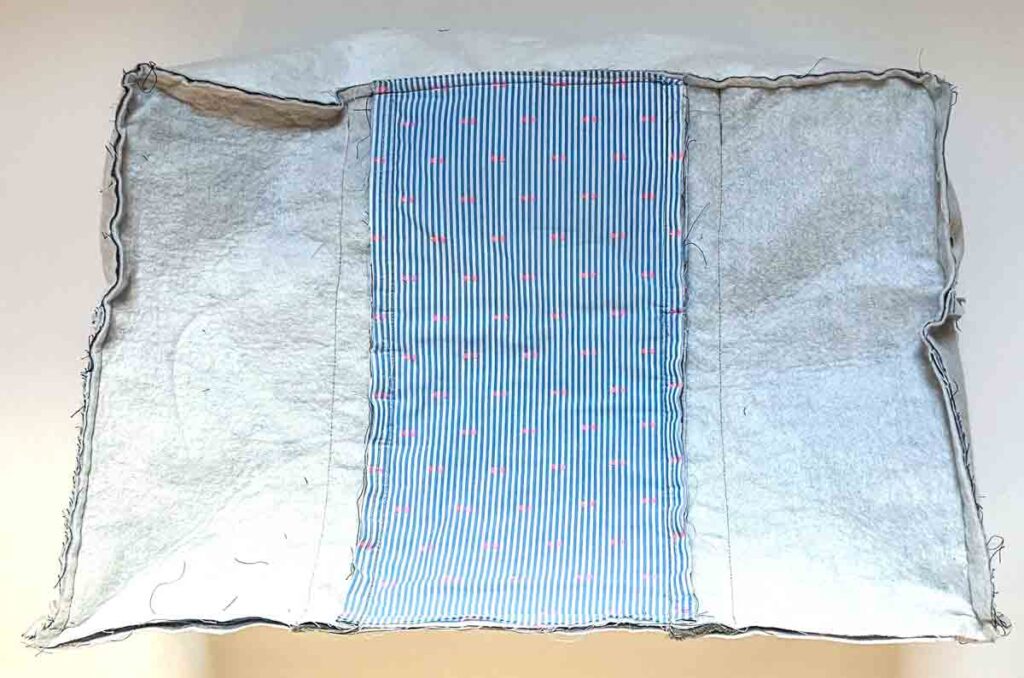
Once you are done, your duffle bag lining will look something like what you see in the LEFT PHOTO.
RIGHT: Pin and sew [BOTTOM PIECE LINING] to [SIDE PIECE LINING], right sides together.
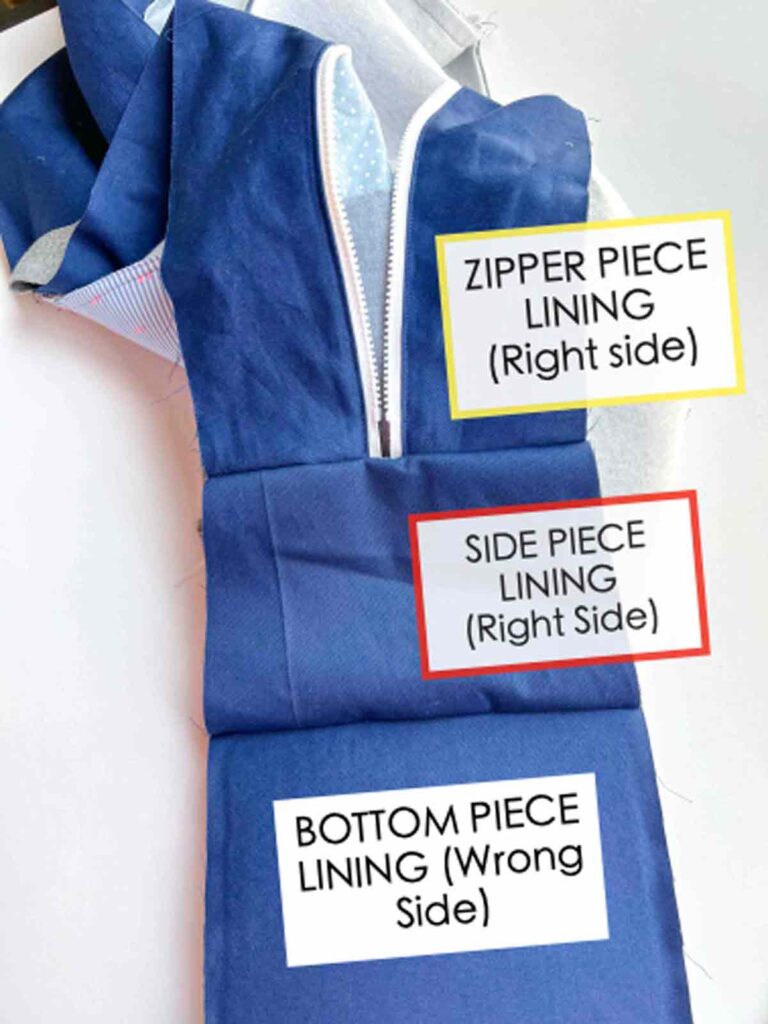
Your duffle bag lining will now look like the photo. Repeat on other side.
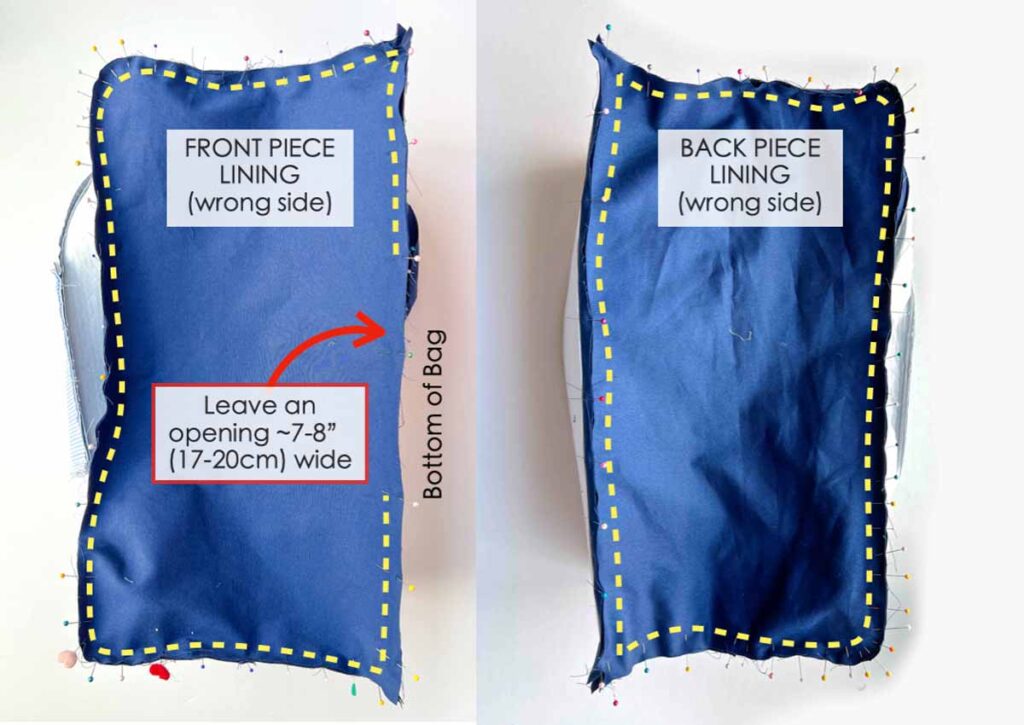
Now, sew [FRONT PIECE LINING] and [BACK PIECE LINING] to rest of duffle bag lining (yellow dotted lines). Next, leave an opening about 7-8”at the bottom of the bag on either the FRONT or BACK PIECE LINING (doesn’t matter which one). We will use this opening to turn the bag to the right side in the next step.
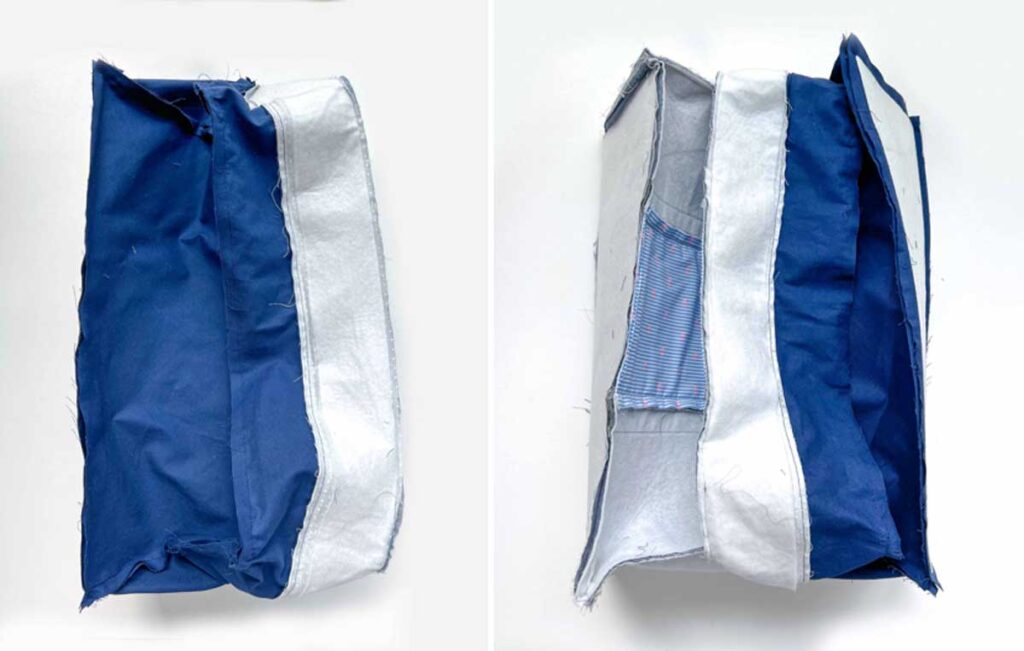
Two wrong-side views of your duffle bag. You are almost done!
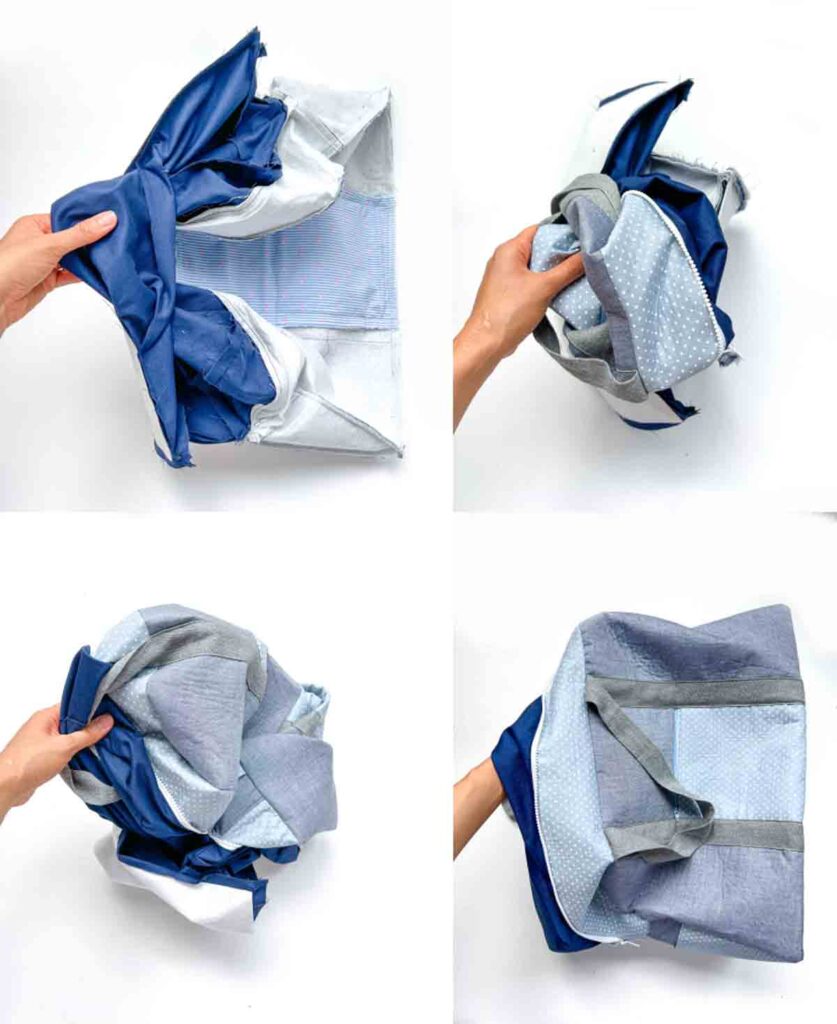
Turn duffle bag to the right side through the opening in the lining.
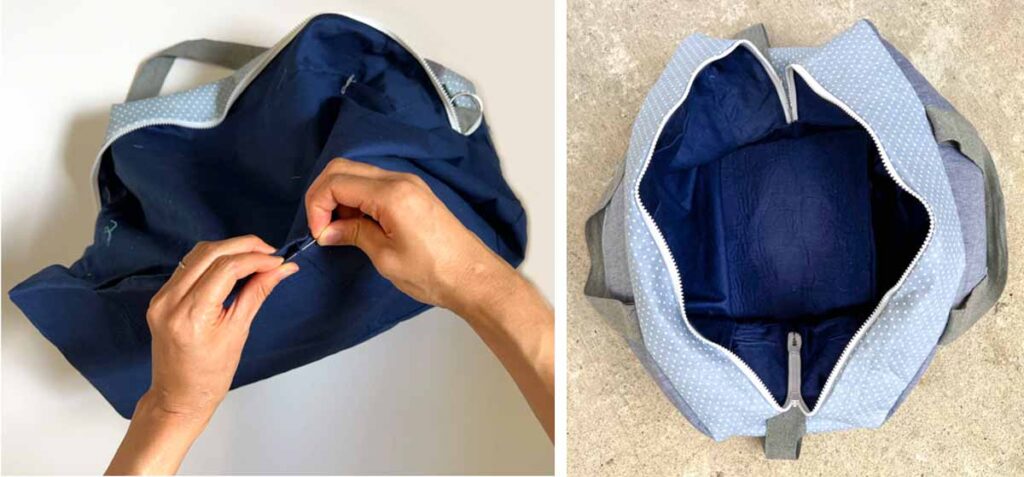
Close the opening in the lining using invisible ladder stitch.
Congratulations! Your large duffle bag is now finished!
How to Sew Shoulder Strap
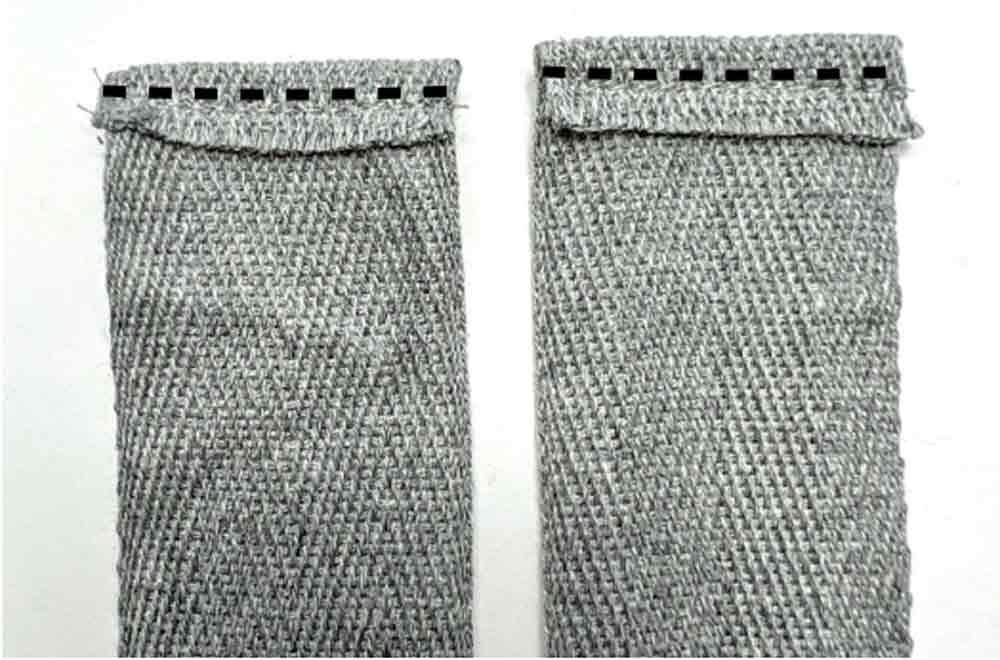
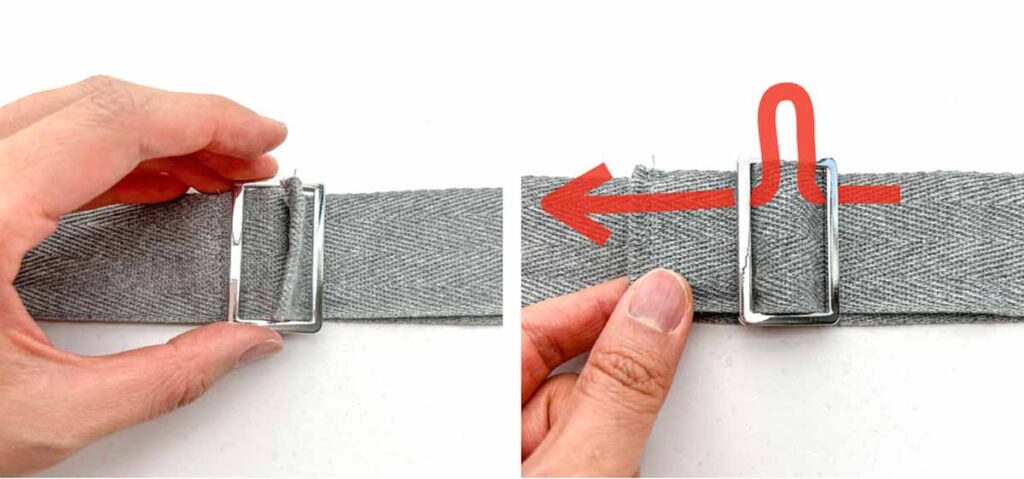
Fold down ends of webbing and stitch about 1/8”(3mm) from fold (black dotted line).
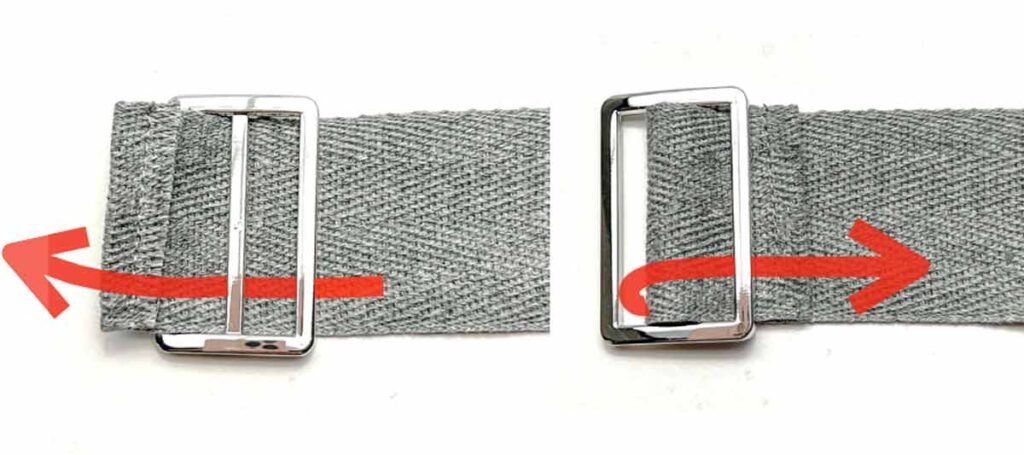
Slide one end of the webbing through the center of the slider (LEFT). Pull it under and through right loop of slider (RIGHT PHOTO) so it’s about 0.25 – 0.5 inches (6-12mm) beyond the slider.
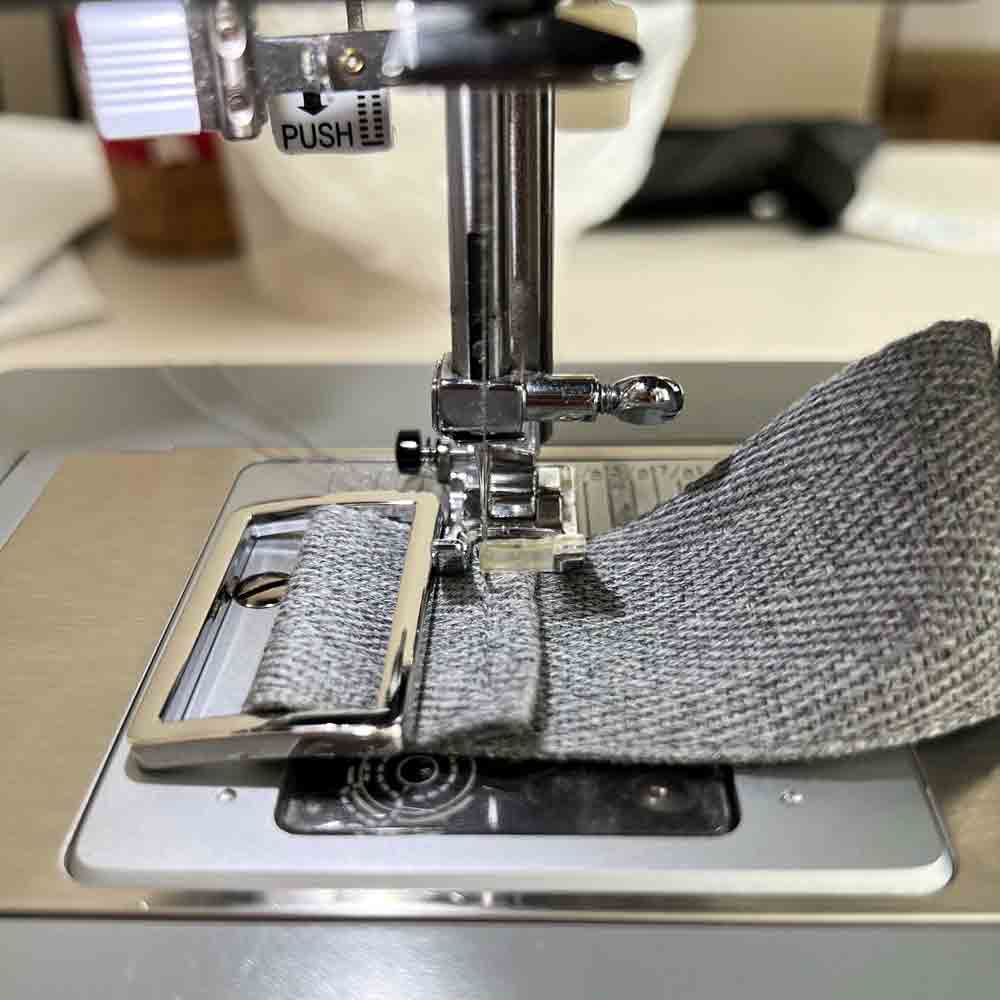
Stitch down end of webbing at 1/8”(3mm) from from previous fold.
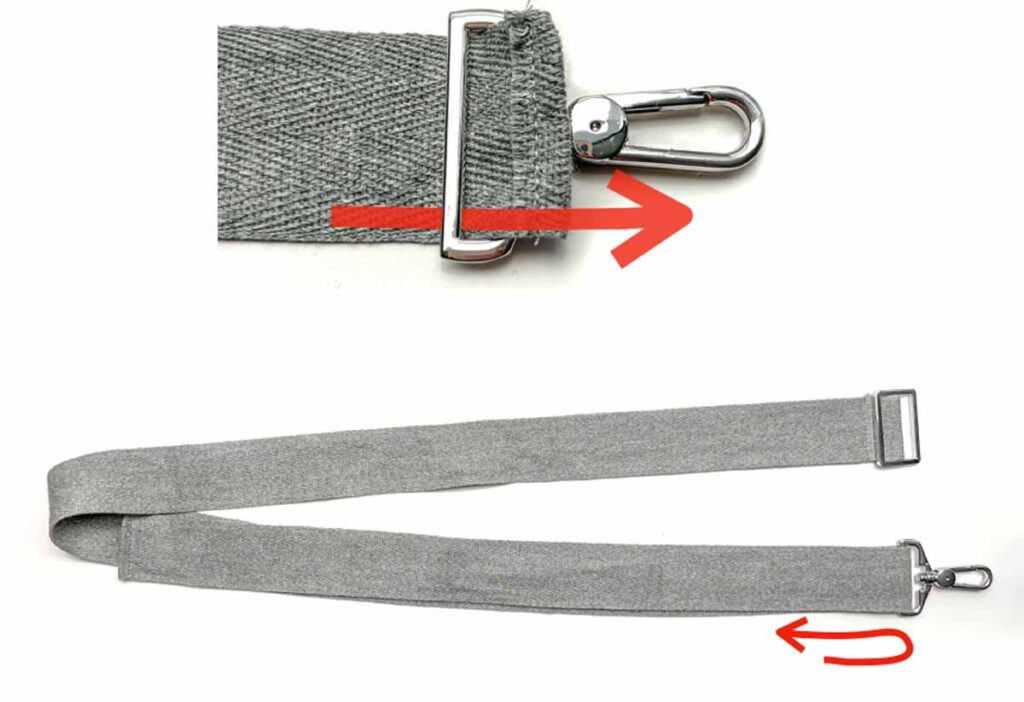
Slide other end of webbing through swivel clip (folded end facing up) and pull over the clip.
Take the end of the webbing to the slider and feed it across and over the center bar of the slider (red arrow).
Thread the end of the webbing over the second swivel clip and stitch down.
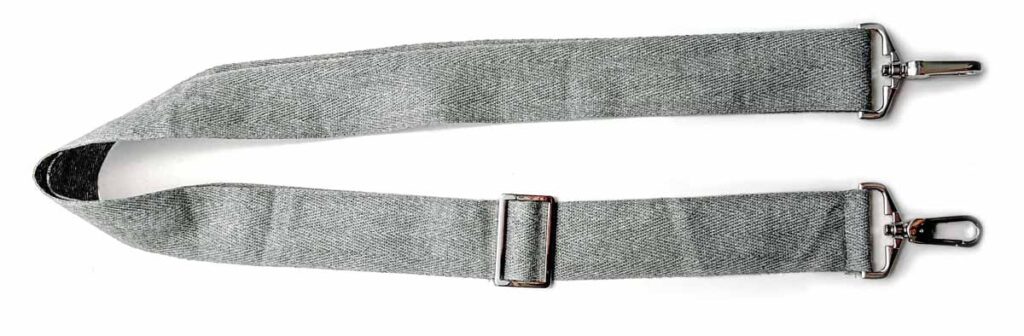
Your shoulder strap is finished!
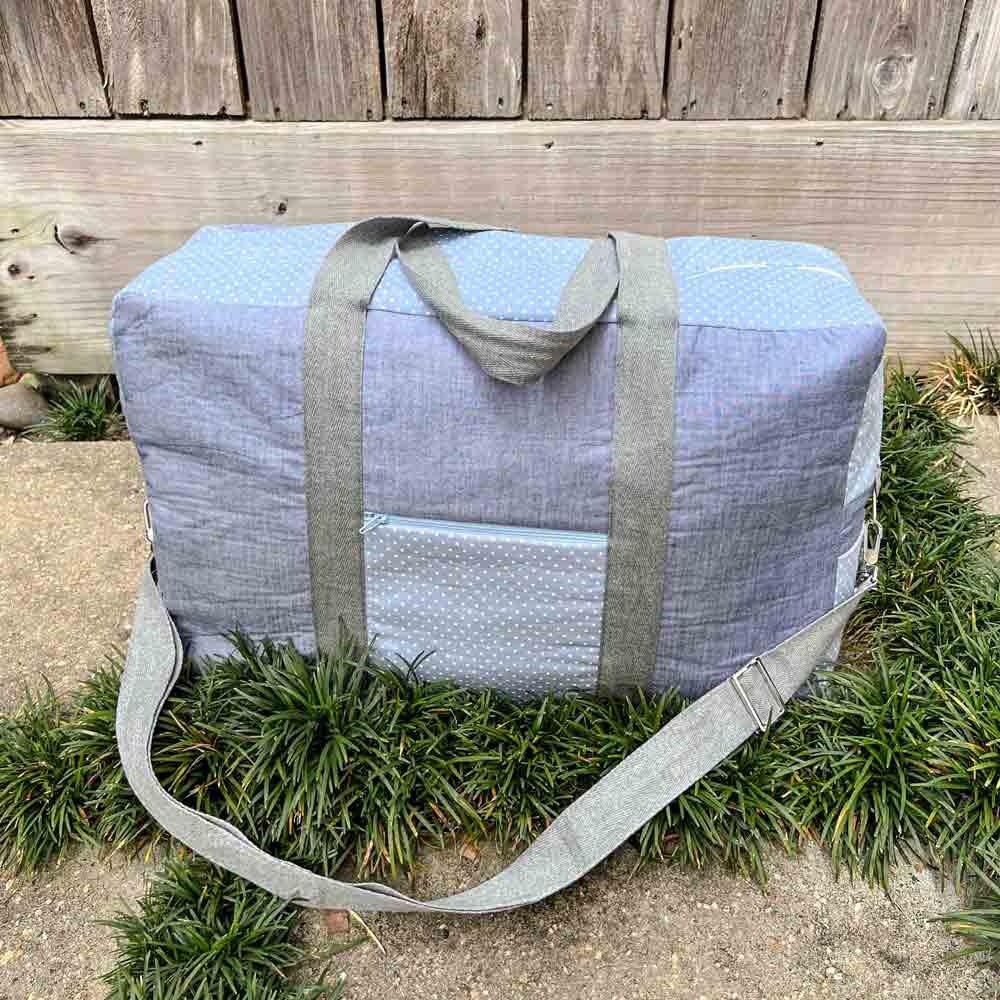
Aren’t you proud of yourself for finishing this sewing project? I sure am! Especially if this is your first time sewing up such a large bag! Now tote it around and show it off! Don’t be shy. Yes, I made that!
This duffel bag also makes a great DIY present for those traveling enthusiasts in your life. Or as bride and bridesmaid gifts. Your loved ones will be THRILLED to receive such a nice gift!
I’d love to hear in the comments below where you are going with your DIY duffel bag, or who you are making it for!
How to Sew a Large Duffel Bag
A simple duffel bag that is perfect for holding everything for your next getaway.
Materials
- DUFFEL BAG SEWING PATTERN
- EXTERIOR FABRIC - 1 Yard (44" Wide) if using one type of fabric, 1/2" each if using 2 different fabrics
- LINING - 1 Yard (44" Wide)
- FUSIBLE INTERFACING - 1 Yard
- FUSIBLE FLEECE - 1 Yard
- ONE SIDED FUSIBLE ULTRA FIRM STABILIZER (20”wide)
- 30” DUAL SEPARATING ZIPPER (x1)
- 7" MATCHING ZIPPER (x2)
- 1.5" WIDE WEBBING in matching color: 4.5 Yards (4.2 meters)
- 1.5” WIDE D RINGS (x2)
- 1.5” WIDE SWIVEL HOOKS (x2)
- 1.5” WIDE SLIDER (x1)
Tools
- SEWING MACHINE
- ZIPPER FOOT
- FABRIC SCISSORS
- CLEAR RULER
- FABRIC CHALK
- SEWING PINS and SEWING CLIPS
- HAND SEWING NEEDLES
- MATCHING THREAD
Instructions
Before you start, make sure to:
- Cut out all pattern pieces on fabric
- Iron on Fusible interfacing (if using)
HOW TO SEW ZIPPER POCKETS
- Pin [FRONT: CENTER TOP PIECE] and [FRONT: CENTER BOTTOM PIECE] to zipper, right sides together and sew.
- Flip zipper so wrong side faces up.
- Place [CENTER TOP LINING PIECE] and [CENTER BOTTOM LINING PIECE] over, wrong side facing up, and stitch.
- Lean seam allowance down towards lining side and edge stitch. Give it a good press.
- With wrong side of zipper facing up, place [CENTER POCKET LINING PIECE] over, right sides together. Baste the entire pocket together.
- You may notice at this point that the [CENTER POCKET PIECE] is a little larger than the lining piece. Trim sides down so that it is the same size as the lining.
- Your [CENTER POCKET PIECE] is now finished! Repeat for other pocket.
HOW TO SEW SIDE POCKETS
- Sew [SIDE POCKET PIECE] exterior and lining, right sides together
- Lean seam allowance down towards lining side and stitch down at 1/8”to sew line.
- Press seam allowance down towards lining. Then turn pocket so exterior fabric faces up and press at the sew line.
- Repeat for other pocket
SEWING FRONT PANELS TOGETHER
- Sew [FRONT SIDE PANEL] pieces to [CENTER POCKET PIECE], right sides together.
- Press seam allowance down towards [FRONT SIDE PANEL] pieces.
- Repeat for other side
HOW TO SEW DUFFEL BAG ZIPPER
- Pin [TOP ZIPPER PIECE] to zipper, right sides together. Match end of zipper to edge of fabric.
- Sew zipper to [TOP ZIPPER PIECE], then repeat and sew zipper to [BOTTOM ZIPPER PIECE]
- Place [SIDE PIECE] over [ZIPPER PIECE]. matching at the mid line. Trim [ZIPPER PIECE] down to match the top width of [SIDE PIECE] if necessary.
- Measure width of the fabric of [TOP ZIPPER PIECE] on one side of the zipper. Take that measurement and subtract seam allowance of 1/2 in (12.7mm).
- Cut two pieces of fusible fleece with the new width. Length is same as [TOP ZIPPER PIECE]
- Fuse fleece onto wrong side of [TOP ZIPPER PIECE] and [BOTTOM ZIPPER PIECE]
SEWING LINING TO ZIPPER
- Open up your zipper. Pin lining to exterior fabric, right sides together.
- Use fabric chalk and mark about 0.5 in(12.7mm) from lining edge.
- Sew lining to zipper + Exterior Fabric (right sides together), stopping 0.5” short of the edge of the lining. Back stitch at the 0.5” mark.
- Lean seam allowance towards lining side and edge stitch down, starting about 1.25”(31.75mm) from edge.
- Give your fabric a good press. Trim any excess lining that extends past the exterior fabric.
SEWING SIDE PIECE TO ZIPPER PIECE
- Pin [TOP ZIPPER PIECE] to [SIDE PIECE], right sides together.*
- Sew at 1/2” (12.7mm) seam allowance**.
- Point seam allowance down towards [SIDE PIECE] and edge stitch.
- Repeat on other side.
SEWING BAG HANDLES
- Pin strap to [DUFFEL FRONT PIECE] and [DUFFEL BACK PIECE].
- Stitch strap down to [DUFFEL FRONT PIECE] at 1/8” (3mm)
from edge of strap. Stop sewing about 1”(25mm)
from top edge of bag.*** - Repeat on other side
SEWING BAG ALL TOGETHER
- Sew [DUFFLE BOTTOM PIECE] to [DUFFLE BACK PIECE], right sides together. Repeat for [DUFFLE FRONT PIECE].
- Use clips (or pins) to clip the Top Zipper Lining Pieces together so they don’t get in the way when you sew the exterior of the bag together.
- Mark mid line of [DUFFLE TOP/SIDE PIECE], [DUFFLE FRONT PIECE] and [DUFFLE BACK PIECE]****
- Mark also the midpoint of rounded curve on Duffel Front and Back Piece.
- Pin [DUFFEL TOP/SIDE PIECE] to {DUFFEL FRONT PIECE] and [DUFFEL BACK PIECE], matching at the midpoints.
- Sew front and back of bag to [DUFFLE TOP/SIDE PIECE], easing at the rounded corners.
- Trim seam allowance down to 1/4”(6.35mm).
- Turn bag to the right side and finish stitching the bag handles at the top
SEWING BAG LINING TOGETHER
- Remove clips/pins holding the [ZIPPER PIECE LINING]
- Close the zipper on the side you will be working on.
- Pin [SIDE PIECE LINING] to [ZIPPER PIECE LINING], right sides together.
- Sew [ZIPPER PIECE LINING] to [SIDE PIECE LINING], pulling the end of the zipper back and out of the way as you sew*****
- Pin and sew [BOTTOM PIECE LINING] to [SIDE PIECE LINING], right sides together.
- Repeat on other side
- Sew [FRONT PIECE LINING] and [BACK PIECE LINING] to rest of duffle bag lining, easing at the rounded corners. Make sure to leave an opening about 7-8”at the bottom of the bag on either the FRONT or BACK PIECE LINING (doesn’t matter which one).
- Turn bag to the right side through the opening.
- Use Invisible ladder Stitch to close the opening and your bag is finished!
HOW TO SEW SHOULDER STRAP
- Fold down ends of webbing and stitch about 1/8”(3mm) from fold.
- Slide one end of the webbing through the center of the slider.
Pull it under and through right loop of slider so it’s
about 0.25 – 0.5 inches (6-12mm) beyond the slider. - Stitch down end of webbing at 1/8”(3mm) from from previous fold.
- Slide other end of webbing through swivel clip (folded end facing up) and pull over the clip.
- Take the end of the webbing to the slider and feed it across and over the center bar of the slider.
- Thread the end of the webbing over the second swivel clip and stitch down.
- Shoulder strap is finished.
- Clip shoulder strap to duffel bag and adjust for length as necessary.
Notes
*Pin the unsewn ends of the lining down as you don’t want to stitch this part down just yet.
**make sure you pull back the free ends of the lining so you don’t sew on it
***You will finish sewing the straps in at a later step
**** Do this by folding your fabric in half lengthwise and making two small notches on both ends of the fold
*****Make sure you are sewing the lining only, NOT any of the exterior fabric.
LARGE DUFFLE BAG PATTERN is available in the FREE MINDYMAKES RESOURCE LIBRARY. To get access, SUBSCRIBE NOW.
More Sewing Projects You will LOVE!
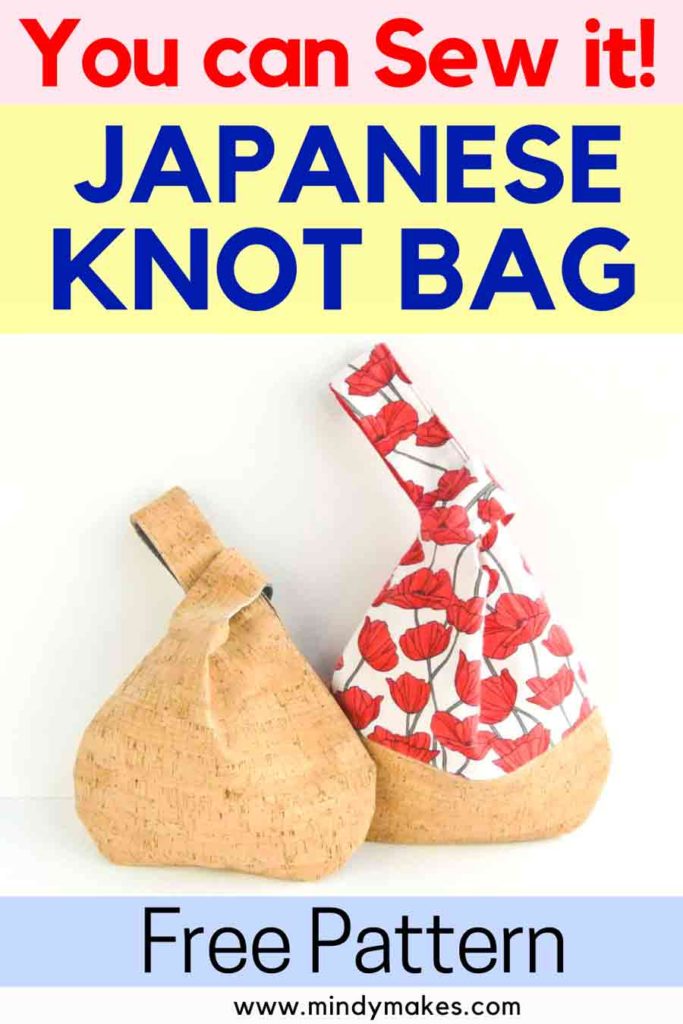
The Japanese knot bag is a fully lined, stylish bag that everyone needs.

Keep your jewelry safe and organized with this handy 8 pocket jewelry bag.
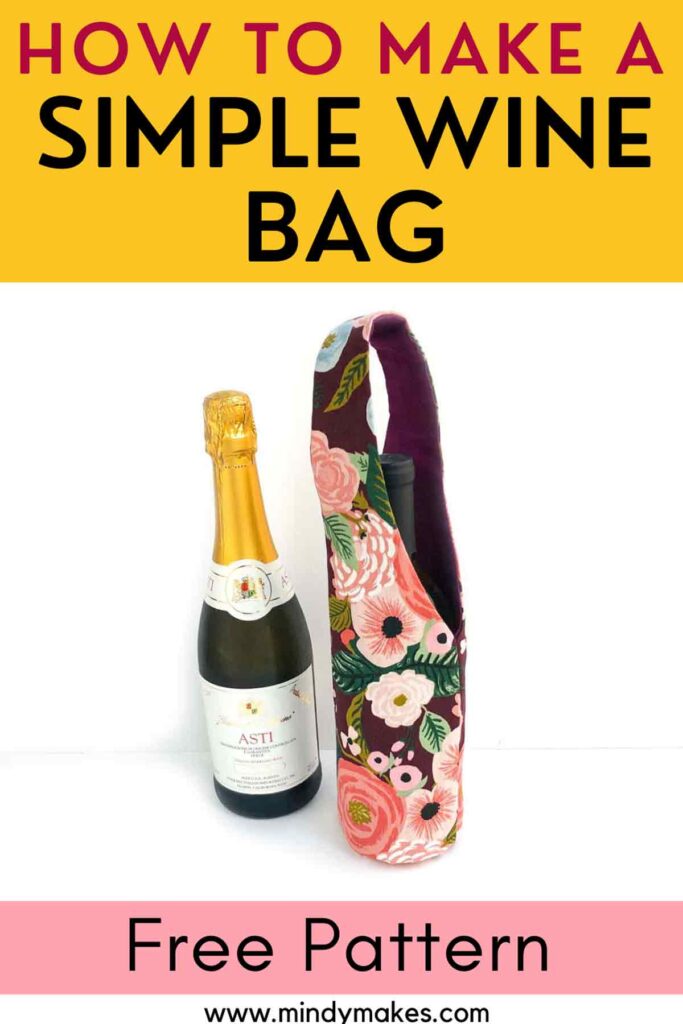
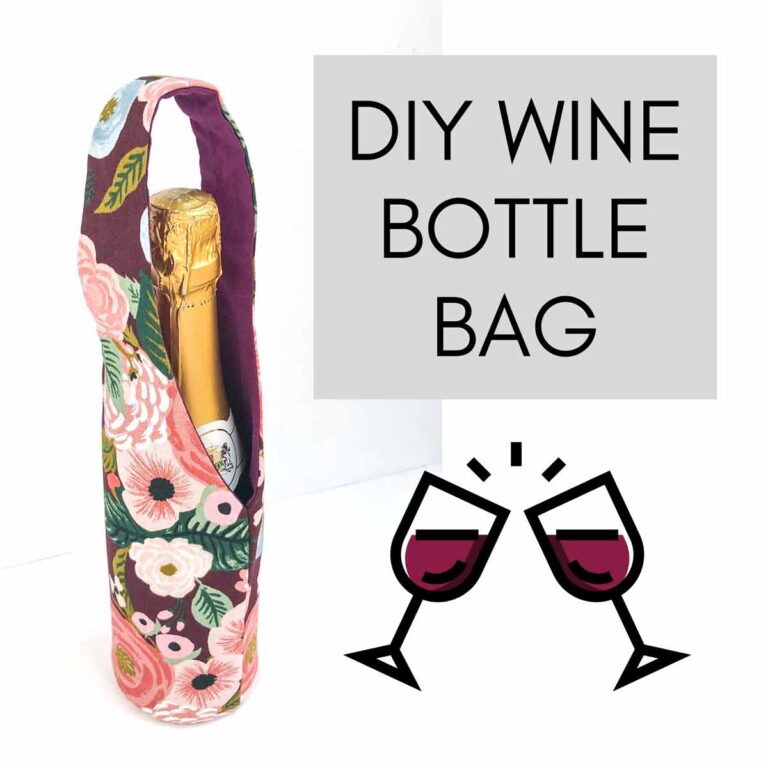
A MUST HAVE for bringing your favorite bottle of wine or champagne to the next social gathering.

This is so excellent. Thank you so much for providing this free pattern. I am part way through constructing my bag and it is turning out beautifully. I think the step for attaching the d rings for the shoulder strap is missing from the instructions. Thought you would want to know!
Hi Ruth,
Yes, thank you for letting me know! I’ve updated the post so it has the instructions for attaching D-rings for the shoulder straps. Thanks again so much!
Great directions and visuals!!! The one thing I can’t find and when and how to add the D-rings for the shoulder strap.
Thanks
Karen
Hi Karen,
Sorry about that! The post has been updated to include the instructions for adding D-rings. Hope that helps!
I am using 2 different pieces of fabric and I can’t seem to lay out the patterns to fit on a 1/2 yard. The pieces colored blue don’t seem to fit on a 1/2 yard. What am I doing wrong?
Hi Geri,
How wide is your 1/2″ yard of fabric? Is it at least 44″ wide?
Yes it is
The problem I have is with getting 4 pieces of the front piece A on the outer fabric. I can only get 2 pieces Thanks for your help.
Hi Geri,
Oh my, there is a correction!!! With 1/2 yard you will be able to get Front/Back Piece (x4), Middle Piece – Zipper Top (x2), and side piece (x2). The bottom piece (x1) will need to be cut out of a different fabric. If you want to cut the bottom piece out of the same fabric as well, you will need 1 yard of the same fabric. I’ve updated the correction in the post. Sorry about that. Hope this helps!
The shortage arises when I need to get 4 front piece A of the outer fabric. I can only get 2 of this piece. Thanks for your help.
Just finished the bag. It came out great. Thanks for posting the tutorial and written directions online. I made it for a friend that is retiring and he loved it. Thanks again!